
WL 75
D
Lichtwecker
Gebrauchsanweisung .................. 2
G
Wake up light
Instructions for use .................... 10
F
Réveil lumineux
Mode d’emploi ............................ 17
E
Luz para despertar
Instrucciones de uso .................. 24
I
Luce sveglia
Istruzioni per l’uso ..................... 31
T
Ișıklı çalar saat
Kullanım Kılavuzu ....................... 38
r
Cветовой будильник
Инструкция по применению ... 45
Q
Budzik świetlny
Instrukcja obsługi ...................... 53

2
Inhaltsverzeichnis
1. Zum Kennenlernen .......................................................................................................................... 3
2. Zeichenerklärung ............................................................................................................................. 3
3. Bestimmungsgemäßer Gebrauch .................................................................................................. 3
4. Warn-/ Sicherheitshinweise ............................................................................................................ 4
5. Gerätebeschreibung ........................................................................................................................ 4
6. Inbetriebnahme ................................................................................................................................ 5
7. Gerätefunktionen ............................................................................................................................. 5
7.1 Uhrzeit / Datum einstellen ............................................................................................................ 5
7.2 Aufweck-Funktion
„Alarm“ .......................................................................................................... 6
7.3 Licht / Leselampe ......................................................................................................................... 6
7.4 Stimmungslicht ............................................................................................................................ 6
7.5 Einschlaf-Funktion „Sleep“ .......................................................................................................... 7
7.6 Radio ........................................................................................................................................... 7
7.7 Displayhelligkeit einstellen ........................................................................................................... 7
7.8 AUX-Anschluss ............................................................................................................................ 7
7.9 Tastenton einschalten /ausschalten ............................................................................................ 8
7.10 Bluetooth
®
aktivieren / deaktiveren ............................................................................................ 8
8. Reinigung/Aufbewahrung ............................................................................................................... 8
9. Was tun bei Problemen? ................................................................................................................. 8
10. Entsorgung ....................................................................................................................................... 8
11. Technische Daten ............................................................................................................................ 8
12. Garantie ............................................................................................................................................ 9
Lieferumfang
•
Lichtwecker mit Wurfantenne
•
Netzadapter
•
AUX-Kabel
•
Gebrauchsanweisung
Lesen Sie diese Gebrauchsanweisung sorgfältig durch, bewahren Sie sie für
den späteren Gebrauch auf, machen Sie sie anderen Benutzern zugänglich
und beachten Sie die Hinweise.
DEUTSCH

3
Sehr geehrte Kundin, sehr geehrter Kunde,
wir freuen uns, dass Sie sich für ein Produkt unseres Sor-
timentes entschieden haben. Unser Name steht für hoch-
wertige und eingehend geprüfte Qualitätsprodukte aus
den Bereichen Wärme, Gewicht, Blutdruck, Körpertem-
peratur, Puls, Sanfte Therapie, Massage, Luft und Beauty.
Mit freundlicher Empfehlung
Ihr beurer-Team
1. Zum Kennenlernen
Der beurer Lichtwecker WL 75 ermöglicht Ihnen ein sanf-
tes und natürliches Erwachen und Einschlafen. Durch das
langsam heller werdende LED-Licht wird ein Sonnenauf-
gang simuliert. Auf diese Weise können Sie sich langsam
an die Lichtverhältnisse gewöhnen und Ihr Körper wird
behutsam auf das Aufwachen vorbereitet. Sie können
zusätzlich eine Aufwachmelodie einstellen, die nach dem
simulierten Sonnenaufgang ertönt und Sie beim Aufwa-
chen akustisch unterstützt. Neben einem Weckton ste-
hen Ihnen Radio und verschiedene Klänge zur Verfügung.
Der beurer Lichtwecker WL 75 verhilft Ihnen sowohl zu
einem ausgeruhten und zufriedenen Start in den Tag als
auch zu einem angenehmen Einschlafen mit Hilfe eines
simulierten Sonnenuntergangs mit Melodien.
Funktionen:
•
Bedienung der Gerätefunktionen über Smartphone mit
„beurer LightUp“ App
•
Aufweck-Funktion „Alarm“ (simulierter Sonnenaufgang:
Lichtwecker wird in einem eingestellten Zeitraum lang-
sam heller)
•
Einschlaf-Funktion „Sleep“ (simulierter Sonnenunter-
gang: Lichtwecker wird langsam dunkler und schaltet
sich nach voreingestellter Zeit automatisch aus)
•
Licht-Funktion (weißes Licht / Leselampe)
•
Stimmungslicht mit individueller Farbfixierung (10 ver-
schiedene Szenen auswählbar)
•
Uhrzeitanzeige auf dem Display
•
UKW-Radio
•
Weckton, Aufwach- und Einschlafmelodien
•
Abspielen eigener Musik via AUX-Eingang
Hinweis
Der Lichtwecker WL 75 lässt sich nur mit der „beurer
LightUp“ App in vollem Umfang verwenden. Basis-
funktionen können zusätzlich direkt am Gerät einge-
stellt werden.
Folgende Funktionen können ausschließlich über die App
bedient werden:
•
Auswahl von 10 definierten Stimmungslicht-Szenen
•
Direkte Farbauswahl des Stimmungslichts
•
Ein- und Ausschalten des Alarms für jeden Tag
•
Einstellen von speziellen Alarmeinstellungen
•
Ein- und Ausschalten des Tastentons
Systemvoraussetzungen App „beurer LightUp“:
•
iOS ≥ 8.0
Android
TM
≥ 4.4
•
Bluetooth
®
≥ 4.0
Für eine Auflistung aller kompatiblen mobilen Geräte,
scannen Sie bitte den folgenden QR-Code:
2. Zeichenerklärung
WARNUNG
Warnhinweis auf Verletzungs-
gefahren oder Gefahren für Ihre
Gesundheit.
ACHTUNG
Sicherheitshinweis auf mögliche
Schäden am Gerät/Zubehör.
Hinweis
Hinweis auf wichtige Informati
-
onen.
Entsorgung gemäß Elektro- und
Elektronik-Altgeräte EG-Richtli-
nie –WEEE (Waste Electrical and
Electronic Equipment)
Hersteller
Dieses Produkt erfüllt die Anfor-
derungen der geltenden euro-
päischen und nationalen Richt-
linien.
3. Bestimmungsgemäßer Gebrauch
WARNUNG
Das Gerät darf nur für den Zweck verwendet werden, für
den es entwickelt wurde, und auf die in der Gebrauchs
-
anweisung angegebene Art und Weise. Jeder unsach-
gemäße Gebrauch kann gefährlich sein. Der Hersteller
haftet nicht für Schäden, die durch unsachgemäßen oder
falschen Gebrauch verursacht wurden.

4
4. Warn-/ Sicherheitshinweise
WARNUNG
•
Das Gerät ist nur für den Einsatz im häuslichen/priva-
ten Umfeld bestimmt, nicht im gewerblichen Bereich.
•
Dieses Gerät kann von Kindern ab 8 Jahren und darü-
ber sowie von Personen mit verringerten physischen,
sensorischen oder mentalen Fähigkeiten oder Mangel
an Erfahrung und Wissen benutzt werden, wenn sie
beaufsichtigt oder bezüglich des sicheren Gebrauchs
des Gerätes unterwiesen wurden und die daraus resul-
tierenden Gefahren verstehen.
•
Kinder dürfen nicht mit dem Gerät spielen.
•
Halten Sie Kinder vom Verpackungsmaterial fern (Er
-
stickungsgefahr).
•
Betreiben Sie das Gerät nur mit dem mitgelieferten
Netzadapter und nur mit der auf dem Netzadapter no-
tierten Netzspannung.
•
Stellen Sie das Gerät auf eine ebene und feste Fläche.
•
Das Gerät muss in der Nähe einer leicht zugänglichen
Steckdose aufgestellt werden.
•
Überprüfen Sie vor dem Gebrauch das Gerät und Zu-
behör auf sichtbare Schäden. Benutzen Sie es im Zwei-
felsfall nicht und wenden Sie sich an Ihren Händler oder
an die angegebene Kundendienstadresse.
•
Halten Sie das Gerät, den Netzadapter und das Strom-
kabel von Wasser fern!
•
Stecken Sie den Netzadapter niemals ein oder aus,
wenn Sie feuchte Hände haben.
•
Reinigung und Benutzerwartung dürfen nicht von Kin-
dern ohne Beaufsichtigung durchgeführt werden.
•
Schalten Sie das Gerät im Falle von Defekten oder Be-
triebsstörungen sofort aus und trennen Sie das Gerät
vom Stromanschluss.
•
Verlegen Sie das Stromkabel so, dass niemand darü-
ber stolpern kann.
ACHTUNG
•
Schützen Sie das Gerät vor Stößen, Feuchtigkeit,
Schmutz, starken Temperaturschwankungen und di-
rekter Sonneneinstrahlung.
•
Lassen Sie das Gerät nicht fallen.
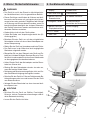
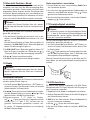
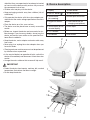
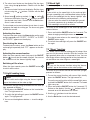
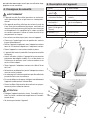
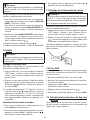
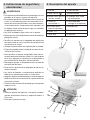
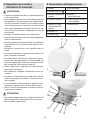
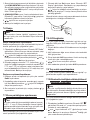
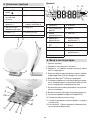
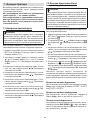
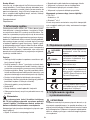
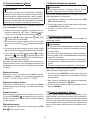
5. Gerätebeschreibung
1 Display 8 Radio-Taste
2 EIN-/AUS-Taste
9 Wurfantenne
3 Sensor-Fläche zur
Snoozefunktion
10 Netzteil-Anschluss
4 Helligkeits-Tasten +/- 11 USB-Anschluss
(zum Aufladen des Smartphones)
5 Sensor-Fläche zur
Displaybeleuchtung
12 AUX-Eingang
6
v / w-Tasten
13 Alarm-Taste
7 AUX-Taste 14 Set-Taste
1
2
4
14
6
13
12
11
10
9
8
7
6
5
3

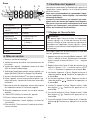
5
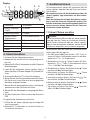
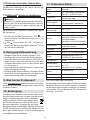
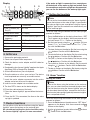
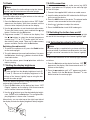
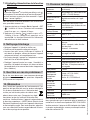
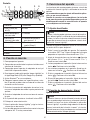
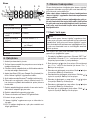
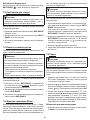
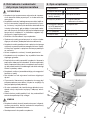
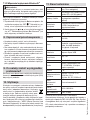
Display
1
2
3
4
5
6
7
8
9
10
12
13
14
15
11
1 Lautstärke 9 Bluetooth
®
2 Jahr(Y) / Monat (M)
Tag (D)
10 Uhrzeit
3 Radio-Weckmodus 11 Display
4 Uhrzeit / Datum /
Radio frequenz
12 Alarm-Speicherplatz 1, 2
5
SET-Modus
13
Einschlaf-Funktion
(„Sleep“)
6 AUX-Modus 14 Piepton
7 Alarm-Modus 15 Aufwachmelodie
8 Radio
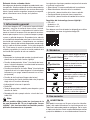
6. Inbetriebnahme
1. Entfernen Sie das Verpackungsmaterial.
2.
Überprüfen Sie, ob alle Teile im Lieferumfang enthal-
ten sind
.
3.
Überprüfen Sie Gerät, Netzadapter und AUX-Kabel auf
Beschädigungen.
4.
Laden Sie die kostenlose „beurer LightUp“ App im
Apple App Store (iOS) oder Google Play (Android) he-
runter.
5. Aktivieren Sie Bluetooth
®
auf Ihrem Smartphone.
6. Stellen Sie das Gerät auf eine ebene und feste Fläche.
Das Gerät muss in der Nähe einer leicht zugänglichen
Steckdose aufgestellt werden.
7. Stecken Sie den Netzadapteranschluss in die Netzad
-
apterbuchse auf der Rückseite des Geräts.
8. Stecken Sie den Netzadapter in eine geeignete Steck
-
dose.
9. Auf dem Display des Geräts erscheint die Uhrzeit mit
0:00.
10. Legen Sie die Wurfantenne nach hinten.
11.
Önen Sie die „beurer LightUp“ App und folgen Sie
den Anweisungen.
12.
Sobald WL 75 verbunden ist, wird die Uhrzeit am
Lichtwecker aktualisiert.
7. Gerätefunktionen
Die Gerätefunktionen können Sie wahlweise über die
„beurer LightUp“ App oder über die Tasten am Lichtwe-
cker einstellen.
Wir empfehlen Ihnen die Gerätefunktionen über die
„beurer LightUp“ App einzustellen, da dies komfor-
tabler ist.
Wenn der Lichtwecker mit dem Smartphone verbun
-
den ist, sind alle Tasten am Lichtwecker gesperrt. So-
bald die Verbindung zwischen Smartphone und Licht-
wecker getrennt wurde, können Sie die Tasten am
Lichtwecker wieder betätigen.
7.1 Uhrzeit / Datum einstellen
Hinweis
Sie können Uhrzeit und Datum über die
„
beurer LightUp“
App oder über die Tasten am Lichtwecker einstellen.
Wenn Sie den Lichtwecker über die „beurer LightUp“
App mit dem Smartphone verbinden, werden Uhrzeit
und Datum automatisch am Lichtwecker eingestellt.
Um die Uhrzeit über die Tasten am Lichtwecker einzu-
stellen, gehen Sie wie folgt vor:
1.
Am Gerät dreimal Set-Taste drücken. „SET Time“ er-
scheint im Display. Drei Sekunden warten, bis das Stun-
denformat „
24 hr“
im Display blinkt.
2.
Stundenformat mit / -Tasten einstellen (24-Stun
-
denformat „
24 hr“
oder 12-Stundenformat AM/PM
„
12 hr
“). Mit Set-Taste bestätigen.
3. Stunde blinkt im Display. Die Stunde mit / -Tasten
einstellen
. Mit Set-Taste bestätigen.
4. Minute blinkt im Display. Die Minute mit
/ -Tasten
einstellen. Mit Set-Taste bestätigen.
5.
Jahreszahl
(Y)
blinkt im Display. Das Jahr mit / -Tas-
ten einstellen. Mit Set-Taste bestätigen.
6.
Monat (M) blinkt im Display. Den Monat mit / -Tasten
einstellen. Mit Set-Taste bestätigen.
7. Tag
(D) blinkt im Display. Den Tag mit / -Tasten ein-
stellen. Mit Set-Taste bestätigen.

6
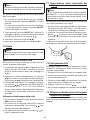
7.2 Aufweck-Funktion „Alarm“
Alarm einstellen
Hinweis
Wenn Sie den Alarm über die Tasten am Lichtwecker
einstellen, können Sie die Alarmzeit und den Alarmton
wählen.
Wenn Sie den Alarm über die
„
beurer LightUp“ App ein-
stellen, können Sie zusätzlich die Alarmtage, die Snoo-
zedauer und einen simulierten Sonnenaufgang (Licht-
wecker wird in einem eingestellten Zeitraum langsam
heller) wählen.
Um den Alarm über die Tasten am Lichtwecker einzustel-
len, gehen Sie wie folgt vor:
1.
Am Gerät einmal Set-Taste drücken. „SET Alarm“ er-
scheint im Display. Drei Sekunden warten, bis
im
Display blinkt.
2.
Mit / -Tasten entweder Alarm oder Alarm
wählen. Mit Set-Taste bestätigen.
3.
Alarmstunde blinkt im Display. Die Alarmstunde mit
/ -Tasten einstellen
. Mit Set-Taste bestätigen.
4.
Alarmminute blinkt im Display. Die Alarmminute mit
/ -Tasten einstellen. Mit Set-Taste bestätigen.
5.
Weckton , Aufwachmelodie 1-6 oder Radio
blinkt im Display. Mit / -Tasten gewünschten Alarm-
ton wählen. Mit Set-Taste bestätigen. Alarm ist nun ak-
tiviert.
Der simulierte Sonnenaufgang startet vor dem eingestell-
ten Alarm um den Körper auf das Aufwachen vorzube-
reiten. Der Alarm ertönt erst nach dem Sonnenaufgang.
Alarm aktivieren
Um den Alarm zu aktivieren, Alarm-Taste am Lichtwe-
cker so oft drücken, bis „
ALARM1
“, „
ALARM2
“ oder
„
ALARM1 und ALARM2
“ im Display erscheint.
Alarm deaktivieren
Um den Alarm zu deaktivieren, Alarm-Taste am Licht-
wecker so oft drücken, bis „
OFF
“ im Display erscheint.
Alarm snoozen
Wenn der Alarm ertönt, EIN-/AUS-Taste berühren
(nicht drücken), um den Alarm zu snoozen. Sie können
die Snoozedauer in der „beurer LightUp“ App einstellen.
Alarm ausschalten
Wenn der Alarm ertönt, EIN-/AUS-Taste drücken, um
den Alarm auszuschalten.
7.3 Licht / Leselampe
Hinweis
Sie können das Licht über die
„
beurer LightUp“ App
oder über die Tasten am Lichtwecker einschalten.
Um das Licht über die Tasten am Lichtwecker einzuschal-
ten, gehen Sie wie folgt vor:
1. Am eingesteckten Gerät kurz die EIN-/AUS-Taste drü-
cken. Das Licht geht an.
2.
Um das Licht wieder auszuschalten, die EIN-/AUS-Tas-
te erneut drücken. Das Licht erlischt.
3.
Mit den Helligkeits-Tasten + - können Sie die Hellig-
keit einstellen.
7.4 Stimmungslicht
Sie können den Lichtwecker auch als Stimmungslicht
verwenden.
Hinweis
Wenn Sie das Stimmungslicht über den Lichtwecker
einschalten, erfolgt ein Stimmungslicht mit einem stan-
dardisierten Farbwechsel.
Wenn Sie das Stimmungslicht über die
„
beurer LightUp“
App einstellen, haben Sie zusätzlich folgende Einstel-
lungsmöglichkeiten:
- F
arbe des Stimmungslichts kann selbst gewählt werden.
- 10 voreingestellte Szenen (z.B. Regenbogen) stehen
zur Verfügung.
- Stimmungslicht kann mit Timer versehen werden.
Um das Stimmungslicht am Lichtwecker einzuschalten,
gehen Sie wie folgt vor:
1. Die EIN-/AUS-Taste 2 Sekunden lang gedrückt halten.
Das Stimmungslicht mit Farbwechsel geht an.
2.
Um eine Farbe des Stimmungslichts zu fi xieren,
erneut EIN-/AUS-Taste drücken.
3.
Um das Stimmungslicht auszuschalten, erneut
EIN-/AUS-Taste drücken.

7
7.5 Einschlaf-Funktion „Sleep“
Der Einschlafbereich „Sleep“ eignet sich ideal als Ein-
schlafhilfe. Hier lässt sich der Sonnenuntergang (Sun-
set-Funktion) einstellen. Dabei wird das Licht nach einer
eingestellten Dauer langsam dunkler. Sie können dem
simulierten Sonnenuntergang noch verschiedene ent-
spannende Klänge zuweisen und wahlweise mit natürli-
chem Licht oder mit einem Stimmungslicht anwenden.
Hinweis
Sie können die Sunset-Funktion über die „beurer
LightUp“ App oder über die Tasten am Lichtwecker ein-
stellen.
Um die Sunset-Funktion am Lichtwecker einzuschalten,
gehen Sie wie folgt vor:
1.
Um die Sunset-Funktion mit normalem Licht zu be-
treiben, kurz die EIN-/AUS-Taste drücken. Das Licht
geht an.
Um die Sunset-Funktion mit dem Stimmungslicht zu
betreiben, die EIN-/AUS-Taste 2 Sekunden gedrückt
halten. Das Stimmungslicht geht an.
2. Die EIN-/AUS-Taste 5 Sekunden gedrückt halten.
02
blinkt im Display. Innerhalb von 5 Sekunden mit /
-Tasten die Dauer des Sonnenuntergangs einstellen.
3. Mit
/ -Tasten Lautstärke einstellen.
4. Mit Set-Taste den gewünschten Klang einstellen.
7.6 Radio
Hinweis
Sie können die Radioeinstellungen über die „beurer
LightUp“ App oder über die Tasten am Lichtwecker
vornehmen.
Radiosender einstellen
Um die Radiosender über die Tasten am Lichtwecker ein-
zustellen, gehen Sie wie folgt vor:
1. Am Gerät zweimal Set-Taste drücken. „SET Radio“ er
-
scheint im Display. Drei Sekunden warten, bis aktuelle
Senderfrequenz
im Display blinkt.
2.
Mit / -Tasten gewünschten Radiosender einstellen.
Um den Sendersuchlauf zu starten, oder -Taste
gedrückt halten. Mit Set-Taste bestätigen.
3.
Programmnummer
P 01
blinkt im Display.
Mit / -Tasten gewünschte Programmnummer
wählen (z.B.
P 01
oder
P 02
), auf dem der ein-
gestellte Radiosender gespeichert werden soll
.
Es stehen 10 Radiospeicherplätze zur Verfügung.
Mit Set-Taste bestätigen.
Radio einschalten / ausschalten
1.
Um das Radio ein- bzw. auszuschalten, Radio-Taste
am Lichtwecker drücken.
2.
Um zwischen den gespeicherten Radiosendern zu
wechseln, zuerst Set-Taste drücken. Mit / -Tasten
gewünschten Radiosender wählen.
3.
Um die Lautstärke einzustellen, während der Radiowie-
dergabe / -Tasten drücken.
7.7 Displayhelligkeit einstellen
Hinweis
Der Lichtwecker besitzt vier Displayhelligkeits-Stufen
(
0, 1, 2
oder
3
)
. Sie können die Displayhelligkeit in den
Einstellungen der „beurer LightUp“ App oder über die
Tasten am Lichtwecker einstellen.
Um die Displayhelligkeit über die Tasten am Lichtwecker
einzustellen, gehen Sie wie folgt vor:
1.
Am Gerät viermal Set-Taste drücken. „SET Display“ er-
scheint im Display. Drei Sekunden warten, bis eine Zahl
im Display blinkt.
2.
Mit / -Tasten gewünschte Displayhelligkeit einstel-
len. Mit Set-Taste bestätigen. Nach 5 Sekunden wird
die eingestellte Displayhelligkeit angezeigt.
Alternativ können Sie auch rechts an die Seite des Dis
-
plays tippen, um die Displayhelligkeit kurzzeitig heller zu
machen.
7.8 AUX-Anschluss
Sie können eine externe Audioquelle (z.B. MP3-Player,
Smartphone oder CD-Player) über den AUX-Eingang mit
dem Lichtwecker verbinden.
1. Mitgelieferte AUX-Kabel an Audioquelle anschließen.
2.
Anderes Ende des AUX-Kabels in den AUX-Eingang auf
der Geräterückseite stecken.
3. AUX-Taste am Gerät drücken. Externe Audioquelle ist
nun mit Lichtwecker verbunden.
4. Mit den
/ -Tasten die Lautstärke regeln.
5.
Um den AUX-Modus wieder zu verlassen, AUX-Taste
drücken.

8
7.9 Tastenton einschalten /ausschalten
Sie können den Tastenton des Lichtweckers ausschließ
-
lich über die Einstellungen in der „
beurer LightUp“ App
einschalten bzw. ausschalten.
7.10 Bluetooth
®
aktivieren / deaktiveren
Hinweis
Bluetooth
®
ist im Auslieferungszustand am Lichtwecker
aktiviert. Wenn Sie Bluetooth
®
deaktivieren, kann der
Lichtwecker nicht mit der „beurer LightUp“ App ver-
bunden werden.
Um Bluetooth
®
am Lichtwecker zu deaktivieren, gehen
Sie wie folgt vor:
1.
Am Gerät fünfmal Set-Taste drücken. „SET “ er-
scheint im Display. Drei Sekunden warten, bis „
on
“
im
Display blinkt.
2.
bzw. -Taste drücken, bis
„
OFF
“
im Display er-
scheint.
Mit Set-Taste bestätigen. Bluetooth
®
ist nun
am Licktwecker deaktiviert.
8. Reinigung/Aufbewahrung
•
Reinigen Sie das Gerät mit einem trockenen Tuch.
•
Verwenden Sie keine scheuernden Reinigungsmittel.
•
Achten Sie darauf, dass kein Wasser in das Gerät ein-
dringt. Falls dies doch einmal der Fall sein sollte, dann
verwenden Sie bitte das Gerät erst dann wieder, wenn
es völlig trocken ist.
•
Gerät und Steckernetzteil keinesfalls in Wasser oder
andere Flüssigkeiten tauchen.
•
Schützen Sie das Gerät vor Stößen, Feuchtigkeit, Staub,
Chemikalien, starken Temperaturschwankungen und zu
nahen Wärmequellen (Öfen, Heizungskörper).
9. Was tun bei Problemen?
Unter www.beurer.com finden Sie weitere Informatio-
nen und eine Auflistung häufig gestellter Fragen (FAQs)
zu diesem Produkt.
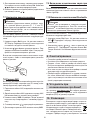
10. Entsorgung
Im Interesse des Umweltschutzes darf das Gerät am En-
de seiner Lebensdauer nicht mit dem Hausmüll entfernt
werden. Die Entsorgung kann über entsprechen
-
de Sammelstellen in Ihrem Land erfolgen. Befol-
gen Sie die örtlichen Vorschriften bei der Entsor-
gung der Materialien. Entsorgen Sie das Gerät
gemäß der Elektro- und Elektronik Altgeräte EG-Richtlinie
– WEEE (Waste Electrical and Electronic Equipment). Bei
Rückfragen wenden Sie sich an die für die Entsorgung
zuständige kommunale Behörde.
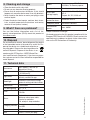
11. Technische Daten
Beleuchtungs-
stärke
Maximal ca. 2.000 Lux (bei 15 cm
Abstand)
Licht
LED Technologie (Lebensdauer
der LED: > 20.000 Stunden)
Lichtstufen
10 am Lichtwecker
Stufenlos per App
Stimmungslicht
Automatischer RGB Farbwechsel
mit individueller Farbfixierung
Snooze-Dauer 1-30 Minuten
LCD-Hintergrund
-
beleuchtung
Aus, 1, 2, 3
Uhrzeit 12h / 24h umstellbar
Alarm
2 Alarmzeiten
Aufwachen: Weckton, Radio, 6
Aufwachmelodien,
Einschlafen:
4 Einschlafmelodien
Ladefunktion
Smartphones können über USB
aufgeladen werden
Tastenton Aus, An
AUX Line-In, 3,5 mm Klinkenstecker
Radio
Frequenzbereich UKW 87,5 -
108 MHz, 10 Speicherplätze
Lautsprecher 2 Watt
Netzteil Span
-
nungsversorgung
Eingang: 110-240 V, AC, 50/60
Hz, 0,5 A
Ausgang: 9 V, DC, 2000mA
Netzteil Schutz
-
klasse
Schutzklasse II
Frequenzband
2402MHz-2480MHz
Sendeleistung
max. 4dBM
Technische Änderungen vorbehalten.
Wir garantieren hiermit, dass dieses Produkt der europä-
ischen RED Richtlinie 2014/53/EU entspricht. Kontaktie-
ren Sie bitte die genannte Serviceadresse, um detaillier-
tere Angaben – wie zum Beispiel die CE – Konformitäts-
erklärung – zu erhalten.

9
12. Garantie
Wir leisten 3 Jahre Garantie ab Kaufdatum für Material- und
Fabrikationsfehler des Produktes. Die Garantie gilt nicht:
• Im Falle von Schäden, die auf unsachgemäßer Bedie-
nung beruhen.
• Für Verschleißteile.
• Bei Eigenverschulden des Kunden.
• Sobald das Gerät durch eine nicht autorisierte Werk-
statt geönet wurde.
Die gesetzlichen Gewährleistungen des Kunden bleiben
durch die Garantie unberührt. Für Geltendmachung eines
Garantiefalles innerhalb der Garantiezeit ist durch den
Kunden der Nachweis des Kaufes zu führen. Die Garan-
tie ist innerhalb eines Zeitraumes von 3 Jahren ab Kauf-
datum gegenüber der Beurer GmbH, Söflinger Str. 218,
89077Ulm (Germany) geltend zu machen.
Bitte wenden Sie sich im Falle von Reklamationen an
unseren Service unter folgendem Kontakt:
Service Hotline: Tel.: +49 (0) 731 / 39 89-144
E-Mail: kd@beurer.de
Fordern wir Sie zur Übersendung des defekten Pro
-
duktes auf, ist das Produkt an folgende Adresse zu
senden:
Beurer GmbH
Servicecenter
Lessingstraße 10b
89231 Neu-Ulm, Germany
Irrtum und Änderungen vorbehalten

10
Table of contents
1. Getting to know your device......................................................................................................... 11
2. Signs and symbols ........................................................................................................................ 11
3. Intended use .................................................................................................................................. 11
4. Warning notices/safety notes ....................................................................................................... 11
5. Device description ......................................................................................................................... 12
6. Initial use ........................................................................................................................................ 13
7. Device functions ............................................................................................................................ 13
7.1 Setting the time/date ................................................................................................................. 13
7.2
“Alarm” function ........................................................................................................................ 13
7.3 Light/reading lamp .................................................................................................................... 14
7.4 Mood light ................................................................................................................................. 14
7.5 “Sleep” function ........................................................................................................................ 14
7.6 Radio ......................................................................................................................................... 15
7.7 Setting the display brightness ................................................................................................... 15
7.8 AUX connection ......................................................................................................................... 15
7.9 Switching the button tone on/o ............................................................................................... 15
7.10 Activating/deactivating Bluetooth
®
.......................................................................................... 15
8. Cleaning and storage .................................................................................................................... 16
9. What if there are problems? ......................................................................................................... 16
10. Disposal .......................................................................................................................................... 16
11. Technical data ................................................................................................................................ 16
Included in delivery
•
Wake up light with cable antenna
•
Mains adapter
•
AUX cable
•
Instructions for use
Read these instructions for use carefully and keep them for later use, be su-
re to make them accessible to other users and observe the information they
contain.
ENGLISH

11
Dear customer,
Thank you for choosing one of our products. Our name
stands for high-quality, thoroughly tested products for
applications related to heating, weight, blood pressure,
body temperature, pulse, gentle therapy, massage, air
and beauty.
With kind regards,
Your beurer team
1. Getting to know your device
The beurer WL 75 wake up light allows you to wake up
and fall asleep gently and naturally. The LED light gradu-
ally becomes brighter like a rising sun, allowing you to
slowly become accustomed to the light conditions and
gently preparing your body for waking up. You can also
set a wake-up melody that is played following the simu-
lated sunrise and provides an acoustic aid to help you
wake up. Besides an alarm tone, you can also choose the
radio or various sounds. The beurer WL 75 wake up light
not only provides a rested and pleasant start to your day
but also helps you drift comfortably o to sleep thanks
to a simulated sunset with melodies.
Functions:
•
Control of the device functions via smartphone with the
“beurer LightUp” app
•
“Alarm” function (simulated sunrise: wake up light grad-
ually becomes brighter over a set period of time)
•
“Sleep” function (simulated sunset: wake up light grad-
ually dims and switches off automatically after a pre-
set time)
•
Light function (white light/reading lamp)
•
Mood light with individual colour setting (choice of 10
dierent sequences)
•
Time shown on the display
•
FM radio
•
Alarm tone, wake-up and sleep melodies
•
Play your own music via the AUX input
Note
The WL 75 wake up light can only be used with its full
functionality in conjunction with the “beurer LightUp”
app. Basic functions can also be set directly on the
device.
The following functions can only be controlled via the
app:
•
Choice of 10 defined mood light sequences
•
Direct choice of mood light colour
•
Alarm can be switched on/o for each day
•
Adjustment of special alarm settings
•
Button tone can be switched on/o
System requirements App “beurer LightUp”:
•
iOS ≥ 8.0
Android
TM
≥ 4.4
•
Bluetooth
®
≥ 4.0
For a list of all compatible mobile devices, please scan
the following QR code:
2. Signs and symbols
WARNING
Warning notice indicating a risk
of injury or damage to health.
IMPORTANT
Safety note indicating possible
damage to the device/acces-
sory.
Note
Note on important information.
Disposal in accordance with the
Waste Electrical and Electronic
Equipment EC Directive – WEEE
Manufacturer
This product satisfies the re-
quirements of the applicable Eu-
ropean and national directives.
3. Intended use
WARNING
The device may only be used for the purpose for which
it is designed and in the manner specified in the instruc-
tions for use. Improper use can be dangerous. The manu-
facturer is not liable for damage resulting from improper
or careless use.
4. Warning notices/safety notes
WARNING
•
The device is intended only for domestic/private use,
not for commercial use.
•
This device may be used by children over the age of
eight and by people with reduced physical, sensory or
mental skills or a lack of experience or knowledge, pro-

12
vided that they are supervised or have been instructed
on how to use the device safely and are fully aware of
the consequent risks of use.
•
Children must not play with the device.
•
Keep packaging material away from children (risk of
suocation).
•
Only operate the device with the mains adapter pro-
vided and at the mains voltage specified on the mains
adapter.
•
Place the device on a firm, even surface.
•
The device must be placed near an easily accessible
socket.
•
Before use, inspect the device and accessories for vis-
ible damage. If you have any doubts, do not use the
device and contact your retailer or the specified Cus-
tomer Service address.
•
Keep the device, mains adapter and mains cable away
from water.
•
Never plug in or unplug the mains adapter when you
have wet hands.
•
Cleaning and user maintenance must not be performed
by children unless supervised.
•
In the event of defects or operational faults, switch the
device o immediately and disconnect it from the mains
socket.
•
Arrange the mains cable so that no-one will trip over it.
IMPORTANT
•
Protect the device from impacts, moisture, dirt, marked
temperature fluctuations and direct sunlight.
•
Do not drop the device.
5. Device description
1 Display 8 Radio button
2 ON/OFF button
9 Cable antenna
3 Touch sensor
(for snoozing)
10 Mains part connection
4 Brightness buttons
+/-
11 USB connection (for
charging smartphones)
5 Touch sensor (for illu
-
minated display)
12 AUX input
6
v/w buttons
13 Alarm button
7 AUX button 14 Set button
1
2
4
14
6
13
12
11
10
9
8
7
6
5
3

13
Display
1
2
3
4
5
6
7
8
9
10
12
13
14
15
11
1 Volume 9 Bluetooth
®
2 Year (Y)/Month (M)/
Day (D)
10 Time
3 Radio alarm mode 11 Display
4 Time/Date/Radio
frequency
12 Alarm memory space 1, 2
5 SET mode 13 “Sleep” function
6 AUX mode 14 Beep
7 Alarm mode 15 Wake-up melody
8 Radio
6. Initial use
1. Remove the packaging material.
2. Check that all parts listed are present.
3.
Check the device, mains adapter and AUX cable for
damage.
4.
Download the free “beurer LightUp” app from the Apple
App Store (iOS) or Google Play (Android).
5. Activate Bluetooth
®
on your smartphone.
6.
Place the device on a firm, even surface. The device
must be placed near an easily accessible socket.
7.
Insert the mains adapter connector into the mains
adapter socket on the rear of the device.
8. Insert the mains adapter into a suitable socket.
9. The time 0:00 is shown on the device display.
10. Place the cable antenna at the back.
11.
Open the “beurer LightUp” app and follow the instruc-
tions.
12. Once the WL 75 is connected, the time on the wake
up light is updated.
7. Device functions
You can either set the device functions using the “beurer
LightUp” app or the buttons on the wake up light.
We recommend setting the device functions using
the “beurer LightUp” app as it is more convenient.
If the wake up light is connected to a smartphone,
all the buttons on the wake up light are locked. Once
the smartphone and wake up light are disconnected,
you can use the buttons on the wake up light again.
7.1 Setting the time/date
Note
You can set the time and date using the
“
beurer LightUp”
app or the buttons on the wake up light.
If you connect
the wake up light to your smartphone using the “beurer
LightUp” app, the time and date are automatically set
on the wake up light.
To set the time using the buttons on the wake up light,
proceed as follows:
1. Press the Set button on the device three times. “SET
Time” appears on the display. Wait three seconds until
the hour format “24 hr” flashes on the display.
2. Set the hour format using the
/ buttons (24-hour
format “
24 hr
” or 12-hour format
AM/PM
“
12 hr
”). Con-
firm with the Set button.
3.
The hour flashes on the display. Set the hour using the
/ buttons. Confirm with the Set button.
4.
The minute flashes on the display. Set the minute using
the / buttons. Confirm with the Set button.
5. The year
(Y) flashes on the display. Set the year using
the / buttons. Confirm with the Set button.
6.
The month
(M)
flashes on the display. Set the month
using the / buttons. Confirm with the Set button.
7.
The day
(D)
flashes on the display. Set the day using the
/ buttons. Confirm with the Set button.
7.2 “Alarm” function
Setting the alarm
Note
If you set the alarm using the buttons on the wake up
light, you can select the alarm time and the alarm tone.
If you set the alarm using the
“
beurer LightUp” app, you
can also select the alarm days, snooze time and a simu-
lated sunrise (wake up light gradually becomes brighter
over a set period of time).
To set the alarm using the buttons on the wake up light,
proceed as follows:
1. Press the Set button on the device once. “SET Alarm”
appears on the display. Wait three seconds until
flashes on the display.
2.
Use the / buttons to select either alarm or alarm
. Confirm with the Set button.

14
3.
The alarm hour fl ashes on the display. Set the alarm
hour using the / buttons. Confi rm with the Set
button.
4. The alarm minute fl ashes on the display. Set the alarm
minute using the
/ buttons. Confi rm with the Set
button.
5.
Alarm tone , wake-up melody 1–6 or radio
fl ashes on the display. Use the / buttons to select
the desired alarm tone. Confi rm with the Set button.
Alarm is now activated.
The simulated sunrise starts before the set alarm in order
to prepare the body for waking up. The alarm only goes
o after the sunrise.
Activating the alarm
To activate the alarm, press the Alarm button on the wake
up light repeatedly until “ALARM1”, “ ALARM2” or “ALARM1
and ALARM2” appears on the display.
Deactivating the alarm
To deactivate the alarm, press the Alarm button on the
wake up light repeatedly until “OFF” appears on the dis-
play.
Activating the snooze function
When the alarm sounds, touch (not press) the ON/OFF
button
to activate the snooze function. You can set
the snooze time in the “beurer LightUp” app.
Switching o the alarm
When the alarm sounds, press the ON/OFF button
to switch o the alarm.
7.3 Light/reading lamp
Note
You can switch on the light using the
“
beurer LightUp”
app or the buttons on the wake up light.
To switch on the light using the buttons on the wake up
light, proceed as follows:
1.
Briefl y press the ON/OFF button on the inserted de-
vice. The light comes on.
2. To switch the light o again, press the ON/OFF button
again. The light goes o .
3.
You can use the brightness buttons + - to set the bright-
ness.
7.4 Mood light
The wake up light can also be used as a mood light.
Note
If you switch on the mood light via the wake up light,
you get a mood light with a standardised colour change.
If you set the mood light via the
“
beurer LightUp” app,
you also have the following setting options:
-
You can select the colour of the mood light yourself.
- 10 preset sequences (e.g. rainbow) are available.
- The mood light can be set on a timer.
To switch on the mood light on the wake up light, pro-
ceed as follows:
1.
Press and hold the ON/OFF button for 2 seconds. The
colour changing mood light comes on.
2.
To maintain one colour on the mood light, press the
ON/OFF button again.
3. To switch the mood light o , press the ON/OFF but-
ton again.
7.5 “Sleep” function
The “Sleep” area is ideal for helping you fall asleep. Here
you can set the sunset function. With this function, the
light gradually dims after a set period of time. You can
also assign various relaxing sounds to the simulated sun-
set and either use natural light or a mood light.
Note
You can set the sunset function using the “beurer
LightUp” app or the buttons on the wake up light.
To switch on the sunset function on the wake up light,
proceed as follows:
1.
To use the sunset function with normal light, briefl y
press the ON/OFF button. The light comes on.
To use the sunset function with the mood light, press
and hold the ON/OFF button for 2 seconds. The mood
light comes on.
2. Press and hold the ON/OFF button for 5 seconds. 02
fl ashes on the display. Use the
/ buttons within 5
seconds to set the duration of the sunset.
3. Use the
/ buttons to set the volume.
4. Use the Set button to set the desired sound.

15
7.6 Radio
Note
You can configure the radio settings using the “beurer
LightUp” app or the buttons on the wake up light.
Setting the radio station
To set the radio station using the buttons on the wake up
light, proceed as follows:
1.
Press the Set button on the device twice. “SET Radio”
appears on the display. Wait three seconds until the
current station frequency flashes on the display.
2. Use the
/ buttons to set the desired radio station.
To start the station search, press and hold the or
button. Confirm with the Set button.
3. Programme number P 01 flashes on the display. Use
the / buttons to select the desired programme
number (e.g. P 01 or P 02) under which the set ra-
dio station is to be saved. There are 10 radio memory
spaces available. Confirm with the Set button.
Switching the radio on/o
1. To switch the radio on or o, press the Radio button
on the wake up light.
2.
To switch between the saved radio stations, first press
the Set button. Use the / buttons to select the de-
sired radio station.
3.
To set the volume, press the / buttons while the
radio is playing.
7.7 Setting the display brightness
Note
The wake up light has four display brightness levels
(
0,
1, 2
and
3
)
. You can set the display brightness in the
settings of the “beurer LightUp” app or using the but-
tons on the wake up light.
To set the display brightness using the buttons on the
wake up light, proceed as follows:
1.
Press the Set button on the device four times. “SET
Display” appears on the display. Wait three seconds
until a number flashes on the display.
2.
Use the / buttons to set the desired display bright-
ness. Confirm with the Set button. The configured dis-
play brightness is shown after 5 seconds.
Alternatively, you can also tap on the right-hand side of
the display to make the display brightness briefly brighter.
7.8 AUX connection
You can connect an external audio source (e.g. MP3
player, smartphone or CD player) to the wake up light
via the AUX input.
1. Connect the supplied AUX cable to an audio source.
2.
Insert the other end of the AUX cable into the AUX input
on the rear of the device.
3.
Press the AUX button on the device. The external audio
source is now connected to the wake up light.
4. Use the
/ buttons to adjust the volume.
5. Press the AUX button to exit AUX mode again.
7.9 Switching the button tone on/o
You can only switch the button tone of the wake up light
on and o via the settings in the “beurer LightUp” app.
7.10 Activating/deactivating Bluetooth
®
Note
The wake up light is supplied to the customer with
Blue-
tooth
®
activated. If you deactivate Bluetooth
®
, the wake
up light cannot be connected to the “beurer LightUp”
app.
To deactivate Bluetooth
®
on the wake up light, proceed
as follows:
1.
Press the Set button on the device five times. “SET ”
appears on the display. Wait three seconds until “on”
flashes on the display.
2.
Press the or button until “OFF” appears on the dis-
play. Confirm with the Set button. Bluetooth
®
is now
deactivated on the wake up light.

16
8. Cleaning and storage
•
Clean the device with a dry cloth.
•
Do not use any abrasive cleaning products.
•
Ensure that no water enters the device. If this should
happen, only reuse the device once it has fully dried out.
•
Never immerse the device or mains part plug in water
or other liquids.
•
Protect the device from impacts, moisture, dust, chem-
icals, marked temperature fluctuations and nearby
sources of heat (ovens, heaters).
9. What if there are problems?
You can find further information and a list of fre-
quently asked questions (FAQs) about this product at
www.beurer.com.
10. Disposal
For environmental reasons, do not dispose of the device
in the household waste at the end of its useful life. Dis
-
pose of the device at a suitable local collection or
recycling point. Observe the local regulations for
material disposal. Dispose of the device in ac-
cordance with EC Directive – WEEE (Waste Elec-
trical and Electronic Equipment). If you have any ques-
tions, please contact the local authorities responsible for
waste disposal.
11. Technical data
Illuminance
Max. approx. 2,000 lux (at
distance of 15 cm)
Light
LED technology (LED service life:
> 20,000 hours)
Light levels
10 on wake up light
Infinitely variable via app
Mood light
Automatic RGB colour change,
option of setting individual colour
Snooze time 1–30 minutes
LCD backlighting O, 1, 2, 3
Time
Can be switched between
12h/24h
Alarm
2 alarm times
Wake up: alarm tone, radio,
6wake-up melodies
Fall asleep:
4 sleep melodies
Charging function
Smartphones can be charged
via USB
Button tone O, On
AUX Line-in, 3.5 mm jack plug
Radio
Frequency range FM 87.5 –
108MHz, 10 memory spaces
Loudspeaker 2 watts
Mains part
voltage supply
Input: 110 – 240 V, AC, 50/60Hz,
0.5 A
Output: 9 V, DC, 2000mA
Mains part
protection class
Protection class II
Frequency band
2402MHz-2480MHz
Transmission
power
max. 4dBM
Subject to technical changes.
We hereby guarantee that this product complies with the
European RED Directive 2014/53/EU. Please contact the
specified service address to obtain further information,
such as the CE Declaration of Conformity.
Subject to errors and changes

17
Table des matières
1. Familiarisation avec l’appareil ...................................................................................................... 18
2. Symboles utilisés ........................................................................................................................... 18
3. Utilisation conforme aux recommandations ............................................................................... 18
4. Consignes de sécurité .................................................................................................................. 19
5. Description de l’appareil ............................................................................................................... 19
6. Mise en service .............................................................................................................................. 20
7. Fonctions de l’appareil .................................................................................................................. 20
7.1 Réglage de l’heure/la date ......................................................................................................... 20
7.2 Fonction réveil
«Alarme» .......................................................................................................... 21
7.3 Lumière/Lampe de lecture ......................................................................................................... 21
7.4 Lumière d’ambiance .................................................................................................................. 21
7.5 Fonction sommeil «Sleep» ....................................................................................................... 21
7.6 Radio ......................................................................................................................................... 22
7.7 Réglage de la luminosité de l’écran ........................................................................................... 22
7.8 Prise AUX................................................................................................................................... 22
7.9 Activation/désactivation du bip des touches ............................................................................ 22
7.10 Activation/désactivation de la fonction Bluetooth
®
................................................................. 23
8. Nettoyage/stockage ...................................................................................................................... 23
9. Que faire en cas de problèmes? ................................................................................................. 23
10. Élimination ..................................................................................................................................... 23
11. Données techniques ..................................................................................................................... 23
Contenu
•
Réveil lumineux avec antenne volante
•
Adaptateur secteur
•
Câble AUX
•
Mode d’emploi
Lisez attentivement ce mode d’emploi, conservez-le pour un usage ultérieur,
mettez-le à disposition des autres utilisateurs et suivez les consignes qui y
figurent.
FRANÇAIS

18
Chère cliente, cher client,
Nous vous remercions d’avoir choisi l’un de nos produits.
Notre société est réputée pour l’excellence de ses pro-
duits et les contrôles de qualité auxquels ils sont soumis.
Nos produits couvrent les domaines de la chaleur, du
poids, de la pression sanguine, de la température cor-
porelle, de la thérapie douce, des massages, de l’amé-
lioration de l’air et de la beauté.
Sincères salutations,
Votre équipe beurer
1. Familiarisation avec l’appareil
Le réveil lumineux beurer WL 75 vous permet de vous
coucher et de vous réveiller en douceur et naturellement.
La lumière LED, s’intensifiant progressivement, permet de
simuler un lever de soleil. Vous pouvez alors tranquillement
vous habituer aux conditions lumineuses et votre corps se
préparer doucement au réveil. En plus de la simulation de
lever de soleil, vous pouvez paramétrer une mélodie de
réveil qui vous accompagne lors de votre réveil. En plus de
la sonnerie, vous pouvez choisir entre la radio et plusieurs
sonorités. Le réveil lumineux WL 75 de beurer vous permet
de débuter la journée reposé et du bon pied mais égale-
ment de vous endormir tout en douceur à la lumière d’un
coucher du soleil et au son de douces mélodies.
Fonctions:
•
Commande des fonctions via smartphone grâce à
l’application «beurer LightUp»
•
Fonction réveil «Alarme» (simulation de coucher de
soleil: le réveil lumineux gagne progressivement en
intensité pendant une période choisie)
•
Fonction sommeil «Sleep» (simulation de coucher de
soleil: le réveil lumineux perd progressivement en inten-
sité et s’éteint automatiquement après la durée définie)
•
Fonction lumière (lumière blanche/lampe de lecture)
•
Lumière d’ambiance avec fixation de couleur indivi
-
duelle (10ambiances lumineuses sélectionnables)
•
Achage de l’heure à l’écran
•
Radio FM
•
Sonnerie, mélodies de réveil et berceuses
•
Lecture de musique via l’entrée AUX
Remarque
Le réveil lumineux WL 75 n’est pleinement exploitable
qu’avec l’application «beurer LightUp». Les fonc-
tions de base peuvent être réglées directement de-
puis l’appareil.
Les fonctions suivantes peuvent être commandées exclu-
sivement depuis l’application:
•
Sélection parmi 10ambiances lumineuses prédéfinies
•
Sélection de couleur directe pour la lumière d’ambiance
•
Activation ou désactivation de l’alarme pour chaque
jour
•
Réglage d’une alarme spéciale
•
Activation ou désactivation des bips des touches
Configuration requise App „beurer LightUp“ :
•
iOS ≥ 8.0
Android
TM
≥ 4.4
•
Bluetooth
®
≥ 4.0
Pour obtenir la liste des appareils mobiles compatibles,
veuillez scanner le code QR suivant:
2. Symboles utilisés
AVERTISSE-
MENT
Ce symbole vous avertit des
risques de blessures ou des
dangers pour votre santé.
ATTENTION
Ce symbole vous avertit des
éventuels dommages au niveau
de l’appareil ou d’un accessoire.
Remarque
Ce symbole indique des infor-
mations importantes.
Élimination conformément à
la directive européenne WEEE
(Waste Electrical and Electronic
Equipment) relative aux déchets
d’équipements électriques et
électroniques
Fabricant
Ce produit répond aux exigences
des directives européennes et
nationales en vigueur.
3. Utilisation conforme aux
recommandations
AVERTISSEMENT
L’appareil ne doit être utilisé qu’aux fins pour lesquelles
il a été conçu et conformément aux indications données
par ce mode d’emploi. Toute utilisation inappropriée peut
être dangereuse. Le fabricant ne peut être tenu pour res-

19
ponsable des dommages causés par une utilisation inap-
propriée ou non conforme.
4. Consignes de sécurité
AVERTISSEMENT
•
L’appareil ne doit être utilisé que dans un environne-
ment domestique/privé et pas dans un cadre profes-
sionnel.
•
Cet appareil peut être utilisé par les enfants à partir de
8ans ainsi que les déficients physiques, sensoriels ou
mentaux et les personnes ayant peu de connaissances
ou d’expérience à la condition qu’ils soient surveillés
ou sachent comment l’utiliser en toute sécurité et en
comprennent les risques.
•
Les enfants ne doivent pas jouer avec cet appareil.
•
Conservez l’emballage hors de portée des enfants
(risque d’étouement).
•
Utilisez l’appareil uniquement avec l’adaptateur secteur
fourni et à la tension indiquée sur l’adaptateur secteur.
•
Posez l’appareil sur une surface stable et plane.
•
L’appareil doit rester à proximité d’une prise accessible
facilement.
•
Avant l’utilisation, vérifiez si l’appareil et les accessoires
présentent des dégâts visibles. En cas de doute, ne
l’utilisez pas et adressez-vous à votre revendeur ou au
service client indiqué.
•
Tenez l’appareil, l’adaptateur secteur et le câble à l’écart
de l’eau!
•
Ne branchez ou débranchez jamais l’adaptateur secteur
avec les mains humides.
•
Le nettoyage et l’entretien ne doivent pas être eectués
par des enfants sans surveillance.
•
En cas de défaut ou de panne, éteignez immédiatement
l’appareil et débranchez l’alimentation.
•
Placez le câble d’alimentation de manière à ce que per-
sonne ne puisse trébucher dessus.
ATTENTION
•
Protégez l’appareil contre les chocs, l’humidité, les sa-
letés, les fortes variations de température et l’ensoleil-
lement direct.
•
Ne laissez pas tomber l’appareil.
5. Description de l’appareil
1 Écran 8 Touche Radio
2 Touche MARCHE/
ARRÊT
9 Antenne volante
3 Bouton tactile (pour
la fonction Snooze)
10 Prise pour l’adaptateur
secteur
4 Touche de
luminosité +/-
11 Prise USB (pour rechar-
ger le smartphone)
5 Écran LCD tactile
(pour l’éclairage de
l’écran)
12 Entrée AUX
6 Touches
v/w
13 Touche Alarm
7 Touche AUX 14 Touche Set
1
2
4
14
6
13
12
11
10
9
8
7
6
5
3

20
Écran
1
2
3
4
5
6
7
8
9
10
12
13
14
15
11
1 Haut-parleur 9 Bluetooth
®
2 Année (A)/Mois (M)/
Jour(D)
10 Heure
3 Mode radio-réveil 11 Écran
4 Heure/Date/
Fréquence radio
12 Emplacement de
l’alarme 1, 2
5 Mode SET 13 Fonction sommeil
(«Sleep»)
6 Mode AUX 14 Bip sonore
7 Mode Alarme 15 Mélodie de réveil
8 Radio
6. Mise en service
1. Retirez le matériel d’emballage.
2.
Vérifiez que toutes les pièces sont présentes lors de
la livraison.
3. Vérifiez que l’appareil, l’adaptateur secteur et le câble
AUX ne sont pas endommagés.
4.
Téléchargez l’application gratuite «beurer LightUp» sur
Apple App Store (iOS) ou sur Google Play (Android).
5. Activez la fonction Bluetooth
®
sur votre smartphone.
6. Posez l’appareil sur une surface stable et plane. L’ap
-
pareil doit rester à proximité d’une prise accessible
facilement.
7.
Branchez la fiche de l’adaptateur secteur dans la prise
de l’adaptateur secteur à l’arrière de l’appareil.
8.
Branchez l’adaptateur secteur sur une prise secteur
adaptée.
9. L’heure 0:00 s’ache sur l’écran de l’appareil.
10. Placez l’antenne volante vers l’arrière.
11.
Ouvrez l’application «beurer LightUp» et suivez les
instructions.
12.
Dès que le WL 75 est connecté, l’heure du réveil lumi
-
neux s’actualise.
7. Fonctions de l’appareil
Vous pouvez commander les fonctions de l’appareil via
l’application «beurer LightUp» ou à l’aide des touches
du réveil lumineux.
Nous vous recommandons de commander l’appa-
reil via l’application «beurer LightUp», qui vous ore
davantage de liberté.
Lorsque le réveil lumineux est connecté au smart-
phone, toutes les touches de l’appareil sont bloquées.
Dès que la connexion entre le smartphone et le réveil
lumineux est interrompue, vous pouvez à nouveau
utiliser les touches du réveil lumineux.
7.1 Réglage de l’heure/la date
Remarque
Vous pouvez régler l’heure et la date via l’application
«
beurer LightUp» ou à l’aide des touches du réveil
lumineux.
Lorsque le réveil lumineux est connecté au
smartphone via l’application «beurer LightUp», l’heure
et la date se synchronisent automatiquement sur le ré-
veil lumineux.
Pour régler l’heure sur le réveil lumineux à l’aide des
touches, procédez comme suit:
1.
Appuyez trois fois sur la touche Set de l’appareil. «SET
Time» s’ache à l’écran. Patientez trois secondes,
jusqu’à ce que le format d’heure «24 hr» clignote
à l’écran.
2. Réglez le format de l’heure à l’aide des touches
/
(format 24heures «24 hr» ou format AM/PM 12heures
«12 hr»). Confirmez en appuyant sur la touche Set.
3.
Les heures clignotent à l’écran. Réglez les heures à
l’aide des touches / . Confirmez en appuyant sur
la touche Set.
4. Les minutes clignotent à l’écran. Réglez les minutes à
l’aide des touches
/ . Confirmez en appuyant sur
la touche Set.
5.
L’année (Y) clignote à l’écran. Réglez l’année à l’aide
des touches / . Confirmez en appuyant sur la
touche Set.
6. Le mois (M) clignote à l’écran. Réglez le mois à l’aide
des touches / . Confirmez en appuyant sur la
touche Set.
7.
Le jour (D) clignote à l’écran. Réglez le jour à l’aide des
touches / . Confirmez en appuyant sur la touche
Set.
Sayfa yükleniyor...
Sayfa yükleniyor...
Sayfa yükleniyor...
Sayfa yükleniyor...
Sayfa yükleniyor...
Sayfa yükleniyor...
Sayfa yükleniyor...
Sayfa yükleniyor...
Sayfa yükleniyor...
Sayfa yükleniyor...
Sayfa yükleniyor...
Sayfa yükleniyor...
Sayfa yükleniyor...
Sayfa yükleniyor...
Sayfa yükleniyor...
Sayfa yükleniyor...
Sayfa yükleniyor...
Sayfa yükleniyor...
Sayfa yükleniyor...
Sayfa yükleniyor...
Sayfa yükleniyor...
Sayfa yükleniyor...
Sayfa yükleniyor...
Sayfa yükleniyor...
Sayfa yükleniyor...
Sayfa yükleniyor...
Sayfa yükleniyor...
Sayfa yükleniyor...
Sayfa yükleniyor...
Sayfa yükleniyor...
Sayfa yükleniyor...
Sayfa yükleniyor...
Sayfa yükleniyor...
Sayfa yükleniyor...
Sayfa yükleniyor...
Sayfa yükleniyor...
Sayfa yükleniyor...
Sayfa yükleniyor...
Sayfa yükleniyor...
Sayfa yükleniyor...
-
 1
1
-
 2
2
-
 3
3
-
 4
4
-
 5
5
-
 6
6
-
 7
7
-
 8
8
-
 9
9
-
 10
10
-
 11
11
-
 12
12
-
 13
13
-
 14
14
-
 15
15
-
 16
16
-
 17
17
-
 18
18
-
 19
19
-
 20
20
-
 21
21
-
 22
22
-
 23
23
-
 24
24
-
 25
25
-
 26
26
-
 27
27
-
 28
28
-
 29
29
-
 30
30
-
 31
31
-
 32
32
-
 33
33
-
 34
34
-
 35
35
-
 36
36
-
 37
37
-
 38
38
-
 39
39
-
 40
40
-
 41
41
-
 42
42
-
 43
43
-
 44
44
-
 45
45
-
 46
46
-
 47
47
-
 48
48
-
 49
49
-
 50
50
-
 51
51
-
 52
52
-
 53
53
-
 54
54
-
 55
55
-
 56
56
-
 57
57
-
 58
58
-
 59
59
-
 60
60


diğer dillerde
- español: Beurer WL 75 El manual del propietario
- français: Beurer WL 75 Le manuel du propriétaire
- italiano: Beurer WL 75 Manuale del proprietario
- polski: Beurer WL 75 Instrukcja obsługi
- Deutsch: Beurer WL 75 Bedienungsanleitung