
USER INSTRUCTIONS
OVENS
KULLANIM KILAVUZU
FIRINLAR
EN
02
TR
13
• HON602X/E/1
CANDY HOOVER GROUP S.R.L. • Via Comolli 16 • 20861 Brugherio (MB) - Italy
BRUGSANVISNING
OVNE
DK
26
KÄYTTÖOHJEET
UUNIT
FI
37
BRUKERINSTRUKSJONER
OVNER
NO
48
ANVÄNDARINSTRUKTIONE
UGN
SV
59

Safety Indications
EN 02
• During cooking, moisture may condense inside the oven cavity or on the
glass of the door. This is a normal condition. To reduce this effect, wait 10-
15 minutes after turning on the power before putting food inside the
oven. ln any case, the condensation disappears when the oven reaches
the cooking temperature.
• Cook the vegetables in a container with a lid instead of an open tray.
• Avoid leaving food inside the oven after cooking for more than 15/20
minutes.
• WARNING: the appliance and accessible parts become hot during use.
Be careful not to touch any hot parts.
• WARNING: the accessible parts can become hot when the grill is in use.
Children should be kept at a safe distance.
• WARNING: ensure that the appliance is switched off before replacing
the bulb, to avoid the possibility of electric shocks.
• WARNING: in order to avoid any danger caused by the accidental
resetting of the thermal interruption device, the appliance should not be
powered by an external switching device, such as a timer, or be
connected to a circuit that is regularly switched on and off.
• Children under 8 should be kept at a safe distance from the appliance if
not continuously supervised.
• Children should not play with the appliance.
• The appliance can be used by those aged 8 or over and by those with
limited physical, sensorial or mental capacities, without experience or
knowledge of the product, only if supervised or provided with instruction
as to the operation of the appliance, in a safe way with awareness of the
possible risks.
• Cleaning and maintenance should not be carried out by unsupervised
children.
• Do not use rough or abrasive materials or sharp metal scrapers to clean
the oven door glasses, as they can scratch the surface and cause the glass
to shatter.
• The oven must be switched off before removing the removable parts.
After cleaning, reassemble them according the instructions.

EN 03
• Only use the meat probe recommended for this oven.
• Do not use a steam cleaner for cleaning operations.
• Connect a plug to the supply cable that is able to bear the voltage,
current and load indicated on the tag and having the earth contact. The
socket must be suitable for the load indicated on the tag and must have
ground contact connected and in operation. The earth conductor is
yellow-green in colour. This operation should be carried out by a suitably
qualified professional. ln case of incompatibility between the socket and
the appliance plug, ask a qualified electrician to substitute the socket
with another suitable type. The plug and the socket must be conformed
to the current norms of the installation country. Connection to the power
source can also be made by placing an omnipolar breaker between the
appliance and the power source that can bear the maximum connected
load and that is in line with current legislation. The yellow-green earth
cable should not be interrupted by the breaker. The socket or omnipolar
breaker used for the connection should be easily accessible when the
appliance is installed.
• The disconnection may be achieved by having the plug accessible or by
incorporating a switch in the fixed wiring in accordance with the wiring
rules.
• lf the power cable is damaged, it should be substituted with a cable or
special bundle available from the manufacturer or by contacting the
customer service department. The type of power cable must be
H05V2V2-F. This operation should be carried out by a suitably qualified
professional. The earth conductor (yellow-green) must be approximately
10 mm longer than the other conductors. For any repairs, refer only to
the Customer Care Department and request the use of original spare
parts.
• Failure to comply with the above can compromise the safety of the
appliance and invalidate the guarantee.
• Any excess of spilled material should be removed before cleaning.
• A long power supply failure during an occurring cooking phase may
cause a malfunction of the monitor. ln this case contact customer service.
• The appliance must not be installed behind a decorative door in order to

avoid overheating.
• When you place the shelf inside, make sure that the stop is directed
upwards and in the back of the cavity. The shelf must be inserted
completely into the cavity.
• WARNING: Do not line the oven walls with aluminium foil or single-use
protection available from stores. Aluminium foil or any other protection,
in direct contact with the hot enamel, risk melting and deteriorating the
enamel of the insides.
• WARNING: Never remove the oven door seal.
• CAUTION: Do not refill the cavity bottom with water during cooking or
when the oven is hot.
• No additional operation/setting is required in order to operate the
appliance at the rated frequencies.
EN 04

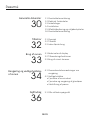
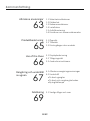
Summary
Oven Cleaning and Maintenance
EN 05
General Instructions
6
1.1 Safety indications
1.2 Electrical safety
1.3 Recommendations
1.4 Installation
1.5 Waste management
1.6 Conformity declaration
2.1 Overview
2.2 Accessories
2.3 First use
Product Description
8
3.1 Display description
3.2 Cooking modes
3.3 Using the minute timer
Use of the Oven
9
4.1 General notes on cleaning
4.2 Maintenance
• Removal of the oven window
• Removal and cleaning of the glass
door
• Changing the bulb
10
5.1 F.A.Q.
Troubleshooting
12

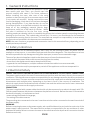
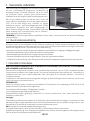
1. General Instructions
We thank you for choosing one of our products. For the
best results with your oven, you should read this
manual carefully and retain it for future reference.
Before installing the oven, take note of the serial
number so that you can give it to customer service staff
if any repairs are required. Having removed the oven
from its packaging, check that it has not been damaged
during transportation. If you have doubts, do not use
the oven and refer to a qualified technician for advice.
Keep all of the packaging material (plastic bags,
polystyrene, nails) out of the reach of children. When
the oven is switched on for the first time, strong
smelling smoke can develop, which is caused by the glue on the insulation panels surrounding the oven
heating for the first time. This is absolutely normal and, if it occurs, you should wait for the smoke to
dissipate before putting food in the oven. The manufacturer accepts no responsibility in cases where
the instructions contained in this document are not observed.
NOTE: the oven functions, properties and accessories cited in this manual will vary, depending on the
model you have purchased.
1.1 Safety Indications
Only use the oven for its intended purpose, that is only for the cooking of foods; any other use, for
example as a heat source, is considered improper and therefore dangerous. The manufacturer cannot
be held responsible for any damage resulting from improper, incorrect or unreasonable usage.
The use of any electrical appliance implies the observance of some fundamental rules:
- do not pull on the power cable to disconnect the plug from the socket;
- do not touch the appliance with wet or damp hands or feet;
- in general the use of adaptors, multiple sockets and extension cables is not recommended;
- in case of malfunction and/or poor operation, switch off the appliance and do not tamper with it.
1.2 Electrical Safety
ENSURE THAT AN ELECTRICIAN OR QUALIFIED TECHNICIAN MAKES THE ELECTRICAL CONNECTIONS.
The power supply to which the oven is connected must conform with the laws in force in the country of
installation. The manufacturer accepts no responsibility for any damage caused by the failure to observe
these instructions. The oven must be connected to an electrical supply with an earthed wall outlet or a
disconnector with multiple poles, depending on the laws in force in the country of installation. The
electrical supply should be protected with suitable fuses and the cables used must have a transverse
section that can ensure correct supply to the oven.
CONNECTION
The oven is supplied with a power cable that should only be connected to an electrical supply with 220-
240 Vac power between the phases or between the phase and neutral. Before the oven is connected to
the electrical supply, it is important to check:
- power voltage indicated on the gauge;
- the setting of the disconnector.
The grounding wire connected to the oven's earth terminal must be connected to the earth terminal of
the power supply.
WARNING
Before connecting the oven to the power supply, ask a qualified electrician to check the continuity of the
power supply's earth terminal. The manufacturer accepts no responsibility for any accidents or other
problems caused by failure to connect the oven to the earth terminal or by an earth connection that has
defective continuity.
EN 06

1.3 Recommendations
After each use of the oven, a minimum of cleaning will help keep the oven perfectly clean.
Do not line the oven walls with aluminium foil or single-use protection available from stores. Aluminium
foil or any other protection, in direct contact with the hot enamel, risks melting and deteriorating the
enamel of the insides. In order to prevent excessive dirtying of your oven and the resulting strong
smokey smells, we recommend not using the oven at very high temperature. It is better to extend the
cooking time and lower the temperature a little. In addition to the accessories supplied with the oven,
we advise you only use dishes and baking moulds resistant to very high temperatures.
1.4 Installation
The manufacturers have no obligation to carry this out. If the assistance of the manufacturer is required
to rectify faults arising from incorrect installation, this assistance is not covered by the guarantee. The
installation instructions for professionally qualified personnel must be followed. Incorrect installation
may cause harm or injury to people, animals or belongings. The manufacturer cannot be held
responsible for such harm or injury.
The oven can be located high in a column or under a worktop. Before fixing, you must ensure good
ventilation in the oven space to allow proper circulation of the fresh air required for cooling and
protecting the internal parts. Make the openings specified on last page according to the type of fitting.
NOTE: as the oven could require maintenance work, it is advisable to keep another wall socket available
so that the oven can be connected to this if it is removed from the space in which it is installed. The
power cable must only be substituted by technical service staff or by technicians with equivalent
qualifications.
A low light around the central main switch could be present when the oven is off. This is a normal
behavior. I can be removed just turning the plug upside down or swapping the supply terminals.
1.5 Waste management and environmental protection
This appliance is labelled in accordance with European Directive 2012/19/EU regarding
electric and electronic appliances (WEEE). The WEEE contain both polluting substances
(that can have a negative effect on the environment) and base elements (that can be
reused). It is important that the WEEE undergo specific treatments to correctly remove and
dispose of the pollutants and recover all the materials. Individuals can play an important
role in ensuring that the WEEE do not become an environmental problem; it is essential to
follow a few basic rules:
- the WEEE should not be treated as domestic waste;
- the WEEE should be taken to dedicated collection areas managed by the town council or a registered
company.
In many countries, domestic collections may be available for large WEEEs. When you buy a new
appliance, the old one can be returned to the vendor who must accept it free of charge as a one-off, as
long as the appliance is of an equivalent type and has the same functions as the purchased appliance.
SAVING AND RESPECTING THE ENVIRONMENT
Where possible, avoid pre-heating the oven and always try to fill it. Open the oven door as infrequently
as possible, because heat from the cavity disperses every time it is opened. For a significant energy
saving, switch off the oven between 5 and 10 minutes before the planned end of the cooking time, and
use the residual heat that the oven continues to generate. Keep the seals clean and in order, to avoid any
heat dispersal outside of the cavity. If you have an electric contract with an hourly tariff, the "delayed
cooking" programme makes energy saving more simple, moving the cooking process to start at the
reduced tariff time slot.
1.6 Declaration of compliance
• By placing the mark on the appliance, we are confirming compliance to all relevant European
safety, health and environmental requirements which are applicable in legislation for this product.
EN 07

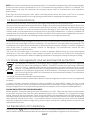
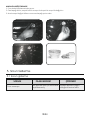
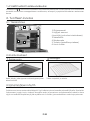
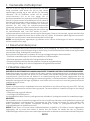
2. Product Description
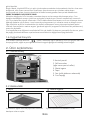
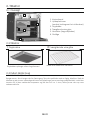
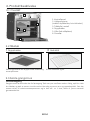
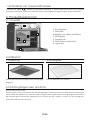
2.1 Overview
1. Control panel
2. Shelf positions
(lateral wire grid if included)
3. Metal grill
4. Drip pan
5. Fan (behind the steel plate)
6. Oven door
2.2 Accessories
Drip pan
1
Collects the residues that drip during the cooking
of foods on the grills.
Metal grill
2
Holds baking trays and plates.
2.3 First Use
PRELIMINARY CLEANING
Clean the oven before using for the first time. Wipe over external surfaces with a damp soft cloth. Wash
all accessories and wipe inside the oven with a solution of hot water and washing up liquid. Set the
empty oven to the maximum temperature and leave on for about 1 hour, this will remove any lingering
smells of newness.
EN 08
1
2
3
4
6
5
5
10
15
20
25
30
35
40
45
50
55

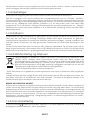
3. Use of the Oven
3.1 Display description
*Tested in accordance with the EN 60350-1 for the purpose of energy consumption declaration and energy class
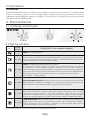
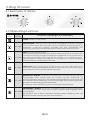
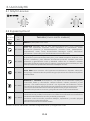
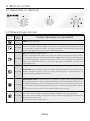
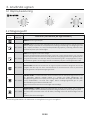
3.2 Cooking Modes
EN 09
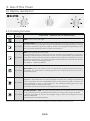
Function
Dial
Function (Depends on the oven model)
LAMP: Turns on the oven light.
CONVECTIONAL: Both top and bottom heating elements are used. Preheat the oven for
about ten minutes. This method is ideal for all traditional roasting and baking. For seizing
red meats, roast beef, leg of lamb, game, bread, foil wrapped food (papillotes), flaky
pastry. Place the food and its dish on a shelf in mid position.
GRILL: use the grill with the door closed.
The top heating element is used alone and you can adjust the temperature. Five minutes
preheating is required to get the elements red-hot. Success is guaranteed for grills, kebabs and
gratin dishes. White meats should be put at a distance from the grill; the cooking time is longer,
but the meat will be tastier. You can put red meats and fish fillets on the shelf with the drip tray
underneath. The oven has two grill positions:
Grill: 1800 W Barbecue: 3000 W
Master bake: This function allows to cook in a healthier way, by reducing the amount of fat or
oil required. The combination of heating elements with a pulsating cycle of air ensures a
perfect baking result.
BOTTOM HEATING + FAN: The bottom heating element is used with the fan circulating
the air inside the oven. This method is ideal for juicy fruit flans, tarts, quiches and pâté.
It prevents food from drying and encourages rising in cakes, bread dough and other
bottom-cooked food.
Place the shelf in the bottom position.
*
CONVECTION + FAN: We recommend you use this method for poultry, pastries, fish and
vegetables. Heat penetrates into the food better and both the cooking and preheating
times are reduced. You can cook different foods at the same time with or without the
same preparation in one or more positions. This cooking method gives even heat
distribution and the smells are not mixed.
Allow about ten minutes extra when cooking foods at the same time.
T °C
range
50 ÷ MAX
50 ÷ MAX
50 ÷ MAX
50 ÷ MAX
50 ÷ MAX
*
5
10
15
20
25
30
35
40
45
50
55

EN 10
4. Oven cleaning and maintenance
4.1 General notes on cleaning
The lifecycle of the appliance can be extended through regular cleaning. Wait for the oven to cool before
carrying out manual cleaning operations. Never use abrasive detergents, steel wool or sharp objects for
cleaning, so as to not irreparably damage the enamelled parts. Use only water, soap or bleach-based
detergents (ammonia).
GLASS PARTS
It is advisable to clean the glass window with absorbent kitchen towel after every use of the oven. To
remove more obstinate stains, you can use a detergent-soaked sponge, well wrung out, and then rinse
with water.
OVEN WINDOW SEAL
If dirty, the seal can be cleaned with a slightly damp sponge.
ACCESSORIES
Clean accessories with a wet, soapy sponge before rinsing and drying them: avoid using abrasive
detergents.
DRIP PAN
After using the grill, remove the pan from the oven. Pour the hot fat into a container and wash the pan in
hot water, using a sponge and washing-up liquid.
If greasy residues remain, immerse the pan in water and detergent. Alternatively, you can wash the pan
in the dishwasher or use a commercial oven detergent. Never put a dirty pan back into the oven.
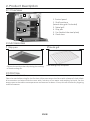
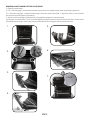
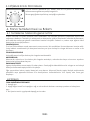
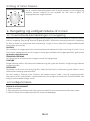
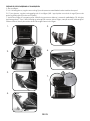
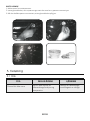
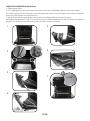
REMOVAL OF THE OVEN WINDOW
1. Open the front window.
2. Open the clamps of the hinge housing on the right and left side of the front window by pushing them
downwards.
3. Replace the window by carrying out the procedure in reverse.
4.2 Maintenance
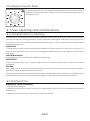
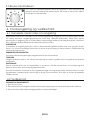
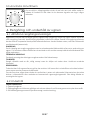
3.3 Using the minute timer
To set the cooking time, turn dial one complete revolution and then position
the index to the required time. When the time has lapsed, the signal will ring
for a few seconds.

EN 11
LOW-E
1
2
3
1.
2.
3.
4.
5.
6.
7.
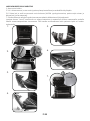
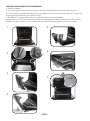
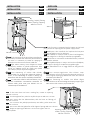
REMOVAL AND CLEANING OF THE GLASS DOOR
1. Open the oven door.
2.3.4. Lock the hinges, remove the screws and remove the upper metal cover by pulling it upwards.
5.6. Remove the glass, carefully extracting it from the oven door (NB: in pyrolytic ovens, also remove
the second and third glass (if present)).
7. At the end of cleaning or substitution, reassemble the parts in reverse order.
On all glass, the indication "Pyro" must be legible and positioned on the left side of the door, close to the
left-hand lateral hinge. In this way, the printed label of the first glass will be inside the door.

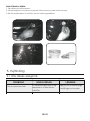
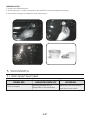
CHANGING THE BULB
1. Disconnect the oven from the mains supply.
2. Undo the glass cover, unscrew the bulb and replace it with a new bulb of the same type.
3. Once the defective bulb is replaced, replace the glass cover.
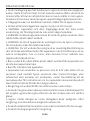
5. Troubleshooting
5.1 FAQ
PROBLEM POSSIBLE CAUSE SOLUTION
A cooking function and
temperature has not been set
Ensure that the necessary
settings are correct
The oven does not heat up
EN 12

TR 13
Güvenlik uyarıları
• Pişirme sırasında fırın bölmesinde veya kapağın camında nem
yoğunlaşabilir. Bu normal bir durumdur. Bu etkiyi azaltmak için yemeği fırının
içine yerleştirmeden önce ve gücü açtıktan sonra 10-15 dakika bekleyin. Her
durumda, fırın pişirme sıcaklığına ulaştığında yoğunlaşma geçer.
• Sebzeleri, açık bir tepsi yerine kapaklı bir kapta pişirin.
• Pişirdikten sonra yemeği fırının içinde 15/20 dakikadan fazla bırakmayın.
• UYARI: Cihaz ve erişilebilir parçalar kullanım sırasında sıcak olur. Sıcak
parçalara dokunmamaya dikkat edin.
•UYARI: Izgara kullanımdayken erişilebilir parçalar çok sıcak olabilir.
Çocuklar güvenli bir mesafede tutulmalıdır.
• UYARI: Elektrik çarpması olasılığını önlemek için ampulü değiştirmeden
önce cihazın kapalı olduğundan emin olun.
• UYARI: Isı kesintisi düzeneğinin yanlışlıkla sıfırlanmasına bağlı oluşabilecek
tehlikeleri önlemek için cihazın zamanlayıcı gibi harici bir anahtarlama
düzeneğiyle çalıştırılmaması veya düzenli olarak açılıp kapatılan bir devreye
bağlanması gerekir.
• 8 yaşından küçük çocuklar, sürekli gözetim altında olmadıkları takdirde
cihazdan güvenli bir mesafede tutulmalıdır.
• Çocuklar cihazla oynamamalıdır.
• Cihaz, 8 yaş veya üzerindeki kullanıcılar ve fiziksel, duyusal ya da
zihinsel becerileri sınırlı olan, ürünle ilgili deneyimi veya bilgisi olmayan
kişiler tarafından ancak gözetim altında olmaları veya cihazın
çalışmasına ilişkin talimatların verilmesi koşuluyla, olası risklere dair
bilince sahip olarak güvenli bir şekilde kullanılabilir.
• Temizlik ve bakım işleri gözetim altında olmayan çocuklar tarafından
yapılmamalıdır.
• Yüzeyi çizebileceği ve camın kırılmasına neden olabileceği için fırın
kapağının camlarını temizlerken sert veya aşındırıcı malzemeler ya da
keskin metal kazıyıcılar kullanmayın.
• Çıkarılabilir parçalar sökülmeden önce fırının kapatılması gerekir.
Temizlendikten sonra parçaları talimatlara göre yeniden takın.
• Yalnızca bu fırın için tavsiye edilen et probunu kullanın.

TR 14
• Temizlik işlemleri için buharlı temizleyici kullanmayın.
• Besleme kablosuna etikette belirtilen gerilimi, akımı ve yükü
kaldırabilecek, toprak bağlantısı olan bir fiş takın. Prizin etikette
belirtilen yüke uygun, toprak bağlantısı yapılmış ve çalışır durumda
olması gerekir. Topraklama iletkeni sarı-yeşil renklidir. Bu işlem, uygun
yetkinliğe sahip personel tarafından gerçekleştirilmelidir. Prizle cihazın
fişi arasında uyumsuzluk olması durumunda, yetkin bir elektrik
ustasından prizi uygun tipte bir prizle değiştirmesini isteyin. Fiş ve priz
kurulumun yapıldığı ülkede geçerli olan normlara uygun olmalıdır. Güç
kaynağı bağlantısı, cihazla güç kaynağı arasına maksimum bağlı yükü
kaldırabilecek ve geçerli mevzuata uygun olan omnipolar bir devre
kesici yerleştirilerek de yapılabilir. Sarı-yeşil topraklama kablosu devre
kesici tarafından kesintiye uğratılmamalıdır. Priz veya bağlantı için
kullanılan omnipolar devre kesici, cihazın kurulumu yapıldığında kolayca
erişilebilir durumda olmalıdır.
• Bağlantı, fişin erişilebilir durumda tutulması veya kablolama
kurallarına uygun şekilde sabit kablo tesisatına bir anahtarın eklenmesi
yoluyla kesilebilir.
• Güç kablosu hasarlıysa üreticiden temin edilen bir kablo veya özel bir
demet ile ya da müşteri hizmetleri departmanıyla iletişim kurularak
değiştirilmelidir. Güç kablosu H05V2V2-F tipinde olmalıdır. Bu işlem
yalnızca uygun yetkinliğe sahip personel tarafından yapılmalıdır. Toprak
iletkeni (sarı-yeşil renkli) diğer iletkenlerden yaklaşık 10 mm daha uzun
olmalıdır. Her türlü onarım işi için sadece Müşteri Hizmetleri
Departmanına başvurun ve orijinal yedek parçaların kullanılmasını talep
edin.
• Yukarıdaki yönergelere uyulmaması cihazın güvenliğini tehlikeye
atabilir ve garantiyi geçersiz kılabilir.
• Temizlemeden önce dökülen malzemeler temizlenmelidir.
• Pişirme aşamasında oluşan uzun süreli bir elektrik kesintisi, monitörün
arızalanmasına neden olabilir. Bu durumda müşteri hizmetleriyle
iletişime geçin.
• Cihaz, aşırı ısınmayı önlemek için dekoratif bir kapının arkasına monte

edilmemelidir.
• Rafı fırının içine yerleştirirken stopun yukarıya baktığından ve
bölmenin arka tarafında olduğundan emin olun. Raf, bölmeye tamamen
girerek yerleştirilmelidir.
• UYARI: Fırın duvarlarını alüminyum folyoyla veya mağazalarda satılan
tek kullanımlık koruma malzemeleriyle kaplamayın. Alüminyum folyo
veya diğer koruma malzemeler sıcak emayeyle doğrudan temas
ettiğinde erime riski oluşturur ve içerideki emayenin bozulmasına
neden olabilir.
• UYARI: Fırın kapağının contasını hiçbir zaman çıkarmayın.
• DİKKAT: Pişirme sırasında veya fırın sıcakken bölmenin alt kısmını suyla
tekrar dolmayın.
• Cihazı nominal frekanslarda çalıştırmak için başka işleme/ayara gerek
yoktur.
TR 15

TR 16
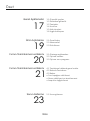
Genel Açıklamalar
17
1.1 Güvenlik ipuçları
1.2 Elektriksel güvenlik
1.3 Tavsiyeler
1.4 Kurulum
1.5 Atık yönetimi
1.6 Uygunluk beyanı
2.1 Genel bakış
2.2 Aksesuarlar
2.3 İlk kullanım
Ürün Açıklaması
19
3.1 Gösterge açıklamaları
3.2 Pişirme modları
3.3 Pişirme sonu programı
Fırının Temizlenmesi ve Bakımı
20
4.1 Temizleme hakkında genel notlar
4.2 Buharla Temizleme
4.3 Bakım
• Fırın kapağının sökülmesi
• Camın sökülmesi ve temizlenmesi
• Ampulün değiştirilmesi
Fırının Temizlenmesi ve Bakımı
21
5.1 Sorun giderme
Sorun Giderme
23
Özet

ELEKTRİK BAĞLANTILARINI BİR ELEKTRİKÇİNİN YA DA KALİFİYE BİR TEKNİSYENİN YAPMASINI
SAĞLAYIN
Fırının bağlanmış olduğu elektrik beslemesinin montajın yapıldığı ülkede yürürlükte bulunan yasalara
uygun olması gereklidir. Bu açıklamalara uyulmaması durumunda ortaya çıkabilecek zararlar için
imalatçı herhangi bir sorumluluk kabul etmemektedir. Montajın yapıldığı ülkede yürürlükte bulunan
yasalara bağlı olarak fırının topraklı bir priz ya da bütün kutupları ayıran bir devre kesici kullanılarak
elektrik beslemesine bağlanması gereklidir. Elektrik beslemesinin uygun sigortalarla korunması ve
kullanılan kabloların fırının doğru bir şekilde beslenebilmesine yeterli kapasitede olması gereklidir.
BAĞLANTI
Fırın, faz arası veya faz nötr arası 220-240 VAC olan bir elektrik beslemesine bağlanması gereken bir
elektrik kablosu ile sağlanmıştır. Fırın elektrik beslemesine bağlanmadan önce aşağıdakilerin kontrol
edilmesi gereklidir:
- etikette belirtilen gerilim değeri;
- devre kesicinin ayarı.
Fırının topraklama klemensine bağlanmış olan topraklama kablosunun elektrik beslemesinin
topraklama klemensine bağlanması gereklidir.
UYARI
Fırını elektrik beslemesine bağlamadan önce, elektrik beslemesinin topraklama klemensinin
sürekliliğini kontrol etmesi için kalifiye bir elektrikçiye başvurun. Fırının topraklama klemensine
bağlanmaması veya topraklama bağlantısının sürekliliğinde bir sorun olması sonucunda ortaya
TR 17
1. Genel Açıklamalar
Ürünlerimizden birini tercih ettiğiniz için teşekkür
ederiz. Fırınınızdan en iyi sonuçları almak için bu
kılavuzu
dikkatle okuyun ve daha sonra başvurmak için saklayın.
Fırının montajından önce, herhangi bir onarım
gerekmesi halinde müşteri hizmetleri personeline
vermek üzere seri numarasını not edin. Fırını
ambalajından çıkardıktan sonra nakliye sırasında hasar
almamış olduğunu kontrol edin. Eğer tereddüdünüz
varsa fırını kullanmayın ve tavsiye almak için kalifiye bir
teknisyene başvurun.
Tüm ambalaj malzemelerini (plastik torbalar, polistiren,
vidalar) çocukların erişemeyeceği yerlerde tutun. Fırın ilk kez çalıştırıldığında güçlü bir duman kokusu
oluşabilir, bunun nedeni fırın ilk kez ısındığında yalıtım panelleri üzerinde bulunan yapışkan maddenin
yanmasıdır. Bu kesinlikle normal bir durumdur ve oluştuğu zaman dumanın yayılması beklendikten
sonra yiyeceklerin fırının içine konulması gereklidir. Bu dokümanda verilen açıklamalara uyulmaması
halinde ortaya çıkabilecek durumlar için imalatçı herhangi bir sorumluluk kabul etmez.
NOT: Bu kılavuzda belirtilen fırın işlevleri, özellikleri ve aksesuarları satın almış olduğunuz modele bağlı
olarak farklılık gösterecektir.
1.1 Güvenlik İpuçları
Fırın sadece kullanım amacına uygun biçimde kullanılmalıdır, kullanım amacı yiyeceklerin pişirilmesidir;
başka bir amaç için, örneğin bir ısı kaynağı olarak kullanılması uygunsuz ve bu nedenle tehlikeli kullanım
olarak değerlendirilir. Uygunsuz, hatalı veya makul olmayan kullanım sonucunda ortaya çıkabilecek her
türlü zarardan imalatçı sorumlu tutulamaz.
Herhangi bir elektrikli cihazın kullanımı sırasında bazı asli kurallara uyulması gereklidir:
- elektrik fişini prizden çıkarmak için asla kablodan tutarak çekmeyin;
- elleriniz ya da ayaklarınız ıslak veya nemli iken cihaza dokunmayın;
- genellikle adaptörlerin, çoklu prizlerin ve uzatma kablolarının kullanılması tavsiye edilmez;
- arızalanması ve/veya düzgün çalışmaması durumunda cihazı kapatın ve kurcalamayın.
1.2 Elektriksel Güvenlik

çıkabilecek her türlü kaza veya zararda imalatçı herhangi bir sorumluluk kabul etmemektedir.
NOT: fırında bazı bakım işlemleri yapılması gerektiğinden, montajın yapılmış olduğu alandan çıkarılması
halinde fırının bağlanabileceği başka bir prizin yakınlarda bulunması tavsiye edilir. Elektrik kablosunun
sadece teknik servis personeli ya da eşdeğer niteliklere sahip teknisyenler tarafından değiştirilmesi
gereklidir.
Bu cihaz, 2012/19/EU Atık Elektrikli ve Elektronik Cihazlar (WEEE) hakkında Avrupa
Yönergesine göre etiketlenmiştir. WEEE hem kirletici maddeleri (çevreye olumsuz bir
etkisi olabilecek), hem de baz elemanları (yeniden kullanılabilir olan) içermektedir.
Kirletici maddelerin bertaraf edilmesi ve tüm malzemelerin geri dönüştürülebilmesi için
WEEE'lerin doğru bir şekilde tasnif edilmesi önemlidir. WEEE'lerin çevre açısından bir
sorun oluşturmaması için bireyler önemli bir rol oynayabilir; birkaç temel kurala uyulması
son derece önemlidir:
- WEEE evsel atık olarak işlem görmemelidir;
- WEEE belediyeler veya tescilli bir firma tarafından yönetilen belirlenmiş toplama alanlarına
1.3 Tavsiyeler
Fırını her kullandıktan sonra yapılacak kısa süreli temizlik işlemi fırının her zaman mükemmel temizlikte
kalmasını sağlayacaktır. Fırının yan duvarlarını alüminyum folyo veya mağazalardan satın alınabilecek
tek kullanımlık koruma malzemeleri ile kaplamayın. Sıcak emaye ile temas eden alüminyum folyo veya
başka herhangi bir koruma malzemesi erime riskine sahiptir ve emaye iç yüzeylerin bozulmasına neden
olabilir. Fırınınızın aşırı kirlenmesini ve bunun sonucunda duman kokusu oluşmaması için fırını çok
yüksek sıcaklıklarda kullanmamanızı tavsiye ederiz. Pişirme süresini uzun tutmak ve sıcaklığı biraz
düşürmek daha iyidir. Fırın ile birlikte verilen aksesuarlara ek olarak, sadece çok yüksek sıcaklıklara
dayanıklı tabaklar ve pişirme kapları kullanmanızı tavsiye ederiz.
1.4 Kurulum
Ürünün kurulumu firmanın yetkilendirilmiş servis/yetkilendirilmiş kişi tarafından yapılmalıdır. Yetkisiz
kişi ve kuruluşlar tarafından yapılan kurulumlardan doğan tüm ürün, kişi, mahal hasarları firmanın
sorumluluğunda değildir. Kurulum yapılacak mahalin ürünün çalışma ve teknik koşullara kullanma
kılavuzunda belirlenen kurallara uygun şekilde olması/sağlanması tüketicinin sorumluluğundadır. Eğer
tüketici tarafından yapılan kurulum nedeniyle ortaya çıkan hataların düzeltilmesi için imalatçının desteği
gerekirse, bu destek garanti kapsamında sağlanmaz. Kurulum açıklamaları profesyonel kalifiye personel
içindir ve kurulum sırasında uyulması gereklidir. Hatalı kurulum insanların ve evcil hayvanların
yaralanmasına ve eşyaların zarar görmesine neden olabilir. Böylesi bir yaralanma veya zarar için imalatçı
sorumlu tutulamaz.
Fırın yüksek bir mutfak dolabına ya da tezgah altına yerleştirilebilir. Sabitlemeden önce, iç parçaların
soğutulması ve korunması için gerekli temiz havanın uygun biçimde dolaşımının sağlanması amacıyla
fırının etrafında iyi bir havalandırma sağlandığından emin olun. Sabitleme şekline göre son sayfada
belirtilen hava alma açıklıklarını açın. Bu cihaz ev standartlarında kullanımına uygun olarak tasarlanmış
ve üretilmiş olup
ticari ve profesyonel amaçla kullanımlara uygun değildir. Ticari kullanımlarda (ev harici) ürün teslim
tarihinden itibaren 1 (bir) ay sure ile üretim hatalarına karşı garanti kapsamındadır. Ticari kullanımlarda
cihazın ömrü kısalabilir ve kullanım beklentilerini karşılamayabilir. Ev ve benzeri kullanım amacıyla
örtüşmeyen (ev veya ev tipi bir mekanda bile olsa) kullanım dolayısıyla cihazda meydana gelebilecek
herhangi bir arıza ve/veya hasar üretici / satıcı tarafından kabul edilmeyecektir. Ticari amaç ile kullanılan
ürünlerde, Malın ayıplı olduğu teslim sırasında açıkça belli ise alıcı 2 (iki) gün içinde durumu satıcıya
ihbar etmelidir. Açıkça belli değilse alıcı malı teslim aldıktan sonra 8 (sekiz) gün içinde incelemek veya
incelettirmekle ve bu inceleme sonucunda malın ayıplı olduğu ortaya çıkarsa, haklarını korumak için
durumu bu süre içinde satıcıya ihbarla yükümlüdür.
1.5 Atık yönetimi ve çevrenin korunması
Bu cihaz ev standartlarında kullanılmak üzere üretilmiştir. Profesyonel kullanım veya
ticare kullanım için kurulmuş olması durumunda, ilgili ticari hususta uygulanan
standartlar dikkate alınmalıdır.
TR 18

TR 19
götürülmelidir.
Birçok ülkede, büyük WEEE'ler için şehir içinde toplama noktaları bulunmaktadır. Yeni bir cihaz satın
aldığınızda, eski cihazın satın alınan cihazla aynı tipte olması ve aynı işlevlere sahip olması
durumunda eski cihazı ücretsiz olarak bire bir kabul etmesi gereken satıcıya iade edebilirsiniz.
ENERJİ TASARRUFU VE ÇEVREYE SAYGI
Mümkün olduğunda, fırını önceden ısıtmaktan kaçının ve her zaman doldurmaya çalışın. Fırın
kapağını olabildiğince az açın çünkü her açılışında ısı kaybı oluşur. Önemli oranda enerji tasarrufu
için, fırını planlanan pişirme süresinden 5 ile 10 dakika daha önce kapatın ve fırının üretmeye devam
edeceği artakalan ısıyı kullanın. Isının hazne dışına kaçmaması için contaları temiz ve düzgün tutun.
Eğer saatlik bir tarife ile ücretlendirilen bir elektrik sözleşmeniz varsa, pişirmeye başlama saatini
indirimli fiyat tarifesinin saatine taşıyan "gecikmeli pişirme" programı ile daha basit bir şekilde enerji
tasarrufu yapılabilir.
Fırın kapalıyken ana düğmenin etrafında hafif bir ışık olabilir. Bu davranış normaldir. Bu durum, prizin
baş aşağı çevrilerek takılması veya besleme terminallerinin değiştirilmesiyle giderilebilir.
1.6 Uygunluk beyanı
• Bu cihazın üzerinde bulunan işareti, mevzuata uygun şekilde bu ürün için geçerli olan tüm
Avrupa güvenlik, sağlık ve çevre gereksinimlerine uygunluğun garanti edildiği anlamına gelir.
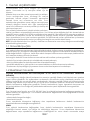
2. Ürün Açıklaması
2.1 Genel bakış
1.Kontrol paneli
2. Raf konumları
(eğer varsa yan tel raflar)
3. Metal ızgara
4. Tepsi
5. Fan (çelik plakanın arkasında)
6. Fırın kapağı
2.2 Aksesuarlar
Metal ızgara
1
Yiyeceklerin ızgara üzerinde pişirilmesi sırasında
damlayan sularını toplar.
Tepsi
2
Pişirme tepsilerini ve tabaklarını tutar.
1
2
3
4
6
5
5
10
15
20
25
30
35
40
45
50
55

5
10
15
20
25
30
35
40
45
50
55
Fonksiyon
ikonu
Fonksiyon (Fırın modeline bağlıdır)
LAMBA: Fırın lambasını yakar.
KONVEKSİYONEL: Hem üst, hem de alt ısıtıcı elemanlar kullanılır. Fırını yaklaşık on dakika
önceden ısıtın. Bu yöntem her türlü geleneksel kızartma ve fırında pişirme için idealdir.
Kırmızı etler, rosto, kuzu butu, ekmek, folyoya sarılmış yiyecekler (papillote), katmer içindir.
Gıdayı bir tabağın içinde orta rafın üzerine yerleştirin.
IZGARA: fırın kapağı kapalı iken bu fonksiyonu kullanın.
Üst ısıtıcı eleman tek başına kullanılır ve sıcaklık ayarı yapılabilir. Elemanların ısınması için
beş dakikalık ön ısıtma gereklidir. Izgaralar, kebaplar ve üstü örtülen yemeklerin
pişirilmesinde başarı garanti edilir. Beyaz etlerin ızgaradan biraz açıkta tutulması gereklidir;
pişirme süresi daha uzundur, ancak et daha lezzetli olacaktır. Kırmızı etleri ve balık filetolarını
altında damlama tepsisi ile rafın üzerine yerleştirin. Fırın iki ızgara konumuna sahiptir:
Izgara: 1800W Barbekü: 3000 W
Master bake (Master pişirme): Bu işlev, gereken katı veya sıvı yağ miktarını azaltarak daha
sağlıklı bir şekilde yemek pişirmenizi sağlar. Isıtma elemanlarının titreşimli hava döngüsüyle
birlikte kullanılması sayesinde mükemmel bir pişirme sonucu elde edersiniz.
ALTTAN ISITMA + FAN: Alt ısıtıcı eleman kullanılır, fan fırının içindeki havanın sirkülasyonunu
sağlar. Bu yöntem sulu meyveler, meyveli pastalar, turtalar, kişler ve etli börekler için idealdir.
Gıdaların kurumasını önler ve keklerin, ekmeklerin ve alttan pişirilen diğer gıdaların
kabarmasını fazlalaştırır. Rafı alt konuma yerleştirin.
*
KONVEKSİYON+ FAN: Bu yöntemi kümes hayvanları, çörekler, balık ve sebzeler için
kullanmanızı tavsiye ederiz. Isı gıdanın içine daha iyi işler ve hem pişirme, hem de ısıtma
süreleri azalır. Değişik gıdaları aynı veya farklı soslarla bir veya daha fazla konumda
pişirebilirsiniz. Bu pişirme yöntemi ısı yayılımının eşit olmasını sağlar ve kokular birbirine
karışmaz. Aynı anda farklı gıdalar pişirdiğiniz zaman fazladan yaklaşık on dakika daha bekleyin.
Sıcaklık
aralığı °C
50 ÷ MAX
50 ÷ MAX
50 ÷ MAX
50 ÷ MAX
50 ÷ MAX
*Enerji tüketimi beyanı ve enerji sınıfı için EN 60350-1'e uygun şekilde test edilmiştir
TR 20
2.3 İlk Kullanım
İLK TEMİZLEME
İlk kez kullanmadan önce fırını temizleyin. Dış yüzeyleri yumuşak bir ıslak bezle silin. Tüm aksesuarları
yıkayın ve fırının içini sabunlu su ve sıvı bulaşık deterjanı karışımına batırılmış bir bezle silin. Boş fırını
maksimum sıcaklık değerine ayarlayın ve yaklaşık 1 saat çalıştırın, bu şekilde fırının yeni olmasından
kaynaklı tüm kokular giderilecektir.
3. Fırının Kullanımı
3.1 Gösterge açıklamaları
3.2 Pişirme Modları
*
Sayfa yükleniyor...
Sayfa yükleniyor...
Sayfa yükleniyor...
Sayfa yükleniyor...
Sayfa yükleniyor...
Sayfa yükleniyor...
Sayfa yükleniyor...
Sayfa yükleniyor...
Sayfa yükleniyor...
Sayfa yükleniyor...
Sayfa yükleniyor...
Sayfa yükleniyor...
Sayfa yükleniyor...
Sayfa yükleniyor...
Sayfa yükleniyor...
Sayfa yükleniyor...
Sayfa yükleniyor...
Sayfa yükleniyor...
Sayfa yükleniyor...
Sayfa yükleniyor...
Sayfa yükleniyor...
Sayfa yükleniyor...
Sayfa yükleniyor...
Sayfa yükleniyor...
Sayfa yükleniyor...
Sayfa yükleniyor...
Sayfa yükleniyor...
Sayfa yükleniyor...
Sayfa yükleniyor...
Sayfa yükleniyor...
Sayfa yükleniyor...
Sayfa yükleniyor...
Sayfa yükleniyor...
Sayfa yükleniyor...
Sayfa yükleniyor...
Sayfa yükleniyor...
Sayfa yükleniyor...
Sayfa yükleniyor...
Sayfa yükleniyor...
Sayfa yükleniyor...
Sayfa yükleniyor...
Sayfa yükleniyor...
Sayfa yükleniyor...
Sayfa yükleniyor...
Sayfa yükleniyor...
Sayfa yükleniyor...
Sayfa yükleniyor...
Sayfa yükleniyor...
Sayfa yükleniyor...
Sayfa yükleniyor...
Sayfa yükleniyor...
-
 1
1
-
 2
2
-
 3
3
-
 4
4
-
 5
5
-
 6
6
-
 7
7
-
 8
8
-
 9
9
-
 10
10
-
 11
11
-
 12
12
-
 13
13
-
 14
14
-
 15
15
-
 16
16
-
 17
17
-
 18
18
-
 19
19
-
 20
20
-
 21
21
-
 22
22
-
 23
23
-
 24
24
-
 25
25
-
 26
26
-
 27
27
-
 28
28
-
 29
29
-
 30
30
-
 31
31
-
 32
32
-
 33
33
-
 34
34
-
 35
35
-
 36
36
-
 37
37
-
 38
38
-
 39
39
-
 40
40
-
 41
41
-
 42
42
-
 43
43
-
 44
44
-
 45
45
-
 46
46
-
 47
47
-
 48
48
-
 49
49
-
 50
50
-
 51
51
-
 52
52
-
 53
53
-
 54
54
-
 55
55
-
 56
56
-
 57
57
-
 58
58
-
 59
59
-
 60
60
-
 61
61
-
 62
62
-
 63
63
-
 64
64
-
 65
65
-
 66
66
-
 67
67
-
 68
68
-
 69
69
-
 70
70
-
 71
71


diğer dillerde
- svenska: Hoover HON602X/E/1 Användarmanual
- English: Hoover HON602X/E/1 User manual
- dansk: Hoover HON602X/E/1 Brugermanual
- suomi: Hoover HON602X/E/1 Ohjekirja