mothercare Chicco_Multifunctional Electric Kettle EASY MEAL Kullanici rehberi
- Tip
- Kullanici rehberi

CUOCIPAPPA
EASY MEAL
STEAM COOKER EASY MEAL
ROBOT CUISEUR EASY MEAL
MAHLZEITENKOCHER EASY MEAL
ROBOT DE COCINA EASY MEAL
COZE PAPA EASY MEAL
EASY MEAL STOOM KEUKENROBOT
ΠΟΛΥΣΥΣΚΕΥΉ ΜΑΓΕΙΡΕΜΑΤΟΣ EASY MEAL
BUHARLI PİŞİRİCİ EASY MEAL
ПАРОВАРКА CHICCO EASY MEAL


3
9
13
12
10
14
16
17
15
11
8
7
4
2
6
5
3
1

4
A
B
C
D

5
ISTRUZIONI PER L’USO
CuociPappa Easy Meal Chicco
Leggere attentamente prima dell’uso e conservare queste istruzioni per riferimento futuro.
AVVERTENZA DI SICUREZZA.ATTENZIONE!
• Questo apparecchio è destinato ad un utilizzo esclusivamente domestico
e deve essere utilizzato conformemente alle istruzioni d’uso. Ogni altro
uso è da considerarsi improprio e quindi pericoloso. Non ne è previsto l’u-
so in: ambienti adibiti a cucina per il personale di negozi, uci e altre aree
di lavoro, agriturismi, hotel, motel e altre strutture ricettive, atta camere.
Il costruttore non potrà essere ritenuto responsabile di eventuali danni de-
rivanti da uso improprio, erroneo e irresponsabile.
• Questo apparecchio è solo per uso interno, non deve pertanto essere
esposto a sole, pioggia ed altri agenti atmosferici.
• Questo apparecchio non deve essere utilizzato da bambini o da persone
con ridotte capacità mentali, o prive di esperienza o della necessaria co-
noscenza. Il prodotto può essere utilizzato da persone con ridotte capacità
siche o sensoriali purché sotto sorveglianza oppure dopo che le stesse
abbiano ricevuto istruzioni relative all’uso sicuro dell’apparecchio ed ab-
biano compreso i pericoli ad esso inerenti. Nel caso in cui l’apparecchio
venga ceduto dall’acquirente o adato a utilizzatori terzi, è necessario che
gli stessi ricevano istruzioni relative all’uso sicuro dell’apparecchio ed ab-
biano compreso i pericoli ad esso inerenti, attraverso la lettura del manua-
le d’uso ed in particolare delle avvertenze di sicurezza in esso contenute
che dovranno sempre accompagnare l’apparecchio.
• La pulizia e la manutenzione destinata ad essere eettuata dall’utilizzatore
non deve essere eettuata da bambini.
• Al ne di prevenire la proliferazione batterica delle preparazioni, si rac-
comanda di consumare la pappa subito dopo la sua preparazione o di
conservarla adottando la modalità più opportuna in base alla tipologia
dell’alimento. Non conservare il cibo direttamente nel boccale.
• Tenere l’apparecchio ed il suo cavo di alimentazione fuori dalla portata dei
bambini.
• Assicurarsi che i bambini non giochino con l’apparecchio.
• Non tirare il cavo di alimentazione o l’apparecchio stesso per staccare la
spina dalla presa di corrente.
• Attenzione: per motivi di sicurezza, l’apparecchio deve sempre essere col-
legato ad un impianto provvisto di un eciente collegamento di terra.
• Prima di avviare la fase di riscaldamento e cottura a vapore, assicurarsi che

6
il foro di uscita del vapore (6) non sia ostruito.
• Non rimuovere mai il coperchio (13) del boccale (10) durante la cottura
o la macinatura. Liquidi bollenti potrebbero fuoriuscire improvvisamente
causando scottature e/o ustioni.
• Durante la fase di riscaldamento e cottura a vapore, dal boccale fuoriesce
vapore bollente che potrebbe essere causa di scottature. La caldaia e tutte
le parti a contatto con il vapore diventano molto calde: prestare sempre la
massima attenzione e manipolare con cautela.
• Non aprire o cercare di aprire il tappo caldaia (14) ad apparecchio acceso e/o in
funzione, pericolo di ustione.
• Prima di aprire/rimuovere il tappo caldaia (14), spegnere l’apparecchio ed at-
tendere almeno 10 minuti.
• Disconnettere sempre l’apparecchio dalla presa di corrente quando non è
in uso, durante il montaggio/smontaggio del prodotto e durante la pulizia
• Assicurarsi che la spina di alimentazione sia sempre staccata dalla presa di
corrente e che l’apparecchio sia completamente freddo prima di spostar-
lo, riporlo, pulirlo, fare operazioni di manutenzione.
• Rimuovere sempre la spina del cavo di alimentazione dalla presa di corrente
prima di accedere alle lame (11).
• ATTENZIONE: non azionare le lame (11) per un periodo di tempo superiore
a 10 secondi ed attendere almeno 10 secondi tra un azionamento e l’altro.
• Fare sempre particolare attenzione quando si maneggiano le lame (8 e 11)
in quanto molto taglienti.
• ATTENZIONE: non lavare le lame (11) in lavastoviglie, perché l’ambiente
umido all’interno di questa, unito alla presenza di sali, può provocare feno-
meni ossidanti.
• Non immergere o bagnare mai il corpo del CuociPappa (1) ed il cavo di ali-
mentazione con acqua o altri liquidi. Mai porre la base sotto l’acqua corrente.
• Per la pulizia del prodotto attenersi scrupolosamente a quanto riportato al
paragrafo VI. “PULIZIA E MANUTENZIONE”.
• Se il cavo di alimentazione è danneggiato, per la sua sostituzione rivolgersi
esclusivamente ad Artsana S.p.A., in modo da prevenire ogni rischio.
• Queste istruzioni sono disponibili sul sito www.chicco.com.
ATTENZIONE: Il mancato rispetto di queste istruzioni può essere fonte di lesioni e di danni all’apparecchio. Il
costruttore non risponde per danni derivanti dal mancato rispetto di queste istruzioni. Apparecchio, accessori ed elementi
dell’imballaggio non sono giocattoli e non devono essere lasciati alla portata dei bambini.
Attenzione: l’uso di qualsiasi apparecchio elettrico comporta l’osservanza di alcune regole fondamentali. In particolare:
- l’installazione elettrica del locale deve essere conforme alle norme di sicurezza vigenti;
- Il voltaggio e la frequenza (vedi dati di targa sotto l’apparecchio) devono corrispondere a quelli della rete elettrica.
- Non utilizzare mai con mani bagnate o umide né a piedi nudi o bagnati o in prossimità di getti d’acqua. Attenzione: non
toccare l’apparecchio se cade in acqua; staccare subito la spina e non utilizzare successivamente, ma rivolgersi a persona-
le competente e qualicato o ad Artsana S.p.A..

7
- In caso di guasto e/o cattivo funzionamento: spegnere l’apparecchio, staccare la spina dalla presa di corrente e rivolgersi
esclusivamente a personale competente e qualicato o al servizio consumatori Artsana S.p.A.. Non tentare di aprirlo o
ripararlo.
- E’ sconsigliabile l’uso di adattatori, prese multiple e/o prolunghe, se necessario utilizzare esclusivamente prodotti confor-
mi alle vigenti norme di sicurezza, senza superare il limite di potenza indicato sull’adattatore e/o prolunga.
- Posizionare sempre l’apparecchio su superci piane e stabili, lontano da apparecchi o materiali delicati, sensibili al calore,
al vapore e all’umidità. Non appoggiare mai sopra o vicino a superci calde, cucine a gas o piastre elettriche.
- Non lasciare mai l’apparecchio incustodito mentre è in funzione.
- Non coprire mai l’apparecchio durante il funzionamento o quando è ancora caldo.
- Prima di ogni utilizzo vericare che tutti i componenti (in particolare il boccale e la base) siano correttamente assemblati
ed assicurarsi che il tappo della caldaia sia chiuso correttamente.
- Assicurarsi che mani, capelli, abiti e utensili da cucina siano fuori dal boccale prima di mettere in funzione l’apparecchio.
- Non versare mai nella caldaia liquidi diversi da acqua potabile di rubinetto o sostanze diverse da quelle previste al paragrafo
VII “MANUTENZIONE DELLA CALDAIA”.
- Durante il ciclo di riscaldamento/cottura l’eventuale fuoriuscita di vapore dai bordi del tappo caldaia (14) o dal condotto
di sfogo del vapore (16), indica un’anomalia funzionale nel circuito del vapore: NON aprire o rimuovere il tappo caldaia
(14), ma spegnere immediatamente, lasciar rareddare completamente, non riutilizzare più l’apparecchio e rivolgersi a
personale competente e qualicato o ad Artsana S.p.A..
- Non utilizzare il prodotto in caso di perdita di liquido dal corpo, nel caso spegnerlo immediatamente e rimuovere la spina
dalla presa di corrente.
- Al termine del ciclo di cottura e ad apparecchio caldo, rimuovere il coperchio (13) prestando attenzione ai vapori bollenti,
per evitare scottature. L’impugnatura del cestello per cottura alimenti potrebbe essere molto calda.
- Per evitare di danneggiare le lame, si sconsiglia di utilizzare questo apparecchio per tritare alimenti particolarmente duri,
come ad esempio cibi ancora surgelati.
- In caso di dubbi sull’interpretazione del contenuto del presente libretto di istruzioni contattare il rivenditore o Artsana S.p.A..
ARTSANA si riserva il diritto di modicare in qualsiasi momento e senza preavviso quanto descritto nel presente manuale
d’istruzioni.
La riproduzione, la trasmissione, la trascrizione nonché la traduzione in altra lingua anche parziale in qualsiasi forma di
questo manuale, sono assolutamente vietate senza la previa autorizzazione scritta da parte di ARTSANA S.p.A..
LEGENDA SIMBOLI
Apparecchio conforme ai requisiti essenziali delle Direttive CE applicabili
ATTENZIONE!
Istruzioni per l’uso
ATTENZIONE! Vapore bollente
Leggere il manuale di istruzioni per l’uso
Attenzione! Supercie calda
Non smaltire questo prodotto o i suoi componenti come riuto urbano, ma operare la raccolta dierenziata facen-
do riferimento alle speciche legislazioni vigenti in ogni paese.
IT - CuociPappa Easy Meal
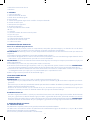
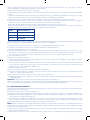
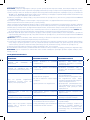
I. CONTENUTO DELLA CONFEZIONE
1 Corpo CuociPappa
1 Coperchio boccale
1 Boccale con manico
1 Cestello basculante Switch System per la cottura degli alimenti
1 Cut Express con accessorio proteggi-dita
1 Gruppo lame
1 Manuale istruzioni d’uso
1 Ricettario
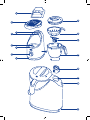
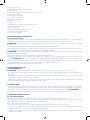
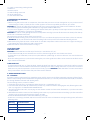
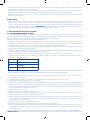
II. LEGENDA
1. Corpo/caldaia
Apparecchio certicato e approvato da IMQ (Istituto Italiano del Marchio di Qualità)

8
2. Zona avvolgi cavo
3. Manopola accensione/spegnimento
4. Led luminoso
5. Sistema di aggancio sicuro delle lame al corpo/caldaia
6. Foro uscita vapore
7. Interruttori di sicurezza
8. Accessorio Cut Express
9. Tampone proteggi-dita
10. Boccale
11. Lame
12. Cestello basculante di cottura Switch System
13. Coperchio del boccale
14. Tappo caldaia
15. Foro di riempimento della caldaia
16. Condotto di sfogo del vapore
17. Cavo non rimovibile
III. PREPARAZIONE DEL PRODOTTO
Prima del primo utilizzo:
1) Prima di usare il prodotto e tutti i suoi componenti vericare che siano integri e non danneggiati. In caso di danneggia-
menti visibili o di dubbio non utilizzare l’apparecchio e rivolgersi a personale qualicato o al rivenditore.
ATTENZIONE: l’imballo e tutte le sue parti devono essere sempre tenute fuori dalla portata dei bambini per ragioni di
sicurezza.
2) Assemblare l’apparecchio facendo riferimento al paragrafo IV “ISTRUZIONI PER L’USO”.
3) Per ragioni igieniche, eseguire un ciclo di cottura senza cibo (con un quantitativo di acqua equivalente al livello 3 indica-
to sul boccale), facendo riferimento al paragrafo Va “COTTURA A VAPORE”.
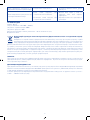
ATTENZIONE: non riempire la caldaia direttamente dal rubinetto per evitare di bagnare parti elettriche (g. D) e non
utilizzare acqua demineralizzata.
Alla prima accensione l’apparecchio potrebbe emanare un leggero odore.
4) Al termine del ciclo di cottura, ruotare la manopola (3) su OFF (“O”) e lasciare rareddare l’apparecchio (almeno 15 mi-
nuti). ATTENZIONE: non avviare le lame perché l’acqua bollente potrebbe uscire dal boccale procurando scottature.
5) Staccare il cavo di alimentazione dalla presa di corrente. Lavare tutti i componenti lavabili con acqua tiepida ed un co-
mune detergente per piatti, passare un panno umido sulla supercie della base.
6) Rimuovere l’acqua residua presente nella caldaia (g. C).
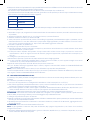
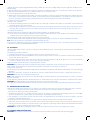
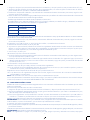
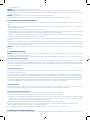
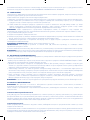
IV. ISTRUZIONI PER L’USO
IL GRUPPO BOCCALE
ATTENZIONE: rimuovere il boccale e il coperchio solo se la manopola (3) è posta in corrispondenza di OFF (“O”).
- Per agganciare il boccale (10), inserirlo sulla base e farlo ruotare in senso orario (g. B). Ruotarlo in senso antiorario per
sganciarlo.
- Per chiudere il coperchio (13) del boccale, inserirlo facendo coincidere i simboli di riferimento (g. A) e ruotarlo in senso
orario. Ruotarlo in senso antiorario per rimuoverlo.
- Posizionare il cestello di cottura (12) all’interno del boccale, inserendo i perni nelle guide che ne consentono la rotazione
per il ribaltamento del cibo all’interno del boccale sottostante.
IL GRUPPO LAME
- Per rimuovere il gruppo lame (11) dal boccale staccare il boccale dalla base, aerrare con cautela il gruppo lame dall’ester-
no del boccale e ruotarlo in senso orario. Estrarre il gruppo lame, aerrandolo dall’alto, facendo attenzione a non tagliarsi.
Per ssare il gruppo lame compiere l’operazione inversa, nché non risulta saldamente agganciato. ATTENZIONE: quan-
do le lame non sono inserite nel boccale, proteggerle e riporle al sicuro fuori dalla portata dei bambini.
V. PREPARAZIONE DELLA PAPPA
Va - COTTURA A VAPORE
Easy Meal cuoce a vapore frutta, verdura, carne e pesce, conservandone l’apporto nutrizionale.
Non utilizzare mai la funzione cottura senza aver correttamente avvitato il gruppo lame (11) al boccale (10) e senza aver
precedentemente riempito la caldaia con acqua potabile fredda.
Per la cottura, procedere come segue:
1. Assicurarsi che l’apparecchio sia scollegato dalla rete elettrica e che la manopola (3) sia su OFF (“O”).
2. Assicurarsi che il foro di uscita del vapore (6) non sia ostruito; se necessario, disostruirlo senza danneggiare la guarnizione,
facendo riferimento al paragrafo VI. “PULIZIA E MANUTENZIONE”.
3. Svitare il tappo della caldaia (14) eseguendo due movimenti distinti di rotazione ed estrazione, secondo le indicazioni
riportate sul prodotto.

9
4. Riempire la caldaia con il quantitativo di acqua potabile fredda necessario ad eettuare il ciclo di cottura desiderato. La durata del
ciclo di cottura aumenta con il quantitativo di acqua inserito.
- Non utilizzare acqua demineralizzata né con additivi (come ad esempio sale, zucchero ecc).
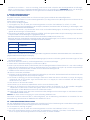
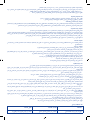
- E’ possibile utilizzare il boccale (10) come misurino, grazie alle 3 tacche presenti per dosare l’acqua e determinare i tempi
medi di cottura, con riferimento alla tabella seguente.
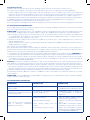
Tacca Tempo indicativo*
1 13 minuti
2 25 minuti
3 30 minuti
* Tempi indicativi con prodotto nuovo alimentato alla tensione di rete di 230Vac. Questi tempi possono variare anche sensibilmente in caso di valori di alimentazione
dierenti o non adeguata pulizia.
5. Richiudere il tappo (14), eseguendo due movimenti distinti di inserimento e rotazione, secondo le indicazioni riportate
sul prodotto.
6. Agganciare il boccale (10) alla base (1), con il gruppo lame (11) inserito all’interno.
7. Inserire il cestello basculante (12) nel boccale (10).
8. Senza pressare né superare il bordo, inserire nel cestello gli ingredienti precedentemente tagliati a pezzettini (con di-
mensione inferiore ad 1 cm). Per velocizzare la preparazione degli ingredienti è possibile utilizzare l’accessorio Cut Ex-
press (8) con l’apposito proteggi dita (9), dopo averlo saldamente agganciato al boccale.
9. Chiudere il coperchio (13) del boccale.
10. Collegare l’apparecchio alla presa di corrente.
11. Attivare la funzione di cottura ruotando la manopola (3) verso destra. Un led luminoso si accende ed entro alcuni minuti
l’apparecchio inizierà a produrre vapore.
12. Il tempo di cottura dipende dalla quantità di acqua inserita nella caldaia. Esaurita l’acqua, il processo si arresta auto-
maticamente e si attiva un segnale acustico. Per fermarlo, spegnare l’apparecchio, riposizionando la manopola (3) su
OFF (“O”).
13. Scollegare la spina dalla presa di corrente.
14. Rimuovere il coperchio (13) dal boccale (10) e vericare la cottura degli ingredienti.
15a. Se non si desidera frullare gli ingredienti dopo la cottura, estrarre il cestello (12) con l’apposita maniglia e versarne il
contenuto in un piatto, facendo attenzione a non scottarsi.
Il liquido di cottura depositato sul fondo del boccale può esser conservato.
15b. Se si desidera frullare gli ingredienti dopo la cottura, seguire le istruzioni della sezione Vb “OMOGENEIZZAZIONE/
FRULLATURA” di seguito.
Nota: prima di eettuare una nuova cottura, lasciar rareddare l’apparecchio completamente.
Svuotare completamente la caldaia dopo l’uso (g. C) per evitare la proliferazione di batteri. Per eettuare la pulizia antical-
care, seguire la sezione VII “MANUTENZIONE DELLA CALDAIA”.
Vb - OMOGENEIZZAZIONE/FRULLATURA
Il CuociPappa Easy Meal permette di omogeneizzare/frullare con diverse consistenze tutti gli alimenti utilizzati per lo svez-
zamento.
Per la frullatura, procedere come segue:
1. assicurarsi che l’apparecchio sia scollegato dalla rete elettrica e che la manopola sia su OFF (“O”).
2a. Per frullare ingredienti precedentemente cotti a vapore, ruotare il cestello basculante (12) per rovesciarne il contenuto
nel boccale, rimuovere il cestello e richiudere il coperchio (13).
2b. Per frullare ingredienti a freddo, inserirli tagliati a pezzettini direttamente all’interno del boccale (10) sulle lame (11). È
anche possibile utilizzare l’accessorio Cut Express per tagliare il cibo direttamente nel boccale .
Aggiungere un adeguato quantitativo di acqua per permettere una corretta omogeneizzazione/frullatura.
ATTENZIONE: non inserire mai nel boccale alimenti duri, congelati o una quantità di cibo superiore a quella massima
indicata (MAX), né pressare gli alimenti, per non danneggiare irreparabilmente le lame.
3. Collegare l’apparecchio alla presa di corrente.
4. Ruotare la manopola (3) verso sinistra nella posizione di frullatura mantenendola in questa posizione per massimo 10 secondi e
rilasciarla, per non compromettere il motore.
5. Ripetere questa operazione no ad ottenere la consistenza desiderata, ad intervalli di 10 secondi, aggiungendo se ne-
cessario del liquido.
ATTENZIONE: NON inserire olio direttamente nel boccale.
Nota: Se gli ingredienti si attaccano alle pareti del boccale (10), spegnere l’apparecchio e, con l’aiuto di un cucchiaio,
spingerli verso le lame.
6. Al termine dell’omogeneizzazione/frullatura, sganciare il boccale (10) dalla base (1), rimuovere il coperchio (13) e rove-
sciare il contenuto del boccale nel piatto.

10
ATTENZIONE: non inserire le mani nel boccale per evitare di ferirsi con le lame.
Si raccomanda di vericare sempre la temperatura degli alimenti e di uniformarla mescolandoli un po’ prima di sommini-
strarli al bambino.
Vc - RISCALDAMENTO E SCONGELAMENTO
Il CuociPappa Easy Meal consente di riscaldare e scongelare alimenti a pezzetti o pappe preparate in precedenza.
- Per riscaldare o scongelare alimenti a pezzetti, seguire le istruzioni descritte alla sezione Va “COTTURA A VAPORE”.
- Per riscaldare o scongelare pappe conservate:
1. la pappa deve essere posta in un contenitore adatto, da posizionare senza coperchio nel cestello per la cottura (12). Il
contenitore da 180ml della Linea System di Chicco (venduto separatamente) è compatibile con il prodotto.
2. Inserire nella caldaia da 1 a 3 livelli d’acqua secondo la quantità da riscaldare/scongelare per poi procedere come per il
ciclo di cottura.
Il tempo necessario per scongelare o riscaldare varia a seconda della temperatura iniziale e della quantità della pappa.
3. Quando il segnale acustico si attiva al temine del ciclo, estrarre con attenzione il recipiente usando un panno per evitare
di scottarsi e mescolarne il contenuto per uniformare la temperatura. Vericare sempre che la pappa non sia troppo
calda prima di somministrarla al bambino.
ATTENZIONE: per motivi di ordine igienico e biologico non riscaldare mai i cibi più di una volta o per un periodo di tempo
superiore ad un’ora.
VI. PULIZIA E MANUTENZIONE
ATTENZIONE: tutte le operazioni di pulizia e manutenzione devono essere eettuate ad apparecchio spento, freddo e
con la spina non collegata alla corrente.
Al termine di ogni ciclo di cottura/omogeneizzazione/frullatura/riscaldamento si consiglia di pulire l’apparecchio come
indicato di seguito.
Pulizia del boccale e degli accessori.
Il boccale (10) e gli altri accessori in plastica: coperchio (13), cestello di cottura (12), accessorio Cut Express (8) e tampone
proteggi-dita (9) possono essere lavati a mano con un comune detergente per piatti (non utilizzare prodotti abrasivi o decal-
cicanti) o in lavastoviglie. Si raccomanda di lavare il boccale solo dopo aver rimosso il gruppo lame.
Pulizia del gruppo lame.
Per evitare/ridurre l’ossidazione e la corrosione delle lame, la pulizia e l’asciugatura del gruppo lame (11) deve essere sem-
pre eettuata subito dopo ogni utilizzo.
Rimuovere il gruppo lame dal boccale seguendo le istruzioni fornite e pulirlo con acqua saponata, facendo molta attenzione alla
parte tagliente. Detergenti aggressivi, come candeggina o varechina, possono intaccare l’acciaio, macchiandolo e ossidandolo
irreparabilmente. Evitare l’uso di detersivi che contengano cloro o suoi composti. Risciacquare abbondantemente con acqua
corrente e asciugare subito con un panno non abrasivo. ATTENZIONE: NON lavare le lame in lavastoviglie per non rovinarle.
Non rimuovere la guarnizione del gruppo lame, nel caso riposizionarla accuratamente nella sua sede.
Pulizia della base.
Non inserire la base (1) in lavastoviglie o sotto l’acqua corrente o immergerla in altri liquidi. Se necessario pulirla con un
panno umido. Non inserire il tappo della caldaia (14) in lavastoviglie.
Risciacquo caldaia.
Rimuovere sempre l’eventuale acqua rimasta nella caldaia inclinando gradualmente l’apparecchio (g. C).
Nel caso di non utilizzo per un tempo superiore alle 8 ore, eettuare una rapida pulizia interna:
a) Riempire la caldaia di sola acqua potabile fredda di rubinetto (g. D), facendo riferimento alla tacca 2 presente sul bocca-
le, richiudere il tappo caldaia (14) e agitare, quindi rimuovere il tappo e svuotare tenendo chiuso il foro di uscita vapore
(6) ed inclinando gradualmente l’apparecchio, per far deuire l’acqua (g. C).
Prestare attenzione a che l’acqua non entri nell’alloggiamento del coperchio della caraa, presso gli interruttori di sicurezza (7).
b) Pulire adeguatamente la zona vicino al foro di uscita vapore accertandosi che non sia ostruito.
Dopo le operazioni di pulizia asciugare accuratamente il prodotto con un panno.
Se necessario, eseguire la procedura di decalcicazione come indicato nel paragrafo seguente.
VII. MANUTENZIONE DELLA CALDAIA
Per garantire un corretto funzionamento del prodotto e il mantenimento della caldaia è necessario eseguire periodica-
mente un ciclo di completa decalcicazione.
IMPORTANTE: la formazione di depositi di calcare è direttamente proporzionale alla durezza dell’acqua utilizzata. Eettua-
re la manutenzione della caldaia almeno ogni 15 giorni o prima di riporre l’apparecchio per lunghi periodi.
a) Ad apparecchio completamente freddo e scollegato dalla presa elettrica, posizionare la manopola (3) su OFF (“O”). IM-
PORTANTE. Se il prodotto non è adeguatamente rareddato, all’interno della caldaia potrebbero essere presenti vapori
e/o acqua bollente: fare attenzione a non scottarsi.
b) Svuotare completamente la caldaia, inclinando gradualmente l’apparecchio (g. C), come descritto nella sezione “RI-

11
SCIACQUO CALDAIA”.
c) Riempire il boccale no alla tacca 1 con acqua potabile fredda di rubinetto ed aggiungere aceto bianco di vino no al
raggiungimento della tacca 3.
Versare la soluzione cosi ottenuta nella caldaia.
Non utilizzare mai acqua demineralizzata né prodotti decalcicanti (liquidi, polveri, pastiglie, ecc.) che potrebbero conte-
nere sostanze tossiche o non idonee al contatto con gli alimenti. Non versare mai liquidi e/o soluzioni diverse da quella
indicata, perché potrebbero danneggiare l’apparecchio irreparabilmente.
d) Richiudere il tappo della caldaia (14) e lasciare agire la soluzione per almeno 10 ore. ATTENZIONE! Non accendere mai
l’apparecchio quando all’interno della caldaia è presente la soluzione decalcicante.
e) Dopo almeno 10 ore, agitare leggermente il prodotto, rimuovere il tappo caldaia (14) e svuotarla tenendo chiuso il foro
di uscita vapore (6) inclinando gradualmente l’apparecchio, (g. C) come descritto nella sezione “RISCIACQUO CALDAIA”.
Nota: l’eventuale fuoriuscita di residui, anche di colore scuro, è assolutamente normale in quanto sono i depositi dei sali
disciolti nell’acqua che vengono rimossi dalla soluzione decalcicante.
f) Sciacquare più volte la caldaia no a quando non fuoriescono più residui: inserire 2 tacche di sola acqua fredda potabile
di rubinetto (g. D), chiudere il tappo caldaia (14), agitare brevemente l’apparecchio, quindi rimuovere il tappo e, mante-
nendo chiuso il foro di uscita del vapore (6), svuotare tutta l’acqua contenuta, inclinando l’apparecchio (g. C).
g) Asciugare accuratamente l’eventuale acqua in prossimità sia del foro di uscita del vapore che della base.
In caso di depositi di calcare particolarmente resistenti e/o abbondanti, ripetere l’operazione aumentando la percentuale
di aceto.
IMPORTANTE. Durante la pulizia non tentare di rimuovere e/o danneggiare le guarnizioni del tappo caldaia (14) e dell’u-
scita vapore (6).
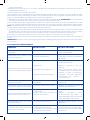
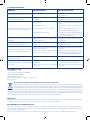
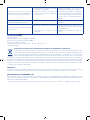
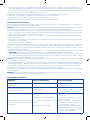
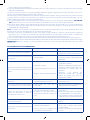
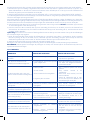
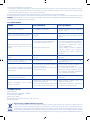
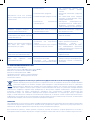
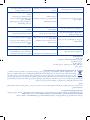
VIII. ANOMALIE DI FUNZIONAMENTO
PROBLEMA POSSIBILI CAUSE POSSIBILE SOLUZIONE
L’apparecchio o il led non si
accendono.
• Spina non inserita correttamente. • Controllare che la spina sia collegata
alla presa di corrente.
L’apparecchio non macina o non
parte il ciclo di cottura.
• Il boccale o il coperchio non sono
sistemati correttamente.
• Posizionare correttamente boccale e
coperchio per attivare gli interruttori
di sicurezza.
Durante la macinatura cattivo odore o
eccessivo rumore dal gruppo motore.
• Prodotto nuovo.
• Troppo cibo.
• Cibo troppo duro nel boccale.
• Tempi di macinatura prolungati.
• Durante i primi utilizzi questa
condizione è normale.
• Ridurre la quantità di cibo nel
boccale.
• Non macinare cibi troppo duri;
scongelare il cibo prima di macinarlo.
• Attenersi ai tempi di macinatura
consigliati, lasciando rareddare
l’apparecchio per evitarne il
surriscaldamento.
Fuoriuscita di pappa dal boccale
durante la macinatura.
• Troppo cibo o cibo troppo liquido
nel boccale.
• Ridurre la quantità di cibo o di liquido
nel boccale.
L’apparecchio impiega troppo tempo
per produrre vapore o non lo produce.
• Accumulo di calcare nella caldaia. • Eseguire le operazioni di pulizia e
manutenzione della caldaia.
Uscita vapore dalla zona tappo caldaia,
o dal condotto di sato posteriore.
• Il tappo caldaia non è inserito o non
è chiuso bene.
• Il foro uscita vapore è ostruito da
residui di cibo o calcare.
• Collocare il tappo caldaia e chiuderlo
bene.
• Eseguire le operazioni di pulizia
e manutenzione della caldaia. Se
necessario, liberare il foro uscita vapore
senza danneggiare la guarnizione.
Al termine della cottura non si apre il
tappo della caldaia.
• Surriscaldamento eccessivo. • Attendere qualche minuto, lasciare
rareddare.
Al termine della cottura, presenza di
acqua sotto l’apparecchio.
• Gruppo lame mancante o non
correttamente posizionato.
• Guarnizione lame mancante o non
correttamente posizionata.
• Inserire il gruppo lame nel boccale
e ruotarlo no a ssarlo saldamente.
• Vericare presenza e posizione della
guarnizione.

12
IX. DATI TECNICI
Modello: 06776
Tensione di alimentazione: 220-240V~, 50/60Hz
Potenza caldaia: 500W
Potenza motore: 130W
Cicli di funzionamento frullatore: 10 s ON – 10 s OFF (“O”)
Made in China
Questo prodotto è conforme alla Direttiva 2012/19/UE e successive modifiche.
Il simbolo del cestino barrato riportato sull’apparecchio indica che il prodotto, alla ne della propria vita utile, do-
vendo essere trattato separatamente dai riuti domestici, deve essere conferito in un centro di raccolta dieren-
ziata per apparecchiature elettriche ed elettroniche oppure riconsegnato al rivenditore al momento dell’acquisto
di una nuova apparecchiatura equivalente. L’utente è responsabile del conferimento dell’apparecchio a ne vita
alle appropriate strutture di raccolta. L’adeguata raccolta dierenziata per l’avvio successivo dell’apparecchio dismesso al
riciclaggio, al trattamento e allo smaltimento ambientalmente compatibile contribuisce ad evitare possibili eetti negativi
sull’ambiente e sulla salute e favorisce il riciclo dei materiali di cui è composto il prodotto. Lo smaltimento abusivo del
prodotto da parte dell’utente comporta sanzioni amministrative stabilite per legge. Per informazioni più dettagliate ine-
renti i sistemi di raccolta disponibili, rivolgersi al servizio locale di smaltimento riuti, o al negozio in cui è stato eettuato
l’acquisto.
GARANZIA
Per la garanzia sui difetti di prodotto si rinvia alle speciche previsioni delle normative nazionali applicabili nel Paese d’ac-
quisto, dove previste. La garanzia non copre i componenti soggetti a normale usura.
DICHIARAZIONE DI CONFORMITA’ UE:
Con la presente Artsana S.p.A. dichiara che questo apparecchio marca Chicco mod. 06776 è conforme ai requisiti essenziali
e alle altre disposizioni pertinenti stabilite dalle Direttive 2014/30/UE (compatibilità elettromagnetica), 2014/35/UE (sicu-
rezza elettrica) e 2011/65/UE (RoHS).
Copia integrale della dichiarazione UE può essere richiesta ad Artsana S.p.A. Via S. Catelli 1 – 22070 Grandate (CO) Italy

13
INSTRUCTIONS
Chicco Easy Meal Steam Cooker
Please read these instructions carefully before use and keep for future reference.
SAFETY WARNING.
WARNING!
• This product is intended for domestic use only, and must be used in
accordance with the user instructions provided. Any other use is to be
deemed improper and therefore dangerous. It is not intended to be used
in: rooms used as a kitchen for sta in shops, oces and other work are-
as, hotels, motels and other accommodation facilities, rooms for rent. The
manufacturer is not responsible for any damage caused by improper, in-
correct or irresponsible use.
• The appliance is intended for indoor use only; do not leave it exposed to
the sun, rain and any other atmospheric conditions.
• This appliance should not be used by children or persons with reduced
mental capabilities, or not possessing the required experience or knowl-
edge. The product can be used by persons with reduced physical or sen-
sory capacities as long as they are supervised or after they have received
instructions for the safe use of the appliance, and have understood the
hazards involved. In the event the appliance is sold by the purchaser or
given to third party users, they must receive the instructions for the safe
use of the appliance and have understood the hazards involved by read-
ing the user manual and, in particular, the safety warnings contained in it,
which should always accompany the appliance.
• The cleaning and maintenance to be performed by the user must not be
carried out by children.
• In order to prevent the proliferation of bacteria in the baby food, it should
be consumed immediately following preparation or stored using the most
appropriate method depending on the type of food. Do not use the bowl
to store food.
• Keep the appliance and its supply cord out of the reach of children.
• Make sure that children do not play with the appliance.
• Do not pull on the power cable or the appliance to unplug the appliance
from the mains.
• Warning: for safety reasons the appliance must always be connected to an
electricity system which has ecient earthing connections.
• Make sure the steam outlet (6) is not obstructed prior to warming or
steaming.

14
• Never remove the lid (13) of the bowl (10) during cooking or blending.
Boiling liquids could leak out suddenly, causing scalding and/or burning.
• During warming and steaming, hot steam is released from the bowl that
could cause burns. The water tank and all parts in contact with the steam
become very hot: always pay maximum attention when using and han-
dling this product.
• Do not open or attempt to open the lid of the water tank (14) when the
appliance is on and/or in use, danger of burns.
• Always switch the appliance o and wait for at least 10 minutes before
opening/removing the water tank cap (14).
• Always disconnect the device from the power socket when it is not in use,
during assembly/disassembly of the product and during the cleaning.
• Check that the power cable is always unplugged from the mains socket
and that the appliance is completely cold before moving it, cleaning it,
storing it or carrying out maintenance work.
• Always disconnect the plug from the mains socket before touching the
blades (11).
• WARNING: do not operate the blades (11) for more than 10 seconds and
wait at least 10 seconds between one operation and the next.
• Always pay attention when handling the blades (8 and 11) as they are very sharp.
• WARNING: do not place the blades (11) in the dishwasher as its humid
environment, combined with the cleaning salts, can cause rusting.
• Do not immerse or wet the body of the Steam Cooker (1) or the power ca-
ble with water or other liquids. Never place the base under running water.
• These instructions are available at www.chicco.com
• To clean the product closely follow the instructions provided in paragraph
VI. “CLEANING AND MAINTENANCE”.
• If the power supply cable is damaged, contact only Artsana S.p.A. for its
replacement, so as to avoid any risks.
WARNING: Failure to follow these instructions could lead to injury and damage to the appliance. The manufacturer
is not liable for damage/injury resulting from failure to follow these instructions. The appliance, accessories and packaging
are not toys and must be kept out of the reach of children.
Warning: the use of any electrical appliance calls for the awareness of some basic rules. In particular:
- The electrical system where the appliance is used must conform to all safety regulations in force;
- The voltage and frequency (see data plate located underneath the appliance) must correspond to those of the mains.
- Never use with wet or damp hands or bare or wet feet or near jets of water. Warning: do not touch the appliance if it falls
into water; unplug it immediately and do not use it again. Contact trained, qualied personnel or Artsana S.p.A..
- If it is faulty and/or does not work properly: switch o and unplug the appliance, and contact trained, qualied personnel or
Artsana S.p.A. customer services. Do not attempt to open or repair it.
- The use of adaptors, power strips and/or extensions is not advisable; if necessary, only use products that comply with
safety standards in force and do not exceed the power limit indicated on the adaptor and/or extension.
- Always position the appliance on at, stable surfaces, at a safe distance from delicate appliances or materials that may be
sensitive to heat, steam or humidity. Never place on or near hot surfaces, gas stoves or electric hot plates.
- Never leave the appliance unattended when it is switched on.
- Never cover the appliance when it is being used or when it is still hot.

15
- Before use, check that all components (in particular the bowl and the base) are properly assembled and make sure that
the water tank lid is closed correctly.
- Make sure that there are no hands, hair, clothes or kitchen utensils in the bowl before operating the appliance.
- Never ll the water tank with liquids other than drinking tap water or substances dierent to those listed in paragraph VII
“BOILER MAINTENANCE”.
- During the warming/cooking cycle, if steam comes out from under the sides of the water tank lid (14) or the steam outlet
tube (16) this indicates that there is an operating fault in the steam circuit: DO NOT open or remove the water tank lid
(14). Turn the appliance o immediately and leave it to cool down completely. Do not reuse and contact trained, qualied
personnel or Artsana S.p.A..
- Do not use the product if liquid is leaking from the appliance body. In this case, turn o the appliance immediately and
unplug it.
- At the end of the cooking cycle and while the appliance is still hot, remove the lid (13) paying particular attention to the
hot steam in order to prevent scalding. The handle of the cooking basket may be very hot.
- To prevent damage to the blades, using this appliance to chop very hard food such as, for instance, frozen food, is not
recommended.
- If you have any doubts about the content of this instruction manual, please contact your dealer or Artsana S.p.A..
ARTSANA reserves the right to change what is described in this instruction manual at any time and without notice.
The reproduction, transmission, copying, as well as the translation into another language, of any part of these instructions,
are absolutely forbidden without the previous written authorization by ARTSANA S.p.A.
SYMBOLS KEY
Appliance complies with the essential requirements of applicable EC Directives
WARNING!
User instructions
WARNING! Hot steam
Read the instructions for use
Warning! Hot surface
Do not dispose of this product or its components as household waste, but recycle, referring to specic legislation
in force in the country of use.
EN - Easy Meal Steam Cooker
I. PACK CONTENTS
1 Steam Cooker Body
1 Bowl lid
1 Bowl with handle
1 Switch System tilting basket for cooking food
1 Cut Express with nger-protection accessory
1 Blade unit
1 User and Instruction Manual
1 Recipe book
II. KEY
1. Body/water tank
2. Power cable area
3. On/o dial
4. Luminous LED
5. Safe system for attaching the blades to the body/water tank
6. Steam outow hole
7. Safety switches
8. Cut Express accessory
9. Finger-protection accessory
10. Bowl
11. Blades
Equipment certied and approved by IMQ (Italian Quality Brand Institute)

16
12. Switch System tilting cooking basket
13. Bowl lid
14. Water tank lid
15. Hole for lling water tank
16. Steam outlet tube
17. Non-removable cable
III. PREPARING THE PRODUCT
Before rst use:
1) Before using the product and its components, check that they are intact and not damaged in any way. In the event of
visible damage or when in doubt, do not use the appliance and contact qualied personnel or your dealer.
WARNING: for reasons of safety, the packaging and all of its parts must be kept out of the reach of children at all times.
2) Assemble the appliance following the indications in paragraph IV. “USER INSTRUCTIONS”.
3) For reasons of hygiene, carry out a cooking cycle without food (with a quantity of water equal to level 3 on the bowl),
following the indications in paragraph Va “STEAMING”.
WARNING: in order to avoid getting the electrical components wet (g. D) do not ll the water tank directly from the tap
and do not use demineralised water.
The appliance may emit an odour when rst turned on.
4) At the end of the cooking cycle, turn the dial (3) to OFF (“O”) and allow the appliance to cool down (at least 15 minutes).
WARNING: do not activate the blades because boiling water could splash out from the bowl leading to burns.
5) Remove the plug from the mains socket. Wash all washable components with warm water and a regular washing-up
liquid. Wipe the surface of the base with a damp cloth.
6) Remove residual water from the water tank (g. C).
IV. INSTRUCTIONS
THE BOWL UNIT
WARNING: remove the bowl and lid only if the dial (3) is switched to OFF (“O”).
- To attach the bowl (10), insert it onto the base and turn clockwise (g. B). Turn anti-clockwise to release.
- To close the lid (13) of the bowl, insert it, line up the reference symbols (g. A) and turn clockwise. Turn anti-clockwise to
remove it.
- Place the cooking basket (12) in the bowl inserting the pins in the guides that allow it to be rotated so the food can be
tipped into the bowl below.
THE BLADE UNIT
- To remove the blade unit (11) from the bowl, detach the bowl from the base, gently grasp the blade unit from outside
the bowl and turn clockwise. Remove the blade unit, holding it from above, taking care not to cut yourself. To secure the
blade unit carry out this operation in reverse until it is rmly in place. WARNING: when the blades are not inserted in the
bowl, protect them and store them safely out of the reach of children.
V. PREPARING BABY FOOD
Va - STEAMING
Easy Meal can be used to steam fruit, vegetables, meat and sh, preserving all of the nutritional properties of these foods.
Never use the cooking function without ensuring that the blade unit (11) is securely fastened to the bowl (10) and without
rst having lled the tank with cold drinking water.
For the cooking process proceed as follows:
1. Check that the appliance is unplugged and that the dial (3) is switched to OFF (“O”).
2. Ensure that the steam outlet (6) is not blocked; if necessary, unblock it without damaging the seal, following the indica-
tions in paragraph VI. “CLEANING AND MAINTENANCE”.
3. Turn the lid of the water tank (14) carrying out two distinct rotation and extraction movements, as per the instructions
on the product.
4. Rell the boiler with the amount of cold drinking water necessary to perform the desired cooking cycle. The time of the
cooking cycle increases with the amount of water inserted.
- Do not use demineralised water or water with additives (e.g. salt, sugar).
- Thanks to its 3 markings, the bowl (10) can be used to measure water and determine average cooking times, refer to the
following table.
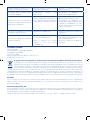
Marking Indicative time*
1 13 minutes
2 25 minutes
3 30 minutes

17
* Indicative time with new product supplied with mains voltage of 230Vac. These times can even slightly change if the power supply values are dierent or non-
adequate cleaning.
5. Replace the lid (14) carrying out two distinct insertion and rotation movements, as per the instructions on the product.
6. Attach the bowl (10) to the base (1), with the blade unit (11) inserted inside.
7. Insert the tilting basket (12) in the bowl (10).
8. Without pressing or going over the edges, place the ingredients, previously chopped into little pieces (with dimensions
of less than 1 cm), into the basket. To speed up the preparation of the ingredients it is possible to use the Cut Express
accessory (8) with its special nger-protection feature (9), after having rmly attached it to the bowl.
9. Close the lid (13) of the bowl.
10. Plug in the appliance.
11. Activate the cooking function by turning the dial (3) to the right. A luminous LED lights up and within a few minutes the
appliance will start to produce steam.
12. The cooking time depends on the amount of water in the tank. When the water has been used up, the process auto-
matically stops and the appliance starts beeping. To stop it, turn o the appliance, returning the dial (3) to OFF (“O”).
13. Unplug the appliance.
14. Remove the lid (13) of the bowl (10) and check the ingredients are cooked correctly.
15a. If you don’t want to blend the ingredients after cooking, remove the basket (12) using the special handle and pour the
contents onto a plate, making sure you don’t burn yourself.
The cooking liquid left at the bottom of the bowl can be preserved.
15b. If you want to blend the ingredients after cooking, following the instructions in section Vb “BLENDING” below.
N.B.: allow the appliance to completely cool down before reusing.
To prevent the proliferation of bacteria, completely empty the water tank after use (g. C). To remove limescale, follow the
indications in section VII “BOILER MAINTENANCE”.
Vb - BLENDING
The Easy Meal Steam Cooker can be used to blend all the dierent foods used during the weaning phase with dierent
consistencies.
For blending, proceed as follows:
1. Check that the appliance is unplugged and that the dial is switched to OFF (“O”).
2a. To blend previously steamed ingredients, turn over the tilting basket (12) to tip its contents into the bowl, remove the
basket and replace the lid (13).
2b. To blend cold ingredients, chop into pieces and insert directly in the bowl (10) on the blades (11). It is also possible to
use the Cut Express accessory to cut up food directly in the bowl.
To ensure optimum blending, add a suitable quantity of water.
WARNING: to prevent irreparable damage from being done to the blades, never add hard or frozen food or a quantity of
food superior to the maximum indicated amount (MAX) to the bowl, and do not press the food.
3. Plug in the appliance.
4. Turn the dial (3) to the left into the blending position and hold for a maximum of 10 seconds, then release so as not to damage
the motor.
5. Repeat this operation, at intervals of 10 seconds, until you achieve the desired consistency, adding liquid if necessary.
WARNING: DO NOT pour oil directly into the bowl.
N.B.: If the ingredients stick to the sides of the bowl (10), turn o the appliance and, with the help of a spoon, push them
towards the blades.
6. After blending, detach the bowl (10) from the base (1), remove the lid (13) and pour the contents of the bowl onto a plate.
WARNING: to avoid getting hurt by the blades never put your hands in the bowl.
It is highly recommended to check the temperature of the contents and mix them well before giving them to children.
Vc - WARMING AND DEFROSTING
With the Easy Meal Steam Cooker, you can warm up and defrost small pieces of food or baby food prepared in advance.
- To warm up or defrost small pieces of food, follow the instructions described in section Va “STEAMING”.
- To warm up or defrost pre-prepared baby foods.
1. the baby food must be in a suitable container (with no lid), which is positioned in the cooking basket (12). The 180ml
container in the Chicco System range (sold separately) is compatible with the product.
2. Pour between 1 and 3 levels of water into the water tank depending on the amount to warm up/defrost, and then
proceed as with the cooking cycle.
The time required to defrost or heat varies depending on the initial temperature and the amount of food.
3. When the appliance beeps at the end of the cycle, carefully remove the container using a tea towel to avoid the risk of
burning and stir the contents so its temperature is even right the way through. Always check that the temperature of the
baby food is not too hot before giving it to children.
WARNING: for hygiene and biological reasons, never reheat food more than once or for longer than an hour.
VI. CLEANING AND MAINTENANCE
WARNING: all cleaning and maintenance must be carried out with the appliance o, cold and unplugged.

18
After each cooking/blending/warming cycle, it is advisable to clean the appliance as described below.
Cleaning the bowl and accessories.
The bowl (10) and the other plastic accessories: lid (13), cooking basket (12), Cut Express accessory (8) and nger-protection
pad (9) can be washed by hand with a regular washing-up liquid (do not use abrasive or descaling products) or in the dish-
washer. It is advisable to remove the blade unit before washing the bowl.
Cleaning the blade unit.
To prevent/reduce the oxidation and corrosion of the blades, the blade unit (11) must be cleaned and dried straight after
every use.
Remove the blade unit from the bowl following the instructions provided and clean it with soapy water, paying close atten-
tion to the sharp part. Harsh detergents, such as bleach, may aect the steel, staining it and oxidising it permanently. Avoid
using detergents containing chlorine or chlorine by-products. Rinse thoroughly under running water and dry immediately
using a non-abrasive cloth. WARNING: DO NOT wash the blades in the dishwasher as this may damage them.
Do not remove the seal from the blade unit; if necessary, carefully replace it in its correct position.
Cleaning the base.
Do not wash the base (1) in the dishwasher or under running water, and do not immerse it in any liquids. If necessary, clean
with a soft cloth. Do not wash the water tank lid (14) in the dishwasher.
Rinsing the water tank.
Always remove any remaining water in the water tank by gradually tilting the appliance (g. C).
If it is has not been used for over 8 hours, quickly clean the insides:
a) Fill the water tank with a quantity of cold tap water (g. D) equal to marking 2 on the bowl, shut the water tank lid (14)
and shake, then remove the lid and empty the water tank, keeping the steam outlet (6) closed and gradually tilting the
appliance to empty out the water (g. C).
Make sure water does not get into the bowl lid slot next to the safety switches (7).
b) Carefully clean the area near the steam outlet making sure it is not blocked.
Thoroughly dry the product with a cloth after cleaning.
If necessary, perform descaling as shown in the paragraph below.
VII. BOILER MAINTENANCE
To ensure the proper functioning of the product and maintenance of the water tank, a complete descaling cycle must be
performed periodically.
IMPORTANT: the formation of limescale deposits is directly proportional to the hardness of the water used. Perform main-
tenance on the water tank at least every 15 days or before storing the appliance away for long periods.
a) Switch the dial (3) on the cold, unplugged appliance to OFF (“O”). IMPORTANT. If the product has not been allowed to
cool properly there may be boiling water and/or steam inside the water tank: be careful not to get burned.
b) Completely empty the water tank, gradually tilting the appliance (g. C), as described in the section “RINSING THE WATER
TANK”.
c) Fill the bowl up to marking 1 with cold tap water and add white wine vinegar until you reach marking 3.
Pour the solution into the water tank.
Never use demineralised water or descaling products (liquids, powders, tablets etc.) which could contain substances that
are toxic or not suitable for contact with foodstus. Never add liquids and/or solutions other than the one specied, as
these could damage the appliance beyond repair.
d) Replace the lid of the water tank (14) and allow the solution to act for at least 10 hours. WARNING! Never turn the ap-
pliance on with the descaling solution in the water tank.
e) After at least 10 hours, shake the product slightly, remove the lid of the water tank (14) and empty it, keeping the steam
outlet (6) closed and gradually tilting the appliance (g. C), as described in the “RINSING THE WATER TANK” section.
N.B.: the discharge of residues, even if dark in colour, is absolutely normal as these are the deposits of the salts dissolved in the water
which are removed by the descaling solution.
f) Rinse the water tank several times until no more residues come out: pour in 2 levels of cold tap water (g. D), shut the
water tank lid (14) and briey shake the appliance, then remove the lid and, keeping the steam outlet (6) closed, empty
out all of the water, tilting the appliance (g. C).
g) Thoroughly dry up any water near the steam outlet or the base.
If large amounts of limescale have formed and prove very dicult to remove, repeat the operation increasing the percent-
age of vinegar in the solution.
IMPORTANT. During cleaning, do not attempt to remove and/or damage the water tank lid (14) and steam outlet (6) seals.

19
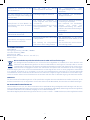
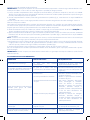
VIII. TROUBLESHOOTING
PROBLEM POSSIBLE CAUSES POSSIBLE SOLUTIONS
The appliance or LED does not turn on.
• The plug is not inserted properly. • Check that the appliance is plugged
into the mains.
The appliance will not blend or the
cooking cycle will not start.
• The bowl or the lid is not in the right
position.
• Position the bowl and lid correctly so
that the safety switches are activated.
The motor unit produces a bad smell
or excessive noise during blending
• New product.
• Too much food.
• The food in the bowl is too hard.
• Blending times too long.
• This is normal the rst few times it is
used.
• Reduce the amount of food in the
bowl
• Do not blend food that is too hard;
Defrost food before blending it.
• Follow the recommended blending
times, leaving the appliance to cool
to prevent overheating.
Food leaks from the bowl during
blending.
• Too much food in the bowl or the
food is too liquid.
• Reduce the amount of food or liquid
in the bowl.
The appliance takes too long to produce
steam or does not produce any.
• Limescale accumulation in the water
tank.
• Perform cleaning and maintenance
on the water tank.
Steam coming out of the water tank
lid area, or from the rear vent tube.
• The water tank lid is not inserted or is
not properly closed.
• The steam outlet is obstructed by
food residue or limescale.
• Position the water tank lid and close
properly.
• Perform cleaning and maintenance on
the water tank. If necessary, clear the
steam outlet without damaging the seal.
The lid will not come o the water
tank after cooking.
• Overheating. • Wait a few minutes and allow to cool.
After cooking, there is water under the
appliance
• Blade unit missing or positioned
incorrectly.
• Blade seal missing or positioned
incorrectly.
• Insert the blade unit in the bowl and
turn it until it is securely tted.
• Check the presence and position of
the seal.
IX. TECHNICAL DATA
Model: 06776
Supply voltage: 220-240 V~, 50/60 Hz
Water tank output: 500 W
Motor output: 130 W
Blender operating cycles: 10 s ON – 10 s OFF (“O”)
Made in China
This product complies with the Directive 2012/19/EU as amended.
The crossed bin symbol on the appliance indicates that the product, at the end of its life, must be disposed of sepa-
rately from domestic waste, either by taking it to a separate waste disposal site for electric and electronic appliances or
by returning it to your dealer when you buy another similar appliance. The user is responsible for taking the appliance
to a special waste disposal site at the end of its life. If the disused appliance is collected correctly as separate waste, it
can be recycled, treated and disposed of ecologically; this avoids a negative impact on both the environment and health, and
contributes towards the recycling of the product’s materials. For further information regarding the waste disposal services avail-
able, contact your local waste disposal agency or the shop where you bought the appliance.
WARRANTY
For the warranty for product defects see the specic provisions of applicable national laws in the country where purchased,
if required. The warranty does not cover components subject to normal wear and tear.
DECLARATION OF EC COMPLIANCE UE:
Artsana S.p.A hereby declares that this Chicco appliance, model number 06776, complies with all essential requirements
and other relevant provisions indicated in Directives 2014/30/UE (electromagnetic compatibility), 2014/35/UE (electrical
safety) and 2011/65/UE (RoHS).
A full copy of the UE declaration can be requested from Artsana S.p.A. Via S. Catelli 1 – 22070 Grandate (Co) Italy.

20
MODE D’EMPLOI
Robot Cuiseur Easy Meal Chicco
Lire attentivement cette notice avant utilisation et la conserver pour toute référence ultérieure.
AVERTISSEMENT DE SÉCURITÉ.
ATTENTION !
• Cet appareil est destiné à un usage exclusivement domestique et doit
être utilisé conformément aux instructions de la notice d’utilisation. Toute
autre utilisation doit être considérée comme impropre et donc potentiel-
lement dangereuse. Il ne doit pas être utilisé dans : des environnements
dédiés à la cuisine pour le personnel de magasins, bureaux et autres lieux
de travail, agrotourismes, hôtels, motels et autres structures d’hôtellerie,
chambres en location. Le fabricant ne pourra être tenu responsable des
éventuels dommages dus à un usage impropre, incorrect et irresponsable.
• Cet appareil est destiné uniquement à une utilisation en intérieur et ne
doit donc pas être exposé au soleil, à la pluie et aux intempéries.
• Cet appareil ne peut être utilisé ni par des enfants ni par des personnes
ayant des capacités mentales réduites ou dépourvues d’expérience et de
connaissances appropriées. Le produit ne doit pas être utilisé par des per-
sonnes ayant des capacités physiques ou sensorielles réduites à moins
qu’elles soient surveillées par une personne responsable de leur sécurité ou
qu’elles reçoivent de cette personne les instructions pour utiliser l’appareil
en toute sécurité et qu’elles aient compris les risques associés. Si l’appareil
est vendu par l’acheteur ou coné à des tiers utilisateurs, il faut que ceux-ci
reçoivent des instructions pour utiliser l’appareil en toute sécurité et qu’ils
aient compris les risques associés, après avoir lu la notice d’utilisation et no-
tamment les avertissements de sécurité qui y sont contenus, qui devront
toujours accompagner l’appareil.
• Le nettoyage et l’entretien, qui incombent à l’utilisateur, ne doivent pas être
eectués par des enfants.
• An de prévenir la prolifération bactérienne dans les préparations, il est
recommandé de consommer le repas tout de suite ou de le conserver
de la manière la plus appropriée en fonction du type d’aliment. Ne pas
conserver les aliments directement dans le bol.
• Tenir l’appareil et son câble d’alimentation hors de portée des enfants.
• Veiller à ce que les enfants ne jouent pas avec l’appareil.
• Ne pas tirer sur le câble d’alimentation ou sur l’appareil pour débrancher la
che de la prise de courant.
• Attention : par mesure de sécurité, l’appareil doit toujours être relié à une
Sayfa yükleniyor ...
Sayfa yükleniyor ...
Sayfa yükleniyor ...
Sayfa yükleniyor ...
Sayfa yükleniyor ...
Sayfa yükleniyor ...
Sayfa yükleniyor ...
Sayfa yükleniyor ...
Sayfa yükleniyor ...
Sayfa yükleniyor ...
Sayfa yükleniyor ...
Sayfa yükleniyor ...
Sayfa yükleniyor ...
Sayfa yükleniyor ...
Sayfa yükleniyor ...
Sayfa yükleniyor ...
Sayfa yükleniyor ...
Sayfa yükleniyor ...
Sayfa yükleniyor ...
Sayfa yükleniyor ...
Sayfa yükleniyor ...
Sayfa yükleniyor ...
Sayfa yükleniyor ...
Sayfa yükleniyor ...
Sayfa yükleniyor ...
Sayfa yükleniyor ...
Sayfa yükleniyor ...
Sayfa yükleniyor ...
Sayfa yükleniyor ...
Sayfa yükleniyor ...
Sayfa yükleniyor ...
Sayfa yükleniyor ...
Sayfa yükleniyor ...
Sayfa yükleniyor ...
Sayfa yükleniyor ...
Sayfa yükleniyor ...
Sayfa yükleniyor ...
Sayfa yükleniyor ...
Sayfa yükleniyor ...
Sayfa yükleniyor ...
Sayfa yükleniyor ...
Sayfa yükleniyor ...
Sayfa yükleniyor ...
Sayfa yükleniyor ...
Sayfa yükleniyor ...
Sayfa yükleniyor ...
Sayfa yükleniyor ...
Sayfa yükleniyor ...
Sayfa yükleniyor ...
Sayfa yükleniyor ...
Sayfa yükleniyor ...
Sayfa yükleniyor ...
Sayfa yükleniyor ...
Sayfa yükleniyor ...
Sayfa yükleniyor ...
Sayfa yükleniyor ...
Sayfa yükleniyor ...
Sayfa yükleniyor ...
Sayfa yükleniyor ...
Sayfa yükleniyor ...
Sayfa yükleniyor ...
Sayfa yükleniyor ...
Sayfa yükleniyor ...
Sayfa yükleniyor ...
Sayfa yükleniyor ...
Sayfa yükleniyor ...
Sayfa yükleniyor ...
Sayfa yükleniyor ...
Sayfa yükleniyor ...
Sayfa yükleniyor ...
Sayfa yükleniyor ...
Sayfa yükleniyor ...
Sayfa yükleniyor ...
Sayfa yükleniyor ...
Sayfa yükleniyor ...
Sayfa yükleniyor ...
Sayfa yükleniyor ...
Sayfa yükleniyor ...
Sayfa yükleniyor ...
Sayfa yükleniyor ...
-
 1
1
-
 2
2
-
 3
3
-
 4
4
-
 5
5
-
 6
6
-
 7
7
-
 8
8
-
 9
9
-
 10
10
-
 11
11
-
 12
12
-
 13
13
-
 14
14
-
 15
15
-
 16
16
-
 17
17
-
 18
18
-
 19
19
-
 20
20
-
 21
21
-
 22
22
-
 23
23
-
 24
24
-
 25
25
-
 26
26
-
 27
27
-
 28
28
-
 29
29
-
 30
30
-
 31
31
-
 32
32
-
 33
33
-
 34
34
-
 35
35
-
 36
36
-
 37
37
-
 38
38
-
 39
39
-
 40
40
-
 41
41
-
 42
42
-
 43
43
-
 44
44
-
 45
45
-
 46
46
-
 47
47
-
 48
48
-
 49
49
-
 50
50
-
 51
51
-
 52
52
-
 53
53
-
 54
54
-
 55
55
-
 56
56
-
 57
57
-
 58
58
-
 59
59
-
 60
60
-
 61
61
-
 62
62
-
 63
63
-
 64
64
-
 65
65
-
 66
66
-
 67
67
-
 68
68
-
 69
69
-
 70
70
-
 71
71
-
 72
72
-
 73
73
-
 74
74
-
 75
75
-
 76
76
-
 77
77
-
 78
78
-
 79
79
-
 80
80
-
 81
81
-
 82
82
-
 83
83
-
 84
84
-
 85
85
-
 86
86
-
 87
87
-
 88
88
-
 89
89
-
 90
90
-
 91
91
-
 92
92
-
 93
93
-
 94
94
-
 95
95
-
 96
96
-
 97
97
-
 98
98
-
 99
99
-
 100
100


mothercare Chicco_Multifunctional Electric Kettle EASY MEAL Kullanici rehberi
- Tip
- Kullanici rehberi
Diğer dillerde
- español: mothercare Chicco_Multifunctional Electric Kettle EASY MEAL Guía del usuario
- français: mothercare Chicco_Multifunctional Electric Kettle EASY MEAL Mode d'emploi
- italiano: mothercare Chicco_Multifunctional Electric Kettle EASY MEAL Guida utente
- Deutsch: mothercare Chicco_Multifunctional Electric Kettle EASY MEAL Benutzerhandbuch
- português: mothercare Chicco_Multifunctional Electric Kettle EASY MEAL Guia de usuario
- English: mothercare Chicco_Multifunctional Electric Kettle EASY MEAL User guide
- русский: mothercare Chicco_Multifunctional Electric Kettle EASY MEAL Руководство пользователя
- Nederlands: mothercare Chicco_Multifunctional Electric Kettle EASY MEAL Gebruikershandleiding
İlgili Makaleler
Diğer Belgeler
-
Chicco CuociPappa Natural Instructions For Use Manual
-
Chicco CUOCIPAPPA SANOVAPORE Kullanım kılavuzu
-
-
-
-
Beaba BABYCOOK 912422 El kitabı
-
-
Cloer 6969 Kullanım kılavuzu
-
-
Tefal TD7010Q0 Kullanım kılavuzu