
instructions
istruzioni
instrucciones
Bedienungsanleitungen
gebruiksaanwijzing
FPM800 series

English 3 - 11
Nederlands 12 - 21
Français 22 - 32
Deutsch 33 - 42
Italiano 43 - 52
Português 53 - 62
Español 63 - 72
Dansk 73 - 82
Svenska 83 - 91
Norsk 92 - 100
Suomi 101 - 109
Türkçe 110 - 118
Česky 119 - 128
Magyar 129 - 138
Polski 139 - 150
E 151 - 162
Slovenčina 163 - 172
Українська 173 - 183
´¸∂w
481 - 291

bm
bs
cn
cp
cq
co
cr
cs
ct
bt
ck
cl
cm
bn
bo
bp
bq
br
6
5
3
2
4
6
1
5
4
3
2
1
bl
bk
8
7
9

bk
bo
bp
bl
bm
bn
cl
bs
78
bt
ck
bs
+
bt cn cq
ck
+
cl
cm cr
ct
br
bq
cs
9

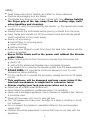
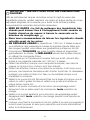
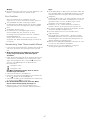
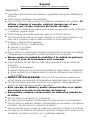
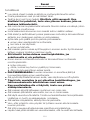
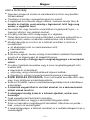
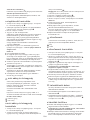
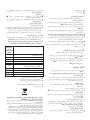
safety
G
Read these instructions carefully and retain for future reference.
G
Remove all packaging and any labels.
G
The blades and discs are very sharp, handle with care. Always hold by
the finger grip at the top, away from the cutting edge, both
when handling and cleaning.
G
Do not lift or carry the processor by the handle - or the handle may break
resulting in injury.
G
Always remove the knife blade before pouring contents from the bowl.
G
Keep hands and utensils out of the processor bowl and blender goblet
whilst connected to the power supply.
G
Switch off and unplug:
GG
before fitting or removing parts;
GG
when not in use;
GG
before cleaning.
G
Never use your fingers to push food down the feed tube. Always use the
pusher/s supplied.
G
Never fit the blade unit to the power unit without the blender
goblet fitted.
G
Before removing the lid from the bowl or blender from the power unit:
GG
switch off;
GG
wait until the attachment/blades have completely stopped;
GG
be careful not to unscrew the blender goblet from the blade assembly.
G
SCALD RISK: Hot ingredients should be allowed to cool to room
temperature before blending.
G
Do not use the lid to operate the processor, always use the on/off speed
control.
G
This appliance will be damaged and may cause injury if the
interlock mechanism is subjected to excessive force.
G
Always unplug your food processor when not in use.
G
Never use an unauthorised attachment.
G
Never leave the appliance unattended when it is operating.
G
Never use a damaged appliance. Get it checked or repaired: see ‘service
& customer care’.
G
Never let the power unit, cord or plug get wet.
G
Don’t let excess cord hang over the edge of a table or worktop or touch
hot surfaces.
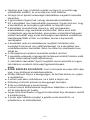
G
Do not exceed the maximum capacities stated in the recommended
speed chart.
G
Children should be supervised to ensure that they do not play with the
appliance.
3

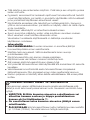
G
This appliance shall not be used by children. Keep the appliance and its
cord out of reach of children.
G
Appliances can be used by persons with reduced physical, sensory or
mental capabilities or lack of experience and knowledge if they have been
given supervision or instruction concerning use of the appliance in a safe
way and if they understand the hazards involved.
G
Only use the appliance for its intended domestic use. Kenwood will not
accept any liability if the appliance is subject to improper use, or failure to
comply with these instructions.
G
Misuse of your processor/blender can result in injury.
G
The maximum rating is based on the attachment that draws the greatest
load. Other attachments may draw less power.
Refer to the relevant section under “using the attachments” for additional
safety warnings for each individual attachment.
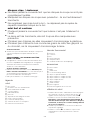
blender
G
SCALD RISK: Hot ingredients should be allowed to cool to room
temperature before blending.
G
Always take care when handling the blade assembly and avoid touching
the cutting edge of the blades when cleaning.
G
Only operate the blender with the lid in place.
G
Only use the goblet with the blade assembly supplied.
G
Never run the blender empty.
G
To ensure the long life of your blender, do not run it for longer than 60
seconds.
G
Smoothie recipes - never blend frozen ingredients that have formed a solid
mass during freezing, break it up before adding to the goblet.
G
The skirt on the base of the goblet is fitted during manufacture and no
attempt should be made to remove it.
4
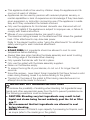
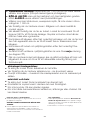
IMPORTANT: HOT
BLENDING INSTRUCTIONS
To minimise the possibility of scalding when blending hot ingredients keep
hands and other exposed skin away from the lid to prevent possible burns.
The following precautions must be observed:
G
CAUTION: Blending very hot ingredients may result in hot
liquid and steam being forced suddenly past the lid or filler
cap
bm
.
G
We recommend that hot ingredients are allowed to cool
before blending.
G
NEVER exceed 1200mls/5 cups capacity if processing hot liquids, such
as soups (refer to the markings on the goblet).

slicing/grating discs
G
Never remove the lid until the cutting disc has completely stopped.
G
Handle the cutting discs with care - they are extremely sharp.
G
Do not overfill the bowl – do not exceed the maximum capacity level
marked on the bowl.
mini bowl and knife
G
Never remove the lid until the knife blade has completely stopped.
G
The knife blade is very sharp - always handle with care.
G
Do not process spices – they may damage the plastic.
G
Do not process hard food such as coffee beans, ice cubes or chocolate –
they may damage the blade.
5
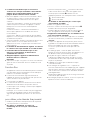
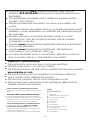
G
ALWAYS commence blending at a low speed and gradually increase
the speed. NEVER blend hot liquids by using the Pulse setting.
G
Liquids which tend to foam such as milk, should be limited to a
maximum capacity of 1000mls/4 cups.
G
Take care when handling the blender as the goblet and its contents will
be very hot.
G
Take particular care when removing the lid. The lid is designed to be a
tight fit to prevent leakage. If necessary protect your hands with a cloth
or oven gloves when handling.
G
Ensure the goblet is securely attached to the base and when removing
from the appliance, guide the base and ensure it is removed together
with the goblet.
G
Ensure that the lid and filler cap are securely in place before every
blending operation.
G
Always ensure that the vents in the filler cap are clear before every
blending operation
br
.
G
When fitting the lid to the goblet always ensure that the lid and goblet
rim are clean and dry to ensure a good seal and prevent spillage.
before plugging in
G
Make sure your electricity supply is the same as the one
shown on the underside of your appliance.
WARNING: THIS APPLIANCE MUST BE EARTHED.
G
This appliance conforms to EC directive 2004/108/EC on
Electromagnetic Compatibility and EC regulation no.
1935/2004 of 27/10/2004 on materials intended for contact
with food.
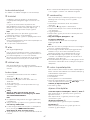
before using for the first time
1 Remove the plastic blade covers from the knife blade. Take
care the blades are very sharp. These covers should
be discarded as they are to protect the blade during
manufacture and transit only.
2 Wash the parts see ‘care & cleaning’
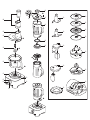
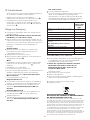
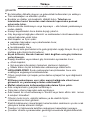
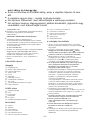
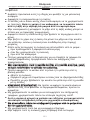
key
processor
1
power unit
2
Trïtan™ bowl with drive shaft
3
detachable drive shaft
4
Trïtan™ lid
5
feed tube
6
pushers
7
safety interlocks
8
cord storage (at back)
9
auto button
bk
speed/pulse control
bl
power on light

thermoresist blender
bm
filler cap
bn
lid
bo
g
oblet
bp
sealing ring
bq
blade unit
br
f
iller cap vents
attachments
bs
k
nife blade
bt
dough tool
ck
d
ual whisk
cl
f
olding tool
cm
max capacity disc
cn
4
mm slicing/grating disc
co
2mm slicing/grating disc
cp
extra fine grater disc
cq
fine Julienne disc
cr
mini bowl and blade
cs
citrus juicer
ct
attachment storage box
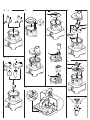
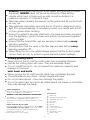
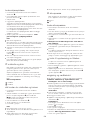
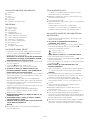
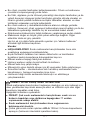
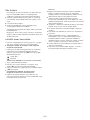
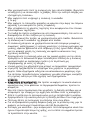
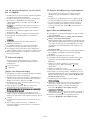
to use your food processor
1 Fit the bowl to the power unit. Place the handle towards the
back on the right hand side and turn clockwise
1
until it
locks.
2 Fit an attachment over the bowl drive shaft.
Note: Detachable drive shaft
2
should be fitted
when using the discs, mini bowl, whisk, folding
tool and citrus juicer.
l
Always fit the bowl and attachment onto the processor
before adding ingredients.
3 Fit the lid
3
- ensuring the top of the drive shaft/tool locates
into the centre of the lid.
l
The processor will not operate if the bowl or lid
are not fitted correctly into the interlock. Check
that the feed tube and bowl handle are situated
to the right hand side.
4 Plug in. The Power On light will come on and flash until the
bowl and lid are fitted correctly. Select one of the following
options: -
Auto Button – the light will come on when the Auto Button is
pressed and the optimum speed for the attachment will be
automatically selected.
Speed Control – manually select the required speed (refer to
the recommended speed chart).
Pulse – use the pulse (P) for short bursts. The pulse will
operate for as long as the control is held in position.
5 At the end of processing turn the speed control to the ‘0’ off
position or if using the Auto press the button and the light
will go out.
l
The Power On light will flash if either the lid or
bowl are not fitted or incorrectly fitted.
l
The Auto Button will not operate if a speed is
selected on the speed control.
l
Always switch off and unplug before removing the
lid.
important
l
Your processor is not suitable for crushing or grinding coffee
beans, or converting granulated sugar to caster sugar.
Eco function
If the food processor is left plugged in for over 30 minutes
without being used, it will go into standby mode to reduce
e
nergy consumption.
l
The Power On light will pulse slowly and the food processor
will not operate until one of the following actions are carried
o
ut:-
l
T
he Auto button is pressed.
l
The speed control is turned to a speed and then turned
back to the ‘O’ off position.
T
he light will change to being constantly lit when ready to
use.
Note: If the bowl or lid are not engaged into the interlock the
p
ower on light will pulse more rapidly than the Eco function.
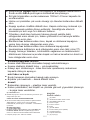
to use your thermoresist blender
1 Fit the sealing ring
bp
into the blade unit
bq
- ensuring the
seal is located correctly in the grooved area.
l
Leaking will occur if the seal is damaged or
incorrectly fitted.
2 Hold the underside of the blade unit
bq
and insert the
blades into the goblet - turn anti-clockwise until it clicks
4
.
Refer to the graphics on the underside of the blade unit as
follows:
- unlocked position
- locked position
The blender will not work if incorrectly
assembled.
3 Put your ingredients into the goblet.
4 Fit the lid to the goblet and push down to secure
5
. Fit the
filler cap.
5 Place the blender onto the power unit, and turn clockwise
6
to lock.
l
The appliance will not operate if the blender is
incorrectly fitted to the interlock.
6 Select Auto, or a speed (refer to the recommended speed
chart) or use the pulse control.
hints
l
When making mayonnaise, put all the ingredients, except the
oil, into the blender. Remove the filler cap. Then, with the
appliance running, add the oil slowly through the hole in the
lid.
l
Thick mixtures, e.g. pâtés and dips, may need scraping down.
If the mixture is difficult to process, add more liquid.
l
Ice crushing - operate the pulse in short bursts until crushed to
the desired consistency.
l
The processing of spices is not recommended as they may
damage the plastic parts.
l
The appliance will not work if the blender is incorrectly fitted.
l
To blend dry ingredients - cut into pieces, remove the filler
cap, then with the appliance running, drop the pieces down
one by one. Keep your hand over the opening. For best
results empty regularly.
l
Don’t use the blender as a storage container. Keep it empty
before and after use.
l
Never blend more than 1.6 litres (2 pts 8 fl oz) - less for
frothy liquids like milkshakes.
6

7
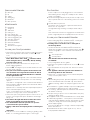
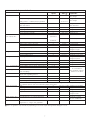
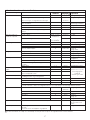
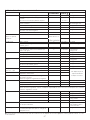
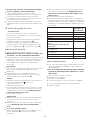
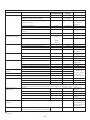
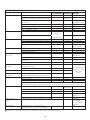
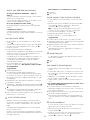
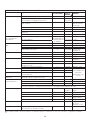
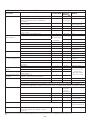
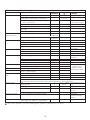
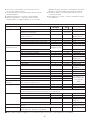
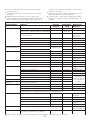
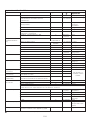
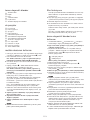
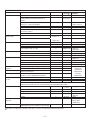
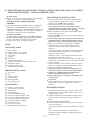
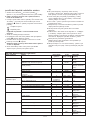
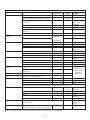
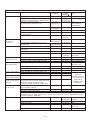
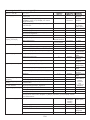
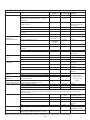
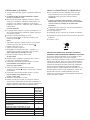
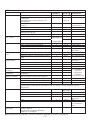
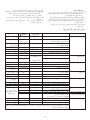
recommended speed chart
tool/attachment function recommended processing maximum
s
peed time
F
F
c
apacities
K
nife blade All in one cake mixes 8 15-20 secs 1.7Kg/3lb 7oz
f
lour weight
P
astry - rubbing fat into flour 5 –8 10 secs 500g/1lb 2oz
flour weight
A
dding water to combine pastry ingredients 10-20 secs
C
hopping fish and lean meat Pulse –8 10-30 secs 800g/1lb 8oz
P
âtés and terrines max lean beef
Chopping vegetables Pulse 5-10 secs 500g/1lb 2oz
Chopping nuts 8 30-60 secs 200g/8oz
Pureeing soft fruit, cooked fruit and vegetables 8 10-30 secs 1Kg/2lb 4oz
Sauces, dressing and dips 8 2 mins max 800g/1lb 8oz
Knife blade with Cold soups Start at low 30-60 secs 1.7 litres/3pts
m
ax capacity disc speed and
Milkshakes/batters increase to 15-30 secs 1.3 litres/2pts
maximum
Dual whisk Egg whites 8 60-90 secs 4 (150g)
Egg & sugar for fatless sponges 8 4-5 min 3 eggs (150g)
Cream 8 30 secs 500mls/18 fl oz
Creaming fat and sugar 8 2 mins max 200g/8oz fat
200g/8oz sugar
Dough tool Yeasted mixes 8 60 secs 1Kg/ 2lb 4oz total wt
White Bread Flour 8 60 secs 600g/1lb 6oz flour wt
Wholemeal Bread Flour 8 60 secs 500g/1lb 2oz flour wt
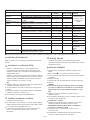
Folding tool Whipping cream and fruit purees 1 –2 60 secs 300g/12oz cream,
300g/12oz puree
Egg whites into heavy mixtures 1 –2 60 secs 600g/1lb 6oz total wt
Flour into creamed fat and sugar mixes 1 –2 60 secs 200g/8oz flour wt
Macaroons 1 –2 60 secs 500g/1lb 2oz total wt
Discs - slicing/grating Firm food items such as carrots, hard cheeses 5 –8 –
Softer items such as cucumbers, tomatoes 1 –5 –
Extra fine grater Parmesan cheese, potatoes for German 8–
potato dumplings
Fine Julienne disc Potato straws and rosti 8–
Stir fries and vegetable garnishes
Thermoresist blender Cold liquids and drinks 8 15-30 secs 1.6 litres/2 pt 8 fl oz
Stock based soups 8 30 secs 1.2 litres/2 pt 1 fl oz
Soups using milk 8 30 secs 1 litres/1pt 8 fl oz
We recommend that hot ingredients are allowed to cool before blending. However should you wish to process
hot ingredients please read the Hot Blending Safety instructions.
Mini bowl and knife Meat 8 20 secs + Pulse 300g/12oz Lean beef
Chopping herbs 8 30 secs 20g/1oz
Chopping nuts 8 30 secs 100g/4oz
Mayonnaise 8 30 secs 2 Eggs
300g/12oz Oil
Purees 8 30 secs 200g/8oz
Mini bowl with discs See individual discs recommended speed – 500g/1lb 2oz Max
Do not overfill bowl
Citrus Juicer Smaller items i.e. limes and lemons 1 –2 – 2Kg/4lb 8oz
Larger fruits i.e. oranges and grapefruits
FF
This is for guidance only and will vary depending on the exact recipe and ingredients being processed.
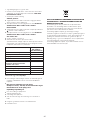
Do not fill above
the maximum capacity
marked on the bowl

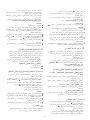
using the attachments
R
efer to recommended speed chart for each attachment.
bs
knife blade
The knife blade is the most versatile of all the attachments.
T
he length of the processing time will determine the texture
achieved. For coarser textures use the pulse control.
Use the knife blade for cake and pastry making, chopping
r
aw and cooked meat, vegetables, nuts, pâté, dips,
pureeing soups and to also make crumbs from biscuits and
bread.
h
ints
G
C
ut food such as meat, bread, vegetables into cubes
approximately 2cm/3/4in before processing.
G
B
iscuits should be broken into pieces and added down the
feed tube whilst the appliance is running.
G
When making pastry use fat straight from the fridge cut into
2cm/3/4in.cubes.
G
Take care not to over-process.
bt
dough tool
Use for yeasted dough mixes.
G
Place the dry ingredients in the bowl and add the liquid
down the feed tube whilst the appliance is running. Process
until a smooth elastic ball of dough is formed this will take
approx. 60 secs.
G
Re-knead by hand only. Re-kneading in the bowl is not
recommended as it may cause the processor to become
unstable.
ck
dual whisk
Use for light mixtures such as egg whites, cream,
evaporated milk and for whisking eggs and sugar for fatless
sponges.
using the whisk
1 Fit the bowl onto the power unit, add the detachable drive
shaft.
2 Push each beater
7
securely into the drive head.
3 Fit the whisk by carefully turning until it drops over the drive
shaft.
4 Add the ingredients.
5 Fit the lid - ensuring the end of the shaft locates into the
centre of the lid.
6 Switch on.
important
G
The whisk is not suitable for making all in one
cake mixes as these mixes are too heavy and will
damage it. Always use the knife blade.
hints
G
Best results are obtained when the eggs are at room
temperature.
G
Ensure the bowl and whisks are clean and free from grease
before whisking.
c
reaming fat and sugar
G
F
or best results fat should be allowed to soften at room
t
emperature (20°C) before creaming. DO NOT use fat
s
traight from the fridge as this will damage the
w
hisk.
G
H
eavier ingredients such as flour and dried fruit should be
f
olded in by hand.
G
D
o not exceed the maximum capacity or processing time
s
tated in the recommended speed chart.
cl
folding tool
Use the folding tool to fold light ingredients into heavier
mixtures for example meringues, mousses and fruit fools.
1
Fit the bowl onto the power unit, add the detachable drive
s
haft.
2 Push the paddle
8
securely into the drive head.
3 Fit the folding tool by carefully turning until it drops over the
drive shaft.
4 Add the ingredients.
5 Fit the lid – ensuring the end of the shaft locates into the
centre of the lid .
6 Select low speed (speed 1 – 2).
to remove the beater
Detach the beater from the drive head by pressing the
release button
9
.
hints
G
Do not use Auto or high speed as a low speed is required to
optimise the folding performance.
G
For best results do not over whisk egg whites or cream –
the folding tool will not be able to fold the mixture correctly if
the whisked mix is too firm.
G
Do not fold the mixture for longer than stated in the
recommended speed chart as the air will be knocked out
and the mix will be too loose.
G
Any unmixed ingredients left on the paddle or sides of the
bowl should be carefully folded in using the spatula.
cm
max capacity disc
When blending liquids in the bowl, the max capacity disc
must be used with the knife blade. It prevents leaking and
improves the chopping performance of the blade.
1 Fit the bowl onto the power unit.
2 Fit the knife blade.
3 Add ingredients to be processed.
4 Fit the capacity disc over the top of the blade ensuring it sits
on the ledge inside the bowl
bk
. Do not push down on
the capacity disc.
5 Fit the lid and switch on.
slicing/grating discs
reversible slicing/grating discs - 4mm
cn
, 2mm
co
Use the grating side for cheese, carrots, potatoes and foods
of a similar texture.
Use the slicing side for cheese, carrots, potatoes, cabbage,
cucumber, courgette, beetroot and onions.
extra fine grater disc
cp
Grates Parmesan cheese and potatoes for German potato
dumplings.
fine julienne
cq
Use to cut potatoes into straws and coarse grate for rosti,
stir fries and vegetable garnishes.
8

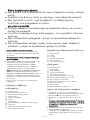
to use the cutting discs
1
Fit the bowl onto the power unit, add the detachable drive
shaft
2
.
2
Holding by the centre grip, place the disc onto the drive shaft
w
ith the appropriate side uppermost
bl
.
3 Fit the lid.
4
Put the food in the feed tube.
C
hoose which size feed tube you want to use. The pusher
contains a smaller feed tube for processing individual items
or thin ingredients.
T
o use the small feed tube - first put the large pusher inside
the feed tube.
To use the large feed tube - use both pushers together.
5
Switch on and push down evenly with the pusher - never
put your fingers in the feed tube.
h
ints
G
Use fresh ingredients
G
Don’t cut food too small. Fill the width of the feed tube fairly
full. This prevents the food from slipping sideways during
processing. Alternatively use the small feed tube.
G
When using the Julienne disc, place ingredients horizontally.
G
When slicing or grating: food placed upright
bm
comes out
shorter than food placed horizontally
bn
.
G
Food placed upright comes out shorter than food placed
horizontal.
G
There will always be a small amount of waste on the disc or
in the bowl after processing.
cr
mini bowl and knife
Use the mini processor bowl to chop herbs and process
small quantities of ingredients e.g. meat, onion, nuts,
mayonnaise, vegetables, purées, sauces and baby food.
The slicing/grating discs can also be used with the mini
bowl.
Insert the mini bowl without the knife blade fitted and refer to
the slicing/grating disc section for fitting and usage
instructions.
Do not overfill the bowl.
mini blade
mini bowl
to use the mini bowl and knife
1 Fit the bowl onto the power unit, add the detachable drive
shaft.
2 Fit the mini bowl over the detachable drive shaft - ensure the
cut out sections align with the locating tabs
bo
on the main
bowl.
Note: The main bowl lid cannot be fitted if the mini bowl is
not located correctly.
3 Place the knife blade over the drive shaft
bp
.
4 Add the ingredients to be processed.
5 Fit the lid and switch on.
hints
G
Herbs are best chopped when clean and dry.
G
Always add a little liquid when blending cooked ingredients
to make baby food.
G
Cut foods such as meat, bread, vegetables into cubes
approximately 1-2 cm (
1
⁄2 –
3
⁄4 in) before processing.
G
When making mayonnaise add the oil down the feed tube.
cs
citrus juicer
Use the citrus juicer to squeeze the juice from citrus fruits
(
eg oranges, lemons, limes and grapefruits).
cone
sieve
to use the citrus juicer
1
Fit the bowl onto the power unit, add the detachable drive
s
haft.
2 Fit the sieve into the bowl - ensuring the sieve handle is
l
ocked into position directly over the bowl handle
bq
.
3
Place the cone over the drive shaft turning until it drops all
the way down
br
.
4
Cut the fruit in half. Then switch on and press the fruit onto
t
he cone.
G
The citrus juicer will not operate if the sieve is
not locked correctly.
G
For best results store and juice the fruit at room temperature
and hand roll on a worktop before juicing.
G
To help with juice extraction move the fruit from side to side
when juicing.
G
When juicing large quantities, empty the strainer regularly to
prevent the build up of pulp and seeds.
ct
attachment storage box
Your food processor is supplied with a storage box for your
bowl attachments and discs.
1 Fit the knife blade and discs into the storage box when not
in use
bs
.
2 The storage box is fitted with a safety lock - close the lid to
lock. To open, push the tab in
bt
and lift up the lid
ck
.
care & cleaning
G
Always switch off and unplug before cleaning.
G
Handle the blades and cutting discs with care -
they are extremely sharp.
G
Some foods may discolour the plastic. This is perfectly
normal and won’t harm the plastic or affect the flavour of
your food. Rub with a cloth dipped in vegetable oil to
remove the discolouration.
power unit
G
Wipe with a damp cloth, then dry. Ensure that the interlock
area is clear of food debris.
G
Don’t immerse the power unit in water.
G
Store excess cord in the storage area at the back of the
power unit
cl
.
blender
1 Empty the goblet, unscrew the blade unit by turning to the
unlock position to release.
2 Wash the goblet by hand.
3 Remove and wash the seals.
4 Don’t touch the sharp blades – brush them clean using hot
soapy water, then rinse thoroughly under the tap. Don’t
immerse the blade unit in water.
5 Leave to dry upside down.
9

d
ual whisk
G
Detach the beaters from the drive head by gently pulling
them free. Wash in warm soapy water.
G
W
ipe the drive head with a damp cloth, then dry. Do not
immerse the drive head in water.
folding tool
G
Detach the beater from the drive head by pressing the
r
elease button
9
.
Wash in warm soapy water.
G
Wipe the drive head with a damp cloth, then dry. Do not
immerse the drive head in water.
a
ll other parts
G
W
ash by hand, then dry.
G
Alternatively they are dishwasher safe and can be washed
o
n the top rack of your dishwasher. Avoid placing items on
t
he bottom rack directly over the heating element. A short
low temperature (Maximum 50°C) programme is
recommended.
service & customer care
G
If the cord is damaged it must, for safety reasons, be
replaced by KENWOOD or an authorised KENWOOD
repairer.
G
If you experience any problems with the
operation of the processor, before calling for
assistance refer to the troubleshooting guide.
If you need help with:
G
using your appliance or
G
servicing or repairs
G
Contact the shop where you purchased your appliance.
G
Designed and engineered by Kenwood in the UK.
G
Made in China.
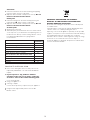
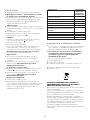
I
MPORTANT INFORMATION FOR CORRECT
DISPOSAL OF THE PRODUCT IN ACCORDANCE
WITH EC DIRECTIVE 2002/96/EC.
A
t the end of its working life, the product must not be disposed
of as urban waste.
It must be taken to a special local authority differentiated waste
c
ollection centre or to a dealer providing this service.
Disposing of a household appliance separately avoids possible
n
egative consequences for the environment and health deriving
from inappropriate disposal and enables the constituent
materials to be recovered to obtain significant savings in energy
and resources. As a reminder of the need to dispose of
household appliances separately, the product is marked with a
crossed-out wheeled dustbin.
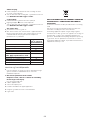
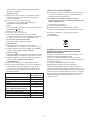
10
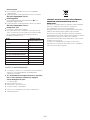
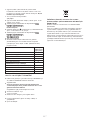
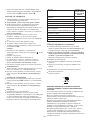
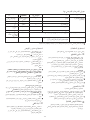
item suitable for
dishwashing
main bowl, mini bowl, lid, pusher
knife blades, dough tool
detachable drive shaft
discs
max capacity disc
whisk beaters/folding tool paddle
Do not immerse the drive head in water
blender goblet, lid, filler cap
blade unit and seal for blender
citrus juicer
spatula

11
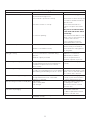
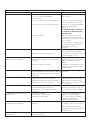
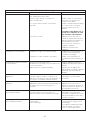
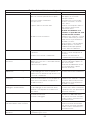
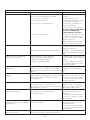
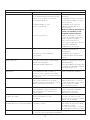
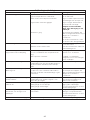
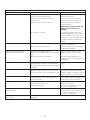
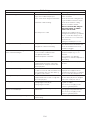
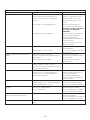
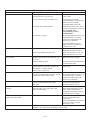
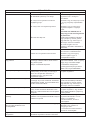
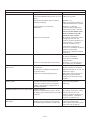
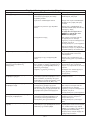
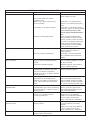
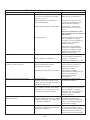
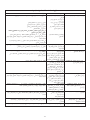
troubleshooting guide
P
roblem Cause Solution
The processor will not operate. No Power. Check processor is plugged in.
N
o power/indicator light not lit.
B
owl not fitted to power unit correctly. Check bowl is located correctly and
the handle is situated towards the
r
ight hand side.
B
owl lid not locked on correctly. Check that the lid interlock is
located correctly into the handle
area.
T
he processor will not work
i
f the bowl and lid are fitted
i
ncorrectly.
Eco function operating. Press either the Auto Button or turn
s
peed control on, then return to ‘O’
to switch off Eco function.
If none of the above check the
fuse/circuit breaker in your home.
Blender will not operate. Blender not locked on correctly. The blender will not operate if
fitted incorrectly to the interlock.
Blender not assembled correctly. Check blade unit is fully tightened
into the goblet.
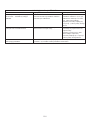
Processor stops or slows Overload protection operated. Switch off, unplug and allow the
during processing. Processor overloaded or overheated during appliance to cool down for
operation. approximately 15 minutes.
Maximum capacity exceeded. Refer to the speed chart for
maximum capacities to process.
Power On light flashing rapidly. Normal operation. Check interlocks are engaged
The light will flash if the bowl, lid or blender are correctly.
not fitted to the power unit or not locked in
place correctly.
Power On light flashing slowly. Normal operation.
Food processor left plugged in for over 30 minutes Press either the Auto Button or turn
without being operated and gone into Eco mode. speed control on and then return to
‘O’ to switch off Eco function.
Auto and Power On light flashing. Normal operation. Check interlocks are engaged
The light will flash if the Auto selected but correctly or press the Auto button
interlocks not engaged. to switch off the Auto function.
Blender leaking from blade assembly base. Seal missing. Check seal is fitted correctly and
Seal incorrectly fitted. not damaged. To obtain a
Seal damaged. replacement seal see “service &
customer care”.
Blender seal missing from blade unit when The seal is packed pre-fitted to the blade unit. Unscrew goblet and check that
removed from packaging. seal is fitted to blade unit.
To obtain a replacement seal see
“service & customer care”.
Poor performance of tools/attachments. Refer to hints in relevant “using the attachment” section. Check attachments are
assembled correctly.

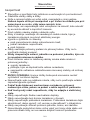
veiligheid
G
Lees deze instructies zorgvuldig door en bewaar ze voor toekomstig
gebruik.
G
Verwijder alle verpakking en labels.
G
De messen en de schijven zijn erg scherp; ga er dus voorzichtig mee om.
Houd ze bij het hanteren en schoonmaken altijd bovenaan bij
de vingergreep en weg van het snijvlak, vast.
G
Til de keukenmachine niet bij het handvat op en draag hem evenmin op
die manier; hierdoor kan het handvat afbreken, waardoor u letsel kunt
oplopen.
G
Voordat u de inhoud uit de kom giet, dient u altijd eerst het mes te
verwijderen.
G
Houd uw handen en keukengereedschap uit de kom van de
keukenmachine en de beker van de blender, wanneer deze op het lichtnet
is aangesloten.
G
Schakel het apparaat uit en haal de stekker uit het stopcontact:-
GG
voordat u onderdelen aanbrengt of verwijdert;
GG
als u het apparaat niet gebruikt;
GG
voor het reinigen.
G
Gebruik nooit uw vingers om voedsel in de invoerkoker te duwen. Gebruik
altijd de bijgeleverde stamper.
G
Zet het mes nooit op het motorblok zonder dat de beker van
de blender is bevestigd.
G
Doe het volgende, voordat u het deksel van de kom of de blender van het
motorblok verwijdert:-
GG
zet het apparaat uit;
GG
wacht totdat de hulpstukken / messen helemaal tot stilstand zijn
gekomen;
GG
zorg dat u de blenderbeker niet losschroeft van de messeneenheid.
G
VERBRANDINGSGEVAAR: Laat hete ingrediënten eerst tot
kamertemperatuur afkoelen voordat u ze in de blender verwerkt.
G
Gebruik nooit het deksel om de keukenmachine te bedienen, maar altijd de
aan/uit-knop.
G
Als teveel kracht wordt uitgeoefend op het
vergrendelingsmechanisme, wordt dit apparaat beschadigd
en kan het letsel veroorzaken.
G
Haal de stekker altijd uit de keukenmachine wanneer u hem
niet gebruikt.
G
Gebruik nooit een niet bij het apparaat behorend hulpstuk.
G
Laat het apparaat nooit onbeheerd terwijl het aan staat.
12
Nederlands
V
ouw voor het lezen a.u.b. de voorpagina met illustraties uit

G
Gebruik nooit een beschadigd apparaat. Laat het nakijken of repareren: zie
Onderhoud en klantenservice.
G
Laat het motorhuis, het netsnoer of de stekker nooit nat worden.
G
Laat het snoer nooit over de rand van een tafel of werkblad hangen of in
aanraking komen met hete oppervlakken.
G
U mag de maximum capaciteit die in de snelheidstabel wordt aangegeven,
niet overschrijden.
G
Op kinderen moet toezicht gehouden worden om er zeker van te zijn dat
ze niet met het apparaat spelen.
G
Dit apparaat mag niet door kinderen worden gebruikt. Houd het apparaat
en het snoer buiten het bereik van kinderen.
G
Dit apparaat kan worden gebruikt door personen met verminderde
lichamelijke, sensorische of geestelijke capaciteiten of gebrek aan ervaring
en kennis mits ze onder toezicht staan of instructie hebben gekregen over
het veilige gebruik van het apparaat, en de betrokken risico's begrijpen.
G
Gebruik het apparaat alleen voor het huishoudelijke gebruik waarvoor het
is bedoeld. Kenwood kan niet aansprakelijk worden gesteld in het geval
dat het apparaat niet correct is gebruikt, of waar deze instructies niet
worden opgevolgd.
G
Misbruik van uw keukenmachine/blender kan tot letsel leiden.
G
Het maximum vermogen is afhankelijk van het hulpstuk dat de grootste
hoeveelheid energie verbruikt. Andere hulpstukken verbruiken misschien
minder energie.
Raadpleeg de betreffende paragraaf onder De hulpstukken gebruiken voor
aanvullende veiligheidswaarschuwingen voor ieder hulpstuk afzonderlijk.
blender
G
VERBRANDINGSGEVAAR: Laat hete ingrediënten eerst tot
kamertemperatuur afkoelen voordat u ze in de blender verwerkt.
G
Wees voorzichtig wanneer u de messen hanteert en raak het snijvlak van
de messen bij het reinigen niet aan.
G
Laat de blender uitsluitend voorzien van deksel lopen.
G
Gebruik de kan uitsluitend met de bijgeleverde messen.
G
De blender nooit leeg gebruiken.
G
Om een lange levensduur van uw blender te garanderen, mag u hem nooit
langer dan 60 seconden gebruiken.
G
Smoothie-recepten – verwerk nooit bevroren ingrediënten die tijdens de
bevriezing tot een vaste massa gevormd zijn; breek de massa op voor u
hem aan de kan toevoegt.
G
De rand rond de beker is tijdens de vervaardiging gemonteerd; probeer
niet om deze rand te verwijderen.
13

14
BELANGRIJK: INSTRUCTIES VOOR HET MENGEN VAN HETE
VLOEISTOFFEN
Om de kans op brandwonden te verkleinen bij het mengen van hete
ingrediënten, moet u uw handen en andere onbeschermde huid uit de
buurt van het deksel houden om eventuele brandwonden te voorkomen.
De volgende voorzorgsmaatregelen moeten worden getroffen:
G
VOORZICHTIG: Het mengen van zeer hete ingrediënten kan
tot gevolg hebben dat hete vloeistof en stoom plotseling uit
het deksel of de vuldop worden gedreven
bm
.
G
We raden u aan hete ingrediënten te laten afkoelen voordat
ze worden verwerkt.
G
Overschrijd bij de verwerking van hete vloeistoffen, zoals soepen,
NOOIT de capaciteit van 1200 ml (gebruik de maatstreepjes op de
beker).
G
Stel de blender in het begin ALTIJD op een lage snelheid in en verhoog
de snelheid geleidelijk. Meng hete vloeistoffen NOOIT door de
pulseerstand te gebruiken.
G
Vloeistoffen die de neiging hebben om te schuimen, zoals melk, mogen
de maximumcapaciteit van 1000 ml niet overschrijden.
G
Wees voorzichtig als u de blender vastpakt: de beker en de inhoud zijn
erg heet.
G
Wees vooral voorzichtig als u het deksel verwijdert. Om lekken te
voorkomen is het deksel zo ontworpen dat het precies past. Bescherm
bij de hantering zo nodig uw handen met een doek of ovenwanten.
G
Zorg dat de beker goed op het onderstel is bevestigd; wanneer u de
beker van het apparaat verwijdert, houdt u het onderstel vast en zorgt
dat hij samen met de beker wordt verwijderd.
G
Zorg dat het deksel en de vuldop altijd goed op hun plaats zitten
voordat u de blender inschakelt.
G
Zorg altijd dat de luchtopeningen in de vuldop vrij zijn voordat u de
blender inschakelt (zie tekening
br
).
G
Zorg er bij het plaatsen van het deksel altijd voor dat het deksel en de
rand van de beker schoon en droog zijn, zodat een goede afsluiting kan
worden verkregen en morsen kan worden voorkomen.
schijven voor snijden/raspen
G
Verwijder het deksel nooit voordat de schijf helemaal tot stilstand is
gekomen.
G
Wees voorzichtig met de snijschijven – ze zijn heel erg scherp
G
Vul de kom niet te ver - overschrijdt de maximum capaciteit die op de kom
wordt aangegeven niet.

minikom met mes
G
Verwijder het deksel nooit voordat het mes helemaal tot stilstand is
gekomen.
G
Het mes is erg scherp – ga er altijd voorzichtig mee om.
G
Verwerk geen specerijen in de keukenmachine – ze kunnen de kunststof
onderdelen beschadigen.
G
Verwerk geen harde ingrediënten, zoals koffiebonen, ijsklontjes of
chocolade – ze kunnen het meselement beschadigen.
15
voordat u de stekker in het stopcontact steekt
G
Zorg dat de elektriciteitsvoorziening dezelfde spanning heeft
a
ls op de onderkant van het apparaat wordt aangegeven.
W
AARSCHUWING: DIT APPARAAT MOET GEAARD
ZIJN.
G
Dit apparaat voldoet aan de EC-richtlijn 2004/108/EC
betreffende de elektromagnetische compatibiliteit en EC-
bepaling 1935/2004 van 27/10/2004 betreffende materialen
die bestemd zijn voor contact met voedsel.
voordat u het apparaat voor het eerst gebruikt
1 Verwijder de plastic beschermhoezen van het mes. Wees
voorzichtig: de messen zijn erg scherp. Deze
beschermhoezen moeten weggegooid worden; ze zijn
uitsluitend bedoeld om het mes tijdens de vervaardiging en
het vervoer te beschermen.
2 Was de onderdelen, zie Reiniging en onderhoud.
legenda
keukenmachine
1
motorblok
2
Trïtan™-kom met aandrijfas
3
verwijderbare aandrijfas
4
Trïtan™-deksel
5
vulopening
6
duwstaafjes
7
veiligheidsvergrendeling
8
snoeropslag (aan achterzijde)
9
auto-toets
bk
snelheids- en pulseerknop
bl
aan/uit-lampje
thermoresist-blender
bm
vuldop
bn
deksel
bo
kan
bp
afsluitring
bq
messeneenheid
br
ventilatiegaten vuldop
hulpstukken
bs
meslemmet
bt
d
eeghulpstuk
ck
dubbele garde
cl
vouwhulpstuk
cm
schijf voor maximale capaciteit
cn
4mm-snij-/raspschijf
co
2mm-snij-/raspschijf
cp
extra fijne raspschijf
cq
fijne julienneschijf
cr
minikom met mes
cs
citruspers
ct
opslagdoos voor hulpstukken
gebruik van uw keukenmachine
1 Zet de kom op het motorblok. Plaats het handvat aan de
rechterkant naar achteren en draai naar rechts
1
tot de
kom vergrendeld is.
2 Plaats een hulpstuk op de aandrijfas van de kom.
NB: De verwijderbare aandrijfas
2
moet op het
apparaat worden gezet wanneer de schijven,
minikom, garde, het vouwhulpstuk en de
citruspers worden gebruikt.
G
Zet de kom en het hulpstuk altijd op de keukenmachine
voordat u ingrediënten toevoegt.
3 Zet het deksel
3
erop – zorg ervoor dat de bovenkant van
de aandrijfas/het hulpmiddel in het midden van het deksel
past.
G
De machine functioneert niet als de kom of het
deksel niet goed vergrendeld zijn. Controleer of
de vulopening en de komhendel zich aan de
rechterkant bevinden.
4 Steek de stekker in het stopcontact. Het aan-/uitlampje gaat
branden en knippert tot de kom en het deksel op de juiste
manier zijn geplaatst. Kies één van de volgende opties: -
Auto-toets – het lampje gaat branden als u op de toets Auto
drukt en de optimale snelheid voor het hulpstuk wordt
automatisch geselecteerd.
Snelheidstoets – selecteer handmatig de vereiste snelheid
(raadpleeg de tabel met aanbevolen snelheden).
Pulseren – gebruik de pulseertoets (P) voor korte pulsen. De
puls duurt zolang als de toets wordt ingedrukt.
5 Aan het eind van de verwerking schakelt u de snelheidstoets
naar de ‘O’/uit-stand, of als u Auto gebruikt, drukt u op die
toets en het lampje gaat uit.
G
Het aan-/uit-lampje knippert als het deksel of de
kom niet of onjuist zijn bevestigd.

G
D
e Auto-toets werkt niet als een snelheid is
geselecteerd met de snelheidstoets.
G
Voor u het deksel verwijdert, dient u het apparaat
a
ltijd uit te schakelen en de stekker uit het
stopcontact te halen.
belangrijk
G
Deze keukenmachine is niet geschikt voor het verpulveren of
m
alen van koffiebonen of voor het vermalen van kristalsuiker
tot basterdsuiker.
Eco-functie
Als de foodprocessor langer dan 30 minuten op het
e
lektriciteitsnet is aangesloten zonder te worden gebruikt,
wordt automatisch de standby-stand geactiveerd om het
e
nergieverbruik te beperken.
G
Het aan-/uitlampje knippert langzaam en de foodprocessor
werkt pas als een van de volgende handelingen wordt
uitgevoerd:-
G
De Auto-toets wordt ingedrukt.
G
De snelheidsknop wordt op een snelheid ingesteld en
vervolgens naar de 'O'/uit-stand gedraaid.
Het lampje blijft branden wanneer het apparaat klaar voor
gebruik is.
NB: Als de kom of het deksel niet goed zijn vergrendeld,
knippert het aan-/uitlampje sneller dan de Eco-functie.
uw thermoresist-blender gebruiken
1 Zet de afsluitring
bp
in de messeneenheid
bq
– zorg dat de
ring correct in de groef wordt geplaatst.
G
Het apparaat lekt wanneer de afsluitring
beschadigd is of niet goed is aangebracht.
2 Houd de onderkant van de meseenheid
bq
vast en steek de
messen in de kan – draai ze naar links, totdat ze vastklikken
4
. Raadpleeg de afbeeldingen aan de onderzijde van de
meseenheid, als volgt:
– onvergrendelde stand
– vergrendelde stand
De blender werkt niet als hij incorrect in elkaar is
gezet.
3 Plaats de ingrediënten in de kan.
4 Plaats het deksel op de kan en duw erop om hem goed vast
te zetten
5
. Zet de vuldop erop.
5 Zet de blender op het motorblok en draai hem naar rechts
6
om hem vast te zetten.
G
Het apparaat werkt niet als de blender onjuist
geplaatst is op de vergrendeling.
6 Selecteer Auto of een snelheid (zie de tabel met aanbevolen
snelheden) of gebruik de pulseerknop.
h
andige tips
G
Bij de bereiding van mayonaise plaatst u alle ingrediënten,
met uitzondering van de olie, in de blender. Verwijder de
v
uldop. Giet de olie vervolgens langzaam door de opening in
het deksel op het draaiende apparaat.
G
Bij dikke mengsels, zoals patés en dips, moet u de wand
v
an het apparaat misschien schoonschrapen. Als het
mengsel moeilijk verwerkt kan worden, voegt u meer
vloeistof toe.
G
V
erbrijzelen van ijsblokjes – pulseer in korte pulsen tot het ijs
de gewenste consistentie bereikt heeft.
G
De verwerking van specerijen wordt afgeraden; dit kan de
p
lastic onderdelen beschadigen.
G
Het apparaat werkt niet als de blender onjuist geplaatst is.
G
D
roge ingrediënten mengen – in stukken snijden, de vuldop
verwijderen, en de stukken één voor één op het draaiende
mes laten vallen. Houd uw handen over de opening. Voor
het beste resultaat het apparaat regelmatig legen.
G
Gebruik de blender niet om voeding in te bewaren. Zorg dat
deze zowel voor als na gebruik leeg is.
G
Meng nooit meer dan 1,6 liter - of minder voor schuimende
vloeistoffen zoals milkshakes.
16

17
tabel met aanbevolen snelheden
instrument/hulpstuk functie aanbevelen verwer- maximum
s
nelheid kingstijd
F
F
c
apaciteit
M
es Kant-en-klare taartmixen 8 15-20 sec 1,7 kg bloemgewicht
Gebaksdeeg – boter met bloem mengen 5 –8 10 sec 500g bloemgewicht
W
ater toevoegen om ingrediënten te mengen 10-20 sec
Vis en mager vlees hakken Pulse –8 10-30 sec 800g
Patés en terrines max mager rundvlees
Groenten hakken Pulse 5-10 sec 500g
Noten hakken 8 30-60 sec 200g
Z
acht fruit, gekookt fruit en gekookte groenten 8 10-30 sec 1 kg
p
ureren
S
auzen, dressing en dips 8 max 2 min 800g
Mes met schijf voor Koude soepen Begin op lage 30-60 sec 1,7 liter
maximale capaciteit snelheid en
Milkshakes/beslag verhoog 15-30 sec 1,3 liter
tot maximum
Dubbele garde Eiwitten 8 60-90 sec 4 (150g)
Ei en suiker voor vetloze taarten 8 4-5 min 3 eieren (150g)
Room 8 30 sec 500 ml
Boter en suiker kloppen 8 max 2 min 200g vet
200g suiker
Deeghulpstuk Mengsels met gist 8 60 sec 1 kg totaalgewicht
Wit broodmeel 8 60 sec 600g bloemgewicht
Volkoren broodmeel 8 60 sec 500g bloemgewicht
Vouwhulpstuk Slagroom en vruchtenpuree 1 –2 60 sec 300g room,
300g puree
Eiwitten in zware mengsels vouwen 1 –2 60 sec totaalgewicht 600g
Werk bloem in het geklopte mengsel van boter 1 –2 60 sec 200g bloemgewicht
en suiker
Bitterkoekjes 1 –2 60 sec totaalgewicht 500g
Schijven – snijden/ Harde ingrediënten als wortelen, harde kaas 5 –8 –
raspen Zachtere ingrediënten als komkommer, tomaten 1 –5 –
Extra fijne rasp Parmezaanse kaas, aardappelen voor 8–
Duitse aardappelknoedels
Fijne julienneschijf Aardappellucifers en rösti 8–
Roerbakgerechten en groentegarnituur
Thermoresist-blender Koude vloeistoffen en dranken 8 15-30 sec 1,6 liter
Soep op bouillonbasis 8 30 sec 1,2 liter
Soep met melk 8 30 sec 1 liter
We raden u aan hete ingrediënten te laten afkoelen voordat ze worden verwerkt. Als u hete ingrediënten
toch wilt verwerken, dient u de veiligheidsinstructies voor het mengen van hete ingrediënten te lezen.
Minikom met mes Vlees 8 20 sec + 300g mager rundvlees
pulseren
Kruiden hakken 8 30 sec 20g
Noten hakken 8 30 sec 100g
Mayonaise 8 30 sec 2 eieren
300g olie
Puree 8 30 sec 200g
Minikom met schijven Zie de aanbevolen snelheid voor iedere schijf – 500g max
De kom niet te ver
vullen
Citrusfruitpers Kleinere ingrediënten, zoals limoenen en 1 –2 – 2 kg
citroenen
Groter fruit zoals sinaasappels en grapefruit
FF
Dit dient uitsluitend als richtlijn en is afhankelijk van het precieze recept en de ingrediënten die worden verwerkt.
Niet boven het op de
kom aangegeven
maximale
vulvermogen vullen

de hulpstukken gebruiken
R
aadpleeg de aanbevolen snelheidstabel voor elk hulpstuk.
bs
meslemmet
Van alle hulpstukken is het meslemmet het meest veelzijdige.
D
e duur van de verwerkingstijd bepaalt de verkregen textuur.
Voor een grovere textuur gebruikt u de pulseerknop.
Gebruik het meslemmet voor het maken van taart en gebak,
v
oor het fijnhakken van rauw of gekookt vlees, groenten,
noten, paté, dips, voor het pureren van soep en voor het
verkruimelen van koekjes en brood.
t
ips
G
S
nij etenswaren zoals vlees, brood en groente in blokjes van
2 cm, voordat u ze gaat verwerken.
G
K
oekjes moeten in stukjes verbrokkeld worden en via de
vulopening worden toegevoegd, terwijl de machine draait.
G
Als u gebak maakt en de boter rechtstreeks uit de koelkast
gebruikt, moet u de boter in blokjes van 2 cm snijden.
G
Zorg ervoor dat u de machine niet te lang gebruikt.
bt
deeghulpstuk
Deze haak wordt gebruikt voor het kneden van gegist deeg.
G
Doe de droge ingrediënten in de kom en giet de vloeistof
door de toevoerbuis, terwijl de vulopening draait. Meng de
ingrediënten totdat een gladde elastische deegbal ontstaat.
Dit duurt 60 seconden.
G
Kneed het deeg opnieuw met de hand. Kneed het deeg niet
in de kom, omdat de machine hierdoor instabiel kan
worden.
ck
dubbele garde
Gebruiken voor lichte mengsels zoals eiwitten, room,
gecondenseerde melk en voor het kloppen van eieren en
suiker voor vetloos biscuitgebak.
de garde gebruiken
1 Plaats de kom op het motorblok en bevestig de
verwijderbare aandrijfas.
2 Duw beide gardes
7
goed in de aandrijfkop.
3 Monteer de garde door hem zorgvuldig te draaien, totdat hij
over de aandrijfas zakt.
4 Voeg de ingrediënten aan de kom toe.
5 Zet het deksel erop – zorg ervoor dat de bovenkant van de
aandrijfas in het midden van het deksel past.
6 Zet de machine aan.
belangrijk
G
De garde is niet geschikt om kant-en-klare
taartmixen te bereiden, aangezien deze mengsels
te zwaar zijn en de garde zullen beschadigen.
Gebruik altijd het mes.
tips
G
Het beste resultaat wordt verkregen met eieren op
kamertemperatuur.
G
Zorg ervoor dat de kom en de garde schoon en vetvrij zijn,
voordat u ze gaat gebruiken.
b
oter en suiker kloppen
G
Voor het beste resultaat moet de boter eerst op
kamertemperatuur komen (20 °C) voordat hij wordt geklopt.
G
ebruik GEEN boter die rechtstreeks uit de
koelkast komt, omdat de garde hierdoor
beschadigd raakt.
G
Z
waardere ingrediënten zoals bloem en gedroogd fruit
moeten handmatig worden ingevouwen.
G
U mag de maximum capaciteit of verwerkingstijd die in de
s
nelheidstabel wordt aangegeven, niet overschrijden.
cl
vouwhulpstuk
Gebruik het vouwhulpstuk om lichte ingrediënten in
z
waardere mengsels te vouwen, zoals voor meringue,
m
ousse en vruchtenmousse.
1
Plaats de kom op het motorblok en bevestig de
verwijderbare aandrijfas.
2 Duw het roerblad
8
goed in de aandrijfkop.
3 Zet het vouwhulpstuk op de foodprocessor door voorzichtig
te draaien tot het over de aandrijfas valt.
4 Voeg de ingrediënten toe.
5 Leg het deksel erop – zorg dat de bovenkant van de
aandrijfas zich in het midden van het deksel bevindt.
6 Selecteer een lage snelheid (snelheid 1 – 2).
ga als volgt te werk om de klopper te verwijderen
Neem de klopper uit de aandrijfkop door op de
ontgrendelingsknop te drukken
9
.
tips
G
Gebruik geen Auto of hoge snelheid, omdat een lage
snelheid nodig is om de werking van het vouwhulpstuk te
optimaliseren.
G
Voor het beste resultaat de eiwitten of room niet te lang
kloppen – het vouwhulpstuk kan het mengsel niet goed
vouwen als het geklopte mengsel te stevig is.
G
Vouw het mengsel niet langer dan aangegeven wordt in de
tabel met aanbevolen snelheden, aangezien de lucht dan uit
het mengsel wordt geslagen en het mengsel te slap wordt.
G
Ongemengde ingrediënten op het blad of de zijkanten van
de kom moeten zorgvuldig met de spatel worden
ingevouwen.
cm
schijf voor max capaciteit
Wanneer vloeistoffen worden gemengd in de kom, moet
gebruik worden gemaakt van de schijf voor maximale
capaciteit met het mes. Hierdoor wordt lekken voorkomen
en worden de hakprestaties van het mes verbeterd.
1 Zet de kom op het motorblok.
2 Monteer het meselement.
3 Voeg de ingrediënten toe die verwerkt moeten worden.
4 Zet de schijf voor maximale capaciteit over de bovenkant
van het mes; zorg er hierbij voor dat de schijf op de rand in
de kom rust
bk
. Duw de capaciteitsschijf niet naar
beneden.
5 Plaats het deksel op de kom en zet de machine aan.
18
Sayfa yükleniyor...
Sayfa yükleniyor...
Sayfa yükleniyor...
Sayfa yükleniyor...
Sayfa yükleniyor...
Sayfa yükleniyor...
Sayfa yükleniyor...
Sayfa yükleniyor...
Sayfa yükleniyor...
Sayfa yükleniyor...
Sayfa yükleniyor...
Sayfa yükleniyor...
Sayfa yükleniyor...
Sayfa yükleniyor...
Sayfa yükleniyor...
Sayfa yükleniyor...
Sayfa yükleniyor...
Sayfa yükleniyor...
Sayfa yükleniyor...
Sayfa yükleniyor...
Sayfa yükleniyor...
Sayfa yükleniyor...
Sayfa yükleniyor...
Sayfa yükleniyor...
Sayfa yükleniyor...
Sayfa yükleniyor...
Sayfa yükleniyor...
Sayfa yükleniyor...
Sayfa yükleniyor...
Sayfa yükleniyor...
Sayfa yükleniyor...
Sayfa yükleniyor...
Sayfa yükleniyor...
Sayfa yükleniyor...
Sayfa yükleniyor...
Sayfa yükleniyor...
Sayfa yükleniyor...
Sayfa yükleniyor...
Sayfa yükleniyor...
Sayfa yükleniyor...
Sayfa yükleniyor...
Sayfa yükleniyor...
Sayfa yükleniyor...
Sayfa yükleniyor...
Sayfa yükleniyor...
Sayfa yükleniyor...
Sayfa yükleniyor...
Sayfa yükleniyor...
Sayfa yükleniyor...
Sayfa yükleniyor...
Sayfa yükleniyor...
Sayfa yükleniyor...
Sayfa yükleniyor...
Sayfa yükleniyor...
Sayfa yükleniyor...
Sayfa yükleniyor...
Sayfa yükleniyor...
Sayfa yükleniyor...
Sayfa yükleniyor...
Sayfa yükleniyor...
Sayfa yükleniyor...
Sayfa yükleniyor...
Sayfa yükleniyor...
Sayfa yükleniyor...
Sayfa yükleniyor...
Sayfa yükleniyor...
Sayfa yükleniyor...
Sayfa yükleniyor...
Sayfa yükleniyor...
Sayfa yükleniyor...
Sayfa yükleniyor...
Sayfa yükleniyor...
Sayfa yükleniyor...
Sayfa yükleniyor...
Sayfa yükleniyor...
Sayfa yükleniyor...
Sayfa yükleniyor...
Sayfa yükleniyor...
Sayfa yükleniyor...
Sayfa yükleniyor...
Sayfa yükleniyor...
Sayfa yükleniyor...
Sayfa yükleniyor...
Sayfa yükleniyor...
Sayfa yükleniyor...
Sayfa yükleniyor...
Sayfa yükleniyor...
Sayfa yükleniyor...
Sayfa yükleniyor...
Sayfa yükleniyor...
Sayfa yükleniyor...
Sayfa yükleniyor...
Sayfa yükleniyor...
Sayfa yükleniyor...
Sayfa yükleniyor...
Sayfa yükleniyor...
Sayfa yükleniyor...
Sayfa yükleniyor...
Sayfa yükleniyor...
Sayfa yükleniyor...
Sayfa yükleniyor...
Sayfa yükleniyor...
Sayfa yükleniyor...
Sayfa yükleniyor...
Sayfa yükleniyor...
Sayfa yükleniyor...
Sayfa yükleniyor...
Sayfa yükleniyor...
Sayfa yükleniyor...
Sayfa yükleniyor...
Sayfa yükleniyor...
Sayfa yükleniyor...
Sayfa yükleniyor...
Sayfa yükleniyor...
Sayfa yükleniyor...
Sayfa yükleniyor...
Sayfa yükleniyor...
Sayfa yükleniyor...
Sayfa yükleniyor...
Sayfa yükleniyor...
Sayfa yükleniyor...
Sayfa yükleniyor...
Sayfa yükleniyor...
Sayfa yükleniyor...
Sayfa yükleniyor...
Sayfa yükleniyor...
Sayfa yükleniyor...
Sayfa yükleniyor...
Sayfa yükleniyor...
Sayfa yükleniyor...
Sayfa yükleniyor...
Sayfa yükleniyor...
Sayfa yükleniyor...
Sayfa yükleniyor...
Sayfa yükleniyor...
Sayfa yükleniyor...
Sayfa yükleniyor...
Sayfa yükleniyor...
Sayfa yükleniyor...
Sayfa yükleniyor...
Sayfa yükleniyor...
Sayfa yükleniyor...
Sayfa yükleniyor...
Sayfa yükleniyor...
Sayfa yükleniyor...
Sayfa yükleniyor...
Sayfa yükleniyor...
Sayfa yükleniyor...
Sayfa yükleniyor...
Sayfa yükleniyor...
Sayfa yükleniyor...
Sayfa yükleniyor...
Sayfa yükleniyor...
Sayfa yükleniyor...
Sayfa yükleniyor...
Sayfa yükleniyor...
Sayfa yükleniyor...
Sayfa yükleniyor...
Sayfa yükleniyor...
Sayfa yükleniyor...
Sayfa yükleniyor...
Sayfa yükleniyor...
Sayfa yükleniyor...
Sayfa yükleniyor...
Sayfa yükleniyor...
Sayfa yükleniyor...
Sayfa yükleniyor...
Sayfa yükleniyor...
Sayfa yükleniyor...
Sayfa yükleniyor...
Sayfa yükleniyor...
Sayfa yükleniyor...
Sayfa yükleniyor...
Sayfa yükleniyor...
Sayfa yükleniyor...
-
 1
1
-
 2
2
-
 3
3
-
 4
4
-
 5
5
-
 6
6
-
 7
7
-
 8
8
-
 9
9
-
 10
10
-
 11
11
-
 12
12
-
 13
13
-
 14
14
-
 15
15
-
 16
16
-
 17
17
-
 18
18
-
 19
19
-
 20
20
-
 21
21
-
 22
22
-
 23
23
-
 24
24
-
 25
25
-
 26
26
-
 27
27
-
 28
28
-
 29
29
-
 30
30
-
 31
31
-
 32
32
-
 33
33
-
 34
34
-
 35
35
-
 36
36
-
 37
37
-
 38
38
-
 39
39
-
 40
40
-
 41
41
-
 42
42
-
 43
43
-
 44
44
-
 45
45
-
 46
46
-
 47
47
-
 48
48
-
 49
49
-
 50
50
-
 51
51
-
 52
52
-
 53
53
-
 54
54
-
 55
55
-
 56
56
-
 57
57
-
 58
58
-
 59
59
-
 60
60
-
 61
61
-
 62
62
-
 63
63
-
 64
64
-
 65
65
-
 66
66
-
 67
67
-
 68
68
-
 69
69
-
 70
70
-
 71
71
-
 72
72
-
 73
73
-
 74
74
-
 75
75
-
 76
76
-
 77
77
-
 78
78
-
 79
79
-
 80
80
-
 81
81
-
 82
82
-
 83
83
-
 84
84
-
 85
85
-
 86
86
-
 87
87
-
 88
88
-
 89
89
-
 90
90
-
 91
91
-
 92
92
-
 93
93
-
 94
94
-
 95
95
-
 96
96
-
 97
97
-
 98
98
-
 99
99
-
 100
100
-
 101
101
-
 102
102
-
 103
103
-
 104
104
-
 105
105
-
 106
106
-
 107
107
-
 108
108
-
 109
109
-
 110
110
-
 111
111
-
 112
112
-
 113
113
-
 114
114
-
 115
115
-
 116
116
-
 117
117
-
 118
118
-
 119
119
-
 120
120
-
 121
121
-
 122
122
-
 123
123
-
 124
124
-
 125
125
-
 126
126
-
 127
127
-
 128
128
-
 129
129
-
 130
130
-
 131
131
-
 132
132
-
 133
133
-
 134
134
-
 135
135
-
 136
136
-
 137
137
-
 138
138
-
 139
139
-
 140
140
-
 141
141
-
 142
142
-
 143
143
-
 144
144
-
 145
145
-
 146
146
-
 147
147
-
 148
148
-
 149
149
-
 150
150
-
 151
151
-
 152
152
-
 153
153
-
 154
154
-
 155
155
-
 156
156
-
 157
157
-
 158
158
-
 159
159
-
 160
160
-
 161
161
-
 162
162
-
 163
163
-
 164
164
-
 165
165
-
 166
166
-
 167
167
-
 168
168
-
 169
169
-
 170
170
-
 171
171
-
 172
172
-
 173
173
-
 174
174
-
 175
175
-
 176
176
-
 177
177
-
 178
178
-
 179
179
-
 180
180
-
 181
181
-
 182
182
-
 183
183
-
 184
184
-
 185
185
-
 186
186
-
 187
187
-
 188
188
-
 189
189
-
 190
190
-
 191
191
-
 192
192
-
 193
193
-
 194
194
-
 195
195


diğer dillerde
- slovenčina: Kenwood FPM800 Návod na obsluhu
- français: Kenwood FPM800 Le manuel du propriétaire
- italiano: Kenwood FPM800 Manuale del proprietario
- polski: Kenwood FPM800 Instrukcja obsługi
- Deutsch: Kenwood FPM800 Bedienungsanleitung
- dansk: Kenwood FPM800 Brugervejledning
İlgili makaleler
-
Kenwood FDP643WH El kitabı
-
Kenwood FP972 El kitabı
-
Kenwood FPM810 series El kitabı
-
Kenwood FP970 Troubleshooting guide
-
Kenwood Electronics FPM270 El kitabı
-
-
Kenwood FPM250 series El kitabı
-
Kenwood FPM264 El kitabı
-
Kenwood KFLEX FHM155SI Kullanım kılavuzu
-
Kenwood FDM780BA El kitabı