
Buzdolabý
Montajý ve kullanýmý
Refrigerator
Installation and use

2 kapýlý donduruculu buzdolabý 1
Montaj ve kullaným talimatlarý
Two-doors refrigerator-freezer
11
Instructions for installation and use
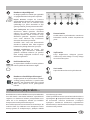
Bu beyaz eþyanýn etkili ve güvenli kullanýmýný saðlamak için:
- sadece yetkili teknik servislere baþvurunuz
- daima yedek parça kullanýlmasýný talep ediniz
To maintain the EFFICIENCY and SAFETY of this appliance, we recommend:
- call only the Service Centers authorized by the manufacturer
- always use original Spare Parts
TK
GB
MTA 4053 NF (TK)
MTA 4058 NF (TK)
MTA 4059 NF (TK)

1
TR
Ariston Buzdolabý için pratik rehber
Buzdolabýnýzýn yerleþtirilmesi
1. Cihazýnýz dýþ ortamda kurulmamalýdýr. Cihazý dýþ
mekan þartlarýna (yaðmur, güneþ gibi.) maruz
býrakmak son derece sakýncalýdýr.
2. Buzdolabý sadece yetiþkinler tarafýndan kullanýl-
malýdýr ve bu kitapçýkta verilen kullaným önerilerine
dikkat edilmelidir.
3. Cihaza çýplak ayaklý iken veya ýslak elle
dokunmayýnýz.
4. Ekli kablo ve çoklu priz kullanmayýnýz. Elektrik
kablolarýnýn kývrýlmamasýna ve aðýrlýk altýnda
kalmamasýna dikkat ediniz.
5. Fiþi prizden çekmek için kabloyu veya buzdolabýný
çekmeyiniz. Bu son derece tehlikelidir.
6. Cihazýn içerisindeki soðutucu ünitelerine ýslak elle
dokunmayýnýz. Derin dondurucudan o anda çýkarmýþ
olduðunuz buz kalýplarýný aðzýnýza almayýnýz,
yapýþabilir ve kalýcý buz yanýklarýna sebep olabilir.
7. Temizlik ve bakým iþleminden once cihazý fiþten
çekiniz. Panel üzerinde ayar düðmesini " " (kapalý)
konumuna getirmek yeterli olmayacaktýr.
8. Buzdolabýnýzda bir problem var ise Ariston Yetkili
Servisi'ni çaðýrmadan önce “Sorunlar ve Çözümleri“
bölümünü okuyunuz; bir dizi problem için çözümleri
bu bölümde bulabilirsiniz.
Eðer sorun devam eder ise Ariston Yetkili Servisi'ni
arayýn, sorununuz en kýsa sürede servis tarafýndan
giderilecektir.
9. Elektrik kablolarý zarar görmüþ ise Ariston Yetkili
Servisi'ni arayarak yeni bir kablo ile deðiþtirilmesini
isteyiniz.
Hava Sirkülasyonu
Kompresör ve kondanser çalýþýrken ýsý üretirler bu
nedenle iyi bir hava sirkülasyonu saðlayarak aþýrý
ýsýnmalar engellenmelidir. Cihazýn yerleþtirildiði
mekanda havalandýrma amaçlý ara sýra açýlabilecek bir
pencere olmalýdýr. Bu odadaki nem oranýnýn da
azalmasýný saðlayacaktýr.
Cihazýnýzýn doðru bir þekilde çalýþmasý için :
- Eðer buzdolabýnýzý üstü kapalý bir yere yerleþtirecek-
seniz, cihazýn üst kýsmýnda en az 10 cm boþluk
kalmasý gerekmektedir.
- Buzdolabýnýzýn yan taraflarýnda 5'er cm mesafe
olmalýdýr.
- Cihazýn arkasý ile duvar arasýnda en az 5 cm boþluk
býrakýlmalýdýr. Bu amaçla verilen mesafe
plastikleri mutlaka takýlmalýdýr.
Cihazýnýzý direkt ýsýdan koruyunuz
Cihazýnýzý direk güneþ alan noktaya veya fýrýn yanýna
yerleþtirmeyiniz.
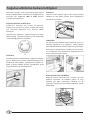
Yerine yerleþtirme
Cihazýnýzý yerleþtirdiðiniz mekanda zeminin düz
olmasýna dikkat ediniz. Eðer zemin tam olarak düz
deðilse ayak ayarlarýný yaparak cihazýn zemin üzerinde
sabit durmasýný saðlayýnýz.
Topraklama
Elektrik baðlantýsýný yapmadan önce, evinizin þebeke
deðerlerinin, buzdolabýnýzýn sebzelik bölümünde sol
tarafa yerleþtirilmiþ olan ürün plaketindeki voltaj
deðerlerine uygunluðunu kontrol ediniz. Emniyetiniz
için buzdolabýnýzýn çalýþtýrýlmasýnda topraklý priz
kullanýnýz. Prizde toprak hattý bulunmuyorsa ehliyetli bir
elektrikçi çaðýrarak prizi deðiþtiriniz.
Buzdolabýnýzý fiþe takmadan önce
Buzdolabýnýz eve geldikten sonra dik vaziyette 3 saat
bekleyiniz. Cihazýnýzý fiþe taktýktan sonra içerisine
yiyecekleri yerleþtirmeden önce en az 4 saat boyunca boþ
olarak çalýþtýrýnýz.
Þebeke geriliminin, soðutucu bölümün iç tarafýnda
bulunan veri plaksýna uygun olduðundan emin olunuz.
Buzdolabýnýzýn kullanma voltajý 220 Volt'tur. Elektrik
fiþini topraklý ve 10 Amper akým deðerine uygun bir prize
takýnýz.
Bu kitapçýkta buzdolabýnýzýn kullanýmý ile ilgili bazý önemli konulara deðinilmiþtir. Bunlarý dikkatlice okuyarak
buzdolabýnýzýn uzun ömürlü olmasýnýn yollarýný keþfedebilirsiniz.
Buzdolabýnýzýn kurma iþlemi cihazýnýzýn performansýný etkileyen en önemli iþlemdir .

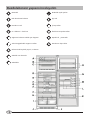
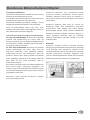
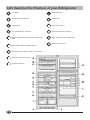
Buzmatik
Hýzlý dondurma bölümü
Dondurucu rafý
O °C bölmesi - fresh box
Soðutucu bölümü sýcaklýk ayar düðmesi
Yerleri deðiþtirilebilir soðutucu raflarý
Raf üzerinde kayabilir peynir / et kutusu
Sebzelik nem kontrolü
Sebzelikler
Buzdolabý ayak ayarlarý
Þiþe rafý
Ýç kapý raflarý
Özel kutu meþrubat raflarý
Kapaklý raf , yumurtalýk
Dondurucu kapý raflarý
Buzdolabýnýzýn yapýsýný inceleyelim
TR
2

3
TR
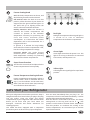
Dondurucu Ayar Düðmesi
Bu düðme yardýmý ile sýcaklýk ayarý yapýlabilir
ve aþaðýda belirtilen fonksiyonlar seçilebilir.
Kapalý Konum: Düðme bu konuma
ayarlandýðýnda cihazýnýzýn tüm fonksiyonlarý
durdurulur ancak yine de cihazýnýz fiþten
çekilmediði için panel üzerindeki E yeþil
gösterge lambasý yanmaya devam edecektir.
Tatil Fonksiyonu: Bu konum seçildiðinde
dondurucu bölüm gýdalarýn muhafaza
edilmesi için gereken minimum derecede
çalýþmaya devam ederek minimum enerji
tüketimini garantiler. Soðutucu bölümün
uzun süreli kullaným dýþý býrakýlmasý
durumlarý durumlarý için idealdir.
Genellikle uzun süreli tatil dönemlerinde
dondurucu bölümün dolu fakat soðutucu
bölümün boþ olduðu durumlar için seçilir.
Ekonomi Fonksiyonu: Bu konum, oda
sýcaklýðýna göre dondurucu bölümdeki
gýdalarýn muhafaza edilmesi için gereken
ideal sýcaklýðý saðlayarak minimum enerji
tüketimini garantiler.
Hýzlý Dondurma Tuþu
Bu tuþ dondurucu bölüme konulan gýdalarýn
hýzlý bir þekilde dondurulmasýný saðlar.
Dondurucu Sýcaklýk Ayar Göstergesi
Düðme yardýmý ile seçilen dondurucu bölüm
sýcaklýðý gösterge üzerinde (–) iþaretli olarak
gösterilir. Ayný zamanda alarm (A1) ve kritik
alarm (A2) uyarýlarý da bu göstergelerde
belirtilir.
Kýrmýzý Lamba
Sýcaklýk alarm sinyal lambasýdýr. Dündurucu
bölümdeki anormal sýcaklýk oluþumlarýnda
yanar.
Yeþil Lamba
Enerji baðlantýsýnýn olduðunu gösterir.
Cihazýnýz fiþe takýlý olduðu ve enerji olduðu
sürece bu lamba yanar.
Sarý Lamba
Süper dondurma konum sinyal lambasýdýr.
Cihazýnýzý çalýþtýralým...
Buzdolabýnýz eve teslim edildikten sonra prize takmadan
önce dik olarak 3 saat kadar bekletiniz. Yiyeceklerinizi
soðutucu ve dondurucu bölüme yerleþtirmeden önce
cihazý ýlýk su ile temizleyiniz. Temizlik için kesinlikle
deterjan türü temizleyiciler kullanmayýnýz.
Bu model kompresör koruma sistemi ile donatýlmýþtýr. Bu
nedenle cihazý fiþe taktýktan sonra kompresör hemen
devreye girmez ise endiþelenmeyin, yaklaþýk 8 dakika
sonra devreye girecektir.
Cihazý fiþe taktýktan sonra üst panel üzerinde dondurucu
ayar düðmesi " " (Kapalý) konumda olabilir. Bu düðmeyi
bu konumdan istenilen dondurucu sýcaklýðýna
ayarlayýnýz. Dondurucu bölümünün soðutulmasýný
hýzlandýrmak için Hýzlý dondurma fonksiyonunu devreye
sokmanýzý tavsiye ederiz.

Soðutucu Bölümü Kullaným Bilgileri
Termostat sayesinde, cihaz içerisindeki sýcaklýk manuel
olarak ayarlanmaktadýr. Sýcaklýk ayarýný deðiþtirmek için
termostat ayar düðmesini MIN ile MAX konumu
arasýnda ayarlayabilirsiniz.
Soðutucu bölümü sýcaklýk ayarý
Dondurucu bölümün boþ olmasý durumunda,
soðutucunun içerisinde en uygun sýcaklýðý elde etmek
için termostat düðmesini orta konuma (MED)
ayarlayýnýz.
Termostat ayarý yapýlýrken , soðutucu kapýsýnýn ne kadar
sýklýkla açýldýðý , içerisinde ne kadar yiyecek saklanacaðý
ve oda sýcaklýðý gözönüne alýnmalýdýr.
Fresh box
Fresh box soðutucu bölümünün en soðuk yeri olduðun-
dan bu bölmeye kýsa sürede kullanmak düþüncesi ile,
dondurmak istemediðiniz yiyeceklerinizi koyabilir (et,
balýk) ya da bu bölümü donmuþ yiyeceklerinizi yavaþ
yavaþ çözdürmek için kullanabilirsiniz.
Et kutusu
Cam rafa monte edilmiþ saða ve sola kolayca hareket
edebilen bu özel bölme, kokulu besin maddelerinin
saklanmasý için idealdir.
Sebzelikler
39 litrelik geniþ sebzelikler büyük miktarda meyve ve
sebzenin saklanmasý için uygundur. Pratik kapaklar
sayesinde sebzeliklerin içerisine ulaþmak ise çok kolaydýr.
Nem kontrol mekanizmalarý, gýdalarýnýzýn kurumama-
sýný ve daha uzun sure taze kalmasýný saðlamak için nem
oranýný yüksek seviyede tutarlar.
Kutu içecekler için özel bölme
Soðutucu bölüm kapýsýnda kutu içecekler için özel
bölmeler mevcuttur. Bu bölmeler, yoðurt, et suyu
tabletleri gibi diðer malzemeleri saklamak için de
uygundur. Ýhtiyaca gore bu bölmeler optimum þekilde
kullanýlabilir.
TR
4

Dondurucu Bölümü Kullaným Bilgileri
Yiyeceklerin saklanmasý
Yiyeceklerin dondurulmasý ve saklanmasý için bir sonraki
bölümde yer alan tablolara baþvurunuz.
Yiyeceklerinizi dondururken daha önceden donmuþ olan
gýdalara temas etmemesine özen gösteriniz.
Dondurmak istediðiniz yiyeceðinizi, sýcaklýðýn -18°C'ye
düþtüðü hýzlý dondurma bölmesine “B“ yerleþtiriniz.
Cihazý ilk kullanacaðýnýz zaman veya uzun süreli
kullaným dýþý býrakýp tekrar çalýþtýrdýðýnýzda cihazýn bir
süre maksimumda çalýþmasýný saðlayýnýz.
Hýzlý dondurma için iki özel fonksiyon öngörülmüþtür:
24 SAAT HIZLI DONDURMA: Bu konum az miktardaki
gýdalarýn hýzlý dondurulmasý için tavsiye edilir. Bu
konumu ayarlamak için hýzlý dondurma düðmesine kýsa
süreli basýlmasý yeterlidir, böylelikle panel üzerindeki F
sarý gösterge lambasý yanacaktýr.
48 SAAT HIZLI DONDURMA: Bu konum çok miktarda
gýdanýn dondurulmasý için tavsiye edilir. Ayrýca bu
fonksiyonu kullanýrken, fazla miktardaki gýdalarýn
yüklenmeden 24 saat önce fonksiyonun aktif hale
getirilmesi tavsiye edilir. Böylece dondurucu bölümün
yeterli soðukluða ulaþtýrýlmasý ve bu þekilde yüklenerek
diðer kalan 24 saat içinde yiyeceklerin daha iyi
dondurulmasý saðlanýr.
Bu konumu ayarlamak için B hýzlý dondurma düðmesine
biraz uzunca basýnýz, fonksiyonun baþladýðý F sarý
lambanýn yanýp sönmeye baþlamasý ile anlaþýlýr. Bu yanýp
sönme ilk 24 saat boyunca devam eder ve ikinci 24 saate
geçildiðinde sürekli yanar.
Dondurma iþlemi sýrasýnda dondurucu kapaðýný
açmamaya özen gösteriniz.
Dondurma iþleminden önce yiyeceklerinizi küçük
porsiyonlar halinde hazýrlamanýz donma iþlemini
hýzlandýrýr. Paketlerin üzerine içinde ne olduðunu ve
hangi tarihte dondurucuya konulduðunu not etmenizi
tavsiye ederiz.
Dondurucu bölümde daha fazla yer açmak için
dondurucu bölüm rafýný çýkarabilirsiniz. Yiyecekleri
yerleþtirdikten sonra kapaðýn tam olarak kapanýp
kapanmadýðýný kontrol ediniz. Elektrik kesintilerinde
dondurucu bölümün kapaðýný açmayýnýz. Böylece ýsý
artýþýný engellemiþ olursunuz. Kapý hiç açýlmadýðý
takdirde dondurulmuþ yiyecekler yaklaþýk 9-14 saat
muhafaza edilir.
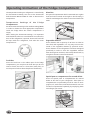
Buzmatik
Dondurucu bölümde bulunan buzmatik kullaným
kolaylýðý ve hijyen düþünülerek tasarlanmýþtýr. Buzmatiði
su ile doldurup yerine yerleþtiriniz. Yaklaþýk iki saat
içerisinde buzlarýnýz hazýrdýr. Buz almak için buzmatiði
yerinden çýkarmayýnýz. Üzerindeki düðmeleri saða
çeviriniz. Gözeneklerdeki buzlar alttaki özel buz kabýna
dökülecektir.Buz kabýný çýkarýp servis yapabilirsiniz.
5
TR

Yiyeceklerin soðutucu bölümde saklanmasý için öneriler;
Yiyecek
Sarýlmýþ et ve balýk (plastik folyo ile
sarýnýz ya da plastik torbalara
yerleþtiriniz)
Taze Peynir
Yumurta
Tereyað, margarin
Piþirilmiþ yiyecekler
Þiþelenmiþ ürünler, süt, yoðurt
Meyve ve sebzeler
(Hava geçirmez kaplara
yerleþtirilerek, soðutulmuþ
olarak soðutucuya yerleþtiriniz)
Sosis, salam, sandviç etleri
genel olarak, pasta, krema,
puding, çikolata, kalýplý pastalar,
kýrmýzý domates, ekmek, kuru
pastalar...
Saklama süresi
2 veya 3 gün
3 veya 4 gün
1 ay
1 hafta
3-4 gün
1 hafta
Soðutucu bölümde
yerleþtirileceði yer
Soðutucu dibinde, sebze
bölmesinin üzerinde (en soðuk
bölüm)
Soðutucu dibinde, sebze
bölmesinin üzerinde (en soðuk
bölüm)
Yumurtalýk rafýnda
Kapý rafýnda
Herhangi bir rafta
Özel kapý rafýnda
Sebze çekmecesinde
Not: Patates, sarýmsak ve soðan soðutucuda saklanmamalýdýr.
Yiyeceklerin Saklanmasý
TR
6

Yiyeceklerin dondurucu bölümde saklanmasý için öneriler:
Et ve Balýk
Besinler
Biftek
Kuzu Eti
Domuz rosto
Dana rosto
Domuz/dana parça et
Domuz/dana pirzola
Kýyma
Yürek ve ciðer
Sucuk/sosis
Tavuk ve hindi
Ördek ve kaz
Sülün, keklik ve
yabaný ördek
Yavani ve evcil
tavþan
Geyik eti
Büyük balýk
Küçük balýk
Kabuklu deniz
ürünleri
Salyangoz, vs.
Haþlanmýþ balýk
Kýzarmýþ balýk
Ambalaj
Folyo
Folyo
Folyo
Folyo
Her bir parça yaðlý kaðýda sarýlýr,
daha sonra folyo içine konur (4 veya
6 dilim)
Her bir parça yaðlý kaðýda sarýlýr,
daha sonra folyo içine konur (4 veya
6 dilim)
Alüminyum kaplarda, yaðlý
kaðýtlara kapatýlmýþ olarak
Plastik torba
Yaðlý kaðýt veya folyo
Folyo
Folyo
Folyo
Folyo
Folyo veya yaðlý kaðýt
Folyo veya yaðlý kaðýt
Plastik torba
Plastik torbalar
Alüminyum veya plastik kap
içindeki tuzlu suya
Folyo veya yaðlý kaðýt
Plastik torba
Yumuþatma
(Gün)
2/3
1/2
1
1
Taze
olarak
1/3
1/4
1/3
3/4
5/6
Saklama
(Ay)
9 -10
6
6
8
6
6
2
3
2
9
6
9
6
9
4 - 6
2 - 3
3 - 6
3
12
4 - 6
Çözme süresi
Gerekmez
Gerekmez
Gerekmez
Gerekmez
Gerekmez
Gerekmez
Buzdolabýnda
yavaþça
Gerekmez
Gerekmez
Buzdolabýnda çok
yavaþ
Buzdolabýnda çok
yavaþ
Buzdolabýnda çok
yavaþ
Buzdolabýnda çok
yavaþ
Buzdolabýnda çok
yavaþ
Buzdolabýnda çok
yavaþ
Gerekmez
Gerekmez
Buzdolabýnda çok
yavaþ
Sýcak su içinde
Doðrudan tavaya
7
TR

Meyve ve sebzeler
Yiyecekler
Elma ve armut
Kayýsý, þeftali, kiraz
ve erik
Piþmiþ meyve
Çilek, böðürtlen
ve ahududu
Meyve suyu
Karnabahar
Lahana ve bürüksel
lahanasý
Mantar ve
kuþkonmaz
Havuç, biber ve
turp
Bezelye
Frans fasulyesi
Ispanak
Çorba için sebze
Hazýrlýk
Kabuðunu soyarak
dilimleyiniz.
Kabýðýný soyunuz ve
çekirdeðini ayýrýnýz.
Kesiniz, piþiriniz ve
sýkýþtýrýnýz
Yýkayýp durulayýnýz
Yýkayýnýz, kesiniz ve
eziniz
Yapraklarý ayýrýnýz,
göbeðini parçalara
ayýrýnýz ve az limonlu
suda bekletiniz
Yýkayýnýz ve küçük
parçalara kesiniz
Yýkayýnýz, kabuðunu
soyunuz ve kesiniz.
Kabuðunu soyunuz,
yýkayýnýz ve gerektiðinde
dilimleyiniz
Ayýrýnýz ve yýkayýnýz
Yýkayýnýz, gerekirse
dilimleyiniz
Yýkayýnýz ve kýyýnýz
Yýkayýnýz ve küçük
parçalara kesiniz
Bekletme
süresi
2 saat
1/2 saat
2 saat
1/2 saat
3/4 saat
3/4 saat
2 saat
3/4 saat
2 saat
3 saat
Ambalaj
Kaplarda (þurup
içinde
Kaplarda (þurup
içinde)
Kaplarda (%10
þeker katýnýz)
Kaplarda (tat için
þeker katýnýz)
Plastik torba
Plastik torba
veya kap
Plastik torba
Plastik torba
Plastik torba
Plastik torba
Plastik torba veya
kap
Kaplarda (üzerine
þeker dökünüz)
Plastik torba
Saklama
(Ay)
12
12
12
10 - 12
6
12
12
10 - 12
12
6 - 7
10 - 12
12
10 - 12
Çözme süresi
Buzdolabýnda,
çok yavaþ
Buzdolabýnda,
çok yavaþ
Buzdolabýnda,
çok yavaþ
Buzdolabýnda,
çok yavaþ
Gerekmez
Oda sýcaklýðýnda
Gerekmez
Gerekmez
Gerekmez
Oda sýcaklýðýnda
Gerekmez
Buzdolabýnda,
çok yavaþ
Oda sýcaklýðýnda
Çeþitli
Yiyecekler
Ekmek
Kekler
Tereyaðý
Krem
Haþlanmýþ yiyecek
veya sebze çorbasý
Yurmurta
Hazýrlýk
Bekletme
süresi
Ambalaj
Plastik torba
Plastik torba
Kendi ambalajý
veya folyo
Plastik veya cam
kap
Kabuksuz, küçük
kap içinde
dondurunuz
Plastik kap
Saklama
(Ay)
4
10
6
6
3 - 6
Çözme süresi
Oda sýcaklýðýnda
veya fýrýnda
10 dakika bekletiniz,
100/200°C'de ýsýtýnýz
Buzdolabýnda
Oda sýcaklýðýnda
veya sýcak su içinde
Oda sýcaklýðýnda
veya buzdolabýnda
Oda sýcaklýðýnda
veya buzdolabýnda
TR
8

Enerji tasarrufu ile ilgili pratik bilgiler
- Cihazýn yerleþtirilmesi
Cihazýnýzý, ýsý kaynaklarýndan, gün ýþýðýndan uzakta
havalandýrmasý olan ortamlara yerleþtiriniz.
- Doðru sýcaklýk ayarý
Cihazýnýzý çok fazla soðuða ayarlarsanýz daha fazla enerji
tüketir.
- Yiyeceklerin yerleþtirilmesi
Yiyeceklerin uygun þartlarda muhafaza edilebilmesi için
hava sirkülasyonu büyük önem taþýmaktadýr.
Gereðinden fazla yiyecek konulursa hava sirkülasyonu
etkinliðini yitirir ve kompresörün fazladan çalýþmasýna
sebep olur.
- Soðutucu ve dondurucu bölüm kapaðý
Soðutucu ve dondurucu bölümün kapaklarýný mümkün
olduðu kadar az açýnýz. Her kapaðý açýþýnýzda soðuk hava
kaybýna sebebiyet verirsiniz. Cihazýnýzýn tekrar optimum
soðukluða ulaþmasý için motor uzun süre çalýþmaya
devam eder ve enerji tüketimi artar.
- Contalarýn kontrolü
Kapý iç lastiklerini sürekli kontrol ediniz ve temizliðine
dikkat ediniz.Böylece soðuk hava kaçaklarýný kontrol
altýna almýþ olursunuz.
- Sýcak yiyecekler
Soðutucu bölüme koyacaðýnýz sýcak bir tencere dolap
içerisindeki sýcaklýðýn süratle yükselmesine sebep olur.
Bu nedenle buzdolabýna koymadan önce oda
sýcaklýðýnda soðumasýný bekleyiniz.
Sesli Ýkaz ve Görsel Uyarýlar
Kapý Açýk Alarmý
Cihazýnýzýn kapýlarýndan herhangi biri iki dakikadan
daha uzun süre açýk kalýrsa sesli ikaz duyulur ve
aydýnlatma lambalarý yanýp sönmeye baþlar. Açýk olan
kapý veya kapýlar kapatýldýðýnda sesli ve görsel ikaz kesilir
ve buzdolabý normal çalýþmaya baþlar.
Dondurucu Bölüm Aþýrý Isý Alarmý
Dondurucu Bölümde oluþabilecek aþýrý ýsýnmalarda
(Elektrik kesintileri vb hata durumlarýnda) kullanýcý sesli
ve görsel olarak uyarýlýr. Alarm durumunda sesli ikaz
duyulur ve kullanýcý panelindeki göstergede A2 yazýsýsý
belirir. Böyle bir durumda yiyeceklerinizi cihazýnýzdan
çýkartýnýz ve çok dikkatli bir þekilde kontrol ediniz,
bozulmuþ olanlarý kullanmayýnýz ve kesinlikle tekrar
dondurmayýnýz.
Cihazýnýzýn üst panelinde bulunan dondurucu ayar
düðmesini kapalý konuma getiriniz (" " pozisyonu) ve
cihazýnýzý tekrar çalýþtýrýnýz. Bu iþlemden sonra sesli ikaz
kesilir, göstergedeki A2 yazýsý kaybolur ve cihazýnýz
normal çalýþmaya baþlar.
9
TR

Cihazýnýzýn Bakýmý
Temizleme iþlemi öncesinde cihazý fiþten çekiniz. Cihazý
tekrara devreye sokmak için ayný iþlemi tekrarlayýnýz. Fiþe
takýp , dondurucu bölümün sýcaklýk ayarýný yapýnýz.
Temizlik ve bakým iþlemi
TATÝL KONUMU: Tatile giderken kapalý olarak
býraktýðýnýz buzdolabýnýz içerisinde hoþ olmayan kokular
oluþur. Tatil konumu sayesinde bu kötü kokularý
engellemiþ olursunuz. Bu özel fonksiyonu devreye
soktuðunuzda dondurucu bölüm minimum derecede
(-18°C) çalýþmaya devam eder. Soðutucu bölümü de
manuel olarak Tatil konumuna ayarlarsanýz siz
tatildeyken buzdolabýnýz çalýþmaya devam eder,
dondurucu bölümdeki gýdalar en iyi þekilde korunur ve
minimum enerji tüketimi garantilenir.
- Kokulu yiyeceklerinizi kapalý kaplar içerisinde
buzdolabýna yerleþtiriniz. Böylece kötü kokularý
engellemiþ olursunuz.
- Temizlik malzemesi olarak sodium bikarbonatlý ýlýk su
veya Ariston Yetkili Servislerinden temin
edebileceðiniz özel temizlik malzemesini kullanýnýz.
Temizleme iþleminde yumuþak bir sünger
kullanmanýzý tavsiye ederiz.
- Kesinlikle kesici alet ve aþýndýrýcý malzemeler
kullanmayýnýz.
- Çýkarýlabilir tüm bölmeleri sabunlu sýcak su ile
temizleyiniz. Buzdolabýnýn içerisine yerleþtirmeden
önce iyice kurulayýnýz.
- Cihazýnýzý uzun süreli kullanmayacak iseniz fiþten
çekip kapýlarýný açýk býrakýnýz.
Problemler ve Çözümleri
Sýcaklýk gösterge paneli tamamen kapalý ise
- Elektrik baðlantýsýný ;
- Fiþin takýlý olup olmadýðýný ;
- Prize elektrik gelip gelmediðini,
Kontrol ediniz.
Kompresör devreye girmiyor
- Cihazý devreye aldýðýnýzdan beri 8 dakika geçti mi ?
Satýn almýþ olduðunuz buzdolabý kompresör koruma
sistemine sahiptir. Kompresör cihaz devreye
alýndýktan 8 dakika sonra çalýþmaya baþlar.
Soðutucu ve dondurucu bölüm yeterince
soðutmuyor
- Kapýlarýn kapalý olduðunu ve kapý iç contalarýnýn
düzgün olup olmadýðýný ;
- Kapýlarýn uzun süre açýk kalýp kalmadýðýný ;
- Soðutucu bölümdeki termostat düðmesinin olmasý
gereken konumda olup olmadýðýný;
- Dondurucu bölümün çok fazla doldurulup
doldurulmadýðýný ;
Kontrol ediniz
Yiyeceklerin gereðinden fazla donmasý
- Ayarlanan dondurucu sýcaklýðýnýn çok düþük olup
olmadýðýný ,
Kontrol ediniz.
Kompresör sürekli çalýþýyor
- Süper dondurma fonksiyonunun aktif hale getirilmiþ
olup olmadýðýný,
- Ortam sýcaklýðýnýn çok yüksek olup olmadýðýný,
- Termostatýn olmasý gerektiði konumda olup
olmadýðýný,
Kontrol ediniz.
Yukarýda belirtilen problemler giderilemiyorsa en yakýn
Ariston Yetkili Servisi'ni arayarak yardým isteyiniz.
Cihazdaki problem en kýsa sürede giderilecektir.
10
TR

11
Practical Manual about Ariston Refrigerator
Installing your Refrigerator
1. Your refrigerator should not be installed at the
outside. It is very harmful for your refrigerator to be
left outside to the effects of outside influences (rain,
sun, etc.).
2. Your refrigerator should be used exclusively by adults
and you should pay attention to the instructions
contained herein.
3. Do not touch it with naked feet or with wet hands.
4. Do not use low quality cable or multiple socket plugs
for the power connection of your refrigerator. Pay
attention that the power connection cable of your
refrigerator is not left under heavy load.
5. In order to unplug the plug from the socket, do not
pull the cable of the plug or your refrigerator. This is
very dangerous.
6. Do not touch the inside units of your refrigerator
with wet hands. Do not put the ice blocks the deep
freezer has produced into your mouth it can stick
and cause permanent ice burns.
7. Before cleaning and maintenance, make sure that
the device is disconnected from the mains. It is
enough if you turn panel setting knob to “ ” (off)
position.
8 If there is a problem with your refrigerator, read the
“Problems and Solutions/Troubleshooting”
chapter before calling the Ariston Customer Services
you can find the solution for a number of problems in
this chapter.
If the problem still prevails, call the Ariston
Customer Services your problem will be dealt with
by the customer services in a short time.
9. If the power cables have been damaged, call the
Ariston Customer Services and ask for them to
replace it with a new cable.
Air Circulation
The compressor and the condenser produce heat when
they are working, so you should create an efficient air
circulation in order to prevent excessive heating. In
order to ventilate the area where you have installed your
refrigerator, there should be a window at the place
which you should open every now and then in order to
provide the necessary air circulation. This will also
guarantee the moisture of the room to drop.
In order for your refrigerator to work efficiently, take
make sure that you do the following:
- If you want to place your refrigerator at a place with a
closed ceiling, you should leave a space of at least 10
cm distance from its top to the ceiling.
- You should leave a space of at least 5 cm distance from
its sides to the wall.
- You should leave a space of at least 5 cm distance
from its back to the wall. You should use the
distance plastics that have been provided for this
purpose.
Protect your refrigerator from direct heat
sources
Do not place your refrigerator at the direct sun shine
and near to heat sources, like ovens.
Installing your refrigerator
Pay attention that the place you install your refrigerator
is even and level. If the place you place your refrigerator
is not exactly even, use the legs of your refrigerator and
set them in order to fix your refrigerator and make it
stand secure on the ground.
Grounding
Before you make the power connections of your
refrigerator, control if and make sure that the mains
connection at your home is compliant with the voltage
value specifications that are stated on the data plate at
the inside of your refrigerator. For your own safety, use
grounded connections for powering your refrigerator. If
there is no grounded connection at the electric socket,
we recommend you to call a professional electrician.
Before you connect your refrigerator to the
power connection
After your refrigerator has arrived at your home, keep it
straight and wait for 3 hours. After you have connected
its power cable to the mains connection, let it work for
at least 4 hours before you put any food into it.
Ensure that the power supply voltage complies with the
figures stated on the rating plate inside the fridge
compartment.
The operational voltage of your refrigerator is 220 Volt.
Connect the power cord to a grounded plug bearing a
current rate of 10 Amperes.
In this manual there are some important subjects about the use of your refrigerator been pointed out. By
reading this manual carefully, you can learn new ways of making your refrigerator live longer.
Installing your refrigerator is one of the procedures that affects the performance of your refrigerator
most.

Ice- maker
Fast freezer compartment
Freezer shelf
0ºC compartment, fresh box
Fridge compartment temperature adjustment
knob
Removable height adjustable shelves
Cheese/meat box that can glide on the shelf
Vegetable moisture control
Vegetable drawers
Adjustable feet
Bottle shelf
Inner door shelves
Special canned drink shelves
Door shelf with cover, egg holder
Freezer door shelves
Let's Examine the Structure of your Refrigerator
12

Red Light
Red light is temperature alarm signal light. It
is turned on in case of abnormal
temperatures in the freezer compartment.
Green Light
Green light shows that the power is on. This
light is on as long as the device is connected
to the mains, and the power is on.
Yellow Light
Yellow light is the signal light for super freeze
position.
13
Freezer Setting Knob
With this knob, temperature can be set, and
the following functions can be selected.
Off Position: When the knob is set to this
position, all the functions of your device are
stopped, but the green indicator light E on
the panel will go on lighting unless the
device is disconnected from the mains.
Holiday Function: When this function is
selected, the freezer compartment will
continue to operate at the minimum
temperature necessary for preserving the
food, and ensure minimum power
consumption. It is ideal when the freezer
department will be left unattended for a
long period of time.
In general, it is selected for long holiday
terms when the freezer compartment is full,
but the cooling compartment is empty.
Economy Mode: This mode ensures
minimum power consumption providing
ideal temperature necessary for preserving
the food in the freezer compartment.
Super Freeze Function
This function ensures that food placed in the
freezer compartment is frozen quickly.
Freezer Temperature Setting Indicator
Freezer Compartment temperature which is
selected with a knob is indicated with the
sign (-) on the indicator. At the same time,
alarm (A1) and critical alarm (A2) warnings
are indicated on these indicators.
Let's Start your Refrigerator
After your refrigerator has arrived at your home, keep it
straight and wait for 3 hours before you plug in the plug
into the socket. Clean the fridge and freezer
compartments of your refrigerator with mild-hot water
before you fill them with your food. Never use
detergent, chemicals and similar substances for
cleaning purposes.
This model has been equipped with a compressor
protection system. So do not worry if your refrigerator
does not start immediately after you plug it on the
compressor will not be activated immediately it will be
activated after approximately 8 minutes.
After the device is connected to the mains, the freezer
setting knob on the top panel can be in “ ” (off)
position. Set this knob to desired freezer temperature
from this position. To accelerate the cooling of the
freezer compartment, we recommend you to activate
super freeze function.

14
Operating Instruction of the Fridge Compartment
The temperature inside your refrigerator is controlled by
the thermostat manually. You can set the thermostat
knob between MIN and MAX in order to decrease the
temperature.
Temperature Settings of the Fridge
Compartment
Set the thermostat setting to the medium setting (MED)
in order to obtain the most appropriate temperature
inside the fridge when the freezer compartment is
empty.
When setting the thermostat settings, it is important
and should be taken into consideration how often the
door of the refrigerator is opened, how much food will
be kept inside the refrigerator, and what the room
temperature is.
Fresh Box
Since the fresh box is the coldest part of the fridge
compartment, you can place the food that you do not
want to freeze, but use in a short time (meat, fish), or
use this part in order to thaw deep frozen food slowly.
Meat Box
This special compartment which is mounted onto a glass
shelf and can be moved to the right or the left easily, is
ideal for and designed in order to store food stuff with
smell.
Vegetable drawers
These drawers with a capacity of 39 litres are ideal to
store fruit and vegetables. It is very easy to access the
inside of the vegetable drawers by practical covers.
These drawers of the refrigerator have been designed
specifically in order to store the vegetables without
them loosing their moisture, and to keep them fresh, by
using their moisture control mechanisms.
Special part or compartment for canned drinks
There are special parts or compartments for canned
drinks at the door of your refrigerator. These parts or
compartments are particularly useful in order to store
yoghurt, oil, stock cubes, and similar materials. You can
use these compartments optimally, by employing them
according to your needs.

15
Operating Instruction of the Freezer Compartment
Storing the food
In order to freeze and store your food refer to the tables
in the following pages.
When freezing your food, make sure they do not touch
any other deep frozen food.
In order to freeze your food, place it into the fast
freezing compartment “B”, where the temperature goes
down till -18ºC.
When you are going to use your refrigerator for the first
time or if you have not used it for a long time, and will
now start using it again, make sure that you keep your
refrigerator at maximum for a while.
Two special functions are assigned for super freeze;
24-HOUR SUPER FREEZE: This mode is recommended
for the freezing of small amounts of food. To set this
mode, press for a short while on the super freeze button
so that the yellow indicator light F on the panel will be
on.
48-HOUR SUPER FREEZE: This mode is recommended
for the freezing of large amounts of food. When using
this function, it is recommended that the function is
activated 24 hours before the large amount of food is
loaded. Thereby, the freezing compartment reaches the
sufficient temperature, and this method of loading
allows that the food is frozen better within the
remaining 24 hours.
To set this mode, press a bit longer on the super freeze
button B. The yellow lamp F begins to flash to show that
the function is activated. This flashing continues for 24
hours, and then the light returns to fixed lighting for the
second 24-hour period.
During the freezing process, do not open the door of the
freezer compartment.
Preparing your food and making smaller portions before
your freezing process will speed up the freezing process.
We suggest you write down on the packages what is
contained inside them and at what date you have put
them into the freezer.
In order to open up more space in the freezer
compartment, you can take off the cover of the freezer
compartment. After you have placed the food therein,
check and control whether the cover closes completely.
In cases of power failure, do not open the door of the
freezer compartment. If the door is not opened at all,
the food will be kept safe for approximately 9-14 hours.
Ice Maker
The ice automate that is located in the freezer
compartment has been designed with ease of use and
hygiene in mind. Fill the ice automate with water and
place it into its place. After approximately two hours,
your ice will be ready. In order to take out the ice cubes,
do not take out the ice automate from its place. Turn the
wheel on the ice automate to the right. The ice cubes in
the holes will fall down into the container below. You
can take out the ice container and serve.

16
Suggestions to store foods in the fridge:
Food
Wrapped meat and fish (wrap
it with plastic folio or place in
plastic bags)
Fresh cheese
Eggs
Butter, margarine
Cooked foods
Bottled products, milk, yoghurt
Fruits and vegetables
(Store in the fridge
compartment after placing in
an airtight container with a lid)
Sausage, salami, sandwich
Meat, cakes, creams,
pudding, chocolate, tomatoes,
bread, pastry...
Period of storage
2 or 3 days
3 or 4 days
1 month
1 week
3 to 4 days
1 week
Store at the fridge
compartment at .....
On the vegetable drawer at
the bottom of the fridge (the
coldest part)
On the vegetable drawer at
the bottom of the fridge (the
coldest part)
In the egg storage rack
In the fridge door rack
In any rack
In the special door rack
In the vegetable drawer
Note: Potatoes, garlic and onions should not be stored in the fridge.
Storage of foods

17
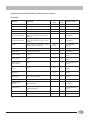
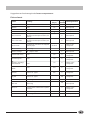
Suggestions on food storage in the freezer compartment:
Fish and meat
Foods
Beef - steak
Mutton
Pork roast
Veal roast
Pork / veal meat
Pork / veal cutlet
mincet meat
Heart and liver
Salami / sausage
Chicken and turkey
Duck and goose
Pheasant, partridge
and wild duck
Wild / domestic
rabbit
Venison
Big fish
Small fish
Shell fish
Snail, etc.
Boiled fish
Fried fish
Packing
Folio
Folio
Folio
Folio
Every piece should be wrapped with
oil-paper and then put into folio (4 or
6 slices)
Every piece should be wrapped with
oil-paper and then put into folio (4 or
6 slices)
In aluminum containers as wrapped
with oil-paper
Plastic bag
Oil - paper or folio
Folio
Folio
Folio
Folio
Folio or oil - paper
Folio or oil - paper
Plastic bag
Plastic bag
In saline water in aluminum or plastic
container
Folio or oil - paper
Plastic bag
Softening
(Days)
2/3
1/2
1
1
As fresh
1/3
1/4
1/3
3/4
5/6
Storage
(Months)
9-10
6
6
8
6
6
2
3
2
9
6
9
6
9
4-6
2-3
3-6
3
12
4-6
Thawing duration
Not required
Not required
Not required
Not required
Not required
Not required
Slowy in the
refrigerator
Not required
Not required
Slowly in the
refrigerator
Slowly in the
refrigerator
Slowly in the
refrigerator
Slowly in the
refrigerator
Slowly in the
refrigerator
Slowly in the
refrigerator
Not required
Not required
Slowly in the
refrigerator
In warm water
Directly in the pan

18
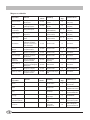
Fruits and vegetables
Foods
Apple and pear
Apricot, peach,
cherry and plum
Cooked fruits
Strawberry, and
raspberry
Fruit juice
Caulifflower
Cabbage and
Brussels sprout
Mushrooms and
asparagus
Carrots, peppers
and radish
Green peas
French beans
Spinacnh
Vegetables for
soups
Preparation
Slice after peeling
Peel and remove seed
Cut, cook and
compress
Wash and rinse
Wash, cut and mash
Remove leaves, put
core into pieces and
hold in sour water
Wash and cut into
small pieces
Wash, peel and cut
Peel, wash and slice
if required
Remove and wash
Wash, slice if riquired
Wash and cut in
small pieces
Holding
Period
(hours)
2
1/2
2
1/2
3/4
3/4
2
3/4
2
3
Packing
In containers
(in syrup)
In containers
(in syrup)
In containers
(add %10 sugar)
In containers
(add sugar)
Plastic bag
Plastic bag or
container
Plastic bag
Plastic bag
Plastic bag
Plastic bag
Plastic bag or
container
In containers
(add sugar)
Plastic bag
Storage
(Months)
12
12
12
10-12
6
12
12
10-12
12
6-7
10-12
12
10-12
Thawing Period
Slowly in the
refrigerator
Slowly in the
refrigerator
Slowly in the
refrigerator
Slowly in the
refrigerator
Not required
Room
temperature
Not required
Not required
Not required
Room
temperature
Not required
Slowly in the
refrigerator
Room
temperature
Wash and cut in
small pieces
Food
Bread
Cakes
Butter
Cream
Boiled food or
vegetable
Eggs
Preparation
Holding period
(hours)
Packing
Plastic bag
Plastic bag
Own package
or folio
Plastic or glass
container
Peel, freeze in
small containers
Plastic bag
Storage
(Months)
4
10
6
6
3-6
Thawing period
Room temperature
or oven
Wait 10 minutes
then heat up to
100 / 200 °C
In the refrigerator
Room temperature
or in hot water
Room temperature
or in refrigerator
Room temperature
or in refrigerator
Sayfa yükleniyor...
Sayfa yükleniyor...
Sayfa yükleniyor...
Sayfa yükleniyor...
-
 1
1
-
 2
2
-
 3
3
-
 4
4
-
 5
5
-
 6
6
-
 7
7
-
 8
8
-
 9
9
-
 10
10
-
 11
11
-
 12
12
-
 13
13
-
 14
14
-
 15
15
-
 16
16
-
 17
17
-
 18
18
-
 19
19
-
 20
20
-
 21
21
-
 22
22
-
 23
23
-
 24
24


Whirlpool MTA 4053 NF (TK) Kullanici rehberi
- Tip
- Kullanici rehberi
- Bu kılavuz aynı zamanda aşağıdakiler için de uygundur:
diğer dillerde
İlgili makaleler
-
Whirlpool HA84TE 31 XO3 1 Kullanici rehberi
-
Whirlpool W84TE 72 X AQUA Kullanici rehberi
-
-
Whirlpool RG 2410 (TR)/ECO Kullanici rehberi
-
-
Whirlpool E2BYH 19 F O3 Kullanici rehberi
-
-
-
-