
OC 15 525 A Title KURTZ DESIGN 10.03.03
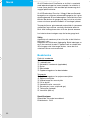
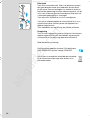
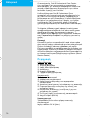
Type 3718
OC 15 525 A
powered
by
ml
600
500
400
300
200
100
50
25
ml
600
500
400
300
200
100
50
25
1
timer
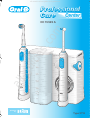
Oral-B
Professional
Care
5000
Center
Professional Professional
CareCare
CenterCenter
Center
Professional Care
Professional Care
3718121_OC15X_P1 Seite 1 Montag, 9. Mai 2005 12:16 12
All manuals and user guides at all-guides.com
all-guides.com

Deutsch 4, 9, 94
English 10, 15, 94
Français 16, 21, 94
Español 22, 27, 94
Português 28, 33, 94
Italiano 34, 39, 94
Nederlands 40, 45, 94
Dansk 46, 51, 94
Norsk 52, 57, 94
Svenska 58, 63, 94
Suomi 64, 69, 94
Ελληνικ
70, 75, 94
Türkçe
76, 94
81, 86, 94
93, 87, 94
Internet:
www.oralb.com
www.braun.com
3-718-121/00/V-05/M
D/GB/F/E/P/I/NL/DK/N/S/FIN/GR/TR/RUS/Arab
Printed in Germany
Haben Sie Fragen zu diesem
Produkt?
Rufen Sie an (gebührenfrei):
00 800 27 28 64 63
08 44 - 88 40 10
If you should require further assistance,
please call our Consumer Service line.
0 800 73 11 792
(free call)
Helpline
1 800 509 448
(free call)
Appelez le Service Consommateurs Oral-B :
0 810 365 855
(numéro azur)
02-711 92 11
Vous avez des questions sur ce produit?
Appelez:
4 00 50 51
Servicio al consumidor para España:
901 11 61 84
Serviço ao Consumidor para Portugal:
808 20 00 33
Servizio consumatori:
02-667 86 23
Heeft u vragen over dit produkt?
Bel Braun/Oral-B Consumenten-infolijn:
0800-4 45 53 88
Har du spørgsmål om produktet? Så ring
70 15 00 13
Spørsmål om dette produktet? Ring
22-72-88-10
Frågor om apparaten? Ring Kundservice
020 - 21 33 21
Onko Sinulla kysyttävää tuotteesta? Soita
09 452 872
∆ËϤʈÓÔ ÁÈ· ÏËÚÔÊÔڛ˜
210 9478700
Danıµma Hattı
0212-473-75-85
íÂÎÂÙÓÌÌ˚È ÔÓÏÓ˘¸
8-800-200-1444
D
A
CH
GB
IRL
F
B
LU
E
P
I
NL
DK
N
S
FIN
GR
TR
RUS
3718121_OC15X_P2 Seite 1 Montag, 9. Mai 2005 12:18 12
All manuals and user guides at all-guides.com

1
2
4
3
5
6
7
8
14
10
11
9
Oral-B
12
13
click!
a
b
Professional Care
timer
Professional Care
click!
3718121_OC15X_P3 Seite 1 Montag, 9. Mai 2005 12:19 12
All manuals and user guides at all-guides.com

4
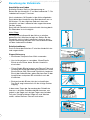
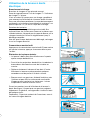
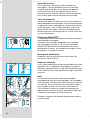
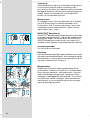
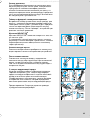
Oral-B Professional Care Center wurde zusammen mit
namhaften Zahnmedizinern für die ideale Zahnpflege
entwickelt.
Die Oral-B Professional Care Zahnbürste
sorgt mit der
3D Putztechnik, bei der sanft pulsierende Vor- und
Rückwärtsbewegungen mit ultraschnellen Seitwärtsbe-
wegungen kombiniert werden, für eine gründliche Plaque-
Entfernung. Verwenden Sie die Zahnbürste zweimal
täglich jeweils mindestens zwei Minuten lang; das ist die
von Zahnärzten empfohlene Mindestputzzeit.
Die Munddusche entfernt Speisereste, die sich noch
zwischen den Zähnen befinden und massiert gleichzeitig
das Zahnfleisch. Verwenden Sie die Munddusche grund-
sätzlich nach dem Zähneputzen.
Lesen Sie bitte die Gebrauchsanweisung sorgfältig durch,
bevor Sie das Gerät in Betrieb nehmen.
Wichtig
Das Gerät muss so befestigt werden, dass es nicht ins
Wasser fallen kann.
Der Netzstecker sollte immer zugänglich sein.
Prüfen Sie gelegentlich, ob das Netzkabel Schadstellen
aufweist. Sollte dies der Fall sein, bringen Sie das Gerät
zum Braun Kundendienst. Ein beschädigtes oder defektes
Gerät darf nicht mehr benutzt werden.
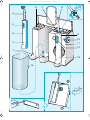
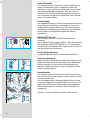
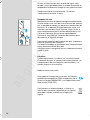
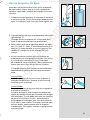
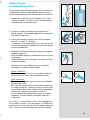
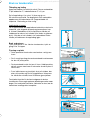
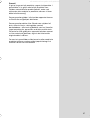
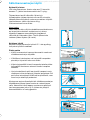
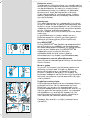
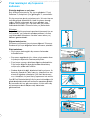
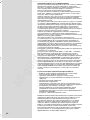
Gerätebeschreibung
Zahnbürste
1
Ladesockel
2
Ladekontroll-Lampe
3
Handstück (aufladbar)
4
Schalter
5
Aufsteckbürste
6
Köcher für Aufsteckbürsten
Munddusche
7
Köcher für Aufsteckdüsen
8
Aufsteckdüse
9
Entriegelungsknopf für Aufsteckdüse
0
Ein/Aus-Schalter
q
Wasserdruckregler
w
Schiebeschalter (Wasser Ein/Aus)
e
Handstück
r
Wasserbehälter (600 ml)
Technische Daten
Netzanschluss: siehe Typenschild am Geräteboden
Leistungsaufnahme: 24 W
Deutsch
3718121_OC15X_P4-98 Seite 4 Montag, 9. Mai 2005 12:06 12
All manuals and user guides at all-guides.com

5
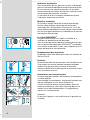
Benutzung der Zahnbürste
Anschließen und Laden
Schließen Sie das Gerät an Netzspannung an.
Setzen Sie das Handstück
3
auf den Ladesockel
1
. Die
Ladekontroll-Lampe
2
leuchtet.
Nach mindestens 16 Stunden ist der Akku vollgeladen.
Damit bietet das Handstück eine Betriebsdauer von ca.
30 Minuten. Für den täglichen Gebrauch kann das
Handstück auf dem Ladesockel des angeschlossenen
Gerätes stehen.
Somit hält die Zahnbürste immer die volle Leistung bereit.
Ein Überladen ist nicht möglich.
Akku-Pfl
ege
Um die maximale Kapazität des Akkus zu erhalten,
gehen Sie alle 6 Monate wie folgt vor: Stellen Sie das
Handstück nicht auf den Ladesockel, damit es durch
reguläre Benutzung entladen wird. Anschließend wieder
auf dem Ladesockel aufladen.
Schalterfunktionen
Durch Drücken des Schalters
4
wird das Handstück ein-
und ausgeschaltet.
Plaque-Entfernung
• Sie können Zahnpasta Ihrer Wahl verwenden.
• Um ein Verspritzen zu vermeiden, führen Sie die
Bürste an die Zähne, bevor Sie das Handstück
einschalten.
• Führen Sie die Bürste langsam von Zahn zu Zahn und
verweilen Sie einige Sekunden pro Zahnfläche. Führen
Sie die Bürste über Zähne und Zahnfleisch, beginnen
Sie mit den Außenflächen, gehen Sie dann über zu den
Innenflächen und putzen Sie schließlich auch die
Kauflächen.
• Sie brauchen die Bürste nicht fest aufzudrücken.
Das Gerät sorgt automatisch für die richtige Putzbe-
wegung.
In den ersten Tagen der Verwendung der Zahnbürste
kann es zu leichtem Zahnfleischbluten kommen, was
jedoch in der Regel nach einigen Tagen verschwindet.
Falls das Zahnfleischbluten länger als zwei Wochen
anhält, sollten Sie Ihren Zahnarzt aufsuchen.
O
ral-B
3718121_OC15X_P4-98 Seite 5 Montag, 9. Mai 2005 12:06 12
All manuals and user guides at all-guides.com

6
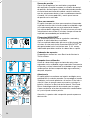
Andruckkontrolle
Zur Optimierung der Putztechnik ist die Zahnbürste mit
einem Druckkontrollsystem ausgestattet: Wenn Sie
die Bürste zu fest andrücken, werden die ultraschnellen
Seitwärtsbewegungen fortgesetzt, aber die sanft pul-
sierenden Vor- und Rückwärtsbewegungen setzen aus.
Das veränderte Laufgeräusch zeigt Ihnen, dass Sie den
Druck vermindern sollten.
Putzzeitsignal
Der eingebaute Memory Timer misst die effektive Putzzeit,
auch wenn das Handstück zwischendurch kurz (max.
30 Sekunden) ausgeschaltet wird. Nach zwei Minuten
(empfohlene Mindestputzzeit) erfolgt das Putzzeitsignal
durch einige kurze Unterbrechungen der Bürsten-
bewegung.
INDICATOR
®
Borsten
Die Aufsteckbürste ist mit INDICATOR
®
-Borsten
versehen.
Bei richtigem Putzen zweimal täglich 2 Minuten lang wird
die Farbe der INDICATOR
®
-Borsten in 3-4 Monaten bis
auf die Hälfte zurückgehen. Dies zeigt an, dass es Zeit ist,
die Aufsteckbürste zu erneuern.
Ersatz-Aufsteckbürsten
Im Handel oder beim Braun Kundendienst erhältlich.
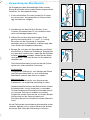
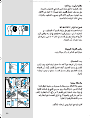
Nach dem Gebrauch
Spülen Sie die Aufsteckbürste nach jedem Gebrauch bei
eingeschaltetem Handstück gründlich unter fließendem
Wasser. Handstück ausschalten und Aufsteckbürste
abziehen. Beide Teile separat unter fließendem Wasser
spülen und abtrocknen.
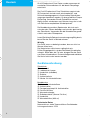
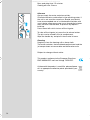
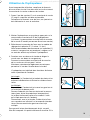
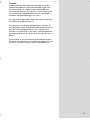
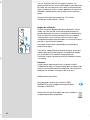
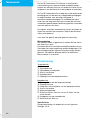
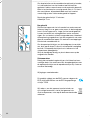
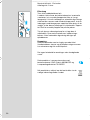
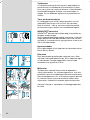
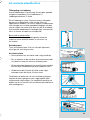
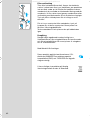
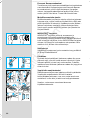
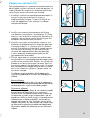
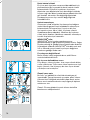
Umweltschutz
Der Plaque-Entferner enthält einen Nickel-Hydrid-Akku,
der am Ende seiner Lebensdauer nicht mit dem Hausmüll
entsorgt werden darf.
Zur umweltgerechten Entsorgung öffnen Sie das Hand-
stück wie dargestellt; nehmen Sie den Akku heraus und
geben Sie ihn bei Ihrem Händler oder entsprechenden
Sammelstellen gemäß nationaler oder lokaler Bestim-
mungen ab.
Vorsicht: Durch das Öffnen wird das Gerät zerstört.
5
7
1 2 3
6
4
3718121_OC15X_P4-98 Seite 6 Montag, 9. Mai 2005 12:06 12
All manuals and user guides at all-guides.com
all-guides.com

7
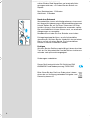
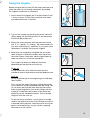
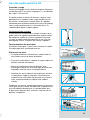
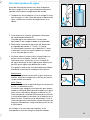
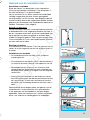
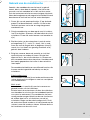
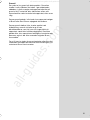
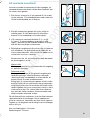
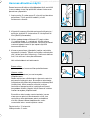
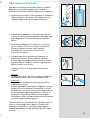
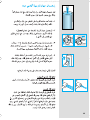
Verwendung der Munddusche
Vor Erstgebrauch den Wasserbehälter füllen und das
Wasser durchlaufen lassen, indem Sie das eingeschaltete
Handstück ins Waschbecken halten.
1. Eine Aufsteckdüse
8
auf das Handstück
e
setzen,
bis sie einrastet. Wasserbehälter mit Wasser füllen
(ggf. Mundwasser zufügen).
2. Munddusche mit dem Ein/Aus-Schalter
0
ein-
schalten. (Schiebeschalter
w
am Handstück sollte
noch nicht hochgeschoben sein.)
3. Wählen Sie mit dem Wasserdruckregler
q
die
gewünschte Impulsstärke (1 = sanft, 5 = kräftig).
Sie sollten mit der Einstellung (1) beginnen,
besonders wenn Ihr Zahnfleisch zu bluten neigt oder
wenn Kinder die Munddusche benutzen.
4. Beugen Sie sich über das Waschbecken und führen
Sie die Düse an Zähne und Zahnfleisch. Schalten Sie
erst dann das Handstück ein, indem Sie den Schiebe-
schalter nach oben
schieben. Halten Sie den Mund
leicht geöffnet, damit das Wasser ins Waschbecken
ablaufen kann.
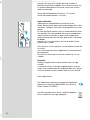
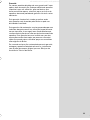
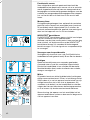
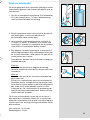
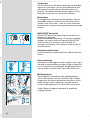
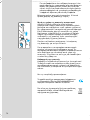
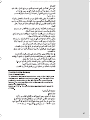
Die Aufsteckdüse bietet je nach Position der Düsen-
spitze zwei unterschiedliche Funktionen:
Einfachstrahl:
Düsenspitze in Stellung (a): zum Reinigen der Zähne
und Zahnzwischenräume, um auch hartnäckige
Speisereste (materia alba) heraus zu spülen.
Mehrfachstrahl:
Düsenspitze in Stellung (b): zum Massieren des
Zahnfleischs, um es gesund und kräftig zu halten.
Unterbrechen Sie zunächst den Wasserstrahl mit dem
Schiebeschalter, um ein Verspritzen zu vermeiden.
Drücken Sie dann die Düsenspitze hinein oder heraus,
um von einer Funktion zur anderen zu schalten.
Fangen Sie mit dem Einfachstrahl an. Richten Sie den
Wasserstrahl auf die Zahnzwischenräume.
Massieren Sie dann Ihr Zahnfleisch mit dem Mehrfach-
strahl.
Um die Funktion der umschaltbaren Aufsteckdüse sicher-
zustellen, befindet sich im unteren Bereich des Schafts
ein kleines Sieb. Wenn der Wasserdruck nachlässt,
2
ab
3718121_OC15X_P4-98 Seite 7 Montag, 9. Mai 2005 12:06 12
All manuals and user guides at all-guides.com

8
sollten Sie das Sieb überprüfen und eventuelle Abla-
gerungen entfernen, z.B. indem Sie den Schaft aus-
klopfen.
Max. Betriebsdauer: 15 Minuten
Abkühlzeit: 2 Stunden
Nach dem Gebrauch
Wasserbehälter immer vollständig entleeren, da es sonst
bei längerer Nichtbenutzung zu Bakterienbildung kommen
könnte. Sollten Sie auf Rat Ihres Zahnarztes hin Chlor-
hexidin-Lösung in Ihrer Munddusche verwenden, spülen
Sie anschließend mit klarem Wasser nach, um eventuelle
Ablagerungen zu vermeiden.
Munddusche mit dem Ein/Aus-Schalter ausschalten.
Entriegelungsknopf drücken, um die Aufsteckdüse
abzunehmen. Wischen Sie das Handstück ab und setzen
Sie es zurück auf seinen Sockel. Die Aufsteckdüsen
können im Köcher aufbewahrt werden.
Reinigen
Wischen Sie das Gehäuse regelmäßig mit einem feuchten
Tuch ab. Der Wasserbehälter und die Köcher sind heraus-
nehmbar und spülmaschinengeeignet.
Änderungen vorbehalten.
Dieses Gerät entspricht den EU-Richtlinien EMV
89/336/EWG und Niederspannung 73/23/EWG.
Bitte führen Sie das Gerät am Ende seiner Lebens-
dauer den zur Verfügung stehenden Rückgabe- und
Sammelsystemen zu.
3718121_OC15X_P4-98 Seite 8 Montag, 9. Mai 2005 12:06 12
All manuals and user guides at all-guides.com

9
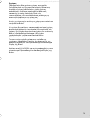
Garantie
Als Hersteller übernehmen wir für dieses Gerät – nach
Wahl des Käufers zusätzlich zu den gesetzlichen Gewähr-
leistungsansprüchen gegen den Verkäufer – eine Garan-
tie von 2 Jahren ab Kaufdatum. Innerhalb dieser Garan-
tiezeit beseitigen wir nach unserer Wahl durch Reparatur
oder Austausch des Gerätes unentgeltlich alle Mängel,
die auf Material- oder Herstellungsfehlern beruhen. Die
Garantie kann in allen Ländern in Anspruch genommen
werden, in denen dieses Braun Gerät von uns autorisiert
verkauft wird.
Von der Garantie sind ausgenommen: Schäden durch
unsachgemäßen Gebrauch, normaler Verschleiß und Ver-
brauch sowie Mängel, die den Wert oder die Gebrauchs-
tauglichkeit des Gerätes nur unerheblich beeinflussen.
Bei Eingriffen durch nicht von uns autorisierte Braun
Kundendienstpartner sowie bei Verwendung anderer als
Original Braun Ersatzteile erlischt die Garantie.
Im Garantiefall senden Sie das Gerät mit Kaufbeleg bitte
an einen autorisierten Braun Kundendienstpartner.
Die Anschriften für Deutschland und Österreich können
Sie unter 00800/27286463 (gebührenfrei) erfragen.
Rufnummer für die Schweiz: 0844-884010,
für Belgien: 02-711 92 11.
3718121_OC15X_P4-98 Seite 9 Montag, 9. Mai 2005 12:06 12
All manuals and user guides at all-guides.com

10
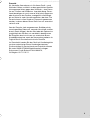
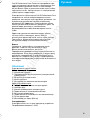
The Oral-B Professional Care Center has been developed
together with leading dental professionals to effectively
remove plaque from all areas of your teeth and to attack
plaque bacteria.
The Oral-B Professional Care
toothbrush adds a gentle
pulsating movement to its oscillation to create a deep-
cleaning 3D brushing action. The toothbrush should be
used twice a day for at least two minutes, the minimum
brushing time recommended by dental professionals.
The irrigator removes remaining food particles from
between your teeth, while it also effectively massages
your gums. Always use the water jet after brushing your
teeth
Please read the use instructions carefully before first use.
Important
The appliance must be mounted in a way that it cannot fall
into water.
The plug should always be accessible. Periodically check
the cord for damage. A damaged or non-functioning
appliance should no longer be used. Take it to a Braun
Service Centre.
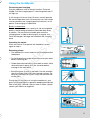
Description
Toothbrush
1
Charging base
2
Charge indicator
3
Toothbrush handle (rechargeable)
4
Switch
5
Brushhead
6
Brushhead compartment
Irri
gator
7
Jet compartment
8
Irrigator jet
9
Jet release button
0
On/off switch
q
Water pressure control dial
w
Sliding switch (water stop and go)
e
Irrigator handle
r
Water container (600 ml/20 fl. oz.)
Specifications
Power supply: see bottom of housing
Power intake: 24 W
English
3718121_OC15X_P4-98 Seite 10 Montag, 9. Mai 2005 12:06 12
All manuals and user guides at all-guides.com

11
Using the toothbrush
Connecting and charging
Plug the appliance into an electrical outlet. Place the
handle
3
on the charging base
1
, the charge indicator
2
will light up.
A full charge will take at least 16 hours and will provide
30 minutes operation time. For everyday use, the handle
can be stored on the charging base to maintain it at full
power. Overcharging is impossible.
Batter
y maintenance
To maintain the maximum capacity of the rechargeable
battery, the following procedure should be done every
6 months: Do not place the handle back onto the
charging base in order to discharge it by regular use.
Once discharged, recharge the handle on the charging
base.
Operating the switch
Press the switch
4
to operate the toothbrush, press
again to stop it.
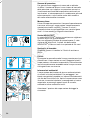
Removing plaque
• The toothbrush can be used with any leading brand of
toothpaste.
• To avoid splashing, guide the brushhead to your teeth
before switching on.
• Guide the brushhead slowly from tooth to tooth. Hold
the brushhead in place for a few seconds before
moving on the next tooth.
• Brush the gums as well as the teeth, first the outsides,
then the insides and finally the chewing surfaces. Do
not press too hard nor scrub, simply let the brush do
all the work.
During the first few days of using the toothbrush, your
gums may bleed slightly. In general, bleeding should stop
after a few days. Should it persist after 2 weeks, please
consult your dentist or hygienist.
O
ral-B
3718121_OC15X_P4-98 Seite 11 Montag, 9. Mai 2005 12:06 12
All manuals and user guides at all-guides.com
all-guides.com

12
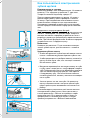
Pressure sensor
For safety and optimum brushing results, the toothbrush
has a pressure control system: If too much pressure is
applied, the oscillating movement of the brushhead will
continue, but the pulsation will stop. There is a noticeable
change in feeling and sound when the pressure sensor is
activated.
Memory timer
An incorporated timer memorises the elapsed brushing
time, even when the handle is briefly switched off (max.
30 seconds). After two minutes – which is the minimum
recommended brushing time – the timer signals by a short
stutter.
INDICATOR
®
bristles
The INDICATOR
®
bristles help you monitor and improve
the brushing performance.
With proper brushing, twice a day for two minutes, the
blue colour on the INDICATOR
®
bristles will disappear
half-way down within 3-4 months, signalling it is time to
replace the brushhead.
Replacement brushheads
Available at your retail store or Braun Service Centres.
After use
Rinse the brushhead thoroughly under running water for
several seconds with the handle switched on. Switch off
the handle and take off the brushhead. Clean both parts
separately under running water, then wipe them dry.
Environmental notice
The toothbrush handle is provided with a nickel-hydride
rechargeable battery. To protect the environment, do not
dispose of the product in the household waste at the end
of its useful life. Open the handle as shown, remove the
battery and dispose of it at your retail store or at appro-
priate collection sites according to national or local regu-
lations.
Caution: Opening the handle will definitely destroy it.
5
7
1 2 3
6
4
3718121_OC15X_P4-98 Seite 12 Montag, 9. Mai 2005 12:06 12
All manuals and user guides at all-guides.com

13
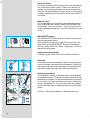
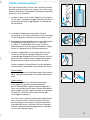
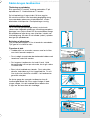
Using the Irrigator
Before using for the first time, fill the water container and
allow the water to run through completely by holding
the irrigator handle over a washbasin.
1. Attach one of the irrigator jets
8 to the handle e until
it locks in place. Fill the water container with water
and add mouthwash, if desired.
2. Turn on the irrigator by pressing the on/off switch
0.
(When doing so, the sliding switch
w on the handle
should not be pushed up.)
3. Select the water pressure with the pressure control
dial
q (1 = gentle, 5 = strong). We recommend that
you start with setting (1), especially if your gums tend
to bleed or if children are using the irrigator.
4. Bend over the washbasin and guide the jet to your
teeth and gums. Slide the handle switch up to start
the water stream. Keep your mouth slightly open to
allow the water to run into the washbasin.
The irrigator jet offers two different functions
depending on the position of the jet tip:
Single jet:
Jet tip in position (a) to clean the teeth and the
interdental spaces and remove resistant food particles
Multi jet:
Jet tip in position (b) to massage the gums and keep
them healthy.
First, turn off the water stream by sliding the handle
switch down (to avoid unintended water spraying). The
jet can easily be switched from one function to the
other by pressing the jet tip in or out. Begin with the
single jet. Guide the water stream to the teeth and
especially to the interdental spaces. Then massage
the gums with the multi jet.
To ensure the jet functions, a small sieve is incorpo-
rated in the lower end of the shaft. Should you notice
a reduced water pressure, check the sieve for any de-
posits and remove them, e.g. by carefully tapping
the shaft on a flat surface.
2
ab
3718121_OC15X_P4-98 Seite 13 Montag, 9. Mai 2005 12:06 12
All manuals and user guides at all-guides.com

14
Max. operating time: 15 minutes
Cooling off time: 2 hours
After use
Always empty the water container entirely.
Otherwise bacteria could collect in the remaining water, if
the unit is not used for some time. Should your dentist
have recommended use of a chlorhexidine solution with
your irrigator, allow some water to run through the irrigator
after use with chlorhexidine, to prevent any deposit
build-up.
Press the on/off switch to turn off the irrigator.
To take off the irrigator jet, press the jet release button.
The jets can be stored in the jet compartment.
Wipe the handle dry and place it back onto its base.
Cleaning
Regularly clean the housing with a damp cloth.
The water container, the brushhead compartment and the
jet compartment are removable and dishwasher-safe.
Subject to change without notice.
This product conforms to the European Directives
EMC 89/336/EEC and Low Voltage 73/23/EEC.
At the end of the product's useful life, please dispose
of it at appropriate collection points provided in your
country.
3718121_OC15X_P4-98 Seite 14 Montag, 9. Mai 2005 12:06 12
All manuals and user guides at all-guides.com

15
Guarantee
We grant 2 years guarantee on the product commencing
on the date of purchase. Within the guarantee period we
will eliminate, free of charge, any defects in the appliance
resulting from faults in materials or workmanship, either
by repairing or replacing the complete appliance as we
may choose. This guarantee extends to every country
where this appliance is supplied by Braun or its
appointed distributor.
This guarantee does not cover: damage due to improper
use, normal wear or use as well as defects that have a
negligible effect on the value or operation of the appli-
ance. The guarantee becomes void if repairs are under-
taken by unauthorised persons and if original Braun parts
are not used.
To obtain service within the guarantee period, hand in or
send the complete appliance with your sales receipt to an
authorised Braun Customer Service Centre.
For UK only:
This guarantee in no way affects your rights under
statutory law.
3718121_OC15X_P4-98 Seite 15 Montag, 9. Mai 2005 12:06 12
All manuals and user guides at all-guides.com

16
Le combiné dentaire Oral-B Professional CareCenter
a été développé avec la collaboration d’éminents experts
afin de lutter efficacement contre la plaque dentaire sur
toutes les surfaces de vos dents et d’attaquer les
bactéries de la plaque dentaire.
La brosse à dents électrique Oral-B Professional Care
combine 2 mouvements de brossage, pulsations douces
et oscillations, pour une action de brossage en 3D et en
profondeur. La brosse à dents électrique doit être utilisée
2 fois par jour pendant au moins 2 minutes, temps de
brossage minimum recommandé par les chirurgiens-
dentistes.
L’hydropulseur élimine les résidus alimentaires dans les
espaces interdentaires tout en massant efficacement les
gencives. Utilisez toujours l’hydropulseur après vous être
brossé les dents.
Veuillez lire attentivement la notice d’utilisation avant la
première utilisation.
Important
L'appareil doit être fixé de façon à ce qu'il ne puisse pas
tomber dans l'eau.
La prise doit toujours être accessible. Vérifiez périodique-
ment le cordon d’alimentation. En cas d’endommagement
ou de disfonctionnement il ne doit plus être utilisé.
Apportez-le dans un Centre de Service Oral-B.
Description
Brosse à dents électrique
1 Chargeur
2 Indicateur de charge
3 Corps de brosse (rechargeable)
4 Commutateur marche/arrêt
5 Brossette
6 Tour de rangement des brossettes
Hydr
opulseur
7 Compartiment de rangement des canules
8 Canule
9 Bouton de déverrouillage de la canule
0 Commutateur marche/arrêt de l’hydropulseur
q Molette de réglage de la pression de l’eau
w Commutateur marche/arrêt du manche de la canule
e Manche de la canule
r Réservoir d’eau (600 ml)
Particularités
Puissance fournie : voir sous le bloc-moteur
Puissance utilisée : 24 W
Français
3718121_OC15X_P4-98 Seite 16 Montag, 9. Mai 2005 12:06 12
All manuals and user guides at all-guides.com
all-guides.com

17
Utilisation de la brosse à dents
électrique
Branchement et charge
Branchez le chargeur à une prise de courant.
Poser le corps de brosse
3 sur le chargeur 1: l’indicateur
de charge
2 s’allume.
Il faut au moins 16 heures pour une charge complète et
une autonomie d’utilisation de la brosse de 30 minutes.
Pour une utilisation quotidienne, le corps de brosse peut
resté posé sur le chargeur branché pour le maintenir à sa
pleine capacité. Il n’y a aucun risque de surcharge.
Entr
etien des batteries
Le processus de charge/décharge suivant doit être
renouvelé tous les 6 mois pour conserver la pleine capa-
cité des batteries. Ne posez pas le corps de brosse sur le
chargeur branché et utilisez le régulièrement jusqu’à
décharge complète.
Une fois que le corps de brosse est déchargé, rechargez
le sur le chargeur branché.
Commutateur marche/arrêt
Appuyez sur le commutateur marche/arrêt 4 pour mettre
en marche la brosse, appuyez à nouveau dessus pour
l’arrêter.
Élimination de la plaque dentaire
• La brosse à dents peut être utilisée avec n’importe
quelle marque de dentifrice.
• Pour éviter les projections de dentifrice, introduisez la
brosse dans votre bouche avant de la mettre en
marche.
• Déplacez lentement la brosse d’une dent à l’autre.
Maintenez la brosse en place pendant quelques
secondes avant de passer à la dent suivante.
• Brossez aussi vos gencives, d’abord l’extérieur, puis
l’intérieur et pour finir les surfaces de mastication.
N’appuyez pas trop fort et ne frottez pas – laissez
simplement la brosse faire son travail.
Durant les premiers jours d’utilisation de la brosse à
dents électrique, il se peut que vos gencives saignent
légèrement. En général, ce saignement s’arrête au bout
de quelques jours.
Cependant, s’il persiste au bout de 2 semaines, consul-
tez votre chirurgien-dentiste.
O
ral-B
3718121_OC15X_P4-98 Seite 17 Montag, 9. Mai 2005 12:06 12
All manuals and user guides at all-guides.com

18
Indicateur de pression
Pour la protection de vos gencives, et pour un brossage
optimal, la brosse est équipée d’un indicateur de pression.
Si vous exercez une trop forte pression sur vos dents,
le mouvement d’oscillations de la brosse continuera mais
le mouvement de pulsations s’arrêtera.
La sensation et le bruit changent notablement quand
l’indicateur de pression est activé.
Minuteur à mémoire
Un minuteur intégré mémorise le temps de brossage
écoulé, même lorsque le brossage est brièvement
interrompu (30 s d’interruption au maximum). La fin du
temps de brossage de deux minutes (temps recommandé
par les chirurgiens-dentistes) est indiquée par de courtes
interruptions du brossage.
Les Poils INDICATOR
®
Les poils INDICATOR
®
vous aident à contrôler et à
améliorer les performances de brossage.
Avec un brossage correct de deux minutes deux fois par
jour, la couleur bleue des poils INDICATOR
®
s’estompera
à mi-hauteur au bout de 3-4 mois, vous indiquant qu’il est
temps de remplacer votre brossette.
Remplacement des brossettes
Disponibles chez votre détaillant ou dans les Centres de
Service Oral-B.
Entretien
Rincez entièrement la brossette sous l’eau du robinet avec
l’interrupteur en marche pendant quelques secondes.
Arrêtez le corps de brosse et enlevez la brossette.
Nettoyez séparément les deux parties en les passant sous
l’eau, ensuite essuyez les.
Informations sur l’environnement
Le corps de brosse contient des batteries rechargeables
au nickel hydride.
Pour protéger l’environnement, ne jetez pas le produit aux
ordures ménagères à la fin de sa durée de vie.
Ouvrez le corps de brosse comme indiqué, retirez les
batteries et portez les chez votre Centre de Service ou
mettez les au rebut conformément à la législation en
vigueur sur l’environnement.
Attention :
En ouvrant l’appareil, vous le détruisez et la garantie est
invalidée.
5
7
1 2 3
6
4
3718121_OC15X_P4-98 Seite 18 Montag, 9. Mai 2005 12:06 12
All manuals and user guides at all-guides.com

19
Utilisation de l’hydropulseur
Avant une première utilisation, remplissez le réservoir
d’eau et faites circuler l’eau dans tout le circuit en tenant
le manche de la canule au-dessus du lavabo.
1. Posez l’une des canules
8 sur le manche de la canule
e jusqu’à ce qu’elle soit bien enclenchée.
Remplissez le réservoir avec de l’eau, en ajoutant un
bain de bouche si vous le souhaitez.
2. Mettez l’hydropulseur en marche en appuyant sur le
commutateur marche/arrêt
0 de l’hydropulseur
(ce faisant, le commutateur marche/arrêt du manche
de la canule
w ne doit pas encore être mis en marche).
3. Sélectionnez la pression de l’eau avec le molette de
réglage de la pression
q (1= doux, 5= fort).
Nous recommandons de commencer sur la position(1),
surtout si vos gencives ont tendance à saigner, ou si
ce sont des enfants qui utilisent l’hydropulseur.
4. Penchez-vous au-dessus du lavabo et dirigez la
canule vers vos dents et vos gencives.
Poussez le commutateur marche/arrêt du manche
de la canule vers le haut pour l’activer.
Maintenez votre bouche légèrement ouverte pour
permettre à l’eau de s’écouler dans le lavabo.
L’hydropulseur est doté de deux fonctions distinctes
selon la position de l’embout:
Jet simple
En position (a) l’embout du jet nettoie les dents et les
espaces interdentaires et élimine les résidus alimen-
taires.
Jet Multiple
En position (b) l’embout du jet masse les gencives et
les maintient en bonne santé.
Fermez d’abord le jet d’eau en abaissant le commu-
tateur (pour éviter les projections intempestives).
Le jet peut facilement passer d’un mode à l’autre
par simple pression sur l’embout.
Commencez avec le jet simple. Guidez le jet d’eau
vers vos dents en insistant sur les espaces interden-
taires. Massez ensuite les gencives avec le jet
multiple.
Pour garantir le bon fonctionnement du jet, un petit
filtre est incorporé à la partie inférieure du manche. Si la
2
ab
3718121_OC15X_P4-98 Seite 19 Montag, 9. Mai 2005 12:06 12
All manuals and user guides at all-guides.com

20
pression de l’eau vous semble diminuer, vérifiez la
présence éventuelle de dépôts sur le filtre et enlevez-les,
en tapotant doucement le manche contre une surface
plate, par exemple.
Temps de fonctionnement maximal : 15 minutes
Temps de refroidissement : 2 heures
Après utilisation
Videz toujours complètement le réservoir d’eau.
Sinon, des bactéries pourraient se développer dans l’eau
restante si l’appareil n’était pas utilisé pendant un certain
temps.
Si votre chirurgien-dentiste vous a recommandé d’utiliser
une solution à la chlorhexidine dans votre hydropulseur,
laisser circuler un peu d’eau dans votre hydropulseur,
après utilisation de cette solution, pour éviter la formation
de dépôt.
Appuyez sur le commutateur marche/arrêt de l’hydro-
pulseur pour l’arrêter.
Pour retirer la canule, appuyez sur le bouton de retrait de
la canule.
Les canules peuvent être rangées dans le compartiment
de rangement.
Essuyez le manche de la canule et reposez-le sur son
support.
Entretien
Nettoyez régulièrement le bloc-moteur avec un linge
humide.
Le réservoir d’eau, la tour de rangement pour les bros-
settes et le compartiment de rangement pour les canules
sont extractibles et sont lavables dans le lave-vaisselle.
Sauf modifications.
Cet appareil est conforme aux normes Européennes
fixées par les Directives 89/336/EEC et la directive
Basse Tension 73/23/EEC.
Une fois le produit en fin de vie, veuillez le déposer
dans un point de recyclage approprié.
3718121_OC15X_P4-98 Seite 20 Montag, 9. Mai 2005 12:06 12
All manuals and user guides at all-guides.com
Sayfa yükleniyor...
Sayfa yükleniyor...
Sayfa yükleniyor...
Sayfa yükleniyor...
Sayfa yükleniyor...
Sayfa yükleniyor...
Sayfa yükleniyor...
Sayfa yükleniyor...
Sayfa yükleniyor...
Sayfa yükleniyor...
Sayfa yükleniyor...
Sayfa yükleniyor...
Sayfa yükleniyor...
Sayfa yükleniyor...
Sayfa yükleniyor...
Sayfa yükleniyor...
Sayfa yükleniyor...
Sayfa yükleniyor...
Sayfa yükleniyor...
Sayfa yükleniyor...
Sayfa yükleniyor...
Sayfa yükleniyor...
Sayfa yükleniyor...
Sayfa yükleniyor...
Sayfa yükleniyor...
Sayfa yükleniyor...
Sayfa yükleniyor...
Sayfa yükleniyor...
Sayfa yükleniyor...
Sayfa yükleniyor...
Sayfa yükleniyor...
Sayfa yükleniyor...
Sayfa yükleniyor...
Sayfa yükleniyor...
Sayfa yükleniyor...
Sayfa yükleniyor...
Sayfa yükleniyor...
Sayfa yükleniyor...
Sayfa yükleniyor...
Sayfa yükleniyor...
Sayfa yükleniyor...
Sayfa yükleniyor...
Sayfa yükleniyor...
Sayfa yükleniyor...
Sayfa yükleniyor...
Sayfa yükleniyor...
Sayfa yükleniyor...
Sayfa yükleniyor...
Sayfa yükleniyor...
Sayfa yükleniyor...
Sayfa yükleniyor...
Sayfa yükleniyor...
Sayfa yükleniyor...
Sayfa yükleniyor...
Sayfa yükleniyor...
Sayfa yükleniyor...
Sayfa yükleniyor...
Sayfa yükleniyor...
Sayfa yükleniyor...
Sayfa yükleniyor...
Sayfa yükleniyor...
Sayfa yükleniyor...
Sayfa yükleniyor...
Sayfa yükleniyor...
Sayfa yükleniyor...
Sayfa yükleniyor...
Sayfa yükleniyor...
Sayfa yükleniyor...
Sayfa yükleniyor...
Sayfa yükleniyor...
Sayfa yükleniyor...
Sayfa yükleniyor...
Sayfa yükleniyor...
Sayfa yükleniyor...
Sayfa yükleniyor...
-
 1
1
-
 2
2
-
 3
3
-
 4
4
-
 5
5
-
 6
6
-
 7
7
-
 8
8
-
 9
9
-
 10
10
-
 11
11
-
 12
12
-
 13
13
-
 14
14
-
 15
15
-
 16
16
-
 17
17
-
 18
18
-
 19
19
-
 20
20
-
 21
21
-
 22
22
-
 23
23
-
 24
24
-
 25
25
-
 26
26
-
 27
27
-
 28
28
-
 29
29
-
 30
30
-
 31
31
-
 32
32
-
 33
33
-
 34
34
-
 35
35
-
 36
36
-
 37
37
-
 38
38
-
 39
39
-
 40
40
-
 41
41
-
 42
42
-
 43
43
-
 44
44
-
 45
45
-
 46
46
-
 47
47
-
 48
48
-
 49
49
-
 50
50
-
 51
51
-
 52
52
-
 53
53
-
 54
54
-
 55
55
-
 56
56
-
 57
57
-
 58
58
-
 59
59
-
 60
60
-
 61
61
-
 62
62
-
 63
63
-
 64
64
-
 65
65
-
 66
66
-
 67
67
-
 68
68
-
 69
69
-
 70
70
-
 71
71
-
 72
72
-
 73
73
-
 74
74
-
 75
75
-
 76
76
-
 77
77
-
 78
78
-
 79
79
-
 80
80
-
 81
81
-
 82
82
-
 83
83
-
 84
84
-
 85
85
-
 86
86
-
 87
87
-
 88
88
-
 89
89
-
 90
90
-
 91
91
-
 92
92
-
 93
93
-
 94
94
-
 95
95


Braun 3718 Kullanım kılavuzu
- Tip
- Kullanım kılavuzu
- Bu kılavuz aynı zamanda aşağıdakiler için de uygundur:
diğer dillerde
- español: Braun 3718 Manual de usuario
- français: Braun 3718 Manuel utilisateur
- italiano: Braun 3718 Manuale utente
- svenska: Braun 3718 Användarmanual
- Deutsch: Braun 3718 Benutzerhandbuch
- português: Braun 3718 Manual do usuário
- English: Braun 3718 User manual
- dansk: Braun 3718 Brugermanual
- suomi: Braun 3718 Ohjekirja
- Nederlands: Braun 3718 Handleiding
İlgili makaleler
-
Braun ORALB PROFESSIONALCARE D17.525 Kullanım kılavuzu
-
-
-
-
-
Braun Professional Care Kullanım kılavuzu
-
-
-
-
Diğer belgeler
-
Panasonic EWDJ10 Kullanma talimatları
-
Oral-B OXYJET Kullanım kılavuzu
-
-
-
Sonicare HX3110/08 Kullanım kılavuzu
-
-
-
Philips HX 5581 Kullanım kılavuzu
-
-
Viper VE17P Kullanım kılavuzu