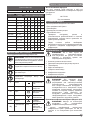
Stanley SS30 Kullanım kılavuzu
- Kategori
- Elektrikli aletler
- Tip
- Kullanım kılavuzu

(Original Instructions) ENGLISH
SS30
English Page 04
French Page 10
Russian Page 16
Ukrainian Page 25
Turkish Page 33
ةيبرعلا Page 45

2
ENGLISH (Original Instructions)
2
1
6
5
4
3
7
6
A
B

3
(Original Instructions) ENGLISH
3
4
5
10
11
10
11
C
D

4
ENGLISH (Original Instructions)
INTENDED USE
Your STANLEY Random orbital sander SS30 has been
designed for sanding wood, metal, plastics and painted
surfaces. This tool is intended for professional use.
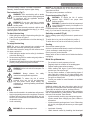
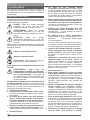
SAFETY INSTRUCTIONS
The definitions below describe the level of severity for each
signal word. Please read the manual and pay attention to
these symbols.
DANGER: Indicates an imminently hazardous
situation which, if not avoided, will result in
death or serious injury.
WARNING: Indicates a potentially hazardous
situation which, if not avoided, could result in
death or serious injury.
CAUTION: Indicates a potentially hazardous
situation which, if not avoided, may result in
minor or moderate injury.
NOTICE: Indicates a practice not related to personal injury
which, if not avoided, may result in property damage.
Denotes risk of electric shock.
Denotes risk of fire.
Warning: To reduce the risk of injury, read the
instruction manual.
General power tool safety warnings
WARNING! Read all safety warnings,
instructions, illustrations and specifications
provided with this power tool. Failure to follow
all instructions listed below may result in electric
shock, fire and/or serious injury.
Save all warnings and instructions for future reference.
The term “power tool” in the warnings refers to your mains-
operated (corded) power tool or battery-operated (cordless)
power tool.
1. Work area safety
a. Keep work area clean and well lit. Cluttered or dark
areas invite accidents.
b. Do not operate power tools in explosive
atmospheres, such as in the presence of flammable
liquids, gases or dust. Power tools create sparks
which may ignite the dust or fumes.
c. Keep children and bystanders away while
operating a power tool. Distractions can cause you
to lose control.
2. Electrical safety
a. Power tool plugs must match the outlet. Never
modify the plug in any way. Do not use any adapter
plugs with earthed (grounded) power tools.
Unmodified plugs and matching outlets will reduce risk
of electric shock.
b. Avoid body contact with earthed or grounded
surfaces such as pipes, radiators, ranges and
refrigerators. There is an increased risk of electric
shock if your body is earthed or grounded.
c. Do not expose power tools to rain or wet
conditions. Water entering a power tool will increase
the risk of electric shock.
d. Do not abuse the cord. Never use the cord for
carrying, pulling or unplugging the power tool.
Keep cord away from heat, oil, sharp edges or
moving parts. Damaged or entangled cords increase
the risk of electric shock.
e. When operating a power tool outdoors, use an
extension cord suitable for outdoor use. Use of
a cord suitable for outdoor use reduces the risk of
electric shock.
f. If operating a power tool in a damp location is
unavoidable, use a residual current device (RCD)
protected supply. Use of an RCD reduces the risk of
electric shock.
3. Personal safety
a. Stay alert, watch what you are doing and use
common sense when operating a power tool. Do
not use a power tool while you are tired or under
the influence of drugs, alcohol or medication. A
moment of inattention while operating power tools may
result in serious personal injury.
b. Use personal protective equipment. Always wear
eye protection. Protective equipment such as a dust
mask, non-skid safety shoes, hard hat, or hearing
protection used for appropriate conditions will reduce
personal injuries.
c. Prevent unintentional starting. Ensure the switch
is in the off-position before connecting to power
source and/or battery pack, picking up or carrying
the tool. Carrying power tools with your finger on the
switch or energising power tools that have the switch
on invites accidents.
d. Remove any adjusting key or wrench before
turning the power tool on. A wrench or a key left
attached to a rotating part of the power tool may result
in personal injury.
e. Do not overreach. Keep proper footing and balance
at all times. This enables better control of the power
tool in unexpected situations.
f. Dress properly. Do not wear loose clothing or
jewellery. Keep your hair and clothing away from
moving parts. Loose clothes, jewellery or long hair
can be caught in moving parts.
g. If devices are provided for the connection of dust
extraction and collection facilities, ensure these
are connected and properly used. Use of dust
collection can reduce dust-related hazards.
h. Do not let familiarity gained from frequent use of
tools allow you to become complacent and ignore
tool safety principles. A careless action can cause
severe injury within a fraction of a second.
4. Power tool use and care
a. Do not force the power tool. Use the correct power
tool for your application. The correct power tool will
do the job better and safer at the rate for which it was
designed.

5
(Original Instructions) ENGLISH
b. Do not use the power tool if the switch does not
turn it on and off. Any power tool that cannot be
controlled with the switch is dangerous and must be
repaired.
c. Disconnect the plug from the power source and/
or remove the battery pack, if detachable from
the power tool before making any adjustments,
changing accessories, or storing power tools.
Such preventive safety measures reduce the risk of
starting the power tool accidentally.
d. Store idle power tools out of the reach of children
and do not allow persons unfamiliar with the
power tool or these instructions to operate the
power tool. Power tools are dangerous in the hands
of untrained users.
e. Maintain power tools and accessories. Check for
misalignment or binding of moving parts, breakage
of parts and any other condition that may affect the
power tools operation. If damaged, have the power
tool repaired before use. Many accidents are caused
by poorly maintained power tools.
f. Keep cutting tools sharp and clean. Properly
maintained cutting tools with sharp cutting edges are
less likely to bind and are easier to control.
g. Use the power tool, accessories and tool bits etc.
in accordance with these instructions, taking into
account the working conditions and the work to
be performed. Use of the power tool for operations
different from those intended could result in a
hazardous situation.
h. Keep handles and grasping surfaces dry, clean
and free from oil and grease. Slippery handles and
grasping surfaces do not allow for safe handling and
control of the tool in unexpected situations.
5. Service
a. Have your power tool serviced by a qualified repair
person using only identical replacement parts.
This will ensure that the safety of the power tool is
maintained
ADDITIONAL SPECIFIC SAFETY RULES
Safety instructions for sanders
a. Hold the power tools by insulated gripping
surfaces, because the sanding surface may
contact its own cord. Cutting a “live” wire may make
exposed metal parts of the power tool “live” and could
give the opertator an electric shock.
b. WARNING! Contact with or inhalation of dusts arising
from sanding applications may endanger the health
of the operator and possible bystanders. Wear a dust
mask specifically designed for protection against dust
and fumes and ensure that persons within or entering
the work area are also protected.
c. Thoroughly remove all dust after sanding.
d. Take special care when sanding paint which is possibly
lead based or when sanding some woods and metal
which may produce toxic dust:
- Do not let children or pregnant women enter the work
area.
- Do not eat, drink or smoke in the work area.
- Dispose of dust particles and any other debris safely.
Additional safety information
WARNING: We recommend the use of a residual
current device with a residual current rating of
30mA or less.
SAFETY OF OTHERS
• This tool is not intended for use by persons (including
children) with reduced physical, sensory or mental
capabilities, or lack of experience and knowledge,
unless they have been given supervision or instruction
concerning use of the tool by a person responsible for
their safety.
• Children should be supervised to ensure that they do
not play with the appliance.
RESIDUAL RISKS
In spite of the application of the relevant safety regulations
and the implementation of safety devices, certain residual
risks cannot be avoided. These are:
– Impairment of hearing
– Risk of personal injury due flying particles.
– Risk of burns due to accessories becoming hot
during operation.
– Risk of personal injury due to prolonged use.
– Risk of dust from hazardous substances.
ELECTRICAL SAFETY
Your tool is double insulated; therefore no earth
wire is required. Always check that the main
voltage corresponds to the voltage on the rating
plate.
WARNING! If the power cord is damaged, it must
be replaced by the manufacturer, authorized
STANLEY Service Center or an equally qualified
person in order to avoid damage or injury. If the
power cord is replaced by an equally qualified
person, but not authorized by STANLEY, the
warranty will not be valid.
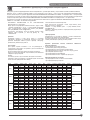
USING AN EXTENSION CABLE
If an extension cable is required, use an approved 3–core
extension cable suitable for the power input of this tool (see
Technical data).The minimum conductor size is 1.5 mm2;
the maximum length is 30 m. When using a cable reel,
always unwind the cable completely.
Cable cross-sectional
area (mm
2
) Cable rated
current (Ampere)
Cable cross-sectional
area (mm
2
) Cable rated
current (Ampere)
0.75 6
1.00 10
1.50 15
2.50 20
4.00 25

6
ENGLISH (Original Instructions)
Cable length (m)
7.5 15 25 30 45 60
Voltage Amperes Cable rated current (Ampere)
110-127 0 - 2.0 6 6 6 6 6 10
2.1 - 3.4 6 6 6 6 15 15
3.5 - 5.0 6 6 10 15 20 20
5.1 - 7.0 10 10 15 20 20 25
7.1 - 12.0 15 15 20 25 25 -
12.1 - 20.0 20 20 25 - - -
220-240 0 - 2.0 6 6 6 6 6 6
2.1 - 3.4 6 6 6 6 6 6
3.5 - 5.0 6 6 6 6 10 15
5.1 - 7.0 10 10 10 10 15 15
7.1 - 12.0 15 15 15 15 20 20
12.1 - 20.0 20 20 20 20 25 -
LABELS ON TOOL
The label on your tool may include the following symbols:
must read the instruction manual before use.
WARNING! To reduce the risk of injury, the
user
Wear safety glasses or goggles.
Wear ear protection.
Wear a dust mask.
V Volts Direct Current
A Amperes n
0
No-Load Speed
Hz Hertz Class II
Construction
W Watts Earthing
Terminal
min minutes Safety Alert
Symbol
Alternating
Current
/min. Revolutions or
Reciprocation
per minute
Position of date code
The Date Code, which also includes the year of manufacture,
is printed into the housing.
Example:
2017 XX JN
Year of manufacturing
PACKAGE CONTAINS
1 Random orbital sander
1 Sanding paper
1 Dust bag
1 Instruction manual
1 Warranty card
1 Service center list
Check for damage to the tool, parts or accessories which
may have occurred during transport.
Take the time to thoroughly read and understand this
manual prior to operation.
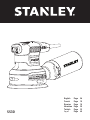
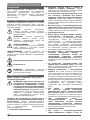
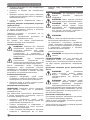
FEATURES (Fig A)
WARNING: Never modify the power tool or any
part of it. Damage or personal injury could result.
1. On/off switch
2. Electronic speed control dial
3. Dust bag
4. Dust bag collar
5. Dust extraction outlet
6. Sanding pad
7. Sanding paper
ASSEMBLY AND ADJUSTMENT
WARNING: To reduce the risk of serious personal
injury, turn tool off and disconnect tool from
power source before making any adjustments or
removing/installing attachments or accessories.
Before reconnecting the tool, depress and
release the trigger switch to ensure that the tool
is off. An accidental start-up can cause injury.
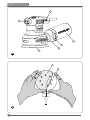
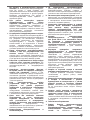
Fitting sanding paper (Figure. A,B)
WARNING! Never use the tool without a sanding
paper or accessory in place.
The tool uses 125 mm (5”) hook and loop sanding paper
with an 8 hole dust extraction pattern.
1. Place the tool on a table, sanding pad (6) up.
2. Place the sanding paper (7) directly on top of the
sanding pad.
3. Hold the sanding pad with one hand and align the dust
extraction holes.
4. Press the sanding paper firmly onto the sanding pad.
Setting the electronic speed control dial (Fig A)
The speed is infinitely variable from 0–13,000 min
-1
using
the electronic speed control dial (2).
Turn the electronic speed control dial to the required level.

7
(Original Instructions) ENGLISH
The correct setting, however, is a matter of experience.
Generally, harder materials require a higher setting.
Dust extraction (Fig C)
WARNING: Since woodworking with a sander
produces dust, always install a dust bag designed
in compliance with the applicable directives
regarding dust emission.
WARNING: Do not use a dust bag or vacuum
extractor without proper spark protection when
sanding metal.
Your sander has a dust extraction methods: a built-in outlet
(5) which allows either the supplied dust bag (3) or a shop
vacuum system to be connected.
To attach the dust bag
1. While holding the sander, fit the dust bag collar(4) to the
outlet (5) as shown in Figure C.
2. Turn the collar (4) anticlockwise to lock the dust bag (3)
in place.
To empty the dust bag
NOTE: Be sure to wear approved eye protection and
approved dust mask when performing this procedure.
For efficient dust extraction, empty the dust collector when
it is about one third full.
1. While holding the sander, turn the collar (4) clockwise to
unlock the dust bag (3).
2. Remove dust bag from the sander and gently shake or
tap the dust bag to empty.
3. Reattach the dust bag back onto the outlet and lock into
place by turning the dust bag collar clockwise.
USE
WARNING:Let the tool work at its own pace. Do
not overload.
WARNING: Always observe the safety
instructions and applicable regulations.
WARNING: To reduce the risk of serious
personal injury, turn tool off and disconnect
tool from power source before making any
adjustments or removing/installing attachments
or accessories.
WARNING:
• Make sure all materials to be sanded are well secured.
• Apply only a gentle pressure to the workpiece. Excessive
pressure does not improve the sanding effect, but only
results in an increased load on the machine and causes
the abrasive to tear.
• Avoid overloading.
WARNING: Do not sand magnesium!
NOTICE: If you wrap the cord around the tool when you
store it, leave a generous loop of cord such that the cord
guard does not bend.
This helps prevent premature cord failure.
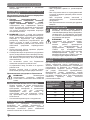
Proper hand position (Fig D)
WARNING: To reduce the risk of serious
personal injury, ALWAYS use proper hand
position as shown.
WARNING: To reduce the risk of serious personal
injury, ALWAYS hold securely in anticipation of a
sudden reaction.
Proper hand position requires either one hand on the sander
body (10) or one hand on the main grip (11) as shown.
Switching on and off (Fig A)
Set the sanding speed using the electronic speed control
dial (2).
To switch the tool on, set the on/off switch to position I.
To switch the tool off, set the on/off switch to position O.
Sanding
Start with the coarsest grit size.
As the tool produces small abrasion marks in all directions,
it is not necessary to sand along the grain.
Check your work at short intervals.
Always switch off the tool when work is finished and before
unplugging.
Hints for optimum use
• Do not exert too much pressure on the tool.
• Regularly check the condition of the sanding paper.
• Replace sanding paper when necessary.
• When sanding new layers of paint before applying
another layer, use extra fine grit.
• On very uneven surfaces, or when removing layers of
paint, start with a coarse grit. On other surfaces, start
with a medium grit. In both cases, gradually change to a
fine grit for a smooth finish.
• Consult your retailer for more information on available
accessories.
Residual risks
Additional residual risks may arise when using the tool
which may not be included in the enclosed safety warnings.
These risks can arise from misuse, prolonged use etc.
Even with the application of the relevant safety regulations
and the implementation of safety devices, certain residual
risks can not be avoided. These include:
• Injuries caused by touching any rotating/moving parts.
• Injuries caused when changing any parts, blades or
accessories.
• Injuries caused by prolonged use of a tool. When using
any tool for prolonged periods ensure you take regular
breaks.
• Impairment of hearing.
• Health hazards caused by breathing dust developed

8
ENGLISH (Original Instructions)
when using your tool (example:- working with wood,
especially oak, beech and MDF.)
MAINTENANCE
Your STANLEY power tool has been designed to operate
over a long period of time with a minimum of maintenance.
Continuous satisfactory operation depends upon proper
tool care and regular cleaning.
• Regularly clean the ventilation slots in your tool using a
soft brush or dry cloth.
• Regularly clean the motor housing using a damp cloth.
Do not use any abrasive or solvent-based cleaner.This
machine is not user-serviceable. If problems occur
contact an authorised repair agent.
Lubrication
Your power tool requires no additional lubrication.
Cleaning
WARNING: Blow dirt and dust out of the main
housing with dry air as often as dirt is seen
collecting in and around the air vents. Wear
approved eye protection and approved dust
mask when performing this procedure.
WARNING: Never use solvents or other harsh
chemicals for cleaning the non-metallic parts
of the tool. These chemicals may weaken the
materials used in these parts. Use a cloth
dampened only with water and mild soap. Never
let any liquid get inside the tool; never immerse any part
of the tool into a liquid. To maintain products SAFETY
and RELIABILITY, repair, carbon brush inspection and
replacement, any other maintenance or adjustment should
be performed by STANLEY Service Centers, always using
Stanley replacement parts.
OPTIONAL ACCESSORIES
WARNING: Since accessories, other than those
offered by STANLEY, have not been tested with
this product, use of such accessories with this
tool could be hazardous. To reduce the risk of
injury, only STANLEY, recommended accessories
should be used with this product.
Consult your dealer for further information on the
appropriate accessories.
PROTECTING THE ENVIRONMENT
Separate collection. This product must not be
disposed of with normal household waste.
Should you find one day that your STANLEY product
needs replacement, or if it is of no further use to you, do
not dispose of it with household waste. Make this product
available for separate collection.
STANLEY provides a facility for the collection
and recycling of STANLEY products once they
have reached the end of their working life. To
take advantage of this service please return your
product to any authorised repair agent who will
collect them on our behalf.
You can check the location of your nearest authorised
repair agent by contacting your local STANLEY office at
the address indicated in this manual. Alternatively, a list
of authorised STANLEY repair agents and full details of
our after-sales service and contacts are available on the
Internet at: www.2helpU.com
NOTES
STANLEY’s policy is one of continuous improvement to
our products and as such, we reserve the right to change
product specifications without prior notice. Standard
equipment and accessories may vary by country. Product
specifications may differ by country. Complete product
range may not be available in all countries. Contact your
local STANLEY dealers for range availability
SERVICE INFORMATION
STANLEY offers a full network of company-owned and
authorized service locations. All STANLEY Service Centers
are staffed with trained personnel to provide customers
with efficient and reliable power tool service. For more
information about our authorized service centers and
if you need technical advice, repair, or genuine factory
replacement parts, contact the STANLEY location nearest
you.
TECHNICAL DATA
RANDOM ORBITAL SANDER SS30
Voltage V
AC
220~240
Frequency Hz 50-60
Power input W 300
Orbits (no load) min
-1
0-13000
Pad diameter mm 125
Weight kg 1.4
Level of sound pressure according to EN 62841-1;
EN 62841-2-4
Sound pressure (L
pA
) dB(A) 78.0
Sound pressure uncertainty (K
pA
) dB(A) 3
Sound power (L
WA
) dB(A) 89.0
Sound power uncertainty (K
WA
) dB(A) 3
Vibration emission value ah:
(ah) = m/s
2
6.2
Uncertainty (K) = m/s
2
1.5

9
(Original Instructions) ENGLISH
VIBRATION AND NOISE
The declared vibration and noise emission values stated in
the technical data and the declaration of conformity have
been measured in accordance with a standard test method
provided by EN 62841 and may be used for comparing one
tool with another. The declared vibration and noise emission
value may also be used in a preliminary assessment of
exposure.
WARNING! The vibration and noise emission
value during actual use of the power tool can
differ from the declared value depending on the
ways in which the tool is used. The vibration and
noise level may increase above the level stated.
When assessing vibration and noise exposure to determine
safety measures required by 2002/44/EC to protect persons
regularly using power tools in employment, an estimation
of vibration and noise exposure should consider, the actual
conditions of use and the way the tool is used, including
taking account of all parts of the operating cycle such as the
times when the tool is switched off and when it is running
idle in addition to the trigger time.
EC declaration of conformity
MACHINERY DIRECTIVE
SS30 - Random orbital sander
STANLEY declares that these products described under
“technical data” are in compliance with: 2006/42/EC,
EN 62841-1: 2015, EN 62841-2-4: 2014.
These products alsoV comply with Directive 2014/30/EU
and 2011/65/EU. For more information, please contact
STANLEY at the following address or refer to the back of
the manual.
The undersigned is responsible for compilation of the
technical file and makes this declaration on behalf of
STANLEY.
R.Laverick
Engineering Manager
STANLEY , Europe, Egide Walschaertsstraat14-18,
2800 Mechelen, Belgium
06.2018
TWO YEAR WARRANTY
If your STANLEY product becomes defective due to faulty
materials or workmanship within 24 months from the date
of purchase, STANLEY guarantees to replace all defective
parts
free of charge or – at our discretion – replace the unit free of
charge provided that:
• The product has not been misused and has been used
in accordance with the instruction manual;
• The product has been subject to fair wear and tear;
• Repairs have not been attempted by unauthorized
persons;
• Proof of purchase is produced;
• The STANLEY product is returned complete with all
original components;
• The product hasn’t been used for hire purposes.
If you wish to make a claim, contact your seller or check
the location of your nearest authorised STANLEY repair
agent in the STANLEY catalogue or contact your local
STANLEY office at the address indicated in this manual. A
list of authorised STANLEY repair agents and full details
of our after sales service is available on the internet at:
www.2helpU.com

FRANÇAIS (Traduction des instructions initiales)
10
UTILISATION PRÉVUE
Votre ponceuse orbitale aléatoire SS30 de STANLEY a
été conçue pour poncer le bois, le métal, le plastique et
les surfaces peintes. Cet outil est destiné à une utilisation
professionnelle.
CONSIGNES DE SÉCURITÉ
Les définitions ci-dessous définissent le niveau de gravité
de chaque mention d’avertissement. Veuillez lire le manuel
et prêter attention à ces symboles.
DANGER: Indique une situation imminente
dangereuse qui, si elle n’est pas évitée,
entraînera des blessures graves ou la mort.
AVERTISSEMENT: Indique une situation
potentiellement dangereuse qui, si elle n’est
pas évitée, entraînera des blessures graves ou
la mort.
ATTENTION: Indique une situation
potentiellement dangereuse qui, si elle n’est
pas évitée, entraînera des blessures légères ou
mineures.
AVIS : Indique une pratique ne concernant pas les blessures
corporelles qui, si elle n’est pas évitée, peut entraîner des
dommages matériels.
Indique un risque d’électrocution.
Indique un risque d’incendie.
Avertissement : Afin de réduire le risque de
blessure, lisez le manuel d’instruction.
Avertissements de sécurité générale concernant l’outil
électrique
AVERTISSEMENT! Lisez tous les
avertissements de sécurité, les instructions,
les illustrations et les spécifications fournies
avec cet outil électrique. Le non-respect de
ces avertissements et de ces instructions peut
provoquer un incendie, une électrocution et/ou
de graves blessures.
Conservez ces avertissements et ces instructions à titre
de référence ultérieure. Le terme « outil électrique » dans
les avertissements fait référence à votre outil électrique
alimenté par le courant (avec cordon d’alimentation) ou
fonctionnant sur batterie (sans cordon).
1. Sécurité de l’aire de travail
a. Travaillez dans un endroit propre et bien éclairé.
Les zones encombrées et sombres peuvent entraîner
des accidents.
b. Ne mettez pas en marche votre outil électrique
dans un environnement explosif, ou en présence
de liquides inflammables, de gaz, ou de poussières.
La mise en marche de l’outil crée des étincelles qui
peuvent enflammer les poussières ou vapeurs.
c. Éloignez les enfants et les personnes présentes de
la zone lorsque l’outil est en fonctionnement. Toute
distraction peut vous faire perdre le contrôle de l’outil.
2. Sécurité électrique
a. Les fiches de l’outil électrique doivent
correspondre à la prise secteur. Ne modifiez jamais
la fiche, de quelque manière que ce soit. N’utilisez
pas d’adaptateurs avec des outils ayant une prise
de terre (mis à la terre). Des fiches non modifiées
et raccordées aux prises murales correspondantes
réduiront les risques de choc électrique.
b. Évitez le contact direct avec les surfaces mises à la
terre ou mises à la masse comme les canalisations,
les radiateurs, les cuisinières et les réfrigérateurs.
Le risque de choc électrique augmente si votre corps
est mis à la terre ou à la masse.
c. N’utilisez pas d’outils électriques dans des
environnements pluvieux ou humides. Si de l’eau
s’introduit dans un outil électrique, le risque de
choc électrique augmentera.
d. Ne malmenez pas le cordon d’alimentation.
N’utilisez jamais le cordon pour transporter, tirer ou
débrancher l’outil électrique. Veillez à garder
le cordon éloigné des
sources de chaleur, des huiles, des rebords coupants
ou des pièces mobiles. Les câbles endommagés ou
entremêlés augmentent le risque de choc électrique.
e. Lorsqu’un outil électrique est utilisé à l’extérieur,
utilisez uniquement une rallonge spécialement
prévue à cet effet. L’usage d’une rallonge adaptée
à l’utilisation en extérieur réduit le risque de choc
électrique.
f. Habillez-vous correctement. Ne portez pas de
vêtements amples ou de bijoux. Gardez vos
cheveux, vos vêtements et vos gants éloignés des
pièces mobiles. Tenez vos cheveux, vêtements et
gants éloignés des pièces mobiles. Les vêtements
amples, les bijoux ou les cheveux longs peuvent être
happés par les pièces mobiles.
3. Sécurité personnelle
a. Soyez vigilant, regardez bien ce que vous faites
et faites preuve de bon sens lorsque vous utilisez
l’outil électrique. N’utilisez pas d’outil électrique si
vous êtes sous l’influence de drogues, d’alcool ou
de médicaments. Un instant d’inattention pendant
l’utilisation d’outils électriques peut entraîner des
blessures graves.
b. Utilisez un équipement de protection individuel.
Utilisez toujours une protection oculaire.
L’utilisation d’équipements de protection tels que les
masques anti-poussière, les chaussures de sécurité
antidérapantes, les casques de sécurité ou les
protections auditives dans des conditions appropriées
réduiront les risques de blessures corporelles.
c. Évitez les démarrages intempestifs. Veillez à ce que
l’interrupteur soit en position d’arrêt avant de brancher
l’outil à une source d’alimentation et/ou une batterie,
de ramasser l’outil ou de le transporter. Transporter
les outils électriques avec le doigt sur l’interrupteur ou
brancher les outils électriques avec l’interrupteur en
position de marche peut entraîner des accidents.
d. Retirez toute clé à molette ou autre clé de réglage
avant de mettre l’outil électrique en marche.

(Traduction des instructions initiales) FRANÇAIS
11
Laissez une clé à molette ou une clé sur une partie
rotative de l’outil électrique peut engendrer des
blessures corporelles.
e. Ne vous penchez pas trop. Gardez en permanence
une position stable et un bon équilibre. Cela permet
un meilleur contrôle de l’outil électrique dans des
situations imprévues.
f. Portez des vêtements appropriés. Ne portez pas de
vêtements amples ou de bijoux. Tenez vos cheveux,
vêtements et gants éloignés des pièces mobiles. Les
vêtements amples, les bijoux ou les cheveux longs
peuvent être happés par les pièces mobiles.
g. Si des dispositifs destinés au raccordement
d’installations d’extraction et de recueil de la
poussière sont fournis, assurez-vous qu’ils sont
correctement raccordés et utilisés. L’utilisation
de cet outil peut réduire les dangers associés à la
présence de poussières.
h. Ne pensez pas que la familiarité que vous avez
acquise en utilisant fréquemment des outils
vous permet d’être complaisant et d’ignorer les
principes de sécurité concernant l’utilisation des
outils. Une action imprudente peut causer de graves
blessures en une fraction de seconde.
4. Utilisation et entretien de l’outil électrique
a. Ne forcez pas l’outil électrique. Utilisez l’outil
électrique adapté à votre travail. L’outil adapté est
plus efficace et moins dangereux s’il est utilisé à la
vitesse pour laquelle il a été conçu.
b. N’utilisez pas l’outil si l’interrupteur ne le met pas
en position de marche et d’arrêt. Tout outil qui ne
peut être contrôlé par l’interrupteur est dangereux et
doit être réparé.
c. Débrancher la fiche de l’alimentation source et
/ ou la batterie de la outil électrique avant de
faire ajustements, changement d’accessoires,
ou stockage d’outils électriques. Ces mesures de
sécurité préventives réduisent le risque de démarrage
accidentel de l’outil électrique.
d. Conservez les outils électriques inutilisés hors
de la portée des enfants et ne laissez pas de
personnes non familiarisées avec l’outil ou ces
instructions utiliser l’outil électrique. Les outils
électriques sont dangereux pour les utilisateurs
inexpérimentés.
e. Maintenir les outils électriques. Vérifiez la dérive
d’alignement ou l’attache des pièces mobiles,
toute possibilité de rupture de pièces et tout état
pouvant affecter l’outil lors de son utilisation.
Si l’outil est endommagé, faites-le réparer avant de
l’utiliser. De nombreux accidents sont dus à des outils
électriques mal entretenus.
f. Maintenez les outils de coupe aiguisés et propres.
Les outils de coupe bien entretenus aux bords aiguisés
sont moins susceptibles de se coincer et plus faciles à
contrôler.
g. Utilisez l’outil électrique, les accessoires et
les mèches de l’outil etc., conformément à ces
instructions en prenant en compte les conditions
de travail et la tâche à réaliser. L’utilisation de l’outil
électrique pour des opérations différentes de celles
pour lesquelles il a été conçu peut entraîner une
situation dangereuse.
h. Maintenez les poignées et les surfaces de
préhension sèches, propres et exemptes d’huile
et de graisse. Des poignées et des surfaces de
préhension glissantes ne permettent pas de manipuler
l’outil en toute sécurité et de le contrôler dans des
situations inattendues.
5. Réparation
a. Faites réparer votre outil électrique par un
réparateur agréé utilisant uniquement les pièces
de rechange identiques. Cela permettra de garantir
la sécurité de l’outil électrique.
CONSIGNES DE SÉCURITÉ SPÉCIFIQUES
ADDITIONNELLES
Consignes de sécurité relatives aux ponceuses
a. Tenez les outils électriques uniquement par les
surfaces isolées à cet effet, parce que la surface
de ponçage peut entrer en contact avec son propre
cordon d’alimentation. Si un câble « sous tension
» est coupé, les pièces métalliques exposées de
l’outil électrique risquent de transmettre le courant et
d’infliger une décharge électrique à l’opérateur.
b. AVERTISSEMENT ! Le contact avec la
poussière ou son inhalation découlant de travaux
de ponçage peut nuire à la santé de l’opérateur
et des éventuels spectateurs. Portez un masque anti-
poussière spécialement conçu pour protéger contre
la poussière et les vapeurs et assurez-vous que les
personnes présentes dans la zone de travail sont
également protégées.
c. Retirez soigneusement toute la poussière après le
ponçage.
d. Soyez particulièrement attentif lorsque vous poncez
de la peinture qui pourrait être à base de plomb ou
lorsque vous poncez du bois ou du métal pouvant
produire de la poussière toxique :
- Ne laissez pas les enfants ou les femmes enceintes
pénétrer dans la zone de travail.
- Ne mangez pas, ne buvez pas et ne fumez pas dans la
zone de travail.
- Débarrassez-vous dûment de toute particule de
poussière ou de tout autre débris.
Consignes de sécurité pour toute utilisation
AVERTISSEMENT ! : Nous recommandons
l’utilisation d’un dispositif à courant résiduel avec
un courant résiduel nominal de 30 mA ou moins.
SÉCURITÉ D’AUTRUI
• Cet outil n’est pas destiné à être utilisé par des
personnes (y compris les enfants) présentant des
capacités physiques, sensorielles ou mentales
réduites, ou sans expérience, ni connaissances,
à moins qu’elles ne soient surveillées ou qu’elles
n’aient été instruites à l’utilisation de l’appareil par une
personne responsable de leur sécurité.
• Les enfants doivent être surveillés pour s’assurer qu’ils
ne jouent pas avec l’appareil.

FRANÇAIS (Traduction des instructions initiales)
12
RISQUES RÉSIDUELS
Malgré l’application des instructions de sécurité en vigueur
et la mise en œuvre des dispositifs de sécurité, certains
risques résiduels ne peuvent être évités. Ces risques sont
les suivants :
– Troubles de l’audition.
– Risques de blessures corporelles dus aux particules
volantes.
– Risques de brûlures dus aux accessoires devenant
brûlant durant leur utilisation.
– Risques de blessures corporelles dus à un usage
prolongé.
– Risques d’explosion de poussières de substances
dangereuses.
SÉCURITÉ ÉLECTRIQUE
Cet outil dispose d’une double isolation ; aucun fil
de terre n’est donc nécessaire. Vérifiez toujours
que la tension du secteur correspond à celle de
la plaque signalétique.
AVERTISSEMENT ! Si le cordon d’alimentation
est endommagé, il doit être remplacé par le
fabricant ou un centre de réparation agréé
STANLEY ou encore une personne tout aussi
qualifiée afin d’éviter tout accident ou blessure. En
cas de remplacement du cordon d’alimentation
par une personne tout aussi qualifiée mais non
agréée par STANLEY, la garantie ne sera plus
valable.
UTILISATION D’UNE RALLONGE
Si une rallonge est nécessaire, utilisez toujours une
rallonge agréée à 3 conducteurs, adaptée à la puissance
absorbée par cet outil (voir les caractéristiques techniques).
La section minimale des conducteurs est de 1,5 mm2 ; la
longueur maximale est de 30 m. Lorsque vous utilisez un
rouleau à câble, déroulez-le toujours complètement.
Superficie de la section
transversale du câble
(mm2) Intensité nominale
du câble (Ampère)
Superficie de la section
transversale du câble
(mm2) Intensité nominale
du câble (Ampère)
0.75 6
1.00 10
1.50 15
2.50 20
4.00 25
Longueur du câble (m)
7.5 15 25 30 45 60
Tension Ampères Intensité nominale du câble (Ampère)
110-127 0 - 2.0 6 6 6 6 6 10
2.1 - 3.4 6 6 6 6 15 15
3.5 - 5.0 6 6 10 15 20 20
5.1 - 7.0 10 10 15 20 20 25
7.1 - 12.0 15 15 20 25 25 -
12.1 - 20.0 20 20 25 - - -
220-240 0 - 2.0 6 6 6 6 6 6
2.1 - 3.4 6 6 6 6 6 6
3.5 - 5.0 6 6 6 6 10 15
5.1 - 7.0 10 10 10 10 15 15
7.1 - 12.0 15 15 15 15 20 20
12.1 - 20.0 20 20 20 20 25 -
ÉTIQUETTES DE L’OUTIL
L’étiquette apposée sur votre outil peut afficher les
symboles suivants :
AVERTISSEMENT ! Pour réduire tout risque
de blessure, l’utilisateur doit lire le manuel
d’instructions avant toute utilisation.
Portez des lunettes de sécurité ou des
lunettes-masque.
Portez des protège-oreilles.
Portez un masque anti-poussière.
V Volts Courant continu
A Ampères n
0
Vitesse à vide
Hz Hertz Construction de
classe II
W Watts Borne de terre
min minutes Symbole
d’alerte de
sécurité
Courant
alternatif
/min. Tours ou
mouvements
alternatifs par
minute

(Traduction des instructions initiales) FRANÇAIS
13
Position du code de la date
Le code de date qui comporte également l’année de
fabrication est imprimé sur le logement.
Exemple :
2017 XX JN
Année de fabrication
L’ENSEMBLE CONTIENT
1 ponceuse orbitale aléatoire
1 papier à poncer
1 sac à poussière
1 manuel d’instruction
1 carte de garantie
1 liste de centres de services
• Vérifiez que l’outil, les pièces détachées et les
accessoires n’ont pas été endommagés durant le
transport.
• Prenez le temps de bien lire et comprendre ce manuel
avant d’utiliser l’outil.
CARACTÉRISTIQUES (Fig. A)
AVERTISSEMENT ! :Ne modifiez jamais l’outil
électrique ou toute partie de celui-ci. Des
dommages ou des blessures pourraient en
résulter.
1. Interrupteur marche/arrêt
2. Bouton de vitesse réglable électronique
3. Sac à poussière
4. Collier de sac à poussière
5. Sortie d’extraction de la poussière
6. Patin de ponçage
7. Papier à poncer
MONTAGE ET RÉGLAGE
AVERTISSEMENT ! : Pour réduire le risque
de blessures physiques graves, arrêtez l’outil
et débranchez-le du secteur avant de réaliser
des réglages ou de démonter/installer des
accessoires. Avant de rebrancher l’outil, appuyez
sur la gâchette et relâchez-la pour vous assurer
que l’outil est déjà hors tension. Un démarrage
accidentel peut provoquer des blessures.
Installation du papier à poncer (Fig. A, B)
AVERTISSEMENT ! N’utilisez jamais l’outil sans
papier à poncer ou un accessoire en place.
L’outil utilise un papier à poncer de 125 mm (5 po) du type
velcro, avec 8 trous d’extraction de poussière.
1. Placez l’outil sur une table, avec le patin de ponçage (6)
vers le haut.
2. Placez le papier de ponçage (7) directement sur le
dessus du patin de ponçage.
3. Tenez le patin de ponçage d’une main et alignez les
trous d’extraction de poussière.
4. Appuyez le papier de ponçage fermement sur le patin
de ponçage.
Réglage du bouton de vitesse réglable électronique
(Fig. A)
La vitesse est variable en continu de 0 à 13 000 min
-1
en
utilisant bouton de vitesse réglable électronique (2).
Tournez le bouton de vitesse réglable électronique jusqu’à
la vitesse requise.
Cependant, choisir la bonne vitesse nécessite de
l’expérience.
Généralement, les matériaux plus durs nécessitent une
vitesse plus élevée.
Extraction de poussière (Fig. C)
AVERTISSEMENT ! : Comme le travail du bois
avec une ponceuse produit de la poussière,
installez toujours un sac à poussière conçu
en conformité avec les directives applicables
relatives aux émissions de poussières.
AVERTISSEMENT ! : N’utilisez pas un sac à
poussière ou un extracteur par aspiration sans
une bonne protection contre les étincelles lors du
ponçage du métal.
Votre ponceuse est dotée d’un dispositif d’extraction
de la poussière : une sortie intégrée (5) vous permet
de connecter soit le sac à poussière fourni (3), soit un
aspirateur industriel.
Installation du sac à poussière
1. Tout en tenant la ponceuse, posez le collier du sac à
poussière (4) sur la sortie (5) comme illustré à la figure
C.
2. Tournez le collier (4) dans le sens antihoraire pour
verrouiller le sac à poussière (3) en place.
Vidange du sac à poussière
REMARQUE : Veillez à porter des lunettes de protection
et des masques anti-poussière approuvés lors de cette
procédure.
Pour une extraction de poussière efficace, videz le sac à
poussière lorsqu’il est environ un tiers plein.
1. Tout en tenant la ponceuse, tournez le collier de serrage
(4) dans le sens horaire pour déverrouiller le sac à
poussière (3).
2. Retirez le sac à poussière de la ponceuse et secouez
doucement ou tapotez le sac à poussière pour le vider.
3. Remettez le sac à poussière sur la sortie et verrouillez-
le en tournant le collier du sac à poussière dans le sens
horaire.
UTILISATION
AVERTISSEMENT ! : Laissez l’outil fonctionner à
son propre rythme. Ne le surchargez pas.
AVERTISSEMENT ! : Suivez toujours les
instructions de sécurité et le règlement
applicable.
AVERTISSEMENT ! : Pour réduire le risque
de blessures physiques graves, arrêtez l’outil
et débranchez-le du secteur avant de réaliser
des réglages ou de démonter/installer des
accessoires.

FRANÇAIS (Traduction des instructions initiales)
14
AVERTISSEMENT !
• Assurez-vous que tous les matériaux à poncer sont
bien attachés.
• Appuyez légèrement sur l’outil pour appliquer une
légère pression sur la pièce. Une pression excessive
n’améliore pas l’effet de ponçage, mais produit
seulement une charge plus grande sur la machine et le
papier abrasif se déchirera plus rapidement.
• Évitez de surcharger l’outil.
AVERTISSEMENT ! : Ne poncez pas le
magnésium !
AVIS : Si vous enroulez le cordon autour de l’outil lorsque
vous l’entreposez, ne serrez pas le cordon afin de ne pas
plier le protège-cordon.
Cela évitera une défaillance prématurée du cordon.
Position correcte de la main (Fig. D)
AVERTISSEMENT !: Pour éviter tout risque
de blessures corporelles graves, placez
TOUJOURS vos mains comme indiqué.
AVERTISSEMENT ! : Afin de réduire le risque de
blessure corporelle sérieuse, tenez TOUJOURS
l’outil fermement de manière à anticiper une
réaction soudaine.
La position correcte de la main consiste à placer une main
sur le corps de la ponceuse (10) ou une main sur la poignée
principale (11) comme illustré.
Démarrage et arrêt de l’outil (Fig. A)
Réglez la vitesse de ponçage à l’aide du bouton de vitesse
réglable électronique (2).
Pour démarrer l’outil, mettez l’interrupteur marche/arrêt
dans la position I.
Pour arrêter l’outil, mettez l’interrupteur marche/arrêt dans
la position O.
Ponçage
Commencez en utilisant le papier ayant le grain le plus gros.
Comme l’outil produit des marques d’abrasion dans toutes
les directions, il n’est pas nécessaire de poncer dans la
direction du grain.
Vérifiez votre travail à de courts intervalles.
Éteignez toujours l’outil lorsque le travail est terminé et
avant de le débrancher.
Conseils pour une utilisation optimale
• N’exercez pas trop de pression sur l’outil.
• Vérifiez régulièrement l’état du papier à poncer.
• Remplacez le papier à poncer si nécessaire.
• Lors du ponçage de nouvelles couches de peinture
avant d’appliquer une autre couche, utilisez un papier
à grain extra-fin.
• Sur des surfaces très inégales, ou lorsque vous poncez
des couches de peinture, commencez avec un gros
grain. Sur d’autres surfaces, commencez avec un grain
moyen. Dans les deux cas, changez graduellement
jusqu’à un grain fin pour une finition lisse.
• Consultez votre revendeur pour obtenir de plus amples
informations sur les accessoires disponibles.
Risques résiduels
Il se peut que des risques résiduels additionnels non
inclus dans les avertissements de sécurité du présent
manuel surviennent lors de l’utilisation de l’outil. Ces
risques peuvent provenir d’une utilisation inappropriée ou
prolongée, etc.
Malgré l’application des instructions de sécurité en vigueur
et la mise en œuvre des dispositifs de sécurité, certains
risques résiduels ne peuvent être évités. Ces risques
comprennent :
• Des blessures provoquées par le contact avec des
pièces mobiles / rotatives.
• Des blessures provoquées lors du changement des
pièces, forets ou accessoires.
• Des blessures provoquées par un usage prolongé
d’un outil. Assurez-vous de prendre régulièrement des
pauses lors d’un usage prolongé d’un outil.
• Des troubles de l’audition.
• Il existe des risques pour la santé causés par l’inhalation
de poussière qui se développent lors de l’utilisation
de votre outil (exemple : travailler avec du bois, en
particulier du chêne, du hêtre ou du MDF).
ENTRETIEN
Votre outil STANLEY a été conçu pour fonctionner pendant
une longue période avec un minimum d’entretien.
Un fonctionnement continu satisfaisant de l’outil dépend
d’un entretien soigneux et régulier.
• Nettoyez régulièrement les fentes d’aération de votre
outil à l’aide d’une brosse douce et d’un chiffon sec.
• Nettoyez régulièrement le boîtier du moteur à l’aide d’un
chiffon humide. N’utilisez pas d’agent nettoyant abrasif
ou à base de solvant.Cet outil n’est pas réparable par
l’utilisateur. Si des problèmes surviennent, consultez un
agent de réparation agréé.
Lubrification
Votre outil électrique ne nécessite aucune lubrification
supplémentaire.
Nettoyage
AVERTISSEMENT ! : Soufflez les saletés et la
poussière qui pénètrent dans le cadre de l’outil
avec de l’air sec dès que vous observez que de
la saleté s’accumule à l’intérieur et autour des
prises d’air. Portez des lunettes de protection et
des masques anti-poussière approuvés lors de
cette procédure.
AVERTISSEMENT ! : N’utilisez jamais de
solvants ou autres produits chimiques corrosifs
pour nettoyer les parties non métalliques de
l’outil. Ces matériaux chimiques peuvent affaiblir
les matériaux de ces parties. Utilisez uniquement
un chiffon imbibé d’eau mélangée à un savon
doux. Ne laissez jamais couler un liquide à
l’intérieur et ne plongez jamais une partie

(Traduction des instructions initiales) FRANÇAIS
15
quelconque de l’outil dans l’eau. Pour maintenir
la SÉCURITÉ et la FIABILITÉ des produits, toute
réparation, toute inspection et tout remplacement
des balais de charbon, et tout autre entretien ou
réglage doivent être effectués par un centre de
services après-vente de STANLEY, en utilisant
toujours des pièces de rechange d’origine
STANLEY.
ACCESSOIRES EN OPTION
AVERTISSEMENT ! : Puisque les accessoires
autres que ceux qui sont offerts par STANLEY
n’ont pas été testés avec ce produit, l’utilisation
de tels accessoires avec cet outil pourrait être
dangereuse. Pour réduire le risque de blessures,
seuls les accessoires recommandés par
STANLEY devraient être utilisés avec ce produit.
Consultez votre revendeur pour obtenir de plus amples
informations sur les accessoires appropriés.
PROTECTION DE L’ENVIRONNEMENT
Collecte séparée. Ce produit ne doit pas être jeté
avec les ordures ménagères.
Si vous décidez de remplacer ce produit STANLEY, ou
si vous n’en avez plus l’utilité, ne le jetez pas avec vos
déchets domestiques. Mettez-le dans un point de collecte
séparée approprié.
STANLEY met à votre disposition un centre
de collecte et de recyclage pour les produits
STANLEY ayant atteint la fin de leur durée de
service. Pour profiter de ce service, veuillez
retourner votre produit à un agent de réparation
agréé qui se chargera de la collecte.
Vous pouvez trouver l’agent de service agréé le plus proche
en contactant votre agence STANLEY locale à l’adresse
indiquée dans ce manuel. Autrement, une liste d’agents de
réparation agréés STANLEY et des informations complètes
concernant notre service après-vente, y compris les
coordonnées, sont disponibles en ligne à l’adresse suivante
: www.2helpU.com.
REMARQUES
STANLEY mène une politique d’amélioration continue
de ses produits et se réserve, de ce fait, le droit d’en
modifier les caractéristiques sans préavis. Les accessoires
ou équipements peuvent varier selon le pays. Les
spécifications du produit peuvent varier selon le pays. La
gamme complète du produit peut ne pas être disponible
dans tous les pays. Contactez votre revendeur STANLEY
local concernant la disponibilité de la gamme.
INFORMATION CONCERNANT LE CENTRE DE
SERVICE
STANLEY offre un réseau complet de centres de service
agréé. Tous les centres de service STANLEY disposent de
personnel formé afin de fournir un service efficace et de
confiance aux clients concernant les outils électriques. Si
vous désirez plus d’informations sur les centres de service
agréés, ou si vous avez besoin d’informations techniques,
de réparation ou de pièce authentique d’usine, contactez le
centre STANLEY le plus proche de chez vous.
CARACTÉRISTIQUES TECHNIQUES
PONCEUSE ORBITALE ALÉATOIRE SS30
Tension V
AC
De 220 à 240
environ
Fréquence Hz 50-60
Alimentation électrique W 300
Orbites (sans charge) min
-1
0-13000
Diamètre du patin mm 125
Poids kg 1.4

16
РУССКИЙ (Перевод с оригинала инструкции)
НАЗНАЧЕНИЕ
Ваша эксцентриковая шлифовальная машина
SS30 STANLEY предназначена для шлифования
деревянных, металлических, пластиковых и
окрашенных поверхностей. Данный инструмент
предназначен для профессионального
использования.
ИНСТРУКЦИИ ПО ТЕХНИКЕ БЕЗОПАСНОСТИ
Следующие определения указывают на степень
важности каждого сигнального слова. Прочтите
руководство по эксплуатации и обратите внимание
на данные символы.
ОПАСНО: Означает чрезвычайно
опасную ситуацию, которая приводит
к смертельному исходу или получению
тяжёлой травмы.
ВНИМАНИЕ: Означает потенциально
опасную ситуацию, которая может
привести к смертельному исходу или
получению тяжёлой травмы.
ПРЕДУПРЕЖДЕНИЕ: Означает
потенциально опасную ситуацию, которая
может привести к получению травмы
лёгкой или средней тяжести.
ПРЕДОСТЕРЕЖЕНИЕ: Означает ситуацию, не
связанную с получением телесной травмы,
которая, однако, может привести к повреждению
инструмента.
Риск поражения электрическим током!
Огнеопасность!
ВНИМАНИЕ: Внимательно прочтите
руководство по эксплуатации для снижения
риска получения травмы.
ПРАВИЛА БЕЗОПАСНОСТИ
Общие правила безопасности при работе с
электроинструментами
ВНИМАНИЕ! Внимательно прочтите все
инструкции по использованию, правила
безопасности, спецификации, а также
рассмотрите все иллюстрации, входящие
в руководство по эксплуатации данного
электроинструмента. Несоблюдение всех
перечисленных ниже инструкций может
привести к поражению электрическим
током, возникновению пожара и/или
получению серьёзной травмы.
Сохраните все инструкции по безопасности и
руководство по эксплуатации для их дальнейшего
использования. Термин «Электроинструмент»
во всех приведённых ниже указаниях относится к
вашему сетевому (с кабелем) электроинструменту
или аккумуляторному (беспроводному)
электроинструменту.
1. Безопасность рабочего места
a. Содержите рабочее место в чистоте и
обеспечьте хорошее освещение. Плохое
освещение или беспорядок на рабочем месте
может привести к несчастному случаю.
b. Не используйте электроинструменты, если
есть опасность возгорания или взрыва,
например, вблизи легко воспламеняющихся
жидкостей, газов или пыли. В процессе
работы электроинструменты создают искровые
разряды, которые могут воспламенить пыль или
горючие пары.
c. Во время работы с электроинструментом не
подпускайте близко детей или посторонних
лиц. Отвлечение внимания может вызвать у Вас
потерю контроля над рабочим процессом.
2. Электробезопасность
a. Вилка кабеля электроинструмента должна
соответствовать штепсельной розетке.
Ни в коем случае не видоизменяйте вилку
электрического кабеля. Не используйте
соединительные штепсели-переходники,
если в силовом кабеле электроинструмента
есть провод заземления. Использование
оригинальной вилки кабеля и соответствующей
ей штепсельной розетки уменьшает риск
поражения электрическим током.
b. Во время работы с электроинструментом
избегайте физического контакта с
заземлёнными объектами, такими как
трубопроводы, радиаторы отопления,
электроплиты и холодильники. Риск поражения
электрическим током увеличивается, если Ваше тело
заземлено.
c. Не используйте электроинструмент под
дождём или во влажной среде. Попадание
воды в электроинструмент увеличивает риск
поражения электрическим током.
d. Бережно обращайтесь с электрическим
кабелем. Ни в коем случае не используйте
кабель для переноски электроинструмента или
для вытягивания его вилки из штепсельной
розетки. Не подвергайте электрический кабель
воздействию высоких температур и смазочных
веществ; держите его в стороне от острых кромок
и движущихся частей электроинструмента.
Повреждённый или запутанный кабель
увеличивает риск поражения электрическим
током.
e. При работе с электроинструментом
на открытом воздухе используйте
удлинительный кабель, предназначенный
для наружных работ. Использование кабеля,
пригодного для работы на открытом воздухе,
снижает риск поражения электрическим током.
f. При необходимости работы с
электроинструментом во влажной
среде используйте источник питания,
оборудованный устройством защитного
отключения (УЗО). Использование УЗО снижает
риск поражения электрическим током.
3. Личная безопасность
a. При работе с электроинструментами
будьте внимательны, следите за тем, что

(Перевод с оригинала инструкции) РУССКИЙ
17
Вы делаете, и руководствуйтесь здравым
смыслом. Не используйте электроинструмент,
если Вы устали, а также находясь под
действием алкоголя или понижающих реакцию
лекарственных препаратов и других средств.
Малейшая неосторожность при работе с
электроинструментами может привести к
серьёзной травме.
b. При работе используйте средства
индивидуальной защиты. Всегда
надевайте защитные очки. Своевременное
использование защитного снаряжения, а
именно: пылезащитной маски, ботинок на
нескользящей подошве, защитного шлема или
противошумовых наушников, значительно
снизит риск получения травмы.
c. Не допускайте непреднамеренного запуска.
Перед тем, как подключить электроинструмент к
сети и/или аккумулятору, поднять или перенести
его, убедитесь, что выключатель находится
в положении «выключено». Не переносите
электроинструмент с нажатым курковым
выключателем и не подключайте к сетевой
розетке электроинструмент, выключатель
которого установлен в положение «включено»,
это может привести к несчастному случаю.
d. Перед включением электроинструмента
снимите с него все регулировочные или
гаечные ключи. Регулировочный или
гаечный ключ, оставленный закреплённым на
вращающейся части электроинструмента, может
стать причиной получения тяжёлой травмы.
e. Работайте в устойчивой позе. Всегда твёрдо
стойте на ногах, сохраняя равновесие. Это
позволит Вам не потерять контроль при работе
электроинструментом в непредвиденной
ситуации.
f. Одевайтесь соответствующим образом.
Во время работы не надевайте свободную
одежду или украшения. Следите за тем,
чтобы Ваши волосы или одежда находились в
постоянном отдалении от движущихся частей
инструмента. Свободная одежда, украшения или
длинные волосы могут попасть в движущиеся
части инструмента.
g. Если электроинструмент снабжён
устройством сбора и удаления пыли,
убедитесь, что данное устройство
подключено и используется надлежащим
образом. Использование устройства
пылеудаления значительно снижает риск
возникновения несчастного случая, связанного
с запылённостью рабочего пространства.
h. Даже если Вы являетесь опытным
пользователем и часто используете
подобные инструменты, не позволяйте
себе расслабляться и игнорировать
правила безопасности при использовании
инструментов. Неосторожность и
невнимательность при работе могут привести к
тяжёлым травмам за доли секунды.
4. Использование электроинструментов и
технический уход
a. Не перегружайте электроинструмент.
Используйте Ваш инструмент по назначению.
Электроинструмент работает надёжно и
безопасно только при соблюдении параметров,
указанных в его технических характеристиках.
b. Не используйте электроинструмент, если его
выключатель не устанавливается в положение
включения или выключения. Электроинструмент
с неисправным выключателем представляет
опасность и подлежит ремонту.
c. Отключайте электроинструмент от сетевой
розетки и/или извлекайте аккумулятор
(если имеется) перед регулировкой,
заменой принадлежностей или при
хранении электроинструмента. Такие меры
предосторожности снижают риск случайного
включения электроинструмента.
d. Храните неиспользуемые
электроинструменты в недоступном
для детей месте и не позволяйте лицам,
не знакомым с электроинструментом
или данными инструкциями, работать с
электроинструментом. Электроинструменты
представляют опасность в руках неопытных
пользователей.
e. Регулярно проверяйте исправность
электроинструмента и дополнительных
принадлежностей. Проверяйте точность
совмещения и легкость перемещения
подвижных частей, целостность деталей и
любых других элементов электроинструмента,
воздействующих на его работу. Не используйте
неисправный электроинструмент, пока он не
будет полностью отремонтирован. Большинство
несчастных случаев являются следствием
недостаточного технического ухода за
электроинструментом.
f. Следите за остротой заточки и чистотой
режущих принадлежностей. Принадлежности
с острыми кромками позволяют избежать
заклинивания и делают работу менее
утомительной.
g. Используйте электроинструмент, аксессуары
и насадки в соответствии с данным
Руководством по эксплуатации и с учётом
рабочих условий и характера будущей
работы. Использование электроинструмента
не по назначению может создать опасную
ситуацию.
h. Следите, чтобы рукоятки и поверхности
захвата оставались сухими, чистыми и не
содержали следов масла и консистентной
смазки. Скользкие рукоятки и поверхности
захвата не обеспечивают безопасное обращение
и управление инструментом в неожиданных
ситуациях.
5. Техническое обслуживание
a. Ремонт Вашего электроинструмента
должен производиться только
квалифицированными специалистами с
использованием идентичных запасных
частей. Это обеспечит безопасность

18
РУССКИЙ (Перевод с оригинала инструкции)
Вашего электроинструмента в дальнейшей
эксплуатации.
ДОПОЛНИТЕЛЬНЫЕ СПЕЦИАЛЬНЫЕ ПРАВИЛА
БЕЗОПАСНОСТИ
Инструкции по технике безопасности при работе
шлифовальными машинами
a. Держите электроинструмент за
изолированные поверхности, поскольку
шлифовальная поверхность может
задеть собственный кабель. Разрезание
находящегося под напряжением провода
делает не покрытые изоляцией металлические
части электроинструмента также «живыми»,
что создаёт опасность поражения оператора
электрическим током.
b. ВНИМАНИЕ! Контакт с пылью или вдыхание
пыли, возникающей в ходе шлифовальных работ,
может представлять опасность для здоровья
оператора и окружающих лиц. Надевайте
респиратор, специально разработанный для
защиты от пыли и паров, и следите, чтобы
лица, находящиеся в рабочей зоне, также были
обеспечены средствами индивидуальной
защиты.
c. После окончания работы тщательно убирайте
всю образовавшуюся пыль.
d. Соблюдайте особую осторожность при удалении
краски, которая может иметь свинцовую основу,
или при шлифовании некоторых сортов дерева
или металла, которые могут быть источником
токсичной пыли:
- Не позволяйте детям или беременным
женщинам находиться в рабочей зоне.
- Не принимайте пищу, не пейте и не курите в
рабочей зоне.
- Удаляйте частицы пыли и прочие отходы
безопасным для окружающей среды способом.
Дополнительные инструкции по безопасности
ВНИМАНИЕ: Рекомендуется
использование устройства защитного
отключения с остаточным током 30 мА или
менее.
БЕЗОПАСНОСТЬ ПОСТОРОННИХ ЛИЦ
• Данное изделие не может использоваться
людьми (включая детей) со сниженными
физическими, сенсорными и умственными
способностями или при отсутствии
необходимого опыта или навыка, за
исключением, если они выполняют работу
под присмотром лица, отвечающего за их
безопасность.
• Не позволяйте детям играть с инструментом.
ОСТАТОЧНЫЕ РИСКИ
Несмотря на соблюдение соответствующих
инструкций по технике безопасности и
использование предохранительных устройств,
некоторые остаточные риски невозможно
полностью исключить. К ним относятся:
- Ухудшение слуха
- Риск получения травмы от разлетающихся
частиц.
- Риск получения ожогов от принадлежностей
и насадок, которые в процессе работы сильно
нагреваются.
- Риск получения травмы, связанный с
продолжительным использованием
инструмента.
- Риск вдыхания пыли от опасных для здоровья
веществ.
ЭЛЕКТРОБЕЗОПАСНОСТЬ
Данный инструмент защищён двойной
изоляцией, что исключает потребность в
заземляющем проводе. Всегда проверяйте,
соответствует ли напряжение, указанное
на табличке с техническими параметрами,
напряжению электросети.
ВНИМАНИЕ! Во избежание
повреждений или получения травмы,
замена повреждённого кабеля
питания должна производиться
только на заводе-изготовителе, в
авторизованном сервисном центре
STANLEY или квалифицированным
персоналом. При замене кабеля питания
квалифицированным лицом, но не
имеющим авторизацию STANLEY, гарантия
на продукт будет недействительной.
ИСПОЛЬЗОВАНИЕ УДЛИНИТЕЛЬНОГО
КАБЕЛЯ
При необходимости использования удлинительного
кабеля, используйте только утверждённые 3-х
жильные кабели промышленного изготовления,
рассчитанные на мощность не меньшую, чем
потребляемая мощность данного инструмента
(см. раздел «Технические характеристики»).
Минимальный размер проводника должен
составлять 1,5 мм²; максимальная длина кабеля
не должна превышать 30 м. При использовании
кабельного барабана, всегда полностью
разматывайте кабель.
Поперечное сечение
проводника (мм²)
Номинал кабеля
(Ампер)
Поперечное сечение
проводника (мм²)
Номинал кабеля
(Ампер)
0.75 6
1.00 10
1.50 15
2.50 20
4.00 25

(Перевод с оригинала инструкции) РУССКИЙ
19
Длина кабеля (м)
7.5 15 25 30 45 60
Напряжение
Ампер Номинал кабеля (Ампер)
110-127 0 - 2.0 6 6 6 6 6 10
2.1 - 3.4 6 6 6 6 15 15
3.5 - 5.0 6 6 10 15 20 20
5.1 - 7.0 10 10 15 20 20 25
7.1 - 12.0 15 15 20 25 25 -
12.1 -20.0 20 20 25 - - -
220-240 0 - 2.0 6 6 6 6 6 6
2.1 - 3.4 6 6 6 6 6 6
3.5 - 5.0 6 6 6 6 10 15
5.1 - 7.0 10 10 10 10 15 15
7.1 - 12.0 15 15 15 15 20 20
12.1-20.0 20 20 20 20 25 -
МАРКИРОВКА ИНСТРУМЕНТА
На инструменте имеются следующие знаки:
ВНИМАНИЕ! Полное ознакомление с
руководством по эксплуатации перед
использованием инструмента снизит
риск получения травмы.
Надевайте защитные очки или маску.
Используйте средства защиты
органов слуха.
Надевайте защитную маску или
респиратор.
V Вольт Постоянный
ток
A Ампер
n
0
Скорость без
нагрузки
Hz Герц Конструкция
Класса II
W Ватт Клемма
заземления
min минут Символ
опасности
Переменный
ток
/min. Кол-во
оборотов
или шагов в
минуту
Место положения кода даты
Код даты, который также включает в себя год
изготовления, отштампован на поверхности корпуса
инструмента.
Пример:
2017 XX JN
Год изготовления
В УПАКОВКУ ВХОДЯТ:
1 Эксцентриковая шлифовальная машина
1 Лист шлифовальной бумаги
1 Пылесборник
1 Руководство по эксплуатации
1 Гарантийный талон
• Проверьте инструмент, детали и
дополнительные приспособления на наличие
повреждений, которые могли произойти во
время транспортировки.
• Перед началом работы необходимо
внимательно прочитать настоящее руководство
и принять к сведению содержащуюся в нем
информацию.
ОПИСАНИЕ (Рис. А)
ВНИМАНИЕ: Ни в коем случае не
модифицируйте электроинструмент
или какую-либо его деталь. Это может
привести к получению травмы или
повреждению инструмента.
1. Клавиша пускового выключателя
2. Дисковой электронный регулятор скорости
3. Пылесборник
4. Муфта пылесборника
5. Отверстие пылеотвода
6. Шлифовальная подошва
7. Шлифовальная бумага
СБОРКА И РЕГУЛИРОВКА
ВНИМАНИЕ: Для снижения риска
получения тяжёлой травмы, перед
регулировкой или снятием/установкой
дополнительных принадлежностей
или насадок выключайте инструмент и
отсоединяйте его от электросети. Перед
повторным подключением инструмента
нажмите и отпустите клавишу пускового
выключателя, чтобы убедиться, что
инструмент действительно выключен.
Непреднамеренный запуск инструмента
может привести к получению травмы.
Крепление шлифовальной бумаги (Рисунок A, B)
ВНИМАНИЕ! Никогда не используйте
инструмент без установленной
шлифовальной бумаги или насадок.
С данной шлифмашиной используется
шлифовальная бумага диаметром 125 мм, на
липучке и 8-ю отверстиями для всасывания
пыли.

20
РУССКИЙ (Перевод с оригинала инструкции)
1. Положите инструмент на стол шлифовальной
подошвой (6) вверх.
2. Положите на подошву круг шлифовальной
бумаги (7).
3. Удерживая подошву одной рукой, совместите
отверстия для всасывания пыли на подошве и
шлифовальной бумаге.
4. Плотно прижмите шлифовальную бумагу к
подошве.
Настройка дискового электронного регулятора
скорости (Рис. А)
При помощи дискового электронного регулятора
(2) можно устанавливать скорость в диапазоне
0–13,000 колебаний в минуту.
Поверните регулятор и установите его на
необходимый уровень.
Правильное регулирование достигается по
приобретении определенного опыта.
Как правило, чем твёрже обрабатываемый
материал, тем выше частота колебаний.
Пылеудаление (Рис. С)
ВНИМАНИЕ: Поскольку при обработке
шлифмашиной древесины происходит
постоянное выделение пыли, всегда
устанавливайте пылесборник,
разработанный в соответствии с
действующими нормативами, касающимися
выбросов пыли.
ВНИМАНИЕ: При шлифовании
металлических поверхностей не
используйте пылесборник или пылесос без
соответствующих средств искрозащиты.
Данная шлифмашина может осуществлять
пылеудаление через встроенное отверстие
пылеотвода (5), позволяющее подсоединить к нему
пылесборник (3), входящий в комплект поставки
инструмента, или промышленный пылесос;
Установка пылесборника
1. Удерживая шлифмашину одной рукой,
установите на отверстие пылеотвода (5) муфту
пылесборника (4), как показано на Рисунке С.
2. Поверните муфту (4) против часовой стрелки,
фиксируя пылесборник (3) на месте.
Опорожнение пылесборника
ПРИМЕЧАНИЕ: Выполняйте данную процедуру,
надев средство защиты глаз и респиратор
утверждённого типа.
Для обеспечения максимальной эффективности
в работе опорожняйте пылесборник, когда он
заполнится примерно на треть.
1. Удерживая шлифмашину одной рукой,
поверните муфту (4) по часовой стрелке для
разблокировки пылесборника (3).
2. Снимите пылесборник со шлифмашины и
аккуратно потрясите или слегка постучите,
опорожняя его содержимое.
3. Снова установите пылесборник на выпускное
отверстие и зафиксируйте его на месте,
повернув муфту пылесборника по часовой
стрелке.
ЭКСПЛУАТАЦИЯ
ВНИМАНИЕ: Не форсируйте рабочий
процесс. Избегайте перегрузки
инструмента.
ВНИМАНИЕ: Всегда следуйте указаниям
действующих норм и правил безопасности.
ВНИМАНИЕ: Для снижения риска
получения тяжёлой травмы, перед
регулировкой или снятием/установкой
дополнительных принадлежностей
или насадок выключайте инструмент и
отсоединяйте его от электросети.
ВНИМАНИЕ:
• Следите, чтобы все обрабатываемые заготовки
были надёжно зафиксированы на месте.
• Не прилагайте к инструменту чрезмерного
усилия. Чрезмерное прижимное давление не
улучшает качество шлифования, но приводит
к перегрузкам инструмента и быстрому
истиранию абразивной бумаги.
• Избегайте перегрузки.
ВНИМАНИЕ: Не допускается шлифование
магния!
ПРЕДОСТЕРЕЖЕНИЕ: Если при хранении вы
наматываете кабель на инструмент, оставьте
большую петлю, таким образом, кабель не погнётся.
Эта мера поможет предотвратить повреждение
кабеля.
Правильное положение рук во время работы
(Рис. D)
ВНИМАНИЕ: Для уменьшения
риска получения тяжёлой травмы,
ВСЕГДА правильно удерживайте
электроинструмент, как показано на
рисунке.
ВНИМАНИЕ: Для уменьшения риска
получения тяжёлой травмы ВСЕГДА
надёжно удерживайте инструмент,
предупреждая внезапные сбои в работе.
Правильное положение рук во время работы: одной
рукой удерживайте корпус шлифмашины (10) или
одной рукой удерживайте основную рукоятку (11),
как показано на рисунке.
Включение и выключение (Рис. А)
При помощи дискового электронного регулятора
(2) установите необходимую скорость.
Чтобы включить инструмент, установите пусковой
выключатель в положение I.
Чтобы выключить инструмент, установите пусковой
выключатель в положение О.
Sayfa yükleniyor ...
Sayfa yükleniyor ...
Sayfa yükleniyor ...
Sayfa yükleniyor ...
Sayfa yükleniyor ...
Sayfa yükleniyor ...
Sayfa yükleniyor ...
Sayfa yükleniyor ...
Sayfa yükleniyor ...
Sayfa yükleniyor ...
Sayfa yükleniyor ...
Sayfa yükleniyor ...
Sayfa yükleniyor ...
Sayfa yükleniyor ...
Sayfa yükleniyor ...
Sayfa yükleniyor ...
Sayfa yükleniyor ...
Sayfa yükleniyor ...
Sayfa yükleniyor ...
Sayfa yükleniyor ...
Sayfa yükleniyor ...
Sayfa yükleniyor ...
Sayfa yükleniyor ...
Sayfa yükleniyor ...
-
 1
1
-
 2
2
-
 3
3
-
 4
4
-
 5
5
-
 6
6
-
 7
7
-
 8
8
-
 9
9
-
 10
10
-
 11
11
-
 12
12
-
 13
13
-
 14
14
-
 15
15
-
 16
16
-
 17
17
-
 18
18
-
 19
19
-
 20
20
-
 21
21
-
 22
22
-
 23
23
-
 24
24
-
 25
25
-
 26
26
-
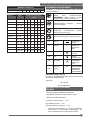 27
27
-
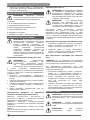 28
28
-
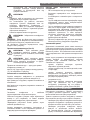 29
29
-
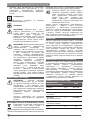 30
30
-
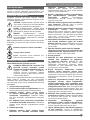 31
31
-
 32
32
-
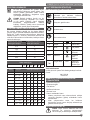 33
33
-
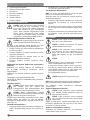 34
34
-
 35
35
-
 36
36
-
 37
37
-
 38
38
-
 39
39
-
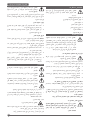 40
40
-
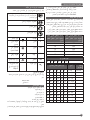 41
41
-
 42
42
-
 43
43
-
 44
44


Stanley SS30 Kullanım kılavuzu
- Kategori
- Elektrikli aletler
- Tip
- Kullanım kılavuzu
Diğer dillerde
- français: Stanley SS30 Manuel utilisateur
- English: Stanley SS30 User manual
- русский: Stanley SS30 Руководство пользователя