
Nokia 5310
Kullanıcı kılavuzu
Basım 2020-03-25 tr-TR

Nokia 5310 Kullanıcı kılavuzu
1 Bu kullanıcı kılavuzu hakkında
Önemli: Cihazınızın ve pilinizin güvenli kullanımı ile ilgili önemli bilgiler için, cihazınızı
kullanmaya başlamadan önce, basılı kullanım kılavuzunda veya www.nokia.com/support
adresinde yer alan ”Güvenliğiniz için” ve ”Ürün Güvenliği” bilgilerini okuyun. Yeni cihazınızı
nasıl kullanmaya başlayacağınıza ilişkin bilgiler için basılı kullanıcı kılavuzunu okuyun.
© 2019 HMD Global Oy. Tüm hakları saklıdır. 2

Nokia 5310 Kullanıcı kılavuzu
İçindekiler
1 Bu kullanıcı kılavuzu hakkında 2
2 İçindekiler 3
3 Başlarken 5
Keys and parts . . . . . . . . . . . . . . . . . . . . . . . . . . . . . . . . . . . . . . . . . . 5
Set up and switch on your phone . . . . . . . . . . . . . . . . . . . . . . . . . . . . . . . . 6
Telefonunuzu şarj etme . . . . . . . . . . . . . . . . . . . . . . . . . . . . . . . . . . . . . 8
Keypad . . . . . . . . . . . . . . . . . . . . . . . . . . . . . . . . . . . . . . . . . . . . . . 9
Write text . . . . . . . . . . . . . . . . . . . . . . . . . . . . . . . . . . . . . . . . . . . . . 9
4 Aramalar, kişiler ve mesajlar 10
Calls . . . . . . . . . . . . . . . . . . . . . . . . . . . . . . . . . . . . . . . . . . . . . . . . 10
Contacts . . . . . . . . . . . . . . . . . . . . . . . . . . . . . . . . . . . . . . . . . . . . . 10
Send messages . . . . . . . . . . . . . . . . . . . . . . . . . . . . . . . . . . . . . . . . . 11
5 Telefonunuzu kişiselleştirme 12
Change tones . . . . . . . . . . . . . . . . . . . . . . . . . . . . . . . . . . . . . . . . . . . 12
Change the look of your home screen . . . . . . . . . . . . . . . . . . . . . . . . . . . . . 12
Profiles . . . . . . . . . . . . . . . . . . . . . . . . . . . . . . . . . . . . . . . . . . . . . . 12
Add shortcuts . . . . . . . . . . . . . . . . . . . . . . . . . . . . . . . . . . . . . . . . . . 13
Get the most out of the two SIM cards . . . . . . . . . . . . . . . . . . . . . . . . . . . . 14
6 Kamera 15
Photos and videos . . . . . . . . . . . . . . . . . . . . . . . . . . . . . . . . . . . . . . . . 15
7 İnternet ve bağlantılar 16
Browse the web . . . . . . . . . . . . . . . . . . . . . . . . . . . . . . . . . . . . . . . . . 16
Bluetooth® . . . . . . . . . . . . . . . . . . . . . . . . . . . . . . . . . . . . . . . . . . . . 16
8 Müzik 17
Music player . . . . . . . . . . . . . . . . . . . . . . . . . . . . . . . . . . . . . . . . . . . 17
Listen to radio . . . . . . . . . . . . . . . . . . . . . . . . . . . . . . . . . . . . . . . . . . 17
© 2019 HMD Global Oy. Tüm hakları saklıdır. 3

Nokia 5310 Kullanıcı kılavuzu
9 Saat, takvim ve hesap makinesi 18
Set the time and date manually . . . . . . . . . . . . . . . . . . . . . . . . . . . . . . . . 18
Çalar saat . . . . . . . . . . . . . . . . . . . . . . . . . . . . . . . . . . . . . . . . . . . . . 18
Calendar . . . . . . . . . . . . . . . . . . . . . . . . . . . . . . . . . . . . . . . . . . . . . 18
Hesap makinesi . . . . . . . . . . . . . . . . . . . . . . . . . . . . . . . . . . . . . . . . . 19
10 Telefonunuzu temizleme 20
Restore factory settings . . . . . . . . . . . . . . . . . . . . . . . . . . . . . . . . . . . . 20
11 Ürün ve güvenlik bilgileri 21
Güvenliğiniz için . . . . . . . . . . . . . . . . . . . . . . . . . . . . . . . . . . . . . . . . . 21
Acil durum aramaları . . . . . . . . . . . . . . . . . . . . . . . . . . . . . . . . . . . . . . . 23
Cihazınızın bakımı . . . . . . . . . . . . . . . . . . . . . . . . . . . . . . . . . . . . . . . . 24
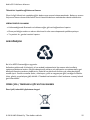
Geri Dönüşüm . . . . . . . . . . . . . . . . . . . . . . . . . . . . . . . . . . . . . . . . . . 25
Üzeri çizili, tekerlekli çöp kutusu simgesi . . . . . . . . . . . . . . . . . . . . . . . . . . . 25
Pil ve şarj cihazı bilgileri . . . . . . . . . . . . . . . . . . . . . . . . . . . . . . . . . . . . . 26
Küçük çocuklar . . . . . . . . . . . . . . . . . . . . . . . . . . . . . . . . . . . . . . . . . . 26
Tıbbi cihazlar . . . . . . . . . . . . . . . . . . . . . . . . . . . . . . . . . . . . . . . . . . . 26
İmplante edilmiş tıbbi cihazlar . . . . . . . . . . . . . . . . . . . . . . . . . . . . . . . . . 27
İşitme Duyusu . . . . . . . . . . . . . . . . . . . . . . . . . . . . . . . . . . . . . . . . . . 27
Cihazınızı zararlı içerikten koruma . . . . . . . . . . . . . . . . . . . . . . . . . . . . . . . 27
Motorlu araçlar . . . . . . . . . . . . . . . . . . . . . . . . . . . . . . . . . . . . . . . . . . 28
Potansiyel patlama tehlikesi olan ortamlar . . . . . . . . . . . . . . . . . . . . . . . . . . 28
Sertifika ve tüketici bilgileri . . . . . . . . . . . . . . . . . . . . . . . . . . . . . . . . . . . 28
Dijital Hak Yönetimi Hakkında . . . . . . . . . . . . . . . . . . . . . . . . . . . . . . . . . 29
Copyrights and other notices . . . . . . . . . . . . . . . . . . . . . . . . . . . . . . . . . . 29
© 2019 HMD Global Oy. Tüm hakları saklıdır. 4

Nokia 5310 Kullanıcı kılavuzu
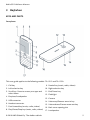
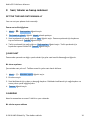
3 Başlarken
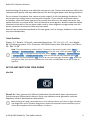
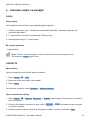
KEYS AND PARTS
Your phone
This user guide applies to the following models: TA-1212 and TA-1230.
1. Call key
2. Left selection key
3. Scroll key. Press to access your apps and
select items.
4. Earpiece/Loudspeaker
5. USB connector
6. Headset connector
7. Fast forward key (music, radio, videos)
8. Play/Pause/Stop key (music, radio, videos)
9. Rewind key (music, radio, videos)
10. Right selection key
11. End/Power key
12. Flashlight
13. Camera
14. Volume up/Camera zoom in key
15. Volume down/Camera zoom out key
16. Back cover opening slot
17. Loudspeaker
© 2019 HMD Global Oy. Tüm hakları saklıdır. 5

Nokia 5310 Kullanıcı kılavuzu
Avoid touching the antenna area while the antenna is in use. Contact with antennas affects the
communication quality and may reduce battery life due to higher power level during operation.
Do not connect to products that create an output signal, as this may damage the device. Do
not connect any voltage source to the audio connector. If you connect an external device
or headset, other than those approved for use with this device, to the audio connector, pay
special attention to volume levels. Parts of the device are magnetic. Metallic materials may be
attracted to the device. Do not place credit cards or other magnetic storage media near the
device, because info stored on them may be erased.
Some of the accessories mentioned in this user guide, such as charger, headset, or data cable,
may be sold separately.
Teknik Özellikler
Display: 2,4” Battery: 1200 mAh, removable Dimensions: 123,75 x 54,2 x 13,1 mm Weight:
88,2 g Operating system: S30+ Processor: MT6260A Camera: Main VGA Memory card: Micro-
SD - Max. 32 GB
Note: The pre-set security code is 12345. To switch on the security code, select Menu >
Settings > Security settings > Phone security , enter the code 12345 and select OK , and
then select On . To change the security code, select Menu > Settings > Security settings
> Change codes > Change security code , enter the current security code and select OK .
Enter your new code and select OK , then enter the new code again and select OK . When you
change the code, you need to remember the new code, as HMD Global is not able to open or
bypass it.
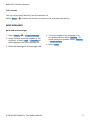
SET UP AND SWITCH ON YOUR PHONE
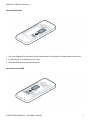
Mini SIM
Önemli: Bu cihaz, yalnızca mini SIM kart (șekle bakın) ile kullanılmak üzere tasarlanmıștır.
Uyumlu olmayan SIM kartların kullanımı, kartın veya telefonun zarar görmesine ve kartta
depolanan verilerin bozulmasına neden olabilir.
Not: Herhangi bir kapağı çıkarmadan önce, cihazı kapatıp cihazın șarj cihazı ve diğer cihazlarla
olan bağlantısını kesin. Kapakları değiștirirken elektronik bileșenlere temas etmekten kaçının.
Cihazı daima kapakları takılı olarak saklayın ve kullanın.
© 2019 HMD Global Oy. Tüm hakları saklıdır. 6

Nokia 5310 Kullanıcı kılavuzu
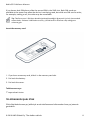
Insert the SIM card
1. Put your fingernail in the small slot at the bottom of the phone, lift and remove the cover.
2. If the battery is in the phone, lift it out.
3. Slide the SIM card in the SIM card slot.
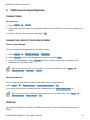
Insert the second SIM
© 2019 HMD Global Oy. Tüm hakları saklıdır. 7

Nokia 5310 Kullanıcı kılavuzu
If you have a dual-SIM phone, slide the second SIM in the SIM2 slot. Both SIM cards are
available at the same time when the device is not being used, but while one SIM card is active,
for example, making a call, the other may be unavailable.
Tip: Telefonunuzun 2 SIM kart destekleyip desteklemediğini öğrenmek için ürün kutusundaki
etikete bakın. Etikette 2 IMEI kodu varsa bu, çift SIM kartlı bir telefona sahip olduğunuz
anlamına gelir.
Insert the memory card
1. If you have a memory card, slide it in the memory card slot.
2. Put back the battery.
3. Put back the cover.
Telefonunuzu açın
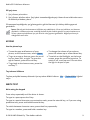
tuşunu basılı tutun.
TELEFONUNUZU ŞARJ ETME
Piliniz fabrikada kısmen şarj edilmiştir ancak telefonunuzu kullanmadan önce şarj etmeniz
gerekebilir.
© 2019 HMD Global Oy. Tüm hakları saklıdır. 8

Nokia 5310 Kullanıcı kılavuzu
Pili şarj etme
1. Şarj cihazını prize takın.
2. Şarj cihazını telefona takın. Şarj işlemi tamamlandığında şarj cihazını önce telefondan sonra
da elektrik prizinden çıkarın.
Pil tamamen boşaldığında, şarj göstergesinin görüntülenmesi için birkaç dakika geçmesi
gerekebilir.
İpucu: Elektrik prizi bulamazsanız USB’den șarj edebilirsiniz. Cihaz șarj edilirken veri aktarımı
yapılabilir. USB’den șarj etme verimliliği önemli ölçüde farklılık gösterir ve șarjın bașlaması ve
cihazın çalıșmaya bașlaması için çok uzun bir süre geçmesi gerekebilir. Bilgisayarınızın açık
olduğundan emin olun.
KEYPAD
Use the phone keys
• To see the apps and features of your
phone, on the home screen, select Menu .
• To go to an app or feature, press the scroll
key up, down, left, or right. To open the
app or feature, press the scroll key.
• To go back to the home screen, press the
end key .
• To change the volume of your phone,
press the volume up or volume down key.
• To switch on the flashlight, on the home
screen, press the scroll key up twice. To
switch it off, scroll up once. Do not shine
the light in anyone’s eyes.
Tuş takımını kilitleme
Tuşlara yanlışlıkla basmayı önlemek için tuş takımı kilidini kullanın. Git > Tuşları kilitle öğesini
seçin.
WRITE TEXT
Write using the keypad
Press a key repeatedly until the letter is shown.
To type in a space press the 0 key.
To type in a special character or punctuation mark, press the asterisk key, or if you are using
predictive text, press and hold the asterisk key.
To switch between character cases, press the # key repeatedly.
To type in a number, press and hold a number key.
© 2019 HMD Global Oy. Tüm hakları saklıdır. 9

Nokia 5310 Kullanıcı kılavuzu
4 Aramalar, kişiler ve mesajlar
CALLS
Arama yapma
Yeni telefonunuzla nasıl bir arama yapabileceğinizi öğrenin.
1. Telefon numarasını yazın. Uluslararası aramalarda kullanılan + karakterini girmek için *
tuşuna iki defa basın.
2. tuşuna basın. Sorulursa, kullanılacak SIM kartı seçin.
3. Aramayı bitirmek için tuşuna basın.
Bir aramayı yanıtlama
tuşuna basın.
İpucu: Telefonu yanıtlayamadığınız ve hızlı bir şekilde sessize almanızı gerektiren bir
durumdaysanız Sessiz öğesini seçin.
CONTACTS
Add a contact
Save and organize your friends’ phone numbers.
1. Select Menu > > Add .
2. Write the name, and type in the number.
3. Select Save .
To add more contacts, select Options > Add new contact .
Save a contact from call log
1. Select Menu > > Missed , Received , or Dialled , depending on from where you want to
save the contact.
2. Scroll to the number you want to save, select Options > Save , and select where you want
to save the contact.
3. Add the contact’s name, check that the phone number is correct, and select Save .
© 2019 HMD Global Oy. Tüm hakları saklıdır. 10

Nokia 5310 Kullanıcı kılavuzu
Call a contact
You can call a contact directly from the contacts list.
Select Menu > , scroll to the contact you want to call, and press the call key.
SEND MESSAGES
Write and send messages
1. Select Menu > > Create message .
2. In the To field, enter the number of the
recipient, or select Add > Contacts to
add recipients from your contacts list.
3. Write the message on the message field.
4. To insert images to the message or to
use predictive text, select Options . To
insert smileys or symbols, select Options
> Insert options
5. Select Send .
© 2019 HMD Global Oy. Tüm hakları saklıdır. 11

Nokia 5310 Kullanıcı kılavuzu
5 Telefonunuzu kişiselleştirme
CHANGE TONES
Set new tones
1. Select Menu > > Tones .
2. Select which tone you want to change and select for which SIM card you want to change it, if
asked.
3. Scroll to the tone that you want and select OK .
CHANGE THE LOOK OF YOUR HOME SCREEN
Choose a new wallpaper
You can change the background of your home screen.
1. Select Menu > > Display settings > Wallpaper .
2. Select Default , scroll to the wallpaper you want, and select View
3. If you like the wallpaper, select Choose and then select how you want to position the
wallpaper on the home screen.
Tip: You can also use a photo you’ve taken or received as wallpaper. Select Menu > >
Display settings > Wallpaper > Photos .
Show date and time
You can select to see date and time on the home screen of your phone.
Select Menu > > Date and time > Show date and time > On .
If you want your phone to update the time automatically, set Auto-update time on.
Tip: You can also set your phone to show the time even in the idle mode. Select Menu > >
Display settings > Glance screen > On .
PROFILES
Your phone has different profiles for different situations. You can edit the profiles to your
liking.
© 2019 HMD Global Oy. Tüm hakları saklıdır. 12

Nokia 5310 Kullanıcı kılavuzu
Tercihleri uyarlama
Farklı durumlarda kullanabileceğiniz çok sayıda profil mevcuttur. Örneğin sesin açık olmaması
gereken durumlar için bir sessiz profil ve yüksek seslere sahip bir dış mekan profili mevcuttur.
Profilleri kişiselleştirebilirsiniz.
1. Menü > > Tercihler öğesini seçin.
2. Bir profili ve ardından da Kişiselleştir öğesini seçin.
Her profil için belirli bir zil sesi, zil sesi seviyesi, mesaj sesleri ve benzer öğeleri
belirleyebilirsiniz.
ADD SHORTCUTS
You can add shortcuts to different apps and settings on your home screen.
Edit Go to settings
On the bottom left of your home screen is Go to , which contains shortcuts to various apps
and settings. Select the shortcuts that are the handiest for you.
1. Select Menu > > Go to settings .
2. Select Choose options .
3. Scroll to each shortcut you want to have on the Go to list and select Mark .
4. Select Done > Yes to save the changes.
You can also reorganize your Go to list.
1. Select Organise .
2. Scroll to the item you want to move, select Move and where you want to move it.
3. Select Back > Yes to save the changes.
© 2019 HMD Global Oy. Tüm hakları saklıdır. 13

Nokia 5310 Kullanıcı kılavuzu
GET THE MOST OUT OF THE TWO SIM CARDS
Select which SIM card to use
Select Menu > > Connectivity > Dual SIM .
• To choose which SIM to use for calls, select Call , and select Always ask , or SIM1 , or
SIM2 .
• To choose which SIM to use for messages, select Message , and select Always ask , or
SIM1 , or SIM2 .
© 2019 HMD Global Oy. Tüm hakları saklıdır. 14

Nokia 5310 Kullanıcı kılavuzu
6 Kamera
PHOTOS AND VIDEOS
Take a photo
1. Select Menu > .
2. To zoom in or out, scroll up or down.
3. To take a photo, select .
Options for the camera
Select Menu > > , and select the option you want, such as Brightness or Image effects .
Record a video
1. Select Menu > .
2. Scroll left and select .
3. To stop the video, select .
© 2019 HMD Global Oy. Tüm hakları saklıdır. 15

Nokia 5310 Kullanıcı kılavuzu
7 İnternet ve bağlantılar
BROWSE THE WEB
Connect to the internet
1. Select Menu > .
2. Write a web address, and select Go .
3. Use the scroll key to move in the browser.
BLUETOOTH®
Connect your phone to other devices with Bluetooth.
Switch on Bluetooth
1. Select Menu > > Connectivity > Bluetooth .
2. Switch Bluetooth to On .
3. Select Paired to find a new device or a device you have paired your phone with previously,
or select Active to see a list of devices available for connecting.
© 2019 HMD Global Oy. Tüm hakları saklıdır. 16

Nokia 5310 Kullanıcı kılavuzu
8 Müzik
MUSIC PLAYER
You can listen to your MP3 music files with the music player.
Listen to music
1. Select Menu > .
2. Scroll to a song, and select Play .
To adjust the volume, use the volume keys. To fast-forward the song, press the fast forward
key. To rewind the song, press the rewind key. To stop playing, press the stop key. To select a
different music style, select Options > Equalizer .
Tip: To set a song as ringtone, select Options > Use as tone .
LISTEN TO RADIO
Listen to your favorite radio stations
1. Select Menu > .
2. To search for all available stations select OK .
To change the volume, scroll up or down. To move between available stations, press the fast
forward or rewind key. To save a station, select Options > Save station , give the station
a name, and select a location for it. To switch to a saved station, press the corresponding
number key on the phone’s keypad. To close the radio, press the stop key.
Tip: You can listen to the radio without a headset as an antenna, but if you insert a headset to
your phone, the performance of the radio improves.
© 2019 HMD Global Oy. Tüm hakları saklıdır. 17

Nokia 5310 Kullanıcı kılavuzu
9 Saat, takvim ve hesap makinesi
SET THE TIME AND DATE MANUALLY
You can set your phone clock manually.
Zaman ve tarihi değiştirme
1. Menü > > Saat ayarları öğesini seçin.
2. Trh./saati ot. güncll. öğesini Kapalı olarak ayarlayın.
3. Saati ayarlamak için aşağı gidin ve Saat öğesini seçin. Zamanı ayarlamak için kaydırma
tuşunu kullanın ve Tamam öğesini seçin.
4. Tarihi ayarlamak için aşağı gidin ve Tarih ayarları öğesini seçin. Tarihi ayarlamak için
kaydırma tuşunu kullanın ve Tamam öğesini seçin.
ÇALAR SAAT
Zamanında uyanmak ve doğru yerde olmak için çalar saati nasıl kullanacağınızı öğrenin.
Bir alarm ayarlama
Çevrenizde saat yok mu? Telefonunuzu bir çalar saat olarak kullanın.
1. Menü > > Alarmları ayarla öğesini seçin.
2. Bir alarm seçin.
3. Saati belirlemek için yukarı ya da aşağı kaydırın. Dakikaları belirlemek için sağa kaydırın ve
sonra yukarı ya da aşağı kaydırın.
4. Tamam öğesini seçin.
CALENDAR
Need to remember an event? Add it to your calendar.
Bir takvim uyarısı ekleme
© 2019 HMD Global Oy. Tüm hakları saklıdır. 18

Nokia 5310 Kullanıcı kılavuzu
1. Menü > öğesini seçin.
2. Bir tarih seçin ve sonrasında Seçnklr. >
Hatırlatıcı ekle öğesini seçin.
3. Etkinlik için bir isim girin ve Tamam
öğesini seçin.
4. Alarm ayarlamak için Alarm açık öğesini
seçin. Saati belirlemek için yukarı ya da
aşağı kaydırın. Dakikaları belirlemek için
sağa kaydırın ve sonra yukarı ya da aşağı
kaydırın.
5. Tamam öğesini seçin.
HESAP MAKINESI
Telefonunuzun hesap makinesiyle nasıl toplama, çıkarma, çarpma ve bölme yapacağınızı
öğrenin.
Nasıl hesaplama yapılır?
1. Menü > öğesini seçin.
2. Hesaplamanızın ilk faktörünü seçin, kaydırma tuşunu kullanarak işlemi seçin ve ikinci faktörü
girin.
3. Hesaplamanın sonucuna ulaşmak için Eşittir işaretini seçin.
Sayı alanlarını boşaltmak için Sil öğesini seçin.
© 2019 HMD Global Oy. Tüm hakları saklıdır. 19

Nokia 5310 Kullanıcı kılavuzu
10 Telefonunuzu temizleme
RESTORE FACTORY SETTINGS
Telefonunuzu sıfırlama
Kazalar olabilir ve telefonunuz yanıt vermeyi kesebilir. Orijinal fabrika ayarlarını geri
yükleyebilirsiniz ancak dikkatli olun, bu sıfırlama işlemi telefon hafızasında kaydettiğiniz tüm
verileri ve tüm kişiselleştirmenizi silecektir.
Telefonunuzu atıyorsanız tüm özel içeriği silmenin sizin sorumluluğunuzda olduğunu
unutmayın.
Orijinal ayarları geri yüklemek için güvenlik koduna sahip olmanız gereklidir.
1. Menü > > Fabrika ayarlarına sıfırla öğesini seçin.
2. Güvenlik kodunu girin. Tamam öğesini seçtikten sonra başka bir onay istenmeyecek ve
telefonunuz sıfırlanarak tüm veriler silinecektir.
© 2019 HMD Global Oy. Tüm hakları saklıdır. 20
Sayfa yükleniyor...
Sayfa yükleniyor...
Sayfa yükleniyor...
Sayfa yükleniyor...
Sayfa yükleniyor...
Sayfa yükleniyor...
Sayfa yükleniyor...
Sayfa yükleniyor...
Sayfa yükleniyor...
Sayfa yükleniyor...
Sayfa yükleniyor...
Sayfa yükleniyor...
Sayfa yükleniyor...
Sayfa yükleniyor...
-
 1
1
-
 2
2
-
 3
3
-
 4
4
-
 5
5
-
 6
6
-
 7
7
-
 8
8
-
 9
9
-
 10
10
-
 11
11
-
 12
12
-
 13
13
-
 14
14
-
 15
15
-
 16
16
-
 17
17
-
 18
18
-
 19
19
-
 20
20
-
 21
21
-
 22
22
-
 23
23
-
 24
24
-
 25
25
-
 26
26
-
 27
27
-
 28
28
-
 29
29
-
 30
30
-
 31
31
-
 32
32
-
 33
33
-
 34
34


