
EN
Electric Lawn Mower INSTRUCTION MANUAL 9
FR
Tondeuse Electrique MANUEL D’INSTRUCTIONS 16
DE
Elektro-Rasenmäher BETRIEBSANLEITUNG 24
IT
Tosaerba elettrico ISTRUZIONI PER L’USO 32
NL
Elektrische grasmaaier GEBRUIKSAANWIJZING 40
ES
Cortadora Eléctrica de
Césped
MANUAL DE
INSTRUCCIONES
48
PT
Cortador de Grama Elétrico MANUAL DE INSTRUÇÕES 56
DA
Elektrisk plæneklipper BRUGSANVISNING 64
EL
Ηλεκτρική μηχανή γκαζόν ΕΓΧΕΙΡΙΔΙΟ ΟΔΗΓΙΩΝ 71
TR
Elektrikli Çim Biçme Makinesi KULLANMA KILAVUZU 79
PL
Elektryczna kosiarka do
trawy
INSTRUKCJA OBSŁUGI 86
HU
Elektromos fűnyíró HASZNÁLATI KÉZIKÖNYV 94
SK
Elektrická kosačka NÁVOD NA OBSLUHU 101
CS
Elektrická sekačka na trávu NÁVOD K OBSLUZE 109
UK
Електрична газонокосарка
ІНСТРУКЦІЯ З
ЕКСПЛУАТАЦІЇ
116
RO
Maşină electrică de tuns iarba MANUAL DE INSTRUCŢIUNI 124
EM331
EM371
EM410

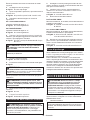
1
Fig.1
1
Fig.2
1
Fig.3
321
Fig.4
1
Fig.5
1
1
2
Fig.6
1
Fig.7
2

1
1
2
Fig.8
1
Fig.9
Fig.10
1
2
Fig.11
1
Fig.12
1
Fig.13
3

1
Fig.14
1
2
Fig.15
1
Fig.16
1
Fig.17
321
Fig.18
Fig.19
Fig.20
Fig.21
4

1
2
Fig.22
Fig.23
Fig.24
12
33
Fig.25
Fig.26
Fig.27
Fig.28
1
Fig.29
5

2
1
Fig.30
1
2
3
4
Fig.31
1
Fig.32
1
2
Fig.33
1
Fig.34
1
Fig.35
6

Fig.36
1
Fig.37
2
1
Fig.38
1
Fig.39
1
Fig.40
1
2
3
4
Fig.41
1
Fig.42
Fig.43
7

1
Fig.44
1
Fig.45
1
2
3
Fig.46
1
2
3
4
Fig.47
5
4
2
3
1
Fig.48
1
2
3
Fig.49
8

9 ENGLISH
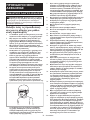
ENGLISH (Original instructions)
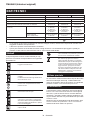
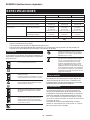
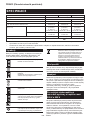
SPECIFICATIONS
Model: EM331 EM371 EM410
No load speed 3,400 min
-1
Cutting height 20 mm - 55 mm 20 mm - 75 mm
Cutting width 330 mm 370 mm 410 mm
Part number of replacement mower blade YA00000731 YA00000732 YA00000733
Dimensions
(L x W x H)
During operation
(with grass basket)
L: 1,040 mm to 1,230 mm
W: 380 mm
H: 870 mm to 1,110 mm
L: 1,140 mm to 1,330 mm
W: 415 mm
H: 890 mm to 1,120 mm
L: 1,255 mm to 1,470 mm
W: 460 mm
H: 955 mm to 1,230 mm
When stored
(without grass basket)
350 mm x 380 mm x
1,090 mm
335 mm x 415 mm x
1,090 mm
395 mm x 460 mm x
1,220 mm
Net weight 10.2 kg 11.6 kg 14.5 kg
Safety class
/II
• Duetoourcontinuingprogramofresearchanddevelopment,thespecicationshereinaresubjecttochange
without notice.
• Specicationsmaydifferfromcountrytocountry.
• Theweightmaydifferdependingontheattachment(s).Thelightestandheaviestcombination,accordingto
EPTA-Procedure01/2014,areshowninthetable.
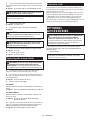
Symbols
Thefollowingsshowthesymbolsusedfortheequip-
ment. Be sure that you understand their meaning before
use.
Takeparticularcareandattention.
Read the instruction manual.
DOUBLEINSULATION
Danger;beawareofthrownobjects.
Thedistancebetweenthetooland
bystanders must be at least 15 m.
Waituntilallmachinecomponentshave
completely stopped before touching them.
Keepthesupplyexiblecordawayfrom
the cutting blades.
Beware of sharp blades. Blades continue
to rotate after the motor is switched off.
Removetheplugfromthemachinebefore
maintenance or if cord is damaged.
Thenoiseofthemachineisnotmorethan
96 dB.
Keep hands and feet away. Do not operate
mower unless the guards and attachments
are in proper place.
Only for EU countries
Donotdisposeofelectricequipment
together with household waste material! In
observanceoftheEuropeanDirective,on
WasteElectricandElectronicEquipment
and its implementation in accordance with
nationallaw,electricequipmentthathave
reached the end of their life must be col-
lectedseparatelyandreturnedtoanenvi-
ronmentally compatible recycling facility.
Intended use
Themachineisintendedforlawnmowing.Donotuse
the machine for other purposes. Use of the machine for
operations other than the intended use could result in a
hazardous situation.
Power supply
Thetoolshouldbeconnectedonlytoapowersupplyof
thesamevoltageasindicatedonthenameplate,and
canonlybeoperatedonsingle-phaseACsupply.They
are double-insulated and can, therefore, also be used
from sockets without earth wire.
If the supply cord is damaged, it must be replaced by the
manufactureroritsserviceagentinordertoavoidahazard.
For public low-voltage distribution
systems of between 220 V and 250 V
Switchingoperationsofelectricapparatuscausevolt-
ageuctuations.Theoperationofthisdeviceunder
unfavorablemainsconditionscanhaveadverseeffects
totheoperationofotherequipment.Withamains
impedanceequalorlessthan0.425Ohms(forEM371)
or0.427Ohms(forEM410),itcanbepresumedthat
therewillbenonegativeeffects.Themainssocketused
forthisdevicemustbeprotectedwithafuseorprotec-
tivecircuitbreakerhavingslowtrippingcharacteristics.

10 ENGLISH
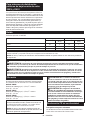
Noise
Applicable standard : EN60335
Model Soundpressurelevel Soundpowerlevel
L
PA
(dB(A)) Uncertainty K
(dB(A))
L
PA
(dB(A)) Uncertainty K
(dB(A))
EM331 83 3 94 2
EM371 83 3 94 1
EM410 84 3 93 2
NOTE:Thedeclarednoiseemissionvalue(s)hasbeenmeasuredinaccordancewithastandardtestmethodand
may be used for comparing one tool with another.
NOTE:Thedeclarednoiseemissionvalue(s)mayalsobeusedinapreliminaryassessmentofexposure.
WARNING: Wear ear protection.
WARNING: The noise emission during actual use of the power tool can differ from the declared val-
ue(s) depending on the ways in which the tool is used especially what kind of workpiece is processed.
WARNING: Be sure to identify safety measures to protect the operator that are based on an estimation
of exposure in the actual conditions of use (taking account of all parts of the operating cycle such as the
times when the tool is switched off and when it is running idle in addition to the trigger time).
Vibration
Thevibrationtotalvalue(tri-axialvectorsum)deter-
mined according to EN60335:
Model EM331
Vibration emission (a
h
) : 2.5 m/s
2
or less
Uncertainty (K) : 1.5 m/s
2
Model EM371
Vibration emission (a
h
) : 2.5 m/s
2
or less
Uncertainty (K) : 1.5 m/s
2
Model EM410
Vibration emission (a
h
) : 2.5 m/s
2
or less
Uncertainty (K) : 1.5 m/s
2
NOTE:Thedeclaredvibrationtotalvalue(s)hasbeen
measured in accordance with a standard test method
and may be used for comparing one tool with another.
NOTE:Thedeclaredvibrationtotalvalue(s)mayalso
be used in a preliminary assessment of exposure.
WARNING: The vibration emission during
actual use of the power tool can differ from the
declared value(s) depending on the ways in which
the tool is used especially what kind of workpiece
is processed.
WARNING: Be sure to identify safety mea-
sures to protect the operator that are based on an
estimation of exposure in the actual conditions of
use (taking account of all parts of the operating
cycle such as the times when the tool is switched
off and when it is running idle in addition to the
trigger time).
EC Declaration of Conformity
For European countries only
TheECdeclarationofconformityisincludedasAnnexA
to this instruction manual.
SAFETY WARNINGS
IMPORTANT SAFETY
INSTRUCTIONS
WARNING: Read all safety warnings and
all instructions. Failure to follow the warnings and
instructionsmayresultinelectricshock,reand/or
seriousinjury.
Save all warnings and instruc-
tions for future reference.
1. Children should be supervised to ensure that
they do not play with the mower.
2. Never allow children or people unfamiliar with
these instructions to use the mower. Local
regulations can restrict the age of the operator.
3. Never operate the mower while people, espe-
cially children, or pets are nearby.
4. Keep in mind that the operator or user is
responsible for accidents or hazards occurring
to other people or their property.
5. While operating the mower, always wear sub-
stantial footwear and long trousers. Do not
operate the mower when barefoot or wearing
open sandals. Avoid wearing clothing or jew-
elry that is loose tting or that has hanging
cords or ties. They can be caught in moving
parts.
6. Always wear protective goggles to protect
your eyes from injury when using power tools.
The goggles must comply with ANSI Z87.1 in
the USA, EN 166 in Europe, or AS/NZS 1336
in Australia/New Zealand. In Australia/New
Zealand, it is legally required to wear a face
shield to protect your face, too.

11 ENGLISH
It is an employer's responsibility to enforce
the use of appropriate safety protective equip-
ments by the tool operators and by other per-
sons in the immediate working area.
7.
Before use, check the supply and power cord for
signs of damage or aging. If the cord becomes
damaged during use, disconnect the cord from
the supply immediately. Do not touch the cord
before disconnecting the supply. Do not use the
mower if the cord is damaged or worn.
8. Operate the mower only in daylight or in good
articial light.
9. Avoid operating the mower in wet grass.
10. Never operate the mower in the rain.
11. Always keep a rm hold on the handle.
12. Always be sure of your footing on slopes.
13. Walk, never run.
14.
Don't grasp the exposed cutting blades or cutting
edges when picking up or holding the mower.
15.
Physical condition - Do not operate mower while under
the inuence of drugs, alcohol, or any medication.
16.
Keep hands and feet away from rotating blades.
Caution - Blades coast after the mower is switched off.
17. Use only the manufacturer genuine blades
specied in this manual.
18. Check the blades carefully for cracks or dam-
age before operation. Replace cracked or
damaged blades immediately.
19. Be sure the area is clear of other people before
mowing. Stop mower if anyone enters the area.
20. Remove foreign matters such as rocks, wire,
bottles, bones and large sticks from the work
area before mowing to prevent personal injury
or damage to the mower.
21.
Stop operation immediately if you notice anything
unusual. Switch off the mower and unplug the power
cord from the power supply. Then inspect the mower.
22. Never attempt to make wheel height adjust-
ments while mower is running.
23.
Release switch lever and wait for blade rotation
to stop before crossing driveways, walks, roads,
and any gravel-covered areas. Also unplug the
power cord from the power supply if you leave
the mower, reach to pick up or remove some-
thing out of your way, or for any other reason
that may distract you from what you are doing.
24. Objects struck by the mower blade can cause
severe injuries to persons. The lawn should
always be carefully examined and cleared of
all objects prior to each mowing.
25. If the mower strikes a foreign object, follow
these steps:
- Stop the mower, release the switch lever and
wait until the blade comes to a complete stop.
- Unplug the power cord from the power supply.
- Thoroughly inspect the mower for any damage.
- Replace the blade if it is damaged in any way.
Repair any damage before restarting and con-
tinuing to operate the mower.
26.
Check the grass basket frequently for wear or
deterioration. For storage, always make sure
the grass basket is empty. Replace a worn grass
basket with a new factory replacement for safety.
27. Use extreme caution when reversing or pulling
the mower towards you.
28. Stop the blade(s) if the mower has to be tilted
for transportation when crossing surfaces
other than grass, and when transporting the
mower to and from the area to be used.
29.
Never operate the mower with defective guards
or shields, or without safety devices, for exam-
ple deectors and/or grass basket, in place.
30.
Switch on the mower carefully according to instruc-
tions and with feet well away from the blade(s).
31.
Do not tilt the mower when switching on the
motor, except if the mower has to be tilted for
starting. In this case, do not tilt it more than
absolutely necessary and lift only the part,
which is away from the operator. Always ensure
that both hands are in the operating position
before returning the appliance to the ground.
32. Do not start the mower when standing in front
of the discharge opening.
33.
Do not put hands or feet near or under rotating parts.
Keep clear of the discharge opening at all times.
34.
Do not transport the mower while the mower is turned on.
35. Stop the mower, and remove plug from the
socket. Make sure that all moving parts have
come to a complete stop
- whenever you leave the mower,
- before clearing blockages or unclogging chute,
- before checking, cleaning or working on the mower,
- after striking a foreign object. Inspect the
mower for damage and make repairs before
restarting and operating the mower.
36. If the mower starts to vibrate abnormally
(check immediately)
- inspect for damage,
- replace or repair any damaged parts,
- check for and tighten any loose parts.
37. Be careful during adjustment of the mower
to prevent entrapment of the ngers between
moving blades and xed parts of the mower.
38.
Mow across the face of slopes, never up and down.
Exercise extreme caution when changing direction
on slopes. Do not mow excessively steep slopes.
39. Do not wash with a hose; avoid getting water
in motor and electrical connections.
40. Check the blade mounting bolt at frequent
intervals for proper tightness.
41.
Keep all nuts, bolts, and screws tight to be sure
the equipment is in safe working condition.
42. Take care as rotating one blade can cause
other blades to rotate.

12 ENGLISH
43. Always allow the mower to cool down before
storing.
44. When servicing the blades be aware that, even
though the power source is switched off, the
blades can still be moved.
45. Replace worn or damaged parts for safety.
Use only genuine replacement parts and
accessories.
46. Have your power tool serviced by a qualied
repair person using only identical replacement
parts.Thiswillensurethatthesafetyofthepower
tool is maintained.
47. Follow instruction for lubricating and chang-
ing accessories.
48.
Keep handles dry, clean and free from oil and grease.
49. Check to make sure that the voltage and fre-
quency of the power supply correspond to the
specications given on the identication plate.
We recommend the use of a residual-current-op-
erated circuit breaker (ground-fault circuit inter-
rupter) with a tripping current of 30 mA or less, or
an earth leakage current protector.
50. This machine can be used by children aged
from 8 years and above and persons with
reduced physical, sensory or mental capabil-
ities or lack of experience and knowledge if
they have been given supervision or instruc-
tion concerning use of the machine in a safe
way and understand the hazards involved.
Cleaning and user maintenance shall not be
made by children without supervision.
Residual risks
Evenifyouareoperatingthisproductinaccordance
withallthesafetyrequirements,potentialrisksofinjury
anddamageremain.Thefollowingdangerscanarisein
connection with the structure and design of this product.
1. Healthdefectsresultingfromvibrationemission
iftheproductisbeingusedoverlongperiodsof
timeornotadequatelymanagedandproperly
maintained.
2. Injuriesanddamagetopropertyduetobroken
application tools or the sudden impact of hidden
objectsduringuse.
3. Dangerofinjuryandpropertydamagecausedby
yingobjects.
WARNING: This product produces an elec-
tromagnetic eld during operation. This eld may
under some circumstances interfere with active
or passive medical implants. To reduce the risk
of serious or fatal injury, we recommend persons
with medical implants to consult their doctor and
the medical implant manufacturer before operat-
ing this product.
SAVE THESE INSTRUCTIONS.
WARNING: DO NOT let comfort or familiarity
with product (gained from repeated use) replace
strict adherence to safety rules for the subject
product.
MISUSE or failure to follow the safety rules stated
in this instruction manual may cause serious
personal injury.
ASSEMBLY
CAUTION: Always be sure that the tool is
switched off and unplugged before carrying out
any work on the tool.
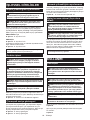
Assembling the handle
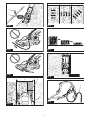
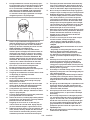
1.
Unload the upper handle from the main unit of the machine.
►Fig.1: 1. Upper handle
2. Loosen the thumb nuts.
►Fig.2: 1.Thumbnut
3. Widen the handle outside a little, and then raise
the handle.
►Fig.3: 1. Handle
4. Adjustthehandleheightbyaligningthearrowwith
the mark.
►Fig.4: 1.Thumbnut2.Mark3. Arrow
5. Tightenthethumbnuts.
►Fig.5: 1.Thumbnut
6. Attachtheupperhandlebyinsertingthelevers
from the outside of the handle, and then tighten the nuts
with the wrench to secure the handle.
►Fig.6: 1.Lever2. Nut
7. Secure the cords with the clamps as shown in the
gure.
►Fig.7: 1. Clamp
Installing the grass basket
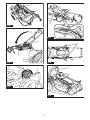
1. Attach the pipes of the grass basket to the frame.
►Fig.8: 1. Pipe 2. Frame
2. Opentherearcover.
►Fig.9: 1.Rearcover
3. Hook the grass basket onto the rear side of the
machine.
►Fig.10
Toremovethegrassbasket,performtheinstallation
procedureinreverse.
Connecting extension cord
WARNING: When connecting the extension
cord to the power plug of the machine, make sure
that the switch lever is released and the cord is
unplugged from the power supply.
WARNING: Do not connect or disconnect the
extension cord with wet hands.
NOTICE: When connecting the extension cord to
the power plug of the machine, be sure to insert it
fully into the socket.
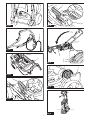
Whenconnectingtheextensioncord,hookitoverthe
hookonthehandleasshownintheguretoprevent
inadvertentunpluggingbyexcessivestrainontheplug.
►Fig.11: 1. Hook 2. Extension cord

13 ENGLISH
FUNCTIONAL
DESCRIPTION
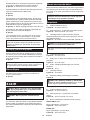
Adjusting the mowing height
WARNING: Before adjusting the mowing
height, unplug the extension cord from the power
supply, and check that the blades have come to a
complete halt.
WARNING:
Never put your hand or leg under
the mower body when adjusting the mowing height.
Youcanadjustthemowingheightintherangeof20mm
to55mm(forEM331/EM371)or20mmto75mm(for
EM410).Themowingheightcanbeadjustedin3levels
(forEM331/EM371)or7levels(forEM410).
For EM331/EM371
►Fig.12: 1.Adjustinglever
For EM410
►Fig.13: 1.Adjustinglever
Holdthehandlewithonehand,andthenmovethe
adjustingleverwiththeotherhand.
►Fig.14: 1.Adjustinglever
NOTE:Tryatestmowingofgrassinalessconspicu-
ous place to get your desired height.
Switch action
WARNING:
Before plugging in the tool, always
check that the switch lever actuates properly and
returns to the “OFF” position when released.
WARNING: For your safety, this machine is
equipped with the lock-off button which prevents
the tool from unintended starting. Never use the
machine if it starts when you pull the switch lever
without pressing the lock-off button. Ask your
local Makita/Dolmar Service Center for repairs.
WARNING: Never disable the lock function or
tape down the lock-off button.
NOTICE: Do not pull the switch lever forcibly
without pressing the lock-off button. The switch
may break.
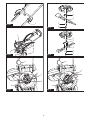
Tostartthemachine,pressthelock-offbutton,and
thensqueezeintheswitchlever.Tostopthemachine,
releasetheswitchlever.
►Fig.15: 1.Switchlever2. Lock-off button
Level indicator of grass basket
Thelevelindicatorofthegrassbasketopensduring
mowing if the grass basket is not full. If the grass basket
isfull,thelevelindicatorclosesduringmowing.Ifit's
full, empty the grass basket before starting mowing.
►Fig.16: 1.Levelindicator
►Fig.17: 1.Levelindicator
Adjusting the handle height
Thehandleheightcanbeadjustedinthreelevels.
Loosen the thumb nuts while holding the handle, then
adjustthehandleheightbyaligningthearrowwithone
of the marks, and then tighten the thumb nuts.
►Fig.18: 1.Thumbnut2.Mark3. Arrow
Motor protection system (Over
current relay)
WARNING: If the machine suddenly stops
while operating it, release the switch lever
and unplug the extension cord. Otherwise, the
machine may suddenly restart and cause an
injury.
CAUTION: Before removing an object that is
jamming the blade, be sure to wear gloves and
unplug the extension cord from the power socket.
Ifthecutoffgrassordirtisjamminginsideofthemain
body, the machine stops automatically to protect the
motor(overcurrentrelay).Inthiscase,unplugthe
extensioncordfromthepowersocket,thenremovethe
materialcausingthejam,andthenletthemachinecool
down for a few minutes before turning on the machine.
NOTE:
Theovercurrentrelaymaybeactivatedwhen
wet or long grass gets caught up inside of the main body.
OPERATION
Mowing
WARNING:
Before mowing, clear away sticks
and stones from the mowing area. Furthermore, clear
away any weeds from the mowing area in advance.
►Fig.19
WARNING: Always wear the safety goggles or
safety glasses with side shields when operating
the mower.
CAUTION: If the cut grass or foreign object
blocks up inside of the mower body, be sure to
turn the power off, and then unplug the extension
cord from the power socket. Before removing the
grass or foreign object, be sure to wear gloves.
CAUTION: Be sure to install the grass basket
when operating the machine.
NOTICE: Use this machine for mowing lawn only.
Do not mow weeds with this machine.
Firmly hold the handle with both hands when mowing.
►Fig.20
Themowingspeedguidelineisapproximatelyone
meter per four seconds.
►Fig.21

14 ENGLISH
Start mowing near the power socket to ensure that the
extension cord does not become an obstacle.
►Fig.22: 1. Power socket 2. Extension cord
Do not allow the extension cord to pass under or
become entangled beneath the machine.
►Fig.23
►Fig.24
Thelinesonbothsidesofthemainbodyareguidelines
to mowing width. Using the lines as guidelines, mow in
strips.Overlapbyonehalftoonethirdthepreviousstrip
tomowthelawnevenly.
►Fig.25: 1.Mowingwidth2.Overlappingarea3. Line
Changethemowingdirectioneachtimetopreventthe
grassgrainpatternfromforminginjustonedirection.
►Fig.26
Periodically check the grass basket for mowed grass.
Emptythebasketbeforeitbecomesfull.Beforeevery
periodic check, be sure to stop the machine.
NOTE: Using the mower with the grass basket full
preventssmoothbladerotationandplacesanextra
load on the motor, which may cause a breakdown.
Mowing a long-grass lawn
Do not try to cut long grass all at once. Instead, mow
thelawninsteps.Leaveadayortwobetweenmowings
untilthelawnbecomesevenlyshort.
►Fig.27
NOTE:Mowinglonggrasstoashortlengthallat
oncemaycausethegrasstodie.Thecutgrassmay
also block up inside of the mower body.
Edge mowing
Whenmowingattheedge,besuretomovethe
machine along the edge.
►Fig.28
MAINTENANCE
WARNING: Before performing the mainte-
nance, unplug the extension cord from the power
supply, and conrm that the blades have come to
a complete halt.
CAUTION: When performing the mainte-
nance, always wear gloves.
TomaintainproductSAFETYandRELIABILITY,
repairs,anyothermaintenanceoradjustmentshould
beperformedbyMakita/DolmarAuthorizedorFactory
ServiceCenters,alwaysusingMakita/Dolmarreplace-
ment parts.
Maintenance after mowing
After mowing, wipe the machine with a dry cloth or a
cloth dipped in soapy water. Also, use a soft brush to
brush off grass cuttings and dirt from blades.
NOTICE: Never use gasoline, benzine, thinner,
alcohol or the like. Discoloration, deformation or
cracks may result.
Storing
1. Disconnect the extension cord.
►Fig.29: 1. Extension cord
2. Opentherearcover,andthenremovethegrass
basket.
►Fig.30: 1.Rearcover2. Grass basket
3. Loosen the thumb nuts while holding the handle,
then widen the handle outside a little, and then fold the
handle.
►Fig.31: 1.Thumbnut2. Handle 3.Mark4. Arrow
CAUTION: When folding the handle, be care-
ful not to pinch your hand or ngers.
NOTE:Makesurethatthearrowindicatesthemark
at the most front position.
4. Tightenthethumbnuts.
►Fig.32: 1.Thumbnut
5. Openthelevers,andthenplacethecordoverthe
lever.
►Fig.33: 1.Lever2. Cord
6. Returntheleverstothehalfwaypositionasshown
inthegure.
►Fig.34: 1.Lever
7. Fold the handle.
►Fig.35: 1. Handle
8. Placethemachineasshowninthegure.
►Fig.36
CAUTION: Be sure to store this machine
indoors and place it on a at surface. Otherwise,
themachinemayfallandcauseaninjury.
You can also store the machine as follows.
1. Disconnect the extension cord.
►Fig.37: 1. Extension cord
2. Opentherearcover,andthenremovethegrass
basket.
►Fig.38: 1.Rearcover2. Grass basket
3. Setthemowingheightwiththeadjustinglever.
For EM331/EM371:
Set the mowing height to "1".
►Fig.39: 1.Adjustinglever
For EM410:
Set the mowing height to "2".
►Fig.40: 1.Adjustinglever

15 ENGLISH
4. Loosen the thumb nuts while holding the handle,
then widen the handle outside a little, and then fold the
handle.
►Fig.41: 1.Thumbnut2. Handle 3.Mark4. Arrow
CAUTION: When folding the handle, be care-
ful not to pinch your hand or ngers.
NOTE:Makesurethatthearrowindicatesthemark
at the most front position.
5. Tightenthethumbnuts.
►Fig.42: 1.Thumbnut
6. Placethemachineasshowninthegure.
►Fig.43
CAUTION: Be sure to store this machine
indoors and place it on a at surface. Otherwise,
themachinemayfallandcauseaninjury.
You can also store the machine by folding the handle.
CAUTION: Before opening the levers, hold
the upper handle rmly. Otherwise, the handle
may fall and cause an injury.
1. Opentheleverswhileholdingtheupperhandle.
►Fig.44: 1.Lever
2. Fold the upper handle.
►Fig.45: 1. Upper handle
Replacing the mower blade
CAUTION: Do not use any wrench other than
the standard hex wrench when replacing the
mower blade. Using a different wrench may lead to
over-tighteningorlooseness,whichmaycauseinjury.
1. Unplug the extension cord and stand up the
machine. (Refer to the instructions for storing.)
2. Insert the pin into the hole, and then hold the han-
dle with one hand and loosen the bolt with the wrench
counterclockwise.
►Fig.46: 1. Blade 2. Wrench 3. Pin
3. Removethemowerblade.
For EM331
Removethebolt,washer,mowerblade,andbracketin
order.
►Fig.47: 1. Bracket 2.Mowerblade3. Washer 4. Bolt
For EM371/EM410
Removethebolt,washer,mowerblade,bracket,and
spacer in order.
►Fig.48: 1. Spacer 2. Bracket 3.Mowerblade
4. Washer 5. Bolt
4. Attach a new mower blade, then insert the pin into
the hole, and then hold the handle with one hand and
tightentheboltwiththewrenchclockwisermly.
►Fig.49: 1.Mowerblade2. Wrench 3. Pin
Extension cord
You should only use extension cords for outdoor use,
PVC or rubber cord ordinary duty with a cross sectional
area not less than 1.5 mm
2
.
Before and during use, check the supply and extension
cords for damage. Do not use the appliance if the cord
is damaged or worn. Keep extension cord away from
cutting elements. If the cord is damaged during use,
disconnect the cord from the supply immediately. Do not
touch the cord before disconnecting the supply.
OPTIONAL
ACCESSORIES
CAUTION: These accessories or attachments
are recommended for use with your Makita/
Dolmar tool specied in this manual.Theuseof
any other accessories or attachments might present
ariskofinjurytopersons.Onlyuseaccessoryor
attachment for its stated purpose.
If you need any assistance for more details regard-
ingtheseaccessories,askyourlocalMakita/Dolmar
ServiceCenter.
• Mowerblade
NOTE: Some items in the list may be included in the
toolpackageasstandardaccessories.Theymay
differ from country to country.

16 FRANÇAIS
FRANÇAIS (Instructions originales)
SPÉCIFICATIONS
Modèle : EM331 EM371 EM410
Vitesseàvide 3 400 min
-1
Hauteur de coupe 20 mm - 55 mm 20 mm - 75 mm
Largeur de coupe 330 mm 370 mm 410 mm
Numéro de référence de la lame de tondeuse de remplacement YA00000731 YA00000732 YA00000733
Dimensions
(L x l x H)
En fonctionnement
(aveclebacàherbe)
L : 1 040 mm à 1 230 mm
l : 380 mm
H : 870 mm à 1 110 mm
L : 1 140 mm à 1 330 mm
l : 415 mm
H : 890 mm à 1 120 mm
L : 1 255 mm à 1 470 mm
l : 460 mm
H : 955 mm à 1 230 mm
Pendant le stockage
(sans le bac à herbe)
350 mm x 380 mm x
1 090 mm
335 mm x 415 mm x
1 090 mm
395 mm x 460 mm x
1 220 mm
Poids net 10,2 kg 11,6 kg 14,5 kg
Catégorie de sécurité
/II
• Étantdonnél’évolutionconstantedenotreprogrammederechercheetdedéveloppement,lesspécications
contenuesdanscemanuelsontsujettesàmodicationsanspréavis.
• Lesspécicationspeuventvariersuivantlespays.
• Lepoidspeutêtredifférentselonlesaccessoires.Lesassociationslapluslégèreetlapluslourde,conformé-
mentàlaprocédureEPTA01/2014,sontindiquéesdansletableau.
Symboles
Voustrouverezci-dessouslessymbolesutiliséspour
l’appareil.Veillezàcomprendreleursignicationavant
toute utilisation.
Veuillezêtreprudentetresterattentif.
Lirelemoded’emploi.
DOUBLEISOLATION
Danger;prendregardeauxprojections
d’objets.
Ladistanceentrel’outiletlespersonnes
présentesdoitêtred’aumoins15m.
Attendezquetouslescomposantsdela
machinesoienttotalementarrêtésavantde
les toucher.
Gardezlecordond’alimentationsoupleà
l’écartdeslamesdecoupe.
Méez-vousdeslamestranchantes.Les
lames continuent de tourner une fois le
moteur coupé. Débranchez le connecteur
delamachineavanttoutentretienousile
cordon est endommagé.
Leniveausonoredelamachinene
dépasse pas les 96 dB.
Éloignezvosmainsetvospieds.N’utilisez
latondeusequesilescartersdeprotection
et les accessoires sont bien en place.
Uniquementpourlespaysdel’Union
européenne
Nepasjeterlesappareilsélectriquesavec
lesorduresménagères!Conformément
àladirectiveeuropéennerelativeaux
déchetsd’équipementsélectriqueset
électroniquesainsiqu’àsonapplication
enconformitéaveclesloisnationales,
lesappareilsélectriquesquiontatteintla
ndeleurduréedeservicedoiventêtre
collectésséparémentetrenvoyésàun
établissement de recyclage respectueux
del’environnement.
Utilisations
La machine est conçue pour tondre la pelouse.
N’utilisezpaslamachineàd’autresns.L’utilisationde
lamachinepourdesopérationsautresquel’utilisation
prévuepourraitentraînerunesituationdangereuse.
Alimentation
L’outilnedevraêtreraccordéqu’àunealimentation
delamêmetensionquecellequiguresurlaplaque
signalétique,etilnepourrafonctionnerquesurun
courantsecteurmonophasé.Réaliséavecunedouble
isolation,ilpeutdecefaitêtrealimentéparuneprise
sans mise à la terre.
Silecordond’alimentationestendommagé,ildoitêtre
remplacéparlefabricantousonprestatairedeservice
and’évitertoutdanger.

17 FRANÇAIS
Pour les systèmes de distribution
publics à basse tension, entre 220 V
et 250 V
La mise sous tension et hors tension des appareils
électriquesprovoquedesuctuationsdetension.
L’utilisationdecetappareildansdesconditions
d’alimentationélectriqueinadéquatespeutavoirdes
effetsnéfastessurlefonctionnementdesautreséqui-
pements.Toutefois,ilnedevraitpasyavoird’effets
négatifssil’impédancedel’alimentationestégaleou
inférieureà0,425ohm(pourleEM371)ou0,427ohm
(pourleEM410).Laprisedecourantutiliséepourcet
appareildoitêtreprotégéeparunfusibleouundisjonc-
teur de protection à déclenchement lent.
Bruit
Norme applicable : EN60335
Modèle Niveaudepressionacoustique Niveaudepuissancesonore
L
PA
(dB(A)) Incertitude K
(dB(A))
L
PA
(dB(A)) Incertitude K
(dB(A))
EM331 83 3 94 2
EM371 83 3 94 1
EM410 84 3 93 2
NOTE :Laoulesvaleursd’émissiondebruitdéclaréesontétémesuréesconformémentàlaméthodedetest
standardetpeuventêtreutiliséespourcomparerlesoutilsentreeux.
NOTE :Laoulesvaleursd’émissiondebruitdéclaréespeuventaussiêtreutiliséespourl’évaluationpréliminaire
del’exposition.
AVERTISSEMENT : Portez un serre-tête antibruit.
AVERTISSEMENT : L’émission de bruit lors de l’usage réel de l’outil électrique peut être différente de
la ou des valeurs déclarées, suivant la façon dont l’outil est utilisé, particulièrement selon le type de pièce
usinée.
AVERTISSEMENT : Les mesures de sécurité à prendre pour protéger l’utilisateur doivent être basées
sur une estimation de l’exposition dans des conditions réelles d’utilisation (en tenant compte de toutes
les composantes du cycle d’utilisation, comme par exemple le moment de sa mise hors tension, lorsqu’il
tourne à vide et le moment de son déclenchement).
Vibrations
Valeurtotaledevibrations(sommedevecteurtriaxial)
déterminée selon EN60335 :
Modèle EM331
Émissiondevibrations(a
h
) : 2,5 m/s
2
ou moins
Incertitude (K) : 1,5 m/s
2
Modèle EM371
Émissiondevibrations(a
h
) : 2,5 m/s
2
ou moins
Incertitude (K) : 1,5 m/s
2
Modèle EM410
Émissiondevibrations(a
h
) : 2,5 m/s
2
ou moins
Incertitude (K) : 1,5 m/s
2
NOTE :Laoulesvaleursdevibrationtotalesdécla-
rées ont été mesurées conformément à la méthode
deteststandardetpeuventêtreutiliséespourcom-
parer les outils entre eux.
NOTE :Laoulesvaleursdevibrationtotalesdécla-
réespeuventaussiêtreutiliséespourl’évaluation
préliminairedel’exposition.
AVERTISSEMENT : L’émission de vibrations
lors de l’usage réel de l’outil électrique peut être
différente de la ou des valeurs déclarées, suivant
la façon dont l’outil est utilisé, particulièrement
selon le type de pièce usinée.
AVERTISSEMENT : Les mesures de sécurité
à prendre pour protéger l’utilisateur doivent être
basées sur une estimation de l’exposition dans
des conditions réelles d’utilisation (en tenant
compte de toutes les composantes du cycle
d’utilisation, comme par exemple le moment de
sa mise hors tension, lorsqu’il tourne à vide et le
moment de son déclenchement).
Déclaration de conformité CE
Pour les pays européens uniquement
La déclaration de conformité CE est fournie en Annexe
Aàcemoded’emploi.

18 FRANÇAIS
CONSIGNES DE
SÉCURITÉ
CONSIGNES DE SÉCURITÉ
IMPORTANTES
AVERTISSEMENT : Lisez toutes les
consignes de sécurité et toutes les instructions. Il
yarisqued’électrocution,d’incendieet/oudegraves
blessures si les mises en garde et les instructions ne
sont pas respectées.
Conservez toutes les mises en
garde et instructions pour réfé-
rence ultérieure.
1. Les enfants doivent être sous la surveillance
d’un adulte an de s’assurer qu’ils ne jouent
pas avec la tondeuse.
2. Ne laissez jamais les enfants ou les personnes
qui ne sont pas familiarisées avec ces instruc-
tions utiliser la tondeuse. Les réglementations
locales peuvent spécier un âge minimum
pour l’utilisation.
3. N’utilisez jamais la tondeuse alors que des
personnes — et tout particulièrement des
enfants — ou des animaux domestiques se
trouvent à proximité.
4. Gardez à l’esprit que l’opérateur ou l’utilisa-
teur est responsable des accidents ou risques
encourus par les personnes ou leur propriété.
5. Pendant l’utilisation de la tondeuse, portez
toujours des chaussures résistantes et un
pantalon long. N’utilisez pas la tondeuse
pieds nus ou avec des sandales qui laissent
les pieds partiellement découverts. Évitez
de porter des vêtements et bijoux amples ou
dotés de cordons ou attaches qui pendent. Les
pièces mobiles risqueraient de les happer.
6.
Pour protéger vos yeux des blessures lorsque
vous utilisez un outil électrique, portez tou-
jours des lunettes de protection, lesquelles
doivent être conformes à ANSI Z87.1 aux
États-Unis, EN 166 en Europe ou AS/NZS 1336
en Australie/Nouvelle-Zélande. En Australie/
Nouvelle-Zélande, la loi exige également le port
d’un écran facial pour se protéger le visage.
L’employeur est responsable d’imposer le
port d’équipements de sécurité appropriés
par les utilisateurs de l’outil et par les autres
personnes se trouvant à proximité de la zone
de travail.
7. Avant utilisation, vériez que le cordon
d’alimentation ne présente pas de signes
d’endommagement ou d’usure. Si le cordon
est endommagé pendant l’utilisation, débran-
chez-le immédiatement du secteur. Ne touchez
pas le cordon avant qu’il soit déconnecté du
secteur. N’utilisez pas la tondeuse si le cordon
est endommagé ou usé.
8. N’utilisez la tondeuse qu’à la lumière du jour
ou sous un bon éclairage articiel.
9. Évitez d’utiliser la tondeuse sur de l’herbe
mouillée.
10. N’utilisez jamais la tondeuse sous la pluie.
11. Tenez toujours la poignée fermement.
12. Assurez-vous toujours d’être en position
stable dans les pentes.
13. Ne courez jamais ; marchez.
14. Ne saisissez pas les lames de coupe exposées
ou les bords tranchants pour soulever ou tenir
la tondeuse.
15. Condition physique - N’utilisez pas la ton-
deuse après avoir consommé une drogue, de
l’alcool ou un médicament.
16. Gardez mains et pieds à l’écart des lames en
rotation. Attention - Les lames continuent de
tourner une fois la tondeuse éteinte.
17. Utilisez exclusivement les lames authen-
tiques du fabricant spéciées dans ce mode
d’emploi.
18. Vériez soigneusement l’absence de ssures
ou de dommages sur les lames avant l’utili-
sation. Remplacez immédiatement les lames
ssurées ou abîmées.
19. Assurez-vous qu’il n’y a personne à proximité
avant de commencer à tondre. Arrêtez la ton-
deuse si quelqu’un s’approche.
20. Pour éviter de vous blesser ou d’abîmer la
tondeuse, enlevez les corps étrangers tels que
pierres, câbles, bouteilles, os et gros bouts de
bois de la zone de travail avant de commencer
à tondre.
21. Cessez immédiatement l’utilisation si vous
remarquez quoi que ce soit d’inhabituel.
Coupez le contact de la tondeuse et débran-
chez le cordon d’alimentation du secteur.
Inspectez ensuite la tondeuse.
22. N’essayez jamais de régler la hauteur des
roues pendant que la tondeuse tourne.
23. Libérez le levier d’interrupteur et attendez que
la lame ait cessé de tourner avant de traverser
une allée, un trottoir, une route ou une zone
recouverte de gravier. Pensez également à
débrancher le cordon d’alimentation du sec-
teur si vous laissez la tondeuse sans surveil-
lance, si vous vous penchez pour ramasser
ou enlever un objet qui fait obstacle, ou pour
toute autre raison pouvant vous distraire de
votre travail.

19 FRANÇAIS
24. Les objets heurtés par la lame de tondeuse
peuvent provoquer de graves blessures.
Pensez toujours à inspecter soigneusement
le gazon et à retirer tous les objets avant de
tondre.
25. Si la tondeuse heurte un corps étranger, pro-
cédez comme suit :
- Arrêtez la tondeuse, libérez le levier d’inter-
rupteur et attendez que la lame ait complète-
ment cessé de tourner.
- Débranchez le cordon d’alimentation du
secteur.
- Inspectez minutieusement la tondeuse pour
vous assurer qu’elle n’a subi aucun dommage.
- Si la lame est abîmée, remplacez-la. Réparez
tout dégât avant de redémarrer et de continuer
à utiliser la tondeuse.
26. Inspectez régulièrement le bac à herbe pour
vérier l’absence d’usure ou de détérioration.
Avant le rangement, assurez-vous toujours
que le bac à herbe est vide. Si le bac à herbe
est usé, remplacez-le par un bac de rechange
neuf pour votre sécurité.
27. Soyez très prudent lorsque vous faites reculer
la tondeuse ou la tirez vers vous.
28. Immobilisez la ou les lames si vous devez
incliner la tondeuse pour la transporter en
traversant une surface autre que du gazon, et
lorsque vous transportez la tondeuse vers ou
hors de la zone d’utilisation.
29.
N’utilisez jamais la tondeuse si ses carters ou
écrans de protection ne fonctionnent pas, ou si
ses dispositifs de sécurité (tels que les déec-
teurs et/ou le bac à herbe) ne sont pas posés.
30. Démarrez la tondeuse prudemment, en suivant
les instructions et en gardant les pieds bien à
l’écart de la ou des lames.
31. N’inclinez pas la tondeuse en allumant le
moteur, sauf si la tondeuse doit être inclinée
pour le démarrage. Le cas échéant, ne l’incli-
nez pas plus que nécessaire et ne soulevez
que la partie opposée à vous. Avant de rame-
ner l’appareil au sol, veillez à ce que vos deux
mains soient toujours en position d’utilisation.
32. Ne vous tenez pas devant l’ouverture de
décharge pour démarrer la tondeuse.
33. Ne mettez pas les mains ou les pieds près des
pièces en rotation, ou sous celles-ci. Restez
en tout temps à l’écart de l’ouverture de
décharge.
34. Ne transportez pas la tondeuse pendant
qu’elle tourne.
35. Arrêtez la tondeuse et retirez le connecteur de
la prise. Assurez-vous que toutes les pièces
mobiles sont parfaitement arrêtées
- chaque fois que vous laissez la tondeuse
sans surveillance,
- avant de retirer un objet bloqué ou de débou-
cher la goulotte,
- avant d’effectuer la vérication, le nettoyage
ou l’entretien de la tondeuse,
- après avoir heurté un corps étranger. Avant
de redémarrer et d’utiliser la tondeuse, vériez
l’absence de dommages et effectuez les répa-
rations nécessaires.
36. Si la tondeuse se met à vibrer anormalement
(vériez immédiatement)
- inspectez les dommages,
- remplacez ou réparez les pièces
endommagées,
- vériez et resserrez les pièces mal serrées.
37. Lorsque vous réglez la tondeuse, évitez de
vous coincer les doigts entre les lames en
mouvement et les pièces xes de la tondeuse.
38. Tondez toujours les pentes latéralement,
jamais de haut en bas ou vice-versa. Soyez
très prudent lorsque vous changez de direc-
tion dans les pentes. Ne tondez pas dans les
pentes trop abruptes.
39. Ne nettoyez pas la tondeuse avec un tuyau
d’arrosage ; évitez de mouiller le moteur et les
connexions électriques.
40. Vériez régulièrement le boulon de montage
de la lame pour vous assurer qu’il est bien
serré.
41. Gardez tous les écrous, boulons et vis bien
serrés pour garantir le fonctionnement sûr de
l’équipement.
42. Soyez prudent car la rotation d’une lame peut
provoquer la rotation d’autres lames.
43. Laissez toujours refroidir la tondeuse avant de
la ranger.
44. Lors de l’entretien des lames, gardez à l’esprit
qu’elles peuvent tourner même si la source
d’alimentation est coupée.
45. Pour votre propre sécurité, remplacez les
pièces usées ou endommagées. Utilisez exclu-
sivement des pièces de rechange et acces-
soires authentiques.
46. Faites réparer votre outil électrique par un
réparateur qualié uniquement en utilisant des
pièces de rechange identiques. La sécurité de
l’outilélectriqueseraainsimaintenue.
47. Suivez les instructions relatives à la lubrica-
tion et au changement des accessoires.
48. Gardez les poignées sèches, propres et
exemptes d’huile et de graisse.
49. Assurez-vous que la tension et la fréquence
de l’alimentation correspondent aux spécica-
tions qui gurent sur la plaque d’identication.
Nousrecommandonsl’utilisationd’undisjoncteur
différentielrésiduel(disjoncteurdefuitedeterre)
au courant de déclenchement de 30 mA ou moins,
ou un protecteur de courant de fuite à la terre.
50. Cette machine peut être utilisée par des
enfants de 8 ans et plus, ainsi que par des per-
sonnes aux facultés physiques, sensorielles
ou mentales diminuées ou sans expérience
ni expertise sous la surveillance d’un adulte
ou s’ils ont reçu des instructions concernant
l’utilisation en toute sécurité de la machine et
s’ils comprennent les risques encourus. Le
nettoyage et l’entretien à la charge de l’uti-
lisateur ne doivent pas être réalisés par des
enfants sans surveillance.

20 FRANÇAIS
Risques résiduels
Mêmesivousutilisezceproduitenrespectanttoutes
lesexigencesdesécurité,desrisquespotentielsde
dommages corporels ou matériels demeurent. Les
dangerssuivantspeuventdécoulerdelastructureetde
la conception de ce produit.
1. Desproblèmesmédicauxdusauxvibrationssi
le produit est utilisé pendant des périodes pro-
longéesous’ilestincorrectementmanipuléet
entretenu.
2. Dommages corporels et matériels suite à des
outilscassésouàl’impactsoudaind’objets
cachéspendantl’utilisation.
3. Risquededommagescorporelsetmatériels
provoquésparlaprojectiond’objets.
AVERTISSEMENT : Ce produit émet un
champ électromagnétique pendant son fonction-
nement. Ce champ peut dans certaines circons-
tances perturber les implants médicaux actifs
ou passifs. Pou réduire le risque de blessures
graves, voire mortelles, nous recommandons aux
personnes porteuses d’un implant médical de
consulter leur médecin et le fabricant de l’implant
médical avant d’utiliser ce produit.
CONSERVEZ CES
INSTRUCTIONS.
AVERTISSEMENT : NE vous laissez PAS
tromper (au l d’une utilisation répétée) par un
sentiment d’aisance et de familiarité avec le
produit, en négligeant le respect rigoureux des
consignes de sécurité qui accompagnent le pro-
duit en question.
La MAUVAISE UTILISATION de l’outil ou l’igno-
rance des consignes de sécurité indiquées
dans ce mode d’emploi peut entraîner de graves
blessures.
ASSEMBLAGE
ATTENTION : Avant d’effectuer toute inter-
vention sur l’outil, assurez-vous toujours qu’il est
hors tension et débranché.
Montage de la poignée
1. Désassemblezlapoignéesupérieuredel’unité
principale de la machine.
►Fig.1: 1. Poignée supérieure
2. Desserrez les écrous à moletés.
►Fig.2: 1.Écrouàmoletés
3. Repoussezlapoignéelégèrementversl’extérieur,
puissoulevez-la.
►Fig.3: 1. Poignée
4. Réglez la hauteur de la poignée en alignant la
èchesurlamarque.
►Fig.4: 1.Écrouàmoletés2.Marque3.Flèche
5. Serrez les écrous à moletés.
►Fig.5: 1.Écrouàmoletés
6. Posez la poignée supérieure en insérant les
leviersàpartirdel’extérieurdelapoignée,puisserrez
lesécrousàl’aidedelaclépourxerlapoignée.
►Fig.6: 1.Levier2.Écrou
7. Fixezlescordonsaveclesattaches,comme
l’illustrelagure.
►Fig.7: 1. Attache
Pose du bac à herbe
1. Fixez les tuyaux du bac à herbe au cadre.
►Fig.8: 1.Tuyau2. Cadre
2. Ouvrezlecouverclearrière.
►Fig.9: 1.Couverclearrière
3. Accrochezlebacàherbeàlapartiearrièredela
machine.
►Fig.10
Pour retirer le bac à herbe, exécutez la procédure de
poseensensinverse.
Connexion de la rallonge
AVERTISSEMENT : Lorsque vous raccor-
dez la rallonge au connecteur électrique de la
machine, vériez que le levier d’interrupteur est
libéré et que le cordon est débranché du secteur.
AVERTISSEMENT : Abstenez-vous de bran-
cher ou de débrancher la rallonge avec des mains
humides.
REMARQUE : Lorsque vous raccordez la ral-
longe au connecteur électrique de la machine,
insérez-le totalement dans la prise.
Lorsquevousraccordezlarallonge,accrochez-la
aucrochetdelapoignéecommel’illustrelagure,
and’éviterundébranchementintempestifdûàune
contrainteexcessivesurleconnecteur.
►Fig.11: 1. Crochet 2. Rallonge
Sayfa yükleniyor ...
Sayfa yükleniyor ...
Sayfa yükleniyor ...
Sayfa yükleniyor ...
Sayfa yükleniyor ...
Sayfa yükleniyor ...
Sayfa yükleniyor ...
Sayfa yükleniyor ...
Sayfa yükleniyor ...
Sayfa yükleniyor ...
Sayfa yükleniyor ...
Sayfa yükleniyor ...
Sayfa yükleniyor ...
Sayfa yükleniyor ...
Sayfa yükleniyor ...
Sayfa yükleniyor ...
Sayfa yükleniyor ...
Sayfa yükleniyor ...
Sayfa yükleniyor ...
Sayfa yükleniyor ...
Sayfa yükleniyor ...
Sayfa yükleniyor ...
Sayfa yükleniyor ...
Sayfa yükleniyor ...
Sayfa yükleniyor ...
Sayfa yükleniyor ...
Sayfa yükleniyor ...
Sayfa yükleniyor ...
Sayfa yükleniyor ...
Sayfa yükleniyor ...
Sayfa yükleniyor ...
Sayfa yükleniyor ...
Sayfa yükleniyor ...
Sayfa yükleniyor ...
Sayfa yükleniyor ...
Sayfa yükleniyor ...
Sayfa yükleniyor ...
Sayfa yükleniyor ...
Sayfa yükleniyor ...
Sayfa yükleniyor ...
Sayfa yükleniyor ...
Sayfa yükleniyor ...
Sayfa yükleniyor ...
Sayfa yükleniyor ...
Sayfa yükleniyor ...
Sayfa yükleniyor ...
Sayfa yükleniyor ...
Sayfa yükleniyor ...
Sayfa yükleniyor ...
Sayfa yükleniyor ...
Sayfa yükleniyor ...
Sayfa yükleniyor ...
Sayfa yükleniyor ...
Sayfa yükleniyor ...
Sayfa yükleniyor ...
Sayfa yükleniyor ...
Sayfa yükleniyor ...
Sayfa yükleniyor ...
Sayfa yükleniyor ...
Sayfa yükleniyor ...
Sayfa yükleniyor ...
Sayfa yükleniyor ...
Sayfa yükleniyor ...
Sayfa yükleniyor ...
Sayfa yükleniyor ...
Sayfa yükleniyor ...
Sayfa yükleniyor ...
Sayfa yükleniyor ...
Sayfa yükleniyor ...
Sayfa yükleniyor ...
Sayfa yükleniyor ...
Sayfa yükleniyor ...
Sayfa yükleniyor ...
Sayfa yükleniyor ...
Sayfa yükleniyor ...
Sayfa yükleniyor ...
Sayfa yükleniyor ...
Sayfa yükleniyor ...
Sayfa yükleniyor ...
Sayfa yükleniyor ...
Sayfa yükleniyor ...
Sayfa yükleniyor ...
Sayfa yükleniyor ...
Sayfa yükleniyor ...
Sayfa yükleniyor ...
Sayfa yükleniyor ...
Sayfa yükleniyor ...
Sayfa yükleniyor ...
Sayfa yükleniyor ...
Sayfa yükleniyor ...
Sayfa yükleniyor ...
Sayfa yükleniyor ...
Sayfa yükleniyor ...
Sayfa yükleniyor ...
Sayfa yükleniyor ...
Sayfa yükleniyor ...
Sayfa yükleniyor ...
Sayfa yükleniyor ...
Sayfa yükleniyor ...
Sayfa yükleniyor ...
Sayfa yükleniyor ...
Sayfa yükleniyor ...
Sayfa yükleniyor ...
Sayfa yükleniyor ...
Sayfa yükleniyor ...
Sayfa yükleniyor ...
Sayfa yükleniyor ...
Sayfa yükleniyor ...
Sayfa yükleniyor ...
Sayfa yükleniyor ...
Sayfa yükleniyor ...
Sayfa yükleniyor ...
-
 1
1
-
 2
2
-
 3
3
-
 4
4
-
 5
5
-
 6
6
-
 7
7
-
 8
8
-
 9
9
-
 10
10
-
 11
11
-
 12
12
-
 13
13
-
 14
14
-
 15
15
-
 16
16
-
 17
17
-
 18
18
-
 19
19
-
 20
20
-
 21
21
-
 22
22
-
 23
23
-
 24
24
-
 25
25
-
 26
26
-
 27
27
-
 28
28
-
 29
29
-
 30
30
-
 31
31
-
 32
32
-
 33
33
-
 34
34
-
 35
35
-
 36
36
-
 37
37
-
 38
38
-
 39
39
-
 40
40
-
 41
41
-
 42
42
-
 43
43
-
 44
44
-
 45
45
-
 46
46
-
 47
47
-
 48
48
-
 49
49
-
 50
50
-
 51
51
-
 52
52
-
 53
53
-
 54
54
-
 55
55
-
 56
56
-
 57
57
-
 58
58
-
 59
59
-
 60
60
-
 61
61
-
 62
62
-
 63
63
-
 64
64
-
 65
65
-
 66
66
-
 67
67
-
 68
68
-
 69
69
-
 70
70
-
 71
71
-
 72
72
-
 73
73
-
 74
74
-
 75
75
-
 76
76
-
 77
77
-
 78
78
-
 79
79
-
 80
80
-
 81
81
-
 82
82
-
 83
83
-
 84
84
-
 85
85
-
 86
86
-
 87
87
-
 88
88
-
 89
89
-
 90
90
-
 91
91
-
 92
92
-
 93
93
-
 94
94
-
 95
95
-
 96
96
-
 97
97
-
 98
98
-
 99
99
-
 100
100
-
 101
101
-
 102
102
-
 103
103
-
 104
104
-
 105
105
-
 106
106
-
 107
107
-
 108
108
-
 109
109
-
 110
110
-
 111
111
-
 112
112
-
 113
113
-
 114
114
-
 115
115
-
 116
116
-
 117
117
-
 118
118
-
 119
119
-
 120
120
-
 121
121
-
 122
122
-
 123
123
-
 124
124
-
 125
125
-
 126
126
-
 127
127
-
 128
128
-
 129
129
-
 130
130
-
 131
131
-
 132
132


Diğer dillerde
- slovenčina: Dolmar EM331 Návod na obsluhu
- français: Dolmar EM331 Le manuel du propriétaire
- italiano: Dolmar EM331 Manuale del proprietario
- dansk: Dolmar EM331 Brugervejledning
- română: Dolmar EM331 Manualul proprietarului