
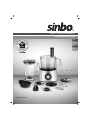
SHB 3111 MUTFAK ROBOTU
KULLANMA KILAVUZU
TR
EN
RU
AR
www.sinbo.com
700W
700W
0850
811
65 65

- 1 -

- 2 -
• Bu cihazın, afla¤ıda belirtilen yerler gibi, ev ve
benzeri uygulamalarda kullanılması amaçlanır.
• Dükkânlarda, bürolarda ve di¤er çalıflma
ortamlarındaki personele ait mutfak alanları,
• Çiftlik evleri
• Müflteriler tarafından, motellerde, otellerde
kullanılan yerler ve di¤er mesken tipi çevreler,
• Yatma yerleri ve kahvaltı yapılan ortamlar.
* Bu cihaz, güvenli bir flekilde kullan›lmas›yla ilgili
kendilerine gözetim veya talimat verilmiflse ve içermifl
oldu¤u tehlikeler kendileri taraf›ndan anlafl›lm›flsa 8
yafl ve üzeri çocuklar ve fiziksel, duyusal veya zihinsel
yetenek eksikli¤i bulunan veya tecrübe ve bilgi
eksikli¤i olan kifliler taraf›ndan kullan›labilir. Çocuklar
cihaz ile oynamamal›d›r. Temizleme ve kullan›c›
bak›m›, gözetimsiz çocuklar taraf›ndan
yap›lmamal›d›r.
Bu cihaz afla¤›daki talimat› içermelidir.
- 8 yafl›ndan küçük çocuklar›n cihaz› kullanmalar›
uygun de¤ildir. 8 yafl›ndan büyük çocuklar ancak bir
gözetmen eflli¤inde cihaz› kullanmal› ve temizli¤ini
yapmal›d›r.
- Çocuklar cihazla oynamamal›d›r.
- Gözetimsiz olarak cihaz› kullanabilecek fiziksel,
duyusal yada akli yönden eksik olanlar›n cihaz› bir
gözetmen eflli¤inde kullanmalar›na iliflkin talimat
yada e¤itilmelerine iliflkin bilgiler verilmelidir.
Cihazla oynamamalarını güvenceye almak için
çocuklar gözetim altında tutulmalıdır.

- 3 -
De¤erli Müflterimiz,
Ürün seçiminde S‹NBO'yu tercih etti¤iniz için teflekkür ederiz.
Uzun ve verimli bir kullan›m için cihaz› kullanmadan önce bu k›lavuzu özellikle güvenlik
talimatlar›na dikkat ederek okuman›z› ve devaml› suretle saklaman›z› tavsiye ederiz.
Sayg›lar›m›zla
Sinbo Küçük Ev Aletleri
SINBO SHB 3111 MUTFAK ROBOTU
KULLANIM KILAVUZU
ÖNEML‹ GÜVENL‹K TAL‹MATI
Elektrikli cihazlar› kullan›rken temel güvenlik önlemlerini mutlaka göz önünde
bulundurman›z gerekmektedir:
1. Cihaz› kullanmaya bafllamadan önce lütfen talimat›n tümünü sonuna kadar okuyup
baflvuru kayna¤› olarak saklay›n›z.
2. Bu cihaz yaln›zca evde kullan›ma yöneliktir.
3. Bu cihaz, cihazlar›n kullan›lmas›nda güvenlik aç›s›ndan sorumluluk üstlenebilecek bir
kiflinin gözetimi ve yönlendirmesi olmadan fiziksel, duyusal ya da zihinsel engeli olan
kifliler (çocuklar dâhil), bu konuda bilgi ya da deneyim sahibi olmayan kifliler taraf›ndan
kullan›lmamal›d›r.
4. Çocuklar›n cihazla oynamas›na engel olmak için yeterli gözetim yap›lmal›d›r.
5. Güç kablosunun ar›zalanmas› durumunda tehlikelerin önlenmesi için cihaz› kullanmaya
devam etmeden önce kablo üretici, servis yetkilisi ya da benzer bir ehliyetli kifli taraf›ndan
de¤ifltirilmelidir.
6. Bu cihaz aksesuarlar yerine tam olarak tak›lmad›¤› takdirde cihaz›n çal›flmas›na izin
vermeyen bir güvenlik tertibat›yla donat›lm›flt›r.
7. Bu cihaz yüksek s›cakl›klara karfl› koruma sa¤layan bir koruyucu cihaz içermektedir.
S›cakl›¤›n çok yükselmesi durumunda cihaz otomatik olarak kapanacakt›r ve motor yeterli
derecede so¤uduktan sonra yeniden çal›fl›r hale gelecektir (yaklafl›k 15 dakika sonra).
8. Cihaz› bir dakikadan daha uzun bir süre kesintisiz olarak çal›flt›rmay›n›z.
9. ‹fllemin 1 dakika içinde tamamlanmamas› durumunda cihaz› yeniden çal›flt›rmaya
bafllamadan önce makineyi kapat›n›z ve 10 dakika boyunca so¤umas›n› bekleyiniz. Cihaz›
5 seferden fazla kullanman›z gerekiyorsa sonraki 5 kullan›mdan önce 90 dakika bekleyerek
cihaz›n oda s›cakl›¤›na ulaflacak flekilde so¤umas›n› sa¤lay›n›z. Bu yaklafl›m cihaz›n
kullan›m ömrünün uzamas›n› sa¤layacakt›r.
10. Cihaz çal›fl›rken eriflilebilir yüzeylerin s›cakl›¤› yüksek olabilir.
11. Elektrik flokuna, yang›na ya da yaralanmaya maruz kalmamak için kabloyu, fifli ya da
motor gövdesini suya ya da herhangi baflka bir s›v›ya sokmay›n›z.
12. Elektrik floku tehlikesine karfl› prizinizin toprakl› olmas›na dikkat ediniz. Prizin güvenli
bir flekilde tak›ld›¤›ndan emin olunuz.

- 4 -
13. Cihaz kullan›lmad›¤› zamanlarda ya da temizlenmeden önce fiflten çekilmelidir.
14. Cihaz›n gövdesini kesinlikle suya sokmay›n›z ya da muslu¤un alt›nda y›kamaya
kalk›flmay›n›z.
15. Malzemeleri cihaza parmaklar›n›z› ya da baflka cisimleri kullanarak sokmaya
kalk›flmay›n›z (b›çak gibi), mutlaka ürünle birlikte verilen itici tokma¤› kullan›n›z.
16. B›çaklar› ve aksesuarlar› özellikle takma, ç›karma ve temizlik s›ras›nda tutarken çok
dikkatli olunuz. B›çaklar çok keskindir.
17. Güç kablosunun masa ya da tezgâh kenar›ndan sarkmamas› ya da s›cak yüzeylerle
temas etmemesi gerekir.
18. Cihaz› gaz ç›k›fllar›n›n ya da elektrikli ocaklar›n ya da s›cak f›r›nlar›n yak›n›na
koymay›n›z.
19. Cihaz›n fiflini çekmeden önce ve kâseyi ç›karmadan önce tüm parçalar›n durmas›n›
bekleyiniz.
20. Teknik özellikler bölümünde belirtilen malzeme miktarlar›n› aflmamaya özen gösteriniz.
21. Cihaz› daima do¤ru flekilde topraklanm›fl bir elektrik kayna¤›na ba¤layarak kullan›n›z.
22. Cihazlar harici bir zamanlay›c› ya da uzaktan kumanda sistemi kullan›larak
çal›flt›r›lmamal›d›r.
NOT: Cihaz›n›z› kesinlikle toprak hatl› prizde kullan›n›z.
- Uyar›: Bu cihaz› tasarlanan kullan›m› d›fl›nda kullanmaya kalk›flmay›n›z
Bu cihaz ev ve benzeri ortamlarda kullan›ma yöneliktir:
- ma¤azalardaki, ofislerdeki veya di¤er çal›flma ortamlar›ndaki personel mutfaklar›;
- çiftlik evleri;
- otel, motel ve benzeri mekânlarda bulunan müflteriler taraf›ndan;
- yatak ve kahvalt› tarz› ortamlar.
- Cihaz harici bir zamanlay›c› veya ayr› uzaktan kontrol sistemleriyle kullan›lmak üzere
tasarlanmam›flt›r.
- Bu cihaz, gözetim alt›nda olduklar› ya da cihaz›n kullan›m›na dair ilgili talimatlar
kendilerine verildi¤i takdirde 8 yafl ve üzeri çocuklar taraf›ndan, fiziksel, duyusal ve
zihinsel becerileri s›n›rl› veya deneyim ve bilgi eksikli¤i olan kifliler taraf›ndan kullan›labilir.
8 yafl›ndan büyük olmad›klar› ve gözetim alt›nda olmad›klar› takdirde, cihaz›n temizlenmesi
ve kullan›c› bak›m› çocuklar taraf›ndan yap›lmamal›d›r.
- Cihaz› ve kablosunu 8 yafl›ndan küçük çocuklar›n eriflemeyece¤i yerlerde saklay›n.
TEKN‹K ÖZELL‹KLER
Voltaj: AC230V
Frekans: 50Hz
Güç: 700W
Kapasite: Kuru malzemeler için 2-Litre kapasite
S›v› malzemeler için 1,2-Litre kapasite

- 5 -
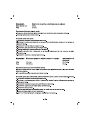
GENEL B‹LG‹
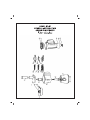
1. Motor Ünitesi, 2. Motor Mili, 3. Kase, 4. B›çak Adaptörü, 5. Kase Kapa¤›, 6. ‹tici tokmak
7. Disk Tutucu, 8. Dilimleme Diski, 9. K›y›c› Diski, 10. Parmak Patates Diski, 11. Do¤ray›c›
12. Yo¤urma Diski, 13. Bulamaç Haz›rlama Diski, 14. Narenciye S›kaca¤› Plakas›,
15. Narenciye S›kaca¤› Bafll›¤›, 16. Blender Ölçü Kab›, 17. Blender Sürahisi Kapa¤›,
18. Blender Sürahisi, 19. Blender B›ça¤›, 20. Güç Aktar›c›,
‹LK KULLANIMDAN ÖNCE
Cihaz› ambalaj›ndan ç›kard›ktan sonra kullanmaya bafllamadan önce cihaz›n parçalar›n›
sökünüz. Yönergeler için “MUTFAK ROBOTUNUN SÖKÜLMES‹” bölümüne bak›n›z.
Motor gövdesi hariç olmak üzere tüm parçalar› s›cak, sabunlu suyla y›kay›n›z. Durulay›p
kurulay›n›z. MOTOR GÖVDES‹N‹ KES‹NL‹KLE SUYA SOKMAYINIZ.
C‹HAZIN KULLANIMI
• Ba¤lantı veya Montajın Nasıl Yapılaca¤ını Gösterir fiema ile Ba¤lantı veya Montajın
Kimin Tarafından Yapılaca¤ına (tüketici, yetkili servis) iliflkin bilgiler
MONTAJ
Do¤ray›c›n›n Tak›lmas›
1. Motor milini motor gövdesinin üstüne konumland›r›n›z.
2. Kaseyi Motor miline hizalay›n›z ve saat yönünde çevirerek motor gövdesine oturmas›n›
sa¤lay›n›z.
3. B›çak adaptörünü motor miline tak›n›z.
4. Do¤ray›c›y› b›çak adaptörüne tak›n›z.
5. Do¤ray›c›y› do¤ru konuma getiriniz.
6. Kasenin kapa¤›n› kapat›n›z ve kapak kaseye kilitlenene kadar saat yönünde çeviriniz.
7. ‹tici tokma¤› besleme hunisine yerlefltiriniz
Malzeme Tek ifllemede kullan›lacak miktar
Çikolata ≤100g
Peynir ≤200g
Et ≤500g
Çay ya da Baharat 50~100g
Meyve ve Sebze 100~300g
So¤an ≤500g
Notlar (Do¤ray›c›):
- Cihaz›n içine malzemeleri koymadan önce do¤ray›c›y› kaseye yerlefltiriniz.
- Malzemeleri gere¤inden fazla ifllememek için anl›k çal›flt›rma özelli¤ini kullan›n›z. Sert
peynir ya da çikolata keserken cihaz› çok uzun süre çal›flt›rmay›n›z. Aksi takdirde
malzemeler çok fazla ›s›n›p erimeye bafllar.
- Standart do¤rama süresi: 30-60 sn.

- 6 -
Yo¤urma Diskinin Tak›lmas›
1. Motor milini motor gövdesinin üstüne konumland›r›n›z.
2. Kaseyi Motor miline hizalay›n›z ve saat yönünde çevirerek motor gövdesine oturmas›n›
sa¤lay›n›z.
3. B›çak adaptörünü motor miline tak›n›z.
4. Yo¤urma diskini b›çak adaptörüne tak›n›z.
5. Yo¤urma diskini do¤ru konuma getiriniz.
6. Kasenin kapa¤›n› kapat›n›z ve kapak kaseye kilitlenene kadar saat yönünde çeviriniz.
7. ‹tici tokma¤› besleme hunisine yerlefltiriniz
Malzeme Tek ifllemede kullan›lacak miktar
Un / Yumuflak Peynir ≤300g
Yumurta ≤5 adet
Notlar (Yo¤urma Diski):
- Cihaz›n içine malzemeleri koymadan önce yo¤urma diskini kaseye yerlefltiriniz.
- Standart yo¤urma süresi: 30sn.
Bulamaç Diskinin Tak›lmas›
1. Motor milini motor gövdesinin üstüne konumland›r›n›z.
2. Kaseyi Motor miline hizalay›n›z ve saat yönünde çevirerek motor gövdesine oturmas›n›
sa¤lay›n›z.
3. B›çak adaptörünü motor miline tak›n›z.
4. Bulamaç diskini b›çak adaptörüne tak›n›z.
5. Bulamaç diskini do¤ru konuma getiriniz.
6. Kasenin kapa¤›n› kapat›n›z ve kapak kaseye kilitlenene kadar saat yönünde çeviriniz.
7. ‹tici tokma¤› besleme hunisine yerlefltiriniz
Malzeme Tek ifllemede kullan›lacak miktar Tek ifllemede kullan›lacak süre
Yumurta 2~5adet 30~70sn.
Peynir 125~350ml 20sn.
Notlar (Bulamaç Diski):
- Bulamaç Diski peynir ve yumurta kar›flt›rmak, mayonez yapmak ve puding haz›rlamak
için kullan›labilir.
- Bulamaç diskini hamur yo¤urmak için kullanmay›n›z.
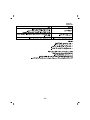
Dilimleme Diski, K›yma Diski ve Parmak Patates Kesme Diskinin Tak›lmas›
1. Motor milini motor gövdesinin üstüne konumland›r›n›z.
2. Kâseyi Motor miline hizalay›n›z ve saat yönünde çevirerek motor gövdesine oturmas›n›
sa¤lay›n›z.

- 7 -
3. ‹stedi¤iniz diski disk tutucuya tak›n›z.
4. Disk tutucuyu motor miline tak›n›z.
5. Kâsenin kapa¤›n› tak›n›z
6. Kapa¤› kâseye oturana kadar ters saat yönünde çeviriniz.
7. Besleme hunisinden malzemeleri doldurunuz.
8. Malzemeleri cihaz›n içine itmek için itme tokma¤›n› kullan›n›z.
Notlar:
- ‹fllenecek malzeme ve iflleme flekline uygun diski seçiniz.
- Malzemeleri besleme hunisinden doldururken yavafl bir flekilde itiniz.
- Malzemeleri besleme hunisinden içeri doldurmadan önce küçük parçalara bölünüz.
- Daha iyi bir etki elde etmek için malzemeleri azar azar doldurunuz. Yumuflak malzemeleri
keserken malzemenin sulanmas›n› önlemek için düflük h›zlar› tercih ediniz. Büyük
miktarlarda malzemelerin ifllenmesi gerekiyorsa malzemeyi birkaç seferde iflleyiniz.
Tek seferde 1200 ml malzeme ifllenebilir.
Narenciye S›kaca¤›n›n Tak›lmas›
1. Motor milini motor gövdesinin üstüne konumland›r›n›z.
2. Kâseyi Motor miline hizalay›n›z ve saat yönünde çevirerek motor gövdesine oturmas›n›
sa¤lay›n›z.
3. Narenciye s›kaca¤› plakas›n› kâseye yerlefltiriniz ve saat yönünde 30 derece çeviriniz.
Notlar (Narenciye S›kaca¤›):
- Narenciye s›kaca¤› düflük h›zda kullan›lmal›d›r.
Blenderin Tak›lmas›
1. B›çak altl›¤›n›n yerine s›k›ca oturdu¤undan emin olunuz.
2. Sürahiye malzemeleri doldurunuz.
3. Ölçü kab›n› ve kapa¤› do¤ru flekilde tak›n›z.
4. Blender sürahisini motor taban›na dik flekilde yerlefltiriniz ve sürahiyi saat yönünde
çevirerek sabitleyiniz.
‹puçlar› ve Uyar›lar
‹flleme tam olarak bafllamadan önce ön-kar›flt›rma yapmak amac›yla ANLIK ÇALIfiTIRMA
özelli¤ini kullan›n›z.
Tek seferde en fazla 1800 ml malzeme iflleyiniz.
Cihaz› çal›flt›rmadan önce b›çak altl›¤›n›n yerine tam olarak oturdu¤undan emin olunuz.
‹fllem s›ras›nda malzeme eklemek için ölçü kab›n› kullan›n›z.
SÖKME
1. ‹tici tokma¤› ç›kar›n›z. Kapa¤› ters saat yönünde çeviriniz, yukar› kald›rarak ç›kar›n›z.

2. B›çak tutucuyu motor milinden ç›kar›n›z.
3. B›ça¤› yukar› do¤ru çekerek b›çak tutucudan ay›r›n›z.
4. Kaseti ters saat yönünde çevirerek motor gövdesinden sökünüz. Yukar› do¤ru kald›rarak
ç›kar›n›z.
KULLANIM HATALARINA ‹L‹fiK‹N B‹LG‹LER
Cihazınızı, beyan edilen voltaj ile çal›flt›r›n›z. Bulundu¤unuz yerin voltaj›n›n uygun olup
olmad›¤›n› kontrol ediniz.
Güç kablosunun ar›zalanmas› durumunda tehlikelerin önlenmesi için kablo üretici, servis
merkezi ya da benzer bir ehliyetli kifli taraf›ndan de¤ifltirilmelidir. Ar›za durumunda
cihaz›kendiniz sökmeye kalk›flmay›n›z, bak›m merkezimiz ya da sat›fl sonras› hizmet
merkezimiz ile ba¤lant›ya geçiniz.
Cihaz› kendiniz onarmaya kalk›flmay›n›z. Meydana gelebilecek ar›zalardan firmam›z
kesinlikle sorumlu de¤ildir, ve cihaz›n›z garanti kapsam› d›fl›nda ifllem görecektir.
BAKIM ve TEM‹ZL‹K
• Tüketicinin Kendi Yapabilece¤i Bakım, Onarım veya Ürünün Temizli¤ine ‹liflkin Bilgiler
Cihaz›n›z› temizlemeden önce fiflini çekiniz!
Cihaz›n›z›n d›fl k›sm›n› gerekiyorsa hafifçe nemlendirilmifl bir bezle herhangi temizlik
malzemesi kullanmadan temizleyiniz.
C‹HAZIN H‹ÇB‹R PARÇASINI OTOMAT‹K BULAfiIK MAK‹NES‹NDE YIKAMAYINIZ.
MOTOR GÖVDES‹N‹ KES‹NL‹KLE SUYA SOKMAYINIZ.
• Periyodik Bakım Gerektirmesi Durumunda, Periyodik Bakımın Yapılaca¤ı Zaman
Aralıkları ile Kimin Tarafından Yapılması Gerekti¤ine ‹liflkin Bilgiler
Cihaz periyodik bak›m gerektirmez.
Her kullan›mdan sonra temizli¤inin yap›lmas›nda fayda vard›r.
SORUN G‹DERME
Sorun: Makine çal›flm›yor.
Çözüm: Parçalar›n do¤ru flekilde tak›lm›fl oldu¤undan emin olunuz.
Fiflin prize do¤ru flekilde tak›lm›fl oldu¤undan emin olunuz.
Sigortan›n at›p atmad›¤›n› ve güç kesintisi olup olmad›¤›n› kontrol ediniz.
Sorun: Makine çal›fl›rken aniden duruyor.
Çözüm: Kase, zorlu iflleme çal›flmas› nedeniyle gevflemifl olabilir. Kase kapa¤›n› yeniden
tak›n›z.
Sorun: Motor çal›fl›yor ama parçalar hareket etmiyor.
Çözüm: Motor milinin do¤ru flekilde tak›ld›¤›ndan emin olunuz.
- 8 -

- 9 -
TAfiIMA ESNASINDA
* Ürünü düflürmeyiniz,
* Darbelere maruz kalmamas›n› sa¤lay›n›z,
* S›k›flmamas›n›, ezilmemesini sa¤lay›n›z,
* Ambalaj üzerindeki iflaretlemelere uyunuz.
ÇEVRE DOSTU ELDEN ÇIKARMA
Çevre korunmas›na sizde katk›da bulunabilirsiniz!
Lütfen yerel düzenlemelere uymay› unutmay›n.
Çal›flmayan elektrikli cihazlar› uygun elden ç›karma merkezlerine götürünüz.
Kullan›m s›ras›nda insan ve çevre sa¤l›¤›na tehlikeli ve zararl› olabilecek bir durum söz
konusu de¤ildir.
Made in Turkey
‹mal Y›l› : 04-2017
EEE Yönetmeli¤ine uygundur.
AEEE Yönetmeli¤ine uygundur.
ÜRET‹C‹ F‹RMA
DE‹MA ELEKTROMEKAN‹K ÜRÜNLER
‹NfiAAT SPOR MALZEMELER‹ ‹MALAT SAN.
VE T‹C. A.fi.
Cihangir Mh. Güvercin Cd. No:4 Haramidere
Mevkii Avcılar - ‹stanbul - Türkiye
Ça¤rı Merkezi: 0850 811 65 65
www.sinbo.com - [email protected]

- 10 -
ENGLISH
SINBO SHB 3111 KITCHEN ROBOT
INSTRUCTIONS FOR USE
IMPORTANT SAFETY WARNINGS
When using electrical appliances, you must observe fundamental safety precautions:
1. Read this manual entirely before using your device and keep it for future reference.
2. This appliance is intended for use at home.
3. This appliance should not be used by physically, sensually or mentally handicapped
ones (including children) without supervision and guidance of someone who can undertake
the responsibility for safety but by the ones who are sufficiently informed and experienced
about the use.
4. Close supervision is required to ensure that children don't play with the appliance.
5. If the power cable is damaged, to avoid any risk hazards, it must be changed by the
manufacturer, service organization or a likewise qualified technician.
6. This appliance is equipped with a safety assembly that does not allow the appliance
to operate if the accessories are not properly installed.
7. This appliance includes a protective device against high temperatures. If the temperature
is too high, the appliance will shut down automatically and will be available for using
after a sufficient cool down (approximately 15 minutes).
8. Do not operate the device uninterrupted for over a minute.
9. If the process will not be able to be completed in 1 minute, shut down the appliance
before re-using and wait for it to cool down for 10 minutes. If you have to use the appliance
for more than 5 times, wait 90 minutes before using it 5 times to cool down and reach
room temperature. This utilization will increase the product usage life.
10. The temperature of accessible surfaces may be hot while the appliance is on.
11. In order to avoid electrical shock, fire or injury, do not submerge the cable, plug or
the motor body to water or any other liquid.
12. Ensure that the socket is grounded against electric shock risk. Make sure that the
socket is installed safely.
13. The appliance shall be unplugged when not utilized or before cleaning.
14. Do not submerge the device's body into water or do not try to wash it under running
water.
15. To not try to insert the materials inside the appliance using your fingers or any other
material (such as blades), use the pushing gavel.
16. Be extremely careful when handling blades and accessories, especially for inserting,
removing or cleaning. Blades are very sharp.
17. The power cable shall not sag from near a table or a counter and shall not come into
contact with hot surfaces.
18. Do not place the appliance near the gas exhaust or electrical ovens or hot ovens.
19. Before unplugging the device and removing the bowl, wait for all moving parts to

- 11 -
stop.
20. Ensure that you do not exceed the material volume indicated in the technical properties
section.
21. Always use the appliance with a grounded mains socket.
22. The appliances shall not be used with an external timer or a remote control system.
23. Be careful if hot liquid is poured into the food processor or blender as it can be ejected
out of the appliance due to a sudden steaming.
24. Switch off the appliance and disconnect from supply before changing accessories or
approaching parts that move in use.
NOTE: Use your appliance only with a grounded mains socket.
- Warning: Do not use this appliance for any other purpose than its intended purpose
This appliance is for use in home and similar environments:
- personnel kitchens in stores, offices or other work environments;
- ranches;
- customers in hotels, motels and similar environments;
- bed and breakfast environments.
- The appliance is not designed to be operated by an external timer or a separate remote
control system.
- This appliance can be operated by children of 8 years and above, people with limited
physical, auditory and cognitive skills or people with lack of experience and knowledge
as long as they are under supervision or they are provided instructions regarding the
operation of the appliance. In case they are not older than 8 years old or unsupervised,
children should not clean or maintain the product.
- Keep the appliance and its cable from the reach of children aged <8.
TECHNICAL SPECIFICATIONS
Voltage: AC230V
Frequency: 50Hz
Power: 700W
Capacity: 2 Liters capacity for dry materials
1.2 Liters capacity for liquid materials
GENERAL INFORMATION
1. Motor Unit, 2. Motor Mill, 3. Bowl, 4. Blade Adapter, 5. Bowl Cap, 6. Pushing Gavel
7. Disk Holder, 8. Slicing Disk, 9. Mincing Disk, 10. French Fries Disk, 11. Chopper,
12. Kneading Disk, 13. Slurry Maker Disk, 14. Citrus Juicer Plate, 15. Citrus Juicer Cap,
16. Blender Measurement Cap, 17. Blender Decanter Cap, 18. Blender Decanter,
19. Blender Blade, 20. Power Transmitter

- 12 -
BEFORE FIRST USE
After removing the package, remove the appliance parts before utilization. For instructions,
see “REMOVING THE PARTS OF KITCHEN ROBOT”.
Excluding the motor body, wash all parts with soapy water. Rinse and dry.
DO NOT SUBMERGE MOTOR BODY INTO WATER.
INSTALLATION
Installing the Chopper
1. Align the motor mill on the motor body.
2. Align the Bowl with the Motor mill and place it on the motor body by turning it clockwise.
3. Place the blade adapter on the motor mill.
4. Place the chopper on the blade adapter.
5. Bring the chopper to the right position.
6. Close the bowl cap and turn it clockwise until the cap locks onto the bowl.
7. Place the pushing gavel to feeding funnel.
Material Amount to be used in single operation
Chocolate ≤100g
Cheese ≤200g
Meat ≤500g
Tea or Spice 50~100g
Fruit or Vegetables 100~300g
Onion ≤500g
Notes (Chopper):
- Place the chopper in the bowl before placing the materials.
- To avoid over-processing the materials, adopt momentary operation. Do not utilize the
appliance for an excessive duration when processing hard cheese or chocolate. Otherwise
the materials will heat up and melt.
- Standard chopping duration: 30-60 secs.
Placing the Kneading Disk
1. Align the motor mill on the motor body.
2. Align the Bowl with the Motor mill and place it on the motor body by turning it clockwise.
3. Place the blade adapter on the motor mill.
4. Place the kneading disk on the blade adapter.
5. Bring the kneading disk to the right position.
6. Close the bowl cap and turn it clockwise until the cap locks onto the bowl.
7. Place the pushing gavel to feeding funnel.

- 13 -
Material Amount to be used in single operation
Flour / Soft Cheese ≤300g
Eggs ≤5 pcs
Notes (Kneading Disk)
- Place the kneading disk in the bowl before placing the materials.
- Standard kneading duration: 30 secs.
Placing the Slurry Maker Disk
1. Align the motor mill on the motor body.
2. Align the Bowl with the Motor mill and place it on the motor body by turning it clockwise.
3. Place the blade adapter on the motor mill.
4. Place the slurry maker disk on the blade adapter.
5. Bring the slurry maker disk to the right position.
6. Close the bowl cap and turn it clockwise until the cap locks onto the bowl.
7. Place the pushing gavel to feeding funnel.
Material Amount to be used in single operation Duration in single operation
Eggs 2~5 pcs 30~70secs.
Cheese 125~350ml 20sn.
Notes (Slurry Maker Disk)
- Slurry Maker Disk can be used to scramble eggs, make mayonnaise and pudding.
- Do not use slurry maker disk for kneading.
Placing the Slicing Disk, Mincing Disk and French Fries Cutter Disk
1. Align the motor mill on the motor body.
2. Align the Bowl with the Motor mill and place it on the motor body by turning it clockwise.
3. Place the disk you want on the disk holder.
4. Place the disk holder on the motor mill.
5. Put on the bowl cap
6. Turn it counter clockwise until the cap is locked on the bowl.
7. Place the materials through the feeding funnel.
8. Use the pushing gavel to push the materials inside the appliance.
Notes :
- Select the disk suitable for the materials and the procedure.
- As you fill the materials through the feeding funnel, push gently.
- Chop the materials into small bits before feeding them through the feeding funnel.
- In order to get a better result, place the materials in small amounts. As you cut the
soft materials, in order to avoid getting the materials wet, prefer lower speeds. If the

- 14 -
materials are to be processed at higher speeds, process the materials in a limited number
of operations. At one go, 1200 ml material can be processed.
Placing the Citrus Juicer
1. Align the motor mill on the motor body.
2. Align the Bowl with the Motor mill and place it on the motor body by turning it clockwise.
3. Place the citrus juicer plate to the bowl and turn 30 degrees clockwise.
Notes (Citrus Juicer):
- The citrus juicer shall be used at low speeds.
Placing the Blender
1. Ensure that the lower part of the blade is tightly locked in its place.
2. Fill the decanter with materials.
3. Place the measurement bowl and cap correctly.
4. Place the blender decanter perpendicular to the motor base and lock it in place by
turning it clockwise.
Hints and Warnings
Before fully starting processing, use INSTANTANOUS OPERATION feature to pre-mix.
Process at most 1800 ml materials in one go.
Before operating the appliance, ensure that the lower part of the blade is locked in its
place.
During processing, use the measurement bowl to add materials
DISASSEMBLY
1. Remove the pushing gavel. Turn the cap counter clockwise, lift it up and remove it.
2. Remove the blade holder from the motor mill.
3. Pull the blades up to remove from blade holder.
4. Turn the cassette counter clockwise and remove it from the motor body. Remove it
by lifting it up.
CLEANING
Unplug the appliance before cleaning it!
Clean the outer side of the appliance using a wet cloth and without using any cleaning
agent if required.
DO NOT WASH ANY PART OF THE APPLIANCE IN DISHWASHER.
DO NOT SUBMERGE MOTOR BODY INTO WATER.

- 15 -
TROUBLESHOOTING
Problem: The appliance is not working.
Solution: Make sure the parts have been correctly inserted.
Solution: Make sure the plug have been correctly inserted.
Solution: Check whether the fuse switch is triggered or there is a power outage.
Problem: Machine suddenly stops as being operated.
Solution: The bowl may be loose due to excessive operation. Refit the bowl cap.
Problem: The motor is working but the parts are not moving.
Solution: Make sure the motor mill is inserted correctly.
WHILE HANDLING
* Do not drop the product,
* Ensure it does not suffer impact,
* Ensure it doesn't get crushed or squeezed,
* Observe the marks on the packaging.
ENVIRONMENT FRIENDLY DISPOSAL
You can also contribute to environmental protection!
Please do not forget to adhere to local regulations.
Take the non-operational electrical appliance to the suitable disposal centers.
There is no situation that might harm human health or the environment during use.


Sayfa yükleniyor...
Sayfa yükleniyor...
Sayfa yükleniyor...
Sayfa yükleniyor...
Sayfa yükleniyor...
Sayfa yükleniyor...
Sayfa yükleniyor...
Sayfa yükleniyor...
Sayfa yükleniyor...
Sayfa yükleniyor...
Sayfa yükleniyor...
Sayfa yükleniyor...
-
 1
1
-
 2
2
-
 3
3
-
 4
4
-
 5
5
-
 6
6
-
 7
7
-
 8
8
-
 9
9
-
 10
10
-
 11
11
-
 12
12
-
 13
13
-
 14
14
-
 15
15
-
 16
16
-
 17
17
-
 18
18
-
 19
19
-
 20
20
-
 21
21
-
 22
22
-
 23
23
-
 24
24
-
 25
25
-
 26
26
-
 27
27
-
 28
28
-
 29
29
-
 30
30
-
 31
31
-
 32
32


diğer dillerde
- English: Sinbo SHB 3111 User guide
İlgili makaleler
-
Sinbo SHB 3112 Kullanici rehberi
-
-
-
-
-
Sinbo SHB 3062 Kullanici rehberi
-
Sinbo SEB 5803 Kullanici rehberi
-
-
-