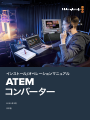
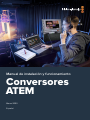
Blackmagic ATEM Converters Kullanım kılavuzu
- Tip
- Kullanım kılavuzu


Welcome
Thank you for purchasing a Blackmagic Design converter for your live production work!
ATEM Camera Converter and ATEM Studio Converter allows you to extend your broadcast
SDI and consumer HDMI cameras using low cost optical fiber! Imagine connecting to cameras
at remote locations on racing tracks, live sporting venues or even massive golf courses!
With ATEM Camera Converter you can have more cameras closer to the action for the most
amazing shots in live production! ATEM Camera Converter not only converts your camera to
optical fiber, but it also includes talkback, external microphone input, program return feed,
tally and built in battery power source! You can place cameras in multiple locations miles away
from your switcher while keeping full broadcast HD video quality!
ATEM Studio Converter is the perfect partner for your ATEM Camera Converters for internally
distributed program output and talkback support. Multiple ATEM Studio Converters can be
looped to allow talkback support to more than 4 cameras. ATEM Talkback Converter 4K gives
you even more camera connections with the option to install optical fiber SFPs if you need
long cable lengths, plus you get 12G-SDI support for Ultra HD 2160p60 video. When using
ATEM Converters with ATEMSwitchers and Blackmagic Studio Cameras, you get professional
video equipment designed to work together for an amazing live production experience!
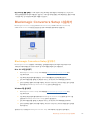
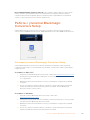
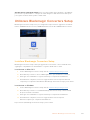
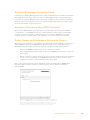
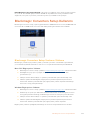
Blackmagic Converters Setup is used to change settings and update the internal software
in your ATEM converter. The latest version of Blackmagic Converters Setup can always be
downloaded from our website at www.blackmagicdesign.com/support. We think it should
take you approximately 5 minutes to complete installation. Before you install Blackmagic
Converters Setup, please check our website and click the support page to download the
latest updates to this manual and Blackmagic Converters Setup software or you can follow
us on Twitter to get notifications of any software updates. Lastly, please register your
ATEM Camera Converter or ATEM Studio Converter when downloading software updates.
We would love to keep you updated on new software updates and new features for your
ATEM converters. Perhaps you can even send us any suggestions for improvements to the
converters. We are constantly working on new features and improvements, so we would love
to hear from you!
Grant Petty
CEO Blackmagic Design
English

Getting Started 5
Introducing ATEM Converters 5
Connecting ATEM Camera Converter 6
Connecting ATEM Studio Converter 8
Connecting ATEM Talkback Converter 4K 11
Confirming your ATEM Converter Set Up 12
Using ATEM Camera Converter 14
Front Control Panel 14
Status Indicators 14
Control Panel Buttons 15
Setting the Camera Number 16
Mounting ATEM Camera Converter 16
Using ATEM Studio Converter 17
Using ATEM Talkback Converter 4K 18
Using Blackmagic Converters Setup 19
Installing Blackmagic Converters Setup 19
Removing Blackmagic Converters Setup 20
Updating your ATEM Converter’s Software 20
Setting the Tally Border and Camera Number 20
Connection Diagrams 21
Connecting to an ATEM Switcher via ATEM Talkback Converter 4K 21
Connecting to an ATEM Switcher via ATEMCamera and Studio Converters 22
Looping Multiple ATEM Converters 23
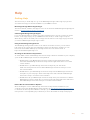
Help 24
Regulatory Notices 25
Safety Information 26
Warranty 27
Contents
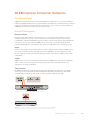
ATEM Converters

Getting Started
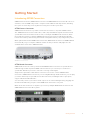
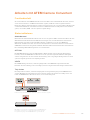
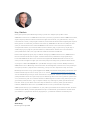
Introducing ATEM Converters
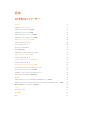
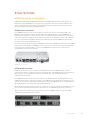
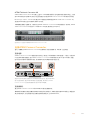
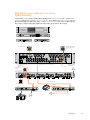
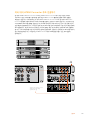
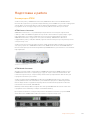
ATEM Camera Converter, ATEM Studio Converter and ATEM Talkback Converter 4K connect to
switchers, such as ATEM and provide a complete studio talkback and tally solution, including
the option of connecting over long distances using low cost fiber optic cable.
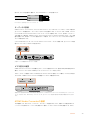
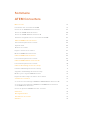
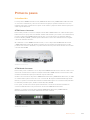
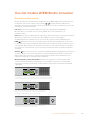
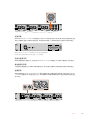
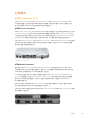
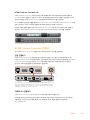
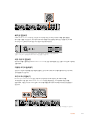
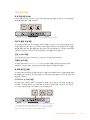
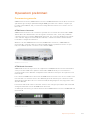
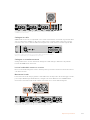
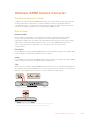
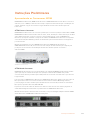
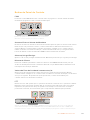
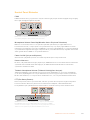
ATEM Camera Converter
ATEM Camera Converter is a portable converter that connects to any SDI or HDMI camera.
The ATEM Camera Converter sends video, audio, tally and talkback signals via bi-directional
optical fiber between itself and a remote unit, for example an ATEM Studio Converter, which
then sends the signal to a switcher. ATEM Camera Converter supports SD, HD and 3G-SDI
formats and can be powered using the internal rechargeable battery or by using mains power.
When paired with another ATEM Camera Converter, ATEM Studio Converter or ATEM Talkback
Converter 4K you get a complete talkback solution for live production. Tally lights are also
enabled when connected to ATEM switchers.
ATEM Camera Converter.
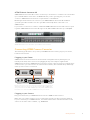
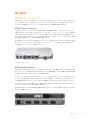
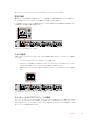
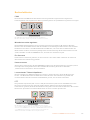
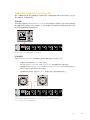
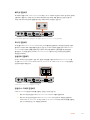
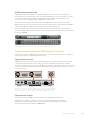
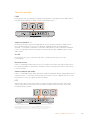
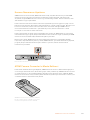
ATEM Studio Converter
ATEM Studio Converter can be partnered with ATEM Camera Converters via optical fiber for
talkback support with any SDI or HDMI cameras. This lets you convert up to 4 cameras to
optical fiber SDI when you need to run video over long cable lengths.
Single mode optical fiber cable with LC connectors are used to connect ATEM Camera
Converter to ATEM Studio Converter. If you are using Blackmagic Studio Cameras, you can plug
your video in directly via optical fiber. The SDI connections, including the fiber optic inputs,
support SD, HD and 6G-SDI video.
You can easily connect your camera audio outputs to an external mixing desk by plugging into
the balanced XLR analog outputs on the ATEM Studio Converter’s rear panel.
When more than 4 cameras are required, you can loop multiple ATEM Studio Converters and
ATEM Talkback Converter 4Ks together.
ATEM Studio Converter.
5Getting Started

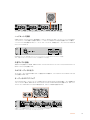
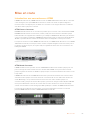
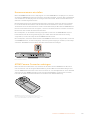
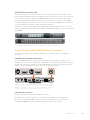
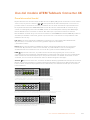
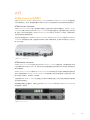
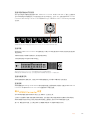
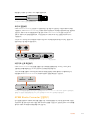
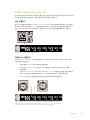
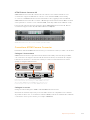
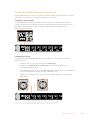
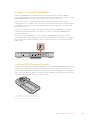
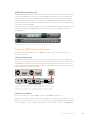
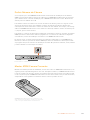
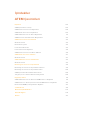
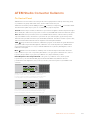
ATEM Talkback Converter 4K
ATEM Talkback Converter 4K is used to connect up to 8 cameras to a switcher via coaxial cable
up to 12G-SDI. When connected to an ATEM switcher you also get tally, plus you can also
connect to ATEM Camera Converters via optical fiber to add talkback.
Blackmagic Studio Camera can connect to your ATEM Talkback Converter 4K via BNC or
optional optical fiber modules. You also get talkback and tally when connected to an
ATEMswitcher.
If you need to connect more cameras, additional ATEM Talkback Converter 4Ks can be looped
together. ATEM Talkback Converter 4K supports SD, HD and Ultra HD video up to 2160p60.
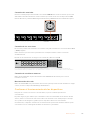
ATEM Talkback Converter 4K with 8 optional SFP modules installed.
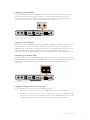
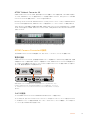
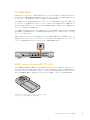
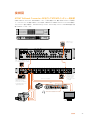
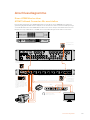
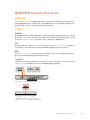
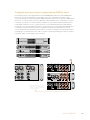
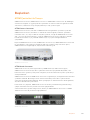
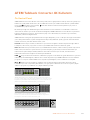
Connecting ATEM Camera Converter
The first thing you’ll want to do is power your ATEM Camera Converter, plug in your camera,
headset and a monitor.
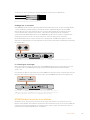
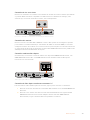
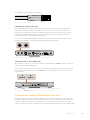
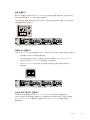
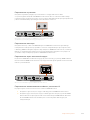
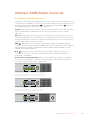
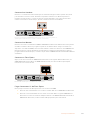
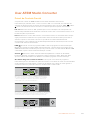
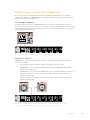
Plugging in your Power
ATEM Camera Converter features both an internal rechargeable battery which gives you
mobility in the field, and a connector for plugging in the power adaptor supplied with
ATEMCamera Converter. ATEM Camera Converter’s power connector supports an input range
of 12V to 31V so you can even use an external camera battery. The internal battery will charge
when a power source is connected.
PTTPGM
VIDEOOPTICAL
PTTPGM
VIDEOOPTICAL
PTTPGM
VIDEOOPTICAL
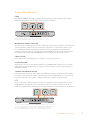
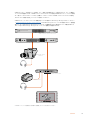
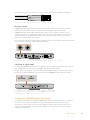
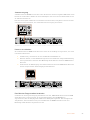
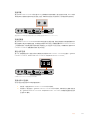
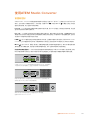
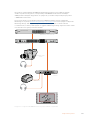
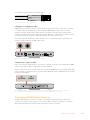
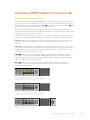
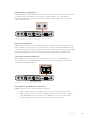
Plug in your power source and charge the internal battery via the 12V to
31V power connector. Connect your camera via the SDI or HDMI input,
and your monitor via the SDI or HDMI output. Bydefault, ATEM Camera
Converter uses embedded SDI or HDMI audio from your camera.
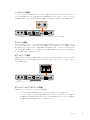
Plugging in your Camera
Plug your camera into your ATEM Camera Converter’s HDMI or SDI connector.
Make sure your camera output is set to a format supported by your live production switcher.
Ifyou’re connecting to an ATEM switcher, check the switcher video standard and then set the
camera to the same video standard, e.g., 1080i59.94.
6Getting Started

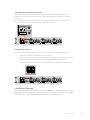
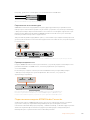
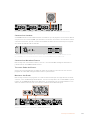
Plugging in your Headset
Plug your talkback headset into ATEM Camera Converter’s standard 3.5mm stereo analog
microphone and headphone inputs. An iPhone or Android compatible headset can be
connected using only the headphone jack. However, if you have an external microphone
connected at the same time, only the external microphone will be used.
PTTPGM
VIDEOOPTICAL
PTTPGM
VIDEOOPTICAL
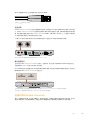
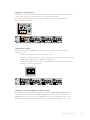
Connect your headset to ATEM Camera Converter via the standard
3.5mm headphone output and microphone input.
Plugging in your Monitor
Plug your monitor into ATEM Camera Converter’s SDI or HDMI output. Using a monitor lets you
view the camera output or the program output from a switcher. If you are connecting to an
ATEM Switcher, you’ll need to set the camera number on your ATEM Camera Converter so the
tally light will illuminate when the camera is switched to the program output. For more
information, refer to the ‘Using ATEM Camera Converter/Setting the Camera Number’ section.
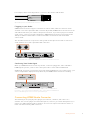
Connecting via Optical Fiber
You’ll now want to connect your ATEM Camera Converter to either a second Camera Converter,
an ATEM Talkback Converter 4K, or an ATEM Studio Converter, via duplex single mode optical
fiber cables with LC connectors. A pair of optical fiber cables are typically known as a
patch cord.
PTTPGM
VIDEOOPTICAL
PTTPGM
VIDEOOPTICAL
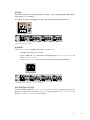
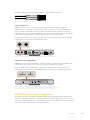
ATEM Camera Converter’s optical fiber SFP module.
Plugging in Optical Fiber LC Connectors
To plug optical fiber connectors into your ATEM Converters:
1 Plug one end of the patch cord to your ATEM Camera Converter’s SFP module.
2 Plug the other end of your patch cord to the SFP module on the second ATEM Camera
Converter. If you are connecting multiple cameras to an ATEM Talkback Converter 4K
or ATEM Studio Converter, choose SFP modules appropriate for each camera.
7Getting Started

For example, when connecting camera 1, connect to the camera 1 SFP module.
Optical fiber patch cord with two LC connectors.
Plugging in your Audio
ATEM Camera Converter supports 2 channels of camera audio, which are carried on audio
channels 1 & 2 of the optical fiber SDI connection. By default, ATEM Camera Converter uses the
embedded audio from your camera’s microphone. However, if you want to plug in an external
audio source, connect your audio equipment to ATEM Camera Converter’s two balanced 1/4”
TRS inputs. When external audio is connected it will be used instead of the embedded
camera audio.
The 1/4” TRS connectors accept stereo analog audio at microphone level and are carried on
audio channels 1 & 2 of the optical fiber SDI connection.
PTTPGM
VIDEOOPTICAL
PTTPGM
VIDEOOPTICAL
Connect external audio equipment to ATEM Camera Converter via TRS connectors.
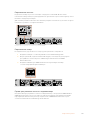
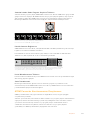
Confirming Your Video Signal
When your ATEM Camera Converter is powered, a camera is plugged in, and a valid SDI or
HDMI signal is present, you’ll see the control panel ‘video’ status indicator illuminated.
Additionally, if you have your monitor connected and the PGM button set for camera video, your
camera output will be displayed and you’ll know your ATEM Camera Converter is working.
PTTPGM
VIDEOOPTICAL
PTTPGM
VIDEOOPTICAL
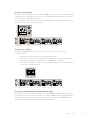
When a valid video signal is detected via SDI or HDMI, you’ll see ATEM Camera
Converter’s ‘video’ status indicator illuminated. The ‘optical’ indicator will illuminate
when a valid SDI signal is detected via the optical fiber input.
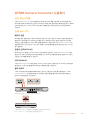
Connecting ATEM Studio Converter
The first thing to do is plug in power, plug in your cameras, a headset, and connect to a
switcher. You can also plug in an external microphone, such as a gooseneck microphone if you
want to use talkback without using a headset. You can even output each camera’s audio to a
mixer via balanced analog XLR connectors.
8Getting Started

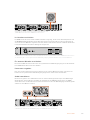
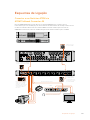
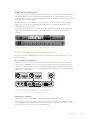
Plugging in Power
Plug in your power via your ATEM Converter’s mains power input using a standard IEC cable.
You can also connect a power adaptor or external camera battery to the 12V to 31V power input.
2 power inputs give you the option of a redundant power connection in case one supply fails or
is accidentally disconnected.
4321
OPTICAL OUT/IN
SDI OUT
L R
RL
USB 2.0
+12V BACKUP
POWER
OPTICAL OUT/IN
SDI OUT
L R
ANALOG AUDIO OUT OPTICAL OUT/IN
SDI OUT
L R
ANALOG AUDIO OUT OPTICAL OUT/IN
SDI OUT
L
OUT
R
ANALOG AUDIO OUTANALOG AUDIO OUT
IN
PGM SDI
OUT
IN
MIC
OUT
IN
H/PHONE
AES/EBU TALKBACK LOOPS
PUSH
LOCK TO TALK
PRESS TO TALK
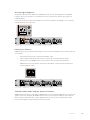
Plug in power via the mains power, or the 12V power connector.
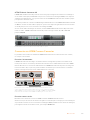
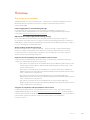
Plugging in Cameras
On the back panel of your ATEM Studio Converter, you’ll see 4 groups of connectors
numbered 1 to 4.
1 Plug your cameras into each optical fiber SFP module.
2 The second LC connector plugged into the SFP module is used to connect the program
video back to your Blackmagic Studio Camera or ATEM Camera Converter.
3 Plug each camera SDI output from your ATEM Studio Converter to the corresponding
camera inputs in your switcher.
4321
OPTICAL OUT/IN
SDI OUT
L R
RL
USB 2.0
+12V BACKUP
POWER
OPTICAL OUT/IN
SDI OUT
L R
ANALOG AUDIO OUT OPTICAL OUT/IN
SDI OUT
L R
ANALOG AUDIO OUT OPTICAL OUT/IN
SDI OUT
L
OUT
R
ANALOG AUDIO OUTANALOG AUDIO OUT
IN
PGM SDI
OUT
IN
MIC
OUT
IN
H/PHONE
AES/EBU TALKBACK LOOPS
PUSH
LOCK TO TALK
PRESS TO TALK
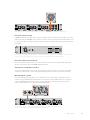
Plug your cameras into ATEM Studio Converter’s optical fiber inputs.
Plugging in the Program Feed from your Switcher
Connect the program output from your switcher to your ATEM Studio Converter’s ‘PGM SDI in’
connector. When connecting the program output from an ATEM switcher, tally is also
embedded in the SDI signal. This will enable tally lights when connected to ATEM Camera
Converters via optical fiber and Blackmagic Studio Cameras.
9Getting Started

4321
OPTICAL OUT/IN
SDI OUT
L R
RL
USB 2.0
+12V BACKUP
POWER
OPTICAL OUT/IN
SDI OUT
L R
ANALOG AUDIO OUT OPTICAL OUT/IN
SDI OUT
L R
ANALOG AUDIO OUT OPTICAL OUT/IN
SDI OUT
L
OUT
R
ANALOG AUDIO OUTANALOG AUDIO OUT
IN
PGM SDI
OUT
IN
MIC
OUT
IN
H/PHONE
AES/EBU TALKBACK LOOPS
PUSH
LOCK TO TALK
PRESS TO TALK
Plug the program SDI output from your switcher into your ATEM Studio Converter’s ‘PGM SDI’ input.
Plugging in your Headset
Your ATEM Studio Converter uses aviation headsets that plug in via the 1/4” TRS headphone
and 0.206” microphone jacks. If both a headset and an external microphone are plugged in,
only the headset will be used. Talkback audio is embedded into audio channels 15 & 16 of the
SDI signal.
4321
OPTICAL OUT/IN
SDI OUT
L R
RL
USB 2.0
+12V BACKUP
POWER
OPTICAL OUT/IN
SDI OUT
L R
ANALOG AUDIO OUT OPTICAL OUT/IN
SDI OUT
L R
ANALOG AUDIO OUT OPTICAL OUT/IN
SDI OUT
L
OUT
R
ANALOG AUDIO OUTANALOG AUDIO OUT
IN
PGM SDI
OUT
IN
MIC
OUT
IN
H/PHONE
AES/EBU TALKBACK LOOPS
PUSH
LOCK TO TALK
PRESS TO TALK
Connect your aviation headset via your ATEM Studio Converter front panel TRS connectors.
You can also plug in an external microphone via the balanced XLR analog input.
Plugging in your External Microphone
If you want to use an external microphone, plug in via the balanced XLR analog input on your
ATEM Studio Converter’s front control panel.
Outputting Camera Audio
You can easily connect your camera audio outputs to an external mixing desk by plugging into
the balanced XLR analog outputs on the rear panel.
Monitoring your Audio
If you want to monitor your program or talkback audio on external audio equipment such as
a Blackmagic Audio Monitor, connect via the RCA outputs on your ATEM Studio Converter’s
rear panel. Plus, you can easily connect your camera’s audio to a mixer using the XLR analog
audio outputs.
4321
OPTICAL OUT/IN
SDI OUT
L R
RL
USB 2.0
+12V BACKUP
POWER
OPTICAL OUT/IN
SDI OUT
L R
ANALOG AUDIO OUT OPTICAL OUT/IN
SDI OUT
L R
ANALOG AUDIO OUT OPTICAL OUT/IN
SDI OUT
L
OUT
R
ANALOG AUDIO OUTANALOG AUDIO OUT
IN
PGM SDI
OUT
IN
MIC
OUT
IN
H/PHONE
AES/EBU TALKBACK LOOPS
PUSH
LOCK TO TALK
PRESS TO TALK
Monitor your program or talkback audio on external equipment by
connecting to ATEM Studio Converter’s RCA outputs.
10Getting Started

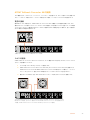
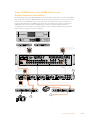
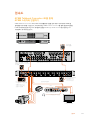
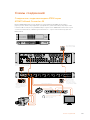
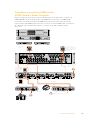
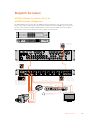
Connecting ATEM Talkback Converter 4K
The first thing to do is plug in power, your cameras, a headset and connect to a switcher. You
can also plug in an external microphone, such as a gooseneck microphone if you want to use
talkback without using a headset.
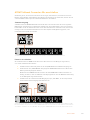
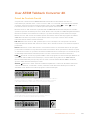
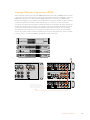
Plugging in Power
Plug in your power via your ATEM Talkback Converter 4K’s mains power input using a standard
IEC cable. You can also connect a power adaptor or external camera battery to the 12V to 31V
power input. 2 power inputs give you the option of a redundant power connection in case one
supply fails or is accidentally disconnected.
PGM SDI MIC H/PHONE
SDI 1 OUT CAM SDI
CAM OPT
OUT/IN
SDI 2 OUT CAM SDI
CAM OPT
OUT/IN
SDI 2 OUT CAM SDI
CAM OPT
OUT/IN
SDI 4 OUT CAM SDI
CAM OPT
OUT/IN
SDI 5 OUT CAM SDI
CAM OPT
OUT/IN
SDI 6 OUT CAM SDI
CAM OPT
OUT/IN
SDI 7 OUT CAM SDI
CAM OPT
OUT/IN
SDI 8 OUT CAM SDI
CAM OPT
OUT/IN
PGM SDI MIC H/PHONE
SDI 1 OUT CAM SDI
CAM OPT
OUT/IN
SDI 2 OUT CAM SDI
CAM OPT
OUT/IN
SDI 2 OUT CAM SDI
CAM OPT
OUT/IN
SDI 4 OUT CAM SDI
CAM OPT
OUT/IN
SDI 5 OUT CAM SDI
CAM OPT
OUT/IN
SDI 6 OUT CAM SDI
CAM OPT
OUT/IN
SDI 7 OUT CAM SDI
CAM OPT
OUT/IN
SDI 8 OUT CAM SDI
CAM OPT
OUT/IN
Plug in power via the mains power, or the 12V or 31V power connector.
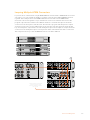
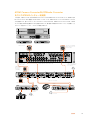
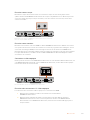
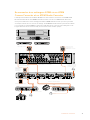
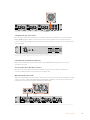
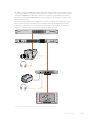
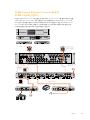
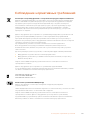
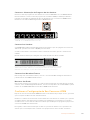
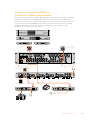
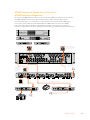
Plugging in Cameras
On the back panel of your ATEM Talkback Converter 4K, you’ll see 8 groups of connectors that
are assigned to camera numbers 1 to 8.
1 Plug your cameras into each ‘Cam SDI in’ connector.
2 Plug your ATEM Talkback Converter 4K’s ‘Cam SDI out’ into your camera’s program
SDI input.
When using ATEM Camera Converters with ATEM Talkback Converter 4K, it is important
to note that talkback and tally are embedded in the SDI signal via optical fiber only.
3 Plug the numbered SDI outputs, for example ‘SDI 1 Out’, to the corresponding camera
inputs in your switcher.
PGM SDI MIC H/PHONE
SDI 1 OUT CAM SDI
CAM OPT
OUT/IN
SDI 2 OUT CAM SDI
CAM OPT
OUT/IN
SDI 2 OUT CAM SDI
CAM OPT
OUT/IN
SDI 4 OUT CAM SDI
CAM OPT
OUT/IN
SDI 5 OUT CAM SDI
CAM OPT
OUT/IN
SDI 6 OUT CAM SDI
CAM OPT
OUT/IN
SDI 7 OUT CAM SDI
CAM OPT
OUT/IN
SDI 8 OUT CAM SDI
CAM OPT
OUT/IN
PGM SDI MIC H/PHONE
SDI 1 OUT CAM SDI
CAM OPT
OUT/IN
SDI 2 OUT CAM SDI
CAM OPT
OUT/IN
SDI 2 OUT CAM SDI
CAM OPT
OUT/IN
SDI 4 OUT CAM SDI
CAM OPT
OUT/IN
SDI 5 OUT CAM SDI
CAM OPT
OUT/IN
SDI 6 OUT CAM SDI
CAM OPT
OUT/IN
SDI 7 OUT CAM SDI
CAM OPT
OUT/IN
SDI 8 OUT CAM SDI
CAM OPT
OUT/IN
PGM SDI MIC H/PHONE
SDI 1 OUT CAM SDI
CAM OPT
OUT/IN
SDI 2 OUT CAM SDI
CAM OPT
OUT/IN
SDI 2 OUT CAM SDI
CAM OPT
OUT/IN
SDI 4 OUT CAM SDI
CAM OPT
OUT/IN
SDI 5 OUT CAM SDI
CAM OPT
OUT/IN
SDI 6 OUT CAM SDI
CAM OPT
OUT/IN
SDI 7 OUT CAM SDI
CAM OPT
OUT/IN
SDI 8 OUT CAM SDI
CAM OPT
OUT/IN
Plug your cameras into ATEM Talkback Converter 4K’s camera SDI inputs. When optical fiber
SFP modules are installed, you can also plug cameras into your ATEM Talkback Converter 4K
via optical fiber. Plug your ATEM Talkback Converter 4K’s ‘SDI out’ into your switcher.
11Getting Started

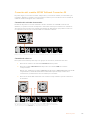
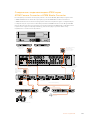
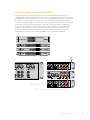
Plugging in the Program Feed from your Switcher
Connect the program output from your switcher to your ATEM Talkback Converter 4K’s
‘PGMSDI in’ connector. When connecting the program output from an ATEM switcher, tally is
also embedded in the SDI signal. This will enable tally lights when connected to ATEM Camera
Converters, Blackmagic Studio Cameras and Blackmagic URSA Broadcast Cameras.
PGM SDI MIC H/PHONE
SDI 1 OUT CAM SDI
CAM OPT
OUT/IN
SDI 2 OUT CAM SDI
CAM OPT
OUT/IN
SDI 2 OUT CAM SDI
CAM OPT
OUT/IN
SDI 4 OUT CAM SDI
CAM OPT
OUT/IN
SDI 5 OUT CAM SDI
CAM OPT
OUT/IN
SDI 6 OUT CAM SDI
CAM OPT
OUT/IN
SDI 7 OUT CAM SDI
CAM OPT
OUT/IN
SDI 8 OUT CAM SDI
CAM OPT
OUT/IN
PGM SDI MIC H/PHONE
SDI 1 OUT CAM SDI
CAM OPT
OUT/IN
SDI 2 OUT CAM SDI
CAM OPT
OUT/IN
SDI 2 OUT CAM SDI
CAM OPT
OUT/IN
SDI 4 OUT CAM SDI
CAM OPT
OUT/IN
SDI 5 OUT CAM SDI
CAM OPT
OUT/IN
SDI 6 OUT CAM SDI
CAM OPT
OUT/IN
SDI 7 OUT CAM SDI
CAM OPT
OUT/IN
SDI 8 OUT CAM SDI
CAM OPT
OUT/IN
Plug the program SDI output from your switcher into your
ATEM Talkback Converter 4K’s ‘PGM SDI’ input.
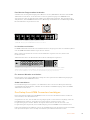
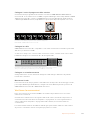
Plugging in your Headset
Your ATEM Talkback Converter 4K uses aviation headsets that plug in via the 1/4” TRS
headphone and 0.206” microphone jacks.
If both a headset and an external microphone are plugged in, only the headset will be used.
Talkback audio is embedded into audio channels 15 & 16 of the SDI signal.
PUSH
1 2 3 4 5 6 7 8
1 2 3 4 5 6 7 8
Connect your aviation headset via your ATEM Talkback Converter 4K front panel TRS connectors. You can also
plug in an external microphone via the balanced XLR analog input if you want to use talkback without a headset.
Plugging in your External Microphone
If you want to use an external microphone, plug in via the balanced XLR analog input on your
ATEM Converter’s front control panel.
Monitoring your Audio
If you want to monitor your program or talkback audio on external audio equipment such as a
Blackmagic Audio Monitor, connect via the RCA outputs on your ATEM Talkback Converter 4K
or ATEM Studio Converter’s rear panel.
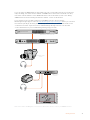
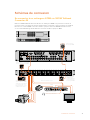
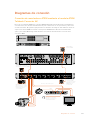
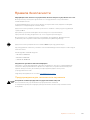
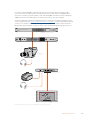
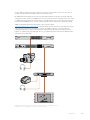
Confirming your ATEM Converter Set Up
After connecting your ATEM Converters to a live production switcher you’ll want to confirm that
everything is working.
Check the switcher is getting a valid signal from your cameras by having the switcher operator
switch each camera to the preview or program output. If all your camera signals can be seen on
the switcher’s preview or program output, you’ll know your ATEM Converters are working.
Next, check your talkback. Have the switcher operator and camera operators speak to each
other using their ‘press to talk’ buttons and headsets.
12Getting Started

If you are using an ATEM switcher, tally signals are sent over the SDI connection. To make sure
tally is working, check the camera number on ATEM Camera Converters and make sure they
match the camera numbers on the ATEM switcher. For more information, refer to the ‘Using
ATEM Camera Converter/Setting the Camera number’ section of this manual.
If you experience any trouble setting up your ATEM Converters, please visit the
Blackmagic Design support center at www.blackmagicdesign.com/support where you can often
find answers quickly by browsing the Blackmagic Forum. Here you can read information and
comments from other experienced users and Blackmagic Design staff. You can also find
contact information for your local Blackmagic Design support team.
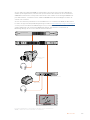
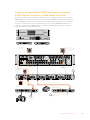
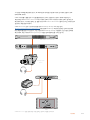
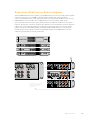
INPUT DISP
H/V
DELAY
3D
LUT 1
BLUE
ONLY
ZOOM PEAK
3D
LUT 2
H
MARK
V
MARK
1
1
3
PUSH
2
2
1
3
PUSH
2
1 4 7 10 COL 1 COL 2
CLEAN
FEED 1
BARS 1
2 5 8 MP 1
CLEAN
FEED 2
MP 1
KEY
PVW 2
3 6 9 BLK MP 2
KEY
MASK
MP 2
KEY
PGM 3
1 M/E Production Studio 4K
PUSH
1 2 3 4 5 6 7 8
1 2 3 4 5 6 7 8
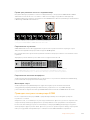
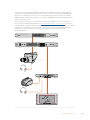
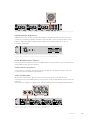
PTTPGM
VIDEOOPTICAL
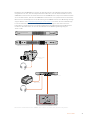
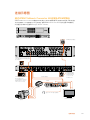
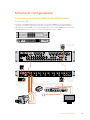
HDMI Camera
Blackmagic Studio
Camera
ATEM Camera
Converter
Monitor
ATEM 1 M/E Production Studio 4K
ATEM Talkback Converter 4K
Refer to the ‘Connection Diagrams’ section for more information on how to connect your ATEM Converters.
13Getting Started

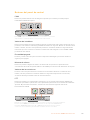
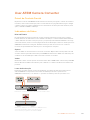
Using ATEM Camera Converter
Front Control Panel
ATEM Camera Converter’s control panel features buttons for adjusting headset and microphone
volume, activating talkback, program/camera monitoring, powering on and off, and setting the
camera number. There are also 5 status indicators for battery level, optical signal, SDI or HDMI
signal, and tally.
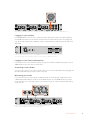
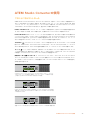
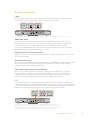
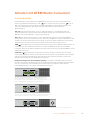
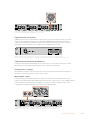
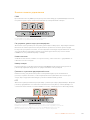
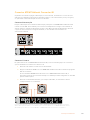
Status Indicators
Battery level
On the far left of the control panel are four green battery level indicators. The number of
illuminated indicators decrease as the battery level decreases. When the remaining single
indicator starts flashing, there’s approximately 10 minutes of battery power left, so you should
plug in an external power source or switch to another charged ATEM Camera Converter.
The battery will last for over 2 hours of continuous use and requires approximately 8 hours for a
complete recharge.
Optical
Next to the battery level LEDs is the ‘optical’ indicator. This lights up when an optical fiber
SDI video signal is detected by ATEM Camera Converter. Use this indicator to confirm a valid
optical SDI signal is being sent or received.
Video
The ‘video’ indicator lights up when a valid SDI or HDMI video signal is detected by
ATEM Camera Converter. Use this indicator to confirm that your camera input signal is present.
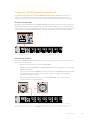
Tally lights
These lights illuminate when a tally signal is received from the program output of an
ATEM switcher. By watching the two red tally lights on opposite sides of ATEM Camera
Converter, your talent and camera operator can see when they are on air.
PTTPGM
VIDEOOPTICAL
PTTPGM
VIDEOOPTICAL
PTTPGM
VIDEOOPTICAL
Battery level, optical, and video signal status indicators.
The tally lights on each side of the ATEM Camera Converter glow red
when your camera is live on the program output of an ATEM switcher.
14Using ATEM Camera Converter

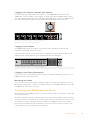
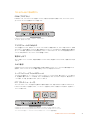
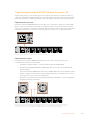
Control Panel Buttons
PGM
Pressing the PGM button toggles between the program video signal and the camera input
signal. The program input is the signal connected via optical fiber.
PTTPGM
VIDEOOPTICAL
PTTPGM
VIDEOOPTICAL
PGM button and microphone volume level buttons.
The buttons will illuminate when pressed or activated.
Microphone Volume Down/Up
The microphone volume buttons provide a quick way to adjust external audio levels. Each press
of the microphone volume buttons provide a smooth increase or decrease in volume over 1
second. When maximum or minimum microphone volume is reached, or if at maximum or
minimum volume at power up, the relevant button will illuminate for 3 seconds. These buttons
do not affect embedded SDI and HDMI audio levels received directly from the camera.
Power On/O
Press and release to instantly power on. Hold for 1 second to power off.
Camera Number
This button is used to set the camera number on your ATEM Camera Converter so your tally
lights function correctly. Refer to the ‘setting the camera number’ section in this manual for a
detailed description.
Talkback Headphone Volume
Press this button to increase the volume of the talkback headphones. When maximum volume
is reached, or if at maximum volume at power up, the button will illuminate for 3 seconds. The
next press will reduce the volume to minimum before the volume is increased again.
PTT
Press to talk allows camera operators to talk to the switcher operator. Hold the button down
while talking. If the PTT button is pressed twice in quick succession, it will stay on to allow
hands free communication. If PTT is pressed again, it will revert to normal press to talk behavior.
PTTPGM
VIDEOOPTICAL
PTTPGM
VIDEOOPTICAL
PTTPGM
VIDEOOPTICAL
The power button will illuminate when ATEM Camera Converter is powered
on. Press the PTT button to engage talkback with another ATEM Camera
Converter, ATEM Talkback Converter 4K, or ATEM Studio Converter.
Press thetalkback headphone button to adjust the talkback volume.
15Using ATEM Camera Converter

Setting the Camera Number
If you want your ATEM Camera Converter to receive tally signals from an ATEM switcher, you’ll
need to set the camera number on your ATEM Camera Converter. This ensures the switcher
sends the tally signal to the correct ATEM Camera Converter. The camera number can be set
from 1 to 99.
To set the camera number with the camera number button, press and hold the button until its
button light flashes 3 times. This will reset the camera number to camera 1. Each subsequent
press of the button will increment the camera number by 1. For example, if you want to set your
ATEM Camera Converter to camera number 5, reset the camera number to 1 and then add 4
button presses.
To test if camera number 5 is set correctly, have the ATEM switcher operator switch camera
number 5 to the program output. If your camera number is set correctly, the tally lights will
illuminate on your ATEM Camera Converter.
Similarly, if you want to test what camera number your ATEM Camera Converter is set to, ask the
ATEM switcher operator to switch camera inputs to the program output until your tally lights
illuminate. The switcher operator can then confirm your camera number.
PTTPGM
VIDEOOPTICAL
PTTPGM
VIDEOOPTICAL
‘Camera number’ button.
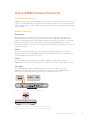
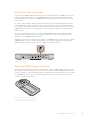
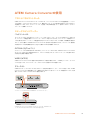
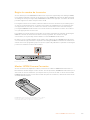
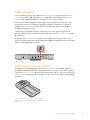
Mounting ATEM Camera Converter
When your camera needs to be mobile, connect your cables to ATEM Camera Converter and
then snap the integrated belt clip on to your belt. For stationary shots, ATEM Camera Converter
can be mounted on a tripod arm with either of its standard 3/8” or 1/4” thread inserts. If you want
to sit ATEM Camera Converter on a desk using its rubber feet, undo the two 2.5 hex socket
screws and remove the belt clip.
ATEM Camera Converter can be clipped
to your belt, mounted on a tripod arm, or
placed on its rubber feet on a desk.
16Using ATEM Camera Converter

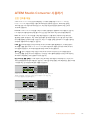
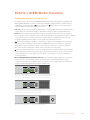
Using ATEM Studio Converter
Your ATEM Studio Converter’s front control panel features two rows of talkback buttons,
including ‘PTT’ and ‘LTT’, or, ‘press to talk’ and ‘lock to talk’, for each of the camera inputs. Next
to the talkback buttons are PGM
and Mute buttons. All buttons are illuminated white
and change to green when selected.
PTT 1–4 The ‘press to talk’ buttons let you communicate with each camera operator
independently. The PTT button illuminates green and activates your external or headset
microphone while the button is pressed.
LTT 1–4 The ‘lock to talk’ buttons lock your external or headset microphone open until you
press them again. You can even lock your microphone open for all cameras if you want to
communicate with all camera operators simultaneously. Cameras can be communicated with
independently using PTT even if all LTT buttons are selected.
PGM
Pressing the program button enables program audio with talkback. When a camera
operator uses talkback, your ATEM Studio Converter’s program audio level is decreased so
talkback can be heard clearly. When PGM is deselected only talkback audio is heard.
Mute
Pressing the ‘mute’ button will quickly fade the built in speaker to silence. Pressing
mute again, or increasing the volume, will restore audio. This button only affects the speaker
output and will not affect your program or talkback audio output.
Built in Speaker and Volume Control — You can hear program audio and talkback via the
control panel speaker, or with headphones via the 1/4” TRS headphones input. Adjust the
volume for the speaker or headphones by turning the volume knob on the control panel
clockwise or counterclockwise.
PUSH
LOCK TO TALK
PRESS TO TALK
ATEM Studio Converter’s control panel buttons are used for talkback,
enabling or disabling program audio, and muting the speaker.
The above illustration shows all the LTT buttons activated.
PUSH
LOCK TO TALK
PRESS TO TALK
You can communicate with a single camera operator
even when LTT is selected for all cameras. All LTT
buttons are deactivated while PTT is pressed.
PUSH
LOCK TO TALK
PRESS TO TALK
Volume is easily adjusted by turning the volume
control clockwise and anticlockwise.
17Using ATEM Studio Converter

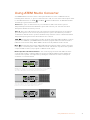
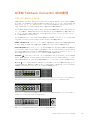
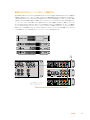
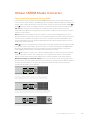
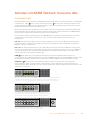
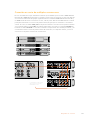
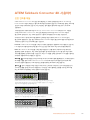
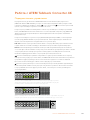
Using ATEM Talkback Converter 4K
Your ATEM Talkback Converter 4K’s front control panel features two rows of talkback buttons,
including ‘PTT’ and ‘LTT’, or, ‘press to talk’ and ‘lock to talk’, for each of the camera inputs.
Next to the talkback buttons are PGM
and Mute buttons. All buttons are illuminated
white and change to green when selected.
A numbered ‘press to talk’ button on the front panel of ATEM Talkback Converter 4K flashes red
when a camera operator presses the ‘call’ button on the left side of a Blackmagic Camera
Fiber Converter attached to a camera. This indicates when a camera operator needs to get
your attention.
The ‘press to talk’ button illuminates red when a camera is on the ATEM Switcher’s Program
output. You can see at a glance which cameras are on air because the numbered ‘press to talk’
buttons for those cameras are red.
PTT 1–8 The ‘press to talk’ buttons let you communicate with each camera operator
independently. The PTT button illuminates green and activates your external or headset
microphone while the button is pressed.
LTT 1–8 The ‘lock to talk’ buttons lock your external or headset microphone open until you
press them again. You can even lock your microphone open for all cameras if you want to
communicate with all camera operators simultaneously. Cameras can be communicated with
independently using PTT even if all LTT buttons are selected.
PGM
Pressing the program button enables program audio with talkback. When a camera
operator uses talkback, your ATEM Talkback Converter 4K’s program audio level is decreased
so talkback can be heard clearly. When PGM is deselected only talkback audio is heard.
Mute
Pressing the ‘mute’ button will quickly fade the built in speaker to silence. Pressing
mute again, or increasing the volume, will restore audio. This button only affects the speaker
output and will not affect your program or talkback audio output.
PUSH
1 2 3 4 5 6 7 8
1 2 3 4 5 6 7 8
ATEM Talkback Converter 4K’s control panel buttons are used for
talkback, enabling or disabling program audio, and muting the speaker.
The above illustration shows LTT buttons 5, 6, 7 and 8 activated.
PUSH
1 2 3 4 6 7 8
1 2 3 4 5 6 7 8
5
You can communicate with a single camera operator
even when LTT is selected for all cameras. All LTT
buttons are deactivated while PTT is pressed.
PUSH
1 2 3 4 5 6 7 8
1 2 3 4 5 6 7 8
Volume is easily adjusted by turning the volume
control clockwise and anticlockwise.
18Using ATEM Talkback Converter 4K

Built in Speaker and Volume Control — You can hear program audio and talkback via the
control panel speaker, or with headphones via the 1/4” TRS headphones input. Adjust the
volume for the speaker or headphones by turning the volume knob on the control panel
clockwise or counterclockwise.
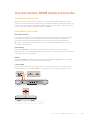
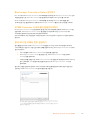
Using Blackmagic Converters Setup
Blackmagic Converters Setup is used to configure settings and update the internal software in
your ATEM Camera Converter, ATEM Talkback Converter 4K or ATEM Studio Converter.
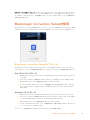
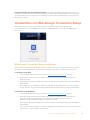
Installing Blackmagic Converters Setup
The Blackmagic Converters utility software can be used to update your converter to new video
standards, add compatibility with new hardware or adjust video and audio levels.
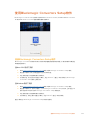
Installation on Mac OS X
1 Download the Blackmagic Converters Setup software from www.blackmagicdesign.com
2 Unzip the downloaded file and open the resulting disk image to reveal its contents.
3 Double click the installer and follow the prompts to complete the installation.
4 When the installation has finished, it will prompt you to restart your computer. Click
‘restart’ to complete the installation. Blackmagic Converters Setup is now installed.
Installation on Windows
1 Download Blackmagic Converters Setup from www.blackmagicdesign.com
2 Unzip the downloaded file. You should see a Blackmagic Converters Setup folder
containing this PDF manual and the Blackmagic Converters Setup installer.
3 Double click the installer and follow the prompts to complete the installation.
4 When the installation has finished, it will prompt you to restart your computer.
Click‘restart’ to complete the installation.
Once the computer has restarted, Blackmagic Converters Setup will be ready to use.
19Using Blackmagic Converters Setup

Removing Blackmagic Converters Setup
To remove the Blackmagic Converters software on Mac OS X, launch the Blackmagic
Converters.dmg installation file, double click on ‘Uninstall Converters’ and simply follow
the prompts.
To remove the Blackmagic Converters software on Windows, open the Windows control panel
and click on ‘Programs and Features’. Select ‘Blackmagic Converters’ from the list, click on
‘Uninstall’ and follow the prompts.
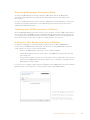
Updating your ATEM Converter’s Software
After installing Blackmagic Converters Setup on your computer, connect a USB cable between
the computer and your ATEM Converter. Launch Blackmagic Converters Setup and follow any
onscreen prompt to update the internal software in your ATEM converter. If no prompt appears,
the internal software is up to date and there is nothing further you need to do.
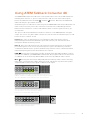
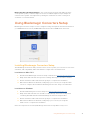
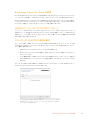
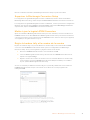
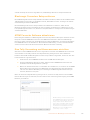
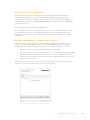
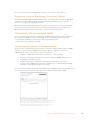
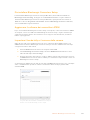
Setting the Tally Border and Camera Number
In addition to tally lights, you can also display a tally border on an SDI or HDMI monitor
connected to your ATEM Camera Converter. This option is set using Blackmagic Converters
Setup, where you can also set the camera number.
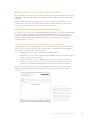
1 Connect an ATEM Camera Converter to your computer via USB.
2 Launch Blackmagic Converters Setup, select your ATEM Camera Converter and click
the ‘settings’ tab.
3 Set the camera number and also choose whether to show a tally border on the monitor
attached to the ATEM Camera Converter. Click ‘save’ to confirm your settings and exit
Blackmagic Converters Setup.
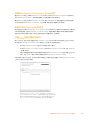
If you chose not to display a tally border, the tally lights on the ATEM Camera Converter will still
illuminate when your camera is live on the program output of the ATEM switcher.
You can easily change the ‘camera number’
setting for your ATEM Camera Converter
using Blackmagic Converters Setup. You
can also choose whether or not to display
a tally border around your connected
monitor by checking or unchecking the
‘show tally on my video output’ checkbox.
20Using Blackmagic Converters Setup
Sayfa yükleniyor...
Sayfa yükleniyor...
Sayfa yükleniyor...
Sayfa yükleniyor...
Sayfa yükleniyor...
Sayfa yükleniyor...
Sayfa yükleniyor...
Sayfa yükleniyor...
Sayfa yükleniyor...
Sayfa yükleniyor...
Sayfa yükleniyor...
Sayfa yükleniyor...
Sayfa yükleniyor...
Sayfa yükleniyor...
Sayfa yükleniyor...
Sayfa yükleniyor...
Sayfa yükleniyor...
Sayfa yükleniyor...
Sayfa yükleniyor...
Sayfa yükleniyor...
Sayfa yükleniyor...
Sayfa yükleniyor...
Sayfa yükleniyor...
Sayfa yükleniyor...
Sayfa yükleniyor...
Sayfa yükleniyor...
Sayfa yükleniyor...
Sayfa yükleniyor...
Sayfa yükleniyor...
Sayfa yükleniyor...
Sayfa yükleniyor...
Sayfa yükleniyor...
Sayfa yükleniyor...
Sayfa yükleniyor...
Sayfa yükleniyor...
Sayfa yükleniyor...
Sayfa yükleniyor...
Sayfa yükleniyor...
Sayfa yükleniyor...
Sayfa yükleniyor...
Sayfa yükleniyor...
Sayfa yükleniyor...
Sayfa yükleniyor...
Sayfa yükleniyor...
Sayfa yükleniyor...
Sayfa yükleniyor...
Sayfa yükleniyor...
Sayfa yükleniyor...
Sayfa yükleniyor...
Sayfa yükleniyor...
Sayfa yükleniyor...
Sayfa yükleniyor...
Sayfa yükleniyor...
Sayfa yükleniyor...
Sayfa yükleniyor...
Sayfa yükleniyor...
Sayfa yükleniyor...
Sayfa yükleniyor...
Sayfa yükleniyor...
Sayfa yükleniyor...
Sayfa yükleniyor...
Sayfa yükleniyor...
Sayfa yükleniyor...
Sayfa yükleniyor...
Sayfa yükleniyor...
Sayfa yükleniyor...
Sayfa yükleniyor...
Sayfa yükleniyor...
Sayfa yükleniyor...
Sayfa yükleniyor...
Sayfa yükleniyor...
Sayfa yükleniyor...
Sayfa yükleniyor...
Sayfa yükleniyor...
Sayfa yükleniyor...
Sayfa yükleniyor...
Sayfa yükleniyor...
Sayfa yükleniyor...
Sayfa yükleniyor...
Sayfa yükleniyor...
Sayfa yükleniyor...
Sayfa yükleniyor...
Sayfa yükleniyor...
Sayfa yükleniyor...
Sayfa yükleniyor...
Sayfa yükleniyor...
Sayfa yükleniyor...
Sayfa yükleniyor...
Sayfa yükleniyor...
Sayfa yükleniyor...
Sayfa yükleniyor...
Sayfa yükleniyor...
Sayfa yükleniyor...
Sayfa yükleniyor...
Sayfa yükleniyor...
Sayfa yükleniyor...
Sayfa yükleniyor...
Sayfa yükleniyor...
Sayfa yükleniyor...
Sayfa yükleniyor...
Sayfa yükleniyor...
Sayfa yükleniyor...
Sayfa yükleniyor...
Sayfa yükleniyor...
Sayfa yükleniyor...
Sayfa yükleniyor...
Sayfa yükleniyor...
Sayfa yükleniyor...
Sayfa yükleniyor...
Sayfa yükleniyor...
Sayfa yükleniyor...
Sayfa yükleniyor...
Sayfa yükleniyor...
Sayfa yükleniyor...
Sayfa yükleniyor...
Sayfa yükleniyor...
Sayfa yükleniyor...
Sayfa yükleniyor...
Sayfa yükleniyor...
Sayfa yükleniyor...
Sayfa yükleniyor...
Sayfa yükleniyor...
Sayfa yükleniyor...
Sayfa yükleniyor...
Sayfa yükleniyor...
Sayfa yükleniyor...
Sayfa yükleniyor...
Sayfa yükleniyor...
Sayfa yükleniyor...
Sayfa yükleniyor...
Sayfa yükleniyor...
Sayfa yükleniyor...
Sayfa yükleniyor...
Sayfa yükleniyor...
Sayfa yükleniyor...
Sayfa yükleniyor...
Sayfa yükleniyor...
Sayfa yükleniyor...
Sayfa yükleniyor...
Sayfa yükleniyor...
Sayfa yükleniyor...
Sayfa yükleniyor...
Sayfa yükleniyor...
Sayfa yükleniyor...
Sayfa yükleniyor...
Sayfa yükleniyor...
Sayfa yükleniyor...
Sayfa yükleniyor...
Sayfa yükleniyor...
Sayfa yükleniyor...
Sayfa yükleniyor...
Sayfa yükleniyor...
Sayfa yükleniyor...
Sayfa yükleniyor...
Sayfa yükleniyor...
Sayfa yükleniyor...
Sayfa yükleniyor...
Sayfa yükleniyor...
Sayfa yükleniyor...
Sayfa yükleniyor...
Sayfa yükleniyor...
Sayfa yükleniyor...
Sayfa yükleniyor...
Sayfa yükleniyor...
Sayfa yükleniyor...
Sayfa yükleniyor...
Sayfa yükleniyor...
Sayfa yükleniyor...
Sayfa yükleniyor...
Sayfa yükleniyor...
Sayfa yükleniyor...
Sayfa yükleniyor...
Sayfa yükleniyor...
Sayfa yükleniyor...
Sayfa yükleniyor...
Sayfa yükleniyor...
Sayfa yükleniyor...
Sayfa yükleniyor...
Sayfa yükleniyor...
Sayfa yükleniyor...
Sayfa yükleniyor...
Sayfa yükleniyor...
Sayfa yükleniyor...
Sayfa yükleniyor...
Sayfa yükleniyor...
Sayfa yükleniyor...
Sayfa yükleniyor...
Sayfa yükleniyor...
Sayfa yükleniyor...
Sayfa yükleniyor...
Sayfa yükleniyor...
Sayfa yükleniyor...
Sayfa yükleniyor...
Sayfa yükleniyor...
Sayfa yükleniyor...
Sayfa yükleniyor...
Sayfa yükleniyor...
Sayfa yükleniyor...
Sayfa yükleniyor...
Sayfa yükleniyor...
Sayfa yükleniyor...
Sayfa yükleniyor...
Sayfa yükleniyor...
Sayfa yükleniyor...
Sayfa yükleniyor...
Sayfa yükleniyor...
Sayfa yükleniyor...
Sayfa yükleniyor...
Sayfa yükleniyor...
Sayfa yükleniyor...
Sayfa yükleniyor...
Sayfa yükleniyor...
Sayfa yükleniyor...
Sayfa yükleniyor...
Sayfa yükleniyor...
Sayfa yükleniyor...
Sayfa yükleniyor...
Sayfa yükleniyor...
Sayfa yükleniyor...
Sayfa yükleniyor...
Sayfa yükleniyor...
Sayfa yükleniyor...
Sayfa yükleniyor...
Sayfa yükleniyor...
Sayfa yükleniyor...
Sayfa yükleniyor...
Sayfa yükleniyor...
Sayfa yükleniyor...
Sayfa yükleniyor...
Sayfa yükleniyor...
Sayfa yükleniyor...
Sayfa yükleniyor...
Sayfa yükleniyor...
Sayfa yükleniyor...
Sayfa yükleniyor...
Sayfa yükleniyor...
Sayfa yükleniyor...
Sayfa yükleniyor...
Sayfa yükleniyor...
Sayfa yükleniyor...
Sayfa yükleniyor...
Sayfa yükleniyor...
Sayfa yükleniyor...
Sayfa yükleniyor...
Sayfa yükleniyor...
Sayfa yükleniyor...
Sayfa yükleniyor...
Sayfa yükleniyor...
Sayfa yükleniyor...
Sayfa yükleniyor...
Sayfa yükleniyor...
Sayfa yükleniyor...
Sayfa yükleniyor...
Sayfa yükleniyor...
Sayfa yükleniyor...
Sayfa yükleniyor...
Sayfa yükleniyor...
Sayfa yükleniyor...
Sayfa yükleniyor...
Sayfa yükleniyor...
Sayfa yükleniyor...
Sayfa yükleniyor...
Sayfa yükleniyor...
Sayfa yükleniyor...
Sayfa yükleniyor...
Sayfa yükleniyor...
Sayfa yükleniyor...
-
 1
1
-
 2
2
-
 3
3
-
 4
4
-
 5
5
-
 6
6
-
 7
7
-
 8
8
-
 9
9
-
 10
10
-
 11
11
-
 12
12
-
 13
13
-
 14
14
-
 15
15
-
 16
16
-
 17
17
-
 18
18
-
 19
19
-
 20
20
-
 21
21
-
 22
22
-
 23
23
-
 24
24
-
 25
25
-
 26
26
-
 27
27
-
 28
28
-
 29
29
-
 30
30
-
 31
31
-
 32
32
-
 33
33
-
 34
34
-
 35
35
-
 36
36
-
 37
37
-
 38
38
-
 39
39
-
 40
40
-
 41
41
-
 42
42
-
 43
43
-
 44
44
-
 45
45
-
 46
46
-
 47
47
-
 48
48
-
 49
49
-
 50
50
-
 51
51
-
 52
52
-
 53
53
-
 54
54
-
 55
55
-
 56
56
-
 57
57
-
 58
58
-
 59
59
-
 60
60
-
 61
61
-
 62
62
-
 63
63
-
 64
64
-
 65
65
-
 66
66
-
 67
67
-
 68
68
-
 69
69
-
 70
70
-
 71
71
-
 72
72
-
 73
73
-
 74
74
-
 75
75
-
 76
76
-
 77
77
-
 78
78
-
 79
79
-
 80
80
-
 81
81
-
 82
82
-
 83
83
-
 84
84
-
 85
85
-
 86
86
-
 87
87
-
 88
88
-
 89
89
-
 90
90
-
 91
91
-
 92
92
-
 93
93
-
 94
94
-
 95
95
-
 96
96
-
 97
97
-
 98
98
-
 99
99
-
 100
100
-
 101
101
-
 102
102
-
 103
103
-
 104
104
-
 105
105
-
 106
106
-
 107
107
-
 108
108
-
 109
109
-
 110
110
-
 111
111
-
 112
112
-
 113
113
-
 114
114
-
 115
115
-
 116
116
-
 117
117
-
 118
118
-
 119
119
-
 120
120
-
 121
121
-
 122
122
-
 123
123
-
 124
124
-
 125
125
-
 126
126
-
 127
127
-
 128
128
-
 129
129
-
 130
130
-
 131
131
-
 132
132
-
 133
133
-
 134
134
-
 135
135
-
 136
136
-
 137
137
-
 138
138
-
 139
139
-
 140
140
-
 141
141
-
 142
142
-
 143
143
-
 144
144
-
 145
145
-
 146
146
-
 147
147
-
 148
148
-
 149
149
-
 150
150
-
 151
151
-
 152
152
-
 153
153
-
 154
154
-
 155
155
-
 156
156
-
 157
157
-
 158
158
-
 159
159
-
 160
160
-
 161
161
-
 162
162
-
 163
163
-
 164
164
-
 165
165
-
 166
166
-
 167
167
-
 168
168
-
 169
169
-
 170
170
-
 171
171
-
 172
172
-
 173
173
-
 174
174
-
 175
175
-
 176
176
-
 177
177
-
 178
178
-
 179
179
-
 180
180
-
 181
181
-
 182
182
-
 183
183
-
 184
184
-
 185
185
-
 186
186
-
 187
187
-
 188
188
-
 189
189
-
 190
190
-
 191
191
-
 192
192
-
 193
193
-
 194
194
-
 195
195
-
 196
196
-
 197
197
-
 198
198
-
 199
199
-
 200
200
-
 201
201
-
 202
202
-
 203
203
-
 204
204
-
 205
205
-
 206
206
-
 207
207
-
 208
208
-
 209
209
-
 210
210
-
 211
211
-
 212
212
-
 213
213
-
 214
214
-
 215
215
-
 216
216
-
 217
217
-
 218
218
-
 219
219
-
 220
220
-
 221
221
-
 222
222
-
 223
223
-
 224
224
-
 225
225
-
 226
226
-
 227
227
-
 228
228
-
 229
229
-
 230
230
-
 231
231
-
 232
232
-
 233
233
-
 234
234
-
 235
235
-
 236
236
-
 237
237
-
 238
238
-
 239
239
-
 240
240
-
 241
241
-
 242
242
-
 243
243
-
 244
244
-
 245
245
-
 246
246
-
 247
247
-
 248
248
-
 249
249
-
 250
250
-
 251
251
-
 252
252
-
 253
253
-
 254
254
-
 255
255
-
 256
256
-
 257
257
-
 258
258
-
 259
259
-
 260
260
-
 261
261
-
 262
262
-
 263
263
-
 264
264
-
 265
265
-
 266
266
-
 267
267
-
 268
268
-
 269
269
-
 270
270
-
 271
271
-
 272
272
-
 273
273
-
 274
274
-
 275
275
-
 276
276
-
 277
277
-
 278
278
-
 279
279
-
 280
280
-
 281
281
-
 282
282
-
 283
283
-
 284
284
-
 285
285
-
 286
286
-
 287
287


Blackmagic ATEM Converters Kullanım kılavuzu
- Tip
- Kullanım kılavuzu
diğer dillerde
İlgili makaleler
-
Blackmagic MiniC SDI Distribution Kullanım kılavuzu
-
Blackmagic Studio Camera Kullanım kılavuzu
-
-
Blackmagic Web Presenter Streamer El kitabı
-
-
-
-
-
-
Diğer belgeler
-
ATEN VC486 Hızlı başlangıç Kılavuzu
-
 Blackmagic Design ATEM Mini Kullanım kılavuzu
-
 Blackmagic Design HyperDeck Studio Mini El kitabı
-
Philips SWA7303S Kullanım kılavuzu
-
Philips SWA7302S/10 Kullanım kılavuzu
-
ATEN UC9040 Hızlı başlangıç Kılavuzu
-
Nikon ME-1 (MICROPHONE) Kullanım kılavuzu
-
TP-LINK VIGI C340S Yükleme Rehberi

