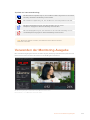
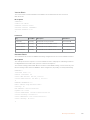
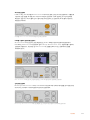
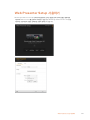
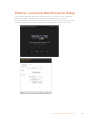
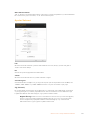
Blackmagic Web Presenter HD Kullanım kılavuzu
- Tip
- Kullanım kılavuzu

February 2021
Installation and Operation Manual
Blackmagic Web Presenter HD
Blackmagic
Web
Presenter HD


English
Welcome
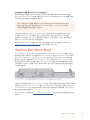
Thank you for purchasing your Blackmagic Web Presenter HD!
Blackmagic Web Presenter plugs directly into any SDI equipment, converts the signal
into H.264 and lets you stream it on popular streaming services such as YouTube Live,
Facebook Live and Twitch. You can also transmit broadcast quality video point to point
using an optional ATEM Streaming Bridge. This makes transmission of professional video
toremote locations easy using the internet!
This instruction manual shows you everything you need to know to get started with
Blackmagic Web Presenter and how to use all the features and controls, including how
toset everything up for YouTube Live, Facebook Live, Twitch, Zoom, Skype and more.
Check the support page on our website at www.blackmagicdesign.com for the latest
version of this manual and for updates to your Blackmagic Web Presenter HD’s internal
software. When downloading the software, be sure to register with your information so
wecan keep you updated when new software is released.
We are continually working on new features and improvements, so we are keen
hear from you!
Grant Petty
CEO Blackmagic Design

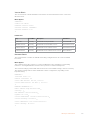
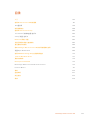
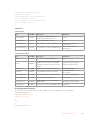
Contents
Getting Started 5
Using Web Presenter HD’s Front Panel 7
LCD Display 9
Using the Monitor Output 10
Using Web Presenter Setup 15
Live Stream Tab 16
Setup Tab 17
Network Settings 18
Setting Internet Sharing forDirectStreaming 18
Streaming Using Your Smartphone 19
Using Blackmagic Web Presenter HD as a Webcam 19
Setting up Open Broadcaster 19
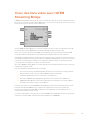
Creating Video Links with ATEM Streaming Bridge 22
Teranex Mini Rack Shelf 23
Updating the Internal Software 23
Developer Information 25
Blackmagic Web Presenter Ethernet Protocol 25
Protocol Blocks 27
Help 36
Regulatory Notices 37
Safety Information 38
Warranty 39
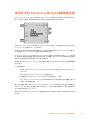
4Blackmagic Web Presenter HD

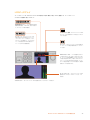
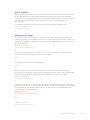
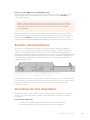
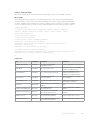
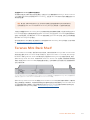
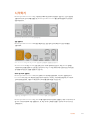
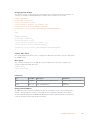
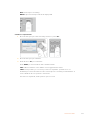
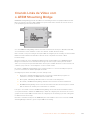
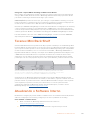
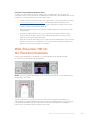
Getting Started
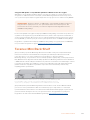
Getting started with your Blackmagic Web Presenter HD is quick and easy! All you need to do
isconnect power, connect video and audio, connect the unit to your computer, then connect to
the internet.
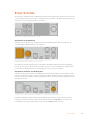
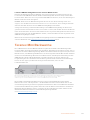
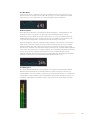
Blackmagic Web Presenter HD front panel
Connecting Power
Plug a standard IEC power cable into your Blackmagic Web Presenter HD’s powerinput on the
rear panel.
Web Presenter HD can be powered using the IEC or 12V DC power input
Web Presenter HD also has an additional 12V DC power input. You can use this input if you want
to connect external power or redundancy via an external power supply, for example a UPS or
external 12V battery.
Connecting Video and Audio
Plug your video source into Blackmagic Web Presenter HD’s SDI input. When video is
connected it will be displayed on your web presenter’s built in LCD. Audio is embedded with
the video on the SDI video signal and you can confirm it by observing the audio meters
on the LCD.
Connect video to your Blackmagic Web Presenter’s SDI input
Blackmagic Web Presenter HD supports 12G-SDI and will automatically switch between HD
and Ultra HD all the way up to 2160p60 when the video input changes. This means you can
input virtually any video signal and it will convert down to 1080p.
5Getting Started

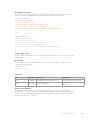
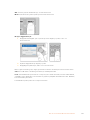
Connecting a Monitor
Plug your HDMI television or SDI monitor into one of the monitor outputs. This lets you monitor
your broadcast and observe important status information that updates constantly with your
video stream. For more information on how to use the monitor output, refer to the ‘Using the
Monitor Output’ section.
Connect a monitor to your web presenter’s monitor output
Connecting to a Computer via USB
Connect your Web Presenter HD to your computer using the USB-C port on the front or rear
panel. These USB ports are used for updating the unit and configuring it with the Blackmagic
Web Presenter Setup utility. Once you have configured your Web Presenter for the first time,
you can then disconnect the unit from the computer.
Connect your Blackmagic Web Presenter HD to your
computer using the USB port on the front or rear panel
Connecting to the Internet
Connect your Blackmagic Web Presenter HD to the internet by plugging a network cable from
the ‘live stream’ Ethernet port to an internet router or a network switch.
Connect your Blackmagic Web Presenter HD to your
network via the Ethernet port on the rear panel
6Getting Started

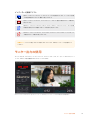
Setting up a Live Stream
You can now setup your Web Presenter HD to stream via any streaming platform such as
YouTube Live, Facebook Live, Twitch and more. For this example, we will set up for a YouTube
Live stream.
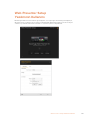
1 Copy your stream key from your YouTube Studio account.
2 Download the Blackmagic Web Presenter Setup utility from
www.blackmagicdesign.com/support and install it on your computer.
This software lets you configure streaming settings for the first time.
3 Launch the Blackmagic Web Presenter Setup utility and go to the ‘live stream’ page.
4 Set the platform to YouTube and the server to ‘primary’. Paste your YouTube stream key
into the ‘key’ field and select a streaming quality. Click ‘save’.
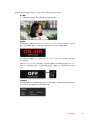
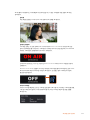
5 You’re now ready to start streaming to the world! Click the ‘on air’ button or press the
‘on air’ button on the unit’s front panel. When your production has finished, press the
‘off’ button to stop your broadcast.
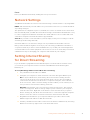
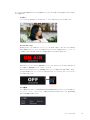
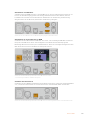
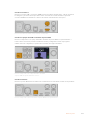
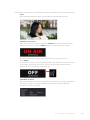
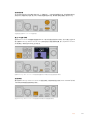
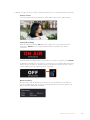
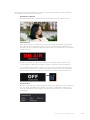
Using Web Presenter HD’s Front Panel
Use Blackmagic Web Presenter’s front panel controls to start and stop streaming and
change settings.
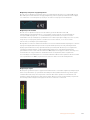
On Air - To start streaming, simply press the ‘on air’ button. The button will highlight red while
streaming on air.
If the on air button flashes, it means a live stream has failed to start, or has stopped
unexpectedly. This might be due to a problem with your internet connection or streaming
settings. Check that your internet connection is working and your streaming settings
are correct.
7Using Web Presenter HD’s Front Panel

Off - To stop streaming, press the ‘off’ button.
Menu - Press the menu button to open the settings on the LCD.
To change a setting:
1 Rotate the knob to select the setting you want to change, then press ‘set’.
2 Rotate the knob to change your setting.
3 Press ‘set’ again to confirm the change.
Press the menu button to step back through the menu items and return to the home screen.
Call - This feature will be enabled in a future update.
Lock - Press and hold this button for 1 second to lock the panel. This disables the buttons,
preventing anyone from accidentally going on air or stopping a stream. The button will
illuminate red when active.
Press and hold for 2 seconds to unlock the panel.
8Using Web Presenter HD’s Front Panel

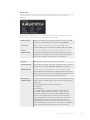
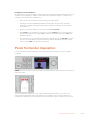
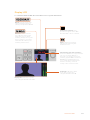
LCD Display
The home screen is the first feature you’ll see when you power up your Web Presenter HD.
The home screen displays important information, including:
Cache – Showsthe
percentage of Web Presenter
HD’s built in memory cache
that is currently in use.
Data Rate – Shows
the data rate of the
encoder whether or
not your Presenter HD
is streaming. You can
connect your video
source to an input and
quickly see the bit rate
required to stream
your live video feed.
Video Monitor – Displays the input video
source that is connected to Web Presenter HD.
Audio Meters – Displays
the audio levels of the
video source connected
to Web Presenter HD.
Duration Counter – Shows the
current duration of your live
stream. The counter will start when
you press the ‘on air’ button.
Internet Connection –
Asmall icon is displayed
whenyour Web Presenter HD
is connected to the network.
On Air Status – A bright red on
air indicator will be displayed
when your live stream is running.
When the unit is standing by
ready to start streaming ‘off’ will
be displayed. Aflashing red and
white on air indicator means that
there has been an interruption
during the stream, such as a
slow internet connection.
9Using Web Presenter HD’s Front Panel

Internet Connection Icons
A blue Ethernet icon is displayed when an Ethernet cable is connected and the
Ethernetconnection will be used for streaming.
A red Ethernet icon is displayed when on air and streaming via Ethernet.
A blue smartphone icon is displayed when a tethered smartphone’s internet
connectionwill be used for streaming.
A red smartphone icon is displayed when on air and streaming via a tethered
smartphone.
TIP If no icon is displayed then your Web Presenter HD is not connected
to the network.
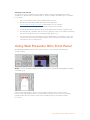
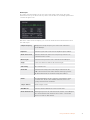
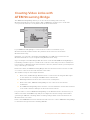
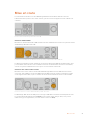
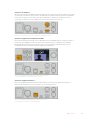
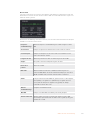
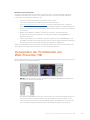
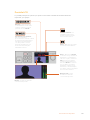
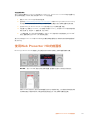
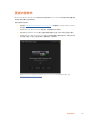
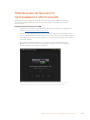
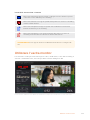
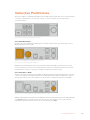
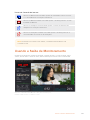
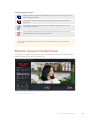
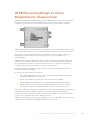
Using the Monitor Output
The monitor output lets you monitor the video input, audio levels, on air status, data rate and
cache levels, plus technical information about the SDI input.
The monitor out on Web Presenter HD provides comprehensive
information including data rate and cache status.
10Using the Monitor Output

The monitor output display is made up of 8 panels. Below is a description of each panel and the
information it displays.
Input View
The main panel displays your current video input from the connected SDI video source.
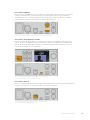
On Air Status
Prior to streaming, the on air status indicator will display ‘off’ to let you know
Web Presenter HD is standing by and ready to broadcast. When streaming begins,
theindicator will display a bright red ‘on air’ status until streaming is stopped.
Underneath the on air indicator is the duration counter. When you press the on air
button on the Web Presenter HD, the duration counter will start running.
If your Web Presenter HD is off air but will stream via a tethered smartphone, the ‘off’
indicator includes a blue smartphone icon in the corner. When on air, the smartphone
icon will illuminate red.
Live Stream
The live stream panel displays information about your live stream settings. This includes
the streaming platform, server and the first 10 digits of your streaming key. It also
displays the stream resolution and quality settings.
11Using the Monitor Output

Video Input
The 5 mini viewers at the top of the video input panel show the previous 6 seconds of
your live stream, each mini viewer represents 1.2 seconds of streaming time.
Below the mini viewers you can view detailed technical information about the video
input source connected to your Web Presenter HD’s SDI input.
Input Standard Displays the resolution and frame rate of the SDI video input.
Web Presenter HD supports up to 2160p60.
Colorimetry Shows the color space of the SDI video input. Web Presenter HD
supports Rec.601, Rec.709 and Rec.2020 color spaces.
SDI Ancillary Data Ancillary data is data carried in the SDI video input that is in
addition to video. This includes embedded audio, timecode and
closed captions. If your SDI input includes ancillary data then
‘Present’ will be displayed.
Timecode Displays the timecode from the SDI video input source.
Closed Captions If your SDI video input includes Closed Captions the format will be
displayed here. CEA-608 and CEA-708 formats are supported.
SMPTE 292 CRC This is an error checking function for SDI video. If your
Web Presenter HD detects a problem in the SDI video input it will
display an error. CRC errors are usually caused by a faulty SDI cable
or a cable that is too long.
Luminance Y Bits
and Chroma Bits
The indicators for ‘luminance y bits’ and ‘chroma bits’ show you
the activity of the SDI video input signal. Each letter represents the
state of one bit of the video signal.
X - An ‘X’ indicates a constantly changing bit.
L - A low bit.
H - A high bit.
SDI offsets are subtracted to make it easy to understand. For
example, all bits are low when video is black.
Generally, all 10 bits for your SDI video input will show ‘X’ to mean
all the bits on your video stream are changing constantly. If your
SDI input is 8 bit video, the two rightmost bits will always be ‘L’ as
they don’t have any data. If a bit stays ‘L’ or ‘H’ when you expect
itto be ‘X’, this indicates a ‘stuck bit’ and could be the result of a
fault in the upstream video.
12Using the Monitor Output

Audio Input
The audio waveform display at the top of the audio input panel shows the audio
information for the past 6 seconds of your live stream. This is continually updated and
scrolls from right to left.
Below the audio waveform display you can view detailed technical information about
the audio input.
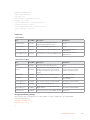
Sample Frequency Displays the sample frequency rate of the audio embedded
in the SDI input.
Emphasis Indicates if your audio source has its emphasis option enabled.
Audio Source Lock Indicates whether the audio source frequency is locked to an
external reference source.
Word Length Shows the bit depth of the audio embedded in the SDI input.
Origin These four characters indicate the channel origin.
Time of Day Free run timecode.
Audio Bits Shows the bit activity in the audio samples embedded in the
SDI connection. Even if the audio channel status says you have
16, 20 or 24 bit audio, the audio bit activity will confirm it.
VUCP Reading VUCP bits from left to right: the ‘V’ bit indicates ‘valid’,
‘U’is the ‘user’ bit, ‘C’ is the ‘channel status’ bit, and ‘P’ is for
‘parity’. This field is like ‘audio bits’.
Sample Address Audio sample counter.
AUX Bits Use Indicates whether AUX bits are used for main audio.
Audio Channels 1-32 Each digit represents an embedded audio channel on the SDI input.
A ‘P’ shows that an audio channel is in use and a ‘-’ means that
there is no audio on that channel.
13Using the Monitor Output

Data Rate Display
The data rate display shows the current data rate of of the encoder over the past
60 seconds. The data rate is measured in megabits per second. This indicator runs
consistently, even when off air, so you can accurately gauge your bandwidth before
going on air.
Cache Display
The cache display shows the percentage of Web Presenter HD’s built in memory buffer
that is currently in use and the graph shows the amount used over the past 60 seconds.
The cache is a small amount of internal memory that continuously records and plays the
program output. It acts as a safety measure if the streaming data rate decreases below
a level able to sustain video.
The variable nature of the internet is mostly due to network activity or wireless signal
strength, so if the broadcast data rate decreases, the buffer data will increase
accordingly. If the connection speed becomes slow enough that it cannot support the
video stream, the cache will fill with video frames to compensate. However, once the
cache is 100% full, the video stream will be compromised, so you will want to avoid a
full cache where possible. You can run a test by connecting a video feed and watching
the cache display in the monitor output without having to start the stream. If the cache
frequently approaches 100%, choose a lower quality in the live stream settings.
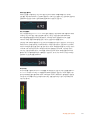
Audio Meters
You can monitor the levels of your audio source using the audio meters. These can be
set to display either PPM or VU levels in the Web Presenter HD’s menu settings. If your
audio levels are too high the meters will illuminate red and may mean that the audio in
your live stream could become distorted or clipped. Ideally try to keep your audio
towards the top of the green section and occasionally in to the yellow section.
14Using the Monitor Output

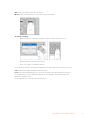
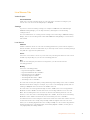
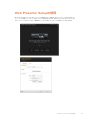
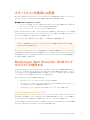
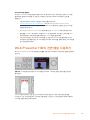
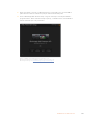
Using Web Presenter Setup
When your Blackmagic Web Presenter is connected to a network, any computer connected to
the same network can be used to control your Web Presenter remotely. With Blackmagic Web
Presenter Setup, you can access the same controls and settings that are available on the unit’s
front panel.
15Using Web Presenter Setup

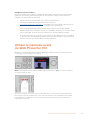
Live Stream Tab
Video Output
Stream Standard
Click on the ‘stream standard’ menu to select the video resolution setting for your
stream. Youcan choose from 720p25 up to 1080p60.
Settings
If you have custom streaming settings, for example an XML file from a Blackmagic
ATEM Streaming Bridge, you can import them by clicking the ‘load streaming
settings’ button.
For more information on creating custom settings and connecting to ATEM Streaming
Bridge, refer to the ‘Creating Video Links with ATEM Streaming Bridge’ section later in
this manual.
Live Stream
Platform
Click the ‘Platform’ menu to select the streaming platform for your broadcast. Options
include YouTube, Facebook and Twitch. If you have imported custom streaming settings
they will also appear in the platform list.
Server
Select the server that is closest to your location by selecting it from the list. The server
list will vary depending on your chosen streaming platform.
Key
Enter the streaming key that has been assigned to your broadcast from the
streaming platform.
Quality
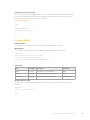
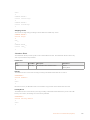
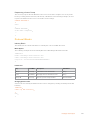
Select the streaming quality:
• HyperDeck High 45 to 70 Mb/s
• HyperDeck Medium 25 to 45 Mb/s
• HyperDeck Low 12 to 20 Mb/s
• Streaming High 6 to 9 Mb/s
• Streaming Medium 4.5 to 7 Mb/s
• Streaming Low 3 to 4.5 Mb/s
The data rate used by the quality setting will change depending on the video standard
Web Presenter HD is using. For example, if you select ‘streaming high’ quality and are
running at 1080p24 then it would use the 6 Mb/s data rate.
The data rates used on HyperDeck High are 45 to 70 Mb/s, the rates for HyperDeck
Medium are 25 to 45 Mb/s and the data rates used for HyperDeck Low are 12 to 20
Mb/s. The streaming data rates are lower to allow for transmitting the data over the
internet, so the data rate for Streaming High is 6 to 9 Mb/s, the data rate for Streaming
Medium is 4.5 to 7 Mb/s and the data rate for Streaming Low is 3 to 4.5 Mb/s.
You will notice that each setting has 2 data rates mentioned. The lower number is used
for the lower frame rates of 24p, 25p and 30p, while the higher data rates are used
when you are running higher frame rates of 50p and 60p. It’s also worth noting that the
default setting for the streaming quality is Streaming High 6 to 9 Mb/s, as this gives a
very high quality streaming channel.
16Using Web Presenter Setup

Off and On Air buttons
You can start or stop a live stream by using the ‘off’ and ‘on air’ buttons. The ‘on air’ button
illuminates red when a live stream is in progress.
Setup Tab
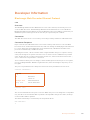
Name
If you want to rename your Web Presenter HD, type a new name into the box and click ‘save’.
Language
Lets you change the unit’s language setting.
Software
Displays Web Presenter HD’s current software version.
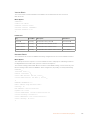
Audio Meters
Use the menu to choose the type of audio meter to display. Choose from VU -18dBFS,
VU-20dBFS, PPM -18dBFS or PPM -20dBFS reference levels.
Network
These settings allow you to configure options such as choosing between connecting to a
network over DHCP or using a static IP address. For more information on connecting your
WebPresenter HD to a network, refer to the ‘network settings’ section.
Connection Priority - When Ethernet and a mobile phone are both connected to
theWeb Presenter, this setting lets you choose which connection will be used for
streaming. For more information on mobile tethering, refer to the ‘streaming using
yoursmartphone’ section
17Using Web Presenter Setup

Reset
Reset your Web Presenter HD by clicking the ‘factory reset’ button.
Network Settings
Your Web Presenter HD can connect to the network using a static IP address or by using DHCP.
DHCP - will automatically set an IP address for your unit and connect it to your network without
any settings changed.
The dynamic host configuration protocol, or DHCP, is a service on network servers and routers
that automatically finds your Web Presenter HD and assigns an IP address. DHCP makes it easy
to connect equipment via Ethernet and make sure that IP addresses do not conflict with each
other. Most computers and network switches support DHCP.
Static IP - If you want to set the IP address yourself, simply set the protocol setting to ‘static IP’
and change the IP settings manually.
A static IP address is one that won’t change even if your Web Presenter HD is rebooted.
Using a static IP address might be necessary if your connecting your Web Presenter HD to a
corporate network. If you have a network administrator, it’s possible your network might have
custom IP addresses for all the equipment connected to it. It’s best to check with your network
administrator if they are managing your computers and network in your company.
Setting Internet Sharing
forDirectStreaming
If you are unable to plug Web Presenter HD directly into a network switch or internet router,
youcan share your computer’s internet connection with Web Presenter HD through its
Ethernet port.
To set up Blackmagic Web Presenter HD for direct streaming:
1 Set your Web Presenter HD to use DHCP.
2 Configure your computer to share its internet connection through its Ethernet port.
Mac: in System Preferences, click ‘sharing’ then select ‘internet sharing’ from the
‘service’ list. In the ‘share your connection from’ menu, choose ‘wi-fi’ if your Mac is
connected to the internet over wifi. In the ‘to computers using’ list, select ‘ethernet’.
Inthe ‘service’ list, tick the ‘internet sharing’ checkbox. When you are asked if you are
sure you want to turn on internet sharing, click ‘start’.
Windows: right click the ‘start’ icon and select ‘network connections’. The ‘network
status’ screen appears. Click on ‘change adapter options’. This lists your computer’s
network connections. Right click on the internet connection and select ‘properties’.
Onthe ‘sharing’ tab, tick ‘allow other network users to connect through this computer’s
internet connection’. Select a network connection in the menu then click ‘OK’.
3 Plug Web Presenter HD into your computer’s Ethernet port. After a few seconds,
DHCPassigns an IP address to Web Presenter HD.
4 Confirm your Web Presenter HD is connected to the internet via Ethernet by observing
Ethernet icon in the top right corner on the unit’s LCD screen.
18Setting Internet Sharing forDirectStreaming

Streaming Using Your Smartphone
Blackmagic Web Presenter is able to stream by tethering to your smartphone. This means you
can stream to the world from any location where your smartphone has a cellular connection.
To set up mobile tethering:
1 Connect your smartphone to Blackmagic Web Presenter HD using a USB-C cable.
You can use the USB-C connector on the front or back panel.
2 Enable your smartphone’s internet hotspot.
On your iOS device open settings > personal hotspot and make sure ‘allow others to join’ option
is on. On your Android device swipe the screen to display the quick menu. Press and hold the
hotspot icon and then turn on USB tethering.
Now you can press the ‘on air’ button on your Blackmagic Web Presenter HD to go live.
TIP Once you’ve finished streaming, we recommend you switch off tethering
connections to save your smartphone’s battery life.
If your Web Presenter HD had an Ethernet cable connected, you are advised to confirm it is
configured to use mobile internet tethering. Open the Web Presenter Setup utility and go to the
‘setup’ tab. In the ‘network’ section, set the connection priority to ‘mobile’.
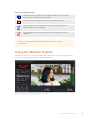
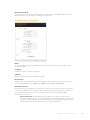
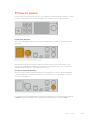
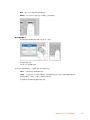
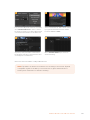
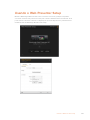
Using Blackmagic Web Presenter HD
as a Webcam
Software such as Skype or Zoom should automatically set Web Presenter HD as the webcam,
so when you launch the application you will see video from your Web Presenter HD
immediately. If the application doesn’t select Web Presenter HD automatically, manually set it
touse Web Presenter HD as the webcam and microphone.
Below is an example of how to set the webcam settings on Skype.
1 In Skype’s menu bar, open the ‘video and audio settings’.
2 Click on the ‘Camera’ menu and select your Web Presenter HD from the list. You will
see the video from Web Presenter HD appear in the preview window.
3 Go to the ‘Microphone’ menu and select your Web Presenter HD as your audio source.
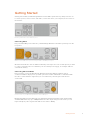
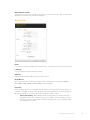
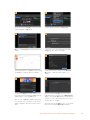
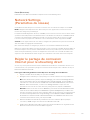
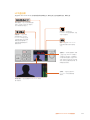
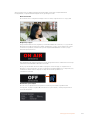
Setting up Open Broadcaster
Open Broadcaster is an open source application that works as a streaming platform between
your Web Presenter HD and your favorite streaming software like YouTube, Twitch, Facebook
Live and others. Broadcaster compresses your video to a bit rate that is easily managed by your
streaming app.
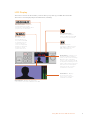
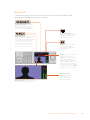
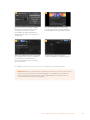
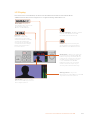
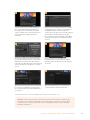
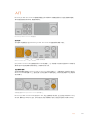
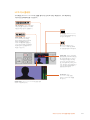
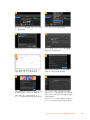
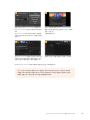
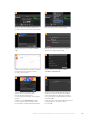
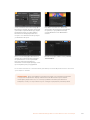
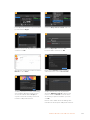
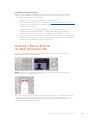
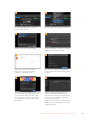
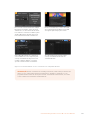
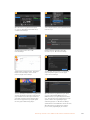
Below is a demonstration of how to set up Open Broadcaster to stream the webcam output
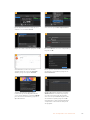
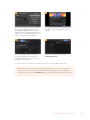
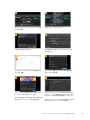
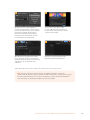
from your Web Presenter HD using YouTube Live as the streaming service.
19Using Blackmagic Web Presenter HD as a Webcam

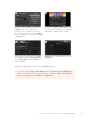
1 2
Launch Open Broadcaster and click on the
plussymbol in the ‘sources’ box.
Select ‘Video Capture Device’.
3
4
Name the new source and click ‘OK’. In the device menu, select your
WebPresenterHD model and click ‘OK’.
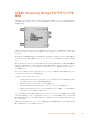
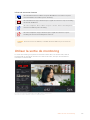
5 6
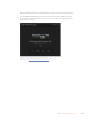
Now go to your YouTube account. Click on the
‘golive’ button then click ‘stream’.
In the YouTube ‘stream’ options, enter your
broadcast details and click ‘create stream’.
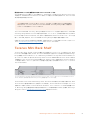
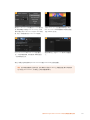
7 8
YouTube will now generate a stream key
that will direct Open Broadcaster to your
YouTube account.
Click the ‘copy’ button next to the stream key.
Copy the stream key that you will now paste
intoOpen Broadcaster.
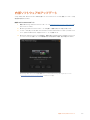
Return to Open Broadcaster and open the
preferences by clicking on ‘OBS/preferences’
in themenu bar. Select ‘stream’. Now paste
in the stream key you copied from YouTube
and click ‘OK’.
You will now see the video from your
Web Presenter HD in the Open Broadcaster
streaming preview window.
20Using Blackmagic Web Presenter HD as a Webcam
Sayfa yükleniyor...
Sayfa yükleniyor...
Sayfa yükleniyor...
Sayfa yükleniyor...
Sayfa yükleniyor...
Sayfa yükleniyor...
Sayfa yükleniyor...
Sayfa yükleniyor...
Sayfa yükleniyor...
Sayfa yükleniyor...
Sayfa yükleniyor...
Sayfa yükleniyor...
Sayfa yükleniyor...
Sayfa yükleniyor...
Sayfa yükleniyor...
Sayfa yükleniyor...
Sayfa yükleniyor...
Sayfa yükleniyor...
Sayfa yükleniyor...
Sayfa yükleniyor...
Sayfa yükleniyor...
Sayfa yükleniyor...
Sayfa yükleniyor...
Sayfa yükleniyor...
Sayfa yükleniyor...
Sayfa yükleniyor...
Sayfa yükleniyor...
Sayfa yükleniyor...
Sayfa yükleniyor...
Sayfa yükleniyor...
Sayfa yükleniyor...
Sayfa yükleniyor...
Sayfa yükleniyor...
Sayfa yükleniyor...
Sayfa yükleniyor...
Sayfa yükleniyor...
Sayfa yükleniyor...
Sayfa yükleniyor...
Sayfa yükleniyor...
Sayfa yükleniyor...
Sayfa yükleniyor...
Sayfa yükleniyor...
Sayfa yükleniyor...
Sayfa yükleniyor...
Sayfa yükleniyor...
Sayfa yükleniyor...
Sayfa yükleniyor...
Sayfa yükleniyor...
Sayfa yükleniyor...
Sayfa yükleniyor...
Sayfa yükleniyor...
Sayfa yükleniyor...
Sayfa yükleniyor...
Sayfa yükleniyor...
Sayfa yükleniyor...
Sayfa yükleniyor...
Sayfa yükleniyor...
Sayfa yükleniyor...
Sayfa yükleniyor...
Sayfa yükleniyor...
Sayfa yükleniyor...
Sayfa yükleniyor...
Sayfa yükleniyor...
Sayfa yükleniyor...
Sayfa yükleniyor...
Sayfa yükleniyor...
Sayfa yükleniyor...
Sayfa yükleniyor...
Sayfa yükleniyor...
Sayfa yükleniyor...
Sayfa yükleniyor...
Sayfa yükleniyor...
Sayfa yükleniyor...
Sayfa yükleniyor...
Sayfa yükleniyor...
Sayfa yükleniyor...
Sayfa yükleniyor...
Sayfa yükleniyor...
Sayfa yükleniyor...
Sayfa yükleniyor...
Sayfa yükleniyor...
Sayfa yükleniyor...
Sayfa yükleniyor...
Sayfa yükleniyor...
Sayfa yükleniyor...
Sayfa yükleniyor...
Sayfa yükleniyor...
Sayfa yükleniyor...
Sayfa yükleniyor...
Sayfa yükleniyor...
Sayfa yükleniyor...
Sayfa yükleniyor...
Sayfa yükleniyor...
Sayfa yükleniyor...
Sayfa yükleniyor...
Sayfa yükleniyor...
Sayfa yükleniyor...
Sayfa yükleniyor...
Sayfa yükleniyor...
Sayfa yükleniyor...
Sayfa yükleniyor...
Sayfa yükleniyor...
Sayfa yükleniyor...
Sayfa yükleniyor...
Sayfa yükleniyor...
Sayfa yükleniyor...
Sayfa yükleniyor...
Sayfa yükleniyor...
Sayfa yükleniyor...
Sayfa yükleniyor...
Sayfa yükleniyor...
Sayfa yükleniyor...
Sayfa yükleniyor...
Sayfa yükleniyor...
Sayfa yükleniyor...
Sayfa yükleniyor...
Sayfa yükleniyor...
Sayfa yükleniyor...
Sayfa yükleniyor...
Sayfa yükleniyor...
Sayfa yükleniyor...
Sayfa yükleniyor...
Sayfa yükleniyor...
Sayfa yükleniyor...
Sayfa yükleniyor...
Sayfa yükleniyor...
Sayfa yükleniyor...
Sayfa yükleniyor...
Sayfa yükleniyor...
Sayfa yükleniyor...
Sayfa yükleniyor...
Sayfa yükleniyor...
Sayfa yükleniyor...
Sayfa yükleniyor...
Sayfa yükleniyor...
Sayfa yükleniyor...
Sayfa yükleniyor...
Sayfa yükleniyor...
Sayfa yükleniyor...
Sayfa yükleniyor...
Sayfa yükleniyor...
Sayfa yükleniyor...
Sayfa yükleniyor...
Sayfa yükleniyor...
Sayfa yükleniyor...
Sayfa yükleniyor...
Sayfa yükleniyor...
Sayfa yükleniyor...
Sayfa yükleniyor...
Sayfa yükleniyor...
Sayfa yükleniyor...
Sayfa yükleniyor...
Sayfa yükleniyor...
Sayfa yükleniyor...
Sayfa yükleniyor...
Sayfa yükleniyor...
Sayfa yükleniyor...
Sayfa yükleniyor...
Sayfa yükleniyor...
Sayfa yükleniyor...
Sayfa yükleniyor...
Sayfa yükleniyor...
Sayfa yükleniyor...
Sayfa yükleniyor...
Sayfa yükleniyor...
Sayfa yükleniyor...
Sayfa yükleniyor...
Sayfa yükleniyor...
Sayfa yükleniyor...
Sayfa yükleniyor...
Sayfa yükleniyor...
Sayfa yükleniyor...
Sayfa yükleniyor...
Sayfa yükleniyor...
Sayfa yükleniyor...
Sayfa yükleniyor...
Sayfa yükleniyor...
Sayfa yükleniyor...
Sayfa yükleniyor...
Sayfa yükleniyor...
Sayfa yükleniyor...
Sayfa yükleniyor...
Sayfa yükleniyor...
Sayfa yükleniyor...
Sayfa yükleniyor...
Sayfa yükleniyor...
Sayfa yükleniyor...
Sayfa yükleniyor...
Sayfa yükleniyor...
Sayfa yükleniyor...
Sayfa yükleniyor...
Sayfa yükleniyor...
Sayfa yükleniyor...
Sayfa yükleniyor...
Sayfa yükleniyor...
Sayfa yükleniyor...
Sayfa yükleniyor...
Sayfa yükleniyor...
Sayfa yükleniyor...
Sayfa yükleniyor...
Sayfa yükleniyor...
Sayfa yükleniyor...
Sayfa yükleniyor...
Sayfa yükleniyor...
Sayfa yükleniyor...
Sayfa yükleniyor...
Sayfa yükleniyor...
Sayfa yükleniyor...
Sayfa yükleniyor...
Sayfa yükleniyor...
Sayfa yükleniyor...
Sayfa yükleniyor...
Sayfa yükleniyor...
Sayfa yükleniyor...
Sayfa yükleniyor...
Sayfa yükleniyor...
Sayfa yükleniyor...
Sayfa yükleniyor...
Sayfa yükleniyor...
Sayfa yükleniyor...
Sayfa yükleniyor...
Sayfa yükleniyor...
Sayfa yükleniyor...
Sayfa yükleniyor...
Sayfa yükleniyor...
Sayfa yükleniyor...
Sayfa yükleniyor...
Sayfa yükleniyor...
Sayfa yükleniyor...
Sayfa yükleniyor...
Sayfa yükleniyor...
Sayfa yükleniyor...
Sayfa yükleniyor...
Sayfa yükleniyor...
Sayfa yükleniyor...
Sayfa yükleniyor...
Sayfa yükleniyor...
Sayfa yükleniyor...
Sayfa yükleniyor...
Sayfa yükleniyor...
Sayfa yükleniyor...
Sayfa yükleniyor...
Sayfa yükleniyor...
Sayfa yükleniyor...
Sayfa yükleniyor...
Sayfa yükleniyor...
Sayfa yükleniyor...
Sayfa yükleniyor...
Sayfa yükleniyor...
Sayfa yükleniyor...
Sayfa yükleniyor...
Sayfa yükleniyor...
Sayfa yükleniyor...
Sayfa yükleniyor...
Sayfa yükleniyor...
Sayfa yükleniyor...
Sayfa yükleniyor...
Sayfa yükleniyor...
Sayfa yükleniyor...
Sayfa yükleniyor...
Sayfa yükleniyor...
Sayfa yükleniyor...
Sayfa yükleniyor...
Sayfa yükleniyor...
Sayfa yükleniyor...
Sayfa yükleniyor...
Sayfa yükleniyor...
Sayfa yükleniyor...
Sayfa yükleniyor...
Sayfa yükleniyor...
Sayfa yükleniyor...
Sayfa yükleniyor...
Sayfa yükleniyor...
Sayfa yükleniyor...
Sayfa yükleniyor...
Sayfa yükleniyor...
Sayfa yükleniyor...
Sayfa yükleniyor...
Sayfa yükleniyor...
Sayfa yükleniyor...
Sayfa yükleniyor...
Sayfa yükleniyor...
Sayfa yükleniyor...
Sayfa yükleniyor...
Sayfa yükleniyor...
Sayfa yükleniyor...
Sayfa yükleniyor...
Sayfa yükleniyor...
Sayfa yükleniyor...
Sayfa yükleniyor...
Sayfa yükleniyor...
Sayfa yükleniyor...
Sayfa yükleniyor...
Sayfa yükleniyor...
Sayfa yükleniyor...
Sayfa yükleniyor...
Sayfa yükleniyor...
Sayfa yükleniyor...
Sayfa yükleniyor...
Sayfa yükleniyor...
Sayfa yükleniyor...
Sayfa yükleniyor...
Sayfa yükleniyor...
Sayfa yükleniyor...
Sayfa yükleniyor...
Sayfa yükleniyor...
Sayfa yükleniyor...
Sayfa yükleniyor...
Sayfa yükleniyor...
Sayfa yükleniyor...
Sayfa yükleniyor...
Sayfa yükleniyor...
Sayfa yükleniyor...
Sayfa yükleniyor...
Sayfa yükleniyor...
Sayfa yükleniyor...
Sayfa yükleniyor...
Sayfa yükleniyor...
Sayfa yükleniyor...
Sayfa yükleniyor...
Sayfa yükleniyor...
Sayfa yükleniyor...
Sayfa yükleniyor...
Sayfa yükleniyor...
Sayfa yükleniyor...
Sayfa yükleniyor...
Sayfa yükleniyor...
Sayfa yükleniyor...
Sayfa yükleniyor...
Sayfa yükleniyor...
Sayfa yükleniyor...
Sayfa yükleniyor...
Sayfa yükleniyor...
Sayfa yükleniyor...
Sayfa yükleniyor...
Sayfa yükleniyor...
Sayfa yükleniyor...
Sayfa yükleniyor...
Sayfa yükleniyor...
Sayfa yükleniyor...
Sayfa yükleniyor...
Sayfa yükleniyor...
Sayfa yükleniyor...
Sayfa yükleniyor...
Sayfa yükleniyor...
Sayfa yükleniyor...
Sayfa yükleniyor...
Sayfa yükleniyor...
Sayfa yükleniyor...
Sayfa yükleniyor...
Sayfa yükleniyor...
Sayfa yükleniyor...
Sayfa yükleniyor...
Sayfa yükleniyor...
Sayfa yükleniyor...
Sayfa yükleniyor...
Sayfa yükleniyor...
Sayfa yükleniyor...
Sayfa yükleniyor...
Sayfa yükleniyor...
Sayfa yükleniyor...
Sayfa yükleniyor...
Sayfa yükleniyor...
Sayfa yükleniyor...
Sayfa yükleniyor...
Sayfa yükleniyor...
Sayfa yükleniyor...
Sayfa yükleniyor...
Sayfa yükleniyor...
Sayfa yükleniyor...
Sayfa yükleniyor...
Sayfa yükleniyor...
Sayfa yükleniyor...
Sayfa yükleniyor...
Sayfa yükleniyor...
Sayfa yükleniyor...
Sayfa yükleniyor...
Sayfa yükleniyor...
Sayfa yükleniyor...
Sayfa yükleniyor...
Sayfa yükleniyor...
Sayfa yükleniyor...
Sayfa yükleniyor...
Sayfa yükleniyor...
Sayfa yükleniyor...
Sayfa yükleniyor...
Sayfa yükleniyor...
Sayfa yükleniyor...
Sayfa yükleniyor...
Sayfa yükleniyor...
Sayfa yükleniyor...
Sayfa yükleniyor...
Sayfa yükleniyor...
Sayfa yükleniyor...
Sayfa yükleniyor...
Sayfa yükleniyor...
Sayfa yükleniyor...
Sayfa yükleniyor...
Sayfa yükleniyor...
-
 1
1
-
 2
2
-
 3
3
-
 4
4
-
 5
5
-
 6
6
-
 7
7
-
 8
8
-
 9
9
-
 10
10
-
 11
11
-
 12
12
-
 13
13
-
 14
14
-
 15
15
-
 16
16
-
 17
17
-
 18
18
-
 19
19
-
 20
20
-
 21
21
-
 22
22
-
 23
23
-
 24
24
-
 25
25
-
 26
26
-
 27
27
-
 28
28
-
 29
29
-
 30
30
-
 31
31
-
 32
32
-
 33
33
-
 34
34
-
 35
35
-
 36
36
-
 37
37
-
 38
38
-
 39
39
-
 40
40
-
 41
41
-
 42
42
-
 43
43
-
 44
44
-
 45
45
-
 46
46
-
 47
47
-
 48
48
-
 49
49
-
 50
50
-
 51
51
-
 52
52
-
 53
53
-
 54
54
-
 55
55
-
 56
56
-
 57
57
-
 58
58
-
 59
59
-
 60
60
-
 61
61
-
 62
62
-
 63
63
-
 64
64
-
 65
65
-
 66
66
-
 67
67
-
 68
68
-
 69
69
-
 70
70
-
 71
71
-
 72
72
-
 73
73
-
 74
74
-
 75
75
-
 76
76
-
 77
77
-
 78
78
-
 79
79
-
 80
80
-
 81
81
-
 82
82
-
 83
83
-
 84
84
-
 85
85
-
 86
86
-
 87
87
-
 88
88
-
 89
89
-
 90
90
-
 91
91
-
 92
92
-
 93
93
-
 94
94
-
 95
95
-
 96
96
-
 97
97
-
 98
98
-
 99
99
-
 100
100
-
 101
101
-
 102
102
-
 103
103
-
 104
104
-
 105
105
-
 106
106
-
 107
107
-
 108
108
-
 109
109
-
 110
110
-
 111
111
-
 112
112
-
 113
113
-
 114
114
-
 115
115
-
 116
116
-
 117
117
-
 118
118
-
 119
119
-
 120
120
-
 121
121
-
 122
122
-
 123
123
-
 124
124
-
 125
125
-
 126
126
-
 127
127
-
 128
128
-
 129
129
-
 130
130
-
 131
131
-
 132
132
-
 133
133
-
 134
134
-
 135
135
-
 136
136
-
 137
137
-
 138
138
-
 139
139
-
 140
140
-
 141
141
-
 142
142
-
 143
143
-
 144
144
-
 145
145
-
 146
146
-
 147
147
-
 148
148
-
 149
149
-
 150
150
-
 151
151
-
 152
152
-
 153
153
-
 154
154
-
 155
155
-
 156
156
-
 157
157
-
 158
158
-
 159
159
-
 160
160
-
 161
161
-
 162
162
-
 163
163
-
 164
164
-
 165
165
-
 166
166
-
 167
167
-
 168
168
-
 169
169
-
 170
170
-
 171
171
-
 172
172
-
 173
173
-
 174
174
-
 175
175
-
 176
176
-
 177
177
-
 178
178
-
 179
179
-
 180
180
-
 181
181
-
 182
182
-
 183
183
-
 184
184
-
 185
185
-
 186
186
-
 187
187
-
 188
188
-
 189
189
-
 190
190
-
 191
191
-
 192
192
-
 193
193
-
 194
194
-
 195
195
-
 196
196
-
 197
197
-
 198
198
-
 199
199
-
 200
200
-
 201
201
-
 202
202
-
 203
203
-
 204
204
-
 205
205
-
 206
206
-
 207
207
-
 208
208
-
 209
209
-
 210
210
-
 211
211
-
 212
212
-
 213
213
-
 214
214
-
 215
215
-
 216
216
-
 217
217
-
 218
218
-
 219
219
-
 220
220
-
 221
221
-
 222
222
-
 223
223
-
 224
224
-
 225
225
-
 226
226
-
 227
227
-
 228
228
-
 229
229
-
 230
230
-
 231
231
-
 232
232
-
 233
233
-
 234
234
-
 235
235
-
 236
236
-
 237
237
-
 238
238
-
 239
239
-
 240
240
-
 241
241
-
 242
242
-
 243
243
-
 244
244
-
 245
245
-
 246
246
-
 247
247
-
 248
248
-
 249
249
-
 250
250
-
 251
251
-
 252
252
-
 253
253
-
 254
254
-
 255
255
-
 256
256
-
 257
257
-
 258
258
-
 259
259
-
 260
260
-
 261
261
-
 262
262
-
 263
263
-
 264
264
-
 265
265
-
 266
266
-
 267
267
-
 268
268
-
 269
269
-
 270
270
-
 271
271
-
 272
272
-
 273
273
-
 274
274
-
 275
275
-
 276
276
-
 277
277
-
 278
278
-
 279
279
-
 280
280
-
 281
281
-
 282
282
-
 283
283
-
 284
284
-
 285
285
-
 286
286
-
 287
287
-
 288
288
-
 289
289
-
 290
290
-
 291
291
-
 292
292
-
 293
293
-
 294
294
-
 295
295
-
 296
296
-
 297
297
-
 298
298
-
 299
299
-
 300
300
-
 301
301
-
 302
302
-
 303
303
-
 304
304
-
 305
305
-
 306
306
-
 307
307
-
 308
308
-
 309
309
-
 310
310
-
 311
311
-
 312
312
-
 313
313
-
 314
314
-
 315
315
-
 316
316
-
 317
317
-
 318
318
-
 319
319
-
 320
320
-
 321
321
-
 322
322
-
 323
323
-
 324
324
-
 325
325
-
 326
326
-
 327
327
-
 328
328
-
 329
329
-
 330
330
-
 331
331
-
 332
332
-
 333
333
-
 334
334
-
 335
335
-
 336
336
-
 337
337
-
 338
338
-
 339
339
-
 340
340
-
 341
341
-
 342
342
-
 343
343
-
 344
344
-
 345
345
-
 346
346
-
 347
347
-
 348
348
-
 349
349
-
 350
350
-
 351
351
-
 352
352
-
 353
353
-
 354
354
-
 355
355
-
 356
356
-
 357
357
-
 358
358
-
 359
359
-
 360
360
-
 361
361
-
 362
362
-
 363
363
-
 364
364
-
 365
365
-
 366
366
-
 367
367
-
 368
368
-
 369
369
-
 370
370
-
 371
371
-
 372
372
-
 373
373
-
 374
374
-
 375
375
-
 376
376
-
 377
377
-
 378
378
-
 379
379
-
 380
380
-
 381
381
-
 382
382
-
 383
383
-
 384
384
-
 385
385
-
 386
386
-
 387
387
-
 388
388
-
 389
389
-
 390
390
-
 391
391
-
 392
392
-
 393
393
-
 394
394
-
 395
395
-
 396
396
-
 397
397
-
 398
398
-
 399
399
-
 400
400
-
 401
401
-
 402
402
-
 403
403
-
 404
404
-
 405
405
-
 406
406
-
 407
407
-
 408
408
-
 409
409
-
 410
410
-
 411
411
-
 412
412
-
 413
413
-
 414
414
-
 415
415
-
 416
416
-
 417
417
-
 418
418
-
 419
419


Blackmagic Web Presenter HD Kullanım kılavuzu
- Tip
- Kullanım kılavuzu
diğer dillerde
- español: Blackmagic Web Presenter HD Manual de usuario
- italiano: Blackmagic Web Presenter HD Manuale utente
- 日本語: Blackmagic Web Presenter HD ユーザーマニュアル
- português: Blackmagic Web Presenter HD Manual do usuário
- English: Blackmagic Web Presenter HD User manual
- русский: Blackmagic Web Presenter HD Руководство пользователя
İlgili makaleler
-
Blackmagic Web Presenter Kullanım kılavuzu
-
Blackmagic Web Presenter Streamer El kitabı
-
-
-
Blackmagic MiniC SDI Distribution Kullanım kılavuzu
-
-
-
-
-
Diğer belgeler
-
 Blackmagic Design Teranex Mini SDI - HDMI 12G Kullanım kılavuzu
-
Creative Live! Cam Chat IM VF0530 Kullanım kılavuzu
-
 Blackmagic Design ATEM Mini Kullanım kılavuzu
-
-
-
 Blackmagic Design HyperDeck Studio Mini El kitabı
-
JBL C414B-XLS/ST Kullanım kılavuzu
-
Hama 00053265 El kitabı
-
Intermec CN51 Kullanım kılavuzu
-
Philips SNP3000/10 Kullanım kılavuzu


