


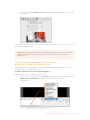
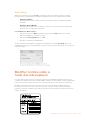
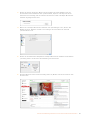
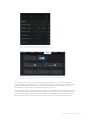
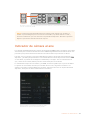
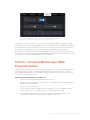
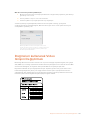
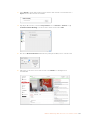
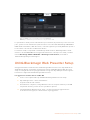
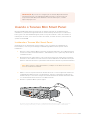
Welcome!
Thank you for purchasing your Blackmagic Web Presenter!
With Blackmagic Web Presenter, our design goal was to make Internet based broadcasting
andeven calling using video for presentations dramatically easier. Unlike our traditional capture
cards, which are designed for post production, Blackmagic Web Presenter is quite different
because it transforms the SDI and HDMI video inputs into USB video that uses the webcam
driver that’s built into your computer.
What this means is that any SDI or HDMI video source now looks the same as a regular webcam
and any software that works with a webcam will now work with professional broadcast quality
products. With webcam support built into all video streaming and calling software, it means that
you have a very large choice of what streaming platform you can use.
Unlike capture cards that send all the pixels in the video source to the computer, Blackmagic
Web Presenter actually reduces the video resolution down to 720p and can even reduce the
video frame rate down to 20, 15, 10 or 5 frames per second when directed to by the software.
This means you get very high quality HD video in 16:9 aspect ratio, but you also get the lowest
data rate to ensure you can stream video reliably and with regular internetconnections.
But Blackmagic Web Presenter is way more than a USB webcam source for SDI and HDMI
video sources, as it also includes a 2 input live switcher so you can do simple multi camera
broadcasts or presentations. All you need to do is add the optional Teranex Mini SmartPanel
and you can then press the 1 and 2 buttons to live switch between sources. ButtheTeranex
Mini Smart Panel also includes video preview, audio meters, input video standard and USB
frame rate information too!
Please check the support page on our website at www.blackmagicdesign.com for the latest
version of this manual and for updates to your Blackmagic Web Presenter’s internal software.
Also when downloading software, please register with your information so we can keep you
updated when new software is released. We are continually working on new features and
improvements, so we would love to hear from you!
Grant Petty
CEO Blackmagic Design
English

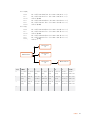
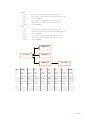
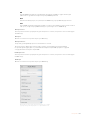
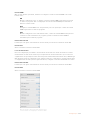
Contents
Blackmagic Web Presenter
Getting Started 5
Plugging in Power 5
Plugging in Video 5
Plugging in Audio 6
Connecting to your Computer 6
Setting Blackmagic Web Presenter as your Webcam 6
Using Blackmagic Web Presenter with Third Party Software 7
Using Blackmagic Web Presenter with Skype 7
Using Blackmagic Web Presenter to Stream with YouTube Live 8
To set your Web Presenter as a new device 8
Setting up a YouTube Live streaming channel 10
Using Teranex Mini Smart Panel 12
Installing Teranex Mini Smart Panel 12
Smart Panel Features 13
Settings 13
Video Input 13
Transition 14
Audio Mixer 15
Setup 17
Changing the Video Input using Switches 17
Teranex Mini Rack Shelf 18
Using the Built in Switcher 18
Using Camera Tally 19
Blackmagic Web Presenter Setup Utility 20
Appendix 22
Help 24
Regulatory Notices and SafetyInformation 25
Warranty 26

Getting Started
Getting Started
Plugging in Power
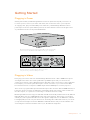
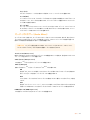
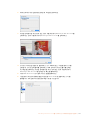
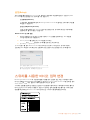
Getting started with your Blackmagic Web Presenter is quick and easy! All you need to do
isconnect power, connect your video and audio, then connect the unit to your computer.
To supply power, plug a standard IEC power cable into your Blackmagic Web Presenter’s
powerinput on the rear panel. When powered, the status indicator at the bottom right corner
of your Web Presenter’s front panel will illuminate.
Blackmagic Web Presenter supports 12G-SDI and will automatically
switch between SD, HD and Ultra HD all the way up to 2160p60
Connect power to your Blackmagic Web Presenter’s
rearpanel using a standard IEC power cable
Plugging in Video
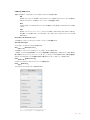
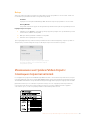
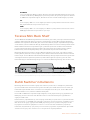
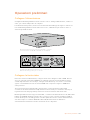
Next, plug your source video into the Blackmagic Web Presenter’s SDI or HDMI video inputs.
You might notice there are both loop SDI and loop HDMI outputs and you can use these
outputs if you want to connect Web Presenter in line with a video connection to other equipment.
For example, you could loop the SDI output to a deck or monitor or you could connect Web
Presenter in between a computer’s HDMI output and the HDMI input of a video projector.
There is also a program SDI output and this will output video after the SDI and HDMI switch, but
before the down conversion to 720p video. This SDI program output is the same resolution as
the video inputs, so is perfect for connecting to a deck for master recording.
Blackmagic Web Presenter supports 12G-SDI and will automatically switch between SD, HD and
Ultra HD all the way up to 2160p60 when the video input changes. This means you can input
virtually any video signal and it will convert the signal to 720p video for the USB video, which is
both high quality but also very low data rate for streaming video. What this means is you can do
your production in higher resolution 1080 HD or Ultra HD but the web presenter will take care
of lowering the resolution and frame rate for you, all within the single unit.
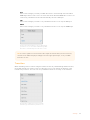
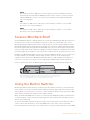
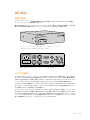
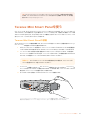
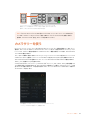
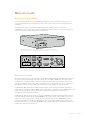
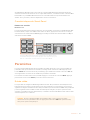
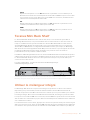
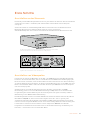
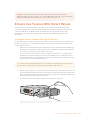
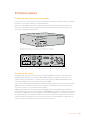
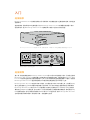
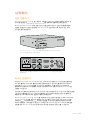
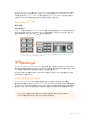
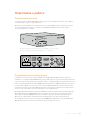
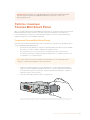
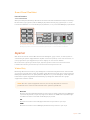
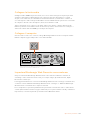
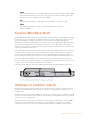
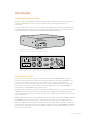
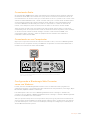
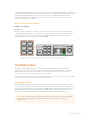
Web Presenter
Blackmagic
Web Presenter
Blackmagic
LINE/MIC IN
HDMI LOOP OUT
ANALOG AUDIO IN
HDMI IN
SDI IN SDI LOOP OUT
SDI PGM OUT
R
L
STEREO IN
USB WEB CAM
5

Getting Started
Plugging in Audio
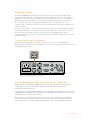
The SDI and HDMI inputs include audio, however there are also 2 additional analog audio
inputs. The XLR audio input is a mono input that lets you plug in microphones. It’s a single
channel mono input because microphones are mono and when you connect to this balanced
XLR audio input the audio will be sent to both left and right audio channels internally. The
second analog audio input is a HiFi input using RCA connectors. This input is good for
computer audio or audio from a music source such as smartphone, music player, audio mixer or
even a CD player.
All audio sources will be connected to an internal stereo audio mixer and all blended together.
If you don’t want audio to be included from any specific audio source, then please ensure you
disconnect the analog audio sources, or turn down audio from HDMI sources such as
computers. Otherwise any audio on any of the inputs will be blended together and sent to the
USB audio output.
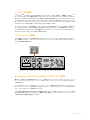
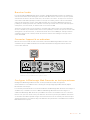
Connecting to your Computer
Now that you have plugged in your video and audio sources, connect your Blackmagic
WebPresenter to your computer via its USB port. Your computer will instantly recognise the unit
as a USB webcam source.
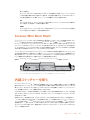
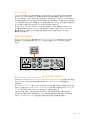
Connect your Blackmagic Web Presenter to your
computer via the USB port on the rear panel
Setting Blackmagic Web Presenter as your Webcam
Finally, choose your Blackmagic Web Presenter as your webcam using your desired video
conferencing or third party streaming software, such as Skype, Open Broadcaster,
XSplitBroadcaster or Periscope.
For information on using Blackmagic Web Presenter with Skype and YouTube Live, refer to the
‘Using Blackmagic Web Presenter with Skype’ and ‘Using Blackmagic Web Presenter to Stream
with YouTube Live’ sections in this manual.
That’s all there is to getting started! You are now ready to start broadcasting amazing high
quality video with mixed audio online! Please keep reading this manual for more information
such as tally features, changing settings and installing an optional Teranex Mini Smart Panel.
Web Presenter
Blackmagic
LINE/MIC IN
HDMI LOOP OUT
ANALOG AUDIO IN
HDMI IN
SDI IN SDI LOOP OUT
SDI PGM OUT
R
L
STEREO IN
USB WEB CAM
Web Presenter
Blackmagic
LINE/MIC IN
HDMI LOOP OUT
ANALOG AUDIO IN
HDMI IN
SDI IN SDI LOOP OUT
SDI PGM OUT
R
L
STEREO IN
USB WEB CAM
6

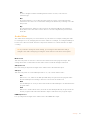
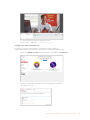
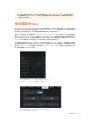
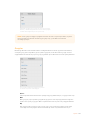
Using Blackmagic Web Presenter with Third Party Software
Using Blackmagic Web Presenter
with Third Party Software
Using Blackmagic Web Presenter with Skype
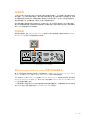
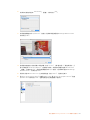
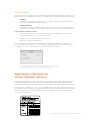
To use Blackmagic Web Presenter with Skype, first download the Skype software and install it
on your computer. The Skype software is free and can be downloaded from www.skype.com
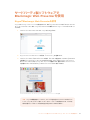
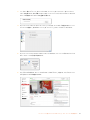
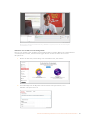
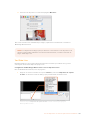
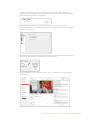
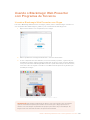
1 Once installed on your computer, launch Skype.
2 Open the preferences under Skype>Preferences and select ‘audio/ video’.
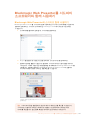
3 If your computer has a webcam it will be selected by default, and the Skype preview
window will show the image from the webcam. By clicking on the ‘Camera’ drop
down menu, you can select Blackmagic Web Presenter from the list. Once selected,
you will see the source video connected to your Web Presenter appear in the Skype
preview window.
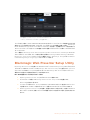
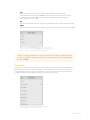
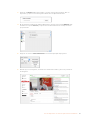
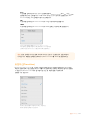
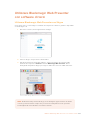
Select Blackmagic Web Presenter from
the ‘Camera’ drop down menu
NOTE In Skype’s preferences window, you may noticed that your image is reversed
from left to right. This is normal as Skype presents users with a mirror image of
themselves for preview purposes. Your video calls themselves will not be reversed.
7

Using Blackmagic Web Presenter with Third Party Software
4 In the ‘Microphone’ drop down menu, select Blackmagic Web Presenter
asyouraudio source.
That’s all you need to do, and if you make a Skype call you will be using the source video that
you have connected to Blackmagic Web Presenter.
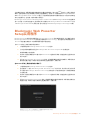
Using Blackmagic Web Presenter
to Stream with YouTube Live
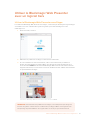
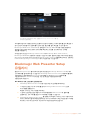
Open Broadcaster is free software that works very well for streaming to YouTube Live and can
be downloaded from: https://obsproject.com.
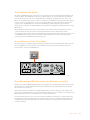
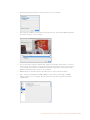
To set your Web Presenter as a new device
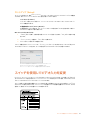
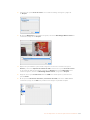
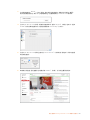
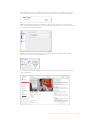
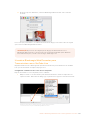
Once installed on your computer, launch the software.
1 Click on the ‘+’ button in the ‘sources’ box to add a source and select‘videocapture
device’. A pop up dialog box will give you the option to create a new source.
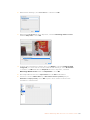
Select ‘video capture device’ from the list of sources and create
a new source for your Blackmagic Web Presenter
NOTE The process of setting up Skype to work with Blackmagic Web Presenter is
thesame on both a Mac OS and Windows computer. For more information refer to the
Skype website: www.skype.com
8

Using Blackmagic Web Presenter with Third Party Software
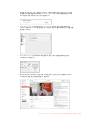
2 Select ‘create new’ in the pop up dialog box and click ‘ok’.
3 In the properties window for the new device, select your Blackmagic Web Presenter
from the ‘device’ drop down menu and click ‘ok’.
4 Follow the same process for audio. Click on the ‘+’ button in the ‘sources’ box
to add a source and select ‘audio input capture’. Select ‘create new’ in the pop
up dialog box and click ‘ok’. In the properties window for the new device, select
‘BlackmagicWebPresenter’ from the ‘device’ drop down menu and click ‘ok’.
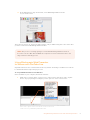
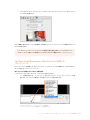
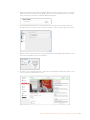
5 Now open the preferences located under OBS>Preferences and click on the
‘video’ tab.
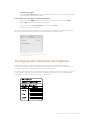
6 Set your base ‘canvas’ resolution to 1280 x 720 and your output ’scaled’ resolution
to1280 x 720, and click ‘ok’. This will allow you to see the input video full screen.
9

Using Blackmagic Web Presenter with Third Party Software
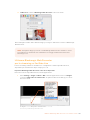
Setting the base ‘canvas’ and ‘scaled’ resolution to 1280 x 720 lets you
view the input video full screen
Setting up a YouTube Live streaming channel
Now you need to create a YouTube live streaming channel. In your browser, go to
www.youtube.com/live_dashboard and sign in or create a new Google account.
1 Select live streaming on the left hand side, and then click ‘get started’.
2 Type in the details about your stream and choose if you would like to make it
a public or a private stream.
10

Using Blackmagic Web Presenter with Third Party Software
3 Click ‘reveal’ at the bottom of the page. Highlight the stream key, right click and select
copy. It’s important to copy this information because in the next step we will paste this
key into the OpenBroadcaster software.
4 In the Open Broadcaster software, go to preferences and select the stream tab. Select
YouTube as your service and paste the stream key into the ‘stream key’ text field.
5 Click the start stream button in the main window of the Open Broadcaster software and
you should now be broadcasting your stream.
6 Back in your web browser, your stream’s status will change to ‘online’ and you can now
see your live stream.
11

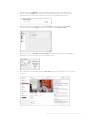
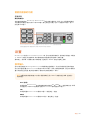
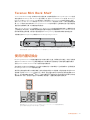
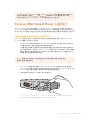
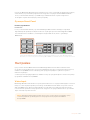
Using Teranex Mini Smart Panel
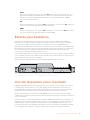
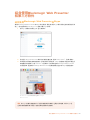
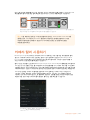
Using Teranex Mini Smart Panel
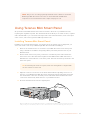
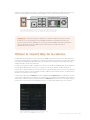
An optional Teranex Mini Smart Panel can be mounted to the front of your Web Presenter,
replacing the original front panel. The Smart Panel buttons allow you to switch sources, together
with a built in LCD so you can monitor the input video and status information, such as the input
video source, video format, plus the USB output frame rate.
Installing Teranex Mini Smart Panel
Installing your optional Smart Panel is easy and because the panels are hot swappable, you
don’t even need to turn off your Blackmagic Web Presenter when installing it.
1 Remove the two M3 screws on each side of your Web Presenter’s basic front panel
using a Pozidriv 2 screwdriver and gently pull the panel away from the front of your
Web Presenter.
2 On the inside of the basic panel, you’ll notice a small clear plastic tube attached to
the bottom corner. This tube directs light from the LED inside the Web Presenter to
illuminate the status indicator on the basic panel. This tube should stay attached to the
basic front panel.
3 Align the connector on the rear of the Smart Panel with the adjoining connector on
the face of your Blackmagic Web Presenter and gently push the Smart Panel towards
the unit until the connectors are firmly seated. The Smart Panel should make a firm
connection and fit neatly inside the face of your Web Presenter.
4 Re-insert the M3 screws from the original panel.
When installing the Teranex Mini Smart Panel to your Blackmagic WebPresenter, holding the panel
with your fingers and thumb positioned above and below the connector will help guide it into place
NOTE The process of setting up the Open Broadcaster software to work with
Blackmagic Web Presenter is the same on both a Mac OS and Windows
computer. Formore information refer to https://obsproject.com.
TIP If reattaching the basic front panel, make sure the light tube is aligned with
the slot in the front of the unit.
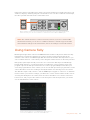
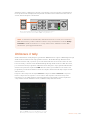
1
2
SET
VIDEO
MENU
AUDIO
Video Format
525i59.95 NTSC
Source
HDMI
USB
25 fps
Video Format
525i59.95 NTSC
Source
HDMI
USB
25 fps
12

Settings
If your Blackmagic Web Presenter is installed in a Teranex Mini Rack Shelf, you will need to
remove the Web Presenter from the rack shelf to access the front panel screws. See the ‘Teranex
Mini RackShelf’ section for more information. Your Web Presenter’s USB port is still accessible
with theSmart Panel attached. To access the port, simply open the rubber USB dust cover.
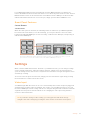
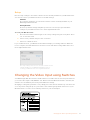
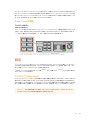
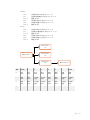
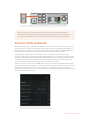
Smart Panel Features
Control Buttons
1 and 2 buttons
When the smart panel is attached, the switching feature is enabled on your Blackmagic Web
Presenter. This means when you are broadcasting, you can press buttons 1 and 2 to switch
between the SDI and HDMI input sources. Pressing ‘1’ will select the SDI input, and pressing ‘2’
will select the HDMI input.
The Teranex Mini Smart Panel enables the switcher feature on your Web Presenter, so you can
press buttons 1 and 2 to live switch between the SDI and HDMI input sources
Settings
When a Teranex Mini Smart Panel is attached to your Web Presenter, you can change settings
such as transition durations, audio mix settings and more. Simply press the ‘menu’ button to
open the settings menu, then use the rotary knob and set button to navigate through the menu
and change a setting.
To move back to the previous menu item, simply press the menu button again. Keep pressing
the menu button to return to the home screen.
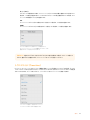
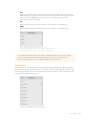
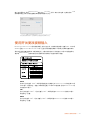
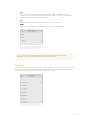
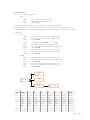
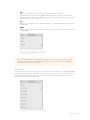
Video Input
Your Blackmagic Web Presenter can be set to automatically detect when an input is plugged in
and will set the program output accordingly. You can also set your Web Presenter to use only
the SDI or HDMI input. These settings can also be changed using the built in switches when the
original basic front panel is attached. Refer to the ‘changing the video input using switches’
section for more information.
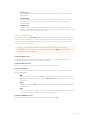
1 MENU
2 VIDEO
SET AUDIO
Video Format
525i59.94 NTSC
Source
HDMI
USB
30 fps
1 MENU
2 VIDEO
SET AUDIO
Video Format
525i59.94 NTSC
Source
HDMI
USB
30 fps
TIP If you want to change a video setting, you can bypass the main menu and go
straight to the video settings by pressing the ‘video’ button on the front control panel.
13

Settings
Auto
Choose this setting if you want your Web Presenter to automatically select the SDI or
HDMI input when a video source is connected. If both SDI and HDMI video sources are
connected, your Web Presenter will automatically select the SDI input.
SDI
Choose this setting if you want to set your Web Presenter to use only the SDI input.
HDMI
Choose this setting if you want to set your Web Presenter to use only the HDMI input.
Use the video input settings to choose which input
you want to use, or select auto for Blackmagic Web
Presenter to automatically detect the video source
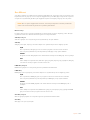
Transition
When switching a live broadcast using the switcher feature in your Blackmagic Web Presenter,
the default transition is a half second cross dissolve, but you can change the duration of the
transition if you want to. You can even set your Web Presenter to use a dip or cut transition!
The transition settings let you choose which
transition type and duration you want to use
TIP If a video signal is received via the video input other than what you have selected,
a black screen will be displayed. Simply select the appropriate input, or set your Web
Presenter to auto.
14

Settings
Cut
To use a straight cut when switching between video sources, select the cut
transition type.
Mix
The mix transition is a cross dissolve. This means one video source will smoothly
transition to the other over a set duration. Change the duration by selecting one of the
mix presets.
Dip
The dip transition is similar to a mix, however, the transition will first smoothly dip to
black, then to the other video source. Choose one of the dip duration presets in the
menu list.
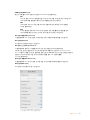
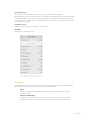
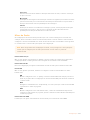
Audio Mixer
The audio mixer settings let you control the mix of your audio. For example, turning the audio
for each input on or off, changing the level of the audio for each input, or setting the XLR input
level to mic or line level audio. Turn the rotary knob clockwise or counterclockwise to adjust
a setting.
Master Level
Turn the rotary knob to increase or decrease the audio level for the program output. This
setting affects the overall volume for the entire master sound mix being broadcasted.
SDI Input Level
Use this setting to adjust the strength of the audio level for the SDI video input.
SDI Input
Turn the rotary knob to set the SDI input audio to on, off, or audio follows video.
ON
When set to ‘on’, audio for the SDI input will always be present in the program audio.
Use the SDI input level setting to increase or decrease the audio level.
OFF
Set the SDI input to ‘off’ if you don’t want audio from the SDI input to be included in the
program audio.
AFV
When set to audio follows video, the audio for the SDI input will only be present in the
master program audio when the SDI video input is switched to the program output.
HDMI Input Level
Lets you adjust the strength of the audio level for the HDMI video input.
TIP If you want to change an audio setting, you can bypass the main menu and go
straight to the audio settings by pressing the ‘audio’ button on the front control panel.
15

Settings
HDMI Input
Turn the rotary knob to set the HDMI input audio to on, off, or audio follows video.
ON
When set to ‘on’, audio for the HDMI input will always be present in the program
audio. Use the HDMI input level setting to increase or decrease the audio level.
OFF
Set the HDMI input to ‘off’ if you don’t want audio from the HDMI input to be included in
the program audio.
AFV
When set to audio follows video, the audio for the HDMI input will only be present in the
master program audio when the HDMI video input is switched to the program output.
XLR Input Level
Lets you adjust the strength of the audio level for the XLR audio input source.
XLR Input
Turns the XLR input audio on or off.
XLR Input Source
Use this setting to set the input source level to mic or line level audio.
The signal strength from a microphone is typically at a lower level compared to levels from
audio playback equipment. To compensate for the lower signal strength, Blackmagic Web
Presenter can be set to ‘mic’ level audio which boosts the input signal. For audio equipment
other than a microphone, set the XLR input level to ‘line’.
RCA Input Level
Adjusts the strength of the audio level for the RCA audio input source.
RCA Input
Turns the RCA input audio on or off.
Turn audio for each input on or off, and
adjust levels using the audio mixer settings
16

Changing the Video Input using Switches
Setup
Use the setup settings to check the software version currently installed on your Web Presenter.
You can also restore your Web Presenter to its default settings.
Software
The software setting lets you check the software version currently installed on your
Blackmagic Web Presenter.
Factory Default
The factory default setting is helpful if you want to start a new project with all the
settings on your Web Presenter set to their original default state.
To reset your Web Presenter:
1 Press the menu button and navigate to the ‘setup’ settings using the rotary knob. Press
‘set’ to enter the menu.
2 Select ‘factory default’ and press the ‘set’ button.
3 Cancel or confirm the reset.
If you confirm the reset, your Web Presenter will now display a ‘resetting’ indicator. When the
reset is complete, the LCD will return to the home screen and all the settings will now be set to
their original default state.
The setup settings can be used to check the software version
currently installed on your Blackmagic Web Presenter, or
resetting your Web Presenter to its original default state
Changing the Video Input using Switches
Your Blackmagic Web Presenter has small switches accessible via the basic front panel that lets
you set the video input to SDI, HDMI or auto. When a Teranex Mini Smart Panel is attached, the
switches are overridden by the smart panel LCD menu settings.
Changing a setting using switches is easy! Simply move the relevant switches up or down to the
on or off position using the tip of a pen. Refer to the switch legend printed on the base of your
Web Presenter to see the correct switch positions for your desired input.
17

Using the Built In Switcher
AUTO
Set switches 1 and 2 to ‘OFF’. Choose this setting if you want your Web Presenter to
automatically select the SDI or HDMI input when a video source is connected. If both
SDI and HDMI video sources are connected, your Web Presenter will automatically
select the SDI input.
SDI
Set switch 2 to ‘OFF’ and 1 to ‘ON’. Choose this setting if you want to set your Web
Presenter to use only the SDI input.
HDMI
Set switch 2 to ‘ON’ and 1 to ‘OFF’. Choose this setting if you want to set your Web
Presenter to use only the HDMI input.
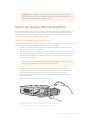
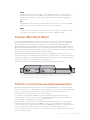
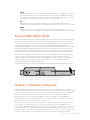
Teranex Mini Rack Shelf
Teranex Mini Rack Shelf is a 1 RU shelf that lets you install your Blackmagic Web Presenter into a
broadcast rack or road case. Your Web Presenter is so small, you can install it next to other
Blackmagic Design equipment that shares a similar form factor, such as Teranex Mini converters,
Blackmagic MultiView 4 and HyperDeck Studio Mini. For example, installing a Blackmagic Web
Presenter together with two HyperDeck Studio Minis gives you one unit to play back your video
sources, and provides another unit for recording the program output from your Web Presenter. This
modular design lets you build your own custom video solutions that are portable and easy to use!
Installing your Blackmagic Web Presenter into a Teranex Mini Rack Shelf is as easy as removing
the unit’s rubber feet, if installed, and fastening the unit to the base of the shelf using the
supplied screws. The Teranex Mini Rack Shelf ships with two original blank panels which you
can use to cover gaps if you don’t need to install additional Blackmagic Design equipment.
For more information check the Blackmagic Design website at www.blackmagicdesign.com.
Teranex Mini Rack Shelf lets you rack mount your Blackmagic Web Presenter
with other Blackmagic Design equipment that shares the same form factor,
such as Teranex Mini Converters and HyperDeck Studio Mini
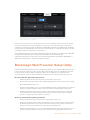
Using the Built in Switcher
Blackmagic Web Presenter features a built in 2 input live switcher. However, to take advantage
of this feature you need to install the Teranex Mini Smart Panel. This panel adds an LCD screen
and pushbutton controls that you can use to control the built in switcher. Once the Teranex Mini
Smart Panel is installed, the switcher feature will be enabled.
When both SDI and HDMI video sources are connected, the HDMI input will be resynchronized
so that both inputs can be transitioned without glitches. This is what makes the Web Presenter
able to do live switching.
To operate the built in switcher, simply press the 1 on the front panel to select SDI as the video
source or the button marked 2 to select the HDMI video source. Once selected, the Web
Presenter will perform a transition. You could connect a computer with a slide show to the HDMI
Web Presenter
Blackmagic
18

Using Camera Tally
input and a camera to the SDI source and do very professional live presentation shows for your
audience, simply by switching using the 1 and 2 buttons. You can also confirm the current input,
the video preview and audio levels on the LCD screen.
When switching a live broadcast using Blackmagic WebPresenter with a Teranex Mini Smart
Panel attached, press the 1 and2buttons to switch between the SDI and HDMI inputs
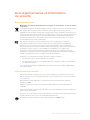
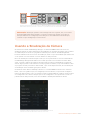
Using Camera Tally
Blackmagic Design studio cameras and ATEM switchers include a tally feature where the tally
information is sent from the switcher to the camera via the program return feed from the
switcher to the camera. Your Blackmagic Web Presenter also includes this tally feature so you
can see which camera is “on air” when you are using the switcher feature on the web presenter.
Using tally is quite simple and all you need to do is connect the SDI output of a Blackmagic
Design Studio Camera to your web presenter as an SDI video source and then connect the
program output of the web presenter back to the camera progam SDI input. Now when you
select the program button on the camera you can see the web presenter’s program video on the
camera. But what’s even more exciting is the tally information is now being sent to the camera.
The SDI video input is tally “camera 1” and the HDMI input is tagged as “camera 2”. So what this
means is that in your camera’s settings, you will need to set the camera number. In this case we
are using the SDI input for the camera, then the camera should be set to camera 1. Once this
has been set, and you press the 1 button on the front panel of the web presenter, you should
see the tally illuminate on the camera.
Set the camera number to ‘1’ for Blackmagic Studio Camera
connected via SDI in the ‘studio’ tab of the LCD menu
1 MENU
2 VIDEO
SET AUDIO
Video Format
525i59.94 NTSC
Source
HDMI
USB
30 fps
1 MENU
2 VIDEO
SET AUDIO
Video Format
525i59.94 NTSC
Source
HDMI
USB
30 fps
NOTE The default transition is a half second mix, however, if you have a Teranex Mini
Smart Panel attached, you can choose a different duration or transition type in the LCD
menu Transition settings. For more information, refer to the ‘Settings’ section in this manual.
19

Blackmagic Web Presenter Setup Utility
Set the camera number to ‘1’ for Blackmagic URSA Mini
connected via SDI in the ‘setup’ tab of the LCD menu
If you are doing a presentation, it can be extremely helpful for the presenter to see a nice
clearred tally indicator on the camera they are using when they are on air. This makes it easy
for them to know when they are live. Imagine having a Blackmagic URSA Mini with
BlackmagicURSA Studio Viewfinder combination and the presenter can see that big red tally
indicator when they are on air. It’s a very powerful combination!
The tally feature is supported on Blackmagic Studio Camera, Blackmagic Micro Studio Camera
and Blackmagic URSA Mini models of cameras. For more details on setting up tally, refer to the
‘Backmagic URSA and URSA Mini’ and ‘Blackmagic Studio Camera’ manuals which can be
downloaded from www.blackmagicdesign.com/support
Blackmagic Web Presenter Setup Utility
Occasionally, updates for your Blackmagic Web Presenter’s internal software will be available
on the Blackmagic Design website. Updates are installed on your Web Presenter via the
Blackmagic Web Presenter Setup utility. We recommend downloading the setup utility and
updating your Web Presenter so you can benefit from new features and improvements.
To update the internal software using Mac OS:
1 Download and unzip Blackmagic Web Presenter Setup.
2 Open the resulting disk image and launch the Blackmagic Web Presenter Setup
Installer.
Follow the onscreen instructions.
3 After installation, connect your Web Presenter to the computer via the USB connector
on the front panel. Lift open the plastic dust cover to access the USB connector.
4 Launch Blackmagic Web Presenter Setup and follow any onscreen prompt to update
the internal software. If no prompt appears, the internal software is up to date and there
is nothing further you need to do.
20
Sayfa yükleniyor...
Sayfa yükleniyor...
Sayfa yükleniyor...
Sayfa yükleniyor...
Sayfa yükleniyor...
Sayfa yükleniyor...
Sayfa yükleniyor...
Sayfa yükleniyor...
Sayfa yükleniyor...
Sayfa yükleniyor...
Sayfa yükleniyor...
Sayfa yükleniyor...
Sayfa yükleniyor...
Sayfa yükleniyor...
Sayfa yükleniyor...
Sayfa yükleniyor...
Sayfa yükleniyor...
Sayfa yükleniyor...
Sayfa yükleniyor...
Sayfa yükleniyor...
Sayfa yükleniyor...
Sayfa yükleniyor...
Sayfa yükleniyor...
Sayfa yükleniyor...
Sayfa yükleniyor...
Sayfa yükleniyor...
Sayfa yükleniyor...
Sayfa yükleniyor...
Sayfa yükleniyor...
Sayfa yükleniyor...
Sayfa yükleniyor...
Sayfa yükleniyor...
Sayfa yükleniyor...
Sayfa yükleniyor...
Sayfa yükleniyor...
Sayfa yükleniyor...
Sayfa yükleniyor...
Sayfa yükleniyor...
Sayfa yükleniyor...
Sayfa yükleniyor...
Sayfa yükleniyor...
Sayfa yükleniyor...
Sayfa yükleniyor...
Sayfa yükleniyor...
Sayfa yükleniyor...
Sayfa yükleniyor...
Sayfa yükleniyor...
Sayfa yükleniyor...
Sayfa yükleniyor...
Sayfa yükleniyor...
Sayfa yükleniyor...
Sayfa yükleniyor...
Sayfa yükleniyor...
Sayfa yükleniyor...
Sayfa yükleniyor...
Sayfa yükleniyor...
Sayfa yükleniyor...
Sayfa yükleniyor...
Sayfa yükleniyor...
Sayfa yükleniyor...
Sayfa yükleniyor...
Sayfa yükleniyor...
Sayfa yükleniyor...
Sayfa yükleniyor...
Sayfa yükleniyor...
Sayfa yükleniyor...
Sayfa yükleniyor...
Sayfa yükleniyor...
Sayfa yükleniyor...
Sayfa yükleniyor...
Sayfa yükleniyor...
Sayfa yükleniyor...
Sayfa yükleniyor...
Sayfa yükleniyor...
Sayfa yükleniyor...
Sayfa yükleniyor...
Sayfa yükleniyor...
Sayfa yükleniyor...
Sayfa yükleniyor...
Sayfa yükleniyor...
Sayfa yükleniyor...
Sayfa yükleniyor...
Sayfa yükleniyor...
Sayfa yükleniyor...
Sayfa yükleniyor...
Sayfa yükleniyor...
Sayfa yükleniyor...
Sayfa yükleniyor...
Sayfa yükleniyor...
Sayfa yükleniyor...
Sayfa yükleniyor...
Sayfa yükleniyor...
Sayfa yükleniyor...
Sayfa yükleniyor...
Sayfa yükleniyor...
Sayfa yükleniyor...
Sayfa yükleniyor...
Sayfa yükleniyor...
Sayfa yükleniyor...
Sayfa yükleniyor...
Sayfa yükleniyor...
Sayfa yükleniyor...
Sayfa yükleniyor...
Sayfa yükleniyor...
Sayfa yükleniyor...
Sayfa yükleniyor...
Sayfa yükleniyor...
Sayfa yükleniyor...
Sayfa yükleniyor...
Sayfa yükleniyor...
Sayfa yükleniyor...
Sayfa yükleniyor...
Sayfa yükleniyor...
Sayfa yükleniyor...
Sayfa yükleniyor...
Sayfa yükleniyor...
Sayfa yükleniyor...
Sayfa yükleniyor...
Sayfa yükleniyor...
Sayfa yükleniyor...
Sayfa yükleniyor...
Sayfa yükleniyor...
Sayfa yükleniyor...
Sayfa yükleniyor...
Sayfa yükleniyor...
Sayfa yükleniyor...
Sayfa yükleniyor...
Sayfa yükleniyor...
Sayfa yükleniyor...
Sayfa yükleniyor...
Sayfa yükleniyor...
Sayfa yükleniyor...
Sayfa yükleniyor...
Sayfa yükleniyor...
Sayfa yükleniyor...
Sayfa yükleniyor...
Sayfa yükleniyor...
Sayfa yükleniyor...
Sayfa yükleniyor...
Sayfa yükleniyor...
Sayfa yükleniyor...
Sayfa yükleniyor...
Sayfa yükleniyor...
Sayfa yükleniyor...
Sayfa yükleniyor...
Sayfa yükleniyor...
Sayfa yükleniyor...
Sayfa yükleniyor...
Sayfa yükleniyor...
Sayfa yükleniyor...
Sayfa yükleniyor...
Sayfa yükleniyor...
Sayfa yükleniyor...
Sayfa yükleniyor...
Sayfa yükleniyor...
Sayfa yükleniyor...
Sayfa yükleniyor...
Sayfa yükleniyor...
Sayfa yükleniyor...
Sayfa yükleniyor...
Sayfa yükleniyor...
Sayfa yükleniyor...
Sayfa yükleniyor...
Sayfa yükleniyor...
Sayfa yükleniyor...
Sayfa yükleniyor...
Sayfa yükleniyor...
Sayfa yükleniyor...
Sayfa yükleniyor...
Sayfa yükleniyor...
Sayfa yükleniyor...
Sayfa yükleniyor...
Sayfa yükleniyor...
Sayfa yükleniyor...
Sayfa yükleniyor...
Sayfa yükleniyor...
Sayfa yükleniyor...
Sayfa yükleniyor...
Sayfa yükleniyor...
Sayfa yükleniyor...
Sayfa yükleniyor...
Sayfa yükleniyor...
Sayfa yükleniyor...
Sayfa yükleniyor...
Sayfa yükleniyor...
Sayfa yükleniyor...
Sayfa yükleniyor...
Sayfa yükleniyor...
Sayfa yükleniyor...
Sayfa yükleniyor...
Sayfa yükleniyor...
Sayfa yükleniyor...
Sayfa yükleniyor...
Sayfa yükleniyor...
Sayfa yükleniyor...
Sayfa yükleniyor...
Sayfa yükleniyor...
Sayfa yükleniyor...
Sayfa yükleniyor...
Sayfa yükleniyor...
Sayfa yükleniyor...
Sayfa yükleniyor...
Sayfa yükleniyor...
Sayfa yükleniyor...
Sayfa yükleniyor...
Sayfa yükleniyor...
Sayfa yükleniyor...
Sayfa yükleniyor...
Sayfa yükleniyor...
Sayfa yükleniyor...
Sayfa yükleniyor...
Sayfa yükleniyor...
Sayfa yükleniyor...
Sayfa yükleniyor...
Sayfa yükleniyor...
Sayfa yükleniyor...
Sayfa yükleniyor...
Sayfa yükleniyor...
Sayfa yükleniyor...
Sayfa yükleniyor...
Sayfa yükleniyor...
Sayfa yükleniyor...
Sayfa yükleniyor...
Sayfa yükleniyor...
Sayfa yükleniyor...
Sayfa yükleniyor...
Sayfa yükleniyor...
Sayfa yükleniyor...
Sayfa yükleniyor...
Sayfa yükleniyor...
Sayfa yükleniyor...
Sayfa yükleniyor...
Sayfa yükleniyor...
Sayfa yükleniyor...
Sayfa yükleniyor...
Sayfa yükleniyor...
Sayfa yükleniyor...
Sayfa yükleniyor...
Sayfa yükleniyor...
Sayfa yükleniyor...
Sayfa yükleniyor...
Sayfa yükleniyor...
Sayfa yükleniyor...
Sayfa yükleniyor...
Sayfa yükleniyor...
Sayfa yükleniyor...
Sayfa yükleniyor...
Sayfa yükleniyor...
Sayfa yükleniyor...
Sayfa yükleniyor...
Sayfa yükleniyor...
Sayfa yükleniyor...
Sayfa yükleniyor...
Sayfa yükleniyor...
-
 1
1
-
 2
2
-
 3
3
-
 4
4
-
 5
5
-
 6
6
-
 7
7
-
 8
8
-
 9
9
-
 10
10
-
 11
11
-
 12
12
-
 13
13
-
 14
14
-
 15
15
-
 16
16
-
 17
17
-
 18
18
-
 19
19
-
 20
20
-
 21
21
-
 22
22
-
 23
23
-
 24
24
-
 25
25
-
 26
26
-
 27
27
-
 28
28
-
 29
29
-
 30
30
-
 31
31
-
 32
32
-
 33
33
-
 34
34
-
 35
35
-
 36
36
-
 37
37
-
 38
38
-
 39
39
-
 40
40
-
 41
41
-
 42
42
-
 43
43
-
 44
44
-
 45
45
-
 46
46
-
 47
47
-
 48
48
-
 49
49
-
 50
50
-
 51
51
-
 52
52
-
 53
53
-
 54
54
-
 55
55
-
 56
56
-
 57
57
-
 58
58
-
 59
59
-
 60
60
-
 61
61
-
 62
62
-
 63
63
-
 64
64
-
 65
65
-
 66
66
-
 67
67
-
 68
68
-
 69
69
-
 70
70
-
 71
71
-
 72
72
-
 73
73
-
 74
74
-
 75
75
-
 76
76
-
 77
77
-
 78
78
-
 79
79
-
 80
80
-
 81
81
-
 82
82
-
 83
83
-
 84
84
-
 85
85
-
 86
86
-
 87
87
-
 88
88
-
 89
89
-
 90
90
-
 91
91
-
 92
92
-
 93
93
-
 94
94
-
 95
95
-
 96
96
-
 97
97
-
 98
98
-
 99
99
-
 100
100
-
 101
101
-
 102
102
-
 103
103
-
 104
104
-
 105
105
-
 106
106
-
 107
107
-
 108
108
-
 109
109
-
 110
110
-
 111
111
-
 112
112
-
 113
113
-
 114
114
-
 115
115
-
 116
116
-
 117
117
-
 118
118
-
 119
119
-
 120
120
-
 121
121
-
 122
122
-
 123
123
-
 124
124
-
 125
125
-
 126
126
-
 127
127
-
 128
128
-
 129
129
-
 130
130
-
 131
131
-
 132
132
-
 133
133
-
 134
134
-
 135
135
-
 136
136
-
 137
137
-
 138
138
-
 139
139
-
 140
140
-
 141
141
-
 142
142
-
 143
143
-
 144
144
-
 145
145
-
 146
146
-
 147
147
-
 148
148
-
 149
149
-
 150
150
-
 151
151
-
 152
152
-
 153
153
-
 154
154
-
 155
155
-
 156
156
-
 157
157
-
 158
158
-
 159
159
-
 160
160
-
 161
161
-
 162
162
-
 163
163
-
 164
164
-
 165
165
-
 166
166
-
 167
167
-
 168
168
-
 169
169
-
 170
170
-
 171
171
-
 172
172
-
 173
173
-
 174
174
-
 175
175
-
 176
176
-
 177
177
-
 178
178
-
 179
179
-
 180
180
-
 181
181
-
 182
182
-
 183
183
-
 184
184
-
 185
185
-
 186
186
-
 187
187
-
 188
188
-
 189
189
-
 190
190
-
 191
191
-
 192
192
-
 193
193
-
 194
194
-
 195
195
-
 196
196
-
 197
197
-
 198
198
-
 199
199
-
 200
200
-
 201
201
-
 202
202
-
 203
203
-
 204
204
-
 205
205
-
 206
206
-
 207
207
-
 208
208
-
 209
209
-
 210
210
-
 211
211
-
 212
212
-
 213
213
-
 214
214
-
 215
215
-
 216
216
-
 217
217
-
 218
218
-
 219
219
-
 220
220
-
 221
221
-
 222
222
-
 223
223
-
 224
224
-
 225
225
-
 226
226
-
 227
227
-
 228
228
-
 229
229
-
 230
230
-
 231
231
-
 232
232
-
 233
233
-
 234
234
-
 235
235
-
 236
236
-
 237
237
-
 238
238
-
 239
239
-
 240
240
-
 241
241
-
 242
242
-
 243
243
-
 244
244
-
 245
245
-
 246
246
-
 247
247
-
 248
248
-
 249
249
-
 250
250
-
 251
251
-
 252
252
-
 253
253
-
 254
254
-
 255
255
-
 256
256
-
 257
257
-
 258
258
-
 259
259
-
 260
260
-
 261
261
-
 262
262
-
 263
263
-
 264
264
-
 265
265
-
 266
266
-
 267
267
-
 268
268
-
 269
269
-
 270
270
-
 271
271
-
 272
272
-
 273
273
-
 274
274


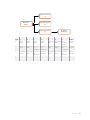
Blackmagic Web Presenter Streamer El kitabı
- Tip
- El kitabı
- Bu kılavuz aynı zamanda aşağıdakiler için de uygundur:
diğer dillerde
- español: Blackmagic Web Presenter Streamer El manual del propietario
- français: Blackmagic Web Presenter Streamer Le manuel du propriétaire
- italiano: Blackmagic Web Presenter Streamer Manuale del proprietario
- 日本語: Blackmagic Web Presenter Streamer 取扱説明書
- português: Blackmagic Web Presenter Streamer Manual do proprietário
İlgili makaleler
-
Blackmagic Web Presenter Kullanım kılavuzu
-
-
Blackmagic MiniC SDI Distribution Kullanım kılavuzu
-
-
-
-
-
Blackmagic Desktop Video Kullanım kılavuzu
-
-
Diğer belgeler
-
 Blackmagic Design Teranex Mini SDI - HDMI 12G Kullanım kılavuzu
-
ATEN VC486 Hızlı başlangıç Kılavuzu
-
-
 Blackmagic Design ATEM Mini Kullanım kılavuzu
-
Sony CMU-BR100 Kullanım kılavuzu
-
Creative Live! Cam Chat IM VF0530 Kullanım kılavuzu
-
-
Philips SPC1035NC/00 Hızlı başlangıç Kılavuzu
-
Philips SPC535NC/00 Hızlı başlangıç Kılavuzu
-

