Braun 7781 WD Kullanım kılavuzu
- Kategori
- Tıraş makinesi aksesuarları
- Tip
- Kullanım kılavuzu
Bu kılavuz aynı zamanda aşağıdakiler için de uygundur:

Type 5377
7781 WD
www.braun.com/register
Xpressive
Silk
•
épil
®
charge
Xpressive
s
m
a
r
t
l
i
g
h
t
98626599_SE_7781_WD_ME/TR_S1.ind1 198626599_SE_7781_WD_ME/TR_S1.ind1 1 22.07.2008 11:31:25 Uhr22.07.2008 11:31:25 Uhr

charge
Xpressive
s
m
a
r
t
l
i
g
h
t
1
9
10
8
7
5a
5b
4a
4
3
2
release
release
6
1
2
6
1a
1b
3
98626599_SE_7781_WD_ME/TR_S3.ind1 198626599_SE_7781_WD_ME/TR_S3.ind1 1 22.07.2008 11:32:36 Uhr22.07.2008 11:32:36 Uhr

s
m
a
r
t
l
i
g
h
t
1
2
7
release
release
release
release
9
90
°
°
3
90°
s
m
a
r
t
l
i
g
h
t
s
m
a
r
t
l
i
g
h
t
8
0
1
2
A
release
release
5
s
m
a
r
t
l
i
g
h
t
s
m
a
r
t
l
i
g
h
t
4
6
s
m
a
r
t
l
i
g
h
t
4
98626599_SE_7781_WD_ME/TR_S4.ind1 198626599_SE_7781_WD_ME/TR_S4.ind1 1 22.07.2008 11:34:08 Uhr22.07.2008 11:34:08 Uhr

trim
shave
trim
shave
trim
shave
trim
shave
1.
2.
3.
a
b
c
d
e
f
g
s
m
a
r
t
l
i
g
h
t
1
1
2
1
2
1
A
B
C1
C2
D1
D2
E
F
G1 G2
trim
shave
trim
shave
trim
shave
B
5
98626599_SE_7781_WD_ME/TR_S5.ind1 198626599_SE_7781_WD_ME/TR_S5.ind1 1 22.07.2008 11:35:33 Uhr22.07.2008 11:35:33 Uhr

6
Our products are engineered to meet the
highest standards of quality, functionality and
design. We hope you thoroughly enjoy using
your Braun Silk·épil Xpressive.
Please read the use instructions carefully
before using the appliance and keep them
for future reference.
Braun Silk·épil Xpressive has been designed
to make the removal of unwanted hair as
efficient, gentle and easy as possible. Its
proven epilation system removes hair at the
root, leaving your skin smooth for weeks. As
the hair that re-grows is fine and soft, there
will be no more stubble.
The epilation head features a unique
arrangement of 40 tweezers and SoftLift
®
tips
for unprecedented efficiency. Thanks to its
pivoting feature, it ideally adapts to the body
contours, for better short hair removal and
thoroughness. The massage system (1a)
stimulates the skin before and soothes it after
the hair is pulled out to significantly reduce
the pain sensation.
The Efficiency cap (1b) for fast epilation
ensures maximum skin contact, always
taking care of the optimum usage position
thanks to its pivoting feature.
The underarm cap (8) has been designed for
usage in delicate body areas such as under
the arms and in the bikini area.
The precision cap (9) provides utmost
precision and control in removing unwanted
hair from the face and other sensitive areas.
The shaver head (10) is specially designed for
a fast and close shave of underarms and
bikini line/area.
Important
For hygienic reasons, do not share this
appliance with other persons.
This appliance is provided with a special
cord set with an integrated Safety Extra
Low Voltage power supply. Do not
exchange or manipulate any part of it.
Otherwise there is risk of electric shock.
This appliance is suitable for use
in a bath or shower. For safety
reasons, it can only be operated
cordlessly.
This appliance is not intended for use by
children or persons with reduced physical
or mental capabilities, unless they are
given supervision by a person responsible
for their safety. In general, we recommend
that you keep the appliance out of reach of
children.
When switched on, the appliance must
never come in contact with the hair on
your head, eyelashes, ribbons, etc. to
prevent any danger of injury as well as to
prevent blockage or damage to the
appliance.
Never use the epilation head without cap.
General information on epilation
All methods of hair removal at the root can
lead to in-growing hair and irritation (e.g.
itching, discomfort and reddening of the skin)
depending on the condition of the skin and
hair. This is a normal reaction and should
quickly disappear, but may be stronger when
you are removing hair at the root for the first
few times or if you have sensitive skin.
If, after 36 hours, the skin still shows
irritation, we recommend that you contact
your physician. In general, the skin reaction
and the sensation of pain tend to diminish
considerably with the repeated use of
Silk·épil.
•
•
•
•
•
•
English
6
98626599_SE_7781_WD_ME/TR.indd 698626599_SE_7781_WD_ME/TR.indd 6 24.07.2008 11:24:26 Uhr24.07.2008 11:24:26 Uhr

7
In some cases inflammation of the skin could
occur when bacteria penetrate the skin (e.g.
when sliding the appliance over the skin).
Thorough cleaning of the epilation head
before each use will minimise the risk of
infection.
If you have any doubts about using this
appliance, please consult your physician. In
the following cases, this appliance should
only be used after prior consultation with a
physician:
– eczema, wounds, inflamed skin reactions
such as folliculitis (purulent hair follicles)
and varicose veins
– around moles,
– reduced immunity of the skin, e.g. diabetes
mellitus, during pregnancy, Raynaud’s
disease, haemophilia, candida or immune
deficiency.
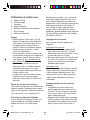
Some useful tips
If you have not used an epilator before, or
if you have not epilated for a longer period
of time, it may take a short time for your
skin to adapt to epilation. The discomfort
experienced in the beginning will decrease
considerably with repeated use as the skin
adapts to the process.
Epilation is easier and more comfortable
when the hair is at the optimum length of
2-5 mm. If hairs are longer, we recommend
that you either shave first and epilate the
shorter, re-growing hairs after 1 or 2 weeks.
When epilating for the first time, it is
advisable to epilate in the evening, so that
any possible reddening can disappear
overnight. To relax the skin we recommend
applying a moisture cream after epilation.
Fine hair which re-grows might not grow
up to the skin surface. The regular use of
massage sponges (e.g. after showering) or
exfoliation peelings helps to prevent in-
growing hair as the gentle scrubbing action
removes the upper skin layer and fine hair
can get through to the skin surface.
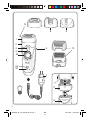
Description
1a Massage system
1b Efficiency cap (not with all models)
2 Epilation head
3 «smartlight»
4 Switch with lock keys (4a)
5a Charging light
5b Low charge light
6 Release button
7 Special cord set
8 Underarm cap
9 Precision cap
10 Shaver head attachment with OptiTrim
comb
Charging
Before use, charge the appliance. For best
performance, we recommend that you
always use a fully charged appliance.
Using the special cord set, connect the
appliance to an electrical outlet with the
motor switched off. Charging time is
approximately 1 hour.
The green charging light (5a) flashes to
show that the epilator is being charged.
When the battery is fully charged, the
charging light shines permanently. Once
fully charged, use the appliance without
cord.
When the red low-charge light (5b) flashes,
reconnect the appliance to an electrical
outlet via the special cord set to recharge.
A full charge provides up to 40 minutes of
cordless operation time. Maximum battery
•
•
•
•
98626599_SE_7781_WD_ME/TR.indd 798626599_SE_7781_WD_ME/TR.indd 7 24.07.2008 11:24:28 Uhr24.07.2008 11:24:28 Uhr

8
capacity will only be reached after several
charging/discharging cycles.
The best environmental temperature for
charging is between 5 °C and 35 °C.
As a safety feature to avoid overheating, it
may happen that the charging lights flash
(red/green). After cooling down, the
appliance will continue charging with the
green charging light flashing.
Getting prepared for …
… dry usage
Your skin must be dry and free from grease or
cream.
… wet usage
The appliance can be used on wet skin, even
under running water. Make sure that the skin
is very moist in order to achieve optimum
gliding conditions for the appliance.
Additionally, you may apply some shower gel
to the moist skin for results that will leave
your skin beautifully soft and smooth after
wet epilation.
Before use, always make sure that epilation
head is clean.
Always make sure that the epilation head
(2) is provided with a cap.
To change caps, press their lateral ribs and
pull off.
To change heads, press the release button
(6).
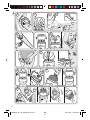
A How to epilate
1 Turning on
Press one of the lock keys (4a) and
turn the switch clockwise to setting 2
(optimum setting). For reduced speed,
choose setting 1 (soft setting).
•
•
•
•
•
•
•
The «smartlight» comes on instantly
and shines as long as the appliance is
switched on. It reproduces an almost
daylight condition, thus revealing even
the finest hair and giving you a better
control for improved epilation efficiency.
2 How to guide the appliance
Always stretch your skin when epilating.
Always make sure that the epilation area
between the massaging rollers is in
contact with your skin.
The pivoting caps automatically adapt to
the contour of your skin.
Guide the appliance in a slow, continu-
ous movement without pressure against
the hair growth, in the direction of the
switch. As hair can grow in different
directions, it may also be helpful to
guide the appliance in different direc-
tions to achieve optimum results. The
pulsating movement of the massaging
rollers stimulate and relax the skin for a
gentler epilation.
If you are used to the sensation of
epilation and prefer a faster way of
removing hair, attach the Efficiency cap
(1b) replacing the massage system (1a).
3 Leg epilation
Epilate your legs from the lower leg in an
upward direction. When epilating behind
the knee, keep the leg stretched out
straight.
4 Underarm and bikini line epilation
For this specific application, the underarm
cap (8) has been developed.
Placed on the epilation head (2), it perfectly
follows the contours of these areas,
providing a gentle and thorough epilation.
•
•
•
•
•
•
98626599_SE_7781_WD_ME/TR.indd 898626599_SE_7781_WD_ME/TR.indd 8 24.07.2008 11:24:28 Uhr24.07.2008 11:24:28 Uhr

9
Please be aware that especially at the
beginning, these areas are particularly
sensitive to pain. With repeated usage
the pain sensation will diminish. For more
comfort, ensure that the hair is at the
optimum length of 2-5 mm.
Before epilating, thoroughly clean the
respective area to remove residues (like
deodorant). Then carefully dab dry with
a towel. When epilating the underarm,
keep your arm raised up so that the skin
is stretched and guide the appliance in
different directions. As skin may be more
sensitive directly after epilation, avoid
using irritating substances such as deo-
dorants with alcohol.
5 Facial epilation
Place the precision cap (9) onto the
epilation head (2) and your Silk·épil is
perfectly suited for conveniently removing
any unwanted hair from the face or other
sensitive areas.
Prior to epilation, we recommend cleaning
the skin with alcohol to promote good
hygiene.
When epilating the face, stretch the skin
with one hand and slowly guide the
epilator with your other hand the direction
of the switch.
Overheating protection
As a safety feature to avoid the unlikely event
of the appliance overheating, it may happen
that the appliance automatically turns off and
the charging lights flash (red/green). In this
case, turn the switch back to position «0»
and let the appliance cool down.
Cleaning the epilation head
Before cleaning, unplug the appliance.
Regular cleaning ensures better performance.
Brush cleaning:
6 Remove the cap and brush it out.
7 Thoroughly clean the tweezers from the
rear side of the epilator head with the
brush dipped into alcohol. While doing so,
turn the tweezer element manually. This
cleaning method ensures best hygienic
conditions for the epilation head.
Cleaning under running water:
8 Remove the cap. Hold the appliance with
the epilation head under running water.
Then press the release button (6) to
remove the epilation head (2).
Thoroughly shake both, the epilation
head and the appliance to make sure that
remaining water can drip out. Leave both
parts to dry. Before reattaching, make sure
that they are completely dry.
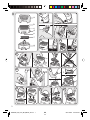
B Using the shaver head
attachment
a OptiTrim comb
b Shaver foil
c Trimmer
d Release buttons
e Trim/shave selector
f Cutter block
g Shaver head base
Shaving
Put on the shaver head attachment (10) by
clicking it in.
Pressing one of the lock keys (4a), turn the
switch clockwise to setting 2.
Make sure the trim/shave selector is in the
«shave» position.
For best results, always make sure that
both, the shaver foil (b) and the trimmer (c)
are in contact with the skin (A). Keeping
your skin stretched (B), slowly move the
appliance against the direction of hair
•
•
•
•
98626599_SE_7781_WD_ME/TR.indd 998626599_SE_7781_WD_ME/TR.indd 9 24.07.2008 11:24:28 Uhr24.07.2008 11:24:28 Uhr

10
growth. The trimmer first raises all long
hairs and cuts them off. Then the flexible
foil follows to smooth away any stubble.
When shaving or trimming in sensitive
areas, make sure that you always keep
your skin stretched to avoid injuries.
Contour trimming
For trimming precise line and contours, lock
the long hair trimmer by sliding the trim/
shave selector (e) to the position «trim» (C1).
Pre-cutting hair for epilation
If you choose to pre-cut your hair to the ideal
length for epilation, place the OptiTrim comb
(a) onto the shaver head. Slide the trim/shave
selector to the «trim» position.
Hold the appliance with the OptiTrim comb
lying flat on the skin. Guide it with the comb
tips against the hair growth as shown in
illustration C2.
N.B. As hair does not always grow in the
same direction, also guide the appliance
slightly diagonally or in different directions in
order to achieve best results.
Cleaning the shaver head
After each use, unplug the appliance.
Brush cleaning
Press the release buttons (d) to remove the
shaver head (D1). Tap the bottom of the
shaver head gently on a flat surface (not on
the foil).
Brush out the cutter block and the inside
of the shaver head. However, do not clean
the shaver foil with the brush as this may
damage the foil.
Cleaning with water
Press the release buttons (d) to remove the
shaver head. Rinse the shaver head and the
•
•
•
cutter block separately under running water
(D2). Leave the cutter block and the foil frame
to dry separately before reattaching them.
Keeping your shaver head attachment in
top shape
The shaving parts need to be lubricated
regularly every 3 months (E). If you clean
the shaver head under running water,
please lubricate it after every cleaning.
Apply some light machine oil or vaseline to
the shaver foil and the metal parts of the
long hair trimmer. Then remove the shaver
head and also apply a tiny amount of
vaseline as shown in picture section (E).
The shaver foil and the cutter block are
precision parts that wear out with time. To
maintain optimum shaving performance,
replace your foil and cutter block when you
notice a reduced shaving performance.
Do not shave with a damaged foil or cord.
How to replace the shaving parts
Shaver foil: Press the release buttons to
remove the shaver head. To remove the
shaver foil, press the foil frame (F). To
mount a new one, insert it from inside the
shaver head.
Cutter block: To remove the cutter block,
press and turn it 90° (G1), then take it off.
To put on a new cutter block, press it onto
the cutter block holder and turn 90° (G2).
Replacements parts (shaver foil, cutter block)
can be obtained from your retailer or Braun
Customer Service Centres.
•
•
•
•
98626599_SE_7781_WD_ME/TR.indd 1098626599_SE_7781_WD_ME/TR.indd 10 24.07.2008 11:24:29 Uhr24.07.2008 11:24:29 Uhr

11
Environmental notice
This product contains rechargeable
batteries. In the interest of protecting
the environment, please do not
dispose of the product in the
household waste at the end of its useful life.
Disposal can take place at a Braun Service
Centre or at appropriate collection points
provided in your country.
For electric specifications, please see printing
on the special cord set. The special cord set
automatically adapts to any worldwide AC
voltage.
Subject to change without notice.
This product conforms to the European
Directives EMC 2004/108/EC and Low
Voltage 2006/95/EC.
Guarantee
We grant a 2 year guarantee on the product
commencing on the date of purchase. Within
the guarantee period we will eliminate any
defects in the appliance resulting from faults
in materials or workmanship, free of charge
either by repairing or replacing the complete
appliance at our discretion.
This guarantee extends to every country
where this appliance is supplied by Braun or
its appointed distributor.
This guarantee does not cover: damage due
to improper use, normal wear or use as well
as defects that have a negligible effect on
the value or operation of the appliance.
The guarantee becomes void if repairs are
undertaken by unauthorised persons and if
original Braun parts are not used.
To obtain service within the guarantee period,
hand in or send the complete appliance with
your sales receipt to an authorised Braun
Customer Service Centre.
For UK only:
This guarantee in no way affects your rights
under statutory law.
98626599_SE_7781_WD_ME/TR.indd 1198626599_SE_7781_WD_ME/TR.indd 11 24.07.2008 11:24:29 Uhr24.07.2008 11:24:29 Uhr

12
Français
Nos produits ont été conçus pour répondre
aux normes de qualité, de fonctionnalité et
de design les plus strictes. Ainsi vous pourrez
pleinement apprécier votre nouveau Silk·épil
Xpressive de Braun.
Lisez le mode d’emploi attentivement avant
toute utilisation et conservez-le.
Le Silk·épil Xpressive de Braun a été conçu
pour épiler les poils indésirables de manière
aussi efficace, douce et facile que possible.
Son système d’épilation avéré retire les poils
à la racine, laissant la peau douce pendant
des semaines. Dans la mesure où la
repousse est fine et souple, elle ne sera
plus piquante.
La tête d’épilation associe 40 pincettes
disposées de manière unique et les picots
SoftLift
®
, pour une efficacité sans précédent.
L’accessoire pivotant s’adapte de manière
idéale aux courbes du corps pour un meilleur
retrait des poils courts et plus de précision.
Le système de massage (1a) stimule la peau
avant le retrait du poil et la détend après pour
réduire de manière significative la sensation
de douleur.
L’accessoire efficacité Efficiency (1b) assure
une épilation rapide grâce à une surface de
contact maximale avec la peau, tout en
permettant de conserver un angle optimal
grâce à sa fonction pivotante.
L‘accessoire spécial aisselles (8) convient
parfaitement pour suivre les contours des
zones sensibles du corps comme les
aisselles et le maillot.
L’ accessoire de précision (9) offre une
précision et un contrôle extrêmes lors de
l’épilation des poils indésirables du visage et
des autres zones sensibles.
La tête rasoir (10) est spécialement conçue
pour un rasage rapide et au plus près des
aisselles et du maillot.
Important
Pour des raisons d’hygiène, ne pas partager
cet appareil avec d’autres personnes.
Avec cet appareil est fourni un cordon
spécial avec une sécurité intégrée
alimentation basse tension. Ne pas
changer ni démonter les différentes parties
du cordon. Sinon, un risque d’électrocution
est possible.
Cet appareil peut être utilisé dans
le bain ou sous la douche ; dans
ces cas pour des raisons de
sécurité, utilisez uniquement
l’appareil sur batterie.
Cet appareil n’est pas destiné à des
enfants ou des personnes aux capacités
physiques, sensorielles ou mentales
réduites à moins qu’elles ne soient sous
la surveillance d’un adulte responsable de
leur sécurité. En général nous recom-
mandons de garder cet appareil hors de
portée des enfants.
Lorsque l’appareil est en marche, il ne doit
jamais entrer en contact avec les cheveux
ou les cils, ceci afin d’éviter les risques
d’accidents et pour ne pas endommager
l’appareil.
Ne jamais utiliser la tête d’épilation (2) sans
embout.
A propos de l’épilation
Toutes les méthodes d’épilation à la racine
peuvent entraîner la repousse de certains
poils sous la peau et des irritations (comme
des démangeaisons, de l’inconfort ou des
rougeurs corporelles), dépendant de l’état de
la peau et des poils.
Ces réactions sont normales et devraient
rapidement disparaître, mais elles peuvent
•
•
•
•
•
•
98626599_SE_7781_WD_ME/TR.indd 1298626599_SE_7781_WD_ME/TR.indd 12 24.07.2008 11:24:30 Uhr24.07.2008 11:24:30 Uhr

13
être accentuées si vous vous épilez pour
les premières fois ou si vous avez la peau
sensible.
Si après 36 heures, la peau est toujours
irritée, nous vous conseillons de contacter
votre médecin. En général, les réactions de la
peau et l’inconfort s’atténuent considérable-
ment au fur et à mesure des épilations avec
Silk·épil.
Certains cas d’inflammation de la peau
peuvent être dus à l’intrusion de bactérie
dans la peau (lors du passage de l’appareil
sur la peau, par exemple). Le fait de nettoyer
minutieusement la tête d’épilation avant
chaque épilation réduit ce risque d’infection.
Si vous avez le moindre doute quant à
l’utilisation de cet appareil, n’hésitez pas à
consulter votre médecin traitant. Il est
important de consulter son médecin avant
une épilation dans les cas suivants :
– eczéma, blessures, inflammations
cutanées (follicules purulents) et varices,
– grains de beauté,
– immunité affaiblie de la peau, comme
diabètes, grossesse, maladie de Raynaud,
– hémophilie ou déficience immunitaire.
Quelques petits trucs utiles
Si vous n’avez jamais utilisé d’épilateur,
ou si vous ne vous êtes pas épilé depuis
longtemps, il faudra un peu de temps pour
que votre peau s’adapte au procédé de
l’épilation. L’inconfort ressenti lors de la
première épilation se réduit considérablement
lors des utilisations suivantes : en effet le
nombre de poils à épiler diminue avec le
temps et la peau s’adapte au procédé de
l’épilation.
L’épilation est plus facile et plus agréable
quand les poils sont d’une longueur comprise
entre 2 et 5 mm. Si vos poils sont plus longs,
nous vous conseillons de les couper à la
longueur recommandée.
Au début, nous vous conseillons de vous
épiler le soir : les rougeurs éventuelles dispa-
raîtront au cours de la nuit. Pour assouplir la
peau, nous vous recommandons d’appliquer
une crème hydratante après l’épilation.
Des poils très fins peuvent parfois repousser
sous la peau. Pour éviter ces poils incarnés,
nous vous conseillons d’utiliser régulièrement
un gant de crin ou de procéder à des exfolia-
tions. En effet, grâce à l’action exfoliante, les
cellules mortes sont retirées permettant ainsi
aux poils fins de ne pas rester bloqués sous
la peau.
Description
1a Système de massage
1b Accessoire efficacité Efficiency
(non fournie avec tous les modèles)
2 Tête d’épilation
3 Lumière «smartlight»
4 Interrupteur avec vitesses (4a)
5a Indicateur de charge
5b Indicateur de batterie faible
6 Bouton d’éjection
7 Cordon d’alimentation spécial
8 Accessoire spécial aisselles
9 Accessoire de précision
10 Tête rasoir avec peigne OptiTrim
Charge
Avant utilisation, chargez l’appareil. Pour
une meilleure performance, nous vous
recommandons de toujours utiliser
l’appareil avec sa batterie complètement
chargée. Branchez l’appareil arrêté avec le
cordon spécial sur une prise de courant.
Le temps de charge est d’environ 1 heure.
•
98626599_SE_7781_WD_ME/TR.indd 1398626599_SE_7781_WD_ME/TR.indd 13 24.07.2008 11:24:31 Uhr24.07.2008 11:24:31 Uhr

14
Le voyant vert (5a) clignote pour indiquer
que l’épilateur est en charge. Lorsque la
batterie est chargée, le voyant de charge
reste allumé. Une fois chargé, utilisez
l’appareil sur sa batterie sans le cordon.
Lorsque la batterie est faible, le voyant
rouge (5b) clignote. Branchez l’appareil sur
une prise de courant à l’aide du cordon
spécial pour le recharger.
À pleine charge, l’autonomie de l’appareil
est de 40 minutes. La capacité maximale
de la batterie sera atteinte après plusieurs
cycles de charge/décharge.
La température ambiante optimale pour
recharger l’appareil se situe entre 5 °C et
35 °C.
Il se peut que les voyants clignotent
(rouge/vert). Il s’agit d’un système de sécu-
rité permettant d’éviter toute surchauffe de
l’appareil. Une fois refroidi, l’appareil conti-
nuera à charger et le voyant vert de charge
clignotera.
Préparation pour …
… une utilisation à sec
La peau doit être sèche et sans aucun résidu
d’huile ou de crème.
… une utilisation humide
L’appareil peut être utilisé sur une peau
humide et même sous l’eau. Assurez-vous
que la peau est suffisamment humide afin
d’obtenir les meilleures conditions de glisse
pour l’appareil. Vous pouvez également
appliquer un peu de gel douche sur la peau
humide pour la rendre extrêmement douce et
lisse après une épilation humide.
Avant utilisation, assurez-vous que la tête
d’épilation est nettoyée.
Assurez-vous qu’un accessoire est
toujours disposé sur la tête d’épilation (2).
•
•
•
•
•
•
•
Pour changer d’accessoire, appuyez sur
les stries latérales et retirez l’accessoire.
Pour changer de tête, appuyez sur le
bouton d’éjection (6).
A Comment s’épiler
1 Mise en marche
Appuyez sur l’un des côtés de
l’interrupteur et faites-le tourner dans le
sens des aiguilles d’une montre sur la
position 2 (réglage optimal). Pour une
vitesse réduite, choisissez la position 1
(réglage doux).
La «smartlight» s’allume instantanément
et reste éclairée tant que l’appareil est
en marche. Elle reproduit des conditions
proches de celles de la lumière du jour,
et révèle ainsi les poils les plus fins, pour
un plus grand contrôle et une efficacité
d’épilation accrue.
2 Comment manier l’appareil
Tirez toujours votre peau pendant
l’épilation.
Assurez-vous toujours que la surface
d’épilation entre les rouleaux massants
est bien en contact avec la peau.
La tête pivotante s’adapte automati-
quement aux courbes de votre corps.
Guidez l’appareil avec un mouvement
lent et continu sans pression dans le
sens opposé à la repousse des poils,
l’interrupteur vers l’avant. Etant donné
que les poils peuvent pousser dans des
directions différentes, il peut s’avérer
utile de guider l’appareil dans des
directions différentes pour obtenir des
résultats optimaux. Le mouvement de
vibration des rouleaux massants stimule
et relaxe la peau pour une épilation plus
douce.
•
•
•
•
•
•
•
•
98626599_SE_7781_WD_ME/TR.indd 1498626599_SE_7781_WD_ME/TR.indd 14 24.07.2008 11:24:31 Uhr24.07.2008 11:24:31 Uhr

15
Si vous êtes une habituée de l’épilation
et que vous recherchez une façon plus
rapide de retirer vos poils, positionnez
l’accessoire efficacité Efficiency (1b) à la
place du système de massage (1a).
3 Epilation des jambes
Epilez vos jambes de bas en haut. Lors de
l’épilation derrière le genou, tendez bien
votre jambe.
4 Epilation du maillot et des aisselles
L‘accessoire spécial aisselles (8) a été
consu pour cette utilisation spécifique.
Placez l‘accessoire spécial aisselles (8) sur
la tête d‘épilation (2) et votre Silk·épil
convient parfaitement pour suivre les
contours de ces zones sensibles.
Sachez tout de même que ces zones sont
particulièrement sensibles à la douleur,
surtout lors des 1ères épilations. Après
plusieurs épilations, la douleur diminuera.
Pour plus de confort, assurez-vous que les
poils sont à la longueur optimale comprise
entre 2 et 5 mm.
Avant l’épilation, nettoyez avec attention
ces zones et enlevez tous résidus (ex. de
déodorants). Puis, séchez avec une
serviette, en tamponnant doucement. Lors
de l’épilation des aisselles, gardez votre
bras en l’air et déplacez l’appareil dans
différentes directions. Comme la peau
risque d’être plus sensible juste après
l’épilation, évitez d’utiliser des substances
irritantes telles que des déodorants
alcoolisés.
5 Epilation du visage
Placez l’accessoire de précision (9) sur la
tête d’épilation (2) pour adapter votre
Silk·épil à l’épilation des poils indésirables
du visage et des autres zones sensibles.
Il est recommandé de nettoyer la peau
• avec de l’alcool avant l’épilation pour une
meilleure hygiène.
Lors de l’épilation du visage, tirez la peau
avec une main, et guidez doucement
l’épilateur avec votre autre main, l’inter-
rupteur dirigé vers l’avant.
Protection contre une éventuelle surchauffe
Il se peut que l’appareil s’arrête et que les
voyants clignotent (rouge/vert). Il s’agit d’un
système de sécurité permettant d’éviter toute
surchauffe de l’appareil. Dans ce cas, mettez
l’interrupteur en position « 0 » et laissez
refroidir l’appareil.
Nettoyage de la tête d’épilation
Après chaque utilisation, débranchez
l’appareil. Un nettoyage régulier garantit
un meilleur fonctionnement de l’appareil.
Nettoyage avec la brosse :
6 Enlevez le capuchon, et brossez-le.
7 Pour nettoyer les pincettes, utilisez la
brosse de nettoyage trempée dans de
l’alcool. Nettoyez les pincettes avec la
brosse de l’arrière vers l’avant de la tête
d’épilation tout en tournant le rouleau
manuellement. Ce mode de nettoyage
permet de garantir les meilleures condi-
tions d’hygiène pour la tête d’épilation.
Nettoyage sous l’eau courante :
8 Retirez le capuchon. Placez l’appareil avec
la tête sous le robinet. Ensuite, pressez le
bouton d’éjection (6) pour retirer la tête
d’épilation.
Egouttez avec soin la tête d’épilation et
l’épilateur, et laissez sécher séparément
les 2 éléments pour permettre à l’eau
restante de s’évaporer. Vérifiez bien que
les éléments sont complètement secs
avant de les remonter.
98626599_SE_7781_WD_ME/TR.indd 1598626599_SE_7781_WD_ME/TR.indd 15 24.07.2008 11:24:32 Uhr24.07.2008 11:24:32 Uhr

16
B Utilisation de la tête rasoir
a Peigne OptiTrim
b Grille de rasage
c Tondeuse
d Bouton d’éjection
e Bouton de sélection rasoir/tondeuse
f Bloc couteaux
g Socle de la tête rasoir
Rasage
Mettez en place la tête rasoir (10) en le
montant à la place de la tête d’épilation.
Faites touner l’interrupteur dans le sens
des aiguilles d’une montre jusqu’à la
position 2 tout en le maintenant appuyé.
Vérifiez bien que la position « shave »
(rasoir) est sélectionnée.
Pour de meilleurs résultats, assurez-vous
que la grille de rasage (b) et la tondeuse (c)
sont toujours l’une et l’autre en contact
avec la peau (A). Tout en maintenant la
peau tendue (B), dirigez doucement
l’appareil dans le sens contraire à la
pousse des poils. La tondeuse soulève
d’abord les poils longs et les coupe.
Ensuite, la grille flexible permet de raser
les poils au plus court.
Lorsque vous rasez ou tondez les zones
sensibles, assurez-vous de toujours
maintenir la peau tendue afin d’éviter les
blessures.
Dessin des contours à la tondeuse
Pour tondre une ligne précise et dessiner des
contours, bloquer la tondeuse pour les poils
longs en faisant glisser le bouton de sélection
(e) sur la position « trim » (tondeuse) (C1).
Pré-coupe des poils pour l’épilation
Si vous décidez de raccourcir les poils à la
longueur idéale pour l’épilation, placez le
peigne OptiTrim (a) sur la tête rasage.
•
•
•
•
•
Sélectionnez la position « trim » (tondeuse).
Maintenez le peigne OptiTrim à plat sur la
peau. Guidez l’appareil avec les dents du
peigne dans le sens inverse de la pousse des
poils comme montré sur l’illustration C2.
N.B. comme les poils ne poussent pas
toujours dans la même direction, passez
également l’appareil légèrement en diagonale
ou dans différentes directions afin d’obtenir
les meilleurs résultats.
Nettoyage de la tête rasoir
Après chaque utilisation, débranchez
l’appareil.
Nettoyage avec la brosse
Appuyez sur les boutons d’éjection (d)
pour retirer la tête rasoir (D1). Tapotez
doucement le bas de la tête rasoir sur une
surface plane (pas sur la grille).
Brossez le bloc couteaux et l’intérieur de la
tête rasoir. En revanche, ne nettoyez pas
la grille avec la brosse car cela risque
d’endommager la grille.
Nettoyage à l’eau
Appuyez sur les boutons d’éjection (d) pour
retirer la tête rasoir. Rincez la tête rasoir et
le bloc couteaux séparément sous l’eau
courante (D2). Laissez le bloc couteaux et
la grille sécher séparément avant de les
réassembler.
Comment garder votre tête rasoir en
bon état
Les éléments du rasoir doivent être
lubrifiés régulièrement, environ tous les
3 mois (E). Si vous nettoyez la tête rasoir
sous l’eau courante, veillez à la lubrifier
après chaque nettoyage.
Appliquez de l’huile de machine à coudre
ou de la vaseline sur la grille et les parties
métalliques de la tondeuse pour les poils
longs. Ensuite, retirez la tête rasoir et
•
•
•
•
98626599_SE_7781_WD_ME/TR.indd 1698626599_SE_7781_WD_ME/TR.indd 16 24.07.2008 11:24:32 Uhr24.07.2008 11:24:32 Uhr

17
appliquez un petit peu de vaseline comme
montré sur l’illustration (E).
La grille et le bloc couteaux sont des
éléments de précision qui s’usent au fil du
temps. Pour conserver une performance
optimale de rasage, remplacez la grille et le
bloc couteaux lorsque vous remarquez une
diminution de la performance de rasage.
Ne vous rasez pas si la grille ou le cordon
sont endommagés.
Comment remplacer les éléments du rasoir ?
La grille : Appuyez sur les boutons
d’éjection pour retirer la tête rasoir. Pour
retirer la grille, appuyez dessus (F). Pour en
insérer une nouvelle, mettez-la en place
par l’intérieur.
Le bloc couteaux : pour retirer le bloc
couteaux, pressez-le et et tournez-le à 90°
(G1) puis le retirer. Pour mettre en place un
nouveau bloc couteaux, pressez-le sur le
socle à bloc couteaux et tournez le de 90°
(G2).
Les pièces de rechange (grille, bloc
couteaux) sont disponibles chez les
revendeurs Braun ou auprès des centres
service agrées Braun.
Respect de l’environnement
Ce produit contient des batteries
rechargeables. Afin de protéger
l’environnement, ne jetez jamais
l’appareil dans les ordures ménagères
à la fin de sa durée de vie. Remettez-le à
votre centre service agréé Braun ou déposez-
le dans des sites de récupération appropriés
conformément aux réglementations locales
ou nationales en vigueur.
Pour les informations électriques, merci de
vous référer aux inscriptions sur le cordon
spécial. Le cordon spécial s’adapte auto-
•
•
matiquement à tout courant alternatif dans le
monde.
Sujet à modification sans préavis.
Cet appareil est conforme aux normes
Européennes fixées par les Directives
2004/108/EC et la directive Basse
Tension 2006/95/EC.
Garantie
Nous accordons une garantie de 2 ans sur
ce produit, à partir de la date d‘achat.
Pendant la durée de la garantie, Braun
prendra gratuitement à sa charge la
réparation des vices de fabrication ou de
matière en se réservant le droit de décider si
certaines pièces doivent être réparées ou si
l‘appareil lui-même doit être échangé.
Cette garantie s‘étend à tous les pays où cet
appareil est commercialisé par Braun ou son
distributeur exclusif.
Cette garantie ne couvre pas : les dommages
occasionnés par une utilisation inadéquate et
l‘usure normale. Cette garantie devient
caduque si des réparations ont été
effectuées par des personnes non agréées
par Braun et si des pièces de rechange ne
provenant pas de Braun ont été utilisées.
Pour toute réclamation intervenant pendant
la période de garantie, retournez ou
rapportez l‘appareil ainsi que l‘attestation de
garantie à votre revendeur ou à un Centre
Service Agréé Braun.
Appelez au 08.10.30.97.80 (ou se référez à
http://www.braun.com/global/contact/
servicepartners/europe.country.html) pour
connaitre le Centre Service Agrée Braun le
plus proche de chez vous.
Clause spéciale pour la France
Outre la garantie contractuelle exposée ci-
dessus, nos clients bénéficient de la garantie
légale des vices cachés prévue aux articles
1641 et suivants du Code civil.
98626599_SE_7781_WD_ME/TR.indd 1798626599_SE_7781_WD_ME/TR.indd 17 24.07.2008 11:24:33 Uhr24.07.2008 11:24:33 Uhr

18
Türkçe
Ürünlerimiz yüksek kalite, fonksiyonellik ve şık
dizayn ilkelerine bağlı kalınarak tasarlanmıştır.
Yeni Braun Silk·épil Xpressive epilatörünüzden
memnun kalacağınızı umarız.
Cihazı kullanmaya başlamadan önce lütfen
kullanım kılavuzunu dikkatle okuyun ve daha
sonra gerektğinde başvurabilmek için
saklayınız.
Braun Silk·épil Xpressive istenmeyen tüylerden
kurtulamanızı olabilecek en etkili,nazik ve kolay
şekilde gerçekleştirmek için tasarlanmıştır.
Epilasyon başlığı SoftLift
®
uçlarla entegre
edilmiş 40 cımbızıyla daha önce hiç olmadığı
kadar etkin bir epilasyon sunar. Oynar başlık
vücut kıvrımlarına ideal uyum sağlayarak
kısa tüylerin bile alınmasını ve komple bir
epilasyon seansı gerçekleşmesini sağlar.
Masaj sistemi (1a) tüy çekilmeden önce cildi
uyarır, çekildikten sonra ise rahatlatarak acı
hissini maskeler.
Hızlı epilasyon için Efficiency ataçmanı (1b)
azami cilt teması yaratır, Kıvrımlara uyum
sağlayan tasarımı sayesinde ideal kullanım
pozisyonunu korumanızı sağlar.
Özel koltuk altı ataçmanı koltuk altı (8) ve
bikini bölgesi gibi hassas bölgelerde kullanım
için tasarlanmıştır.
Hassas uç (9) istenmeyen tüylerin yüzden
veya diğer hassas bölgelerden alınmasında
en üstün hassasiyeti ve kontrolü sağlar.
Tıraş başlığı ise (10) koltukaltı ve bikini
bölgesinde hızlı, acısız ve güvenli bir tıraş
işlemi için özel olarak tasarlanmıştır.
Önemli
Hijyenik sebeplerden dolayı, cihazı başka-
larıyla paylaşmayınız.
•
Cihazınızda ekstra düşük voltaj için
güvenlik sağlayan adaptör içeren özel
kablo seti vardır. Bu setin hiçbir parçasını
değiştirmeyin veya başka amaçlar için
kullanmayın aksi taktirde elektrik şoku
meydana gelebilir.
Bu cihaz banyoda veya duşta
kullanılmaya uygundur. Emniyetli
olması açısından sadece kablosuz
olarak çalıştırılması gerekir.
Bu cihaz çocuklar ya da fiziksel ya
da zihinsel yetenek kısıtlamaları olan
insanların kullanımı için ideal olmayabilir,
bu sebeple güvenliklerinden sorumlu bir
gözetmen eşliğinde kullanılması tavsiye
edilir. Genel şartlarda, cihazın çocukların
ulaşabileceği alanlarda tutulmamasını
tavsiye ederiz.
Cihaz çalışırken kesinlikle saçlarınızla,
kirpiklerinizle ve buna benzer tehlike
yaratacak bölgelere temas etmesini
önleyiniz.
Cihazı hiç bir zaman bir başlık (2) takılı
olmadan kullanmaya çalışmayınız.
Epilasyon hakkında genel bilgi
Tüylerin kökten alındığı tüm epilasyon
metodları batık tüy sorununa ve irritasyona
sebep olabilir (örn. kaşıntı, kızarıklık vs.)
Bu çoğunlukla normal bir tepkidir ve hızlıca
geçecektir ama tüylerinizi ilk defa kökten
alıyorsanız veya hassas bir cildiniz varsa
daha uzun sürede geçebilir.
Eğer, 36 saat sonra cildinizde hala irritasyon
belirtileri devam ediyorsa doktorunuza
danışmanızı tavsiye ederiz. Normal şartlarda,
cilt reaksiyonu ve acı hissi Silk·épil’in düzenli
ve tekrarlı kullanımında çok ciddi miktarda
azalacaktır.
Bazı durumlarda, cildin altına nüfuz eden
bakteriler, ciltte enfeksiyon yaratabilir. Bu riski
•
•
•
•
•
98626599_SE_7781_WD_ME/TR.indd 1898626599_SE_7781_WD_ME/TR.indd 18 24.07.2008 11:24:34 Uhr24.07.2008 11:24:34 Uhr

19
yok etmek için epilasyon başlıklarını her
kulanımdan önce iyice temizleyiniz.
Eπer bu ürünün kullan∂m∂yla ilgili herhangi bir
µüpheniz varsa, lütfen doktorunuza dan∂µ∂n∂z.
Aµaπ∂daki durumlarda, cihaz sadece doktora
dan∂µ∂ld∂ktan sonra kullan∂lmal∂d∂r:
– egzama, yaralar, folliculitis (kümecik) gibi
iltihapl∂ cilt reaksiyonlar∂ ve varisli damarlar
– ciltteki benlerin çevresi
– derinin dayan∂kl∂l∂π∂n∂ kaybetmesi (örneπin
µeker hastal∂π∂, hamilelik, Raynaud
hastal∂π∂) hemofili, vücut baπ∂µ∂kl∂k
sisteminde sorun olmas∂.
Bazı faydalı ipuçları
Daha önce epilatör kullanmadıysanız veya
uzun zamandır epilasyon yaptırmadıysanız
cildinizin epilasyona alışması biraz daha uzun
sürebilir. Başlangıçta hissettiğiniz rahatsızlık,
düzenli kullanım ile beraber cilt alıştıkça,
hissedilebilir seviyede azalacaktır.
Tüylerin uzunluğu optimum seviye olan 2–5
mm arasında olduğunda epilasyon daha
kolay ve konforlu olacaktır. Eğer tüyleriniz bu
seviyeden daha uzunsa, önce tıraş başlığı ile
kısaltmanızı sonra epilasyon yapmanızı
tavsiye ederiz.
lk defa epilasyon yaparken, akşam saatlerini
tercih etmenizi öneririz. Bu sayede, epilasyon
sebebiyle oluşabilecek herhangi bir irritasyon
sabaha kadar kaybolacaktır. Epilasyon
sonrası cildi rahatlatmak için nemlendirici bir
krem bir kullanmanızı öneririz.
Tekrar uzamaya başlayan ince tüyler, cildin
yüzeyinden dışarıya doğru uzayamayabilirler.
Düzenli olarak kullanacağınız, masaj süngeri
veya kese lifi gibi ürünler batık tüylerin
oluşmasını engeller. Zira, bu şekilde cildinizin
en üst, deri tabakasını alır ve ince tüylerin
daha kolay bir şekilde cilt yüzeyinden dışarı
çıkabilmelerini sağlarsınız.
Tanımlar
1a Masaj sistemi
1b Efficiency ataçmanı
2 Epilasyon başlığı
3 «smartlight»
4 Kilitleme özellikli çalıştırma düğmesi (4a)
5a Şarj ışığı
5b Düşük şarj seviye göstergesi
6 Başlık çıkartma düğmesi
7 Özel kablo seti
8 Koltuk altı ataçmanı
9 Hassas uç
10 OptiTrim kısaltma taraklı tıraş başlığı
Şarj etmek
Cihazı kullanmadan önce şarj ediniz. En iyi
performansı elde etmek için her zaman tam
olarak dolu bir cihaz kullanmanızı tavsiye
ederiz. Özel kablo setinin kullanılması ile,
cihazı bir elektrik prizine takınız ve bu
esnada motoru kapalı olsun. Şarj süresi
yaklaşık olarak 1 saattir.
Yeşil şarj ışığı (5a) epilatörün şarj
edilmekte olduğunu göstermek için yanıp
söner. Pili tam olarak dolduğu zaman, şarj
ışığı sürekli olarak yanmaya başlar. Bir
kere tam olarak şarj olduktan sonra cihazı
kablosuz olarak kullanınız.
Kırmızı düşük şarj ışığı yanıp söndüğü
zaman (5b), cihazı, özel kablo setini
kullanmak sureti ile yeniden şarj olması için
elektrik prizine bağlayınız.
Tam şarj 40 dakikaya kadar kablosuz
işletim süresi sağlar. Maksimum pil
kapasitesi ancak bir çok kere şarj/deşarj
devresinden sonra elde edilebilir.
•
•
•
•
98626599_SE_7781_WD_ME/TR.indd 1998626599_SE_7781_WD_ME/TR.indd 19 24.07.2008 11:24:34 Uhr24.07.2008 11:24:34 Uhr

20
Şarj etmek için en ideal çevre ısı derecesi
5 °C ve 35 °C arasındadır.
Bir emniyet önlemi olarak cihazın fazla
ısınmasını önlemek üzere şarj ışıkları böyle
bir durumda yanıp dönecektir (kırmızı/
yeşil). Cihazın soğumasından sonra, yeşil
şarj ışığı yanıp sönerken cihaz şarj etmeye
devam edecektir.
Gerekli hazırlığı yapmak …
… kuru kullanım
Epilasyon öncesi cildiniz kuru ve yağ ya da
kremden arındırılmış olmalıdır.
… Islak Kullanım
Cihaz ıslak cilt üzerinde kullanılabilir, hatta
akmakta olan suyun altında bile. Cihaz
için maksimum kayma koşullarının elde
edilebilmesi için cildinizin tamamen nemli
olmasını temin ediniz. Ayrıca ıslak epilasyon
sonucunda son derece yumuşak ve pürüzsüz
bir cilde kavuşmak için ilaveten bir miktar duş
jeli de kullanabilirsiniz.
Kullanımdan önce epilasyon başlığınızın
temiz olduğundan emin olunuz.
Epilasyon başlığınıza (2) her zaman bir
ataçmanın (1) takılı olduğundan emin
olunuz.
Ataçmanları değiştirmek için yanlardaki
çıkıntılara basıp çekiniz.
Başlıkları değiştirmek için başlık çıkartma
düğmesine (6) basınız.
A Nasıl epilasyon yapılır
1 Cihazı çalıştırmak
Kilit butonlarından birine basıp çalıştırma
düğmesini saat yönünde çeviriniz.
Düğmeyi 2 nolu hız seviyesine getiriniz
(ideal hız). Daha az bir hız seviyesi
istiyorsanız 1 no’lu ayarı tercih ediniz.
•
•
•
•
•
•
•
«smartlight» aydınlatma ışığı çalışacaktır
ve cihaz çalışır durumda olduğu müd-
detçe yanar durumda kalacaktır.
Neredeyse günışığı etkisi yaratan bu
ışık ile en ince ve açık renkli tüyler bile
aydınlanacak ve daha etkili bir epilasyon
deneyimi yaşamanıza imkan tanıya-
caktır.
2 Cihazı cilt üzerinde kullanmak
Epilasyon yaparken cildinizi geriniz.
Masaj silindirleri arasında kalan epilas-
yon sisteminin cildinize sürekli temas
halinde olmasını sağlayınız.
Oynar özellikli başlıklar cilt kıvrımlarına
uyum sağlayacaktır.
Cihazı yavaş, ve kesintisiz hareketlerle
cildinize bastırmadan, tüylerin uzama
yönünün aksine doğru ve çalıştırma
düğmesi yönünde kullanınız. Tüyler farklı
yönlere doğru uzayabildiği için, cihazı
buna uygun olarak farklı doğrultularda
kullanmak optimum sonuç almanıza
yarayacaktır. Masaj silindirlerinin titreşim
hareketi, daha nazik bir epilasyon sağla-
mak için cildinizi uyarıp rahatlatacaktır.
Epilasyon hissine zaman içinde
alıştıysanız ve istenmeyen tüyler için
daha hızlı bir yol arıyorsanız, masaj
sistemi ataçmanını (1a) çıkartıp,
Efficiency ataçmanını (1b) takabilirsiniz.
3 Bacaklarda epilasyon
Bacaklarınızı alt bacaklardan başlayarak
yukarı doğru epilasyon yapınız. Diz
bölgenizi epilasyon yaparken bacağınızın
düz bir şekilde uzatılmış olmasını
sağlayınız.
4 Koltuk altı ve bikini bölgesi epilasyonu
Bu özel epilasyon için koltuk altı ataçmanı
(8) geliştirildi.
•
•
•
•
•
•
98626599_SE_7781_WD_ME/TR.indd 2098626599_SE_7781_WD_ME/TR.indd 20 24.07.2008 11:24:34 Uhr24.07.2008 11:24:34 Uhr

21
Epilasyon başlığına takılmış (2), bu hassas
bölgelerin kıvrımlarına uyarak hassas ve
mükemmel bir epilasyon sağlar.
Önemle hatırlatmak isteriz ki, özellikle
başlangıç aşamalarında bu bölgeler acıya
karşı ekstra duyarlı olabilir. Düzenli ve
tekrar eden kullanımlar sonunda duyulan
acı hissinde azalma olacaktır. Daha fazla
konfor için tüylerinizin 2–5 mm kısalığında
olduğundan emin olunuz.
Epilasyondan önce, cildin yabancı
maddelerden arındırıldığından emin olunuz.
(deodorant, krem vs.) Koltukaltını epilasyon
yaparken cildinizin gergin olmasını sağla-
yacak şekilde kolunuzu yukarı kaldırın ve
cihazı farklı yönlere doğru hareket ettirerek
kullanınız. Epilasyon sonrası cilt daha
hassas olabileceği için alkol içeren tahriş
edici maddelerin kullanılmamasını tavsiye
ederiz. (örn. Deodorant vs.)
5 Yüzde epilasyon
Hassas ucu (9) epilasyon başının (2)
üzerine yerleştiriniz. Şimdi Silk·epil’iniz,
istemediğiniz tüyleri, yüzünüzden veya
diğer hassas yerlerden kolayca almaya
hazırdır.
Epilasyondan önce, hijyenik koşuuların
sağlandığından emin olmak için cildinizi
alkolle temizlemenizi tavsiye ederiz.
Yüzünüzde epilasyon yaparken bir elinizle
cildinizi gereken diğer elinizle buton
yönünde epilatöru yavaşça hareket ettiriniz.
Aşırı Isınmaya karşı koruma
Bir güvenlik özelliği olarak, cihazın muhtemel
olmayan bir şekilde fazlası ile ısınmasını
engellemek için, cihaz söz konusu durum-
larda otomatik olarak kapanmakta ve şarj
ışıkları (kırmızı/yeşil ışıklar) yanıp sönmeye
başlamaktadır. Bu durumda, anahtarı tekrar
«0» pozisyonuna çeviriniz ve cihazın soğuma-
sına izin veriniz.
Epilasyon başlığını temizlemek
Her kullanımdan sonra cihazı prizden çekiniz.
Düzenli temizlik daha iyi bir performansı
beraberinde getirecektir.
Fırça ile temizleme:
6 Başlık üstündeki ataçmanı çıkartın ve fırça
ile temizleyin.
7 Alkole batırılmış bir fırça ile epilasyon
başlığının arka tarafındaki cımbızları iyice
temizleyiniz. Bunu yaparken manuel olarak
cımbız silindirini döndürün. Bu temizlik
metodu epilasyon başlığının en hijyenik bir
biçimde temizlenmesini sağlar.
Akan su altında temizleme:
8 Başlık üstündeki ataçmanı çıkartın.
Epilasyon başlığını akan suyun altına
tutunuz. Daha sonra çıkartma düğmesine
(6) basarak epilasyon başlığını çıkartınız.
Her ikisini de iyice silkeleyiniz, gövdenin
ve epilasyon başlığının üzerindeki suların
aktığından emin olunuz. Her iki parçayı da
kurumaya bırakınız. Tekrar takmadan önce
iyice kuruduklarından emin olunuz.
B Tıraş başlığını kullanırken
a OptiTrim tarak
b Tıraş eleği
c Uzun tüy düzeltici
d Çıkartma düğmeleri
e Düzeltme/tıraş seçici buton
f Kesici bıçak bloğu
g Tıraş başlığı tabanı
Tıraş
Tıraş başlığını yerine klikleyerek oturacak
şekilde gövdeye takın.
Kilit düğmesine basarken, çalıştırma
düğmesini 2 numaralı hız seviyesine
getirerek cihazı çalıştırınız.
•
•
98626599_SE_7781_WD_ME/TR.indd 2198626599_SE_7781_WD_ME/TR.indd 21 24.07.2008 11:24:35 Uhr24.07.2008 11:24:35 Uhr
Sayfa yükleniyor...
Sayfa yükleniyor...
Sayfa yükleniyor...
Sayfa yükleniyor...
Sayfa yükleniyor...
Sayfa yükleniyor...
Sayfa yükleniyor...
Sayfa yükleniyor...
Sayfa yükleniyor...
Sayfa yükleniyor...
Sayfa yükleniyor...
Sayfa yükleniyor...
Sayfa yükleniyor...
Sayfa yükleniyor...
Sayfa yükleniyor...
Sayfa yükleniyor...
Sayfa yükleniyor...
Sayfa yükleniyor...
Sayfa yükleniyor...
-
 1
1
-
 2
2
-
 3
3
-
 4
4
-
 5
5
-
 6
6
-
 7
7
-
 8
8
-
 9
9
-
 10
10
-
 11
11
-
 12
12
-
 13
13
-
 14
14
-
 15
15
-
 16
16
-
 17
17
-
 18
18
-
 19
19
-
 20
20
-
 21
21
-
 22
22
-
 23
23
-
 24
24
-
 25
25
-
 26
26
-
 27
27
-
 28
28
-
 29
29
-
 30
30
-
 31
31
-
 32
32
-
 33
33
-
 34
34
-
 35
35
-
 36
36
-
 37
37
-
 38
38
-
 39
39


Braun 7781 WD Kullanım kılavuzu
- Kategori
- Tıraş makinesi aksesuarları
- Tip
- Kullanım kılavuzu
- Bu kılavuz aynı zamanda aşağıdakiler için de uygundur:
diğer dillerde
- français: Braun 7781 WD Manuel utilisateur
- English: Braun 7781 WD User manual
İlgili makaleler
-
Braun Legs, Body & Face 7-569 WD, Silk-épil 7 Kullanım kılavuzu
-
Braun 5375 Kullanım kılavuzu
-
Braun Silk-épil Xpressive Kullanım kılavuzu
-
-
-
-
-
Braun Silk-épil 5 Kullanım kılavuzu
-
-
Braun 7180, 7185, Silk-épil Xpressive Kullanım kılavuzu
Diğer belgeler
-
Philips HP6578/10 Kullanım kılavuzu
-
Philips BRE650/10 Kullanım kılavuzu
-
Panasonic ES-ED20 El kitabı
-
Panasonic ESED90 Kullanma talimatları
-
Philips HP6576/00 Kullanım kılavuzu
-
King AMBROSIA P 2386 Kullanım kılavuzu
-
Panasonic ES-ED94 El kitabı
-
-
 Pellini Arzum AR 565 Kullanım kılavuzu
-
