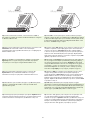
HP LaserJet M5025 Multifunction Printer series Hızlı başlangıç Kılavuzu
- Kategori
- Ağ oluşturma
- Tip
- Hızlı başlangıç Kılavuzu
Bu kılavuz aynı zamanda aşağıdakiler için de uygundur:

HP LaserJet M5025/M5035 MFP
Getting Started Guide
µ
Başlangıç Kılavuzu

1
Copyright and License
© 2006 Copyright Hewlett-Packard Development Company, L.P.
Reproduction, adaptation or translation without prior written permission is
prohibited, except as allowed under the copyright laws.
The information contained herein is subject to change without notice.
The only warranties for HP products and services are set forth in the
express warranty statements accompanying such products and services.
Nothing herein should be construed as constituting an additional warranty.
HP shall not be liable for technical or editorial errors or omissions
contained herein.
Part number: Q7829-90903
Edition 1, 10/2006
FCC Regulations
This equipment has been tested and found to comply with the limits for a
Class A digital device, pursuant to Part 15 of the FCC rules. These limits
are designed to provide reasonable protection against harmful
interference in a residential installation. This equipment generates, uses,
and can radiate radio-frequency energy. If this equipment is not installed
and used in accordance with the instructions, it may cause harmful
interference to radio communications. However, there is no guarantee that
interference will not occur in a particular installation. If this equipment
does cause harmful interference to radio or television reception, which can
be determined by turning the equipment off and on, correct the
interference by one or more of the following measures:
• Reorient or relocate the receiving antenna. Increase separation
between equipment and receiver.
• Connect equipment to an outlet on a circuit different from that to
which the receiver is located.
• Consult your dealer or an experienced radio/TV technician.
Any changes or modifications to the device that are not expressly
approved by HP could void the user’s authority to operate this equipment.
Use of a shielded interface cable is required to comply with the Class A
limits of Part 15 of FCC rules. For more regulatory information, see the
HP LaserJet 5035MFP electronic user guide. Hewlett-Packard shall not be
liable for any direct, indirect, incidental, consequential, or other damage
alleged in connection with the furnishing or use of this information.
Trademark Credits
Windows® is a U.S. registered trademark of Microsoft Corporation.

2
English
Ελληνικά
Türkçe
775 mm (31 in)
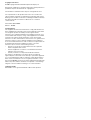
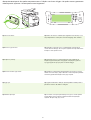
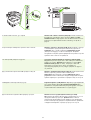
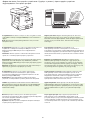
Make sure there is enough space to position the device. To position the device, select a sturdy, well-ventilated, dust-free area that
is out of direct sunlight.
, ,
.
, ,
.
, .
,
.
Aygıtı yerleştirmek için yeterli alan olmasına dikkat edin. Aygıtı yerleştirmek için, sağlam, iyi havalandırmalı, tozsuz ve doğrudan
güneş ışığı almayan bir yer seçin.
, . ,
, .
Βεβαιωθείτε ότι υπάρχει αρκετός ελεύθερος χώρος στο σηµείο
που θα τοποθετήσετε τη συσκευή.
Για να τοποθετήσετε τη συσκευή, επιλέξτε µια σταθερή περιοχή µε καλό
εξαερισµό που δεν σκονίζεται εύκολα και που δεν είναι εκτεθειµένη σε
άµεσο ηλιακό φως.
• Prepare the site • • Προετοιµάστε το χώρο • • Yeri hazırlama •

English
3
Ελληνικά
Türkçe
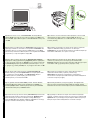
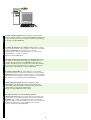
1) Remove the contents from the box. Note: The handles are on the left,
right, and back of the device.
2) Place the device on a sturdy surface.
1) . :
, .
2) .
1) . :
, .
2) .
1) Kutunun içindekileri çıkarın. Not: Tutamaçlar aygıtın solunda, sağında
ve arkasında yer alır.
2) Aygıtı sağlam bir yüzeye yerleştirin.
1) . : ,
.
2) .
1) Αφαιρέστε τα περιεχόµενα από τη συσκευασία.
Σηµείωση: Οι χειρολαβές βρίσκονται στα αριστερά, στα δεξιά και στο
πίσω µέρος της συσκευής.
2) Τοποθετήστε τη συσκευή σε µια σταθερή επιφάνεια.
• Unpack the device • • Αποσυσκευάστε τη συσκευή •
• Aygıtı paketinden çıkarma •

4
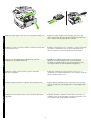
3) Remove all of the orange tape and cardboard packaging. 4) Remove the orange tray locks from tray 2 (callout 1) and tray 3
(callout 2).
3) . 4) 2 (. 1) 3
(. 2).
3) . 4) 2 (. 1) 3 (. 2).
3) Turuncu renkli tüm bantları ve karton ambalaj malzemelerini çıkarın. 4) Tepsi 2 (şekil 1) ve tepsi 3’ten (şekil 2) turuncu renkli tepsi kilitlerini
çıkarın.
3) . 4) 2 ( 1) 3
( 2).
3) Αφαιρέστε όλες τις ταινίες πορτοκαλί χρώµατος και τη χάρτινη
συσκευασία.
4) Αφαιρέστε τις πορτοκαλί ασφάλειες από το δίσκο 2 (επεξήγηση 1) και
από το δίσκο 3 (επεξήγηση 2).
• Prepare the hardware • • Προετοιµάστε το υλικό •
• Donanımı hazırlama •

English
5
Ελληνικά
Türkçe
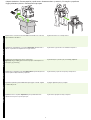
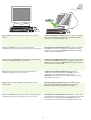
5) Open the upper-right door and remove the orange print-cartridge locks. 6) Remove the print cartridge from its packaging, remove the strip
(callout 1) and orange tape, insert the print cartridge (callout 2) into the
device, and then close the upper-right door (callout 3).
5)
.
6) ,
(. 1) ,
(. 2) (. 3).
5)
.
6) , (. 1)
, (. 2)
(. 3).
5) Sağ üst kapağı açarak turuncu renkli baskı kartuşu kilitlerini çıkarın. 6) Baskı kartuşunu paketinden çıkarın, şeridi (şekil 1) ve turuncu bandı
çıkarın, baskı kartuşunu (şekil 2) aygıta takın ve sağ üst kapağı kapatın
(şekil 3).
5)
.
6) , ( 1)
, ( 2),
( 3).
5) Ανοίξτε την επάνω δεξιά θύρα και αφαιρέστε τις πορτοκαλί
ασφάλειες από τις κεφαλές εκτύπωσης.
6) Αφαιρέστε την κεφαλή εκτύπωσης από τη συσκευασία της,
αφαιρέστε την ταινία (επεξήγηση 1) και την πορτοκαλί ταινία,
εισαγάγετε την κεφαλή εκτύπωσης στη συσκευή (επεξήγηση 2) και,
στη συνέχεια, κλείστε την επάνω δεξιά θύρα (επεξήγηση 3).

6
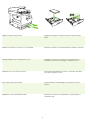
7) Open each tray to load the media. 8) Adjust the tray guides to match the media size, and then load the
media.
7) , . 8) .
7) . 8)
.
7) Her tepsiyi açarak ortamı yükleyin. 8) Tepsi kılavuzlarını ortam genişliğine göre ayarlayın veya ortamı
yükleyin.
7) , . 8)
.
7) Ανοίξτε κάθε δίσκο για να τοποθετήσετε το µέσο. 8) Ρυθµίστε τους οδηγούς του δίσκου ώστε να αντιστοιχούν στις
διαστάσεις του µέσου και, στη συνέχεια, τοποθετήστε το µέσο.

English
7
Ελληνικά
Türkçe
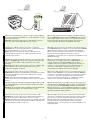
9) Close all of the trays. 10) Move the scanner carriage shipping lock toward the back of the device
so it unlocks.
9) . 10)
, .
9) . 10) ,
.
9) Tüm tepsileri kapatın. 10) Tarayıcının nakliye kilidini aygıtın arkasına doğru çekerek serbest
kalmasını sağlayın.
9) . 10)
, .
9) Κλείστε όλους τους δίσκους. 10) Μετακινήστε την ασφάλεια αποστολής του σαρωτή προς την πίσω
πλευρά της συσκευής ώστε να απασφαλιστεί.

8
11)
.
12) USB , ,
22 15.
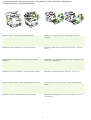
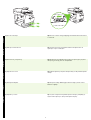
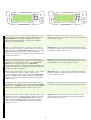
11) If necessary, remove the two control-panel overlays and install new
overlays.
12) If you are connecting using a USB cable, wait until you are prompted
at the computer in step 22 on page 15.
11)
.
12) USB
22 . 15
.
11) Gerekirse, iki kontrol paneli kaplamasını çıkarıp yenilerini takın. 12) USB kablosuyla bağlayacaksanız, bilgisayarda adım 22’de (sayfa 15)
soruluncaya kadar bekleyin.
11) ,
.
12) ’ USB, ’
’ ( 22
. 15).
11) Εάν απαιτείται, αφαιρέστε τις δύο ζελατίνες του πίνακα ελέγχου και
τοποθετήστε τις νέες ζελατίνες.
12) Εάν πρόκειται να συνδέσετε τη συσκευή µε καλώδιο USB,
περιµένετε ωσότου σας ζητηθεί από τον υπολογιστή, στο βήµα 22
στη σελίδα 15.

English
9
Ελληνικά
Türkçe
13) Connect the network cable. 14) Connect the power cable.
13) . 14) .
13) . 14) .
13) Ağ kablosunu bağlayın. 14) Güç kablosunu bağlayın.
13) ’ . 14) ’ .
13) Συνδέστε το καλώδιο δικτύου. 14) Συνδέστε το καλώδιο τροφοδοσίας.

10
15) Turn on the device. 16) Wait for the device to initialize (this might take a few minutes). If you
are prompted at the control panel, enter the language, date, and time.
15) . 16) (
). ,
, .
15) . 16) (
).
, .
15) Aygıtı açın. 16) Aygıtın hazırlanmasını bekleyin (bu birkaç dakika sürebilir). Kontrol
panelinde sorulursa, dili, tarihi ve saati girin.
15) . 16) , (
). ’
, , .
15) Ανάψτε τη συσκευή. 16) Περιµένετε ωσότου η συσκευή ξεκινήσει (αυτό ενδέχεται να
διαρκέσει µερικά λεπτά). Εάν σας ζητηθεί, εισαγάγετε τη γλώσσα,
την ηµεροµηνία και την ώρα µέσω του πίνακα ελέγχου.
• Set up the control panel • • Ρυθµίστε τον πίνακα ελέγχου •
• Kontrol panelini ayarlama •

English
11
Ελληνικά
Türkçe
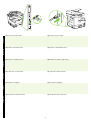
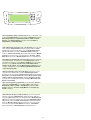
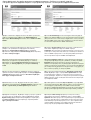
17) If you are connected to a network, print a test page from the control
panel and check for a valid IP Address. On the control panel, touch the
Network Address button, and then touch Print. The IP address
information appears below “TCP/IP”. If your IP address information
appears, go to step 19 on page 13.
Note: Many networks provide IP addresses automatically. If the IP
address shows a series of zeros, make sure that you are connected to the
network and go to step 18.
17) ,
IP .
Network Address ( )
Print (). IP
“TCP/IP”. IP ,
19 13.
: IP .
IP ,
18.
17)
IP-. ,
. «TCP/IP»
IP-. IP-
19 . 13.
: IP- .
IP- ,
18.
17) Ağa bağlıysanız, kontrol panelinden bir sınama sayfası yazdırın ve
geçerli IP Adresi olup olmadığını denetleyin. Kontrol panelinde, Ağ Adresi
düğmesine ve sonra Yazdır’a dokunun. “TCP/IP” altında IP adresi bilgileri
görünür. IP adresi bilgileriniz görünürse, adım 19’a (sayfa 13) geçin.
Not: Ağların çoğu IP adreslerini otomatik olarak verir. IP adresinde bir dizi
sıfır görünüyorsa, ağa bağlı olduğunuzu denetleyin ve adım 18’e geçin.
17) ’ ,
, -.
Network Address ( ),
Print (). IP-
“TCP/IP”. IP- ,
19 . 13.
: - .
- ’ , ’
18.
17) Εάν είστε συνδεδεµένος σε δίκτυο, εκτυπώστε µια δοκιµαστική
σελίδα από τον πίνακα ελέγχου και ελέγξτε εάν η συσκευή έλαβε έγκυρη
διεύθυνση IP. Στον πίνακα ελέγχου, πατήστε το κουµπί ∆ιεύθυνση
δικτύου και, στη συνέχεια, πατήστε το κουµπί Εκτύπωση.
Οι πληροφορίες σχετικά µε την διεύθυνση IP εµφανίζονται κάτω από το
«TCP/IP». Εάν εµφανιστούν οι πληροφορίες σχετικά µε την διεύθυνση IP,
µεταβείτε στο βήµα 19 στη σελίδα 13.
Σηµείωση: Πολλά δίκτυα παρέχουν διευθύνσεις IP αυτόµατα. Εάν η
διεύθυνση IP είναι µια σειρά από µηδενικά, βεβαιωθείτε πως η συσκευή
είναι συνδεδεµένη στο δίκτυο και µεταβείτε στο βήµα 18.

12
18) Configure the IP address (if necessary). On the control panel, scroll
to and touch Administration. Scroll to and touch Initial Setup, and then
Networking and I/O. Touch Embedded Jetdirect, TCP/IP, and IPV4
Settings. Touch Manual Settings, and then enter the IP Address,
Subnet Mask, and Default Gateway.
18) IP ( ).
Administration (). Initial
Setup ( ) Networking and I/O
( /). Embedded Jetdirect (
Jetdirect), TCP/IP IPV4 Settings ( IPV4). Manual
Settings ( ), IP , Subnet
Mask ( ) Default Gateway ( ).
18) IP ( ).
.
,
/.
Jetdirect, TCP/IP IPV4. ,
IP ,
.
18) IP adresini (gerekirse) yapılandırın. Kontrol panelinde, Yönetim’e
gidip dokunun. İlk Kurulum’a ve sonra Ağ ve G/Ç’ye gidip dokunun.
Katıştırılmış Jetdirect, TCP/IP ve IPV4 Ayarları’na dokunun. El ile
Ayarlar’a dokunun ve IP Adresi
, Alt Ağ Maskesi ve Varsayılan Ağ
Geçidi’ne dokunun.
18) IP- ( ).
Administration ().
Initial Setup ( ) Networking and
I/O ( /). Embedded Jetdirect
( Jetdirect), TCP/IP, IPV4 Settings ( IPV4).
Manual Settings ( ),
IP- Address (-), Subnet Mask
( ) Default Gateway ( ).
18) Ρυθµίστε τη διεύθυνση IP (εάν απαιτείται). Εκτελέστε µετακύλιση
στον πίνακα ελέγχου και πατήστε το κουµπί ∆ιαχείριση. Εκτελέστε
µετακύλιση και πατήστε το κουµπί Αρχικές ρυθµίσεις και, στη συνέχεια,
πατήστε το κουµπί ∆ίκτυο και I/O. Επιλέξτε Embedded Jetdirect,
TCP/IP και IPV4 Settings. Επιλέξτε Μη αυτόµατες ρυθµίσεις και, στη
συνέχεια, συµπληρώστε τα πεδία ∆ιεύθυνση IP, Μάσκα υποδικτύου
και Προεπιλεγµένη πύλη.

English
13
Ελληνικά
Türkçe
Prepare for software installation. 19) HP recommends closing all
unnecessary applications prior to installing the printing system software.
For Macintosh software installation instructions, go to step 24 on page 16.
. 19) HP
.
Macintosh
24 16.
. 19) HP
.
Macintosh
. 16 ( 24).
Yazılım yüklemesi için hazırlanın. 19) HP, yazdırma sistem yazılımını
yüklemeye başlamadan önce gerekli olmayan uygulamaları kapatmanızı
önerir.
Macintosh yazılım yükleme yönergeleri için adım 24’e (sayfa 16) geçin.
.
19)
.
’ Macintosh 24 . 16.
Προετοιµάστε τη συσκευή για εγκατάσταση του λογισµικού.
19) Η ΗΡ συνιστά να κλείνετε όσες εφαρµογές δεν χρειάζονται, προτού
εγκαταστήσετε το λογισµικό του συστήµατος εκτύπωσης.
Για οδηγίες σχετικά µε την εγκατάσταση λογισµικού σε υπολογιστές
Macintosh, µεταβείτε στο βήµα 24 στη σελίδα 16.
• Install the software • • Εγκαταστήστε το λογισµικό •
• Yazılımı yükleme •

14
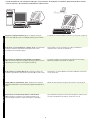
To install a USB connection, go to step 20. Windows with a direct connection (USB). 20) Install the software from
the CD before connecting the cable to the device. Note: If the New
Hardware Found message appears, insert the CD. Follow the onscreen
instructions, accept the default selections, and then go to step 31 on
page 19.
USB , 20. Windows (USB). 20)
, .
: New Hardware Found
( ), .
,
31 19.
USB 20. Windows (USB). 20)
-.
:
-. ,
31 . 19.
USB bağlantısı kurmak için adım 20’ye geçin. Doğrudan bağlantı ile (USB) Windows. 20) Kabloyu aygıta bağlamadan
önce yazılımı CD’den yükleyin. Not: Yeni Donanım Bulundu iletisi
görüntülenirse, CD’yi takın. Ekrandaki yönergeleri uygulayın, varsayılan
seçimleri kabul edin ve ardından adım 31’e (sayfa 19) geçin.
’ USB 20. Windows ( USB).
20) - ,
’ . : ’
“New Hardware Found” ( ),
-. ,
, 31 . 19.
Για σύνδεση USB, µεταβείτε στο βήµα 20. Λειτουργικό σύστηµα Windows µε απευθείας σύνδεση (USB).
20) Εγκαταστήστε το λογισµικό από το δίσκο CD προτού συνδέσετε το
καλώδιο στη συσκευή. Σηµείωση: Εάν εµφανιστεί το µήνυµα New
Hardware Found (Βρέθηκε νέο υλικό), εισαγάγετε το δίσκο CD.
Ακολουθήστε τις οδηγίες επί της οθόνης, αποδεχθείτε τις
προεπιλεγµένες ρυθµίσεις και, στη συνέχεια, µεταβείτε στο βήµα 31
στη σελίδα 19.

English
15
Ελληνικά
Türkçe
Windows
21) On the welcome screen, click Install Printer. The Setup Wizard
appears. Note: If the welcome screen does not appear, click Start, and
then click Run. Type X:SETUP (replace X with CD-ROM drive letter), and
click OK.
22) Follow the onscreen instructions. When prompted, connect a USB
cable between the device and the computer. Note: HP does not
recommend using USB hubs. Use a USB cable that is no longer than
2 meters (6.5 feet).
21) Install Printer (
). . :
, Start () Run
(). X:SETUP ( X CD-ROM
) OK.
22) . ,
USB .
: HP USB .
USB , - 2 .
21) .
. :
, , .
X:SETUP ( X
-), OK.
22) .
USB .
: HP
USB. USB
2 (6,5 ).
21) Hoş geldiniz ekranında, Yazıcı Yükle’yi tıklatın. Kurulum Sihirbazı
görüntülenir. Not: Hoş geldiniz ekranı görüntülenmezse, Başlat’ı ve
ardından Çalıştır’ı tıklatın. X:SETUP yazın (burada X yerine CD-ROM
sürücüsünün harfini yazın) ve Tamam’ı tıklatın.
22) Ekranda görüntülenen yönergeleri uygulayın. İstendiğinde USB
kablosunu aygıta ve bilgisayara bağlayın. Not: HP, USB hub aygıtları
kullanılmasını önermez. 2 metreden (6,5 fit) kısa bir USB kablosu kullanın.
21) Install Printer (
). . :
’, Start
()
Run (). X:SETUP ( “X”
-), OK.
22) . ’
, ’ ’ USB.
: HP USB-.
USB 2 .
21) Στην οθόνη υποδοχής, κάντε κλικ στο Εγκατάσταση εκτυπωτή.
Εµφανίζεται ο Οδηγός εγκατάστασης. Σηµείωση: Εάν δεν εµφανίζεται
η οθόνη υποδοχής, κάντε κλικ στο Έναρξη και, στη συνέχεια, κάντε κλικ
στο Εκτέλεση. Πληκτρολογήστε X:SETUP (αντικαταστήστε το «X» µε
το γράµµα της µονάδας CD-ROM) και, στη συνέχεια, κάντε κλικ στο OK.
22) Ακολουθήστε τις οδηγίες επί της οθόνης. Όταν σας ζητηθεί,
συνδέστε τη συσκευή και τον υπολογιστή µε ένα καλώδιο USB.
Σηµείωση: Η HP δεν συνιστά τη χρήση διανοµέων USB. Χρησιµοποιήστε
ένα καλώδιο USB όχι µεγαλύτερο από 2 µέτρα (6,5 πόδια).

16
23) Click Finish. If prompted, restart the computer. Go to step 31 on
page 19.
Connect to a Macintosh computer. 24) Place the CD in the CD-ROM
drive and run the installer. Complete an easy install. Note: Install the
software before connecting the USB cable.
23) Finish (). ,
. 31 19.
Macintosh. 24)
CD-ROM .
. : ,
USB .
23) .
. 31 . 19.
Macintosh. 24)
- CD-ROM
. .
: USB
.
23) Son’u tıklatın. İstenirse, bilgisayarı yeniden başlatın. Adım 31’e
(sayfa 19) geçin.
Macintosh bilgisayara bağlama. 24) CD’yi, CD-ROM sürücüsüne
yerleştirin ve yükleyiciyi çalıştırın. Kolay yükleme gerçekleştirin.
Not: Yazılımı, USB kablosunu bağlamadan önce yükleyin.
23) Finish (). ’ ,
'. 31 . 19.
' ’ Macintosh. 24) -
- .
(Easy). :
, ’ USB.
23) Κάντε κλικ στο Τερµατισµός. Εάν σας ζητηθεί, επανεκκινήστε τον
υπολογιστή. Μεταβείτε στο βήµα 31 στη σελίδα 19.
Σύνδεση σε υπολογιστή Macintosh. 24) Τοποθετήστε το δίσκο CD στη
µονάδα δίσκου CD-ROM και εκτελέστε το πρόγραµµα εγκατάστασης.
Επιλέξτε εύκολη εγκατάσταση. Σηµείωση: Εγκαταστήστε το λογισµικό
προτού συνδέσετε το καλώδιο USB.

English
17
Ελληνικά
Türkçe
25) Connect a USB cable between the device and the computer. Note: HP
does not recommend using USB hubs. Use a USB cable that is no longer
than 2 meters (6.5 feet).
Important: Perform steps 26-30 only if the USB cable was connected
before the software was installed. Otherwise, go to step 31.
26) From Apple System Preferences (available in the Apple drop-down
menu) click Print & Fax, and then click the Printing tab at the top of the
window. 27) To add your device, click the “+” icon to launch the Printer
Browser. By default, the Printer Browser displays devices that are
connected through USB, Bonjour, and AppleTalk networking.
25) USB .
: HP USB .
USB , - 2 .
: 26-30, USB
.
31.
26) Apple System Preferences ( Apple)
Print & Fax ( ) Printing
() . 27)
, “+”
.
, USB, Bonjour
AppleTalk networking.
25) USB .
: HP
USB. USB
2 (6,5 ).
: 26-30 USB
.
31.
26) Apple System Preferences (
Apple) Print & Fax, Printing
. 27) ,
«+»; (Printer
Browser). Printer Browser ,
USB, Bonjour AppleTalk.
25) Aygıtı ve bilgisayarı USB kablosuyla birbirine bağlayın. Not: HP, USB
hub aygıtları kullanılmasını önermez. 2 metreden (6,5 fit) kısa bir USB
kablosu kullanın.
Önemli: 26-30 arası adımları yalnızca, USB kablosu yazılım yüklenmeden
önce bağlandıysa uygulayın. Tersi durumda, adım 31’e geçin.
26) Apple System Preferences’da (Apple Sistem Tercihleri) (Apple açılır
menüsünde bulunur) Print & Fax (Yazdır ve Faksla) seçeneğini tıklatın ve
sonra pencerenin en başındaki Printing
(Yazdırma) sekmesini tıklatın.
27) Aygıtı eklemek için, “+” simgesini tıklatarak Printer Browser’ı başlatın.
Varsayılan olarak, Printer Browser uygulaması USB, Bonjour ve AppleTalk
ağı üzerinden bağlanan aygıtları görüntüler.
25) ’ ’ USB.
: HP USB-.
USB 2 .
: 26-30 , USB
’ .
31.
26) Apple System Preferences ( Apple)
( Apple) “Print & Fax” (
), “Printing” () .
27) , “+”
. ,
, ’ ’ USB, Bonjour
AppleTalk.
25) Όταν σας ζητηθεί, συνδέστε τη συσκευή και τον υπολογιστή µε ένα
καλώδιο USB. Σηµείωση: Η HP δεν συνιστά τη χρήση διανοµέων USB.
Χρησιµοποιήστε ένα καλώδιο USB όχι µεγαλύτερο από 2 µέτρα
(6,5 πόδια).
Σηµαντικό: Ακολουθήστε τα βήµατα 26-30 µόνον εάν το καλώδιο USB
ήταν συνδεδεµένο προτού γίνει η εγκατάσταση του λογισµικού.
∆ιαφορετικά, µεταβείτε στο βήµα 31.
26) Από το µενού Apple System Preferences (διατίθεται στο
αναδιπλούµενο µενού Apple) κάντε κλικ στο Print & Fax και, στη
συνέχεια, κάντε κλικ στην καρτέλα Printing στην κορυφή του
παραθύρου. 27) Για να προσθέσετε τη συσκευή σας, κάντε κλικ στο
εικονίδιο «+» για να εκτελέσετε το λογισµικό Printer Browser. Ως
προεπιλογή, ο Printer Browser εµφανίζει συσκευές που είναι
συνδεδεµένες µέσω USB, Bonjour και δικτύου AppleTalk.

18
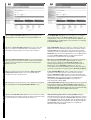
28) From the Printer Browser window, select the HP device. Note: If
HP software is installed, the software should automatically be configured
for Macintosh OS X V 10.4.
29) Click Add to create a printer queue, and then follow the prompt to
manually configure the device’s installable options. Note: Macintosh OS X
V 10.2 and V 10.3 might require you to manually select the printer model
from the Printer Model drop-down menu. 30) Under Model Name, select
the device, click Add, and go to step 31.
28) HP.
: HP software ,
Macintosh OS X V 10.4.
29) Add (), ,
,
. : acintosh OS X
V 10.2 V 10.3
Printer Model ( ). 30) Model
Name ( ) , Add
() 31.
28) Printer Browser HP.
: HP,
Macintosh OS X V 10.4.
29) Add ,
. :
Macintosh OS X V 10.2 V 10.3
Printer Model
. 30) Model Name , Add
31.
28) Printer Browser penceresinden, HP aygıtını seçin. Not: HP yazılımı
yüklenirse, yazılımın Macintosh OS X V 10.4 için otomatik olarak
yapılandırılması gerekir.
29) Add’i (Ekle) tıklatarak bir yazıcı kuyruğu oluşturun ve aygıtın
yüklenebilir seçeneklerini yapılandırmak için istemi izleyin. Not: Macintosh
OS X V 10.2 ve V 10.3 yazıcı modelini Printer Model (Yazıcı Modeli) açılır
menüsünden el ile seçmenizi gerektirebilir. 30) Model Name (Model Adı)
altında, aygıtı seçin, Add’i (Ekle) tıklatın ve adım 31’e geçin.
28) HP. :
HP ,
Macintosh X . 10.4.
29) “Add” (), ,
,
. : M, acintosh X . 10.2
. 10.3
. 30) “Model Name” ( )
, “Add” () 31.
28) Από το παράθυρο του Printer Browser, επιλέξτε τη συσκευή HP.
Σηµείωση: Εάν το λογισµικό HP έχει εγκατασταθεί, θα ρυθµιστεί
αυτόµατα για το λειτουργικό σύστηµα Macintosh OS X V 10.4.
29) Κάντε κλικ στο Προσθήκη
για να δηµιουργήστε µια ουρά εκτύπωσης
και, στη συνέχεια, ακολουθήστε τη διαδικασία µη αυτόµατης ρύθµισης
των επιλογών εγκατάστασης της συσκευής. Σηµείωση: Τα λειτουργικά
συστήµατα Macintosh OS X V. 10.2 και V. 10.3 ενδέχεται να σας ζητήσουν
να επιλέξετε το µοντέλο του εκτυπωτή από το αναπτυσσόµενο µενού
Printer Model. 30) Κάτω από το Όνοµα µοντέλου, επιλέξτε τη συσκευή,
κάντε κλικ στο Προσθήκη και, στη συνέχεια, µεταβείτε στο βήµα 31.

English
19
Ελληνικά
Türkçe
Test the software installation. 31) Print a page from any program to
make sure that the software is correctly installed. Note: If the page failed
to print, reinstall the software. If the page fails to print after reinstalling, go
to www.hp.com/support/M5035mfp.
. 31)
, ,
. : ,
.
,
www.hp.com/support/M5035mfp.
. 31) ,
, .
: ,
.
, www.hp.com/support/M5035mfp.
Yazılım yüklemesini sınayın. 31) Yazılımın düzgün bir şekilde
yüklendiğinden emin olmak için herhangi bir programdan bir sayfa
yazdırın. Not: Sayfa yazdırılamazsa, yazılımı yeniden yükleyin. Sayfa,
yeniden yükleme sonrasında da yazdırılamazsa,
www.hp.com/support/M5035mfp adresine bakın.
. 31) - ,
, .
: ,
.
, -
www.hp.com/support/M5035mfp.
Εκτελέστε δοκιµή της εγκατάστασης του λογισµικού. 31) Τυπώστε
µια σελίδα από οποιοδήποτε πρόγραµµα, ώστε να βεβαιωθείτε ότι το
λογισµικό έχει εγκατασταθεί σωστά. Σηµείωση: Εάν η σελίδα δεν
τυπωθεί, επανεγκαταστήστε το λογισµικό. Εάν η σελίδα δεν εκτυπωθεί
ακόµη και µετά την επανεγκατάσταση του λογισµικού, µεταβείτε στη
διαδικτυακή τοποθεσία www.hp.com/support/M5035mfp.
Sayfa yükleniyor...
Sayfa yükleniyor...
Sayfa yükleniyor...
Sayfa yükleniyor...
Sayfa yükleniyor...
Sayfa yükleniyor...
Sayfa yükleniyor...
Sayfa yükleniyor...
Sayfa yükleniyor...
Sayfa yükleniyor...
Sayfa yükleniyor...
Sayfa yükleniyor...
Sayfa yükleniyor...
Sayfa yükleniyor...
Sayfa yükleniyor...
Sayfa yükleniyor...
-
 1
1
-
 2
2
-
 3
3
-
 4
4
-
 5
5
-
 6
6
-
 7
7
-
 8
8
-
 9
9
-
 10
10
-
 11
11
-
 12
12
-
 13
13
-
 14
14
-
 15
15
-
 16
16
-
 17
17
-
 18
18
-
 19
19
-
 20
20
-
 21
21
-
 22
22
-
 23
23
-
 24
24
-
 25
25
-
 26
26
-
 27
27
-
 28
28
-
 29
29
-
 30
30
-
 31
31
-
 32
32
-
 33
33
-
 34
34
-
 35
35
-
 36
36


HP LaserJet M5025 Multifunction Printer series Hızlı başlangıç Kılavuzu
- Kategori
- Ağ oluşturma
- Tip
- Hızlı başlangıç Kılavuzu
- Bu kılavuz aynı zamanda aşağıdakiler için de uygundur:
İlgili makaleler
-
HP LaserJet M5035 Multifunction Printer series Hızlı başlangıç Kılavuzu
-
HP LaserJet M4345 Multifunction Printer series Hızlı başlangıç Kılavuzu
-
-
HP LaserJet M3035 Multifunction Printer series Hızlı başlangıç Kılavuzu
-
HP Color LaserJet CP3505 Printer series Hızlı başlangıç Kılavuzu
-
HP LaserJet M9040/M9050 Multifunction Printer series Hızlı başlangıç Kılavuzu
-
-
-
HP LaserJet 9040 Printer series Hızlı başlangıç Kılavuzu
-
HP LaserJet 4100 Multifunction Printer series Hızlı başlangıç Kılavuzu