Elta 2422 Kullanım kılavuzu
- Kategori
- Radyolar
- Tip
- Kullanım kılavuzu
Bu kılavuz aynı zamanda aşağıdakiler için de uygundur:

2422
0703
DESIGN MUSIC- CENTER MIT
VERTIKAL CD/MP3-PLAYER
DESIGN MUSIC CENTER WITH
VERTICAL CD/MP3 PLAYER
CENTRO MUSICA DI DESIGN CON
LETTORE CD/MP3 VERTICALE
FORMATERVEZETT MUSIC CENTER
FÜGGŐLEGES CD/MP3 LEJÁTSZÓVAL
CENTRAL MUSICA DE DISEÑO CON
REPRODUCTOR CD/MP3 VERTICAL
NOWOCZESNE CENTRUM MUZYCZNE Z
PIONOWYM ODTWARZACZEM CD/MP3
ONTWERP MUZIEKCENTRUM MET
VERTICALE CD/MP3-SPELER
SYSTÈME MUSIQUE DESIGN AVEC
LECTEUR CD/MP3 VERTICAL
CENTRO DE MÚSICA DE DESIGN,
COM LEITOR DE CD/MP3 VERTICAL
DÜŞEY TASARIMLI CD/MP3
ÇALARLI ŞIK MÜZIK SETI
МУЗЫКАЛЬНЫЙ ЦЕНТР
«DESIGN» С ВЕРТИКАЛЬНЫМ
CD/MP3 ПРОИГРЫВАТЕЛЕМ.
HUDEBNÍ CENTRUM DESIGN S
VERTIKÁLNÍM PŘEHRÁVAČEM CD/MP3
ДИЗАЙН МУЗИКАЛЕН ЦЕНТЪР С
ВЕРТИКАЛНА CD/MP3 СИСТЕМА
SISTEM DESIGN MUSIC CU
PLAYER VERTICAL CD/MP3

03. 02.
Bitte verwenden Sie das Gerät nur seiner vorhergesehenen Bestimmung entsprechend.
Das Gerät ist ausschließlich für den Einsatz in Wohn- und Geschäftsbereichen
bestimmt.
Bitte bewahren Sie die Bedienungsanleitung auch für eine spätere Verwendung
sorgfältig auf.
BEDIENUNGSANLEITUNG
WEITERE INFORMATIONEN
Lassen Sie NIEMALS Personen, und insbesondere keine Kinder, Gegenstände in
Löcher, Schächte oder andere Öffnungen des Gehäuses stecken; dies könnte zu einem
tödlichen elektrischen Schlag führen. Das Gerätegehäuse, darf nur von ausgebildetem
Fachpersonal geöffnet werden.
Hinweise zum Umweltschutz
Dieses Produkt darf am Ende seiner Lebensdauer nicht über den normalen
Haushaltsabfall entsorgt werden, sondern muss an einem Sammelpunkt für das
Recycling von elektrischen und elektronischen Geräten abgegeben werden. Das Symbol
auf dem Produkt, der Gebrauchsanleitung oder der Verpackung weist darauf hin.
Die Werkstoffe sind gemäß ihrer Kennzeichnung wiederverwertbar. Mit der
Wiederverwendung, der stofflichen Verwertung oder anderen Formen der Verwertung
von Altgeräten leisten Sie einen wichtigen Beitrag zum Schutze unserer Umwelt.
Bitte erfragen Sie bei der Gemeindeverwaltung die zuständige Entsorgungsstelle.
Das dreieckige Blitzsymbol mit
Pfeilkopf weist den Benutzer auf
das Vorhandensein von
nicht-isolierter "gefährlicher
Spannung" im Inneren des
Gerätes hin, die ausreichen
kann, um für Personen die
Gefahr eines elektrischen
Schlages darzustellen.
Das dreieckige Symbol mit dem
Ausrufezeichen weist den
Benutzer auf wichtige
Bedienungs- und Wartungs-
(Reparatur-) hinweise hin, die in
dieser Gebrauchsanweisung
enthalten sind.
VORSICHT
GEFAHR EINES ELEKTRISCHEN
SCHLAGES, NICHT ÖFFNEN
VORSICHT: UM DIE GEFAHR EINES
ELEKTRISCHEN SCHLAGES ZU
REDUZIEREN DIE FRONT- (BZW. RÜCK-)
ABDECKUNG NICHT ENTFERNEN ES
SIND KEINE VOM BENUTZER ZU
WARTENDEN TEILE IM INNEREN
VORHANDEN
WARTUNGSARBEITEN QUALIFIZIERTEM
FACHPERSONAL ÜBERLASSEN
Achtung bei Kleinteilen und Batterien, bitte nicht Verschlucken, dies kann zu ernsthaften
Schädigungen oder Erticken führen. Achten Sie inbesondere bei Kindern darauf, dass
Kleinteile und Batterien ausserhalb deren Reichweite sind.
Wichtige Hinweise zum Gehörschutz
Vorsicht:
Ihr Gehör liegt Ihnen und auch uns am Herzen.
Deshalb seien Sie bitte vorsichtig beim Gebrauch dieses Gerätes.
Wir empfehlen: Vermeiden Sie hohe Lautstärken.
Sollte das Gerät von Kindern verwendet werden, achten Sie darauf, dass das Gerät
nicht zu laut eingestellt wird.
Achtung!
Zu hohe Lautstärken können bei Kindern irreparable Schäden hervorrufen.
MODELL 2422
DESIGN MUSIC- CENTER MIT VERTIKAL CD/MP3-PLAYER
Behindern Sie nicht die Belüftung des Gerätes, wie etwa mit Vorhängen, Zeitungen,
Decken oder mit Möbelstücken, die Belüftungsschlitze müsssen immer frei sein.
Überhitzung kann Schäden verursachen und die Lebensdauer des Gerätes verkürzen.
Hitze und Wärme
Setzen Sie das Gerät nicht direkter Sonnenstrahlung aus. Achten Sie darauf, das das
Gerät keinen direkten Wärmequellen wie Heizung oder offenem Feuer ausgesetzt ist.
Achten Sie darauf, das die Lüftungsschlitze des Gerätes nicht verdeckt sind.
Feuchtigkeit und Reinigung
Dieses Produkt ist nicht wasserfest! Tauchen Sie das Gerät nicht in Wasser ein und
lassen Sie es auch nicht mit Wasser in Berührung kommen. Im Gerät eindringendes
Wasser kann ernsthafte Schäden verursachen. Verwenden Sie keine Reinigungsmittel,
die Alkohol, Ammoniak, Benzin oder Schleifmittel enthalten, da diese das Gerät
beschädigen können. Verwenden Sie zum Reinigen ein weiches, feuchtes Tuch.
Batterien fachgerecht entsorgen
Batterien gehören nicht in den Hausmüll. Die Batterien müssen bei einer Sammelstelle
für Altbatterien abgegeben werden. Werfen Sie Batterien niemals in Feuer.
1. ALLE ANWEISUNGEN LESEN - Vor Betrieb des Geräts sollten Sie alle Sicherheits- und
Bedienungsanleitungen lesen.
2. ANWEISUNGEN AUFBEWAHREN - Die Sicherheits- und Bedienungsanleitungen sollten für
zukünftigen Bezug aufbewahrt werden.
3. WARNUNGEN BEACHTEN - Die Warnungen auf dem Gerät und in der Bedienungsanleitung
sollten beachtet werden.
4. ANWEISUNGEN BEFOLGEN - Alle Bedienungs- und Verwendungsanweisungen sollten befolgt
werden.
5. WASSER UND FEUCHTIGKEIT - Dieses Gerät nicht in der Nähe von Wasser verwenden, z.B.
in der Nähe einer Badewanne, eines Waschbeckens, einer Küchenspüle, eines Waschzubers, in
einem nassen Keller, in der Nähe eines Schwimmbeckens usw.
6. WANDMONTAGE - Benutzen Sie zur Wandmontage die Aufhängungen auf der Geräterückseite.
7. BELÜFTUNG - Schlitze und Öffnungen im Gehäuse dienen der Belüftung. Sie sind für
zuverlässigen Betrieb des Gerätes und Schutz vor Überhitzung erforderlich und dürfen nicht
blockiert oder abgedeckt werden. Die Öffnungen sollten niemals dadurch blockiert werden, dass
das Gerät auf ein Bett, ein Sofa, einen Teppich oder eine ähnliche Oberfläche gestellt wird. Das
Gerät sollte nur dann in Einbauinstallierung wie in einem Bücherschrank oder einem Regal
verwendet werden, wenn angemessene Belüftung vorgesehen ist bzw. die Anweisungen des
Herstellers befolgt worden sind.
8. WÄRME - Das Gerät sollte fern von Wärmequellen wie Radiatoren, Heizkörpern, Öfen und
anderen wärmeerzeugenden Geräten (einschließlich Verstärkern) aufgestellt werden.
9. STROMVERSORGUNG - Dieses Gerät sollte nur mit der auf dem Typenschild angegebenen
Stromversorgungsart betrieben werden. Wenn Sie nicht sicher sind, was für eine
Stromversorgung Sie haben, so wenden Sie sich bitte an Ihren Fachhändler oder Ihr
Elektrizitätswerk. Beziehen Sie sich für Batteriebetrieb oder andere Stromquellen bitte auf die
Bedienungsanleitung.
10. NETZKABELSCHUTZ - Netzkabel sollten so verlegt werden, dass möglichst nicht darauf
getreten wird und dass sie nicht eingeklemmt werden, mit besonderer Beachtung der Kabel an
Steckern, Verlängerungskabeln und dem Austritt des Kabels aus dem Gerät.

05. 04.
11. NICHTBENUTZUNG - Ziehen Sie bei längerer Nichtbenutzung Netzstecker und Antennenkabel
ab.
12. EINDRINGEN VON FREMDKÖRPERN UND FLÜSSIGKEITEN - Niemals Objekte
irgendwelcher Art durch die Öffnungen in das Gerät schieben, da diese unter hoher Spannung
stehende Teile berühren oder kurzschließen können, wodurch es zu Feuer oder Stromschlag
kommen kann. Niemals Flüssigkeiten irgendwelcher Art auf dem Gerät verschütten.
13. BESCHÄDIGUNG, DIE EINE WARTUNG ERFORDERT - Ziehen Sie stets den Netzstecker und
wenden sich an einen autorisierten Kundendienst, wenn:
a. das Netzkabel oder der Stecker beschädigt ist;
b. Flüssigkeit oder Fremdkörper in das Gerät eingedrungen sind;
c. das Gerät Regen oder Feuchtigkeit ausgesetzt war;
d. das Gerät nicht wie gewöhnlich funktioniert. Stellen Sie nur jene Steuerungen ein, die in der
Bedienungsanleitung beschrieben sind;
e. das Gerät fallen gelassen oder beschädigt wurde;
f. das Gerät schwere Veränderungen der Leistungsmerkmale zeigt.
14. WARTUNG - Versuchen Sie nicht, das Gerät selbst zu warten, da Sie sich durch Öffnen bzw.
Entfernen von Abdeckungen hohen Spannungen und sonstigen Gefahren aussetzen können.
Wenden Sie sich mit Wartung und Reparaturen stets an einen autorisierten Kundendienst.
15. REINIGUNG - Ziehen Sie vor dem Reinigen den Netzstecker. Benutzen Sie keine flüssigen oder
Sprühreiniger, sondern nur ein feuchtes Tuch. Folgen Sie den Reinigungshinweisen in der
Bedienungsanleitung.
16. GEWITTER - Ziehen Sie während eines Gewitters und bei längerer Nichtbenutzung Netzstecker
und Antennenkabel als zusätzlichen Schutz gegen Überspannung ab.
17. SICHERHEITSÜBERPRÜFUNG - Verlangen Sie nach einer Wartung stets eine
Sicherheitsüberprüfung durch den Kundendienst.
18. ÜBERLASTUNG - Überlasten Sie Steckdosen und Verlängerungskabel nicht, das kann zu Feuer
und Stromschlag führen.
19. ELEKTROSTATISCHE ENTLADUNG - Wenn ein Fehler angezeigt wird oder eine Fehlfunktion
besteht, das Netzkabel rausziehen und alle Batterien entfernen. Danach das Netzkabel wieder
anschließen.
WARNHINWEISE
DIESER CD-PLAYER IST EIN KLASSE 1 LASERPRODUKT. DIESER CD-PLAYER BENUTZT
SICHTBARE / UNSICHTBARE LASERSTRAHLEN, DIE ZU GEFÄHRLICHER
STRAHLENBELASTUNG FÜHREN KÖNNEN. BITTE BETREIBEN SIE DEN CD-PLAYER
ENTSPRECHEND DER BEDIENUNGSANLEITUNG UND UMGEHEN NICHT DIE
SICHERHEITSVERSCHLÜSSE.
AUF DER GERÄTERÜCKSEITE BEFINDEN SICH SYMBOLE MIT WARNHINWEISEN.
STEUERUNGEN ODER EINSTELLUNGEN ANDERS ALS IN DIESER BEDIENUNGSANLEITUNG
BESCHRIEBEN KÖNNEN ZUR FREISETZUNG GEFÄHRLICHER STRAHLUNG FÜHREN. GERÄT
NICHT ÖFFNEN.
BESCHREIBUNG UND TASTENBELEGUNG
1. BUZZ / CD / MP3 / RADIO / AUX
FUNKTIONSUMSCHALTER
2. FM ST. / FM MO / AM BANDUMSCHALTER
3. ◄TUNING► SENDERSUCHE
4. KLAPPE CD LAUFWERK
5. PLAY / PAUSE ►/ TASTE
6. F.FWD TASTE
7. REP / RAND TASTE
8. VOL + TASTE
9. VOL - TASTE
10 FOLDER UP TASTE
11. REW. TASTE
12. STOP TASTE
13. REMOTE SENSOR FÜR FERNBEDIENUNG
14. UKW STEREO ANZEIGE
15. LCD DISPLAY
16. POWER TASTE
17. AL.ON / OFF TASTE
18. PROG. TASTE
19. AL.SET TASTE
20. MIN EINSTELLTASTE
21. HOUR EINSTELLTASTE
22. TIME SET TASTE
23. LAUTSPRECHER
24. AUX EINGANGSBUCHSE
25. KOPFHÖRERBUCHSE
26. R SP ANSCHLUSS LAUTSPRECHER
RECHTS
27. L SP ANSCHLUSS LAUTSPRECHER LINKS
28. BATTERIEFACH
29. UKW WURFANTENNE
30. NETZKABEL
31. AUFHÄNGUNG
1 2 3
101214151618
1113171923
4
5
7
9
20
21
22
6
8
24
31
25
26
27
28
30
23
29

07. 06.
FERNBEDIENUNG
1. STOP TASTE (Stopp)
2. REW TASTE (Titelsprung / Suche rückwärts)
3. PROG TASTE (Programmierung)
4. FOLDER UP TASTE (Verzeichnis- / Albumanwahl)
5. REP / RAND TASTE (Zufallswiedergabe)
6. PLAY / PAUSE TASTE (Wiedergabe / Pause)
7. F.FWD TASTE (Titelsprung / Suche vorwärts)
8. Batteriefach
EINSETZEN DER BATTERIEN
1. Öffnen Sie die Abdeckung des Batteriefaches an der Unterseite der Fernbedienung.
2. Setzen Sie 2 x AAA - Batterien mit der im Batteriefach angegebenen Polarität ein. Es werden
Alkalinebatterien empfohlen.
3. Setzen Sie die Abdeckung des Batteriefaches wieder ein, bis sie gut sitzt.
NETZANSCHLUSS 230V ~ 50HZ
Schließen Sie das Netzkabel an einer 230V ~ 50Hz Steckdose an.
Warnhinweise:
• Überzeugen Sie sich vor Netzanschluss, dass Netzspannung und Angaben auf dem Typenschild
übereinstimmen (230V ~ 50Hz).
• Berühren Sie den Netzsetcker nicht mit nassen Händen.
• Bei längerer Nichtbenutzung (Urlaub usw.) ziehen Sie bitte den Netzstecker.
• Beim Ziehen des Netzsteckers fassen Sie bitte am Stecker an und nicht am Kabel um
Kabelbruch und daraus resultierende Risiken zu vermeiden.
SICHERHEITSHINWEISE ZU BATTERIEN:
• Bewahren Sie Batterien kinder- und haustiersicher auf.
• Achten Sie beim Einsetzen der Batterien auf die Polarität (+/-). Falsch eingesetzte Batterien
können zu Beschädigungen und / oder Fehlfunktionen führen.
• Entnehmen Sie erschöpfte Batterien aus dem Gerät. Entnehmen Sie die Batterien, wenn das
Gerät für einen längeren Zeitraum nicht benutzt wird, um ein Auslaufen der Batterien zu
vermeiden.
• Werfen Sie Batterien nicht ins Feuer. Setzen Sie Batterien nicht offenen Flammen oder
Erwärmung aus.
• Entsorgung von Batterien: erschöpfte Batterien müssen umweltgerecht entsort werden. Nähere
Informationen erhalten Sie von Ihrer örtlichen Umweltbehörde.
• Folgen Sie den Anleitungen der Batteriehersteller zur sicheren Benutzung und Entsorgung.
1
2
3
4
5
6
8
7
BATTERIE ZUR NOTSTROMVERSORGUNG
Zwei 1,5V AA Batterien (nicht mitgeliefert) können als Notstromversorgung der Uhr eingesetzt
werden. Bei Netzausfall wird die Uhrzeit nicht angezeigt, die Uhr arbeitet jedoch weiter. Das LCD
Display und die anderen Funktionen stehen wieder zur Verfügung, sobald die Stromversorgung
wieder funktioniert. Die Notbatterien sollten regelmäßig ausgewechselt werden, ebenfalls, wenn die
Uhr für längere Zeit nicht benötigt wird.
EINSTELLEN DER UHRZEIT
Schließen Sie das Gerät an der Steckdose an.
1. Halten Sie TIME SET gedrückt und drücken gleichzeitig HOUR zum Einstellen der Stunden.
2. Halten Sie TIME SET gedrückt und drücken gleichzeitig MIN zum Einstellen der Minuten.
EINSTELLEN DER WECKZEIT
1. Halten Sie AL.SET gedrückt und drücken gleichzeitig HOUR zum Einstellen der Stunden der
Weckzeit.
2. Halten Sie AL.SET gedrückt und drücken gleichzeitig MIN zum Einstellen der Minuten der
Weckzeit.
3. Nach dem Einstellen der Weckzeit drücken Sie AL.ON / OFF zum Einschalten der Weckfunktion
(das Wecksymbol wird im Display angezeigt).
HINWEISE:
1. Beim Umschalten des Funktionsschalters auf BUZZ begibt sich das Gerät in Stand-by.
2. Beim Umschalten des Funktionsschalters auf BUZZ kann das Gerät nicht mit POWER
eingeschaltet werden. Stellen Sie den Funktionsumschalter erst auf CD / MP3, RADIO oder AUX
um.
WECKEN MIT SUMMER:
a. Schieben Sie den BUZZ / CD / MP3 / RADIO / AUX Funktionsumschalter auf BUZZ.
b. Zur eingestellten Weckzeit ertönt der Summer für 3 Minuten.
Hinweis: Zum Ausschalten des Alarms drücken Sie AL.ON / OFF.
WECKEN MIT CD:
a. Schieben Sie den BUZZ / CD / MP3 / RADIO / AUX Funktionsumschalter auf CD.
b. Öffnen Sie die Klappe des CD Laufwerks mit der Hand und legen eine CD mit dem Aufdruck
nach oben in das Laufwerk ein.
c. Schließen Sie das Laufwerk wieder manuell.
d. Zur eingestellten Weckzeit beginnt die CD Wiedergabe mit dem ersten Track.
Hinweis: Das Gerät schaltet sich automatisch nach einer Stunde wieder aus.
Zum manuellen Ausschalten der CD drücken Sie STOP.
WECKEN MIT RADIO:
a. Schieben Sie den BUZZ / CD / MP3 / RADIO / AUX Funktionsumschalter auf RADIO.
b. Schieben Sie den FM ST. / FM MO / AM Bandumschalter auf AM oder FM.
c. Drücken Sie POWER zum Einschalten des Geräts.
d. Stellen Sie mit ◄TUNING► einen Sender ein und regeln die Lautstärke.
e. Danach schalten Sie das Gerät mit POWER wieder aus.
f. Zur eingestellten Weckzeit schaltet sich das Radio automatisch ein.
Hinweis: Das Gerät schaltet sich automatisch nach einer Stunde wieder aus.
Zum manuellen Ausschalten des Radios drücken Sie POWER.
AUSSCHALTEN DES ALARMS
Zum Ausschalten der Alarmfunktion drücken Sie AL.ON / OFF (das Wecksymbol im Display
erlischt).

09. 08.
RICHTIG FALSCH
LAUTSTÄRKE EINSTELLEN
• Mit VOL + erhöhen Sie die Lautstärke.
• Mit VOL - verringern Sie die Lautstärke.
RADIOBETRIEB
1. Schieben Sie den BUZZ / CD / MP3 / RADIO / AUX Funktionsumschalter auf RADIO.
2. Schieben Sie den FM ST. / FM MO / AM Bandumschalter auf das gewünschte Frequenzband.
3. Drücken Sie POWER zum Einschalten des Geräts.
4. Stellen Sie mit ◄TUNING► einen Sender ein.
Hinweis: Für besseren Mittelwellenempfang richten Sie das Gerät (eingebaute Antenne) bitte
aus, für besseren UKW-Empfang wickeln Sie die UKW Wurfantenne vollständig ab.
Hinweis: Die STEREO Anzeige leuchtet bei Empfang eines UKW Stereoprogramms auf. Bei
Nebengeräusen schieben Sie den Bandumschalter bitte auf FM MO zum Empfang von UKW
Sendern in Mono.
5. Mit VOL+/- stellen Sie die Lautstärke ein.
6. Zum Ausschalten des Radios drücken Sie POWER.
BEHANDLUNG VON CD’S
• Schützen Sie CD’s vor Kratzern und Staub. Bei vorsichtiger Benutzung sollte ein gelegentliches
Abwischen mit einem weichen Tuch ausreichend sein, um einen guten Klang zu gewährleisten.
Bewahren Sie CD’s im Cover auf.
• Fassen Sie CD’s nur an der Außenkante an, berühren Sie die Oberflächen nicht.
• Fassen Sie CD’s wie in nachstehender Abbildung an.
• Zum Reinigen benutzen Sie nur ein weiches Tuch. Benutzen Sie weder Benzin, Verdünner oder
sonstige Chemikalien, das führt zu Beschädigungen. Wischen Sie eine CD nur von innen nach
außen ab, nicht mit kreisförmigen Bewegungen.
• Setzen Sie CD’s nicht direkter Sonneneinstrahlung, Feuchtigkeit oder hohen Temperaturen aus.
Legen Sie CD’s nicht auf Elektrogeräten oder Wärmequellen ab.
• Eine verstaubte Tonabnehmerlinse kann zu Tonsprüngen führen. Zum Reinigen öffnen Sie das
Laufwerk und blasen den Staub mit einem Objektivreiniger (erhältlich in Fotoläden) ab.
Hinweis: Berühren Sie die Tonabnehmerlinse nicht. Achten Sie darauf, dass keine Flüssigkeiten
in das Gerät eindringen.
• Zur Reinigung des Gehäuses wischen Sie den CD-Player mit einem weichen, feuchten Tuch ab.
• Benutzen Sie keinesfalls Benzin oder scharfe Chemikalien, damit beschädigen Sie das Finish.
CD WIEDERGABE
HINWEIS: Berühren Sie keinesfalls die Tonabnehmerlinse im CD Laufwerk. Reinigen Sie die Linse
mit einer Reinigungs-CD.
1. Schieben Sie den BUZZ / CD / MP3 / RADIO / AUX Funktionsumschalter auf CD.
2. Öffnen Sie das CD Laufwerk manuell und legen eine CD mit dem Aufdruck nach oben ein.
3. Drücken POWER zum Einschalten des Geräts. Nach einigen Sekunden beginnt die Wiedergabe
automatisch.
4. Einen vorherigen oder nächsten Track wählen Sie mit REW. / F.FWD .
5. Mit PLAY / PAUSE beginnen Sie die Wiedergabe.
6. Erneuter Tastendruck auf PLAY / PAUSE unterbricht die Wiedergabe (Pause) und ein weiterer
Tastendruck auf PLAY / PAUSE setzt die Wiedergabe von gleicher Stelle aus fort.
7. Mit STOP halten Sie die Wiedergabe an.
ZUFALLSWIEDERGABE
• Drücken Sie in Wiedergabe dreimal REP / RAND, im Display wird RAND angezeigt.
Alle Tracks der CD werden in zufälliger Reihenfolge wiedergegeben.
SUCHE VORWÄRTS / RÜCKWÄRTS
1. Mit REW. / F.FWD suchen Sie innerhalb des Tracks nach einer bestimmten Stelle mit
hoher Geschwindigkeit. Beim Loslassen der Taste wird die normale Wiedergabe fortgesetzt.
2. Einfacher Tastendruck auf REW. bringt Sie zum Anfang des derzeitigen Tracks zurück.
Zweifacher Tastendruck springt einen Track zurück.
3. Mit F.FWD springen Sie zum nächsten Track.
4. Halten Sie die CD Rückwärtssuche (REW ) zum Durchsuchen des aktuellen Tracks und
Aufrufen des / der vorherigen Tracks gedrückt. Beim Auffinden der gewünschten Stelle lassen
Sie die Taste wieder los, die normale Wiedergabe wird von dieser Stelle aus fortgesetzt.
5. Halten Sie die CD Vorwärtssuche (F.FWD ) zum Durchsuchen des aktuellen Tracks und
Aufrufen des / der nächsten Tracks gedrückt. Beim Auffinden der gewünschten Stelle lassen Sie
die Taste wieder los, die normale Wiedergabe wird von dieser Stelle aus fortgesetzt.
WIEDERHOLUNG
Mit REP / RAND wiederholen Sie einen einzelnen Track oder die gesamte CD.
1. Einfacher Tastendruck in Wiedergabe auf REP / RAND ruft im Display das REP Symbol auf. Der
Track wird nun ständig wiederholt.
2. Erneuter Tastendruck auf REP / RAND zur Wiederholung aller Tracks auf der CD. Im Display
wird ALL REP angezeigt.
3. Zum Abschalten der Wiederholungsfunktion drücken Sie erneut REP /RAND, bis das
Wiederholungssymbol im Display erlischt.
VORPROGRAMMIERUNG
Mit dieser Funktion können Sie bis zu 20 Tracks zur Wiedergabe in beliebiger Reihenfolge
programmieren.
1. Drücken Sie in Stopmodus PROG., PROG 01 blinkt im Display.
2. Mit REW. / F.FWD wählen Sie den gewünschten Track.
3. Mit PROG. speichern Sie die Tracknummer.
4. Wiederholen Sie die Schritte 2 und 3 zur Auswahl von bis zu 20 Tracks.
5. Zur Wiedergabe der Tracks in der gewählten Reihenfolge drücken Sie PLAY / PAUSE. Die
entsprechende Tracknummer und PROG werden angezeigt.
6. Mit REW. / F.FWD springen Sie zum vorherigen oder nächsten Track in der
vorprogrammierten Reihenfolge.
Hinweis: Nach Wiedergabe der vorprogrammierten Tracks begibt sich der CD-Player in
Stopmodus zurück.
7. Zur Löschung der vorprogrammierten Reihenfolge drücken Sie zweimal STOP.

11. 10.
MP3 WIEDERGABE
Hinweis: MP3 Discs haben umfangreiche Inhalte, daher dauert das Laden etwas länger.
1. Schieben Sie den BUZZ / CD / MP3 / RADIO / AUX Funktionsumschalter auf CD.
2. Öffnen Sie die Klappe des CD Laufwerks manuell und legen eine CD mit dem Aufdruck nach
oben ein.
3. Schließen Sie die CD-Klappe wieder und drücken POWER zum Einschalten des Geräts, die Disc
dreht sich und beginnt kurz darauf automatisch mit der Wiedergabe.
4. Mit REW und F.FWD wählen Sie einen Track
5. Mit PLAY/PAUSE unterbrechen Sie die Wiedergabe vorübergehend (Pause).
6. Erneuter Tastendruck auf PLAY/PAUSE setzt die Wiedergabe von gleicher Stelle aus fort.
7. Mit STOP halten Sie die Wiedergabe an.
WIEDERHOLUNG
Wiederholung einzelner Track
Drücken Sie in Wiedergabe einmal REP / RAND zur Wiederholung des aktuellen Tracks. Im Display
wird REP angezeigt.
Wiederholung Verzeichnis
Drücken Sie in Wiedergabe zweimal REP / RAND zur Wiederholung aller Tracks im aktuellen
Verzeichnis. Im Display wird REP angezeigt, Verzeichnis- und Tracknummer blinken.
Wiederholung Disc
Drücken Sie in Wiedergabe dreimal REP / RAND zur Wiederholung aller Tracks auf der Disc. Im
Display wird ALL REP angezeigt.
Zufallswiedergabe
Drücken Sie in Wiedergabe viermal REP / RAND zur zufälligen Wiedergabe aller Tracks, im Display
wird RAND angezeigt.
Mit PLAY/PAUSE kehren Sie zur normalen Wiedergabe zurück.
EINSTELLUNG VERZEICHNIS
Drücken Sie zur Auswahl des gewünschten Verzeichnisses FOLDER UP.
Hinweis: nur gültig in MP3 Wiedergabe, wenn auf der Disc mehrere Alben / Verzeichnisse
gespeichert sind. Die Trackauswahl zur Wiedergabe erfolgt vom Verzeichnis.
TRACKSUCHE
Mit REW und F.FWD springen Sie in Wiedergabe zum vorherigen / nächsten Track.
SUCHE VORWÄRTS / RÜCKWÄRTS
Mit REW. / F.FWD suchen Sie innerhalb des Tracks nach einer bestimmten Stelle mit hoher
Geschwindigkeit. Beim Loslassen der Taste wird die normale Wiedergabe fortgesetzt.
Einfacher Tastendruck auf REW. bringt Sie zum Anfang des derzeitigen Tracks zurück.
Zweifacher Tastendruck springt einen Track zurück.
Mit F.FWD springen Sie zum nächsten Track.
VORPROGRAMMIERUNG
Mit dieser Funktion können Sie bis zu 10 Tracks zur Wiedergabe in beliebiger Reihenfolge
programmieren.
Hinweis: Einstellung nur im Stoppmodus.
Drücken Sie im Stoppmodus PROG., PROG 01 blinkt im Display.
Mit FOLDER UP wählen Sie das gewünschte Album, mit REW. / F.FWD wählen Sie den
gewünschten Track. Mit PROG. speichern Sie die Tracknummer.
Die erste Tracknummer ist nun gespeichert, die Programmnummer ändert sich zu PROG 02.
Wiederholen Sie vorstehende Schritte zur Auswahl von bis zu 10 Tracks.
Zur Wiedergabe der Tracks in der gewählten Reihenfolge drücken Sie PLAY/PAUSE. Nach
Wiedergabe der vorprogrammierten Tracks begibt sich der CD-Player in Stoppmodus zurück.
AUX EINGANGSBUCHSE
1. Mit POWER schalten Sie das Gerät ein.
2. Schließen Sie das AUX-Kabel Ihres Media-Players (MP3-Player usw.) an der AUX
Eingangsbuchse auf der Geräterückseite an.
3. Schieben Sie den BUZZ / CD / ALARM / AUX Funktionsumschalter auf AUX.
4. Die Musik Ihres Media-Players wird nun vom Gerät wiedergegeben.
KOPFHÖRERBUCHSE
Das Gerät hat eine Kopfhörerbuchse für privaten Hörgenuss. Schließen Sie den 3,5mm Stereo
Klinkenstecker der Kopfhörer an der Kopfhörerbuchse an. Beim Anschluss von Kopfhörern werden
die Lautsprecher automatisch stummgeschaltet.
TECHNISCHE DATEN
Frequenzbereich: MW (AM) 525 - 1615 kHz
UKW (FM) 87,5 - 108 MHz
Notstrombatterie für die Uhrzeit: 2 x 1,5V AA Batterien (nicht enthalten)
Fernbedienung: 2 x 1,5V AAA Batterien (nicht enthalten)
Stromversorgung: 230V ~ 50Hz
Nettogewicht: ca. 1,0 kg

13. 12.
1. READ INSTRUCTIONS - All safety and operating instructions should be read before the device
is operated.
2. RETAIN INSTRUCTIONS - The safety and operating instructions should be retained for future
reference.
3. HEAD WARNINGS - All warnings and cautions on the device and in the manual should be
adhered to.
4. FOLLOW INSTRUCTIONS - All operating and use instructions should be followed.
5. WATER AND MOISTURE - The appliance should not be used near water, e.g. near a bathtub,
washbowl, kitchen sink, laundry tub, in a wet basement, or near a swimming pool or the like.
6. WALL MOUNTING - Use keyhole brackets on the rear of the device for wall mounting.
7. VENTILATION - Openings in the device serve its proper ventilation, are necessary for the
operation and prevent overheating. The appliance should be situated so that its location or
position does not interfere with its proper ventilation. Do not place on bed, sofa, rug or similar
surface that may block the ventilation openings, in a built-in installation, such as a bookcase or
cabinet that may impede the flow of air through the ventilation openings.
8. HEAT - The appliance should be situated away from heat sources such as radiators, heat
registers, stoves or other appliances (including amplifiers) that produce heat.
9. POWER SOURCES - The product should be operated only with the type of power supply
indicated on the rating label. If you are not sure of the type of power supply to your home, consult
your product dealer or local power company. For products intended to operate with battery power
or other sources, refer to the manual.
10. POWER CORD PROTECTION - Power supply cords should be routed so that they are not likely
to be walked on or pinched by items placed upon or against them, paying particular attention to
cords at plugs, convenience receptacles, and the point where they exit from the device.
11. PERIODS OF NONUSE - Unplug from mains power supply when left unused for a long period of
time.
INSTRUCTION MANUAL
FURTHER INFORMATION
The triangular symbol with
the lightning Bolt warns the
user to the presence of
dangerous non-isolated
voltage on the inside of this
device which may cause an
electric shock.
The triangular symbol with
the exclamation highlights
important points of which
the user should refer to the
manual regarding
maintenance and repair.
WARNING
DANGER OF A HAZARDOUS
ELECTRIC SHOCK. DO NOT OPEN
WARNING: TO REDUCE THE RISK
OF AN ELECTRIC SHOCK, DO NOT
REMOVE THE FRONT OR BACK
COVER. INSIDE THE UNIT, THERE
ARE NO PARTS THAT CAN BE
REPAIRED OR ADJUSTED BY THE
USER. PLEASE REFER TO
QUALIFIED TECHNICIANS.
Please keep this instruction manual for further reference
Do not obstruct the ventilation of the device. Make sure, that no curtains, newspapers,
furniture or any other type of object are blocking the ventilation system of the apparatus.
The ventilation system must be clear of objects at all times! Overheating may lead into
serious damage of the device and reduce its performance and lifespan.
Heat and warmth
Do not expose the appliance to direct sunlight. Make sure that the appliance is not
subject to direct heat sources such as heaters or open fire. Make sure that the ventilation
slots of the appliance are not covered.
Moisture and cleaning
This appliance is not waterproof! Do not immerse player in water. Do not allow player to
come in contact with water. If water gets inside the player it may cause serious damage.
Do not use cleaning agents that contain alcohol, ammoniac, benzene or abrasives as
these could damage the player. For cleaning, use a soft, moistened cloth.
Instructions on environment protection
Do not dispose of this product in the usual household garbage at the end of its life cycle;
hand it over at a collection point for the recycling of electrical and electronic appliances.
The symbol on the product, the instructions for use or the packing will inform about the
methods for disposal.
The materials are recyclable as mentioned in its marking. By recycling, material recycling
or other forms of re-utilization of old appliances, you are making an important
contribution to protect our environment.
Please inquire at the community administration for the authorized disposal location.
NEVER let allow anyone, especially children, to put objects into the holes, slots or
openings on this devise. This may lead into death due to electric shock. The device must
only be opened by a qualified assistant.
Beware of small pieces and batteries, do not swallow them. It may be hazardous to your
health and lead into suffocation. Please, Make sure to keep small devices and batteries
out of the reach of children.
Important advice regarding hearing protection
Caution:
You care for your hearing, and so do we.
Therefore, use caution while using this appliance.
Our recommendation: Avoid high volumes.
Children should be supervised while using headphones; make sure that the appliance is
not set to high volume
Caution!
High volumes may cause irreparable damage to children’s ears.
Only use the appliance for its intended purpose.
This device may only be used in housings and business premises.
Professional recycling
Batteries and packaging should not be disposed of in the trash. Batteries must be
handed over to a collection centre for used batteries. Separating disposable packaging
materials is ecologically friendly.
MODEL 2422
DESIGN MUSIC CENTER WITH VERTICAL CD/MP3 PLAYER

15. 14.
12. OBJECT AND LIQUID ENTRY - Care should be taken so that objects do not fall and liquids are
not spilled into the device.
13. DAMAGE REQUIRING SERVICE - Unplug this product from the wall outlet and take it to
qualified service personnel under the following conditions:
a) if power supply cord or plug are damaged;
b) if liquid has been spilled into or objects have fallen into the device;
c) if the device has been exposed to rain or water;
d) if the device does not operate when used according to the manual. Adjust only those controls
that are covered by the manual as an improper adjustment of other controls may interfere
with the normal operation;
e) if the product has been dropped or damaged in any way:
f) if the product shows a distinct change in performance; this indicates a need for service.
14. SERVICING - The user should not attempt to service the product beyond that described in the
manual. All servicing should be referred to qualified service personnel.
15. CLEANING - Unplug this product from the wall outlet before cleaning. Do not use liquid cleaners
or aerosol cleaners. Use a damp cloth for cleaning.
16. LIGHTNING - For added protection during a lightning storm or when it is left unattended and
unused for long periods of time, unplug device from the wall outlet and disconnect the antenna or
cable system. This will prevent damage to the device due to lightning and power surges.
17. SAFETY CHECK - Upon completion of any service or repairs to this device ask the service
technician to perform safety checks to determine that it is in proper operating condition.
18. OVERLOAD - Do not overload wall outlets, extension cords or integral convenience receptacles
as this can result in fire or electric shock.
19. ELECTROSTATIC DISCHARGE - In case of error message or malfunction, unplug power supply
and remove all batteries; afterwards, connect power supply again.
CAUTION
THIS CD PLAYER IS A CLASS I LASER PRODUCT. HOWEVER, THIS CD PLAYER USES A
VISIBLE / INVISIBLE LASER BEAM, WHICH COULD CAUSE HAZARDOUS RADIATION
EXPOSURE IF DIRECTED. BE SURE TO OPERATE THE CD PLAYER CORRECTLY AS
INSTRUCTED.
INVISIBLE LASER RADIATION WILL BE EMITTED WHEN THE PRODUCT IS OPEN AND
INTERLOCKS ARE DEFEATED. DO NOT DEFEAT THE SAFETY INTERLOCKS.
GRAPHIC SYMBOLS WITH SUPPLEMENTARY MARKINGS ARE LOCATED ON THE BOTTOM OF
THE UNIT.
USE OF CONTROLS, ADJUSTMENTS OR PERFORMANCE OF PROCEDURES HEREIN MAY
RESULT IN HAZARDOUS RADIATION EXPOSURE.
LOCATION OF CONTROLS
1. BUZZ / CD / MP3 / RADIO / AUX FUNCTION
SELECTOR
2. FM ST. / FM MO / AM BAND SELECTOR
3. ◄TUNING► CONTROL KNOB
4. CD DOOR
5. PLAY / PAUSE ►/ BUTTON
6. F.FWD BUTTON
7. REP / RAND BUTTON
8. VOL + BUTTON
9. VOL - BUTTON
10. FOLDER UP BUTTON
11. REW. BUTTON
12. STOP BUTTON
13. REMOTE SENSOR
14. FM STEREO INDICATOR
15. LCD DISPLAY
16. POWER BUTTON
17. AL.ON / OFF BUTTON
18. PROG. BUTTON
19. AL.SET BUTTON
20. MIN SET BUTTON
21. HOUR SET BUTTON
22. TIME SET BUTTON
23. SPEAKERS
24. AUX INPUT JACK
25. HEADPHONE JACK
26. R SP RIGHT SPEAKER JACK
27. L SP LEFT SPEAKER JACK
28. BATTERY COMPARTMENT
29. FM ANTENNA
30. AC POWER SUPPLY CABLE
31. MONTING BRACKETS
1 2 3
101214151618
1113171923
4
5
7
9
20
21
22
6
8
24
31
25
26
27
28
30
23
29

17. 16.
REMOTE CONTROL
1. STOP button
2. REW button
3. PROG button
4. FOLDER UP button
5. REP / RAND button
6. PLAY / PAUSE button
7. F.FWD button
8. Battery compartment
CHANGE BATTERIES
1. Open the battery cover at the rear of the remote control.
2. Insert 2 x AAA batteries while observing the polarity. We recommend the use of alkaline
batteries.
3. Close the battery compartment properly.
POWER SUPPLY (MAINS 230V ~ 50HZ)
Connect the power supply cable plug to a (230V ~ 50Hy) wall outlet.
Warning:
• Before using the device, check that the local mains power supply is compatible with the HI-FI
System (230V ~ 50Hz).
• Do not plug or unplug the power supply cable with wet hands.
• When planning not to use this unit for long periods of time (i.e. vacation, etc.) disconnect from
the wall outlet.
• When disconnecting from the wall outlet, please pull the plug; do not pull the cord in order to
avoid electric shock caused by the damaged cable.
BATTERY SAFETY PRECAUTIONS:
• Keep batteries away from children and pets.
• Insert the batteries observing the polarity (+/-). Failure to properly align the battery polarity can
cause damage and/or property damage.
• Remove exhausted batteries from the device. Remove the batteries when the device will not be
used for extended periods of time to prevent damage due to battery leakage.
• Never throw batteries into the fire. Do not expose batteries to fire or other heat sources.
• Battery disposal: exhausted batteries must be properly disposed of and recycled in compliance
with all applicable laws. For detailed information contact your local municipality’s waste authority.
• Follow the battery manufacturer’s safety, usage and disposal instructions.
BACKUP BATTERY
Two 1.5V “AA” batteries (not included) may be installed as a backup option to maintain the time in
case of power failure. In the event of a power outage, the time will not be displayed; however, the
clock will continue to operate and the actual time will be maintained. The LCD display and other
functions will resume once electrical power is restored. The backup batteries should be replaced as
needed; remove the batteries if the clock is not used or stored for long periods of time.
1
2
3
4
5
6
8
7
SET CURRENT TIME
Connect the AC power cord to a wall outlet.
1. While pressing and holding the TIME SET button, press the HOUR button to set the desired
hour.
2. While pressing and holding the TIME SET button, press the MIN button to set the desired
minutes.
SET ALARM
1. While pressing and holding the AL.SET button, press the HOUR button to set the desired alarm
hour.
2. While pressing and holding the AL.SET button, press the MIN button to set the desired alarm
minutes.
3. After setting the alarm time, remember to press the AL.ON / OFF button to turn on the alarm
function (alarm icon will be displayed in the LCD).
NOTE:
1. When sliding the function switch to BUZZ position the unit will turn to standby mode.
2. When sliding the function switch to BUZZ position, the unit cannot be turned on with the POWER
button until sliding the switch to CD / MP3 / RADIO / AUX mode.
WAKE UP TO ALARM BUZZER:
a. Slide the BUZZ / CD / MP3 / RADIO / AUX function selector to BUZZ position.
b. The alarm buzzer will sound for 3 minutes at the set alarm time.
Note: Press the AL.ON / OFF button to turn off the alarm.
WAKE UP TO CD:
a. Slide the BUZZ / CD / MP3 / RADIO / AUX function selector to CD position.
b. Open the CD door manually and insert a CD (with the label side facing up) into the CD
compartment.
c. Close the CD Door manually.
d. The CD will sound at the set alarm time playing the first track on the CD.
Note: The unit will automatically be turned off after 1 hour.
To deactivate the alarm (CD) manually, press the STOP Button.
WAKE UP TO RADIO:
a. Slide the BUZZ / CD / MP3 / RADIO / AUX function selector to RADIO position.
b. Slide the FM ST. / FM MO / AM band selector to AM or FM position.
c. Press the POWER button to turn the unit on.
d. Tune the radio with the ◄TUNING► control knob to a broadcasting station and adjust the
volume.
e. Then press the POWER button to turn off the unit.
f. The radio will sound at the set alarm time.
Note: The unit will automatically be turned off after 1 hour.
To deactivate the alarm (Radio) manually, press the POWER button.
TURN OFF ALARM
To cancel the alarm mode:
Press the AL.ON / OFF button to turn off the alarm function (the alarm icon in the LCD display
turns off).
ADJUST VOLUME
• Press VOL + button to increase the volume.
• Press VOL - button to decrease the volume.

19. 18.
DO DO NOT
RADIO OPERATION
1. Set the BUZZ / CD / MP3 / RADIO / AUX function selector to RADIO position.
2. Set the FM ST./FM MO/AM band selector to the desired band.
3. Press the POWER button to switch on the device.
4. Rotate the ◄TUNING► control knob to the desired radio station.
Note: For better AM reception turn the unit to position the built-in directional antenna; for better
FM reception fully extend the FW wire antenna.
Note: The STEREO indicator will light when a program is received in FM Stereo. If the FM
reception is noisy, switch the band selector to the FM MO position and the program will be
received in mono.
5. Press the VOL +/- to adjust to a comfortable listening level.
6. To switch off the radio press the POWER button.
HANDLING COMPACT DISCS
• Always protect a disc against scratches and dust. If a disc is treated with reasonable care, wiping
off the disc with a soft cloth should be the only maintenance needed to retain its excellent sound
reproduction. Discs should be retained in their original cases during periods of nonuse.
• Handle a disc only by its edges. Do not touch the surface.
• Handle a disc as shown in the illustrations.
• Use a soft cloth to wipe a disc clean. Do not use benzene, thinners or other chemical cleaners as
damage may result. A disc should always be wiped in a straight line from its center to its edge.
Never wipe a disc in a circular motion.
• Do not expose a disc to direct sunlight, high humidity, or high temperatures for extended periods
of time. Do not place the disc on other equipment or near any heat source.
• Dust on the pickup lens can lead to erratic operation and skipping of the sound during playback.
To clean the pickup lens, open the disc compartment and blow the dust off. Use a camera lens
blower (available at most camera stores).
Note: Do not touch the lens. Do not allow any liquids to enter the product.
• To clean the CD player cabinet use a soft and damp cloth.
• Never use benzene or other strong chemical cleaners, as these could damage the finish.
CD PLAYBACK
NOTE: Never touch the laser lens inside the CD compartment. Clean the laser lens with a CD
cleaner disc if it becomes dirty.
1. Slide the BUZZ / CD / MP3 / RADIO / AUX function selector to CD position.
2. Open the CD compartment manually and insert a CD into the tray with label facing up.
3. Press the POWER button to turn on the unit, the disc will rotate for a few seconds and then start
playback automatically.
4. Select the previous or next track with REW. / F.FWD .
5. Press the PLAY / PAUSE button to start playback.
6. Press the PLAY / PAUSE button to pause playback, press the PLAY / PAUSE button again to
resume playback.
7. Press the STOP button to stop playback.
RANDOM PLAYBACK
• Press the REP / RAND button once, RAND will be displayed and the CD is played in random
order.
SEARCH REVERSE / FORWARD
1. Press and hold REW. / F.FWD buttons to search through the track at high speed. When
the desired track section is found, release the button and normal playback will resume.
2. Press the REW. once to skip to the beginning of the current track. Press two or more times to
skip to the previous tracks on the disc.
3. Press the F.FWD to skip to the next track on the disc.
4. Press and hold the CD Reverse Search (REW ) Button, the current track will be scanned and
move backwards to the previous track(s); When the desired track section is found, release the
button and normal play will resume.
5. Press and hold the CD Forward Search (F.FWD ) Button, the current track will be scanned
and move forward to the next track(s); When the desired track section is found, release the
selected button and normal play will resume.
REPEAT FUNCTION
Press the REP / RAND button to repeat a single track or all tracks on a CD.
1. Press the REP / RAND button once during playback, REP will be displayed. The same track will
be repeated.
2. Press the REP / RAND button a second time to repeat all tracks, ALL REP will be displayed and
the whole CD is repeated.
3. To cancel repeat mode press the REP / RAND button a third time.
PROGRAM FUNCTION
The Program feature is used to program up to 20 tracks to play in a selected order.
1. While in stop mode press the PROG. button, PROG 01 flashes in the display.
2. Press REW. / F.FWD to select the desired track.
3. Press the PROG. button to store the track into memory.
4. Repeat step 2 to 3 to select up to 20 tracks.
5. To play the selected tracks in the programmed sequence press the PLAY/PAUSE button. Track
number and PROG are displayed.
6. Press the REW. / F.FWD buttons to listen to the previous or next programmed track.
Note: After all programmed tracks have played, the CD player will return to stop mode.
7. To clear the programmed tracks from memory press STOP twice.
MP3 DISC SECTION
Note: Because MP3 discs have a large capacity, disc access times are a little longer.
1. Slide the function switch (BUZZ / CD / MP3 / RADIO) to CD position.
2. Open the CD DOOR and insert a CD into the tray with the label facing up.
3. Close the CD DOOR and press the POWER button to turn on the unit, the disc will rotate for a
few seconds and then play automatically.
4. Use the REW / F.FWD buttons to select a track.
5. Press the PLAY/PAUSE button to pause playback.
6. To stop the album temporarily, press PAUSE button, to resume, press again.
7. Press the STOP button to stop playback.

21. 20.
REPEAT PLAYING FUNCTION
Single track repeat
While in playback mode, press the REP / RAND button once to repeat the current track. The display
shows as REP.
Single folder repeat
In playback mode, press the REP / RAND button twice, all tracks in the current album will be
repeated, the display shows REP, folder number and track number.
Disc repeat
In playback mode, press the REP / RAND button 3 times to play all tracks on the disc repeatedly.
The display shows ALL REP.
Random playback
While in playback mode, press the REP / RAND button 4 times, RAND appears in the display.
Press the PLAY / PAUSE button to begin random playback.
ALBLUM SETTING
Press the FOLDER UP button to select the desired album
Note: this function is only valid for MP3 discs, which contain the songs in different folders. Select
tracks to playback from the album.
TRACK SEARCH
Press the REW and F.FWD buttons during playback to skip to the desired previous or next
track.
FORWARD / REVERSE SEARCH
Press and hold REW. / F.FWD during playback to scan the track which is being played at high
speed. When the desired section of the current track if found, release the button and normal
playback will resume.
Press and hold the F.FWD button while playing to scan the current track forward at high speed.
Press and hold the REW. while playing to scan the current track backward at high speed.
PROGRAM PLAYBACK
The tracks on the disc can be programmed to play in any order (up to 10 tracks can be
programmed).
Note: this can only be done in stop mode.
Press the PROG. button while in the stop mode, PROG 01 flashes in the display.
Press FOLDER UP to select the desired album, and press REW. / F.FWD to select the
desired tracks in the album, then press PROG. to store in memory.
The first track number is now stored and the program number changes to PROG 02, waiting for your
next selection.
Repeat above steps to program additional tracks.
After programming is finished, press the PLAY / PAUSE button to start playback from the first
programmed track. The player stops automatically after all programmed tracks have been played.
AUX INPUT JACK
1. Press the POWER button to turn on the unit.
2. Connect the AUX cable from the output jack of your media player such as portable MP3 player to
the AUX input jack.
3. Slide the BUZZ / CD / ALARM / AUX function selector to AUX.
4. Playback starts from your media player.
HEADPHONE JACK
Your device is equipped with a headphone jack for private listening. Simply plug any 3.5mm stereo
headphone into the headphone jack. With the headphone connected the speakers will be
automatically muted.
TECHNICAL DATA
Frequency range: AM 525 - 1615 kHz
FM 87.5 - 108 MHz
Back-up battery for clock: 2 x 1.5V AA batteries (not included)
Remote control: 2 x 1.5V AAA batteries (not included)
Power supply: 230V ~ 50Hz
Net weight: ca. 1.0 kg

23. 22.
1. LISEZ LES INSTRUCTIONS - Il est impératif de lire les instructions relatives à la sécurité et au
fonctionnement avant de se servir de l'appareil.
2. CONSERVEZ CES INSTRUCTIONS - Les instructions relatives à la sécurité et au
fonctionnement doivent être conservées pour s’y référer ultérieurement.
3. AVERTISSEMENTS IMPORTANTS - Tous les avertissements et mises en garde situés sur
l'appareil et dans le manuel doivent être respectés.
4. SUIVEZ LES INSTRUCTIONS - Il est impératif de suivre toutes les instructions relatives aux
fonctionnement et à l’utilisation
5. EAU ET HUMILITÉ - L'appareil ne doit jamais être utilisé à proximité d'un point d’eau, par
exemple près d'une baignoire, un lavabo, un évier de cuisine, un bac à laver, un sous-sol humide
ou près d'une piscine ou d’un lieu de ce genre.
6. MONTAGE MURAL - Utilisez les supports perforés à l'arrière de l'appareil pour le montage
mural.
7. VENTILATION - Les ouvertures de l'appareil servent à ventilation correcte et sont nécessaires
pour le fonctionnement et éviter une surchauffe. L'appareil doit être situé de sorte que de son
emplacement ou sa position ne gêne pas sa ventilation correcte. Ne pas placer sur un lit, un
divan, une couverture ou tout autre surface semblable qui pourrait obstruer les ouvertures de
ventilation, dans un meuble encastré tel qu'une bibliothèque ou une armoire qui pourrait entraver
le flux d'air à travers les ouvertures de ventilation.
8. CHALEUR - L'appareil doit être situé loin de toute source de chaleur telles que des radiateurs,
des grilles de chaleur, des poêles (y compris des amplificateurs électroniques) ou d'autres
appareils produisant de la chaleur.
9. SOURCES D'ALIMENTATION - Le produit ne doit être alimenté qu’avec le type d'alimentation
électrique indiqué sur l'étiquette signalétique. Si vous n'êtes pas sûr du type d'alimentation
électrique dont vous disposez chez vous, consultez le revendeur de votre produit ou votre
compagnie d'électricité locale. Pour les produits destinés à fonctionner avec des piles ou avec
d'autres sources d'alimentation, veuillez vous reporter au manuel.
10. PROTECTION DU CORDON D'ALIMENTATION - Les cordons d'alimentation électrique doivent
toujours être disposés de telle manière qu'il ne risquent pas d'être piétinés ou d'être pincés par
des éléments placés sur eux ou contre eux, en accordant une attention toute particulière aux
cordons aux endroits situés vers les prises, les logements et le point où ils sortent de l'appareil.
Ne gênez pas la ventilation du dispositif. Assurez-vous que rideaux, journaux,
couvertures ou meubles ne bloquent en aucun cas les fentes de ventilation de l’appareil.
La ventilation doit être assurée à tout moment! La surchauffe peut causer à l’appareil
des dommages sérieux et réduire sa performance et sa durée de vie.
MODELL 2422
SYSTÈME MUSIQUE DESIGN AVEC LECTEUR CD/MP3 VERTICAL
Veuillez utiliser l'appareil uniquement aux fins pour lesquelles il a été créé.
Cet appareil est exclusivement destiné à l'usage dans des locaux privés ou à usage
commercial.
Veuillez conserver ce mode d`emploi pour utilisation ultérieure.
Indications relatives à la protection de l’environnement
Au terme de sa durée de vie, ce produit ne doit pas être éliminé avec les ordures
ménagères mais doit être remis à un point de collecte destiné au recyclage des
appareils électriques et électroniques. Le symbole figurant sur le produit, la notice
d’utilisation ou l’emballage vous indique cela.
Les matériaux sont recyclables conformément à leur marquage. Vous apportez une
large contribution à la protection de l’environnement par le biais du recyclage, dela
réutilisation matérielle ou par les autres formes de réutilisation des appareils usagés.
Veuillez vous adresser à la municipalité pour connaître la déchetterie compétente.
NE JAMAIS laisser une personne ou surtout un enfant mettre des objets dans les trous,
fentes ou autres ouvertures de l’appareil. Cela pourrait entraîner la mort par décharge
électrique. L’appareil doit être ouvert uniquement par un assistant qualifié.
La chaleur et sources de chaleur
Veuillez ne pas exposer l’appareil à la lumière directe (dusoleil). Assurez-vous que
l’appareil n’est pas en contact direct avec des sources de chaleur telles qu’un chauffage
ou un feu. Assurez-vous que les fentes d’aération de l’appareil ne sont pas fermées.
Humidité et nettoyage
L’appareil n’est pas étanche! Ne plongez pas l’appareil dans l’eau. Evitez son contact
avec l’eau. De l’eau dans l’appareil pourrait sérieusement l’endommager.
N’employez pas de détergents contenant de l’alcool, de l’ammoniaque, du benzène ou
des abrasifs. Ces produits pourraient endommager votre appareil. Pour nettoyer
l’appareil, utilisez un chiffon doux et humide.
Prenez garde aux petites pièces et piles, ne les avalez pas. Cela pourrait être dangereux
pour votre santé et mener à l'étouffement. Prêtez l'attention la plus élevée pour garder
les petits appareils et piles hors de la portée des enfants.
Conseil important pour la protection de l’ouïe
Attention:
Nous tenons à votre ouïe autant que vous.
Par conséquent, prenez vos précautions lors de l’usage de cet appareil.
Notre recommandations: Evitez les volumes forts.
Dans le cas où des enfants utilisent l’appareil, assurez-vous que le volume n’est pas sur
la position élevée.
Attention!
Les volumes élevés peuvent irrémédiablement endommager l’ouïe des enfants.
Recyclage professionnel
Les piles et l’emballage n’appartiennent pas à la catégorie des ordures ménagères. Les
piles doivent être dirigées vers un centre collectant les piles usagées. Les matériaux de
l’emballage sont écologiques.
MANUELD’UTILISATION
PLUS D’INFORMATIONS
La présence d’une tête de flèche
clignotante dans un triangle
équilatéral informe l’utilisateur
que l’intérieur de l’appareil
présente une “tension
dangereuse” non isolée dont la
puissance peut constituer un
risque de choc électrique.
La présence d’un point
d’exclamation dans un triangle
équilatéral informe l’utilisateur
que la documentation
accompagnant l’appareil contient
d’importantes instructions de
fonctionnement et de
maintenance (réparation).
ATTENTION
RISQUE DE CHOC ELECTRIQUE
NE PAS OUVRIR
ATTENTION : AFIN DE REDUIRE LE
RISQUE DE CHOC ELECTRIQUE, NE PAS
RETIRER LE CAPOT (OU L’ARRIERE).
L’INTERIEUR DE L’APPAREIL NE
CONTIENT AUCUNE PIECE POUVANT
ETRE REPAREE PAR L’UTILISATEUR.
CONFIER LES REPARATIONS A UN
SERVICE DE MAINTENANCE QUALIFIE.

25. 24.
11. PÉRIODES D’INUTILISATION - Débranchez de l'alimentation électrique secteur lorsque
l'appareil est laissé inutilisé pendant une longue période.
12. ENTRÉE D'OBJETS ET DE LIQUIDES - Il faut faire attention à ce que des objets ne tombent
pas sur l'appareil et que les liquides ne soient pas renversés dessus.
13. DOMMAGES NÉCESSITANT UNE RÉPARATION - Débrancher ce produit de la prise murale et
confiez-le à du personnel de maintenance agréé dans les conditions suivantes :
a) si le cordon d'alimentation ou la prise sont endommagés ;
b) si du liquide a été versé à l'intérieur ou si des objets sont tombés sur appareil ;
c) si l'appareil a été exposé à de la pluie ou à de l'eau ;
d) si l'appareil ne fonctionne pas lorsqu'il est utilisé conformément au manuel d'utilisation. Ne
réglez que les commandes qui sont traitées dans le manuel car un mauvais réglage d'autres
commandes peut empêcher le fonctionnement normal ;
e) si le produit est tombé ou a été endommagé de quelque façon que ce soit.
f) si le produit monte un changement notable de comportement ; cela indique le besoin
d'effectuer une maintenance.
14. MAINTENANCE - L'utilisateur ne doit pas essayer d'assurer la maintenance du produit au-delà
de ce qui est décrit dans le manuel. Toutes les opérations de maintenance doivent être
effectuées par du personnel qualifié
15. NETTOYAGE - Débranchez ce produit de la prise murale avant le nettoyage. Ne pas utiliser de
produits nettoyants liquides ou en bombe aérosol. Utilisez un chiffon humide pour le nettoyage.
16. FOUDRE - Pour une protection supplémentaire pendant un orage ou lorsque l'appareil est laissé
sans surveillance et inutilisé pendant de longues périodes, débranchez l'appareil de la prise
murale et déconnectez l'antenne ou le câble. Cela évitera des dommages à l'appareil dus à la
foudre et aux surtensions.
17. VÉRIFICATION DE SÉCURITÉ - Après toute maintenance ou réparation sur cet appareil,
demandez à un technicien de maintenance d'effectuer des vérifications de sécurité pour
déterminer s'il se trouve en condition de fonctionnement correct.
18. SURCHARGE - Ne surchargez pas les prises murales, les cordons d'extension ou les logements
intégrés car cela peut provoquer un incendie ou un choc électrique.
19. DÉCHARGE ÉLECTROSTATIQUE - Dans les cas de message d'erreur ou de
dysfonctionnement, débranchez l'alimentation secteur et retirez toutes les piles, rebranchez
ensuite l'alimentation.
AVERTISSEMENT
CE LECTEUR DE CD EST UN PRODUIT COMPORTANT UN LASER DE CLASSE 1. CEPENDANT,
CE LECTEUR DE CD UTILISE UN FAISCEAU LASER VISIBLE / INVISIBLE, QUI PEUT
PROVOQUER UNE EXPOSITION À DES RAYONNEMENTS DANGEREUX S’IL EST DIRIGÉ
VERS UNE PERSONNE. VEILLEZ À FAIRE FONCTIONNER LE LECTEUR DE CD
CORRECTEMENT COMME INDIQUÉ DANS CES INSTRUCTIONS.
UN RAYONNEMENT LASER INVISIBLE EST EMIS LORSQUE LE PRODUIT EST OUVERT ET
QUE LES DISPOSITIFS DE VERROUILLAGE SONT NEUTRALISES. NE NEUTRALISEZ PAS LES
DISPOSITIFS DE VERROUILLAGE DE SECURITE.
DES SYMBOLES GRAPHIQUES AVEC DES MARQUAGES SUPPLÉMENTAIRE SONT SITUÉS
SUR LE BAS DE L'UNITÉ.
L'UTILISATION DE COMMANDES, LES RÉGLAGES OU L’EXÉCUTION DE PROCÉDURES
DÉCRITS DANS CE DOCUMENT PEUVENT ENTRAÎNER UNE EXPOSITION DANGEREUSE AU
RAYONNEMENT.
EMPLACEMENTS DES COMMANDES
1. SÉLECTEUR DE FONCTION
BUZZ / CD / MP3 / RADIO / AUX
2. SÉLECTEUR DE BANDE DE FRÉQUENCES
FM ST. / FM MO / AM
3. TOUCHE DE COMMANDE ◄TUNING►
4. PORTE DU LOGEMENT DU CD
5. TOUCHE PLAY/PAUSE ►/
6. TOUCHE F.FWD
7. TOUCHE REP / RAND
8. TOUCHE VOL +
9. TOUCHE VOL -
10. TOUCHE FOLDER UP
11. TOUCHE REW.
12. TOUCHE STOP
13. REMOTE SENSOR
14. TÉMOIN STEREO FM
15. AFFICHAGE À CRISTAUX LIQUIDES
16. TOUCHE POWER
17. TOUCHE AL.ON / OFF
18. TOUCHE PROG.
19. TOUCHE AL.SET
20. TOUCHE DE RÉGLAGE MIN
21. TOUCHE DE RÉGLAGE HOUR
22. TOUCHE TIME SET
23. HAUT-PARLEURS
24. PRISE D’ENTRÉE AUX
25. PRISE POUR CASQUE
26. PRISE ÉCOUTEUR DROIT R SP
27. PRISE ÉCOUTEUR GAUCHE L SP
28. COMPARTIMENT DES PILES
29. ANTENNE FM
30. CÂBLE D’ALIMENTATION ÉLECTRIQUE
COURANT ALTERNATIF
31. UPPORTS DE MONTAGE
1 2 3
101214151618
1113171923
4
5
7
9
20
21
22
6
8
24
31
25
26
27
28
30
23
29

27. 26.
TÉLÉCOMMANDE
1. Touche STOP
2. Touche REW
3. Touche PROG
4. Touche FOLDER UP
5. Touche REP / RAND
6. Touche PLAY / PAUSE
7. Bouton F.FWD
8. Logement des piles
REMPLACEMENT DES PILES
1. Ouvrez le cache des piles à l’arrière de la télécommande.
2. Insérez 2 piles de type AAA en respectant la polarité. Nous vous conseillons d’utiliser des piles
alcalines.
3. Fermez correctement le compartiment des piles.
ALIMENTATION ÉLECTRIQUE (SECTEUR 230 V ~ 50 HZ)
Branchez la prise du câble d’alimentation dans une prise murale (230V~50Hz).
Avertissement :
• Avant d'utiliser l'appareil, vérifiez que l'alimentation électrique du secteur local est compatible
avec le système HI-FI (230 V ~ 50 Hz).
• Ne pas brancher ou débrancher le câble d'alimentation avec des mains humides.
• Lorsque vous prévoyez de ne pas utiliser cette unité pendant des périodes prolongées (par
exemple pendant des vacances, etc.), débranchez-le de la prise murale.
• Lorsque vous le débranchez de la prise murale, veuillez tirer sur la prise ; ne tirez pas sur le
cordon pour éviter des chocs électriques provoqués par le câble endommagé.
PRÉCAUTIONS DE SÉCURITÉ RELATIVES AUX PILES :
• Gardez les piles loin des enfants et des animaux.
• Insérez les piles en respectant la polarité (+/-). Un mauvais respect de la polarité des piles peut
provoquer des dommages et / ou des dégâts matériels.
• Retirez les piles usagées de l’appareil. Retirez les piles lorsque l’appareil n’est pas utilisé
pendant des périodes prolongées pour éviter des dommages provoqués par des fuites.
• Ne jetez jamais les piles dans le feu. N’exposez pas les piles à un feu ou à d’autres sources de
chaleur.
• Mise au rebut des piles : les piles usagées doivent être éliminées correctement et recyclées en
conformité avec toutes les lois applicables. Pour obtenir des informations détaillées, contactez le
service en charge des déchets de votre municipalité.
• Suivez les instructions relatives à la sécurité, l'utilisation et la mise au rebut données par le
fabricant des piles.
1
2
3
4
5
6
8
7
PILES DE SAUVEGARDE
Il est possible d'installer deux piles de 1,5 V de type « AA » comme option de sauvegarde pour
conserver l'heure en cas de défaillance de l'alimentation. En cas de panne d'électricité, l’heure ne
sera pas affichée ; cependant, l'horloge continuera à fonctionner est l’heure réelle sera conservée.
L'affichage à cristaux liquides et les autres fonctions recommenceront à fonctionner lorsque
l'alimentation électrique reviendra. Les piles de sauvegardes doivent être remplacées au besoin ;
retirer les piles si l’horloge n'est pas utilisée ou enregistrée pendant de longues périodes.
RÉGLER L'HEURE ACTUELLE
Branchez le cordon d'alimentation en courant alternatif dans une prise murale.
1. Tout en appuyant et en maintenant appuyée la touche TIME SET, appuyez sur la touche HOUR
pour régler l’heure désirée.
2. Tout en appuyant et en maintenant appuyée la touche TIME SET, appuyez sur la touche MIN
pour régler les minutes désirées.
RÉGLER L'ALARME
1. Tout en appuyant et en maintenant appuyée la touche AL.SET, appuyez sur la touche HOUR
pour régler l’heure d'alarme désirée.
2. Tout en appuyant et en maintenant appuyée la touche AL.SET, appuyez sur la touche MIN pour
régler les minutes désirées.
3. Après avoir effectué le réglage de l'heure d'alarme, pensez à appuyer sur la touche AL.ON / OFF
pour activer la fonction d'alarme (l'alarme de l'icône sera affichée sur l'écran à cristaux
liquides).
REMARQUE :
1. Lorsque l’interrupteur de fonction est glissé en position BUZZ, l’appareil passe en mode veille.
2. Lorsque l’interrupteur de fonction est glissé en position BUZZ, l’appareil ne peut pas être éteint
avec la touche POWER tant que l’interrupteur de fonction n’est pas placé en mode
CD / MP3 / RADIO / AUX.
RÉVEIL AVEC LE VIBREUR D'ALARME
a. Faites glisser le sélecteur de fonction BUZZ / CD / MP3 / RADIO / AUX sur la position BUZZ.
b. Le vibreur d'alarme sonnera pendant trois minutes à l’heure d’alarme sélectionnée.
Remarque : Appuyez sur la touche AL.ON / OFF pour éteindre l'alarme.
RÉVEIL AVEC UN CD
a. Faites glisser le sélecteur de fonction BUZZ / CD / MP3 / RADIO / AUX sur la position CD.
b. Ouvrez manuellement la porte du CD et insérez un CD (côté avec étiquette vers le haut) dans le
logement du CD.
c. Fermez manuellement la porte du CD.
d. Le CD sera lu à l’heure d'alarme sélectionnée en lisant la première piste du CD.
Remarque : L’unité s’éteindra automatiquement au bout d’une heure.
Pour désactiver l’alarme (CD) manuellement, appuyez sur le bouton STOP.
RÉVEIL AVEC LA RADIO
a. Faites glisser le sélecteur de fonction BUZZ / CD / MP3 / RADIO / AUX sur la position RADIO.
b. Faites glisser le sélecteur de bande de fréquences sur la position AM ou FM.
c. Appuyez sur la touche POWER pour allumer l’unité.
d. Réglez la radio avec le bouton de commande ◄TUNING► sur une station radio et ajustez le
volume.
e. Appuyez ensuite sur la touche POWER pour allumer l’unité.
f. La radio sonnera à l’heure d’alarme sélectionnée.
Remarque : L’unité s’éteindra automatiquement au bout d’une heure.
Pour désactiver l’alarme (Radio) manuellement, appuyez sur le bouton POWER.

29. 28.
À FAIRE À NE PAS FAIRE
ARRÊTER L’ALARME
Pour arrêter le mode alarme :
Appuyez sur la touche AL.ON / OFF pour éteindre la fonction alarme (l’icône d’alarme sur
l’affichage à cristaux liquides disparaît).
AJUSTER LE VOLUME
• Appuyez sur la touche VOL + pour augmenter le volume.
• Appuyez sur la touche VOL - pour diminuer le volume.
FONCTIONNEMENT DE LA RADIO
1. Réglez le sélecteur de fonction BUZZ / CD / MP3 / RADIO / AUX sur la position RADIO.
2. Réglez le sélecteur de bande de fréquences FM ST. / FM MO / AM sur la fréquence désirée.
3. Appuyez sur la touche POWER pour allumer l’unité.
4. Tournez le bouton de commande ◄TUNING► pour vous positionner sur la station désirée.
Remarque : Pour une meilleure réception AM, tournez l’unité pour positionner l’antenne directionnelle
intégrée ; pour une meilleure réception FM, déployez complètement l’antenne filaire FM.
Remarque : Le témoin STEREO s’allume lorsque la réception d’un programme s’effectue en
stéréo. Si la réception FM est brouillée par le bruit, basculez le sélecteur de bande de
fréquences sur la position FM MO et le programme sera reçu en mono.
5. Appuyez sur VOL +/- pour ajuster un niveau d’écoute confortable.
6. Pour éteindre la radio, appuyez sur la touche POWER.
MANIPULATION DES DISQUES COMPACTS
• Protégez toujours les disques contre les rayures et la poussière. Si vous prenez soin
normalement des disques, il suffit, pour conserver leurs capacités de reproduction sonore
intactes, de les essuyer avec un tissu doux. Les disques doivent être conservés dans leur boîtier
d’origine lorsqu’ils ne sont pas utilisés.
• Tenez le disque uniquement par les bords. Ne touchez jamais sa surface.
• Manipulez le disque comme indiqué dans les illustrations.
• Utilisez un tissu doux pour essuyer la surface du disque. N’utilisez pas de benzène, de diluants
ou d’autres produits nettoyants chimiques car ils risquent de provoquer des dommages. Un
disque doit toujours être nettoyé en faisant un mouvement rectiligne, du centre vers les bords.
N'essuyez jamais un disque en effectuant un mouvement circulaire.
• N’exposez jamais un disque à la lumière du soleil directe, à une humidité élevée, ou à de hautes
températures pendant des périodes prolongées. Ne placez pas le disque sur d'autres appareils
ou près d'une source de chaleur quelconque.
• De la poussière sur la lentille réceptrice peut entraîner un fonctionnement irrégulier et des sauts
de son pendant la lecture. Pour nettoyer la lentille réceptrice, ouvrez le logement du disque et
soufflez pour retirer la poussière. Utilisez une soufflette pour objectif (disponible dans la plupart
des magasins de photo).
Remarque : Ne touchez jamais la lentille. Ne laissez jamais un liquide quelconque pénétrer dans le produit.
• Pour nettoyer le boîtier d’un lecteur de CD, utilisez un tissu doux et humide.
• N’utilisez jamais de benzène ou d’autres produits nettoyants chimiques forts, car ils pourraient
endommager le revêtement.
LECTURE D’UN CD
REMARQUE : Ne touchez jamais la lentille du laser à l’intérieur du logement du CD. Nettoyez la
lentille du laser avec un disque nettoyeur de CD si elle devient sale.
1. Faites glisser le sélecteur de fonction BUZZ / CD / MP3 / ALARM / RADIO sur la position CD.
2. Ouvrez manuellement le logement du CD et insérez un CD sur le plateau, l’étiquette placée vers le haut.
3. Appuyez sur la touche POWER pour mettre l’unité en marche, le disque va tourner pendant
quelques secondes puis va démarrer automatiquement la lecture.
4. Sélectionnez la piste précédente ou suivante avec REW. / F.FWD .
5. Appuyez sur la touche PLAY / PAUSE pour démarrer la lecture.
6. Appuyez sur la touche PLAY / PAUSE pour faire une pause pendant la lecture, appuyez de
nouveau sur PLAY / PAUSE pour reprendre la lecture.
7. Appuyez sur la touche STOP pour arrêter la lecture.
LECTURE ALÉATOIRE
• Appuyez une fois sur le bouton REP / RAND, RAND va s’afficher et le CD est lu dans un ordre
aléatoire.
RECHERCHE VERS L’ARRIÈRE / VERS L’AVANT
1. Appuyez et maintenez appuyées les touches REW. / F.FWD pour effectuer une
recherche rapide dans la plage. Lorsque vous trouvez la section de piste désirée, relâchez la
touche, la lecture normale reprend.
2. Appuyez sur REW. une fois pour sauter au début de la piste actuelle. Appuyez deux fois ou
plus pour sauter vers les pistes précédentes du disque.
3. Appuyez sur F.FWD pour sauter vers la piste suivante sur le disque.
4. Appuyez et maintenez appuyée la touche de recherche en arrière du CD (REW ), la piste
actuelle va être balayée et se déplacer en arrière vers la(les) piste(s) précédente(s) ; lorsque la
piste désirée est trouvée, relâchez la touche et la lecture normale reprendra.
5. Appuyez et maintenez appuyée la touche de recherche en avant du CD (F.FWD ), la piste
actuelle va être balayée et se déplacer en avant vers la(les) piste(s) précédente(s) ; lorsque la
piste désirée est trouvée, relâchez la touche et la lecture normale reprendra.
FONCTION RÉPÉTITION
Appuyez sur la touche REP / RAND pour répéter une seule piste ou toutes les pistes d'un CD.
1. Appuyez une fois sur la touche REP / RAND pendant la lecture, REP va s’afficher. La même
piste sera répétée.
2. Appuyez une deuxième fois sur la touche REP / RAND pour répéter toutes les pistes, ALL REP
va s’afficher et l’intégralité du CD est répétée.
3. Pour annuler le mode répétition, appuyez une troisième fois sur la touche REP / RAND.
FONCTION PROGRAMME
La fonction programme est utilisée pour programmer jusqu’à 20 pistes à lire dans un ordre
déterminé.
1. En mode arrêt, appuyez sur la touche PROG., PROG 01 clignote sur l’affichage.
2. Appuyez sur REW. / F.FWD pour sélectionner la piste désirée.
3. Appuyez sur la touche PROG. pour enregistrer la piste en mémoire.
4. Répétez l’étape 2 à 3 pour sélectionner jusqu’à 20 pistes.
5. Pour lire les pistes sélectionnées dans la séquence programmée, appuyez sur la touche
PLAY/PAUSE. Le numéro de la piste et PROG s’affichent.
6. Appuyez sur les touches REW. / F.FWD pour écouter la piste programmée précédente ou
suivante.
Remarque : Une fois que toutes les pistes programmées ont été lues, le lecteur de CD retourne
automatiquement en mode arrêt.
7. Pour effacer les pistes programmées de la mémoire, appuyez deux fois sur STOP.

31. 30.
SECTION DISQUE MP3
Remarque: Comme les disques MP3 ont une grande capacité, les temps d’accès au disque sont un
petit peu plus longs..
1. Faites glisser le sélecteur de fonction (BUZZ / CD / MP3 / RADIO) sur la position CD.
2. Ouvrez la PORTE DU CD et insérez un CD sur le plateau, l'étiquette placée vers le haut.
3. Fermez la PORTE DU CD et appuyez sur la touche POWER pour mettre en marche l'unité, le
disque va tourner pendant quelques secondes puis le lecteur va commencer automatiquement.
4. Utilisez les touches REW / F.FWD pour sélectionner une piste.
5. Utilisez la touche PLAY / PAUSE pour mettre la lecture en pause.
6. Pour arrêter momentanément à l'album, appuyez sur la touche PAUSE, pour reprendre appuyer
de nouveau dessus.
7. Appuyez sur la touche STOP pour arrêter la lecture.
RÉPÉTER LA FONCTION DE LECTURE
Répétition d'une seule liste
En mode lecture, appuyez une fois sur le bouton REP / RAND pour répéter la piste en cours. L'écran
affiche REP.
Répétition d'un seul dossier
En mode lecture, appuyez deux fois sur le bouton REP / RAND, toutes les pistes de l'album actuel
seront répétées, l'écran affiche REP, le numéro de dossier et le numéro de la piste.
Répétition du disque
En mode lecture, appuyez trois fois sur le bouton REP / RAND pour lire toutes les pistes du disque
de manière répétitive. L’écran affiche ALL REP.
Lecture aléatoire
En mode lecture, appuyez quatre fois sur le bouton REP / RAND, RANDapparaît sur l'affichage.
Appuyez sur la touche PLAY / PAUSE pour commencer la lecture aléatoire.
PARAMÉTRAGE DE L'ALBUM
Appuyez sur le bouton FOLDER UP pour sélectionner l'album désiré.
Remarque : cette fonction n'est valide que pour les disques MP3, qui contiennent les chansons dans
différents dossiers.
Sélectionnez les pistes à lire dans l'album.
RECHERCHE DE PISTE
Appuyez sur les touches REW et F.FWD pendant la lecture pour sauter à la piste précédente
ou suivante désirée.
RECHERCHE VERS L'AVANT/VERS L'ARRIÈRE
Appuyez et maintenez appuyée la touche REW. / F.FWD pendant la lecture pour balayer à
haute vitesse la piste en cours de lecture. Lorsque la section désirée de la piste actuelle est trouvée,
relâchez le bouton et la lecture normale reprendra.
Appuyez et maintenez appuyée la touche F.FWD pendant la lecture pour balayer à haute vitesse
vers l'avant la piste en cours de lecture.
Appuyez et maintenez appuyée la touche REW. pendant la lecture pour balayer à haute vitesse
vers l'arrière la piste en cours de lecture.
PROGRAMME DE LECTURE
Les pistes sur le disque peuvent être programmées pour être lues dans n'importe quel ordre (il est
possible de programmer jusqu'à 10 pistes).
Remarque: Cela ne peut être effectué qu'en mode arrêt.
Appuyez sur la touche PROG. lorsque vous êtes en mode arrêt, PROG 01 clignote sur l’affichage.
Appuyez sur FOLDER UP pour sélectionner l'album désiré, puis appuyez sur REW. / F.FWD
pour sélectionner les pistes désirées dans l'album, puis appuyez sur PROG. pour enregistrer cela en
mémoire.
Le premier numéro piste est maintenant enregistré et le numéro du programme se modifient en
PROG 02, attendant votre prochaine sélection.
Répétez l'étape ci-dessus pour programmer des pistes supplémentaires.
Lorsque la programmation est terminée, appuyez selon la touche PLAY / PAUSE pour commencer la
lecture à partir de la première piste programmée. Le lecteur s'arrête automatiquement une fois que
toutes les pistes programmées ont été lues.
PRISE D’ENTRÉE AUX
1. Appuyez sur la touche POWER pour allumer l’unité.
2. Connectez le câble AUX provenant de la prise de sortie de votre lecteur de média tel qu’un
lecteur MP3 sur la prise d’entrée AUX.
3. Faites glisser le sélecteur de fonction BUZZ / CD / RADIO / AUX sur la position AUX.
4. La lecture commence sur votre lecteur de média.
PRISE POUR CASQUE
Votre appareil est équipé d'une prise pour casque pour une écoute individuelle. Branchez
simplement un casque d’écoute stéréo dans la prise pour écouteurs. Lorsque le casque est branché,
les haut-parleurs sont coupés automatiquement.
DONNÉES TECHNIQUES
Plage de fréquences : AM 525 - 1615 kHz
FM 87,5 - 108 MHz
Pile de sauvegarde pour l’horloge : 2 piles 1,5 V de type AA (non fournies)
Télécommande : 2 piles 1,5 V de type AAA (non fournies)
Alimentation électrique : 230 V~50 Hz
Poids net : environ 10 kg

33. 32.
1. OLVASSA EL AZ UTASÍTÁSOKAT - A készülék működtetése előtt az összes biztonsági és
működtetési utasítást olvassa el.
2. ŐRIZZE MEG AZ ÚTMUTATÓT - A biztonsági és működtetési útmutatókat tartsa meg a későbbi
használatra.
3. FIGYELMEZTETÉSEK - A terméken és a használati útmutatóban található figyelmeztetéseket
tartsa be.
4. KÖVESSE AZ UTASÍTÁSOKAT - A működtetési és használati utasításokat tartsa be.
5. VÍZ ÉS NEDVESSÉG - Ne használja a terméket víz, pl. például fürdőkád, mosdókagyló, konyhai
mosogató, mosóteknő közelében, úszómedence mellett vagy átnedvesedett alagsorban.
6. FALRA SZERELÉS - A falra szereléshez használja a készülék hátoldalán található
tartónyílásokat.
7. SZELLŐZÉS - A készüléken található nyílások a megfelelő szellőzést szolgálják, a működéshez
valamint a túlmelegedés elkerülése érdekében szükségesek. A készüléket úgy kell elhelyezni,
hogy meglegyen a megfelelő szellőzése. A termék ágyra, kanapéra, pokrócra vagy más hasonló
felületre helyezése, beépítése pl. szekrénybe vagy tartóba csak akkor megengedett, ha a
megfelelő szellőzés biztosított.
8. HŐ - A terméket a hőforrásoktól, pl. radiátoroktól, konvektoroktól, kályháktól vagy más hőt
termelő készülékektől (beleértve az erősítőket is) távol kell elhelyezni.
9. ÁRAMELLÁTÁS - A terméket csak a törzslapon megjelölttel egyező feszültséget szolgáltató
áramforrásról szabad üzemeltetni. Ha nem biztos az otthoni hálózati áram típusát illetően,
tájékozódjon a termék forgalmazójánál vagy a helyi áramszolgáltatónál. Az elemről vagy más
áramforrásról üzemelő termékekkel kapcsolatban tájékozódjon a kézikönyvből.
10. HÁLÓZATI CSATLAKOZÓ KÁBEL VÉDELME - A hálózati csatlakozó kábelt úgy kell vezetni,
hogy arra ne lépjenek rá és a rá vagy mellé helyezett tárgyakba ne akadhasson bele, különösen
odafigyelve a kábelre a csatlakozónál, dugaszhelyeknél és azon a ponton, ahol kilép a
készülékből.
Az egyenlőszárú háromszögben
található villám-szimbólum arra
hivatott felhívni a felhasználó
figyelmét, hogy a készüléken
belül szigeteletlen „veszélyes
feszültség” van, amely elég erős
lehet ahhoz, hogy valakinek
áramütést okozzon.
Az egyenlőszárú háromszögben
található felkiáltójel arra hivatott
felhívni a felhasználó figyelmét,
hogy a készüléket kísérő
leírásokban fontos üzemeltetési
és karbantartási utasítások
vannak.
VIGYÁZAT
ÁRAMÜTÉS VESZÉLYE ÁLL FENN
NE NYISSUK KI
VIGYÁZAT: AZ ÁRAMÜTÉS
KOCKÁZATÁNAK CSÖKKENTÉSE
ÉRDEKÉBEN NE VEGYÜK LE A TETŐT
(ILL. A HÁTLAPOT). A KÉSZÜLÉK
BELSEJÉBEN NINCSENEK A
FELHASZNÁLÓ ÁLTAL JAVÍTANDÓ
ALKATRÉSZEK. SZÜKSÉG ESETÉN
FORDULJUNK SZAKEMBERHEZ
MODEL 2422
FORMATERVEZETT MUSIC CENTER FÜGGŐLEGES CD/MP3 LEJÁTSZÓVAL
Ne akadályozza a készülék szellőzését, például függönnyel, újsággal, takaróval vagy
bútorral. A szellőzőnyílásoknak mindig szabadon kell maradnia. A túlmelegedés kárt
tehet a készülékben, és emiatt annak élettartama lerövidülhet.
Környezetvédelmi tanácsok
Ezt a terméket az élettartama végén ne dobjuk a normál háztartási szemétbe, hanem
adjuk le a villamos és elektronikai hulladékok átvevőhelyén. A terméken található
szimbólum, a használati útmutató vagy a csomagolás felirata erre hívja fel a figyelmet.
A készülék anyagai a jelölésüknek megfelelõen újrahasznosíthatóak. Az
újrahasznosítással, az anyagok ismételt felhasználásával, illetve a használt készülékek
egyéb felhasználásával sokat tehetünk környezetünk megóvásáért.
A megfelelõ hulladék-átvevõhelyrõl a helyi önkormányzatnál érdeklõdhetünk.
Kérjük, őrizze meg a használati útmutatót, hogy az később is rendelkezésére álljon.
Meleg és forróság
Ne tegyük ki a készüléket a közvetlen napsütés hatásának. Ügyeljünk arra, hogy a
készülék ne legyen fűtőberendezés, nyílt láng vagy egyéb hőforrás közelében. A
készülék szellőzőnyílásait mindig hagyjuk szabadon.
Nedvesség és tisztítás
Ez a készülék nem vízálló! Ne tegyük vízbe a lejátszót, és ügyeljünk arra, hogy ne is
kerüljön vízzel érintkezésbe. A lejátszóba bejutó víz súlyos károkat okozhat. A készülék
megtisztítására ne használjunk alkoholt, ammóniát, benzint, vagy súrolószert tartalmazó
tisztítóanyagot, mivel ezek károsíthatják a lejátszót. A készülék megtisztítására enyhén
megnedvesített puha törlőruhát használjunk.
Kérjük gondoskodjon róla, hogy a készülék burkolatának nyílásaiba SOHA senki,
főképpen pedig gyermekek, ne dughassanak bele semmit, ez ugyanis életveszélyes
áramütéshez vezethet. A készülék burkolatát csak erre megfelelően képzett szakember
nyithatja fel.
Óvatosan bánjon az apró alkatrészekkel és elemekkel, és azokat ne nyelje le, mert ez
komoly sérüléseket okozhat! Gondoskodjon arról, hogy az apró alkatrészek és elemek
ne kerüljenek gyermekek kezébe.
Fontos tanácsok a halláskárosodás elkerülésére
Figyelmeztetés:
Az Ön hallásáért nemcsak Ön, de mi is aggódunk.
Éppen ezért kérjük, legyen óvatos a készülék használatánál.
Azt ajánljuk, hogy: kerülje a nagy hangerővel való hallgatást.
Ha a készüléket gyermekek használják, ügyeljünk arra, hogy ne állítsák a készüléket túl
hangosra.
Vigyázat!
A túl nagy hangerő a gyermekeknél gyógyíthatatlan károsodást okozhat.
A készüléket kizárólag a rendeltetésének megfelelõen használjuk.
A készülék kizárólag lakásokban és üzletekben történõ felhasználásra alkalmas.
Előírásos hulladék-elhelyezés
Az elemek és a csomagolóanyagok nem a háztartási szemétbe valók. Az elemeket a
használt elemek számára kijelölt gyűjtőhelyre vigyük. A csomagolóanyagok szelektív
elhelyezése szintén védi környezetünket.
KEZELÉSI ÚTMUTATÓ
KIEGÉSZÍTŐ INFORMÁCIÓK

35. 34.
11. HASZNÁLATON KÍVÜLI IDŐSZAK - Húzza ki a készüléket a hálózati csatlakozóból, ha
hosszabb ideig nem használja.
12. TÁRGYAK ÉS FOLYADÉKOK BEJUTÁSA - Vigyázni kell, hogy a burkolat nyílásain át
semmilyen tárgy ne essen, vagy folyadék ne folyjon a készülék belsejébe.
13. JAVÍTÁST IGÉNYLŐ SÉRÜLÉSEK - Húzza ki a készüléket a fali csatlakozóból és vigye el egy
képesítéssel rendelkező szakemberhez, ha:
a) a hálózati vezeték vagy a csatlakozódugasz megsérült;
b) folyadék folyt, vagy valamilyen tárgy esett a készülék belsejébe;
c) a készüléket eső vagy víz érte;
d) a készülék nem működik, pedig a kézikönyvnek megfelelően használják. Csak azokat a
kezelőszerveket állítsa be, amelyeket a kézikönyv tartalmaz, mert más kezelőszervek
helytelen használata kihathat a megfelelő működésre;
e) a termék leesett vagy bármilyen más módon megsérült:
f) a termék teljesítményében jelentős változás következett be; ez szervizelés szükségességét
jelzi.
14. SZERVIZELÉS - A felhasználó nem végezhet semmilyen olyan szervizelési műveletet a
készüléken, amely nincs leírva a használati útmutatóban. A javításokat csak képesítéssel
rendelkező szakember végezheti.
15. TISZTÍTÁS - Tisztítás előtt húzza ki a készüléket a fali csatlakozóból. Ne használjon folyékony
vagy aeroszolos tisztítószereket. Használjon nedves törlőruhát a tisztításhoz.
16. VILLÁMLÁS - A kiegészítő védelem érdekében a villámlással járó viharok ideje alatt, vagy ha
hosszabb ideig felügyelet nélkül hagyja, húzza ki a készüléket a fali csatlakozóból és
csatlakoztassa szét az antenna vagy kábel rendszert. Ezzel megelőzhető a készülék károsodása
villámcsapás vagy feszültségingadozás miatt.
17. BIZTONSÁGI ELLENŐRZÉS - Bármilyen szervizelési vagy javítási művelet befejezése után
kérje meg a javítást végző személyt, hogy végezzen biztonsági ellenőrzést a megfelelő működés
feltételeinek ellenőrzésére.
18. TÚLTERHELÉS - Ne terhelje túl a fali csatlakozókat, hosszabbítókat vagy egybeépített
konnektor aljzatokat, mert ez tüzet vagy áramütést okozhat.
19. ELEKTROSZTATIKUS KISÜTÉS - Hibaüzenet vagy hibás működés esetén húzza ki a
tápegységet és távolítsa el az összes elemet, majd csatlakoztassa újra a tápegységet.
VIGYÁZAT
EZ A CD LEJÁTSZÓ 1. OSZTÁLYÚ LÉZERES TERMÉK. ENNEK KÖVETKEZTÉBEN EBBEN A CD
LEJÁTSZÓBAN LÁTHATÓ / LÁTHATATLAN LÉZERSUGÁR VAN AMI VESZÉLYES SUGÁRHATÁST
OKOZHAT. ÜGYELJEN RÁ, HOGY A CD LEJÁTSZÓT HELYESEN, AZ UTASÍTÁSOKNAK
MEGFELELŐEN HASZNÁLJA.
LÁTHATATLAN LÉZERSUGÁRZÁS LÉPHET KI, BURKOLATOT FELNYITJÁK ÉS A BIZTONSÁGI
RETESZ KI VAN IKTATVA. NE IKTASSA KI A BIZTONSÁGI RETESZEKET.
A KÉSZÜLÉK HÁTOLDALÁN KIEGÉSZÍTŐ JELZÉSEKKEL ELLÁTOTT GRAFIKUS
SZIMBÓLUMOK TALÁLHATÓK.
A KEZELŐSZERVEK HASZNÁLATA, A BEÁLLÍTÁSOK VAGY A TELJESÍTMÉNY AZ ITT
LEÍRTAKKAL ELLENTÉTES MÓDOSÍTÁSÁVAL VESZÉLYES SUGÁRZÁSNAK TEHETI KI MAGÁT.
A KEZELŐSZERVEK ELHELYEZKEDÉSE
1. BUZZ / CD / MP3 / RADIO / AUX
FUNKCIÓ VÁLASZTÓGOMB
2. FM ST. / FM MO / AM SÁV
VÁLASZTÓGOMB
3. ◄TUNING► SZABÁLYOZÓGOMB
4. CD AJTÓ
5. PLAY / PAUSE ►/ GOMB
6. F.FWD GOMB
7. REP / RAND GOMB
8. VOL + GOMB
9. VOL - GOMB
10. FOLDER UP GOMB
11. REW. GOMB
12. STOP GOMB
13. REMOTE SENSOR
14. FM STEREO JELZŐLÁMPA
15. LCD KIJELZŐ
16. POWER GOMB
17. AL.ON / OFF GOMB
18. PROG. GOMB
19. AL.SET GOMB
20. MIN BEÁLLÍTÓGOMB
21. HOUR BEÁLLÍTÓGOMB
22. TIME SET GOMB
23. HANGSZÓRÓK
24. AUX BEMENET CSATLAKOZÓJA
25. FÜLHALLGATÓ CSATLAKOZÓ
26. R SP JOBB HANGSZÓRÓ CSATLAKOZÓJA
27. L SP BAL HANGSZÓRÓ CSATLAKOZÓJA
28. ELEMTARTÓ
29. FM ANTENNA
30. AC HÁLÓZATI CSATLAKOZÓ KÁBEL
31. SZERELŐ KONZOL
1 2 3
101214151618
1113171923
4
5
7
9
20
21
22
6
8
24
31
25
26
27
28
30
23
29

37. 36.
TÁVIRÁNYÍTÓ
1. STOP gomb
2. REW gomb
3. PROG gomb
4. FOLDER UP gomb
5. REP / RAND gomb
6. PLAY / PAUSE gomb
7. F.FWD gomb
8. Elemtartó
ELEMEK CSERÉJE
1. Nyissa fel az elemtartó fedelét a távirányító hátsó részén.
2. Helyezzen be 2 x AAA elemet ügyelve a polaritásra. Mi alkáli elemek használatát javasoljuk.
3. Tegye vissza az elemtartó fedelét.
ÁRAMELLÁTÁS (HÁLÓZATI 230 V ~ 50 HZ)
Csatlakoztassa a hálózati csatlakozó kábelt egy (230 V ~ 50 Hz) fali aljzathoz.
Figyelmeztetés:
• Mielőtt használni kezdi a készüléket, ellenőrizze, hogy a helyi hálózat feszültsége egyezik a
HI-FI rendszerével (230 V ~ 50 Hz).
• Nedves kézzel ne dugja be vagy húzza ki a csatlakozó kábelt az aljzatból.
• Amikor hosszabb ideig nem tervezi a készülék használatát (pl. elutazik, stb.) húzza ki a kábelt a
fali csatlakozóból.
• Amikor kihúzza a fali csatlakozóból, a csatlakozót húzza; ne a kábelt húzza, mert az esetlegesen
sérült kábel áramütést okozhat.
AZ ELEMEKKEL KAPCSOLATOS BIZTONSÁGI FIGYELMEZTETÉSEK:
• Az elemeket tartsa távol gyerekektől és háziállatoktól.
• Az elemek behelyezésekor figyeljen oda a polaritásra (+/-). A nem megfelelő polaritással
behelyezett elemek károsodást és / vagy anyagi kárt okozhatnak.
• Az elhasználódott elemeket vegye ki a készülékből. Távolítsa el az elemeket, ha a készüléket
hosszabb ideig nem használja az elemek megfolyásából eredő károk megelőzése érdekében.
• Az elemeket soha ne dobja tűzbe. Ne tegye ki az elemeket tűz vagy más hőforrás hatásának.
• Az elemek megsemmisítése: az elhasználódott elemeket az érvényes jogszabályoknak
megfelelően kell megsemmisíteni és újrahasznosítani. Részletes információért forduljon a
területileg illetékes hulladékkezelőhöz.
• Kövesse az elemek gyártója által megszabott biztonsági, használati és megsemmisítési
előírásokat.
1
2
3
4
5
6
8
7
TARTALÉK ELEM
Két 1,5 V “AA” elem (nincs mellékelve) telepíthető tartalék forrásként, hogy a készülékből
áramszünet esetén ne törlődjön a pontos idő. Áramkimaradás esetén az idő nem kerül
megjelenítésre; ugyanakkor az óra tovább működik és a pontos idő megmarad. Az LCD kijelző és
más funkciók visszaállnak, amint az áramellátás helyreáll. A tartalék elemeket szükség esetén ki kell
cserélni; távolítsa el az elemeket ha az órát nem használja vagy a készüléket hosszabb időre elteszi.
A PONTOS IDŐ BEÁLLÍTÁSA
Csatlakoztassa az AC hálózati csatlakozó kábelt a fali csatlakozóba.
1. A TIME SET gombot lenyomva tartva nyomja le a HOUR gombot az órák beállításához.
2. A TIME SET gombot lenyomva tartva nyomja le a MIN gombot a percek beállításához.
AZ ÉBRESZTŐ BEÁLLÍTÁSA
1. Az AL.SET gombot lenyomva tartva nyomja le a HOUR gombot az ébresztés órájának
beállításához.
2. Az AL.SET gombot lenyomva tartva nyomja le a MIN gombot az ébresztés percének
beállításához.
3. Az ébresztési idő beállítása után ne felejtse el lenyomni az AL.ON / OFF gombot az ébresztés
funkció bekapcsolásához (az LCD kijelzőn megjelenik az ébresztő ikonja ).
MEGJEGYZÉS:
1. Amikor a funkció kapcsolót a BUZZ állásba csúsztatja, a készülék készenléti állapotba kapcsol.
2. Amikor a funkció kapcsolót a BUZZ állásba csúsztatja, a készülék nem kapcsolható be a
POWER gombbal mindaddig, amíg a kapcsolót a CD / MP3 / RADIO / AUX állásokba nem
csúsztatja.
ÉBRESZTÉS BERREGŐVEL:
a. Csúsztassa a BUZZ / CD / MP3 / RADIO / AUX funkció választógombot a BUZZ állásba.
b. A beállított ébresztési időpontban 3 percig szólni fog az ébresztő berregő.
Megjegyzés: Nyomja le az AL.ON / OFF gombot az ébresztés kikapcsolásához.
ÉBRESZTÉS CD-VEL:
a. Csúsztassa a BUZZ / CD / MP3 / RADIO / AUX funkció választógombot a CD állásba.
b. Nyissa ki a CD-lejátszó ajtaját és helyezzen egy CD lemezt (a címkézett oldalával felfelé) a
CD-tartóba.
c. Kézzel zárja be a CD ajtót.
d. A beállított ébresztési időpontban felhangzik a CD lemez első műsorszáma.
Megjegyzés: 1 óra elteltével a készülék automatikusan kikapcsol.
Az (CD) ébresztés kézi kikapcsolásához (CD) nyomja le a STOP gombot.
ÉBRESZTÉS RÁDIÓVAL:
a. Csúsztassa a BUZZ / CD / MP3 / RADIO / AUX funkció választógombot a CD állásba.
b. Csúsztassa az FM ST. / FM MO / AM sáv választógombot az AM vagy az FM állásba.
c. Nyomja le a POWER gombot a készülék bekapcsolásához.
d. Hangolja be a rádiót a ◄TUNING► szabályozógombbal a kívánt rádióállomásra és állítsa be a
hangerőt.
e. Ezután nyomja le a POWER gombot a készülék kikapcsolásához.
f. A beállított ébresztési időpontban bekapcsol a rádió.
Megjegyzés: 1 óra elteltével a készülék automatikusan kikapcsol.
A (rádiós) ébresztés kézi kikapcsolásához nyomja le a POWER gombot.

39. 38.
HELYES TILOS
AZ ÉBRESZTŐ KIKAPCSOLÁSA
Az ébresztő üzemmód kikapcsolásához:
Nyomja le az AL.ON / OFF gombot az ébresztő funkció kikapcsolásához (az LCD kijelzőről eltűnik az
ébresztő ikonja ).
A HANGERŐ BEÁLLÍTÁSA
• Nyomja le a VOL + gombot a hangerő megnöveléséhez.
• Nyomja le a VOL - gombot a hangerő lecsökkentéséhez.
A RÁDIÓ HASZNÁLATA
1. Állítsa a BUZZ / CD / MP3 / RADIO / AUX funkció választógombot a RADIO állásba.
2. Állítsa az FM ST. / FM MO / AM sáv választógombot a kívánt frekvenciasávra.
3. Nyomja le a POWER gombot a készülék bekapcsolásához.
4. Tekerje a ◄TUNING► szabályozógombot a kívánt rádióállomásra.
Megjegyzés: A jobb AM vétel érdekében forgassa el a készüléket, hogy a beépített
irányantennát beállítsa, a jobb FM vétel érdekében húzza szét az FW vezetékantennát.
Megjegyzés: Amikor az adást FM Sztereo üzemmódban veszi a készülék, kigyullad a STEREO
jelzőlámpa. Ha az FM vétel zajos, állítsa a sáv választógombot az FM MO állásba, ekkor az
adás mono módban kerül vételre.
5. Nyomja le a VOL +/- gombokat a kellemes hangerőszint beállításához.
6. A rádió kikapcsolásához nyomja le a POWER gombot.
A CD LEMEZEKKEL KEZELÉSE
• Mindig védje a lemezt a karcolásokkal és porral szemben. Ha a lemezt megfelelő óvatossággal
szeretné kezelni, a felületének letörlése puha törlőruhával az egyetlen karbantartási művelet,
amit a hangvisszaadás romlásának elkerülésére el kell végeznie. Amikor nem használja, a
lemezeket az eredeti tokban kell tartani.
• A lemezt csak a széleinél fogja meg. Ne érjen a felületéhez.
• A lemezeket az ábrán bemutatottaknak megfelelően kezelje.
• A lemezek tisztításhoz használjon puha törlőruhát. Ne használjon benzolt, hígítót vagy más
vegyszert, mert azok károsíthatják a lemezt. A lemezt mindig egyenes mozdulatokkal, a
közepétől a széle felé haladva kell letörölni. Soha ne törölje a lemezt körkörös mozdulatokkal.
• A lemezt ne tegye ki közvetlen napsugárzásnak, magas páratartalomnak vagy magas
hőmérsékleteknek hosszabb ideig. Ne tegye a lemezt semmilyen készülékre vagy más
hőforrásra.
• A lencsékre került por hibás működést és kihagyásokat eredményezhet a lejátszás során. A
lencsék tisztításához nyissa fel a lemeztartó ajtaját és fújja le a port. Használjon kamera lencse
átfúvót (a legtöbb fényképészeti boltban beszerezhető).
Megjegyzés: Ne érjen a lencsékhez. Ne jusson semmilyen folyadék a készülék belsejébe.
• A CD lejátszó belső felületeinek tisztításához használjon puha törlőruhát.
• Soha ne használjon benzolt vagy más erős kémiai tisztítószert, mert azok károsíthatják a
felületet.
CD LEJÁTSZÁS
MEGJEGYZÉS: Soha ne érjen a lencsékhez a CD tartó belsejében. A lencséket CD tisztító
lemezzel tisztítsa meg ha elszennyeződnek.
1. Csúsztassa a BUZZ / CD / MP3 / RADIO / AUX funkció választógombot a CD állásba.
2. Nyissa ki a CD-lejátszó ajtaját és helyezzen egy CD lemezt a címkézett oldalával felfelé.
3. Nyomja le a POWER gombot a készülék bekapcsolásához, a lemez néhány másodpercig forog,
majd automatikusan elkezdi a lejátszást.
4. Válassza ki az előző vagy a következő műsorszámot a REW. / F.FWD gombokkal.
5. Nyomja le a PLAY / PAUSE gombot a lejátszás elindításához
6. Nyomja le a PLAY / PAUSE gombot a lejátszás szüneteltetéséhez, nyomja le a PLAY / PAUSE
gombot ismételten a lejátszás folytatásához.
7. Nyomja le a STOP gombot a lejátszás leállításához.
VÉLETLEN LEJÁTSZÁS
• Nyomja le egyszer a REP / RAND gombot, a RAND felirat jelenik meg és a CD műsorszámai
véletlen sorrendben kerülnek lejátszásra.
KERESÉS VISSZA / ELŐRE
1. Nyomja le és tartsa a REW. / F.FWD gombokat, ha egy műsorszámon belül szeretne
megkeresni egy részt nagy sebességgel. Amikor a kívánt részt megtalálta, engedje fel a gombot
és folytatódik a normál lejátszás.
2. Nyomja le a REW. gombot egyszer az aktuális műsorszám elejére lépéshez. Nyomja le
kétszer vagy többször a lemez korábbi műsorszámaihoz való lépéshez.
3. Nyomja le a F.FWD a lemez következő műsorszámához való lépéshez.
4. Nyomja le és tartsa lenyomva a CD Keresés visszafelé (REW. ) gombot, a készülék ekkor
átfuttatja az aktuális műsorszámot és visszafelé léptet az előző műsorszám(ok)ra; amikor a
műsorszám kívánt részét megtalálta, engedje fel a gombot és ekkor folytatódik a normál
lejátszás.
5. Nyomja le és tartsa lenyomva a CD Keresés előrefelé (F.FWD ) gombot, a készülék ekkor
átfuttatja az aktuális műsorszámot és előrefelé léptet a következő műsorszám(ok)ra; amikor a
műsorszám kívánt részét megtalálta, engedje fel a gombot és ekkor folytatódik a normál
lejátszás.
ISMÉTLÉS FUNKCIÓ
Nyomja le a REP / RAND gombot egy műsorszám vagy az összes műsorszám megismétléséhez a CD-n.
1. Nyomja le a REP / RAND gombot egyszer a lejátszás során, megjelenik a REP felirat. Ugyanaz
a műsorszám ismétlődik.
2. Nyomja le a REP / RAND gombot még egyszer az összes műsorszám megismétléséhez, az ALL
REP felirat jelenik meg és az egész CD-lemez ismétlődik.
3. Az ismétlés üzemmód kikapcsolásához nyomja le harmadszor is a REP / RAND gombot.
PROGRAMOZÁS FUNKCIÓ
A Programozás funkcióval legfeljebb 20 műsorszám játszható le adott sorrendben.
1. Amikor a készülék leállított módban van, nyomja meg a PROG. gombot, a PROG 01 felirat kezd
villogni a képernyőn.
2. Nyomja le a REW. / F.FWD gombokat a kívánt műsorszám kiválasztásához.
3. Nyomja le a PROG. gombot a műsorszám tárolásához a memóriában.
4. Ismételje meg a 2 és 3 lépéseket és jelöljön ki legfeljebb 20 műsorszámot.
5. A kijelölt műsorszámok programozott sorrendben való lejátszásához nyomja le a PLAY / PAUSE
gombot. A műsorszám száma és a PROG felirat kerül kijelzésre.
6. Nyomja le a REW. / F.FWD gombokat az előző vagy következő programozott műsorszám
kiválasztásához.
Megjegyzés: Miután az összes beprogramozott műsorszámot lejátszotta, a CD lejátszó megáll.
7. A beprogramozott műsorszámok törléséhez a memóriából nyomja le a STOP gombot kétszer
Sayfa yükleniyor...
Sayfa yükleniyor...
Sayfa yükleniyor...
Sayfa yükleniyor...
Sayfa yükleniyor...
Sayfa yükleniyor...
Sayfa yükleniyor...
Sayfa yükleniyor...
Sayfa yükleniyor...
Sayfa yükleniyor...
Sayfa yükleniyor...
Sayfa yükleniyor...
Sayfa yükleniyor...
Sayfa yükleniyor...
Sayfa yükleniyor...
Sayfa yükleniyor...
Sayfa yükleniyor...
Sayfa yükleniyor...
Sayfa yükleniyor...
Sayfa yükleniyor...
Sayfa yükleniyor...
Sayfa yükleniyor...
Sayfa yükleniyor...
Sayfa yükleniyor...
Sayfa yükleniyor...
Sayfa yükleniyor...
Sayfa yükleniyor...
Sayfa yükleniyor...
Sayfa yükleniyor...
Sayfa yükleniyor...
Sayfa yükleniyor...
Sayfa yükleniyor...
Sayfa yükleniyor...
Sayfa yükleniyor...
Sayfa yükleniyor...
Sayfa yükleniyor...
Sayfa yükleniyor...
Sayfa yükleniyor...
Sayfa yükleniyor...
Sayfa yükleniyor...
Sayfa yükleniyor...
Sayfa yükleniyor...
Sayfa yükleniyor...
Sayfa yükleniyor...
Sayfa yükleniyor...
Sayfa yükleniyor...
Sayfa yükleniyor...
Sayfa yükleniyor...
Sayfa yükleniyor...
Sayfa yükleniyor...
Sayfa yükleniyor...
-
 1
1
-
 2
2
-
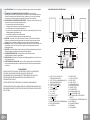 3
3
-
 4
4
-
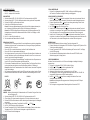 5
5
-
 6
6
-
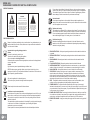 7
7
-
 8
8
-
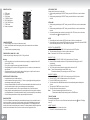 9
9
-
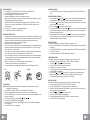 10
10
-
 11
11
-
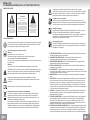 12
12
-
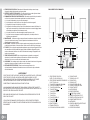 13
13
-
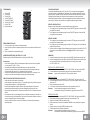 14
14
-
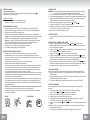 15
15
-
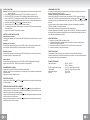 16
16
-
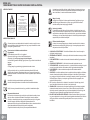 17
17
-
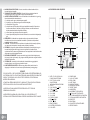 18
18
-
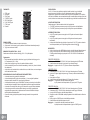 19
19
-
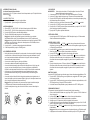 20
20
-
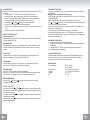 21
21
-
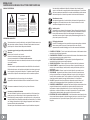 22
22
-
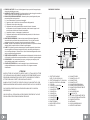 23
23
-
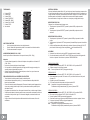 24
24
-
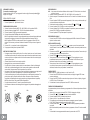 25
25
-
 26
26
-
 27
27
-
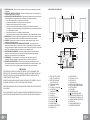 28
28
-
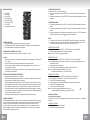 29
29
-
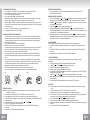 30
30
-
 31
31
-
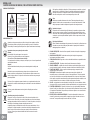 32
32
-
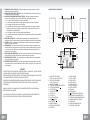 33
33
-
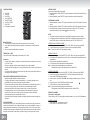 34
34
-
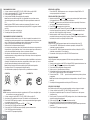 35
35
-
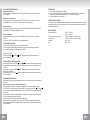 36
36
-
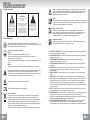 37
37
-
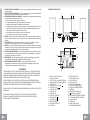 38
38
-
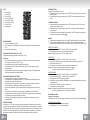 39
39
-
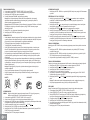 40
40
-
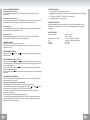 41
41
-
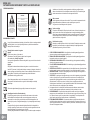 42
42
-
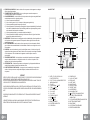 43
43
-
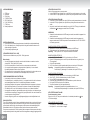 44
44
-
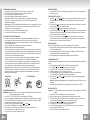 45
45
-
 46
46
-
 47
47
-
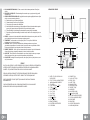 48
48
-
 49
49
-
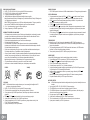 50
50
-
 51
51
-
 52
52
-
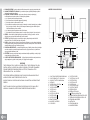 53
53
-
 54
54
-
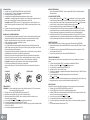 55
55
-
 56
56
-
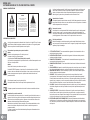 57
57
-
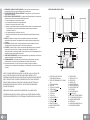 58
58
-
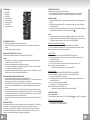 59
59
-
 60
60
-
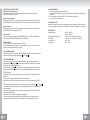 61
61
-
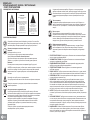 62
62
-
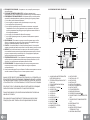 63
63
-
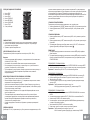 64
64
-
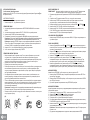 65
65
-
 66
66
-
 67
67
-
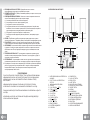 68
68
-
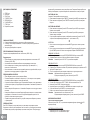 69
69
-
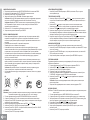 70
70
-
 71
71


Elta 2422 Kullanım kılavuzu
- Kategori
- Radyolar
- Tip
- Kullanım kılavuzu
- Bu kılavuz aynı zamanda aşağıdakiler için de uygundur:
diğer dillerde
- slovenčina: Elta 2422 Používateľská príručka
- español: Elta 2422 Manual de usuario
- français: Elta 2422 Manuel utilisateur
- italiano: Elta 2422 Manuale utente
- português: Elta 2422 Manual do usuário
- Nederlands: Elta 2422 Handleiding
İlgili makaleler
-
Elta 6688 Kullanım kılavuzu
-
-
-
-
-
-
-
-
-