Thomas super 30 s El kitabı
- Kategori
- Elektrikli süpürgeler
- Tip
- El kitabı

THOMAS Waschsauger
COMPACT 20 /COMPACT 20 S
und SUPER 30/SUPER 30 S
Gebrauchsanweisung · Instructions for Use · Mode d’emploi · Gebruiks-
aanwijzing · Modo de empleo · Modo de utilição · Használati utasítás
Kullanma talimatı · Рукoвoдствo пo экспйатации

Inhalt Seite
Geräteabbildung ................................ 4
Montage ...................................... 5
Warnhinweise .................................. 6
Montage-Beschreibung .......................... 7-8
Alles Saugen (naß und trocken)....................8-9
Gebrauch des Gerätes mit Sprühextraktion ......... 9-11
Gerätereinigung und Pflege ....................... 11
Hilfe bei evtl. Störungen .......................... 12
Der Umwelt zuliebe . . . . . . . . . . . . . . . . . . . . . . . . . . . . . . 12
Kundendienst ................................... 12
Garantie....................................... 61
Contents Page
Illustration of Parts ............................... 4
Assembling the Appliance ......................... 5
Points of Safety .................................13
Assembly Instructions ..........................14-15
Wet and dry vacuuming .......................15-16
Operating the spray-extraction system ............16-18
Maintenance and care............................18
If unexpected difficulties arise ......................18
For the sake of the environment ....................18
Customer Service ...............................18
Guarantee .....................................61
Sommaire Page
Illustration de l’appareil ...........................4
Illustrations du montage.......................... 5
Indications importantes ..........................19
Description du montage.......................20-21
Aspirer tout (liquides et poussières) ..............21-22
Emploi du système injection-extraction ...........22-24
Nettoyage et entretien . . . . . . . . . . . . . . . . . . . . . . . . . . 24
Conseils lors de difficultés éventuelles ...............24
Pour l’amour de l’environnement................ 24
Service-après-vente ............................24
Garantie..................................... 62
Inhoud Bladzijde
Toestelafbeelding .............................. 4
Montage ..................................... 5
Belangrijke raadgevingen ........................ 25
Montagebeschrijving ..........................26-27
Alles zuigen (stof en vlooistoffen) ................27-28
Gebruik van het sproei-zuigsystem ...............28-30
Reiniging en onderhoud ......................... 30
Raadgevingen bij storingen ...................... 30
Ter wille van het milieu........................... 30
Klantendienst .................................. 30
Garantie...................................... 62
Contenido Pagina
Ilustración del aparato ............................ 4
Ilustraciones de montaje........................... 5
Indicaciones importantes ..........................31
Descripción de montaje ........................32-33
Aspirar todo (mojado y seco) ...................33-34
Uso del sistema pulverizar-extraer ...............34-36
Limpieza y mantenimiento del aparato.............. 36
Ayuda en caso de molestias eventuales . . . . . . . . . . . . . 36
Por la proteccion del medio ambiente .............. 36
Servicio posventa ............................... 36
Índice Página
Ilustração do aparelho .......................... 4
Ilustrações de montagem ......................... 5
Indicações importantes .......................... 37
Descrição da montagem ....................... 38-39
Aspirar tudo: líquidos e pó ..................... 39-40
Utilização do aparelho com pulverizador/extrator . 40-42
Limpeza e cuidado do aparelho ................... 42
Ajuda em casos eventuais de avarias ............... 42
Por amor ao meio ambiente respeitar o seguinte ...... 42
Serviço de ajuda após vendas ..................... 42
Tartalomjegyzék Oldal
A készülék és tartozékai ......................... 4
Szerelési és kezelési ábrák ....................... 5
Fontos figyelmeztetések .......................... 43
A készülék összeállítása.......................... 44
Porszívózás (száraz és nedves felszívás)............. 45
A folyadékporlasztós tisztítórendszer használata....46-47
A takarítógép tisztítása és karbantartása ............ 48
Hibaelhárítás .................................. 48
Mindent a környezetért .......................... 48
Vevőszolgálat.................................. 48
koncentrátum 48
İçindekiler Sayfa
Aletin görünümü................................. 4
Montaj ........................................ 5
Önemli açıklamalar ..............................49
Montaj tarifi ....................................50
Kuru süpürmek ..................................50
Islak süpürmek ..................................50
Aletin püskürtme ekstraksiyonu ile kullanımı ...........51
Aletin temizliği ve bakımı ..........................52
Muhtemel ariza halinde...........................52
Çevrenin Korunması..............................52
Müşteri Hizmetleri ...............................52
Coдepжaниe Cтрaницa
Изображения агрегата и
дополнительных принадлежностей
............... 4
Указания по технике безопасности
............... 53
Монтаж
....................................... 54
Описание монтажа
.............................. 54
Работа в любом режиме (жидкостном и сухом)
..... 56
Использование агрегата в распылительно-
экстракционном режиме
......................... 57
Уход за агрегатом и его очистка
.................. 59
Мероприятия прп возможных неисправностях
...... 59
Ради окружающей среды
........................... 60
Служба Заказчика
............................. 60
2
E
P
H

3
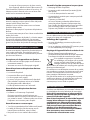
1 = Schmutzbehälter
Collecting bin
Cuve
Vergaarbak
Recipiente
recipiente
tartály
Pislik deposu
Грязесборник
2 = Motorkopf
Motor block
Bloc-moteur
Motordeel
Bloque motor
bloco do motor
motorblokk
Motor başı
Блок двигателя
3 = Verschlußschnapper
Snap fastener
Fermeture a déclic
Knipslot
Tapa de cierre de golpe
tampa de fecho de golpe
zárókallantyú
Kapatma dili
Защелкивающаяся
4 = Lenkrollen
Castor wheels
Roulettes orientables
Stuurwieltjes
Polea-guía
poleia-guia
talpgörgők
Yönlendirme tekerlekleri
Направляющие ролики
5 = Schnellkupplung
Coupling piece
Valve
Snelkoppeling
Embrague de uso rápido
embreagem rápida
nyomócső csatlakozója
Hızlı bağlantı
Быстроразъемное
соединение
6 = Kontrolleuchte
Pilot lamp
Bascule/
Lampe-témoin
Controllampje
Piloto de control
lâmpada de controle
kijelző lámpa
Kontrol lambası
Контрольная лампа
7 = Drehschalter
Control knob
Bouton de réglage
Draaiknop
Interruptor giratorio
interruptor giratório
tárcsás kapcsoló
Döner şalter
Поворотный переключатель
8 = Saugstutzen
Suction socket
Bouche d’aspiration
Zuigmond
Codo de empalme de aspiración
cabo de ligação de aspiração
gégecső aljzat
Emme borusu manşosu
Всасывающий патрубок
9 = Tragegriff
Carrying handle
Poignée de maniement
Dekselgreep
Asa de transporte
punho de transporte
fogantyú
Tahşıma kolu
Ручка для переноски
10 = Netzanschlußleitung
Mains cable
Câble de raccordement
Aansluitkabel
Linea de conexión a la red
cabo adutor
hálózati csatlakozózsinór
Elektrik bağlantı hattı
Сетевой кабель
11 = By-Pass-Saugkraft-
regulierung
By-pass suction control
Réglage de puissance
by-pass
By-pass-zuigkrachtregeling
Regularización de la
fuerza aspiradora by-pass
regulação de força de
aspiração by-pass
szívóerő szabályozó tolóka
By-Pass Emme kuvveti ayarı
Байпасный регулятор
всасывающей мощности
12 = Druckschlauch
Delivery tube
Conduite du nettoyant
Persleiding
Manga de presión
manga de pressão
nyomócső
Basınç hortumu
Напорный шлангопровод
13 = Saugschlauch
Flexible hose
Flexible
Slang
Tubo flexible para aspirar
mangueira de pressão
gégecső
Emme hortumu
Всасывающий
шлангопровод
14 = Saugrohr
Suction tubes
Tuyaux
Buizen
Tubo aspirante
tubo de aspiração
merev szívócső
Emme borusu
Всасывающая трубка
15 = Kunststoff-Clips
Plastic clips
Clips
Clips de plástico
clip de plástico
Plastik klips
nyomócső felerősítő pánt
Hortum mandalları
Пластиковые зажимы
16 = Rohr-Clipse
Tube clips
Clips pour tuyaux
Buisclips
Clips de tubo
Fermagli per tubo
Csőklip
Grampos para tubos
Boru klipsi
Зажимы для трубы
17 = Absperr ventil
Spray diffusor control
Pistolet diffuseur
Ventielhouder
Válvula de cierre
válvula de bloqueio
nyomószelep
Kapatma ventili
Запорный клапан
18 = Teppich-Sprüh-
extraktions-Düse
Spray-extraction carpet
shampoo nozzle
Suceur injection-extraction
pour tapis
Sproeiextractiezuigmond
Tobera de pulverizar-
extraer para alfombras
bocal de pulverização/
extração de tapete
szőnyegtisztító fej
Halı püskürtme
ekstraksiyon başlığı
Нaсaдкa для рaспылeния
мoющиx средств для кoврoвыx
пoкрытий
19 = Druckschlauch
Delivery tube
Conduite du nettoyant
Persleiding
Manga de presión
mangueira de pressão
nyomócső
Basınç hortumu
Нaпoрный шлaнгoпрoвoд
20 = Polster-Sprüh-
extraktionsdüse
Spray-extraction upholstery
shampoo nozzle
Suceur injection-extraction
pour fauteuils
Sproei-extractiezuigmond
voor stoffering
Tobera de pulverizar-
extraer para acolchados
bocal de pulverização/
ex-tração de estofados de
móveis
kárpittisztító fej
Koltuk püskürtme
ekstraksiyon başlığı
Haсaдкa для рaспылeния мoющиx
срeдств для
мягкoй мeбeли
21 = Polsterdüse
Upholstery nozzle
Brosse pour fauteuils
Zuiger voor zetelbekleding
Tobera para acolchados
bocal de estofados de móveis
kárpitszívó fej
Koltuklar için emme başlığı
Haсaдкa для
мягкoй мeбeлн
(тoльк “Super 30“)
22 = Hartbodenadapter
Adaptor for hard floors
Adapteur-raclette
Adapter voor gladde vloeren
Adaptador para suelos duros
adaptador para pisos duros
fejkiegészítő szilárd padlóhoz
Sert döşeme adaptörü
Переходник
для
жестких
наполъных
пoкрытий
23 = Teppichdüse
Carpet + floor nozzle
Brosse tapis/sols durs
Tapijtborstel
Tobera de alfombras
bocal de tapete
szőnyegporszívó fej
Halı için başlık
Haсaдкa для
чистки кoврoвыx
пoкрытий
24 = Fugendüse
Crevice nozzle
Suceur plat
Platte zuiger
Tobera de ranuras
bocal de fendas
fugaszívófej
Eklem yeri için başlık
Haсaдкa для
oчистки узкиx
щeлeй (
тoлькo “Super 30“)
25 = Kegelfilter
Taper filter
Filtre conique
Kegelfilter
Filtro cónico
Filtro cónico
Kúpos szűrő
Konik filtre
Конический фильтр
28 = Sprühmitteltank
Extraction liquid tank
Réservoir pour liquide
nettoyante
Shampoo reservoir
Depósito del líquido
pulverizador
reservatório de agente de
pulverização
tisztítóoldat tartálya
Püskürtme madde deposu
Бaчoк для рaспыляeмoгo
мoющeгo срeдства
29 = Reinigungskonzentrat
Cleaning solution
Nettoyant concentré
Geconcentreerd
reinigingsmiddel
Producto de limpieza
concentrado
solução química
tisztítófolyadék koncentrátum
Temizleme konsantresi
Концентрированное моющее
средство
34 = Papierfiltersack
Paper filter bag
Sac-collecteur-de-poussière
Stofopvangzak
Saco de filtro de papel
saco de filtro de papel
papír porzsák
Kağıt filtre torbası
Бумажный
фильтровальный мещок
35 = Hygiene-Hand schuhe
Gants
Gloves
Handschoenen
Guantes
meias de higiene
nylonkesztyű
Sıhhi eldiven
Гигиенические перчатки

4
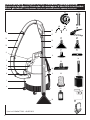
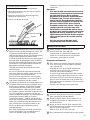
Geräteabbildung / Illustration of Parts / Illustration / Toestelafbeelding/
Ilustración del aparato/Ilustrações de montagem/A készülék és tartozékai/
Aletin görünümü /
Изoбрaжeниe aгрeгaтa и дoпoлнитeльныx принaдлeжнoстeй
24
23
25
34
15
13
19
2
7
6
5
8
1
4
11
17
12
14
9
10
3
18
*) Nur bei COMPACT 20 S + SUPER 30 S

5
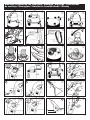
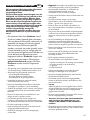
Montage/Assembling the Appliance / Montage / Montage / Ilustraciones
de montaje / Montagem / Szerelési és kezelési ábrák / Montaj
18
22
Q R
W
*) Nur bei COMPACT 20 S + SUPER 30 S
H
1
2
1
2
Pos. 1 o. 2
1
2
J
2
25
E

Wichtige Hinweise
Bitte lesen Sie die in dieser Gebrauchs-
anweisung aufgeführten Informationen
sorgfältig durch. Sie geben wichtige Hin-
weise für die Sicherheit, die Installation, den
Gebrauch und die Wartung des THOMAS 4
in 1. Bewahren Sie die Gebrauchsanweisung
sorgfältig auf und geben Sie diese ggf. an
Nachbesitzer weiter. Der Hersteller haftet
nicht, wenn die nachstehenden Anweisun-
gen nicht beachtet werden. Der THOMAS
4 in 1 darf nicht mißbräuchlich, d. h.
entgegen der vorgesehenen Verwendung
benutzt werden. Er dient ausschließlich der
Nutzung im Haushalt.
• Dieses Gerät kann von Kindern ab 8
Jahren und darüber und von Personen mit
reduzierten physischen, sensorischen oder
mentalen Fähigkeiten oder Mangel an
Erfahrung und /oder Wissen be-
nutzt werden, wenn sie beaufsichtigt oder
bezüglich des sicheren Gebrauchs des
Gerätes unterwiesen wurden und die
daraus resultierenden Gefahren
verstanden haben. Kinder dürfen nicht
mit dem Gerät spielen. Reinigung und
Benutzer-Wartung dürfen nicht durch
Kinder ohne Beaufsichtigung
durchgeführt werden.
• Die Spannungsangabe auf dem Typenschild muss mit
der Versorgungsspannung übereinstimmen.
Absicherung mind. 16 A (UK: 13 A).
• Das Gerät darf nicht in Betrieb genommen werden,
wenn:
– die Netzanschlußleitung beschädigt ist,
– das Gerät sichtbare Schäden aufweist,
– das Motorteil einmal heruntergefallen sein sollte.
• Prüfen Sie den Sauger auf Transportschäden.
• Entsorgen Sie die Verpackung nach den örtlichen
Vorschriften.
• Benutzen Sie das Gerät nie in Räumen, in denen
feuergefährliche Stoffe lagern oder sich Gase
gebildet haben.
• Bewahren Sie das Gerät sowie das Zubehör in
trockenen, sauberen und geschlossenen
Räumlichkeiten auf.
• Äußerste Sorgfalt ist geboten, wenn Sie Treppen-
stufen reinigen. Stellen Sie sicher, daß das Gerät eine
feste Stellung auf dem Boden der Treppe hat und
sorgen Sie dafür, daß der Schlauch nicht über seine
bestehende Länge hinaus angespannt wird. Stellen
Sie immer, wenn Sie den Sauger auf den
Treppenstufen benutzen sicher, daß Sie das Gerät
mit einer Hand festhalten.
• Filter sollten in regelmäßigen Intervallen gewechselt
werden, wie in Ihrer Bedienungsbroschüre angegeben.
• Benutzen Sie den 4 in 1 nicht für Trocken saugen,
wenn der Filter nicht eingelegt ist.
• Achtung! Diese Geräteausführung ist nicht zum
Absaugen gesundheitsgefährdender Stäube
geeignet.
• Keine lösemittelhaltigen Flüssigkeiten wie z. B.
Lackverdünnung, Öl, Benzin und auch keine
ätzenden Flüssigkeiten aufsaugen.
• Nicht im Freien stehenlassen und keiner direkten
Nässe aussetzen.
• Düsen und Rohre dürfen (bei eingeschaltetem Gerät)
nicht in Kopfnähe kommen, z. B. Gefahr
für Augen und Ohren.
• Niemals den Stecker am Kabel aus der Steckdose
ziehen, sondern ausschließlich am Stecker.
• Sorgen Sie dafür, daß die Netzanschlußleitung
weder Hitze noch chemischen Flüssigkeiten
ausgesetzt ist und nicht über scharfe Kanten oder
Oberflächen gezogen wird.
• Wenn die Anschlußleitung dieses Gerätes beschädigt
wird, muß sie durch den Hersteller oder seinen
Kundendienst oder ähnlich qualifizierte Personen
ersetzt werden, um Gefähr dungen zu vermeiden.
• Sauger nicht direkt neben Heizaggregaten
aufbewahren.
• Niemals den THOMAS 4 in 1 selbst reparieren,
sondern nur durch eine bevollmächtigte
Kundendienst-Station instandsetzen lassen.
• Verwenden Sie nur Original-Ersatzteile.
• Der Netzstecker ist zu ziehen:
– bei Störungen während des Betriebes,
– vor jeder Reinigung und Pflege,
– nach dem Gebrauch,
– bei jedem Filterwechsel.
• Bevor der THOMAS 4 in 1 entsorgt wird, schneiden
Sie bitte die Netzanschlußleitung ab.
• Nie den Reinigungsmittel-Strahl auf Steckdosen
oder elektrische Geräte richten
• Chemikalien (Sprühextraktions-Reinigungsmittel)
gehören nicht in die Hände von Kindern.
• Achtung! Nur bei Verwendung des Original-
THOMAS-Reinigungsmittels können
Gerätefunktionen und Reinigungswirkung
gewährleistet werden.
• Personen mit empfindlicher Haut sollten direkten
Kontakt mit der Reinigungslösung vermeiden.
• Vor Durchführung irgendwelcher Arbeiten
am Gerät den Schalter in Position „Null”
bringen und Netzstecker herausziehen.
• Sollte das Reinigungskonzentrat auf die Schleimhäute
(Auge, Mund, etc.) gelangen, ist sofort mit viel
Wasser nachzuspülen.
6
D

7
Wir gratulieren Ihnen zu einem
guten Kauf!
Nutzen Sie den vollen Gegenwert durch
richtigen Gebrauch.
Verwendungsmöglichkeiten
Der THOMAS 4 in 1 kann als Staub sauger zur
Reinigung von Teppichen, Polstermöbeln, Glattböden
und für die regelmäßige Wohnungspflege eingesetzt
werden; er kann Schmutz ebenso wie Flüssigkeiten
aufnehmen, z. B. macht er verstopfte Spülbecken und
andere Ausgüsse frei. Mit nur wenigen Handgriffen
kann Ihr 4 in 1 mit beiliegendem Standard zubehör zur
Naßreinigung Ihrer Teppiche oder Polstermöbel
ausgerüstet werden.
Der THOMAS 4 in 1 ist ein Mehrzweck produkt. Im
Sprühextraktionsbereich ist er für die Grundreinigung
von Teppichen, Polstermöbeln und Hartböden unter
Verwendung der Reinigungslösung vorgesehen.
Beim Naßsaugen kommen nur Flüssigkeiten auf
Wasserbasis in Frage, und er darf niemals für
entflammbare Flüssigkeiten gebraucht werden.
In seiner Staubsaugerfunktion ist er u. a. zur Beseitigung
von trockenem Schmutz und Staub von Teppichen,
Fußböden, Möbeln und Gardinen vorgesehen.
Montage-Beschreibung
Nehmen Sie das Gerät aus dem Karton, entfernen
Sie alles Packmaterial und identifizieren Sie die Teile und
Funktionen auf den Zeichnungen am Anfang dieser
Gebrauchsanweisung, die Ihnen helfen sollen, die
nachfolgenden Hinweise zu verstehen.
Die für das Fahrwerk erforderlichen Teile werden aus
verpackungstechnischen Gründen in der Verpackung
lose beigefügt.
Lenkrollen montieren
A Verschlußschnapper (3) öffnen und Motorkopf
(2) abheben.
B Sprühmitteltank (28) und Reinigungsflüssigkeit
entnehmen. Behälter (1) mit der Öffnung nach
unten aufstellen.
C Lenkrollen (4) mit Bolzen fest in den Behälterboden
(1) bis auf Anschlag eindrücken.
Den Behälter (1) mit den montierten Lenkrollen
(4) auf die Rollen stellen und eine Funktionsprüfung
durchführen.
Motorkopf aufsetzen
D Motorkopf (2) so aufsetzen, daß die Flächen an
der Haube und dem Behälter übereinstimmen.
Anschließend die beiden Verschlußschnapper (3)
andrücken.
Saugschlauch anschließen
E Saugschlauch (13) in den Saugstutzen (8) so ein-
drücken, daß die Markierungen von Saugstutzen
und Sauganschlußstück übereinstimmen und der
Knopf einrastet. Anschließend kann das
gewünschte Zubehör angeschlossen werden.
Zum Abnehmen des Schlauches das
Schlauchanschlußstück drehend abziehen.
Saugrohrhalterung
F Saugrohr (14) kpl. mit Zubehör und Saugschlauch
an der Geräterückseite einhängen.
Kabelaufbewahrung
G Nach dem Saugen kann die Netzanschlußleitung
(10), wie auf der Abbildung aufgezeigt, aufge-
wickelt und in die Kabelmulde eingehängt werden.
Filterwechsel
Vor jedem Filterwechsel Netzstecker
ziehen!
Hygiene bei Filterwechsel und Saug-
tonnenentleerung
Bei Austausch aller im Gerät einsetzbaren Filtersysteme
(z. B. Schaum-/Papierschutzfilter, Paierfiltersack,
Turbinenschutzfilter, etc.) und zur Entleerung der
Saugtonne, benutzen Sie bitte die beiliegenden
Hygienehandschuhe (je nach version).
Ersatzhandschuhe sind im einschlägigen Handel überall
erhältlich.
Papierfiltersack
K Den Papierfiltersack (34) an der Kartonkante (35)
fassen und fest an den Ansaugstutzen (8) drücken.
Danach den Papierfiltersack an die Behälterwand
anlegen.
THOMAS innenbeaufschlagte Papierfiltersäcke
sind unerläßlich beim Saugen von Feinstaub,
z. B. Ruß, Holzasche, Sägemehl oder Zement.
Darüber hinaus sind sie auch für den Normal-
betrieb empfehlenswert, denn sie verbessern
sowohl das Staubrückhaltevermögen als auch die
Hygiene bei der Entleerung.

H Motorschutz-Filter
Nach jedem Naßsaugen und Sprühextraktions-
arbeitsgang den Motorschutzfilter (33) auf Ver-
schmutzung überprüfen und, falls nötig, reinigen.
Dazu das Schwimmerventil (38) in Pfeilrichtung
öffnen und den Motorschutzfilter aus der Ansaug-
öffnung entnehmen. Den gereinigten bzw. neuen
Filter wieder einlegen und anschließend das
Schwimmerventil aufsetzen.
Reinigungskonzentrat
Ihr THOMAS 4 in 1 enthält 0,5 Liter ProTex
Reinigungskonzentrat. Hinweise zur Anwendung und
Dosierung entnehmen Sie bitte dem Flaschenetikett.
Verwendung des Zubehörs
Umschaltbare Teppichdüse
Diese Düse ist zum Absaugen von Teppichen und
Teppichböden sowie für Hartböden wie Stein, Parkett
oder Kunststoff geeignet.
Mit der Umschalttaste kann sie auf die jeweilige Art des
Bodens eingestellt werden:
Glatte Böden mit vorstehendem Bürstenkranz
saugen, dazu die Umschalttaste auf Symbol
stellen.
Teppichböden mit eingezogenem Bürstenkranz
saugen, dazu die Umschalttaste auf Symbol
stellen.
Polsterdüse
Zum Absaugen von Polstermöbeln, Matratzen und
kleineren unebenen Flächen. Durch den Fadenauf-
nehmer an der Düse werden auch Fäden + Fusseln
gut aufgenommen. Zur bequemen Handhabung
kann diese Düse auch mit nur einem Saugrohr
verwendet oder direkt an das Griffstück des
Saugschlauchs angesteckt werden.
Fugendüse
Sie dient zum gründlichen Aussaugen von Ecken, Rillen,
Fugen und besonders engen Stellen. Auch die
Fugendüse kann direkt am Griffstück des Saugschlauchs
verwendet werden.
Aufbewahrung und Transport
Drehschalter auf „0” stellen und den Netzstecker ziehen.
Die Netzanschlußleitung, am Sauger beginnend, in
größeren Schleifen in der Hand aufwickeln und in die
Kabelmulde einhängen.
Das Saugrohr kann komplett mit Düse und Schlauch in
die Halterungen am Motorteil eingehängt werden
(siehe Bild F + G).
Trockensaugen
Zusammenbau
A
Bei gezogenem Netzstecker den Motorkopf (2)
abnehmen.
L
Dann den im Motorkopf (2) angebrachten
Ansaugschlauch (37) in die dafür vorgesehene
Halterung (36) drücken.
Filtereinsatz
J Verwenden Sie den Kegelfilter (25) zusätzlich zum
Papierfiltersack. Somit erreichen Sie bestes
Staubrückhaltevermögen.
Den Kegelfilter (25) an der Unterseite des
Motorkopfs (2) aufsetzen. Je nach Modell an
Pos. 1 oder 2 mit den Drehklammern verriegeln.
Bei starker Verschmutzung oder nachlassender
Saugleistung kann der Kegelfilter (25) mit klarem
Wasser, ohne Wasch- und Reinigungsmittelzu-
sätze, ausgewaschen werden. Achten Sie darauf,
dass der Filter beim nächsten Saugeinsatz ganz
durchgetrocknet ist.
K Den Papierfiltersack (34) an der Kartonkante (35)
fassen und fest an den Ansaugstutzen (8) drücken.
Danach den Papierfiltersack an die Behälterwand
anlegen.
D Motorkopf (2) aufsetzen. Der Drehschalter am
Gerät muß auf „0” stehen.
G Netzanschlußleitung (10) anschließen.
Inbetriebnahme
Gerät einschalten
M Beim Arbeitsgang „Trockensaugen” muß der
Drehknopf (7) auf das Symbol Teppichdüse”
gestellt werden.
Kontrolleuchte (6) darf nicht aufleuchten.
Das Gerät ist betriebsbereit.
Naßsaugen
Zusammenbau
A Bei gezogenem Netzstecker den Motorkopf (2)
abnehmen.
Achtung! Vor dem Saugen von Flüssigkeiten
immer die Filtereinheit entnehmen, da diese sonst
gebrauchsunfähig wird.
L Das Schwimmerventil (38) stets sauber und
gangbar halten. Es unterbricht automatisch das
Ansaugen, wenn der Behälter voll ist.
D Motorkopf (2) aufsetzen. Der Drehschalter am
Gerät muß auf „0” stehen.
G Netzanschlußleitung (10) anschließen.
8

Inbetriebnahme
Gerät einschalten
M Beim Arbeitsgang „Naßsaugen” muß der
Drehknopf (7) auf das Symbol „Teppichdüse”
gestellt werden.
Kontrolleuchte (6) darf nicht aufleuchten.
Das Gerät ist betriebsbereit.
Flüssigkeiten aus Behältern können direkt mit dem
Saugschlauch bzw. den Saugrohren aufgesaugt
werden.
Vorsicht beim Absaugen aus Behältern oder
Becken, deren Flüssigkeitsspiegel höher
liegt und deren Füllinhalt größer ist als das
Fassungsvermögen des Saugbehälters. In
diesem Fall würde bei vollem Behälter und
geschlossenem Schwimmerventil nach dem
Saugheber-Prinzip weiter Flüssigkeit
nachfließen.
Deshalb in solchen Fällen nur Teilmengen absaugen und
zwischendurch den Saugbehälter entleeren.
Nach dem Saugen zuerst das Saugrohr aus der
Flüssigkeit heben und danach erst den Motor
abschalten.
Achtung! Benzin, Verdünnung, Heizöl usw. können
durch Verwirbelung mit der Saugluft explosive Dämpfe
oder Gemische bilden.
Azeton, Säuren und Lösungsmittel können die am Gerät
verwendeten Materialien angreifen. Putz- und
Schmutzwasser mit handelsüblichen Haushaltsreinigern
können unbedenklich aufgesaugt werden.
Nach dem Naßsaugen den Behälter und alle
verwendeten Teile reinigen und trocknen lassen.
Gebrauch des Sprühextraktionssystems
Vor der Teppich-Naßreinigung
Vergewissern Sie sich, daß alles, was Sie naß reinigen
wollen, auch dafür geeignet ist.
Sie sollten das Gerät nicht für zarte, handgewebte oder
farbunechte Teppiche benutzen.
Zur Prüfung geben Sie etwas Reinigungsmittellösung
auf einen weißen Lappen und reiben diesen an einer
weniger gut sichtbaren Stelle auf dem Teppich. Zeigen
sich auf dem Lappen keine Farbspuren, kann von einer
Farbechtheit ausgegangen werden. Im anderen Fall
darf der Teppich nicht naß gereinigt werden.
Haben Sie Zweifel, wenden Sie sich diesbezüglich an
einen Fachhändler.
Vor jeder Teppich-Naßreinigung ist die gesamte
Fläche gründlich zu saugen.
Während des Reinigens und danach sollte der Raum
gut belüftet werden, um eine rasche Trocknung zu
ermöglichen.
Teppich naßreinigen / sprühextrahieren
A Bei gezogenem Netzstecker Motorkopf (2)
abnehmen.
B Bei Anwendung des Sprühextrakionssystems ist
darauf zu achten, daß der Sprühmitteltank (28)
eingesetzt ist.
N Geben Sie das Reinigungskonzentrat in den
Sprühmitteltank (28) und füllen Sie den Rest mit
Wasser auf. (Dosierhinweis auf ProTex Flaschen-
etikett beachten.)
Verwenden Sie handwarmes Wasser (max. 30 °C).
Höhere Temperaturen können dem Gerät, aber
auch Teppich und Polstermöbeln schaden. )
L Lösen Sie den sich im Motorkopf (2) befindlichen
Ansaugschlauch (37).
O Hängen Sie diesen, während Sie den Motorkopf
(2) aufsetzen, in die Reinigungsflüssigkeit.
D Verriegeln Sie den Behälter durch Andrücken der
beiden Verschlußschnapper (3).
Saug- und Druckschlauch anschließen
P Schieben Sie das Absperrventil (17) in die Auf-
nahme am Saugrohr. Anschließend stecken Sie
den Handgriff (11) in das Saugrohr (14).
Befestigen Sie nun den Druckschlauch (19) mit den
Schlauchclipsen (15) am Saug schlauch (13).
E Danach wird der Saugschlauch (13) in den
Ansaugstutzen (8) so eingeschoben, daß die
Markierungen übereinstimmen und der
Saugschlauch (13) hörbar einrastet.
Q Anschließend den Druckschlauch (19) in die
Schnellkupplung (5) am Motorkopf (2) fest
eindrücken.
Schieben Sie nun das zweite Saugrohr (mit den
Einhängeösen) auf das bereits montierte Rohr.
S Montieren Sie die Sprühextraktionsdüse (18)
T Den an der Düse befestigten Druckschlauch (12)
mit der Kupplung (39) am Absperrventil (17)
ansetzen und durch Drehen zur Verriegelung
bringen. Anschließend den Druckschlauch (12)
in die Schlauchhalterung an den Saugrohren
drücken bzw. beim Einsatz von Edelstahlrohren mit
den kleineren Rohrclipsen (16) am Saugrohr
befestigen.
Der Drehschalter am Gerät muß auf „0” stehen.
9

G Netzanschlußleitung (10) anschließen.
Das Gerät ist nun betriebsbereit.
Gerät einschalten
U Drehknopf (7) auf Sprühextraktionsstellung
drehen.
Die Kontrolleuchte (6) muß nun
aufleuchten.
T Die Teppich-Sprühextraktionsdüse in einer Zim-
mer ecke auf den Teppich aufsetzen. Den Ventil-
hebel (40) am Griffstück drücken bis Reinigungs-
lösung aufgesprüht wird. Dann die auf dem
Teppich aufliegende Düse in einer geraden Bahn
langsam über den Teppich ziehen.
Am Ende der Bahn oder bei Unterbrechungen
den Ventilhebel loslassen, um den Sprühstrahl zu
stoppen. Wenn die aufgesprühte Flüssigkeit
abgesaugt ist, die Düse abheben und mit leichter
Überlappung eine neue Bahn beginnen.
So kann Streifen für Streifen die gesamte Fläche
behandelt werden.
Sollten auf der gereinigten Bahn noch Flüssigkeits-
spuren zurückbleiben, können diese Stellen mit
losgelassenem Ventilhebel (40) nochmals abge-
saugt werden.
Dank des durchsichtigen Oberteils der Saugdüse
können Sie selbst entscheiden, wann dieser
Vorgang beendet ist.
V Bei stark verschmutzten Stellen können Sie mit
dem Gerät doppelte Flüssigkeit auftragen,
indem Sie in der Vorwärtsbewegung bereits
aufsprühen und beim Zurückziehen sprühen
und saugen. Zusätzlich läßt sich durch Stellung
„nur Sprühen” eine Vorbehandlung durch-
führen.
Achten Sie darauf, daß nicht zu viel Flüssigkeit
auf dem Teppich verteilt wird, weil hierdurch
Wellen oder Beulen im Teppich entstehen kön-
nen, die sich erst nach längerem Trocken-
vorgang wieder zurückbilden.
Damit ein Nachlaufen der im Saugrohr befind-
lichen Flüssigkeit vermieden wird, sollten Sie das
Saugrohr noch bei laufendem Motor schräg nach
oben halten.
Danach erst Gerät ausschalten.
Achtung!
• Wenn der Teppich zu einem früheren
Zeitpunkt shampooniert wurde, kann es
bei erstmaligem Gebrauch des
Sprühextraktionsgerätes zu stärkerer
Schaumbildung im Schmutzbehälter
kommen. Falls Schaum aus dem
Luftauslaß heraustreten sollte, schalten
Sie das Gerät ab und entleeren den
Schmutzbehälter. Um weitere Schaum-
bildung zuvermeiden, geben Sie 1 Tasse
Essig in den Schmutzbehälter.
Erhöhte Schaumbildung ist nach
einmaliger Grundreinigung mit dem
THOMAS ProTex Reinigungskonzentrat
ausgeschlossen, da dieses mit einem
speziellen Schaumstop ausgerüstet ist.
• Solange der Teppich noch feucht ist,
sollten Sie ihn nicht begehen.
Hartboden naßreinigen
W Den Hartbodenadapter (22) wie im Bild dargestellt
mit der Gummilippe nach oben zeigend in
Pfeilrichtung auf die Sprühex-Teppichdüse (18) bis
auf Anschlag aufschieben.
Jetzt können Sie Ihre glatten Keramik-, Stein- und
Kunststoffböden in einem Arbeitsgang reinigen
und trocknen.
10
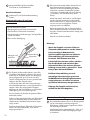
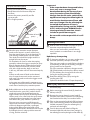
Das Sprühextrakions-System
• Reinigungslösung mit Druck tief einsprühen
• Schmutz lösen und fasertief auswaschen
• Schmutzwasser kraftvoll absaugen und Teppichflor
wieder aufrichten.
Alles in einem Arbeitsgang.
Saugrohr
Druckleitung
Arbeitsrichtung
Absaugen und
Aufrichten
Einsprühen
Lösen und Auswaschen

Polsterreinigung
X
Zur Reinigung Ihrer Polstermöbel oder Autositze
verwenden Sie die Polstersprühextraktionsdüse
(20).
Die Polstersprühextraktionsdüse (20) wird direkt
auf das Absperrventil (17) aufgeschoben und
durch Drehen der Kupplung (39) wird der
Druckschlauch am Ventil befestigt.
Achten Sie bei Polstern darauf, daß nicht zuviel
Flüssigkeit aufgetragen wird, da je nach Unterbau
mit einer längeren Trocknungszeit zu rechnen ist.
Reinigungsvorgang siehe Teppichreinigung.
Nach der Naßreinigung
Netzstecker ziehen.
R Vor dem Abnehmen des Motorkopfes (2) muß der
Druckschlauch (19) gelöst werden. Vor dem Lösen
des Druckschlauches zuerst den Ventilhebel des
Absperrventils betätigen, um den Restdruck im
System abzubauen.
A Motorkopf (2) vom Gerät abnehmen und auf
eine Auffangschale absetzen, um Verunreinigung
durch abtropfendes Wasser zu vermeiden.
B Sprühmitteltank (28) entnehmen und entleeren.
Schmutzbehälter entleeren und gründlich
ausspülen.
O Zur Pflege der Pumpe und Ventile den Sprüh mittel-
tank mit klarem Wasser füllen, in den Behäl ter
setzen und den Motorkopf (2) wieder aufsetzen.
Das Sprühsystem auf glattem Boden oder über dem
Spülbecken in Betrieb nehmen.
Anschließend die beiden Behälter reinigen und die
demontierten Teile gut trocknen lassen.
Gerätereinigung und Pflege
Vor dem Reinigen stets den Netzstecker ziehen!
Motorgehäuse nie in Wasser tauchen!
Motorgehäuse und Behälter mit feuchtem Tuch
abwischen und nachtrocknen.
Stark verschmutzte Behälter können mit Wasser
ausgewaschen werden. Danach aber gut abtrocknen
lassen.
Behälter und verwendete Zubehörteile müssen nach
jedem Naßsaugen mit warmem Seifenwasser gereinigt
werden, insbesondere nach Aufnahme von klebrigen
Flüssigkeiten. Keine scheuernden Reinigungsmittel
verwenden.
11

Hilfe bei evtl. Störungen
Falls Ihr Gerät wider Erwarten einmal nicht
zufriedenstellend funktioniert, brauchen Sie nicht gleich
den Kundendienst einzuschalten. Bitte prüfen Sie
zunächst, ob die Störung nur kleine Ursachen hat:
Wenn beim Saugen Staub austritt:
• Sind Papierschutzfilter und Schaumstoff-Filter dicht,
richtig befestigt und ohne Defekt?
• Wurde ein Original-Papierschutzfilter verwendet?
Wenn die Saugkraft allmählich nachläßt:
• Ist der Schmutzbehälter voll?
• Sind die Filterporen durch Feinstaub oder Ruß
verstopft?
• Ist der Papierfiltersack voll?
• Sind Düse, Verlängerungsrohr oder Saugschlauch
durch Schmutz verstopft?
(Saugschlauch bei eingeschaltetem Gerät
auseinanderziehen - Dehnung lockert Verstopftes).
• Ist der Turbinenschutzfilter verschmutzt?
Wenn die Saugkraft plötzlich nachläßt:
• Hat das Schwimmerventil die Saugluft gestoppt?
Das kann passieren bei extremer Schrägstellung
oder beim Umkippen des Gerätes. Sauger aus-
schalten - der Schwimmer fällt nach unten - das
Gerät ist wieder betriebsbereit.
Wenn der Motor nicht läuft:
• Ist die Sicherung intakt und Spannung da?
• Sind Kabel, Stecker und Steckdose intakt?
• Vor Prüfung Stecker ziehen.
• Niemals selbst den Motor öffnen!
Wenn keine Reinigungsflüssigkeit austritt:
• Ist die Pumpe eingeschaltet (Kontrolleuchte [6] muß
aufleuchten)?
• Ansaugfiltersieb reinigen (37)
• Ist Reinigungsflüssigkeit im Sprühmitteltank?
• Hängt der Ansaugschlauch frei im Sprühmitteltank?
• Ist die Sprühdüse verstopft?
Falls die Sprühdüse einmal verstopft ist, Düse einige Zeit
ins Wasser legen. Danach kräftig durchblasen.
Der Umwelt zuliebe
Verpackungsmaterial und ausgediente Geräte nicht
einfach wegwerfen!
Geräteverpackung:
• Der Verpackungskarton kann der Altpapier-
Sammlung zugeführt werden.
• Den Kunststoffbeutel aus Polyethylen (PE) zur
Wiederverwertung an Sammelstellen abgeben.
Verwertung des Gerätes nach dem Ende
seiner Lebenszeit:
• Entsorgen Sie das Gerät nach den örtlichen
Vorschriften und schneiden Sie vorher den
gezogenen Netzstecker ab.
Das Symbol auf dem Produkt oder seiner
Verpackung weist darauf hin, dass dieses
Produkt nicht als normaler Haushaltsabfall zu
behandeln ist, son dern an einem Sammel-
punkt für das Recycling von elektrischen und elektroni-
schen Geräten abgegeben werden muss.
Durch Ihren Beitrag zum korrekten Entsorgen dieses Pro-
dukts schützen Sie die Umwelt und die Gesundheit Ihrer
Mit menschen. Umwelt und Gesundheit werden durch fal
-
sches Entsorgen gefährdet.
Weitere Informationen über das Recycling dieses Pro-
dukts erhalten Sie von Ihrem Rathaus, Ihrer Müllabfuhr
oder dem Geschäft, in dem Sie das Produkt gekauft
haben.
Kundendienst
Fragen Sie Ihren Händler nach der Adresse oder
Telefon-Nummer des für Sie zuständigen THOMAS-
Kundendienstes.
Bitte geben Sie Ihm zugleich die Angaben
vom Typenschild auf der Rückseite Ihres
THOMAS 4 in 1 an.
Zur Aufrechterhaltung der Sicherheit des
Gerätes sollten Sie Reparaturen, insbe-
sondere an stromführenden Teilen, nur
durch Elektro-Fachkräfte durchführen
lassen. Im Störungsfall sollten Sie sich daher
an Ihren Fachhändler oder direkt an den
Kundendienst wenden.
Die Kontaktdaten finden Sie auf der
Rückseite.
12

Important
Please read through the information
contained in this instructions booklet
carefully. It gives important advice on the
safety, assembly, use and maintenance of
the THOMAS 4 in 1. Retain the instructions
booklet in a safe place for future reference
and, if applicable, pass it on to the
subsequent owner of the appliance.
The manufacturer will not be liable if the
instructions specified below pare not
observed. Do not put the THOMAS 4 in 1
to improper use, i.e. do not use the
appliance other than for the purposes it is
meant for.
• This appliance can be used by children
who are over 8 and by those with
reduced physical, sensory or mental
capabilities or lacking experience and/or
knowledge given that they have been
supervised or instructed in the safe use of
the appliance and have understood the
resulting dangers. Children must not play
with the appliance. Cleaning and user
maintenance must not be undertaken by
children who are not subject to
supervision.
• The voltage shown on the model plate must concur
with that of the electricity mains supply. A fuse of no
less than 16 Amps must be fitted (UK: 13 Amps).
• Do not operate the appliance if:
– the mains cable is damaged
– the appliance shows clear signs of damage
– the motor block has been dropped.
• Check the appliance for any damages which may
have occurred during transport.
• Dispose of the packaging in accordance with local
regulations.
• Never operate the appliance in rooms where
inflammable materials are stored or where gases
have formed.
• Store the appliance and its attachments in a dry,
clean and enclosed space.
• Extreme care is required when vacuuming stair-
carpets with your appliance. Ensure that the
vacuum cleaner stands firmly on the step and
take care that the flexible hose is not stretched
beyond its actual length. When using the vacuum
cleaner on stairs, always ensure that you hold the
appliance steady with one hand.
• Filters should be changed at regular intervals, as
indicated in the instructions booklet.
• Ensure that the filter is fitted before dry vacuuming.
• Warning! This vacuum cleaner is not suitable for
vacuuming noxious substances.
• Do not vacuum solvent liquids, such as paint
thinner, oil, petrol or corrosive liquids.
• Do not leave the appliance in the open and do
not expose directly to oisture.
• Do not allow nozzles and tubes (when the
appliance is switched on) to come within the
proximity of the head - danger for eyes and
ears, for example.
• Never unplug the appliance by pulling at the
cable, but only by removing the plug directly
from the socket.
• Ensure that the mains cable is not exposed to either
heat or chemical substances, nor that it is pulled
across sharp edges or surfaces.
• If the connecting cable of this equipment unit is
damaged, it must be replaced by the manufacturer
or by his customer service department or by other
similarly qualified persons in order to prevent risks.
• Do not store the appliance next to a hot stove or
heater.
• Never repair the 4 in 1 yourself, but have all repairs
carried out by an authorised customer service station
only.
• Only original accessories should be used.
• Pull out the plug
- if the appliance malfunctions during operation
- before cleaning and maintenance
- after use
- when changing the filter.
• Before disposal of the 4 in 1, cut off the mains cable.
• Never point the jet of cleaning solution at plug
sockets or electrical appliances.
• Chemicals (spray-extraction cleaning solution) do
not belong in the hands of children.
• Important! Correct functioning of the
appliance and cleansing efficiency can be ensured
only when the original THOMAS cleaning solution
has been used.
• Avoid direct contact with the cleaning solution if
you have sensitive skin.
• Before carrying out any work what-
soever on the appliance, turn the control
knob to the ”off” position and pull out
the plug.
• If the cleaning concentrate comes in contact with
mucous membranes (eyes, mouth, etc), immediately
rinse with water.
13
GB

Congratulations on your new
purchase!
Enjoy your appliance to the full through
correct usage.
Applications
You are now the owner of one of the most efficient
and versatile appliances available, which can easily be
adapted for any one of its four cleaning functions.
The THOMAS 4 in 1 can be used as a vacuum cleaner
for cleaning carpets, upholstery, smooth floors and for
regular household care; it can vacuum dirt as well as
liquids, e.g. it can clear blocked sinks and drains. With
only a few simple accessories, it can be used for
shampooing your carpets or upholstery.
The THOMAS 4 in 1 is a multi-purpose product.
In conjunction with the cleaning solution, the spray-
extraction function enables you to clean carpets,
upholstery and hard floors. The wet vacuuming mode
is suitable for picking up water-based liquids only and
it should never be used for vacuuming inflammable
liquids. As a vacuum cleaner, it is intended for the
removal of dry dirt and dust from carpets, floors,
furniture and curtains.
Unpacking the appliance
Unpack the appliance from the carton, remove any
packaging and identify the following parts and
functions in the diagrams at the beginning of this
booklet to gain a better understanding of the
instructions given below.
The letters indicated below refer to the diagrams on
pages 3 and 5.
Assembly instructions
Assembling the THOMAS 4 in 1.
The parts required for the chassis are to be found
loosely packed in the carton.
Assembling the castor wheels
A
Undo the snap-on fasteners (3) and lift off the
motor block (2).
B
Take out the extraction liquid tank (28) and
cleaning solution. Turn the collecting bin (1) upside
down, i.e. with the opening facing the floor.
C Press down the steering castors (4) with bolts firmly
into the bottom of the container (1) up to the stop.
Place the container (1) with the fitted steering
castors (4) on the rollers and test for function.
Fitting the motor block
D Place the motor block (2) on the collecting bin (1),
making sure that the surfaces of both parts
correspond. Secure the motor block (2) by means
of both snap-on fasteners (3).
Connecting the flexible hose
E Insert the flexible hose (13) in the suction socket (8)
in such a manner that the markings on both the
suction socket and the hose connecting piece
correspond and the button clicks into place.
Remove the hose by turning the hose connecting
piece and slowly with drawing the hose.
Then attach the desired accessories.
Suction tube holder
F The suction tubes (14) complete with accessories
and flexible hose (13) can be hooked into the
fixtures at the back of the appliance.
Cable storage
G After use, the mains cable (1) can be wound
loosely in the hand and hung over the notch in the
carrying handle, as shown in the illustration.
Changing the filter
Always pull out the plug before changing
the filter!
NOTE!
Hygienic filter change and emptying of the
collector bin.
Emptying the collector bin and change of all filter types
used in the vacuum cleaner (e.g. foam-/paper filters,
paper filter bags, etc.) can be done hygienically. To this
end, please use the hygienic gloves included in the
delivery.
Replacement gloves are readily available at relevant
supply stores.
Motor protection filter
H After each wet suction and spray extraction
process, check the motor protection filter (33) for
contaminations and clean if required. For this,
open the float valve (38) in the direction of the
arrow, and take the motor protection filter from
the suction opening. Replace the cleaned or new
filter and then put the float valve back in place.
14

15
Paper filter bag
K
Place the filter bag (34) inside the collecting bin (1),
making sure that the opening located in the
cardboard inlay (35) is placed in line with the
suction socket (8).
Then press the filter bag (34) evenly around the
sides of the collecting bin (1).
THOMAS paper filter bags are essential when
vacuuming fine dust, e.g. soot, ashes, sawdust or
cement. However, they are also recommended for
normal use, as they not only improve the retention
of dust, but also make filter changes more
hygienic.
Concentrated cleaning solution
Your THOMAS 4 in 1 contains 1 Liter of ProTex cleaning
concentrate. Please see bottle label for instructions for
use and dosage.
Use of tools and accessories
Reversible carpet + floor nozzle
This nozzle is suitable for vacuuming carpets and hard
floors, such as stone, parquet and synthetic tiles.
By means of the foot-operated lever, the nozzle can be
adjusted to suit the type of floor to be vacuumed:
- Vacuum smooth floors with the brush edge:
set the lever at the symbol .
- Vacuum carpets with the smooth edge, i.e.
brush rim is retracted: set the lever at the
symbol .
Upholstery nozzle
Used for vacuuming upholstered furniture, mattresses,
and small uneven surfaces. The nozzle's thread
catcher also allows you to vacuum threads and fluff.
For easy handling the upholstery nozzle can also be
used with only one section tube, or directly on the
hose's grip.
Joint nozzle
Used for thoroughly vacuuming corners, grooves,
joints and other tight places. The joint nozzle can also
be directly attached to the grip.
Storage and transport
Set the control knob at “0” and pull out the plug.
Coil the mains cable loosely in the hand and hang it
over the notch in the carrying handle.
The suction tubes, complete with nozzle and flexible
hose, can be hooked into the fixtures at the back of the
appliance.
Dry vacuuming
Assembly
A
Pull out the plug and lift off the motor
block (2).
L Then push the cleaning solution tube (37), which is
located in the motor block (2), into the fixture
provided for this purpose (36).
Inserting the filter
J Use the taper filter (25) in addition to the paper
filter sack. By doing this you achieve the best
retention of the residue dust. Place the taper filter
(25) on the underside of the motor head (2).
Depending on the model in position 1 or 2 and
lock with the rotary clips. In the case of stubborn
dirt weak suction power the taper filter (25) can be
washed out with clear water without adding
washing detergents or cleaning agents. Make sure
that the filter is completely dry when using the
vacuum cleaner the next time.
K Place the filter bag (34) inside the collecting bin,
making sure that the opening located in the
cardboard inlay (35) is placed in line with the
suction socket (8).
Then press the filter bag evenly around the sides
of the collecting bin.
D Put the motor block (2) back in position. The control
knob on the appliance must be set at ”0”.
G Plug the appliance into a mains socket.
Switching on the appliance
M When using the appliance in the dry vacuuming
mode, the control knob (7) must be set at the
„carpet + floor nozzle" symbol.
The pilot lamp (6) should not be lit up.
The appliance is ready for use.
Wet vacuuming
Assembly
A Pull out the plug and lift off the motor
block (2).
Warning! Always remove the filter unit before
vacuuming liquids, as it will otherwise become
unserviceable (see section "Changing the filter").
L Always ensure that the float (38) is kept clean and
in good condition. It acts as a safety device and
automatically interrupts the flow of air when the
collecting bin is full.

D Put the motor block (2) back in position. The control
knob on the appliance must be set at “0”.
G Plug the appliance into a mains socket.
Switching on the appliance
M When using the appliance in the wet vacuuming
mode, the control knob (7) must be set at the
“carpet + floor nozzle” symbol.
The pump lamp (6) should not be lit up.
The appliance is ready for use.
Liquids can be directly vacuumed out of containers
with either the vacuum hose or the hose with a
section.
Take care when vacuuming liquids from
high-sided containers or basins, where the
quantity level exceeds the liquid capacity
of the collecting bin. Remember that, in
such a case, the liquid will continue to flow
from the container even if the collecting bin
is full and the float has stopped the suction
flow of the appliance.
Therefore, vacuum only small quantities of liquid at a
time and empty the collecting bin before switching on
again.
Always lift the suction tube out of the liquid before
switching off the motor.
Warning! If petrol, paint thinner, fuel oil etc. are
allowed to mix with the suction air flow, explosive fumes
or compounds may be formed.
Acetone, acids and solvents may attack the materials on
your appliance. It is quite safe to vacuum water which
contains ordinary household cleaning agents.
After vacuuming liquids, the collecting bin and all
accessories used should be wiped clean and left to
dry.
Operating the spray-extraction system
Before spray-extraction cleaning
Make sure that what is to be cleaned by spray-
extraction is suitable for this purpose.
Do not use the appliance for delicate, hand-woven or
non-fast carpets.
Test the colour-fastness of your carpet by pouring a
little cleaning solution onto a white cloth and rubbing
this onto a normally hidden section of the carpet. If
there are no traces of dye on the cloth, it can be
assumed that the carpet is colour-fast.
However, if dye comes off onto the cloth, do not clean
the carpet by spray-extraction.
If you are in doubt, contact a specialist dealer.
Before shampooin g your carpet, vacuum-clean the
whole area thoroughly.
Ensure that the room is well-aired during and after
spray-extraction cleaning to enable the carpet to dry
quickly.
Carpet shampooing
A
Pull out the plug and lift off the motor
block (2).
B When using the appliance in the spray-extraction
mode, ensure that the extraction liquid tank (28) is
inserted in the collecting bin.
N Pour the cleaning concentrate into the sprayer
tank (28) and fill up with water. (Observe the
dosing instructions on the lable of the Protex
bottle.)
Use lukewarm water (max. 30°C) only. Higher
temperatures can damage not only the appliance,
but also the carpet and upholstery.
L Detach the cleaning solution tube (37) from its
fixture in the motor block (2).
O While putting the motor block (2) back on the
collecting bin, let the cleaning solution tube (37)
dangle down into the cleaning solution.
D Secure the motor block on the collecting bin by
means of both snap-on fasteners (3).
Connecting the flexible hose and delivery
tube
P
Slide the spray diffusor control (17) into the fixture
provided on the suction tube. Then insert the
handgrip (11) in the suction tube. Attach the
delivery tube (19) to the flexible hose (13) by means
of the plastic clips.
E Then insert the flexible hose (13) in the suction
socket (8) in such a manner that the markings on
both correspond and the button audibly clicks
into place.
Q Subsequently, insert the delivery tube (19) firmly
into the coupling piece (5) on the motor block (2).
Now attach the second suction tube (the one with
fixture studs) to the p suction tube which is already
mounted.
S Attach the spray-extraction carpet shampoo
nozzle (18).
T Attach the delivery tube (12), which is mounted on
the nozzle, by the coupling piece (39) to the spray
diffusor control (17) and secure by turning the
coupling piece (39).
Then press the delivery tube (12) into the sclamping
fixtures on the suction tubes.
The control knob on the appliance must be set
at ”0”.
G Plug the appliance into a mains socket.
The appliance is now ready for use.
Switching on the appliance
U
Turn the control knob (7) to the „spray-extraction"
symbol.
The pump lamp (6) should now be lit up.
16

T Place the spray-extraction carpet shampoo
nozzle on the carpet in a corner of the room.
Press the control trigger (4) on the handgrip (11)
until cleaning solution sprays onto the carpet.
Then slowly draw back the upright nozzle in a
straight line over the carpet.
On completion of a lane or when interrupting
operation, release the trigger to stop the jet spray
flow of cleaning solution. When the sprayed on
liquid has been vacuumed off, raise the nozzle
and, with a slight overlap, begin a new lane.
In this way, the entire area can be covered strip by
strip.
If there are still traces of liquid on the cleaned
strip of carpet, these areas can be vacuumed
over again, but make sure that the trigger control
(40) is released!
As the upper part of the nozzle is transparent, you
can judge for yourself by the colour of the extracted
water when to end the spray-extraction process.
V Badly soiled areas can be pre-treated by turning the
control knob to the „spray only" position. Aim the
nozzle at the area to be treated and press the
trigger control to emit a jet spray of cleaning solution.
Leave to work in for a short time, then spray-extract
as described above (remember to turn the control
knob back to the „spray-extraction" position U).
Take care not to spray too much fluid onto the
carpet as this can result in ripples or lumps forming,
which only disappear again after a prolonged
drying period. When vacuuming liquids, avoid
spilling the residual liquid in the vacuum hose or tube
by holding the hose or tube up with the motor still
running, and then switch off.
Important!
• If the carpet has been shampooed before,
there may occur a stronger foam
development during the first use of your
spray-extraction system. Should foam
emerge from the air outlet, switch off the
appliance and empty the collecting bin. To
avoid further development of foam, add
one cup of vinegar into the collecting bin.
Increased development of foam is
impossible after having used the THOMAS
4 IN 1 with its Original THOMAS ProTex
cleaning solution for one time, since it
includes a special foam stopper.
• Do not walk on the carpet while it is still
damp.
Washing hard floors
W
Slide the hard floor adaptor (22) onto the spray-
extraction carpet shampoo nozzle (18).
Now you can wash and dry smooth ceramic,
stone, synthetic or wooden floors in one single
operation.
Upholstery shampooing
X
To shampoo upholstery or car seats, use the spray-
extraction upholstery shampoo nozzle (20).
Take care not to apply too much fluid to upholstery
as, depending on the type of padding, a lengthy
drying period can be expected.
The spray-extraction upholstery shampoo nozzle
(20) is fitted directly onto the spray diffusor control
(17). The delivery tube is secured at the valve by
turning the coupling piece (39).
T Detach the delivery tube (12) by turning the
coupling piece (39).
Operate as described under ”Carpet shampooing".
After spray-extraction cleaning
Pull out the plug.
R Before removing the motor block (2), detach the
delivery tube (19).
A
Remove the vacuum cleaner's motor head (2)
and place onto shallow container to avoid getting
the intended surface dirty from residual water.
B Take out the extraction liquid tank (28) and empty.
(Any unused cleaning solution can be stored in a
suitable receptacle.) Empty the collecting bin (1)
and wash out thoroughly.
O Care for the pump and valves by filling the
extraction liquid tank with clear water, putting it in
the collecting bin and replacing the motor block (2).
17
The spray-extraction system:
• sprays pressurised jets of cleaning solution
• breaks down dirt and cleanses deep into
the fibres
• extracts dirty water powerfully and lifts
up carpet pile.
All in a single operation.
suction tube
delivery tube
direction of work
extracts and
raises
sprays
dissolves and cleanses

Operate the spray-system on a smooth floor or
over the sink.
Subsequently, clean both receptacles and leave
the dismantled parts to dry thoroughly.
Care and maintenance
Always pull out the plug before cleaning the appliance!
Never immerse the motor block in water!
Clean the motor block casing and collecting bin with a
moist cloth and wipe dry.
If there is a reduction in suction power, change the
paper filter.
If necessary, the collecting bin can be washed out with
water. Ensure that the bin is completely dry before
using again.
Rinse out the collecting bin and all accessories used
with warm, soapy water after wet vacuuming
(particularly sticky liquids). Do not use abrasive
cleaning agents!
If unexpected difficulties arise
Before contacting your dealer, check whether the fault
is due to one of the following minor causes:
Dust escaping from suction socket:
• Are the foam and protective paper filters correctly
positioned and undamaged?
• Have you used the correct original filters?
Gradual reduction in suction power:
• Is the collecting bin full?
• Are the pores of the filter clogged up by dust or
soot?
• Is the paper filter bag full?
• Is there a blockage in the nozzle, extension tube or
flexible hose? (Stretch the flexible hose while the
appliance is switched on - this will loosen the
obstruction.)
• Is the protective motor filter dirty?
Sudden reduction in suction power:
• Has the float stopped the flow of air? This can
happen if the appliance is standing at a slant or if
the appliance falls over. Turn off the vacuum cleaner
- the float will fall back into place - the appliance is
ready for use again.
The motor does not function:
• Has the fuse blown?
• Is there damage to the mains cable, plug or socket?
Pull out the plug before checking!
• Never open the motor yourself!
Cleaning solution does not flow out:
• Clean the filter mesh at the end of the cleaning
solution tube (37).
• Is the pump switched on?
(The pilot lamp [6] should be lit up.)
• Is there cleaning solution in the extraction liquid tank?
• Is the cleaning solution tube dangling freely into the
extraction liquid tank?
• Is the delivery tube nozzle blocked? (In this case,
unscrew the cap nut and place the nozzle in water for
a time. Subsequently, blow vigorously through the
nozzle. When replacing the nozzle, ensure that the jet
spray opening stands parallel to the suction tube.)
For the sake of the environment
Do not just throw away packaging material and worn
out appliances!
Appliance packaging:
• The packaging carton can be placed in the waste
paper collection bin
• The plastic bag made of polyethylene (PE) should be
placed in the appropriate disposal bin for recycling.
Appliance disposal at the end of service life:
• Appliance disposal in accordance with the local
regulations but before doing so disconnect and cut
off the mains plug.
The symbol on the respective product or its
packaging indicates that this product must not
be disposed of as household waste. Instead,
it should be handed into the collection point
for recycling electrical and electronic equipment.
By ensuring the proper disposal of this product, you will
help to prevent potential adverse consequences for the
environment and human health, which could otherwise
be caused by inappropriate disposal of this product.
For more explicit information about recycling of this
product, please contact your local town hall, your
household waste disposal service or the shop where
you purchased the product.
Customer Service
Ask your dealer for the address or telephone number
of your nearest THOMAS Customer Service.
Specify model number and type when
contacting your dealer - you will find these
details on the rating plate located at the
back of the 4 in 1.
To maintain the safety of your appliance,
you should have repairs, especially on live
parts, carried out by a trained electrician
only. In the event of a fault, you should
therefore approach your dealer or the
THOMAS Customer Service directly.
Contact details are on the reverse side.
18

Avis importants
Lisez s.v.pl. soigneusement les
informations mentionnées dans le présent
mode d'emploi. Ce sont des indications
importantes pour la sécurité, le montage,
l'utilisation et l'entretien de l'appareil.
Conservez ce mode d'emploi et
transmettez-le, le cas échéant, aux
prochains acquéreurs. Le producteur refuse
toute responsabilité, si les instructions
ci-dessous ne sont pas respectées. L'appareil
ne peut pas faire l'objet d'abus, c. à.d. être
utilisé à des fins pour lesquelles il n'est pas
destiné. Il sert uniquement à l'usage
domestique normal.
• Cet appareil peut être utilisé par des
enfants à partir de 8 ans et des personnes
ayant des capacités physiques, sensorielles
ou mentales réduites ou un manque
d'expérience ou de connaissances sous
surveillance ou à condition qu'ils aient reçu
les instructions appropriées leur permettant
de se servir de l'appareil en toute sécurité
et de comprendre les risques qui peuvent
en résulter. Ne laisser pas les enfants
jouer avec l'appareil. Le nettoyage et
l'entretien régulier de l'appareil ne
doivent pas être réalisés par des enfants
sans surveillance.
• La tension spécifiée sur la plaque signalétique doit
concorder avec la tension débitée par le secteur.
Ampérage min. 16 A. (UK: 13 A).
• Ne pas enclencher l'appareil si:
– le câble d'alimentation est endommagé,
– l'aspirateur présente des endommagements
visibles,
– le bloc-moteur est tombé par terre.
• Contrôlez, si l'appareil ne présente pas des dégâts
de transport.
• Pour l'élimination de l'emballage, conformez-vous
aux prescriptions locales.
• N'utilisez jamais l'aspirateur dans des chambres où
se trouvent des matériaux inflammables ou dans
des pièces où se sont formés des gaz.
• Conservez l‘appareil ainsi que les accessoires dans
un endroit sec, propre et fermé.
• Faites particulièrement attention quand vous
nettoyez les marches d'escaliers. Rassurez-vous que
le Thomas 4 en 1 soit posé fermement sur la
marche d'escalier et que le flexible ne soit pas
tendu au-delà de sa longueur effective. Vous
devez tenir l'appareil toujours d'une main, quand
vous l'utilisez dans les marches d'escaliers.
• Changez les filtres à intervalles réguliers, comme
expliqué dans le mode d'emploi.
• Ne jamais aspirer les déchets secs sans filtre!
• Attention! Cet aspirateur n'est pas apte à
aspirer des poussierès dangereuses pour la santé.
• Ne jamais aspirer des liquides contenant des dissolvants
comme p. ex. les diluants de couleurs, les huiles, la
benzine, etc., ou encore des liquides corrosifs.
• Ne pas laisser l'aspirateur au-dehors; il est à
préserver de l'humidité.
• Les suceurs et tuyaux ne sont pas à porter (quand
l'appareil est en marche) à proximité de la tête, il
pourrait en résulter un danger p.ex. pour les yeux
et les oreilles.
• Ne jamais retirer la fiche de la prise de courant en
tirant sur le câble, mais bien sur la fiche même.
• Veillez à ce que le câble d'alimentation ne soit jamais
exposé à la chaleur ou à des liquides chimiques ou
tiré par-dessus des arrêtes et surfaces tranchantes.
• Si le câble de branchement de cet appareil devait être
endommagé, il doit être remplacé par le fabricant ou
par son service après-vente ou encore par une autre
personne qualifiée pour éviter tous risques.
• Ne pas garder le Thomas 4 en 1 à proximité
d'appareils de chauffage.
• Ne réparez jamais vous-même l'appareil.
Confiez ce travail à un service technique agréé.
• Utiliser uniquement les accessoires originaux.
• Retirer la fiche:
- lors de la marche anormale de l'appareil,
- avant tout nettoyage et entretien,
- après utilisation,
- lors de chaque changement de filtre.
• Avant l'élimination définitive du 4 en 1 coupez
s.v.pl. son câble d'alimentation.
• Ne dirigez jamais le jet d'eau de nettoyage sur les
prises de courant ou les appareils électriques.
• Préservez les enfants des produits chimiques (produit
nettoyant pour l'injection-extraction).
• Attention! La bonne marche de l'appareil ainsi
que son efficacité de nettoyage sont seulement
assurés si vous vous servez du liquide nettoyant
Thomas ProTex original.
• Il est conseillé aux personnes à la peau sensible
d'éviter le contact avec le produit nettoyant.
• Avant d'effectuer le moindre travail à
l'appareil, mettez l’interrupteur sur la
position “0” et retirez la fiche.
• Si par mégarde le concentré de nettoyage entre
en contact avec les muqueuses (oeil, bouche,
etc. . . .), il faut immédiatement rincer abondamment
a l'eau claire.
19
F

Vous avez effectué un excellent achat!
Nous vous en félicitons.
Profitez pleinement de ses services par un
usage adéquat.
Possibilités d'emploi
Vous possédez maintenant un des appareils les plus
efficaces et les plus polyvalents actuellement offerts
sur le marché, qui s'adapte facilement à chacune de
ses 4 fonctions de nettoyage. Le Thomas 4 en 1 peut
s'utiliser comme aspirateur pour le nettoyage des
tapis, fauteuils, sièges, sols durs et pour l'entretien
régulier de votre appartement. Il aspire la poussière
et autres saletés ainsi que les liquides; il débouche
p. ex. les éviers et siphons. Muni de quelques
accessoires simples, il servira à shampouiner vos tapis,
fauteuils etc.
Le Thomas 4 en 1 est un appareil universel. En
position injection-extraction il nettoie vos tapis,
fauteuils, sièges ainsi que les sols durs en utilisant le
nettoyant recommandé. En position aspiration de
liquides, il n'est destine qu'à l'enlèvement de liquides à
base d'eau. L'appareil ne peut servir en aucun cas à
l'aspiration de liquides inflammables. En mode
aspiration de matières sèches, il n'est destiné qu'à
l'aspiration de poussières et de saletes des tapis,
planchers, meubles, rideaux etc.
Deballage de l'aspirateur
Sortir l'appareil du carton, retirer le materiél
d'emballage et identifier les différentes pièces et
fonctions, en consultant les illustrations du début de ce
livret, afin de bien comprendre les instructions qui
suivent.
Les lettres suivantes se rapportent aux illustrations des
pages.
Description du montage
Assemblage du Thomas 4 en 1.
Les composants du socle sont places séparément dans
l'emballage.
Montage des roulettes
A Ouvrir les poignées de verrouillage (3) et retirer le
bloc-moteur (2).
B Retirer le réservoir pour liquide nettoyante (28) et
le nettoyant liquide. Placer la cuve (1) à l'envers,
donc son ouverture vers le bas.
C Fixer les roulettes d'orientation (4) avec les boulons
sur le fond du réservoir (1) puis les enfoncer
jusqu'à la butée.
Poser le réservoir (1) sur les roulettes d'orientation
montées (4) et procéder à un essai de
fonctionnement.
Placement du bloc-moteur
D Mettre en place le bloc-moteur (2) de façon à ce
que les parties planes du capot et de la cuve
soient mises en concordance. Ensuite caler avec les
poignées de verrouillage (3).
Raccordement du flexible
E Introduire le flexible (13) dans la bouche
d'aspiration (8) de façon à ce que les repères du
flexible et de la bouche d'aspiration soient mis en
concordance et que le bouton-arrêtoir
s'encliquette. Pour enlever le flexible, tirer sur le
flexible en le tournant vers la gauche et la droite.
Ensuite vous pouvez raccorder les accessoires
désirés.
Porte-tuyau
F Accrocher le tuyau (14) avec le flexible (13) et son
accessoire au dos de l'aspirateur.
Porte-câble
G Après l'aspiration, enrouler le câble (10) pour le
pendre, comme indiqué à la reproduction, dans
l'encoche de la poignée du capot.
Remplacement du filtre
Retirer la fiche avant chaque changement de
filtre!
ATTENTION!
Changement du filtre et vidange du bidon
hygiénique.
Pour le vidange du bidon et un changement hygiénique
de tous les systèmes de filtres insérables dans l'appareil
(p. ex. filtre de protection en papier, en mousse, sac
filtre en papier etc.) utiliser les gants d'hygiène joints.
Vous trouverez de gants de rechange dans chaque
magasin spécialisé.
Filtre de protection moteur
H Après chaque aspiration par voie humide et
operation d'extraction à pulvérisation, vérifier si
le filtre de protection moteur (33) est encrassé et,
si nécessaire, le nettoyer. Pour ce faire, ouvrir la
soupape à flotteur (38) dans le sens indiqué par la
flèche et prélever le filtre de protection moteur de
l'orifice d'aspiration. Remettre en place le filtre
nettoyé ou nouveau et ensuite poser la soupape à
flotteur dessus.
20
Sayfa yükleniyor...
Sayfa yükleniyor...
Sayfa yükleniyor...
Sayfa yükleniyor...
Sayfa yükleniyor...
Sayfa yükleniyor...
Sayfa yükleniyor...
Sayfa yükleniyor...
Sayfa yükleniyor...
Sayfa yükleniyor...
Sayfa yükleniyor...
Sayfa yükleniyor...
Sayfa yükleniyor...
Sayfa yükleniyor...
Sayfa yükleniyor...
Sayfa yükleniyor...
Sayfa yükleniyor...
Sayfa yükleniyor...
Sayfa yükleniyor...
Sayfa yükleniyor...
Sayfa yükleniyor...
Sayfa yükleniyor...
Sayfa yükleniyor...
Sayfa yükleniyor...
Sayfa yükleniyor...
Sayfa yükleniyor...
Sayfa yükleniyor...
Sayfa yükleniyor...
Sayfa yükleniyor...
Sayfa yükleniyor...
Sayfa yükleniyor...
Sayfa yükleniyor...
Sayfa yükleniyor...
Sayfa yükleniyor...
Sayfa yükleniyor...
Sayfa yükleniyor...
Sayfa yükleniyor...
Sayfa yükleniyor...
Sayfa yükleniyor...
Sayfa yükleniyor...
Sayfa yükleniyor...
Sayfa yükleniyor...
Sayfa yükleniyor...
Sayfa yükleniyor...
Sayfa yükleniyor...
Sayfa yükleniyor...
-
 1
1
-
 2
2
-
 3
3
-
 4
4
-
 5
5
-
 6
6
-
 7
7
-
 8
8
-
 9
9
-
 10
10
-
 11
11
-
 12
12
-
 13
13
-
 14
14
-
 15
15
-
 16
16
-
 17
17
-
 18
18
-
 19
19
-
 20
20
-
 21
21
-
 22
22
-
 23
23
-
 24
24
-
 25
25
-
 26
26
-
 27
27
-
 28
28
-
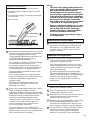 29
29
-
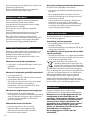 30
30
-
 31
31
-
 32
32
-
 33
33
-
 34
34
-
 35
35
-
 36
36
-
 37
37
-
 38
38
-
 39
39
-
 40
40
-
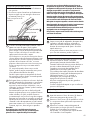 41
41
-
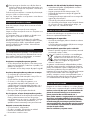 42
42
-
 43
43
-
 44
44
-
 45
45
-
 46
46
-
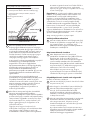 47
47
-
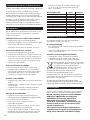 48
48
-
 49
49
-
 50
50
-
 51
51
-
 52
52
-
 53
53
-
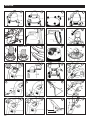 54
54
-
 55
55
-
 56
56
-
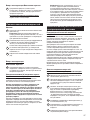 57
57
-
 58
58
-
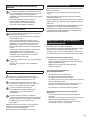 59
59
-
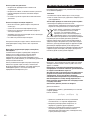 60
60
-
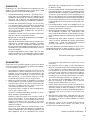 61
61
-
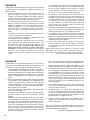 62
62
-
 63
63
-
 64
64
-
 65
65
-
 66
66


Thomas super 30 s El kitabı
- Kategori
- Elektrikli süpürgeler
- Tip
- El kitabı
diğer dillerde
- español: Thomas super 30 s El manual del propietario
- français: Thomas super 30 s Le manuel du propriétaire
- Deutsch: Thomas super 30 s Bedienungsanleitung
- português: Thomas super 30 s Manual do proprietário
- English: Thomas super 30 s Owner's manual
- русский: Thomas super 30 s Инструкция по применению
- Nederlands: Thomas super 30 s de handleiding
İlgili makaleler
Diğer belgeler
-
Philips fc 6844 01 Kullanım kılavuzu
-
Arnica Vira ET12200 Su Filtreli Halı Yıkama Makinesi Kullanım kılavuzu
-
Ryobi EWD-1245 El kitabı
-
-
-
HEISSNER F636-PXC Kullanım kılavuzu
-
EHEIM 5360 El kitabı
-
Kärcher INJECTEUR / EXTRACTEUR SE6100 El kitabı
-
-
AEG NT 1500 A El kitabı