Siemens Built-in microwave oven Kullanım kılavuzu
- Kategori
- Mikrodalgalar
- Tip
- Kullanım kılavuzu


3
Ú Table of contents
[en]Instruction manual
Important safety information.....................................................3
Causes of damage .............................................................................5
Installation and connection.......................................................6
The control panel .......................................................................6
Rotary selector ....................................................................................6
Accessories .........................................................................................6
Before using the appliance for the first time ...........................7
Setting the clock .................................................................................7
The microwave............................................................................7
Notes regarding ovenware................................................................7
Microwave power settings.................................................................7
Setting the microwave........................................................................8
Cooling fan...........................................................................................8
Memory........................................................................................8
Saving memory settings ....................................................................8
Starting the memory...........................................................................8
Changing the signal duration....................................................9
Care and cleaning ......................................................................9
Cleaning agents ..................................................................................9
Malfunction table......................................................................10
After-sales service ...................................................................10
E number and FD number .............................................................10
Technical data .................................................................................. 11
Environmentally-friendly disposal.................................................. 11
Automatic programmes ...........................................................11
Setting a programme ......................................................................11
Defrosting using the automatic programmes............................. 11
Cooking with the automatic programmes................................... 12
Tested for you in our cooking studio .....................................12
Information regarding the tables...................................................12
Defrost................................................................................................ 12
Defrosting, heating up or cooking frozen food .......................... 13
Heating food ..................................................................................... 13
Cooking food....................................................................................14
Microwave tips.................................................................................. 14
Test dishes in accordance with EN 60705 .............................15
Cooking and defrosting with microwave.....................................15
Produktinfo
Additional information on products, accessories, replacement
parts and services can be found at www.siemens-home.bsh-
group.com and in the online shop www.siemens-home.bsh-
group.com/eshops
: Important safety information
Read these instructions carefully. Only then
will you be able to operate your appliance
safely and correctly. Retain the instruction
manual and installation instructions for
future use or for subsequent owners.
This appliance is only intended to be fully
fitted in a kitchen. Observe the special
installation instructions.
Check the appliance for damage after
unpacking it. Do not connect the appliance
if it has been damaged in transport.
Only a licensed professional may connect
appliances without plugs. Damage caused
by incorrect connection is not covered
under warranty.
This appliance is intended for domestic use
only. The appliance must only be used for
the preparation of food and drink. The
appliance must be supervised during
operation. Only use this appliance indoors.
This appliance is intended for use up to a
maximum height of 4000 metres above sea
level.
This appliance may be used by children
over the age of 8 years old and by persons
with reduced physical, sensory or mental
capabilities or by persons with a lack of
experience or knowledge if they are
supervised or are instructed by a person
responsible for their safety how to use the
appliance safely and have understood the
associated hazards.
Children must not play with, on, or around
the appliance. Children must not clean the
appliance or carry out general maintenance
unless they are at least 8 years old and are
being supervised.
Keep children below the age of 8 years old
at a safe distance from the appliance and
power cable.
Always insert the accessories into the
cooking compartment correctly. See
"Description of accessories in the
instruction manual.
Risk of fire!
■
The appliance becomes very hot. If the
appliance is installed in a fitted unit with a
decorative door, heat will accumulate
when the decorative door is closed. Only
operate the appliance when the decorative
door is open.
Risk of fire!
■
Combustible items stored in the cooking
compartment may catch fire. Never store
combustible items in the cooking

4
compartment. Never open the appliance
door if there is smoke inside. Switch off
the appliance and unplug it from the
mains or switch off the circuit breaker in
the fuse box.
Risk of fire!
■
Using the appliance for anything other
than its intended purpose is dangerous
and may cause damage.
The following is not permitted: drying out
food or clothing, heating slippers, grain or
cereal pillows, sponges, damp cleaning
cloths or similar.
For example, heated slippers and grain or
cereal pillows may catch fire, even several
hours after they have been heated.The
appliance must only be used for the
preparation of food and drinks.
Risk of fire!
■
Food may catch fire. Never heat food in
heat-retaining packages.
Do not leave food heating unattended in
containers made of plastic, paper or other
combustible materials.
Do not select a microwave power or time
setting that is higher than necessary.
Follow the information provided in this
instruction manual.
Never use the microwave to dry food.
Never defrost or heat food with a low
water content, e.g. bread, at too high a
microwave power or for too long.
Risk of fire!
■
Cooking oil may catch fire. Never use the
microwave to heat cooking oil on its own.
Risk of explosion!
Liquids and other food may explode when
in containers that have been tightly sealed.
Never heat liquids or other food in
containers that have been tightly sealed.
Risk of serious damage to health!
■
The surface of the appliance may become
damaged if it is not cleaned properly.
Microwave energy may escape. Clean the
appliance on a regular basis, and remove
any food residue immediately. Always
keep the cooking compartment, door seal,
door and door stop clean; see also
section Care and cleaning.
Risk of serious damage to health!
■
Microwave energy may escape if the
cooking compartment door or the door
seal is damaged. Never use the appliance
if the cooking compartment door or the
door seal is damaged. Contact the after-
sales service.
Risk of serious damage to health!
■
Microwave energy will escape from
appliances that do not have any casing.
Never remove the casing. For any
maintenance or repair work, contact the
after-sales service.
Risk of electric shock!
■
Incorrect repairs are dangerous. Repairs
may only be carried out and damaged
power cables replaced by one of our
trained after-sales technicians. If the
appliance is defective, unplug the
appliance from the mains or switch off the
circuit breaker in the fuse box. Contact the
after-sales service.
Risk of electric shock and serious injury!
■
The cable insulation on electrical
appliances may melt when touching hot
parts of the appliance. Never bring
electrical appliance cables into contact
with hot parts of the appliance.
Risk of electric shock!
■
Do not use any high-pressure cleaners or
steam cleaners, which can result in an
electric shock.
Risk of electric shock!
■
Penetrating moisture may cause electric
shock. Never subject the appliance to
intense heat or humidity. Only use this
appliance indoors.
Risk of electric shock!
■
A defective appliance may cause electric
shock. Never switch on a defective
appliance. Unplug the appliance from the
mains or switch off the circuit breaker in
the fuse box. Contact the after-sales
service.
Risk of electric shock!
■
The appliance is a high-voltage appliance.
Never remove the casing.
Risk of burns!
■
The appliance becomes very hot. Never
touch the interior surfaces of the cooking
compartment or the heating elements.
Always allow the appliance to cool down.
Keep children at a safe distance.
Risk of serious burns!
■
Accessories and ovenware become very
hot. Always use oven gloves to remove
accessories or ovenware from the cooking
compartment.
Risk of burns!
■
Alcoholic vapours may catch fire in the hot
cooking compartment. Never prepare food
containing large quantities of drinks with a
high alcohol content. Only use small
quantities of drinks with a high alcohol
content. Open the appliance door with
care.
Risk of burns!
■
Foods with peel or skin may burst or
explode during, or even after, heating.
Never cook eggs in their shells or reheat
hard-boiled eggs. Never cook shellfish or
crustaceans. Always prick the yolk when
baking or poaching eggs. The skin of

5
foods that have a peel or skin, such as
apples, tomatoes, potatoes and sausages,
may burst. Before heating, prick the peel
or skin.
Risk of burns!
■
Heat is not distributed evenly through
baby food. Never heat baby food in closed
containers. Always remove the lid or teat.
Stir or shake well after the food has been
heated. Check the temperature of the food
before it is given to the child.
Risk of burns!
■
Heated food gives off heat. The ovenware
may become hot. Always use oven gloves
to remove ovenware or accessories from
the cooking compartment.
Risk of burns!
■
Airtight packaging may burst when food is
heated. Always observe the instructions
on the packaging. Always use oven gloves
to remove dishes from the cooking
compartment.
Risk of scalding!
■
When you open the appliance door, hot
steam may escape. Open the appliance
door with care. Keep children at a safe
distance.
Risk of scalding!
■
Water in a hot cooking compartment may
create hot steam. Never pour water into
the hot cooking compartment.
Risk of scalding!
■
There is a possibility of delayed boiling
when a liquid is heated. This means that
the liquid reaches boiling temperature
without the usual steam bubbles rising to
the surface. Even if the container only
vibrates a little, the hot liquid may
suddenly boil over and spatter. When
heating, always place a spoon in the
container. This will prevent delayed
boiling.
Risk of injury!
■
Scratched glass in the appliance door
may develop into a crack. Do not use a
glass scraper, sharp or abrasive cleaning
aids or detergents.
Risk of injury!
■
Unsuitable ovenware may crack. Porcelain
or ceramic ovenware can have small
perforations in the handles or lids. These
perforations conceal a cavity below. Any
moisture that penetrates this cavity could
cause the ovenware to crack. Only use
microwave-safe ovenware.
Risk of injury!
■
If using the appliance in microwave mode
only, placing cookware and containers
made of metal inside the appliance may
cause sparks when the appliance is
operating. This will damage the appliance.
Never use metal containers when using
the appliance in microwave mode only.
Causes of damage
Caution!
■ Heavily soiled seal: If the seal is very dirty, the appliance door
will no longer close properly during operation. The fronts of
adjacent units could be damaged. Always keep the seal
clean.
■ Operating the microwave without food: Operating the
appliance without food in the cooking compartment may lead
to overloading. Never switch on the appliance unless there is
food in the cooking compartment. An exception to this rule is
a short crockery test (see the section "Microwave, suitable
crockery").
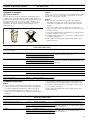
■ Microwave popcorn: Never set the microwave power too
high. Use a power setting no higher than 600 watts. Always
place the popcorn bag on a glass plate. The disc may jump if
overloaded.
■ Liquid that has boiled over must not be allowed to run
through the turntable drive into the interior of the appliance.
Monitor the cooking process. Choose a shorter cooking time
initially, and increase the cooking time as required.
■ Never use the microwave oven without the turntable.
■ Creation of sparks: Metal e.g. a spoon in a glass must be
kept at least 2 cm from the oven walls and the inside of the
door. Sparks could irreparably damage the glass on the
inside of the door.
■ Foil containers: Do not use foil containers in the appliance.
They damage the appliance by producing sparks.
■ Cooling with the appliance door open: Only leave the
cooking compartment to cool with the door closed. Do not
trap anything in the appliance door. Even if the door is only
slightly ajar, the fronts of adjacent units may be damaged
over time.
■ Condensation in the cooking compartment: Condensation
may appear on the door window, interior walls and floor. This
is normal and does not adversely affect microwave operation.
To prevent corrosion, wipe off the condensation every time
you cook.

6
Installation and connection
This appliance is intended for domestic use only.
This appliance is only intended to be fully fitted in a kitchen.
Please observe the special installation instructions.
The appliance is fitted with a plug and must only be connected
to a properly-installed earthed socket. The fuse protection must
be rated at 10 amperes (L or B circuit breakers). The mains
voltage must correspond to the voltage specified on the rating
plate.
The socket must be installed and the power cable replaced by
a qualified electrician only. If the plug is no longer accessible
following installation, an all-pin disconnecting device must be
present on the installation side, with a contact gap of at least
3 mm.
Multiple plugs, plug bars and extension leads must not be
used. Overloading can result in a risk of fire.
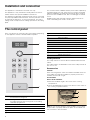
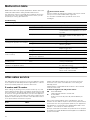
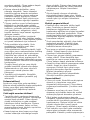
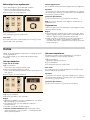
The control panel
Here, you will see an overview of the control panel. Depending
on the appliance model, individual details may differ.
Rotary selector
The rotary selector is used to alter the default values and set
values.
The rotary selector is retractable. Press on the rotary selector to
lock it in or out.
Accessories
Caution!
When removing dishes, make sure that the turntable does not
move. Make sure that the turntable is properly locked. The
turntable can turn left or right.
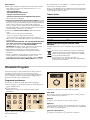
The turntable
How to fit the turntable:
1. Place the turntable ring a in the recess in the cooking
compartment.
2. Let the turntable b slot in place in the drive c in the centre of
the cooking compartment floor.
Note: Do not use the appliance if the turntable is not in place.
Ensure that it is properly slotted into place. The turntable can
turn clockwise or anti-clockwise.
1 Display
for clock and cooking time
2 Rotary selector
for setting the time and cooking time or for setting
automatic programmes
3 Buttons
4 Door opener
Buttons Use
¹
Starts operation
»
Sets the clock
º
Stops operation
90 Selects 90 watt microwave power
180 Selects 180 watt microwave power
360 Selects 360 watt microwave power
600 Selects 600 watt microwave power
900 Selects 900 watt microwave power
¼
Selects the kilogrammes for the programmes
X
Selects automatic programmes
l
Selects the memory
Buttons Use
E
D
F

7
Special accessories
You can purchase special accessories from the after-sales
service or specialist retailers. Please specify the HZ number.
You will find a comprehensive range of products in our
brochures and on the Internet. The availability of special
accessories and whether it is possible to order them online
may vary depending on your country. Please see the sales
brochures for more details.
Before using the appliance for the first time
Here you will find everything you need to do before using the
microwave to prepare food for the first time. First read the
section on Safety information.
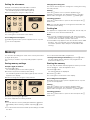
Setting the clock
When the appliance is first connected or after a power cut,
three zeros will appear in the display panel.
1. Press the » button.
‚ƒ:‹‹œ appears in the display and the indicator lamp above
the
» button lights up.
2. Set the clock using the rotary selector.
3. Press the » button again.
The current time is set.
Hiding the clock
Press the
» button and then press the º button.
The display is blank.
Resetting the clock
Press the
» button.
The time
‚ƒ:‹‹. appears in the display. Then make the settings
as described in steps 2 and 3.
Change the clock, e.g. from summer to winter time
Set as described in point 1 to 3.
The microwave
Microwaves are converted to heat in foodstuffs. You will find
information about ovenware and how to set the microwave.
Note: In the Tested for you in our cooking studio section, you
will find examples for defrosting, heating and cooking with the
microwave oven.
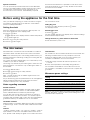
Try out the microwave straight away. You could heat up a cup
of water for your tea, for example.
Use a large cup without any decorative gold or silver trim and
place a teaspoon in it. Place the cup containing the water on
the turntable.
1. Press the 900 W button.
2. Set‚:„‹ minutes using the rotary selector.
3. Press the ¹ button.
After 1 minute 30 seconds, an audible signal sounds. The
water for the tea is hot.
As you are drinking your tea, please take time to read again the
safety precautions that can be found at the front of the
instruction manual. This is very important.
Notes regarding ovenware
Suitable ovenware
Suitable dishes are heat-resistant ovenware made of glass,
glass ceramic, porcelain, ceramic or heat-resistant plastic.
These materials allow microwaves to pass through.
You can also use serving dishes. This saves you having to
transfer food from one dish to another. You should only use
ovenware with decorative gold or silver trim if the manufacturer
guarantees that they are suitable for use in microwaves.
Unsuitable ovenware
Metal ovenware is unsuitable. Metal does not allow microwaves
to pass through. Food in covered metal containers will remain
cold.
Caution!
Creation of sparks: metal – e.g. a spoon in a glass – must be
kept at least 2 cm from the oven walls and the inside of the
door. Sparks could destroy the glass on the inside of the door.
Ovenware test
Do not switch on the microwave unless there is food inside. The
following ovenware test is the only exception to this rule.
Perform the following test if you are unsure whether your
ovenware is suitable for use in the microwave:
1. Heat the empty ovenware at maximum power for ½ to
1 minute.
2. Check the temperature occasionally during that time.
The ovenware should still be cold or warm to the touch.
The ovenware is unsuitable if it becomes hot or sparks are
generated.
Microwave power settings
Note: You can set the 900 W microwave power setting for 30
minutes, 600 W for 1 hour, the other power settings for 1 hour
and 39 minutes respectively.
Steamer ovenware HZ 86 D 000
Microwave power
setting
Suitable for
90 W Defrosting delicate foods
180 W Defrosting and continued cooking
360 W Cooking meat and heating delicate foods
600 W Heating and cooking food
900 W Heating liquids

8
Setting the microwave
Example: microwave power 600 watts, 5 minutes
1. Press the required microwave power setting.
The indicator light above the button lights up.
2. Set a cooking time using the rotary selector.
3. Press the ¹ button.
The cooking time counts down in the display.
The cooking time has elapsed
An audible signal sounds. Open the appliance door or press
º. The clock reappears.
Changing the cooking time
This can be done at any time. Change the cooking time using
the rotary selector.
Pausing
Press the
º button once or open the appliance door.
Operation is suspended. The display above the
¹ button
flashes. After closing the door, press the
¹ button again.
Cancelling operation
Press the
º button twice or open the door and press the º
button once.
Note: You can also adjust the cooking time first and then the
microwave power setting.
Cooling fan
The appliance is equipped with a cooling fan. The fan may run
on even if the oven has been switched off.
Notes
■ The cooking compartment remains cold during microwave
operation. The cooling fan will still switch on. The fan may run
on even when microwave operation has ended.
■ Condensation may appear on the door window, interior walls
and floor. This is normal and does not adversely affect
microwave operation. Wipe away the condensation after
cooking.
Memory
You can save the settings for a dish in the memory and call it
up again at any time.
The memory is useful for if you frequently prepare a specific
dish.
Saving memory settings
Example: 360 W, 25 minutes
1. Press the l button.
The indicator light above the button lights up.
2. Press the required microwave power setting.
The indicator light above the button lights up and 1:00 min
appears in the display.
3. Set the cooking time using the rotary selector.
4. Confirm by pressing the l button.
The clock reappears. The setting is saved.
Notes
■ You can save the memory settings and start the appliance
immediately. When finishing, instead of pressing
l, press
¹.
■ You cannot save several microwave power settings one after
the other.
■ You cannot save automatic programmes.
■ Saving a new setting in the memory: press the l button.
The old settings appear. Save the new programme as
described in steps 1 to 4.
Starting the memory
It is very easy to start the saved programme. Place your meal
into the appliance. Close the appliance door.
1. Press the l button.
The saved settings are displayed.
2. Press the ¹ button.
The cooking time counts down in the display.
The cooking time has elapsed
An audible signal sounds. Open the appliance door or press
º. The clock reappears.
Pausing
Press the
º button once or open the appliance door.
Operation is suspended. The display above the
¹ button
flashes. After closing the door, press the
¹ button again.
Cancelling operation
Press the
º button twice or open the door and press the º
button once.
PLQ
NJ
PLQ
PLQ
NJ
PLQ

9
Changing the signal duration
You will hear an audible signal when the appliance is switched
off. You can change the duration of the signal.
To do so, press the
¹ button for approx. 6 seconds.
The new signal duration is adopted.
The clock reappears.
The following are possible:
Short signal duration - 3 tones
Long signal duration - 30 tones.
Care and cleaning
With careful care and cleaning your microwave oven will retain
its looks and remain good order. We will explain here how you
should care for and clean your appliance correctly.
: Risk of short circuit!
Never use high-pressure cleaners or steam cleaners to clean
the oven.
: Risk of burns!
Never clean the appliance immediately after switching off. Let
the appliance cool down.
: Risk of electric shock!
Do not immerse the appliance in water or clean under a jet of
water.
Surfaces are different, and damage caused by using the wrong
cleaning agent can be avoided by observing the information in
the table below.
Do not use
■ sharp or abrasive cleaning agents.
The surface could be damaged. If such a substance comes
into contact with the front of the appliance, wash it off
immediately with water.
■ metal or glass scrapers to clean the glass in the appliance
door.
■ metal or glass scrapers for cleaning the seal.
■ hard scouring pads or cleaning sponges.
Wash new sponge cloths thoroughly before use.
■ cleaning agents with high concentrations of alcohol.
Cleaning agents
Caution!
Before cleaning, unplug the appliance from the mains or switch
off the circuit breaker in the fuse box. Clean the outside of the
appliance and the cooking compartment with a damp cloth and
mild detergent. Dry with a clean cloth.
Area Cleaning agents
Appliance front Hot soapy water:
Clean with a dish cloth and dry with a
soft cloth. Do not use glass cleaners or
metal or glass scrapers for cleaning.
Appliance front with
stainless steel
Hot soapy water:
Clean with a dish cloth and dry with a
soft cloth. Remove flecks of limescale,
grease, starch and albumin (e.g. egg
white) immediately. Corrosion can form
under such residues. Special stainless
steel cleaning agents can be obtained
from the after-sales service or from spe-
cialist shops. Do not use glass cleaners
or metal or glass scrapers for cleaning.
Cooking compart-
ment made of stain-
less steel
Hot soapy water or a vinegar solution:
Clean with a dish cloth and dry with a
soft cloth.
If the oven is very dirty: use oven
cleaner, but only when cooking com-
partment is cold. It is best to use a stain-
less-steel sponge. Do not use oven
spray or other aggressive oven cleaners
or abrasive materials. Scouring pads,
rough sponges and pan cleaners are
also unsuitable. These items scratch the
surface. Allow the interior surfaces to
dry thoroughly.
Recess in cooking
compartment
Damp cloth:
Ensure that no water seeps through the
turntable drive into the appliance inte-
rior.
Turntable and turnta-
ble ring
Hot soapy water:
When putting the turntable back in
place, make sure it slots in correctly.
Door panels Glass cleaner:
Clean with a dish cloth. Do not use a
glass scraper.
Seal Hot soapy water:
Clean with a dish cloth, do not scour. Do
not use a metal or glass scraper for
cleaning.
Area Cleaning agents

10
Malfunction table
Malfunctions often have simple explanations. Please refer to the
malfunction table before calling the after-sales service.
If a meal does not turn out exactly as you wanted, refer to the
Tested for you in our cooking studio section, where you will
find plenty of cooking tips and tricks.
: Risk of electric shock!
Incorrect repairs are dangerous. Repairs may only be carried
out by one of our trained after-sales engineers.
You can take remedial action yourself for some error
messages.
Troubleshooting
After-sales service
Our after-sales service is there for you if your appliance needs
to be repaired. We will always find the right solution in order to
avoid unnecessary visits from a service technician.
E number and FD number
When calling us, please give the product number (E no.) and
the production number (FD no.) so that we can provide you with
the correct advice. The rating plate bearing these numbers can
be found on the right-hand side when you open the appliance
door. To save time, you can make a note of the number of your
appliance and the telephone number of the after-sales service
in the space below, should it be required.
Please note that there will be a fee for a visit by a service
technician in the event of a malfunction, even during the
warranty period.
Please find the contact data of all countries in the enclosed
customer service list.
To book an engineer visit and product advice
Rely on the professionalism of the manufacturer. You can
therefore be sure that the repair is carried out by trained service
technicians who carry original spare parts for your appliances.
This appliance corresponds to the standards EN 55011 and
CISPR 11. It is a Group 2, Class B product.
Group 2 means that microwaves are produced for the purpose
of heating food. Class B states that the appliance is suitable for
private households.
Error message Possible cause Remedy/note
The appliance does not work The plug is not plugged in. Plug the plug in
Power failure Check whether the kitchen light works.
Faulty circuit breaker Look in the fuse box to make sure that the
circuit breaker for the appliance is in work-
ing order.
Faulty operation Switch off the circuit breaker in the fuse
box. Switch it back on after approx. 10
seconds.
Three zeros light up in the display. Power failure Reset the time.
The appliance is not in operation. A
cooking time appears in the display.
The rotary selector was actuated accidentally.
Press the
º button.
The
¹ button was not pressed after setting. Press the ¹ button or cancel the setting
with the
º button.
The microwave does not work. The door was not fully closed. Check whether food residue or debris is
trapped in the door.
The
¹ button was not pressed. Press the ¹ button.
It takes longer than before for the
food to heat up
The microwave power level setting was too low. Select a higher microwave power setting.
A larger amount of food than usual has been
placed in the appliance.
Double the amount – double the time.
The food was colder than usual. Stir or turn the food during cooking.
The turntable makes a scratching or
grinding noise.
Dirt or debris in the area around the turntable
drive.
Clean the roller ring and the recess in the
cooking compartment.
Microwave operation has been can-
celled for no apparent reason.
The microwave has a fault. If this fault occurs repeatedly, please call
the after-sales service.
"M" appears in the display. The appliance is in demo mode.
Press and hold the
¹ button and the º
button for approx. 7 seconds.
Demo mode is deactivated.
E no.
FD no.
After-sales service
O
GB 0344 892 8999
Calls charged at local or mobile rate.
IE 01450 2655
0.03 € per minute at peak. Off peak 0.0088 € per
minute.

11
Technical data
Environmentally-friendly disposal
Dispose of packaging in an environmentally-friendly manner.
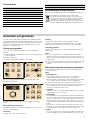
Automatic programmes
You can use the automatic programmes to defrost food with
the greatest of ease and prepare dishes quickly and easily. You
select the programme and enter the weight of your food. The
automatic programme makes the optimum setting. You can
select from 7 programmes.
Setting a programme
Once you have selected a programme, make settings as
follows:
1. Press the X button repeatedly until the required programme
number appears.
2. Press the ¼ button.
"P" and a default weight appear in the display.
3. Turn the rotary selector to specify the weight of the dish.
4. Press the ¹ button.
You will see the cooking time for the programme counting
down.
The cooking time has elapsed
An audible signal sounds. Open the appliance door or press
º. The clock reappears.
Correction
Press the
º button twice and reset.
Pausing
Press the
º button once or open the appliance door.
Operation is suspended. The display above the
¹ button
flashes. After closing the door, press the
¹ button again.
Cancelling operation
Press the
º button twice or open the door and press the º
button once.
Notes
■ For some programmes, an audible signal sounds after a
certain time. Open the appliance door and stir the food or
turn the meat or poultry. After closing the door, press the
¹
button again.
■ You can query the programme number and weight using X
or
¼. The queried value is shown for 3 seconds in the
display.
Defrosting using the automatic programmes
You can use the 4 defrosting programmes to defrost meat,
poultry and bread.
Notes
■ Preparing food
Use food that has been frozen at -18 °C and stored in
portion-sized quantities that are as thin as possible.
Take the food to be defrosted out of all packaging and weigh
it. You need to know the weight to set the programme.
■ Liquid will be produced when defrosting meat or poultry.
Drain off this liquid when turning meat and poultry and under
no circumstances use it for other purposes or allow it to
come into contact with other foods.
■ Ovenware
Place the food in a microwaveable shallow dish, e.g. a china
or glass plate, but do not cover.
■ Resting time
The defrosted food should be left to stand for an additional
10 to 30 minutes until it reaches an even temperature. Large
pieces of meat require a longer standing time than smaller
pieces. Flat pieces of meat and items made from minced
meat should be separated from each other before leaving to
stand.
After this time, you can continue to prepare the food, even
though thick pieces of meat may still be frozen in the middle.
The giblets can be removed from poultry at this point.
■ Signal
For some programmes, a signal sounds after a certain time.
Open the appliance door and separate the food out or turn
Input voltage AC 220 - 230 V 50 Hz
Power consumption 1450 W
Maximum output power 900 W
Microwave frequency 2450 MHz
Fuse 10 A
Dimensions (HxWxD)
appliance 382 x 594 x 388 mm
cooking compartment 208 x 328 x 369 mm
VDE approved yes
CE mark yes
This appliance is labelled in accordance with
European Directive 2012/19/EU concerning used
electrical and electronic appliances (waste electrical
and electronic equipment - WEEE). The guideline
determines the framework for the return and recycling
of used appliances as applicable throughout the EU.
PLQ
PLQ
NJ
NJ

12
the meat or poultry. Close the door and press the Start
button.
Cooking with the automatic programmes
With the 3 cooking programmes, you can cook rice, potatoes
or vegetables.
Notes
■ Ovenware
The food must be cooked in microwaveable cookware with a
lid. For rice, you should use a large, deep dish.
■ Preparing food
Weigh out the food. You need to know the weight to set the
programme.
Rice:
Do not use boil-in-the-bag rice. Add the required amount of
water, as specified on the packaging. This is usually two or
three times the quantity of rice.
Potatoes:
For boiled potatoes, cut the fresh potatoes into small, even-
sized pieces. Add one tablespoon of water for each 100 g
boiled potatoes, and a little salt.
Fresh vegetables:
Weigh out the fresh, trimmed vegetables. Cut the vegetables
into small, even-sized pieces. Add a tbsp water for each
100 g vegetables.
■ Signal
While the programme is running, a signal sounds after some
time. Stir the food.
■ Resting time
Once the programme has finished, stir the food again. You
should leave it to stand for another 5 to 10 minutes until it
reaches an even temperature.
The cooking result will depend on the quality and consistency
of the food.
Tested for you in our cooking studio
Here you will find a selection of recipes and the ideal settings
for them. We show you which microwave power setting is best
suited to your dish. There are also tips about ovenware and
preparation methods.
Information regarding the tables
The following tables provide you with numerous options and
settings for the microwave.
The times specified in the tables are only guidelines. They may
vary according to the ovenware used, the quality, temperature
and consistency of the food.
Time ranges are often specified in the tables. Set the shortest
time first and then extend the time if necessary.
It may be that you have different quantities from those specified
in the tables. A rule of thumb can be applied:
Double the amount - almost twice the cooking time
Half the amount - half the cooking time.
Always place the ovenware on the turntable.
Defrost
Notes
■ Place the frozen food in an open container on the turntable.
■ Delicate parts such as the legs and wings of chicken or fatty
outer layers of roasts can be covered with small pieces of
aluminium foil. The foil must not touch the oven walls. You
can remove the foil half way through the defrosting time.
■ Liquid will be produced when defrosting meat or poultry.
Drain off this liquid when turning meat and poultry and under
no circumstances use it for other purposes or allow it to
come into contact with other foods.
■ Turn or stir the food once or twice during the defrosting time.
Large pieces of food should be turned several times.
■ Leave defrosted items to stand at room temperature for a
further 10 to 20 minutes so that the temperature is even
throughout. The giblets can be removed from poultry at this
point. The meat can still be further prepared, even if it has a
small frozen core.
Programme no. Weight range in kg
Defrost
P 01 Minced meat 0.20 - 1.00
P 02 Pieces of meat 0.20 - 1.00
P 03
Chicken, chicken
pieces
0.40 - 1.80
P 04 Bread 0.20 - 1.00
Programme no. Weight range in kg
Cooking
P 05 Rice 0.05 - 0.2
P 06 Potatoes 0.15 - 1.0
P 07 Vegetables 0.15 - 1.0
Defrost Weight Microwave power setting in watts,
cooking time in minutes
Notes
Whole pieces of meat (beef, veal or
pork - on the bone or boned)
800 g 180 W, 15 mins + 90 W, 10-20 mins -
1 kg 180 W, 20 mins + 90 W, 15-25 mins
1.5 kg 180 W, 30 mins + 90 W, 20-30 mins
Meat in pieces or slices of beef,
veal or pork
200 g 180 W, 2 mins + 90 W, 4-6 mins Separate any defrosted parts when
turning
500 g 180 W, 5 mins + 90 W, 5-10 mins
800 g 180 W, 8 mins + 90 W, 10-15 mins
Minced meat, mixed 200 g 90 W, 10 mins Freeze food flat if possible
Turn several times, remove any
defrosted meat
500 g 180 W, 5 mins + 90 W, 10-15 mins
800 g 180 W, 8 mins + 90 W, 10-20 mins
Poultry or poultry portions 600 g 180 W, 8 mins + 90 W, 10-15 mins -
1.2 kg 180 W, 15 mins + 90 W, 20-25 mins
Fish fillet, fish steak or slices 400 g 180 W, 5 mins + 90 W, 10-15 mins Separate any defrosted parts

13
Defrosting, heating up or cooking frozen food
Notes
■ Take ready meals out of the packaging. They will heat up
more quickly and evenly in microwaveable ovenware. The
different components of the meal may not require the same
amount of time to heat up .
■ Food which lies flat will cook more quickly than food which is
piled high. You should therefore distribute the food so that it
is as flat as possible in the ovenware. Different foodstuffs
should not be placed in layers on top of one another.
■ Always cover the food. If you do not have a suitable cover for
your ovenware, use a plate or special microwave foil.
■ Stir or turn the food 2 or 3 times during cooking.
■ After heating, allow the food to stand for a further 2 to
5 minutes so that it can achieve an even temperature.
■ Always use an oven cloth or oven gloves when removing
plates from the oven.
■ This will help the food retain its own distinct taste, so it will
require less seasoning.
Heating food
: Risk of scalding!
There is a possibility of delayed boiling when a liquid is heated.
This means that the liquid reaches boiling temperature without
the usual steam bubbles rising to the surface. Even if the
container only moves a little, the hot liquid can suddenly boil
over and spatter. When heating liquids, always place a spoon in
the container. This will prevent delayed boiling.
Caution!
Metal e.g. a spoon in a glass must be kept at least 2 cm
from the oven walls and the inside of the door. Sparks could
irreparably damage the glass on the inside of the door.
Notes
■ Take ready meals out of the packaging. They will heat up
more quickly and evenly in microwaveable ovenware. The
different components of the meal may not require the same
amount of time to heat up .
■ Always cover the food. If you do not have a suitable cover for
your container, use a plate or special microwave foil.
■ Stir or turn the food several times during the heating time.
Check the temperature.
■ After heating, allow the food to stand for a further 2 to
5 minutes so that it can achieve an even temperature.
■ Always use an oven cloth or oven gloves when removing
plates from the oven.
Vegetables, e.g. peas 300 g 180 W, 10-15 mins -
Fruit, e.g. raspberries 300 g 180 W, 710 mins Stir carefully during defrosting and
separate any defrosted parts
500 g 180 W, 8 mins + 90 W, 5-10 mins
Butter, defrosting 125 g 180 W, 1 min. + 90 W, 2-3 mins Remove all packaging
250 g 180 W, 1 min + 90 W, 3-4 mins
Loaf of bread 500 g 180 W, 6 mins + 90 W, 5-10 mins -
1 kg 180 W, 12 mins + 90 W, 10-20 mins
Cakes, dry, e.g. sponge cake 500 g 90 W, 10-15 mins Only for cakes without icing, cream or
crème pâtissière, separate the pieces
of cake
750 g 180 W, 5 mins + 90 W, 10-15 mins
Cakes, moist, e.g. fruit flan, cheese-
cake
500 g 180 W, 5 mins + 90 W, 15-20 mins Only for cakes without icing, cream or
gelatine
750 g 180 W, 7 mins + 90 W, 15-20 mins
Defrost Weight Microwave power setting in watts,
cooking time in minutes
Notes
Defrosting, heating up or cooking fro-
zen food
Weight Microwave power setting in
watts, cooking time in minutes
Notes
Menu, plated meal, ready meal
(2-3 components)
300-400 g 600 W, 8-11 mins -
Soup 400 g 600 W, 8-10 mins -
Stews 500 g 600 W, 10-13 mins -
Slices or pieces of meat in sauce, e.g.
goulash
500 g 600 W, 12-17 mins Separate the pieces of meat when stir-
ring
Fish, e.g. fillet steaks 400 g 600 W, 10-15 mins Add water, lemon juice or wine as
desired
Bakes, e.g. lasagne, cannelloni 450 g 600 W, 1015 mins -
Side dishes, e.g. rice, pasta 250 g 600 W, 2-5 mins Add a little liquid
500 g 600 W, 8-10 mins
Vegetables, e.g. peas, broccoli, carrots 300 g 600 W, 8-10 mins Pour water into the dish so that it cov-
ers the base
600 g 600 W, 14-17 mins
Creamed spinach 450 g 600 W, 11-16 mins Cook without additional water

14
Cooking food
Notes
■ Food which lies flat will cook more quickly than food which is
piled high. You should therefore distribute the food so that it
is as flat as possible in the ovenware. Different foodstuffs
should not be placed in layers on top of one another.
■ Cook the food in ovenware with a lid. If you do not have a
suitable lid for your ovenware, use a plate or special
microwave foil.
■ This will help the food retain its own distinct taste, so it will
require less seasoning.
■ After cooking, allow the food to stand for a further 2 to
5 minutes so that it can achieve an even temperature.
■ Always use an oven cloth or oven gloves when removing
plates from the oven.
Microwave tips
Heating food Weight Microwave power setting in
watts, cooking time in minutes
Notes
Menu, plated meal, ready meal
(2-3 components)
350-500 g 600 W, 4-8 mins -
Drinks 150 ml 900 W, 1-2 mins Place a spoon in the glass; do not overheat
alcoholic drinks; check during heating
300 ml 900 W, 3-3 mins
500 ml 900 W, 3-4 mins
Baby food, e.g. baby bottle 50 ml 360 W, approx. ½ min No teats or lids. Always shake well after heat-
ing. You must check the temperature
100 ml 360 W, approx. 1 min
200 ml
360 W, 1
^ min
Soup 1 cup 200 g 600 W, 2-3 mins -
Soup, 2 cups 400 g 600 W, 4-5 mins -
Meat in sauce 500 g 600 W, 8-11 mins Separate the slices of meat
Stew 400 g 600 W, 6-8 mins -
800 g 600 W, 8-11 mins -
Vegetables, 1 portion 150 g 600 W, 2-3 mins add a little liquid
Vegetables, 2 portions 300 g 600 W, 3-5 mins
Cooking food Weight Microwave power setting in
watts, cooking time in minutes
Notes
Meat loaf 750 g 600 W, 20-25 mins Cook uncovered
Whole chicken, fresh, no giblets 1.2 kg 600 W, 25-30 mins Turn halfway through the cooking time
Fresh vegetables 250 g 600 W, 5-10 mins Cut vegetables into pieces of equal size.
Add 1 to 2 tbsp water per 100 g of vegetables.
Stir during cooking
500 g 600 W, 10-15 mins
Potatoes 250 g 600 W, 8-10 mins Cut potatoes into pieces of equal size;
Add 1 to 2 tbsp water for every 100 g.
Stir during cooking
500 g 600 W, 11-14 mins
750 g 600 W, 15-22 mins
Rice 125 g 900 W, 5-7 mins +
180 W, 12-15 mins
Add double the quantity of liquid.
250 g 900 W, 6-8 mins +
180 W, 15-18 mins
Sweet foods, e.g. blancmange
(instant)
500 ml 600 W, 6-8 mins Stir the custard pudding thoroughly 2 to
3 times during cooking using an egg whisk.
Fruit, compote 500 g 600 W, 9-12 mins -
You cannot find any information about the settings for the
quantity of food you have prepared.
Increase or reduce the cooking times using the following rule of
thumb:
Double the amount = almost double the cooking time
Half the amount = half the cooking time
The food has become too dry. Next time, set a shorter cooking time or select a lower microwave
power setting. Cover the food and add more liquid.
When the time has elapsed, the food is not defrosted, hot or
cooked.
Set a longer time. Large quantities and food which is piled high
require longer times.
When the time has elapsed, the food is overheated at the
edge but not done in the middle.
Stir it during the cooking time and next time, select a lower micro-
wave power setting and a longer cooking time.
After defrosting, the poultry or meat is defrosted on the out-
side but not defrosted in the middle.
Next time, select a lower microwave power setting. If you are
defrosting a large quantity, turn it several times.

15
Condensation
Condensation may appear on the door window, interior walls
and floor. This is normal. This does not affect how the
microwave operates. Wipe away the condensation after
cooking.
Test dishes in accordance with EN 60705
The quality and correct operation of microwave appliances are
tested by testing institutes using these dishes.
In accordance with EN 60705, IEC 60705, DIN 44547 and
EN 60350 (2009)
Cooking and defrosting with microwave
Microwave cooking
Microwave defrosting
Dish Microwave setting (watts) nd cooking time in minutes Notes
Custard, 565 g 180 watts, 25-30 mins + 90 watts, 20-25 mins Place the 20 x 17 cm Pyrex dish on the turntable.
Sponge 600 watts, 8-10 mins Place the Ø 22 cm Pyrex dish on the turntable.
Meatloaf 600 watts, 20-25 mins Place the Pyrex dish on the turntable.
Dish Microwave setting (watts) nd cooking time in minutes Note
Meat 180 watts, 5-7 mins + 90 watts, 10-15 mins Place the Ø 22 cm Pyrex dish on the turntable.

16
EEE Yönetmeliǧine Uygundur. PCB içermez.
ô İçindekiler
[tr]Kullanma kιlavuzu
Önemli güvenlik uyarıları ........................................................ 16
Hasar nedenleri................................................................................ 18
Kurulması ve elektriğe bağlanması ........................................ 19
Kumanda bölümü..................................................................... 19
Döner düğme....................................................................................19
Aksesuar............................................................................................19
İlk kullanımdan önce................................................................ 20
Saatin ayarlanması ..........................................................................20
Mikrodalga................................................................................ 20
Kaplar hakkında bilgiler.................................................................. 20
Mikrodalga fırın kademeleri ...........................................................20
Mikrodalga fırının ayarlanması.......................................................21
Soğutma fanı.....................................................................................21
Hafıza ........................................................................................ 21
Hafızaya kaydetme .......................................................................... 21
Hafızanın başlatılması...................................................................... 21
Sinyal süresinin değiştirilmesi ............................................... 22
Bakım ve Temizlik .................................................................... 22
Temizlik malzemeleri .......................................................................22
Arıza tablosu ............................................................................ 23
Müşteri Hizmetleri.................................................................... 23
Enumarası ve FDnumarası...........................................................23
Teknik Veriler ....................................................................................24
Çevre kurallarına uygun şekilde imha edilmesi ......................... 24
Otomatik Program.................................................................... 24
Programın ayarlanması ................................................................... 24
Otomatik program ile buz çözme .................................................25
Otomatik program ile pişirme........................................................ 25
Sizin için mutfağ
ımızda test edilmiştir................................... 25
Tablolara ilişkin uyarılar ..................................................................25
Buz çözme ........................................................................................ 25
Derin dondurulmuş yiyeceklerin çözülmesi, ısıtılması veya
pişirilmesi...........................................................................................26
Yemeklerin ısıtılması ........................................................................ 27
Yemeklerin pişirilmesi ..................................................................... 27
Mikrodalga fırınla ilgili ipuçları ....................................................... 28
EN 60705'ye göre test edilen yemekler.................................. 28
Mikrodalga fırın ile pişirme ve buz çözme .................................. 28
Produktinfo
Ürün, aksesuar, yedek parçalar ve hizmetler hakkında daha
fazla bilgi için: www.siemens-home.bsh-group.com ve Online-
Mağaza: www.siemens-home.bsh-group.com/eshops
: Önemli güvenlik uyarıları
Bu kılavuzu dikkatlice okuyunuz. Ancak bu
şekilde cihazı güvenli ve doğru bir biçimde
kullanmanız mümkün olacaktır. Daha sonra
kullanılmak üzere veya başka birisinin
kullanımı için kullanım ve montaj kılavuzunu
muhafaza ediniz.
Bu cihaz yalnızca montaj için tasarlanmıştır.
Özel montaj kılavuzunu dikkate alınız.
Ambalajı açıldıktan sonra cihaz kontrol
edilmelidir. Bir nakliye hasarı olması
durumunda, cihaz bağlantısı yapılmamalıdır.
Sadece eğitimli bir uzman soket olmadan
cihazların bağlantısını yapabilir. Yanlış
bağlantı nedeniyle hasar ortaya çıkması
durumunda cihaz garanti kapsamı dışı
nda
kalır.
Bu cihaz sadece evde ve ev ortamında
kullanılmak için tasarlanmıştır. Cihazı
sadece yiyecek ve içecek hazırlamak için
kullanınız. Cihaz çalışırken dikkatli olunuz.
Cihazı sadece kapalı alanlarda kullanınız.
Bu cihaz, deniz seviyesinden en fazla 4000
metre yükseklikte kullanılmak üzere
tasarlanmıştır.
Bu cihaz 8 yaşından küçük çocuklar, sınırlı
fiziksel, zihinsel ve duygusal yeteneklere
sahip kişiler ve eksik tecrübe veya bilgi
sahibi kişiler tarafından ancak sorumlu bir
kişinin denetimi altında olmaları veya
kendilerine cihazın güvenli kullanımı ve
ortaya çıkabilecek tehlikeler hakkında bilgi
verilmiş olması durumunda kullanılabilir.
Çocuklar cihazla oynamamalıdır. Temizlik
ve kullanıcı
bakımı çocuklar tarafından
yapılamaz; ancak 8 yaşından büyük
çocuklar denetim altında yapabilir.
8 yaşından küçük çocukları cihazdan ve
bağlantı kablosundan uzak tutunuz.
Aksesuarı her zaman pişirme alanının içine
doğru olacak şekilde yerleştiriniz. Kullanım
kılavuzundaki Aksesuar Açıklaması
bölümüne bakınız .
Yangın tehlikesi!
■
Cihaz çok sıcak. Cihaz dekoratif kapaklı
gömme bir mobilyanın içerisine kurulursa
kapak kapalı durumdayken ısı birikmesi

17
meydana gelebilir. Cihazı sadece kapak
açık durumdayken çalıştırınız.
Yangın tehlikesi!
■
Pişirme alanında bekletilen, yanıcı
nesneler tutuşabilir. Yanıcı nesneleri
kesinlikle pişirme alanında muhafaza
etmeyiniz. Cihazdan duman geliyorsa
kesinlikle kapısını açmayınız. Cihazı
kapatınız ve elektrik fişini çekiniz veya
sigorta kutusundan sigortayı kapatınız.
Yangın tehlikesi!
■
Cihazın usulüne uygun kullanılmaması
tehlikelidir ve hasara neden olabilir.
Besinlerin veya kıyafetlerin kurutulması,
terliklerin, içerisinde çekirdek veya tahıl
olan yastıklarının, süngerlerin, nemli
temizlik bezlerini veya benzeri eşyaların
ısıtılması yasaktır.
Örneğin ısınmış terlikler, içerisinde
çekirdek veya tahıl olan yastıkları saatler
sonra da tutuşabilir. Cihazı sadece yiyecek
ve içecek hazırlamak için kullanınız.
Yangın tehlikesi!
■
Gıda maddeleri alev alabilir. Gıda
maddelerini kesinlikle sıcak tutan
ambalajlarda ısıtmayınız.
Gıda maddelerini kesinlikle plastik, kağıt
veya diğer yanıcı malzemelerden üretilmiş
kaplarda gözetimsiz olarak ısıtmayınız.
Kesinlikle aşırı yüksek bir mikrodalga
kademesi veya süresi ayarlamayınız. Bu
kullanım kılavuzundaki talimatlara uyunuz.
Gıda maddelerini kesinlikle mikrodalgada
kurutmayınız.
Örneğin ekmek gibi su oranı düşük
gıdaları kesinlikle yüksek mikrodalga
kademesinde ve çok uzun süre buz
çözme veya ısıtma işlemine tabi
tutmayınız.
Yangın tehlikesi!
■
Yemeklik yağ tutuşabilir. Kesinlikle
mikrodalga ile sadece yemeklik yağ
ısıtmayınız.
Patlama tehlikesi!
İçinde sıvı veya diğer gıda maddeleri
bulunan sıkıca kapatılmış kaplar patlayabilir.
Sıvıları veya diğer gıda maddelerini
kesinlikle sıkıca kapatılmış kaplarda
ısıtmayınız.
Ciddi sağlık sorunları tehlikesi!
■
Temizliğin eksik yapılması durumunda
cihazın yüzeyi zarar görebilir. Mikrodalga
enerjisi dışarı çıkabilir. Cihazı düzenli
olarak temizleyiniz ve gıda maddesi
kalıntılarını derhal temizleyiniz. Pişirme
alanını, kapı contasını, kapıyı ve kapı
yuvasını daima temiz tutunuz; ayrıca bkz.
Bölüm Bakım ve Temizlik.
Ciddi sağlık sorunları tehlikesi!
■
Hasarlı pişirme alanı kapısı veya kapı
contası nedeniyle mikrodalga enerjisi
dışarı çıkabilir. Pişirme alanı kapısı veya
kapı contası hasarlı ise cihazı kesinlikle
çalıştırmayınız. Müşteri hizmetlerini
arayınız.
Ciddi sağlık sorunları tehlikesi!
■
Gövde kapağı olmayan cihazlarda
mikrodalga enerjisi dışarı çıkar. Gövde
kapağını kesinlikle çıkartmayınız. Bakım ve
onarım işleri için müşteri hizmetlerini
arayınız.
Elektrik çarpma tehlikesi!
■
Usulüne aykırı onarımlar tehlike teşkil
eder. Onarımlar ve hasarlı elektrik
kablolarının değiştirilmesi, sadece
tarafımızdan eğitilmiş bir müşteri hizmetleri
teknisyeni tarafından yapılmalıdır. Cihaz
arızalıysa elektrik fişini çekiniz veya sigorta
kutusundan sigortayı kapatınız. Müşteri
hizmetlerini arayınız.
Elektrik çarpma tehlikesi!
■
Sıcak parçalardaki elektrikli cihaz kablo
izolasyonu eriyebilir. Elektrikli cihaz
bağlantı kablolarını sıcak parçalarla
kesinlikle temas ettirmeyiniz.
Elektrik çarpması tehlikesi!
■
İçeri sızan su elektrik çarpmasına neden
olabilir. Yüksek basınçlı veya buharlı
temizleyici kullanılmamalıdır.
Elektrik çarpma tehlikesi!
■
Cihaza nem girmesi elektrik çarpmasına
neden olabilir. Cihazı kesinlikle aşırı
sıcaklığa ve neme maruz bırakmayınız.
Cihazı sadece kapalı alanlarda kullanınız.
Elektrik çarpma tehlikesi!
■
Arızalı bir cihaz elektrik çarpmasına neden
olabilir. Arızalı bir cihazı kesinlikle
açmayınız. Elektrik fişini çekiniz veya
sigorta kutusundan sigortayı kapatınız.
Müşteri hizmetlerini arayınız.
Elektrik çarpma tehlikesi!
■
Cihaz yüksek gerilimle çalışmaktadır.
Gövdeyi kesinlikle çıkarmayınız.
Yanma tehlikesi!
■
Cihaz çok sıcak. Kesinlikle sıcak pişirme
alanının iç yüzeylerine veya ısıtıcı
elemanlara dokunmayınız. Cihaz daima
soğumaya bırakılmalıdır. Çocukları uzak
tutunuz.
Yanma tehlikesi!
■
Aksesuar veya kap çok ısınır. Sıcak
aksesuar veya kapları daima bir mutfak
eldiveniyle pişirme alanından çıkartınız.
Yanma tehlikesi!
■
Alkol buharı sıcak pişirme alanında
tutuşabilir. Kesinlikle fazla miktarda yüksek
oranda alkollü içeceklerle yemekler
hazırlamayınız. Sadece küçük bir miktar
yüksek oranda alkol içeren içecek
kullanınız. Cihaz kapısını dikkatlice açınız.
Yanma tehlikesi!
■
Sert kabuklu veya derili gıda maddeleri
ısıtma işlemi sırasında veya sonrasında
patlayabilir. Kabuklu yumurta pişirmeyiniz

18
veya katı pişirilmiş yumurtaları ısıtmayınız.
Kabuklu deniz ürünlerini pişirmeyiniz.
Bardakta pişecek yumurtalarda veya
sahanda yumurtada önce yumurtanın
sarısını deliniz. Örneğin elma, domates,
patates veya sosis gibi sert kabuklu veya
derili yiyeceklerde kabuk patlayabilir. Bu
tür gıda maddelerini ısıtmadan önce
kabuklarında veya derilerinde bir delik
açınız.
Yanma tehlikesi!
■
Bebek mamasında ısı eşit oranda
dağılmaz. Bebek mamasını kesinlikle
kapalı kap içerisinde ısıtmayınız. Kapağı
veya emziği daima çıkarınız. Mamayı
ısıttıktan sonra iyice karıştırınız veya
çalkalayınız. Mamayı bebeğe vermeden
önce sıcaklığı kontrol ediniz.
Yanma tehlikesi!
■
Isıtılan yemekler etrafa ısı yayar. Kap
ısınabilir. Kabı veya aksesuarı daima bir
mutfak eldiveniyle pişirme alanından
çıkartınız.
Yanma tehlikesi!
■
Hava geçirmeyecek şekilde paketlenmiş
gıdalarda ambalaj patlayabilir. Ambalaj
üzerindeki bilgileri daima dikkate alınız.
Yemekleri daima bir mutfak eldiveni
kullanarak pişirme alanından çıkarınız.
Haşlanma tehlikesi!
■
Cihaz kapısının açılması sırasında sıcak
buhar çıkışı olabilir. Cihaz kapısını
dikkatlice açınız. Çocukları uzak tutunuz.
Haşlanma tehlikesi!
■
Pişirme alanındaki su nedeniyle sıcak su
buharı ortaya çıkabilir. Kesinlikle sıcak
pişirme alanına su püskürtmeyiniz.
Haşlanma tehlikesi!
■
Sıvıların ısıtılması esnasında kaynama
noktasında gecikme oluşabilir. Yani, sıvılar
kaynama sıcaklığına ulaşır ancak bu
sırada standart buhar kabarcıkları
yükselmez. Kabın sadece biraz sarsılması
durumunda bile sıcak sıvı aniden taşabilir
ve sıçrayabilir. Isıtma işlemi sırasında
kabın içerisine daima bir kaşık koyunuz.
Böylece kaynama noktasındaki gecikme
engellenir.
Yaralanma tehlikesi!
■
Çizik cihaz kapısı camı kırılarak
sıçrayabilir. Cam kazıyıcı, keskin veya
aşındırıcı temizlik maddeleri kullanmayınız.
Yaralanma tehlikesi!
■
Uygun olmayan kaplar kırılabilir. Porselen
ve seramik kapların kulplarının ve
kapaklarının içinde çok küçük delikler
olabilir. Bu deliklerin arkasında bir boşluk
bölümü yer almaktadır. Boşluk bölümüne
giren nem, kabın çatlamasına neden
olabilir. Sadece mikrodalga fırına uygun
kaplar kullanınız.
Yaralanma tehlikesi!
■
Metalden üretilen kaplar ve tencereler,
sadece mikrodalganın kullanılması
sırasında kıvılcım oluşumuna neden
olabilir. Cihaz hasar görebilir. Sadece
mikrodalganın kullanılması sırasında asla
metal kaplar kullanmayınız.
Hasar nedenleri
Dikkat!
■ Aşırı kirlenmiş conta: Eğer conta aşırı kirlenmişse çalışma
sırasında cihazın kapağı artık tam olarak kapanmayacaktır.
Yandaki mobilyaların ön cepheleri hasar görebilir. Contayı
daima temiz tutunuz.
■ Yemek olmadan mikrodalga fırının çalıştırılması: Pişirme
alanında yemek olmadan cihazın çalıştırılması aşırı
yüklenmeye neden olur. Pişirme alanında yemek olmadan
cihazı kesinlikle çalıştırmayınız. İstisnai olarak kısa süreli bir
kap testi için bkz. Bölüm "Mikrodalga fırın, Kap".
■ Mikrodalgada patlamış mısır: Mikrodalga gücünü asla çok
yüksek bir kademeye ayarlamayınız. Maksimum 600 Watt
kullanınız. Patlamış mısır torbasını daima bir cam tabağın
içine koyunuz. Aşırı yüklenme nedeniyle camda çatlama
olabilir.
■ Aşırı pişirilen sıvılar döner tabladan cihazın içerisine giremez.
Pişirme işlemini izleyiniz. Öncelikle kısa bir pişirme süresi
seçiniz ve gerekirse pişirme süresini uzatınız.
■ Mikrodalga fırını döner tabla olmadan kesinlikle
kullanmayınız.
■ Kıvılcım oluşumu: Metal - ör n. camın içindeki kaşık - fırın
duvarlarından ve kapak iç kısmından en az 2 cm mesafede
bulunmalıdır. Kıvılcımlar kapağın iç camına zarar verebilir.
■ Alüminyum kaplar: Cihazda alüminyum kaplar
kullanılmamalıdır. Kıvılcım oluşumu cihaza zarar verir.
■ Cihaz kapağı açık şekilde soğutma: Pişirme alanı sadece
kapalı durumdayken soğumaya bırakılmalıdır. Cihaz kapağına
sıkıştırmayınız. Kapak, çok az aralık kalacak şekilde açık bile
olsa zamanla yanındaki mobilyaların ön cephelerine zarar
verebilir.
■ Pişirme alanında yoğuşma suyu: Kapak camında, iç
kenarlarda ve zeminde yoğunlaşmış su oluşabilir. Bu
normaldir ve mirodalganın çalışması bu durumdan
etkilenmez. Korozyon oluşmasını engellemek için her pişirme
sonrasında yoğuşma suyunu temizleyiniz.

19
Kurulması ve elektriğe bağlanması
Bu cihaz sadece evde kullanım için tasarlanmıştır.
Bu cihaz yalnızca monte edilerek kullanılmak üzere
tasarlanmıştır.
Lütfen özel montaj talimatına dikkat ediniz.
Cihaz fişlidir veya yalnızca talimatlara uygun olarak kurulumu
gerçekleştirilmiş bir topraklı prize takılabilir. Sigorta 10 Amper
(L veya B otomat) olmalıdır. Şebeke gerilimi, tip plakasında
belirtilen gerilim ile örtüşmelidir.
Prizin döşenmesi veya bağlantı hattının değiştirilmesi yalnızca
uzman elektrik teknisyenleri tarafından gerçekleştirilmelidir.
Montajdan sonra fişe ulaşılamıyorsa, kurulum tarafında en az
3 mm kontak mesafeli birçok kutup ayırma düzeneği mevcut
olmalıdır.
Çoklu fişler, fiş blokları veya uzatmalar kullanmayınız. A
şırı
yüklenme durumunda yangın tehlikesi ortaya çıkar.
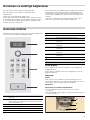
Kumanda bölümü
Burada kumanda bölümüne ilişkin genel bir bakış bulabilirsiniz.
Cihaz tipine göre özelliklerde farklılıklar olabilir.
Döner düğme
Döner düğme ile tüm önerilen değerleri ve ayar değerlerini
değiştirebilirsiniz.
Döner düğme indirilebilir. Konumunu değiştirmek için döner
düğmeye bastırınız.
Aksesuar
Dikkat!
Kabı çıkarırken döner tablanın hareket etmediğinden emin
olunuz. Döner tablanın yerine doğru oturduğundan emin olunuz.
Döner tabla, sola veya sağa doğru döndürülebilir.
Döner tabla
Döner tablayı şu şekilde ayarlayabilirsiniz:
1. Çevirme halkasını a pişirme alanındaki oyuk üzerine
yerleştiriniz.
2. Döner tablayı b, pişirme alanının zemininde bulunan tahrik c
üzerine oturtunuz.
1 Saat ve süre için
gösterge
2 Döner düğme
Saat ve süresinin ayarlanması için veya otomatik prog-
ramın ayarlanması için
3 Tuşlar
4 Kapak açma düğmesi
Tuşlar Kullanımı
¹
Bununla çalışmayı başlatırsınız
»
Bununla, saati ayarlıyorsunuz
º
Bununla çalışmayı durdurursunuz
90 Mikrodalga fırın kademesinin 90 Watt olarak
seçilmesi
180 Mikrodalga fırın kademesinin 180 Watt olarak
seçilmesi
360 Mikrodalga fırın kademesinin 360 Watt olarak
seçilmesi
600 Mikrodalga fırın kademesinin 600 Watt olarak
seçilmesi
900 Mikrodalga fırın kademesinin 900 Watt olarak
seçilmesi
¼
Programlarda kilogramın seçilmesi
X
Otomatik programın seçilmesi
l
Hafızanın seçilmesi
Tuşlar Kullanımı
E
D
F

20
Bilgi: Aleti yalnızca döner tabla yerleştirilmiş olarak kullanınız.
Yerine doğru oturduğundan emin olunuz. Döner tabla, sola
veya sağa doğru döndürülebilir.
Özel aksesuar
Özel aksesuarları müşteri hizmetlerinden veya yetkili
satıcılardan satın alabilirsiniz. Lütfen HZ numarasını giriniz.
Fırınınızla ilgili geniş kapsamlı teklifleri broşürlerimizde veya
internette bulabilirsiniz. Özel aksesuarların mevcut olma
durumu veya online satın alma imkanları ülkelere göre
değişiklik gösterebilir. Lütfen satış dokümanlarını gözden
geçiriniz.
İlk kullanımdan önce
Mikrodalga fırınınızla ilk kez yemek pişirmeden önce neler
yapmanız gerektiğini burada tecrübe edebilirsiniz. İlk olarak
Güvenlik bilgileri bölümünü okuyunuz.
Saatin ayarlanması
Cihaz bağlandığında veya bir elektrik kesintisinden sonra,
gösterge alanında üç adet sıfır yanar.
1. » tuşuna basınız.
Göstergede
‚ƒ:‹‹œ görünür ve gösterge lambası» tuşu ile
yanar.
2. Döner düğme ile saati ayarlayınız.
3. » tuşuna yeniden basınız.
Güncel saat ayarlanır.
Saatin gizlenmesi
» tuşuna ve ardından º tuşuna basınız.
Gösterge kaybolur.
Saatin yeniden ayarlanması
» tuşuna basınız.
Göstergede
‚ƒ:‹‹ saat bilgisi görüntülenir. Ardından Madde 2
ve 3'te açıklanan şekilde ayarlayınız.
Saatin değiştirilmesi, örn. yaz saatinden kış saatine
geçilmesi
Madde 1 - 3 içinde tarif edilen şekilde ayarlayınız.
Mikrodalga
Mikrodalgalar gıda maddelerinde ısıya dönüştürülür.
Mikrodalga fırını nasıl yerleştirmeniz gerektiğini okuyabilir ve
kaplar hakkında bilgi alabilirsiniz.
Bilgi: Bu bölümde mikrodalga fırında buz çözme, ısıtma ve
pişirme için kendi mutfağımızda sizler için test ettiğimiz bilgileri
bulacaksınız.
Mikrodalga fırını aynı şekilde tekrar deneyiniz. Örneğin çayınız
için bir fincan su ısıtınız.
Altın veya gümüş işlemesi olmayan büyük bir fincan alınız ve
içine bir çay kaşığı koyunuz. Fincanı içine su koyarak döner
tablanın üzerine yerleş
tiriniz.
1. 900 W tuşuna basınız.
2. Döner düğme ile ‚:„‹ dakika ayarlayınız.
3. ¹ tuşuna basınız.
1 dakika 30 saniye sonra bir sinyal duyulur. Çayınız için su
ışınmıştır.
Çayınızı içerken kullanım kılavuzunun başındaki güvenlik
uyarılarını bir kez daha okuyunuz. Bunlar çok önemlidir.
Kaplar hakkında bilgiler
Uygun kap
Cam, cam seramik, porselen, seramik veya ısıya dayanıklı
plastik gibi kaplar uygundur. Bu materyaller ısıyı geçirir.
Servis kabı da kullanabilirsiniz. Bu şekilde kaptan kaba
doldurma işleminden de tasarruf edersiniz. Altın veya gümüş
dekorlu kapları, sadece, üretici firma mikrodalgaya dayanıklı
olduğunu garanti ediyorsa kullanınız.
Uygun olmayan kaplar
Metal kaplar uygun değildir. Metal mikrodalgaları geçirmez.
Yiyecekler kapalı metal kaplarda soğuk kalırlar.
Dikkat!
Kıvılcım oluşumu: Metaller ö rn. camın içindeki kaşık fırının
duvarlarından en az 2 cm uzak durmalıdır. Kıvılcımlar kapağın
iç camına zarar verebilir.
Kap testi
Asla mikrodalgayı yiyeceksiz çalıştırmayınız. Tek istisna
devamda belirtilmiş olan kap testidir.
Eğer kabınızın mikrodalgaya uygun olup olmadığından emin
değilseniz şu testi yapınız:
1. Boş kabı ½ ila 1 dakika arası maksimum güçteki cihaza
yerleştiriniz.
2. Ara sıra sıcaklığı kontrol ediniz.
Kap, soğuk ya da vücut sıcaklığında olmalıdır.
Eğer daha sıcak olursa ya da kıvılcımlar oluşursa uygunsuzdur.
Mikrodalga fırın kademeleri
Bilgi: 900 W mikrodalga kademesini 30 dakika, 600 W
kademesini 1 saat, diğer kademelerin her birini de 1 saat
39 dakika kullanacak şekilde ayarlayabilirsiniz.
Buharda pişirme kabı HZ 86 D 000
Mikrodalga gücü Uygun işlem
90 W Hassas yiyeceklerin buzunun çözülmesi
180 W Buz çözme ve pişirmeye devam edilmesi
360 W Etin pişirilmesi ve hassas yiyeceklerin ısı-
tılması
600 W Yiyeceklerin ısıtılması ve pişirilmesi
900 W Sıvıların ısıtılması
Sayfa yükleniyor...
Sayfa yükleniyor...
Sayfa yükleniyor...
Sayfa yükleniyor...
Sayfa yükleniyor...
Sayfa yükleniyor...
Sayfa yükleniyor...
Sayfa yükleniyor...
Sayfa yükleniyor...
Sayfa yükleniyor...
Sayfa yükleniyor...
Sayfa yükleniyor...
-
 1
1
-
 2
2
-
 3
3
-
 4
4
-
 5
5
-
 6
6
-
 7
7
-
 8
8
-
 9
9
-
 10
10
-
 11
11
-
 12
12
-
 13
13
-
 14
14
-
 15
15
-
 16
16
-
 17
17
-
 18
18
-
 19
19
-
 20
20
-
 21
21
-
 22
22
-
 23
23
-
 24
24
-
 25
25
-
 26
26
-
 27
27
-
 28
28
-
 29
29
-
 30
30
-
 31
31
-
 32
32


Siemens Built-in microwave oven Kullanım kılavuzu
- Kategori
- Mikrodalgalar
- Tip
- Kullanım kılavuzu
diğer dillerde
İlgili makaleler
Diğer belgeler
-
Beko MGC 20100 S El kitabı
-
Moulinex MO28ES El kitabı
-
Moulinex MO28MSWH El kitabı
-
PROFILO MD1000 Kullanım kılavuzu
-
Franke FMW 250 G XS Installation And Operating Instructions Manual
-
Zanussi ZMS2100SWA Kullanım kılavuzu
-
Electrolux EMS21200K Kullanım kılavuzu
-
PROFILO HG1503T Kullanım kılavuzu
-
Bosch MUC88B68/01 Kullanım kılavuzu
-
Bosch HSV452CTR/08 Kullanım kılavuzu