Indesit T 5 FNF L HG (TK) Kullanici rehberi
- Kategori
- Buzdolabı-dondurucular
- Tip
- Kullanici rehberi
Bu kılavuz aynı zamanda aşağıdakiler için de uygundur:

Buzdolabý
Montajý ve kullanýmý
Refrigerator
Installation and use
T 5 FNF L HG

2 kapýlý donduruculu buzdolabý 1
Montaj ve kullaným talimatlarý
Two-doors refrigerator-freezer
9
Instructions for installation and use
Bu beyaz eþyanýn etkili ve güvenli kullanýmýný saðlamak için:
- sadece yetkili teknik servislere baþvurunuz
- daima yedek parça kullanýlmasýný talep ediniz
To maintain the EFFICIENCY and SAFETY of this appliance, we recommend:
- call only the Service Centers authorized by the manufacturer
- always use original Spare Parts
TK
GB

1
TK
Güvenlik, iyi bir alýþkanlýk
Buzluktan henüz çýkarýlmýþ buz küplerini de aðzýnýza
atmayýnýz, bu da yanmalara yol açabilir.
7. Fiþi prizden çekmeden önce kesinlikle ne temizlik, nede
bakým iþlemi yapýnýz.
8. Eski buzdolabýnýzý gelip almalarýný beklerken, çocuklarýn
oyun sýrasýnda içinde kapalý kalmalarý ihtimalini önlemek için
olasý kilitleme mekanizmasýný devre dýþý býrakýnýz.
9. Arýza halinde, yetkili teknik servisi çaðýrmadan önce,
sorunu giderme imkâný olabileceðinden kitapçýðýn Bir sorun
mu var? bölümünü inceleyiniz. Ýç kýsýmlara müdahale etmek
suretiyle arýzayý kendi baþýnýza gidermeye çalýþmayýnýz.
10. Besleme kablosunun deðiþtirilmesi gerektiðinde Yetkili
Servislerimize baþvurunuz. Bazý durumlarda baðlantýlar özel
terminaller aracýlýðýyla gerçekleþtirilmiþtir, bazen de
baðlantýlara müdahale edebilmek için özel bir alet
kullanýlmasý gereklidir.
11. Yemeklerin koyulduðu bölme içinde, imalâtçýnýn önerdiði
tiptekiler dýþýnda elektrikli gereçler kullanmayýnýz.
12. Cihazýn çalýþma ömrü sona erdiðinde, izolasyon
köpüðünde siklopentan gazý, soðutma devresinde ise
muhtemelen R600a (izobutan) gazý içerdiðinden, hurdaya
ayrýlmadan önce güvenli bir konuma alýnmasý gerekmektedir.
Bunun için ilgili yerel Kurum ve Mercilere yada yetkili
satýcýnýza danýþabilirsiniz.
Montajý
Cihazýn iyi çalýþmasýnýn ve daha az elektrik tüketiminin
saðlanmasý için montaj iþleminin doðru yapýlmasý gerekir.
Havalandýrma
Kompresör ve kondanser ýsý açýða çýkardýklarýndan iyi bir
havalandýrmaya gereksinim duyarlar. Ýyi bir
havalandýrmaya sahip olmayan alanlar pek uygun
sayýlmaz. Dolayýsý ile cihazýn dýþarý açýlan bir pencere yada
havalandýrma kanalý bulunan, böylelikle hava sirkülasyonu
saðlanan ve aþýrý nemli olmayan bir mekâna monte
edilmesi gerekir.
Montaj sýrasýnda, cihaza yeterli havalandýrma olanaðý
saðlayan ýzgaralarý kapatacak yada týkayacak þekilde
yerleþtirme yapýlmamasýna dikkat ediniz.
Cihazýn iyi þekilde havalandýrýlmasýný saðlamak için:
- üst kýsmýnda bulunan olasý mobilyalarla en ez 10 cm
mesafe býrakýlmasý;
- yan taraflarý ile bu kýsýmlarda bulunan olasý mobilyalar
veya duvarlar arasýnda en az 5 cm mesafe býrakýlmasý
gerekir.
Isý kaynaðýndan uzaklýk
Cihazý doðrudan güneþ ýþýðý alan yerlere veya elektrik fýrýný,
ocak ve benzeri ýsý kaynaklarýnýn hemen yanýna
yerleþtirmekten kaçýnýnýz.
Zemine tam düz oturmasý
Cihaz zeminde tamamen düz þekilde oturmalýdýr; eðer
zemin eðimliyse, ön tarafta bulunan ayarlanabilir ayaklarla
dengeleme yapýlabilir.
Elektrik baðlantýsý ve topraklama
Elektrik baðlantýsýný yapmadan önce, cihazýn özelliklerini
bildiren ve sebze kabý sol alt kýsmýnda bulunan etikette
gösterilen voltajýn evinizdeki elektrik tesisatýna uygun olup
olmadýðýný ve prizin 46/90 sayýlý elektrik sistemleri güvenlik
yasasýnda öngörülen uygun bir toprak baðlantýsýna sahip
olup olmadýðýný kontrol ediniz. Toprak baðlantýsý
yapýlmamasý halinde imalâtçý firma hiç bir sorumluluk
taþýmayacaktýr. Çoklu priz yada adaptör kullanmayýnýz.
Cihazý yerleþtirirken baðlandýðý prizin eriþilebilir
konumda olmasýna dikkat ediniz.
Güç yetersiz mi?
Elektrik prizi, cihazýn, sebzeliðin sol alt tarafýndaki etikette
belirtilen maksimum güç yükünü kaldýrabilme özelliðine
sahip olmalýdýr.
Elektrik baðlantýsýný yapmadan önce
Nakliyesinden sonra cihazý dikey vaziyette konumlandýrýnýz
ve doðru çalýþmasýný saðlamak için elektrik prizine
baðlamadan önce en az 3 saat bekleyiniz.
DÝKKAT
Ýþbu kitapçýkta yer alan uyarýlarý dikkatle okuyunuz, zira montaj,
kullaným ve bakým güvenliði ile ilgili önemli bilgiler verirler.
Bu cihaz Avrupa Birliðinin aþaðýdaki
Yönetmeliklerine uygundur:
- 19/02/73 tarihli 73/23/CEE yönetmeliði (Düþük
Gerilimler) ve sonraki deðiþiklikleri;
- 03/05/89 tarihli 89/336/CEE yönetmeliði (Elektromanyetik
Uyum) ve sonraki deðiþiklikleri.
1. Bu cihaz açýk alana, hatta bu alanýn üstü bir çatý ile
kapatýlmýþ olsa bile, monte edilmez; cihazý yaðmur, fýrtýna
ve kötü hava þartlarýna maruz býrakmak çok tehlikelidir.
2. Sadece yetiþkinler tarafýndan ve bu kitapçýkta yer alan
talimatlar çerçevesinde gýdalarýn saklanmasý ve
dondurulmasý amacýna yönelik olarak kullanýlmalýdýr.
3. Ayaklarýnýz çýplak, elleriniz ve ayaklarýnýz ýslakken asla
cihaza dokunmayýnýz ve yerinden oynatmaya çalýþmayýnýz.
4. Çoklu prizli uzatma kablosu kullanýlmasýný tavsiye
etmiyoruz. Eðer buzdolabý mobilyalar arasýna monte edilmiþ
ise, kablonun sert kývrýmlara ve ezilmelere maruz kalmamýþ
olmasýný kontrol ediniz.
5. Fiþi duvar prizinden çýkarmak için kabloyu yada
buzdolabýnýn kendisini çekmeyiniz: bu çok tehlikelidir.
6. Soðutucu iç bölmelere bilhassa ýslak ellerle dokunmayýnýz,
yanma ve diðer yaralanmalara maruz kalabilirsiniz.

2
TK
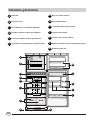
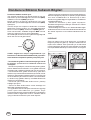
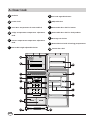
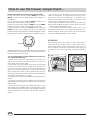
Yakýndan görünümü
A
Buzmatik
B
Dondurucu rafý
C
Et ve balýk için Cool Box bölmesi
D
Soðutucu bölümü sýcaklýk ayar düðmesi
E
Dondurucu bölümü sýcaklýk ayar bölmesi
F
Çýkarýlabilir ve yükseklik ayarý yapýlabilir katlar
G
Meyve ve sebze haznesi
H
Ayarlanabilir ayaklar
I
Çýkarýlabilir þiþe koyma bölümü
J
Eþya koyma bölümü
K
Teneke kutu içecekler bölümü
L
Kapaklý çýkarýlabilir hazne ve yumurta koyma yeri
M
Dondurucu kapý rafý
L
K
M
J
I
HH
G
F
D
E
B
C
A

3
TK
Þekil 1
Cihazýn çalýþtýrýlmasý
DÝKKAT:
Nakliyesinden sonra cihazý dikey vaziyette
konumlandýrýnýz ve doðru çalýþmasýný saðlamak için
elektrik prizine baðlamadan önce yaklaþýk 3 saat
bekleyiniz.
Yemekleri buzdolabýna yada dondurucu bölmeye (freezer)
koymadan önce buralarý ýlýk su ve bikarbonat ile iyice
temizleyiniz.
Fiþi elektrik prizine baðladýktan sonra aydýnlanma
lambasýnýn yanýyor olmasýný kontrol edip, D ve E ýsý
ayar düðmesini orta derece soðuða ayarladýktan sonra,
bir kaç saat bekleyiniz ve sonrasýnda taze gýdalarý
buzdolabý bölmesine, dondurulmuþ gýdalarý ise dondurucu
bölmesine yerleþtiriniz.
Buzdolabýna koyulmamasý gerekenler
Sarýmsak (koku yayar), soðan ve pýrasa.
Muz (siyahlaþýr).
Turunçgiller (balkonda gölgede-serinde tutulmalarý daha
iyidir).
Patates ve yumru kökler (karanlýk ve nemsiz ortamda
korunurlar).
Buzdolabý bölmesi en verimli nasýl kullanýlýr
Termostat sayesinde, cihaz içerisindeki sýcaklýk manuel
olarak ayarlanmaktadýr. Sýcaklýk ayarýný deðiþtirmek için
termostat ayar düðmesini MIN ile MAX konumu arasýnda
ayarlayabilirsiniz.
Soðutucu bölümü sýcaklýk ayarý
Dondurucu bölümün boþ olmasý durumunda, soðutucunun
içerisinde en uygun sýcaklýðý elde etmek için termostat
düðmesini orta konuma (MED) ayarlayýnýz.
Termostat ayarý yapýlýrken , soðutucu kapýsýnýn ne kadar
sýklýkla açýldýðý , içerisinde ne kadar yiyecek saklanacaðý
ve oda sýcaklýðý gözönüne alýnmalýdýr.
fridge
- Sanýlanýn aksine, piþirilmiþ gýdalar çið olanlara nispeten
daha uzun süre dayanmazlar.
- Sývý maddeleri aðzý açýk olarak koymanýz sakýncalýdýr,
zira buzdolabý içinde nem oranýný arttýrýr ve buzlanma
(kýraðý) oluþumunu hýzlandýrýrlar.
- Gýdalarý sadece soðukken, yada en fazla ýlýkken
yerleþtiriniz, asla sýcak halde koymayýnýz: sýcak gýdalar
derhal iç ýsýyý arttýrýr ve kompresörün daha fazla çalýþýp
enerji israfýna yol açmasýna neden olur.
UYARI: Soðuk hava akýþýný engellememek için
yiyecekleri hava kanallarýný kapatacak þekilde
yerleþtirmeyiniz.
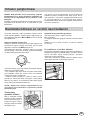
Teneke kutu
içecekler bölümü
Kapý iç tarafýnda bulunan
teneke kutudaki içecekleri
koyma bölümüne (þekil 1)
ihtiyacýnýza göre yoðurt,
tereyaðý ve benzeri kaplarý
da koyabilirsiniz.
Et ve balýk için Cool Box bölmesi
Bu bölme et ve balýklarýn saklanma sürelerini uzatmak için
tasarlanmýþtýr (bazen bir haftaya kadar). Cool Box bölmesi
ayrýca, normalde soðuk olarak tüketilen yemekleri
soðutmak için de kullanýlabilir.
Cool Box bölmesinin kapaðý bölmenin taban kýsmýný
dýþarý doðru çekmek suretiyle açýlýr (þekil 2).
Þekil 2

4
TK
- Dondurulacak gýdalarýn hazýrlanmasýyla ilgili olarak
bu bilgileri içeren özel bir kullaným kýlavuzunu
inceleyiniz.
- Dondurulmuþ haldeyken, kýsmen de olsa çözülen gýdalar,
asla bir daha dondurulmamalýdýr: bu tür gýdalarý tüketmek
(24 saat içinde), yada tekrar dondurmak için piþirmelisiniz.
- Dondurulacak taze gýdalar dondurulmuþ yada derin
dondurulmuþ olanlarla temas halinde koyulmamalý, bunlar
dondurucu bölmesindeki ýzgaranýn üstüne, mümkünse yan
ve arka cidarlarýn yakýnýna konulmalýdýr. Unutulmamalýdýr
ki, dondurulmuþ gýdalarýn daha iyi muhafaza edilebilmesi
dondurma hýzýna baðlýdýr.
- Dondurma iþlemi sýrasýnda dondurucunun (freezer)
kapaðýný açmayýnýz.
- Günlük en fazla dondurulabilir miktar sebzeliðin sol
tarafýndaki etikette belirtilmiþtir.
- En iyi þekilde bir dondurma iþlemi ile dondurulmuþ gýdayý
çözme iþlemi elde edebilmek için gýdalarý küçük
porsiyonlara bölmenizi ve böylece daha hýzlý ve eþ daðýlýmlý
dondurulmalarýný saðlamanýzý öneririz. Paketler üzerine
içeriði ve dondurma tarihine iliþkin notlar düþünüz.
Dondurucu Bölümü Kullaným Bilgileri
Dondurucu bölümü sýcaklýk ayarý
Yeni konulan yiyeceklerin hýzlý dondurulmasý ve hýzlý buz
elde etmek için termostat düðmesini orta konuma (MED)
/ Maksimum konuma (MAX) ayarlayýnýz.
Normal kullaným ve donmuþ yiyeceklerinizin uzun süre
saklanmasý için termostat düðmesini orta konuma (MED)
ayarlayýnýz.
Yalnýzca oluþan buz küplerinin saklanmasý ve elektrik
tasarrufuna yönelik kullaným için termostat düðmesini
Minimum konuma (MIN) / Orta konuma (MED) getiriniz.
Sýcak mevsimlerde, Freezer düðmesi MAX konuma
getirilirse, soðutucunuz uzun süreli çalýþacaktýr.
Termostat ayarý, dondurucu bölüm yeterince soðuduðunda
tekrar eski konumuna getirilmelidir.
freezer
UYARI: Soðuk hava akýþýný engellememek için
Dondurucu ve Hýzlý dondurma bölümünde yiyecekleri
hava kanallarýný kapatacak þekilde yerleþtirmeyiniz.
- Elektrik kesilmesi ve herhangi bir arýza halinde dondurucu
bölmenin kapaðýný açmayýnýz, bu þekilde iç soðukluk daha
uzun süre muhafaza edilir ve dondurulmuþ ile derin
dondurulmuþ gýdalar deðiþime uðramadan 9-14 saat arasý
muhafaza edilebilirler.
- Dondurucu bölmesine içi dolu þiþeler koymayýnýz:
donduklarýnda genleþme nedeniyle hacimlerinin artmasý
nedeniyle patlayabilirler.
- Ortam sýcaklýðý uzun süre ile 14º C dereceden daha soðuk
ýsýda kalýrsa, dondurucu bölmesinde saklama sýcaklýklarýna
tam olarak eriþilemez ve bu nedenle saklama süresi de
kýsalýr.
ICEDEVICE
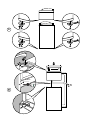
Özel buz kaplarýný alýp suyla doldurunuz ve Icedevice
bölgesine yerleþtiriniz (Þekil 3). Yaklaþýk 2 saat sonra buz
küpleri hazýr olacaktýr. Buzu çýkarmak için iki adet tutma
kulpunu saða doðru döndürmek yeterli olacaktýr: bu þekilde
buz küpleri alttaki kaba düþer ve servise hazýr olurlar (Þekil
4).
Þekil 3
Þekil 4

5
TK
Tasarruf saðlamak için öneriler
- Montajýn doðru yapýlmasý
Buzdolabý monte edilirken ýsý kaynaklarýndan, direkt güneþ
ýþýðý alan yerlerden uzaða ve havalandýrmasý iyi olan
mekânlara monte edilmeli, montaj / havalandýrma
paragrafýnda belirtilen mesafelere uyulmalýdýr.
- Doðru soðutma derecesi
Aþýrý soðuk enerji tüketimini arttýrýr.
- Fazla doldurulmamasý
Gýdalarýn iyi muhafaza edilebilmesi için soðuk buzdolabýnýn
içinde serbestçe sirküle edebilmelidir. Buzdolabýnýn aþýrý
doldurulmasý bu sirkülasyonu engelleyeceði gibi,
kompresörün de sürekli çalýþmasýna neden olur.
- Kapýlarýnýn kapalý tutulmasý
Buzdolabýnýzý mümkün mertebe az açmaya çalýþýnýz, zira
her açýlýþta içindeki soðuk havanýn büyük kýsmý dýþarý
kaçar. Tekrar ayný soðukluðu saðlamak için motorun daha
fazla çalýþmasý daha çok enerji tüketilmesi demektir.
- Contalara dikkat
Etkin olarak iþ görmeleri için kapýlara sýkýca yapýþmalarýný
saðlamak amacýyla sýkça temizleyiniz; böylelikle soðuðu
kesinlikle dýþarý kaçýrmazlar.
- Sýcak yemek koymayýnýz
Buzdolabýna sýcak bir tencere koyulmasý derhal içindeki
ýsýyý bir kaç derece yükseltir. Buzdolabýna yemekleri
koymadan önce dýþarýda ortam sýcaklýðýnda soðumalarýný
bekleyiniz.
- Dondurucu bölmesinde buzlanma
Dondurucu bölmenin (freezer) cidarlarý üzerinde oluþan
buzlanmanýn kalýnlýðýný kontrol ediniz ve bu tabaka çok
kalýnlaþtýðýnda derhal buz çözme iþlemine geçiniz (alt
bölümde anlatýlan buzdolabýný formda tutma paragrafýna
bakýnýz).

6
TK
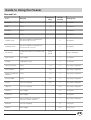
<L\HFHN $P EDODM <XP XúDPD
JQ
'HSR ODPD
D\
(ULP H6UHVL
6Õ÷ÕUHWL
$OPLQ\XP IRO\R *HUHNOLGH÷LO
.X]XHWL
$OPLQ\XP IRO\R ò *HUHNOLGH÷LO
'RPX]HWL
$OPLQ\XP IRO\R *HUHNOLGH÷LO
'DQDHWL
$OPLQ\XP IRO\R *HUHNOLGH÷LO
'DQD'RP X]3 LU]ROD
+HU ELUSD U oD VW UHoILOPLOH VDUÕOÕUYH
GDKDVRQUDDOP LQ\XP IRO\RLOH
NDSODQÕU± GLOLP
*HUHNOLGH÷LO
'DQD.X]X3LU]ROD
+HU ELUSD U oD VW UHoILOPLOH VDUÕOÕUYH
GDKDVRQUDDOP LQ\XP IRO\RLOH
NDSODQÕU± GLOLP
*HUHNOLGH÷LO
.Õ\PD
6 WUHo ILOP LOH VD UÕOD UD N DO PLQ \X P
NRQWH\QHUOHUH\HUOHúWLULOLU
7D]H
.Õ\ÕOPÕú
%X]GRODEÕQGD
\DYDúoD
.DOSYH&L÷HU
.oNSODVWLNSRúHWOHU *HUHNOLGH÷LO
6RVLV
6WUHoILOP YH \D$ OP LQ\XP ) RO\R *HUHNWL÷LNDGDU
7 DYXNYH+ LQGL
$OPLQ\XP IRO\R %X]GRODEÕQGD oRN
\DYDúoD
gUGHNYH. D]
$OPLQ\XP IRO\R ó %X]GRODEÕQGD oRN
\DYDúoD
6 OQ . HN OLNYH < D E DQ
gUGH÷L
$OPLQ\XP IRO\R %X]GRODEÕQGD oRN
\DYDúoD
<DEDQL7DYúDQYH
7DYúDQ
$OPLQ\XP IRO\R ô %X]GRODEÕQGD oRN
\DYDúoD
*H\LNHWL
6WUHoILOP YH \D$ OP LQ\XP ) RO\R %X]GRODEÕQGD oRN
\DYDúoD
%\NEDOÕN
6WUHoILOP YH \D$ OP LQ\XP ) RO\R %X]GRODEÕQGD oRN
\DYDúoD
.oN%DOÕN
. o N S OD V WLNS R ú H WOH U * H U H N OLGH ÷ L O
. DEXN OXKD \YDQ ODU
. o N S OD V WLNS R ú H WOH U * H U H N OLGH ÷ L O
.DEXNOXGHQL]KD \Y DQÕ
$OPLQ\XP NRQWH\QHUOHUGHYH\D
SODVWLNNRQWH\Q HUOH UGHWX] OX VXGD
PXKDID]DHGLQ
% X]GR ODEÕQGD oRN
\DYDúoD
+DúODQPÕúEDOÕN
6WUHoILOP YH \D$ OP LQ\XP ) RO\R 6ÕFDNVXGD
.Õ]DUWÕOP Õú%DOÕN
.oN3ODVWLN 3 RúHWOHU 'R÷UXGDQWDYDGD
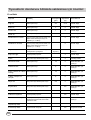
Yiyeceklerin dondurucu bölümde saklanmasý için öneriler:
Et ve Balýk

7
TK
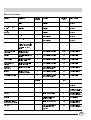
Meyve ve sebzeler

8
TK
Yetkili olmayan teknik servislere asla baþvurmayýnýz
ve orijinal yedek parça kullanýlmasý halinde bunu
kesinlikle reddediniz.
Mod.
RG 2330
TI
Cod.
93139180000 S/N 704211801
220 - 240 V- 50 Hz 150 W
W
Fuse
A
Max 15 w
Total
Gross
Bruto
Brut
Compr.
Kompr.
Syst.
R 134 a
kg 0,090
Gross
Bruto
Brut
340
Net
Util
Utile
Gross
Bruto
Brut
Freez. Capac
Poder de Cong
75
Made in Italy 13918
Test
P.S-I.
Pressure
HIGH-235
LOW 140
kg/24 h
4,0
Class
Clase
N
Classe
Tüm bu kontrollere raðmen cihaz çalýþmýyorsa ve tespit
ettiðiniz aksaklýk halâ sürüyorsa, bu bilgileri aktararak, arýza
tipini, buzdolabý modelini (Mod.) ve sebzelik yanýnda sol
alt taraftaki etikette yazýlý rakamlarý bildirerek en yakýn
Teknik Servisi çaðýrýnýz (bkz aþaðýdaki resimdeki örnek).
Buzdolabýný formda tutma
Temizlik ve özel bakýmlar
Buzdolabýný temizlemeden önce fiþi daima prizden
çekiniz.
- Bu cihazýn imâl edildiði malzemeler hijyenik ve kokuyu
iletmez özelliklere sahiptir, ancak bu özelliði koruyabilmek
için gýdalarýn daima korunmalý ve kapalý olarak koyulmalarý
gerekir. Böylelikle hem çýkarýlmasý zor lekeler önlenir, hem
de kötü kokularýn ortaya çýkmasýnýn önüne geçilir.
- Sadece su ve bikarbonat. Buzdolabýnýn gerek içi, gerek
dýþýnýn temizlenmesi için ýlýk suyla sodyum bikarbonat
kullanýnýz, zira bu madde ayný zamanda iyi bir
dezenfektandýr. bunlar o an için elinizde mevcut deðilse
nötr sabun da kullanabilirsiniz (örneðin Marsilya sabunu).
- Kullanýlmamasý gerekenler: Aþýndýrýcý ve çiziciler, çamaþýr
sularý, amonyak asla kullanýlmamalýdýr. Solvent çözücüler
ve benzerlerinin kullanýlmasý da kesinlikle yasaktýr.
- Buzdolabýnýn içindeki çýkarýlabilir tüm parçalarý bulaþýk
deterjaný yada sabun katýlmýþ sýcak suya yatýrýnýz. Yerlerine
koymadan bunlarý iyice durulayýp kurutmayý ihmal
etmeyiniz.
Þekil 5
- Buzdolabýnýn arka tarafý? Burada toz yýðýlýp birikerek
cihazýn verimli çalýþmasýna bazý sorunlar çýkarabilir. Bu
tozlarý elektrik süpürgesini orta güçte çalýþtýrarak boru
aðzýyla emebilirsiniz. Ancak bu iþlemi nazikçe yapmaya
dikkat etmelisiniz!
- Uzun süre çalýþmadan kaldýðýnda. Yaz aylarýnda tatil
nedeniyle buzdolabýný durdurmaya karar verirseniz, içini
temizleyip kapýlarýný açýk býrakýnýz, aksi halde küf ve kötü
kokular oluþur.
- Ýç lambanýn deðiþtirilmesi. Termostat kutusunun arka
tarafýnda iç aydýnlatma
lambasý bulunur. Bunu
deðiþtirmek istediðinizde
cihazýn elektrik baðlantýsýný
kesiniz, çalýþmayan lambayý
sökerek çýkarýnýz ve
koruyucu kapak üzerinde
yazan güçten yüksek
olmayan (10 W) bir yenisiyle
þekil 5te gösterildiði gibi
deðiþtiriniz.
Bir sorun mu var
Buzdolabý çalýþmýyor
Þunlarý kontrol ettiniz mi:
· Dairenizin ana þalterinin kapalý olup olmadýðýný;
· Fiþin prize iyice oturmuþ olup olmadýðýný;
· Prizde cereyan olup olmadýðýný; cihazýn fiþini baþka bir
prize takmayý deneyiniz.
Buzdolabý ve dondurucu bölme (freezer) az
soðutuyor
Þunlarý kontrol ettiniz mi:
· Kapýlarýn iyi kapanýp kapanmadýðýný ve contalarýn eskimiþ
olup olmadýklarýný;
· Kapýlarýn uzun süre açýk tutulup tutulmadýklarýný;
· Isý ayar düðmesinin doðru pozisyonda olup olmadýðýný;
· Dondurucu yada buzdolabýnýn aþýrý dolu olup
olmadýklarýný.
Buzdolabýnda yiyecekler aþýrý donuyor
Þunlarý kontrol ettiniz mi:
· Isý ayar düðmesinin doðru pozisyonda olup olmadýðýný.
Motor sürekli çalýþýyor
Þunlarý kontrol ettiniz mi:
· Kapýlar tam kapalý deðil, yada uzun süre açýk kalmýþ
durumdalar;
· Dýþ hava sýcaklýðý çok yüksek;
· Isý ayar düðmesi doðru pozisyonda deðil.
Cihaz çok sesli çalýþýyor.
Ýç soðutucu gaz kompresör stop durumdayken bile az bir
ses çýkarýyor (bu bir arýza yada kusur deðildir).
Þunlarý kontrol ettiniz mi:
· Buzdolabý zemine tam ve düz oturuyor mu;
· Mobilya ve sair eþya arasýna monte edili olduðundan
çalýþmasý sýrasýnda bunlardan titreþim nedeniyle sesler
çýkýyor mu.

9
GB
ATTENTION
Read your manual carefully since it contains instructions
which will ensure safe installation, use and maintenance of
your appliance.
Your Refrigerator is built to International safety standards
(EN60) ans has been awarded the European approval mark
(IMQ) for compliance with UK electrical safety requirements.
It also meets the EC standards on the prevention and elimi-
nation of readio interference (EC directive 87/308 - 02.06.89).
1. This appliance is designed to be used indoors and under
no circumstances should it be installed outside even if pro-
tected by a roof. Leaving the appliance exposed to the rain
and whether is exceedingly dangerous.
2. The appliance should be used only by adults and exclu-
sively for storing foodstuffs in compliance with the instruc-
tions provided in this manual. Under no circumstances should
children be allowed to operate, or tamper with, this prod-
uct.
3. Do not attempt to operate or handle this appliance when
barefoot, or with wet hands or feet.
4. It is highly recommended that you do not operate this
appliance by connecting it to the power supply with exten-
sions or multiple socket plugs. If the refrigerator has been
installed between two cabinets, make sure that the supply
chord is not dangerously crimped or trapped beneath a heavy
object.
5. Never pull the cable or the appliance to remove the plug
from the socket; this is exceedingly dangerous.
6. Do not touch the internal cooling elements, especially if
your hands are wet, since you could burn or hurt yourself.
7. Before doing any cleaning, disconnect the appliance from
the electricity (by pulling out the plug or turning off the gen-
eral switch in your home).
8. Before disposing of your old appliance, remember to break
or remove the lock as a safety measure to protect children
who might lock themselves inside the appliance when play-
ing. In addition, if the appliance is a new one with a lock,
keeo the key out of the reach of small children.
9. If your appliance is not operating properly, read the chap-
ter entitled, “Trouble Shooting”, which might help you re-
solve the problem, before calling an after-sales service cen-
tre. Do not attempt to repair the appliance by tampering
with the internal components.
10. If the power supply cord must be replaced, please contact
one of our Customer Service Centers. In some cases, the con-
nections are made using special terminals and in others a special
tool must be used to access the connections.
11. Do not use electric appliances inside the compartment
for food storage, if these are not those recommended by
the manufacturer.
12. At the end of the functional life of your appliance –
containing cyclopentane gas in the insulation foam and
perhaps gas R600a (isobutane) in the refrigeration circuit –
the latter should made safe before being sent to the dump.
For this operation, please contact your dealer or the Local
Organisation in charge of waste disposal.
Installation
Proper installation of the appliance is essential to en-
sure the best and most efficient performance of your
appliance.
Ventilation
The compressor and condenser generate heat and, there-
fore, need to be ventilated properly. Rooms with less than
perfect ventilation are not very suited for installation of the
appliance. Therefore, it should be installed in a room with
an opening (window or French window) that provide the
appropriate amount of air re-circulation. It is also important
that the room not be too humid.
During installation, make sure not to cover or obstruct the
grates that allow for proper ventilation of the appliance.
For proper ventilation of the appliance, you must leave:
- a space of at least 10 cm between the top part and any
cabinets above it;
- a space of at least 5 cm between the sides of the appliance
and any adjacent cabinets/walls.
Away from Heat
Avoid positioning the appliance in a place where it is directly
exposed to sunlight or near an oven, cook top or the like.
Levelling
The floor should be perfectly level; if not, you can adjust the
feet at the front of the appliance.
Earthing
Before making the electrical connection, check that the volt-
age shown on the data plate, that you will find on the bot-
tom left hand side of the appliance next to the crisper, cor-
responds to that of your home and that the socket is earthed
in compliance with all current electrical regulations. If the
system is not earthed, the manufacturer declines all liability
for consequent damages or losses. Do not use adapters or
multiple sockets. Position the appliance in such a way
that you can access the socket where it is plugged in.
Check the power load
The electrical socket must support the maximum power load
of the appliance shown on the data plate (on the bottom
left hand side of the appliance next to the crisper).
Before plugging the appliance to the mains
Stand the appliance upright and wait at least 3 hours before
plugging the appliance into the mains to ensure proper per-
formance.
Safety - a good habit to get into.

10
GB
A
Icedevice
B
Freezer shelf
C
“Cool Box” compartment for meat and fish
D
Fridge compartment temperature adjustment
knob
E
Freezer compartment temperature adjustment
knob
F
Removable height adjustable shelves
G
Fruit and vegetable drawer
H
Adjustable feet
I
Removable door shelf for bottles
J
Removable door shelf for food products
K
Beverage can shelves
L
Removable shelf with lid and egg compartment
M
Freezer door shelf
L
K
M
J
I
HH
G
F
D
E
B
C
A
A closer look

11
GB
How to Start the Appliance
NOTICE
After the appliance has been delivered, stand it in the
upright position and wait approximately 3 hours be-
fore connecting it to the electrical outlet to guarantee
that it operates properly.
Before placing foodstuffs in the refrigerator or freezer, clean
the interior well with warm water and baking soda.
After putting the plug in the socket, make sure that the
light is on inside the appliance and then turn the thermostat
knob (D and E) to the “med” setting. After a few hours
have passed, you can place fresh food in the refrigerator
compartment and frozen foods into the freezer.
What Not to Store in the Refrigerator
Garlic (transmits odour), onions and leeks.
Bananas (they will turn black).
Citrus fruits.
Potatoes and root vegetables (store in dark, dry places).
How to use the refrigerator compartment...
The temperature inside your refrigerator is controlled by the
thermostat manually. You can set the thermostat knob between
MIN and MAX in order to decrease the temperature.
Temperature Settings of the Fridge Compartment
Set the thermostat setting to the medium setting (MED) in
order to obtain the most appropriate temperature inside the
fridge when the freezer compartment is empty.
When setting the thermostat settings, it is important and
should be taken into consideration how often the door of
the refrigerator is opened, how much food will be kept inside
the refrigerator, and what the room temperature is.
fridge
- Contrary to popular belief, cooked foods do not store any
longer than raw food.
- Do not place liquids in containers without covering them
because this will lead to an increase in the level of moisture
within the refrigerator, causing the formation of frost.
- Remember to cool hot food before storing otherwise the
temperature inside the appliance will increase, causing the
compressor to work harder and use more energy.
WARNING: Do not place any food in direct contact
with the air windows in order not to obstruct air
flow.
The can rack
The can rack (Fig. 1) on the
inner door allows you to
store not only cans, but also
yoghurt, butter and other
containers, according to
your requirements.
Fig. 1
Using the "Cool Box" compartment for meat
and fish
This compartment was designed to allow for longer
preservation times for fresh meat and fish (for as long as a
week). This is possible as the coldest temperature of the
entire fridge is available inside this specific compartment.
Moreover, the “Cool Box” compartment can also be used
to cool dishes that are normally eaten “cold”.
The cover of the “Cool Box” is opened towards to the
basement of the same compartment (Fig. 2).
Fig. 2

12
GB
- For the preparation of food to be frozen, please con-
sult a specialized manual.
- Food that has be thawed, even partially, must not be re-
frozen: you must cook it in order to consume it (within 24
hours) or to freeze it once again.
- Fresh foods that you intend to freeze must not be placed
in contact with those that are already frozen or those that
have been fast-frozen. Rather, they must placed atop the
grate in the freezer compartment, in contact with the walls
of the compartment (back or side) if possible. Please keep in
mind that proper conservation of frozen foods depends on
the speed with which they are frozen.
- During the freezing process, avoid opening the door of the
freezer.
- The maximum daily quantity of food that can be frozen is
indicated on the rating plate located to the left of the veg-
etable crisper.
- In order to freeze and then thaw foods optimally, it is rec-
ommended that you divide food into small portions so that
they freeze quickly and uniformly. The packages should be
clearly marked with the content and the date they were
frozen.
- Do not open the freezer door in the event of a power
failure or malfunction. This precaution will slow the rise in
temperature within the compartment. If the door is not
opened, frozen and fast-frozen foods will remain in their
current state for approximately 9-14 hours.
- Do not place full bottles in the freezer: they could easily
burst because all liquids increase in volume when they freeze.
- Fill the ice cube trays about 3/4 full.
- If the ambient temperature remains below 14°C for an
extended period of time, the temperature needed for ex-
tended storage of food in the freezer will not be reached,
resulting in reduced storage life of the food.
How to use the freezer compartment...
Temperature Settings of the Freezer Compartment
Set the thermostat to the medium (MED) or maximum
(MAX) in order to freeze foods quickly and to obtain ice
immediately.
Set the thermostat to the medium (MED) for normal use
and to store frozen foods for long periods.
Set the thermostat to the minimum (MIN) or medium (MED)
in order to keep ice cubes frozen and to save energy.
During hot seasons, when the “freezer” knob is turned to
“MAX” position, your fridge will operate for elongated
period. The thermostat position should be brought to its initial
position when the freezer compartment is cooled sufficiently.
freezer
WARNING: Do not place any food in direct contact with the
all air windows in the freezer and fast freezer compartment
in order not to obstruct air flow.
ICE DEVICE
After pouring water in the special ice cups, place them in
their places in the ice device (Fig. 3). After about 2 hours,
the ice cubes will be ready. In order to get the ice cubes, it
will be sufficient to turn the two buttons to the right. The
ice cubes will fall in to the tray below, ready to be used (Fig.
4).
Fig. 4Fig. 3

13
GB
Guide to Using the Freezer
Meat and Fish
Food Wrapping
Tenderising
(days)
Storage
(months)
Thawing Time
Beef Roast Tinfoil 2 / 3 9 / 10 Not required.
Lamb Tinfoil 1 / 2 6 Not required.
Pork Roast Tinfoil 1 6 Not required.
Veal Roast Tinfoil 1 8 Not required.
Veal/Pork Chops
Each piece wrapped in cling wrap and
then in tinfoil (4 to 6 slices)
6 Not required.
Veal/Lamb Cutlets
Each piece wrapped in cling wrap and
then in tinfoil (4 to 6 slices)
6 Not required.
Minced Meat
In aluminium containers covered with cling
wrap.
Freshly
minced
2 Slowly in refrigerator.
Heart and Liver Plastic Baggies 3 Not required.
Sausages Cling Wrap or Tinfoil 2 As necessary.
Chicken and Turkey Tinfoil 1 / 3 9 Very slowly in refrigerator.
Duck and Goose Tinfoil 1 / 4 6 Very slowly in refrigerator.
Pheasant, Partrige and
Wild Duck
Tinfoil 1 / 3 9 Very slowly in refrigerator.
Hare and Rabbit Tinfoil 3 / 4 6 Very slowly in refrigerator.
Venison Tinfoil or Cling Wrap 5 / 6 9 Very slowly in refrigerator.
Large Fish Tinfoil or Cling Wrap 4 / 6 Very slowly in refrigerator.
Small Fish Plastic Baggies 2 / 3 Not required.
Crustaceans Plastic Baggies 3 / 6 Not required.
Shellfish
Store in salted water in aluminium
containers or plastic containers.
3 Very slowly in refrigerator.
Boiled Fish Tinfoil or Cling Wrap 12 In hot water.
Fried Fish Plastic Baggies 4 / 6 Directly in pan.

14
GB
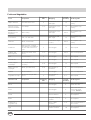
Fruits and Vegetables
Food Preparation
Blanching
Time
Wrapping
Storage
(months)
Thawing Time
Apples and Pears Peel and cut into slices. 2’
In Containers (cover
with syrup)
12
In refrigerator very
slowly.
Apricots, Peaches,
Cherries and Plums
Peel and pit. 1’ / 2’
In Containers (cover
with syrup)
12
In refrigerator very
slowly.
Strawberries
Blackberries and
Raspberries
Rinse and fry.
In Containers (cover
with sugar)
10 / 12
In refrigerator very
slowly.
Cooked Fruit Cut, cook and strain.
In Containers (add
10% sugar)
12
In refrigerator very
slowly.
Fruit Juice Wash, cut and crush.
In Containers (sugar
to taste)
10 / 12
In refrigerator very
slowly.
Cauliflower
Remove leaves, cut head
into small pieces and blanch
in water and a little lemon
juice.
2’ Plastic Baggies 12 Not required.
Cabbage and
Brussel Sprouts
Wash and cut into small
pieces.
1’ / 2’ Plastic Baggies 10 / 12 At room temperature.
Peas Shell and wash. 2’ Plastic Baggies 12 Not required.
French Beans Wash and slice if required. 2 Plastic Baggies 10 / 12 Not required.
Carrots, Peppers
and Turnips
Peel, wash and slice if
necessary.
3’ / 4’ Plastic Baggies 12 Not required.
Mushrooms and
Asparagus
Wash, peel and cut up. 3’ / 4’
Plastic Baggies or
Containers
6 At room temperature.
Spinach Wash and mince. 2’ Plastic Baggies 12 At room temperature.
Vegetable for Soups
Wash and cut up in small
pieces.
3’
Plastic Baggies or
Containers
6 / 7 Not required.
Various Foods Preparation
Blanching
Time
Wrapping
Storage
(months)
Thawing time
Bread Plastic Baggies 4
At room temperature
and in the oven.
Cakes Plastic Baggies 6
About 10 minutes at
room temperature,
cook at 100/200°C.
Cream Plastic Containers 6
At room temperature or
in refrigerator.
Butter
In original wrapping
or tinfoil
6 In refrigerator.
Boiled Food or
Vegetable Soup
Plastic or Glass
Containers
3 / 6
At room temperature or
in hot water.
Eggs
Freeze without shells
in small containers
10
At room temperature or
in refrigerator.

15
GB
Keeping Your Appliance in Shape
Cleaning and maintenance
Always unplug the appliance from the mains before
cleaning.
- Your appliance is manufactured with hygienic odourless
materials. To preserve these characteristics, always use sealed
containers for strong smelling foods to avoid the formation
of odours that are difficult to remove.
- Use only a water and bicarbonate solution: Clean the
internal and exterior of your appliance with a sponge soaked
with a warm water and sodium bicarbonate solution, which
is also a good disinfectant. If you do not have any sodium
bicarbonate at home, use neutral detergent.
- What not to use: Do not use abrasive detergents, bleach
or detergents containing ammonia. Never use solvent based
products.
- Dishwashable: All the removable parts can be cleaned by
soaking in hot soapy water or detergent. If you own a
dishwasher, you may wash these parts in the dishwasher.
Remember to dry thoroughly before replacing them.
- What about the back panel? Dust may deposit on the back
panel and affect the proper running of the appliance. To
remove dust, vacuum away the dust very carefully using the
appropriate vacuum cleaner accessory.
- Discontinued use of the appliance: If the appliance is not in
use for any length of time, remember to clean the interior
and dry thoroughly, leaving the doors open to prevent the
formation of bad odours and mould.
Fig. 5
- How to replace the internal lamp. The lamp for the internal
light is situated at the rear of the thermostat box. To replace
it, disconnect the appliance from the electricity mains,
unscrew the burned out bulb and replace it with another
bulb with a wattage no higher than 10 Watt, follow the
instructions illustrated in fig. 5.
Tips on Saving Energy
- Install the Appliance Properly
In other words, away from sources of heat and direct sun-
light, in a well ventilated room complying with the mini-
mum distances indicated in the paragraph entitled, “ Instal-
lation/Ventilation.”
- Use the Right Temperature Setting
A setting which is too cold increases energy consumption.
- Do not Overfill
To conserve food properly, the cold air must circulate freely
within the refrigerator. If it is overfilled, this will prevent proper
air circulation, forcing the compressor to work continuously.
- Close the Doors
Open your refrigerator as little as possible because each time
you do so you loose much of the cold air. To raise the tem-
perature to the proper level again, the motor must work for
a long time, consuming energy.
- Keep an Eye on the Seals
Keep the seals clean and make sure that they adhere well to
the door. This alone will ensure that no cold air escapes.
- No Hot Foods
A hot pot or pan placed in the refrigerator immediately raises
the temperature several degrees. Let hot cookware and food
cool to ambient temperature before placing them in the re-
frigerator.
- Defrost the Freezer
Check the thickness of the frost on the walls of the freezer
and immediately defrost it if the layer of frost is too thick.
(see the section entitled, “Keeping your Appliance in Shape”).

16
GB
Is There a Problem?
The refrigerator does not function.
Have you checked whether:
• The main switch for the electricity to the apartment or
home has been turned off;
• The plug is properly inserted in the outlet;
• The outlet is adequate; try inserting the plug into another
outlet in the room.
The refrigerator and the freezer do not cool
properly.
Have you checked whether:
• The doors do not close well or the seals are faulty;
• The doors are left open too long;
• The thermostat knob is not on the proper setting;
• The refrigerator or freezer is overfilled.
The food in the refrigerator becomes too cold.
Have you checked whether:
• The thermostat knob is on the proper setting.
The motor runs continuously.
Have you checked whether
• The doors are not closed well or have remained open too
long;
• The ambient temperature is too high;
• The thermostat knob is not on the proper setting.
The appliance makes too much noise.
The gas refrigerant produces a slight noise even when the
compressor is not running (this is not a defect).
Have you checked whether:
• The refrigerator is level.
• The appliance was installed between cabinets or objects
that vibrate and make noise.
Never call on unauthorized technicians and always
refuse spare parts which are not originals.
Mod.
RG 2330
TI
Cod.
93139180000 S/N 704211801
220 - 240 V- 50 Hz 150 W
W
Fuse
A
Max 15 w
Total
Gross
Bruto
Brut
Compr.
Kompr.
Syst.
R 134 a
kg 0,090
Gross
Bruto
Brut
340
Net
Util
Utile
Gross
Bruto
Brut
Freez. Capac
Poder de Cong
75
Made in Italy 13918
Test
P.S-I.
Pressure
HIGH-235
LOW 140
kg/24 h
4,0
Class
Clase
N
Classe
If after all the checks, the appliance still does not operate or
the problem persists, call the nearest Service Centre and
inform them of: the type of problem, the abbreviation of
the model name (Mod.) and the relative numbers (S/N) writ-
ten on the rating plate located at the bottom left next to
the vegetable crisper (see examples in the figures below).

17
GB

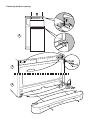
Reversing the door opening
3
1
2
Sayfa yükleniyor...
Sayfa yükleniyor...
Sayfa yükleniyor...
Sayfa yükleniyor...
-
 1
1
-
 2
2
-
 3
3
-
 4
4
-
 5
5
-
 6
6
-
 7
7
-
 8
8
-
 9
9
-
 10
10
-
 11
11
-
 12
12
-
 13
13
-
 14
14
-
 15
15
-
 16
16
-
 17
17
-
 18
18
-
 19
19
-
 20
20
-
 21
21
-
 22
22
-
 23
23
-
 24
24


Indesit T 5 FNF L HG (TK) Kullanici rehberi
- Kategori
- Buzdolabı-dondurucular
- Tip
- Kullanici rehberi
- Bu kılavuz aynı zamanda aşağıdakiler için de uygundur:
diğer dillerde
- English: Indesit T 5 FNF L HG (TK) User guide
İlgili makaleler
Diğer belgeler
-
Ariston Freezer Fridge/Freezer Combined Kullanım kılavuzu
-
Whirlpool T 5 FNF GF (TK) Kullanici rehberi
-
-
Whirlpool S 46 B Kullanici rehberi
-
-
-
-
Samsung RM25KGRS Kullanım kılavuzu
-
VOSS MOA 237-1 Kullanım kılavuzu
-
AEG MC191 Kullanım kılavuzu