Palson WINDSTORM Operating Instructions Manual
- Kategori
- Elektrikli süpürgeler
- Tip
- Operating Instructions Manual

Aspirador sin bolsa
Vacuum cleaner without bag
Aspirateur sans sac
Aspirador sem saco
Staubsauger ohne Staubbeutel
Aspiratutto senza sacchetto
Stofzuiger zonder zak
Porzsák nélküli porszívó
Windstorm
COD. 30553
GB
E
F
P
D
I
NL
GR
RU
AR
HU
TR
MODO DE EMPLEO
OPERATING INSTRUCTIONS
MODE D’EMPLOI
MODO DE EMPRÊGO
GEBRAUCHSANLEITUNG
ISTRUZIONI
GEBRUIKSAANWIJZING
TROPOS CRHSHS
HASZNÁLATI UTASÍTÁS
kullanma wekli
BG

2

3
ESPAÑOL. . . . . . . . . . . . . . . 12
ENGLISH . . . . . . . . . . . . . . . 16
FRANÇAIS . . . . . . . . . . . . . . 20
PORTUGUÊS. . . . . . . . . . . . 24
DEUTSCH . . . . . . . . . . . . . . 28
ITALIANO . . . . . . . . . . . . . . . 32
NEDERLANDS. . . . . . . . . . . 36
ELLHNIKA . . . . . . . . . . . . . . 40
. . . . . . . . . . . . . 44
. . . . . . . . . . . 51
MAGYAR . . . . . . . . . . . . . . . 52
TÜRkÇe
. . . . . . . . . . . . . . . . 56
. . . . . . . . . . . . . . 60
GB
E
F
P
D
I
NL
GR
RU
AR
HU
TR
BG

4
1
6
7
8
2
3
5
4
9
10
14
15
16
11
12
18
13
17
19
20
21
22
23
16
24

5
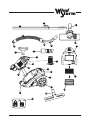
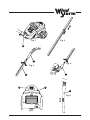
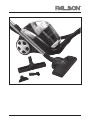
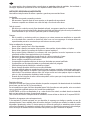
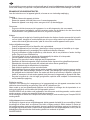
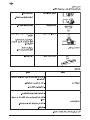
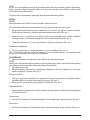
1. Tubo metálico telescópico
2. Manguera flexible
3. Conector de la manguera
4. Empuñadura de la manguera
5. Regulador del caudal de aspiración
6. Bloqueo del tubo
7. Accesorio-cepillo para suelos
8. Selector de tipo de suelo
9. Accesorio para tapicería
10. Accesorio cepillo-tobera
11. Conexión de la manguera
12. Asa de transporte
13. Filtro Hepa
14. Botón de liberación del depósito
15. Depósito de polvo
16. Bloqueo-Desbloqueo vaciado
depósito
17. Botón de rebobinado del cable
18. Regulador de potencia/Botón de
encendido/apagado
19. Filtro de salida
20. Cubierta de filtro de salida
21. Botón de apertura del depósito del
polvo
22. Soporte para el almacenamiento
23. Ruedas especial parquet
24. Accesorio cepillo para parquet de
pelo de caballo
1. Telescopic metal pipe
2. Flexible hose
3. Hose connector
4. Hose grip
5. Suction flow controller
6. Pipe blockage
7. Floor brush accessory
8. Floor type selector
9. Upholstery accessory
10. Brush-nozzle accessory
11. Hose connection
12. Carrying handle
13. Hepa Filter
14. Dust receptacle release button
15. Dust receptacle
16. Lock-Unlock vacuuming receptacle
17. Cord rollup button
18. Power controller / On / Off button
19. Output filter
20. Output filter cover
21. Dust receptacle open button
22. Support for storage
23. Special parquet floor wheels
24. Horsehair brush accessory for
parquet floors
1. Tube métallique télescopique
2. Tuyau flexible
3. Connecteur du tuyau
4. Poignée du tuyau
5. Régulateur de débit d’aspiration
6. Verrouillage du tuyau
7. Accessoire brosse pour sols
8. Sélecteur de type de sols
9. Accessoires pour tapisserie
10. Accessoire brosse-tuyère
11. Raccord du tuyau
12. Anse de transport
13. Filtre Hepa
14. Bouton de déverrouillage du dépôt
15. Dépôt de poussières
16. Verrouillage/déverrouillage pour vider
le dépôt
17. Bouton d’enroulage du câble
18. Régulateur de puissance/Bouton
d’allumage/extinction
19. Filtre de sortie
20. Couvercle de filtre de sortie
21. Bouton d’ouverture de dépôt de
poussières
22. Support pour le stockage
23. Roues spécial parquet
24. Accessoire brosse pour parquet en
crin de cheval
1. Tubo telescópico metálico
2. Mangueira flexível
3. Conector da mangueira
4. Pega da mangueira
5. Regulador do caudal de aspiração
6. Bloqueio do tubo
7. Acessório-escova para chão
8. Selector do tipo de chão
9. Acessório para estofos
10. Acessório escova-bocal
11. Conexão da mangueira
12. Pega de transporte
13. Filtro Hepa
14. Botão de libertação do depósito
15. Depósito do pó
16. Bloqueio-Desbloqueio esvaziamento
depósito
17. Botão de rebobinagem do cabo
18. Regulador de potência/Botão de ligar/
desligar
19. Filtro de saída
20. Tampa do filtro de saída
21. Botão de abertura do depósito do pó
22. Suporte para armazenamento
23. Rodas especiais parquet
24. Acessório escova para parquet de
pêlo de cavalo
1. Ausziehbares Metallrohr
2. Flexibler Schlauch
3. Schlauchanschluss
4. Griff (am Schlauch)
5. Reguliertaste für die Saugleistung
6. Rohrfeststellknopf
7. Bürstenaufsatz für Boden
8. Auswahl der Bodenart
9. Aufsatz für Polstermöbel
10. Aufsatzbürste mit Düse
11. Anschlussöffnung am Gerät
12. Tragegriff
13. Hepa-Filter
14. Freigabetaste Staubbehälter
15. Staubbehälter
16. Verriegelung zum Entleeren des
Staubbehälters
17. Taste zum Kabelaufrollen
18. Regulierung der
Saugleistung/Ein-/Ausschalter
19. Nachsatzfilter
20. Abdeckung des Nachsatzfilters
21. Freigabetaste zum Öffnen des
Staubbehälters
22. Stützfuß für Aufbewahrung
23. Parkettgeeignete Räder
24. Bürstenaufsatz aus Pferdehaar für
Parkett
1. Tubo telescopico in metallo
2. Manicotto flessibile
3. Raccordo del manicotto
4. Impugnatura del manicotto
5. Regolatore della portata di
aspirazione
6. Dispositivo di blocco del tubo
7.
Accessorio con spazzola per pavimenti
8. Selettore per il tipo di pavimento
9. Accessorio per tappezzeria
10. Accessorio spazzola-bocchetta
11. Raccordo del manicotto
12. Manico per il trasporto
13. Filtro Hepa
14. Pulsante di sgancio del serbatoio
15. Serbatoio della polvere
16. Blocco-sblocco svuotamento
serbatoio
17. Pulsante di riavvolgimento del cavo
18. Regolatore di potenza/pulsante di
accensione/spegnimento
19. Filtro in uscita
20. Coperchio del filtro in uscita
21. Pulsante di apertura del serbatoio
della polvere
22. Supporto per riporre l’aspiratutto
23. Ruote speciali per parquet
24. Accessorio con spazzola per parquet
in crini di cavallo

6
1. Telescopische metalen buis
2. Flexibele slang
3. Slangaansluitstuk
4. Handgreep van de slang
5. Regelaar voor zuigvermogen
6. Buisvergrendeling
7. Hulpstuk met borstel voor vloeren
8. Selectieknop voor type vloer
9. Hulpstuk voor bekleding
10. Hulpstuk met borstel en mondstuk
11. Slangaansluiting
12. Transporthandgreep
13. Hepa-filter
14. Knop voor vrijmaken van tank
15. Stoftank
16. Ver-/ontgrendeling leegmaken van tank
17. Snoerheropwindlknop
18. Vermogensregelaar/Aan/uit-knop
19. Uitgangsfilter
20. Deksel van uitgangsfilter
21. Knop voor openen van stoftank
22. Drager voor bewaring
23. Wielen speciaal voor parket
24. Hulpstuk met borstel van paardenhaar voor
parketvloeren

7
5. A szívási teljesítmény szabályozója
8. Padló fajtáját kiválasztó gomb
12. Fogó
14. A tartály kiengedésére szolgáló gomb
15. Portartály
17. A kábel feltekerésére szolgáló gomb
18. Teljesítmény szabályozó/Be- és kikapcsoló gomb
21. A portartály nyitó gombja
22. Felakasztó a tároláshoz
23. Különleges kerekek a parketthez
1. Teleskopik metalik boru
2. Esnek hortum
6. Boru kitleyici
8. Zemin tipi seçicisi
13. Hepa Filtresi
15. Toz deposu
23. Parkeye özel tekerlekler

8
11
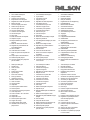
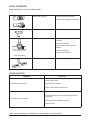
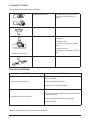
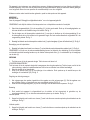
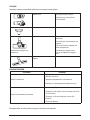
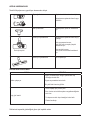
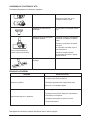
Fig. 1
Fig. 2
1
4
Fig. 3
7
Fig. 4
18
17
Fig. 5
5
Fig. 6

9
Fig. 7
1
8
Fig. 8
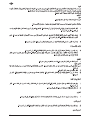
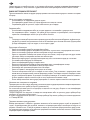
15
Fig. 9
Fig. 10
Fig. 11
21
Fig. 12

10
Fig. 13
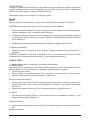
13
Fig. 14
13
Fig. 15
20
Fig. 16
19
Fig. 17
Fig. 18 Fig. 19

11

12
y diseño. Esperamos que disfrute de su nuevo aspirador WINDSTORM de PALSON.
INSTRUCCIONES DE SEGURIDAD IMPORTANTES
Lea todas las instrucciones antes de utilizar el aparato y guárdelas para futuras consultas.
Ubicación
- No utilice o guarde el aparato en exteriores.
- No almacene el aparato cerca de hornos calientes o aparatos de calefacción.
- Almacene el aparato en un entorno seco en el que no exista riesgo de sufrir daños.
Cable de corriente
- No deje que el cable de corriente quede demasiado tirante ni pase el aparato por encima.
-
Niños
-
Este producto no está permitido para uso infantil u otras personas sin asistencia o supervisión si su
para asegurar que no juegan con dicho producto.
Otras consideraciones de seguridad
- No utilice nunca el aparato sin el filtro Hepa instalado.
- No utilice nunca el aparato en presencia de líquidos o vapores explosivos.
volátiles. No aspire nunca ácidos o polvo de asbesto.
- Desconecte siempre el aparato de la red eléctrica después de utilizarlo o antes de limpiarlo.
- No deje desatendido el aparato en funcionamiento.
- No modifique nunca el aparato de ningún modo.
- Las reparaciones de aparatos eléctricos deben ser llevadas a cabo únicamente por personal
cualificado.
- Las reparaciones no llevadas a cabo por profesionales pueden resultar peligrosas.
- Utilice únicamente piezas de repuesto y accesorios originales.
- No manipule nunca aparatos eléctricos con las manos mojadas.
alfombras pueden generar pequeñas cargas estáticas en el depósito. Estas cargas son completamente
-
local.
Requisitos eléctricos
Compruebe que la tensión que figura en la placa de datos del aparato se corresponde con el suministro
contacto con un electricista cualificado para proceder a su sustitución.
podría generarse una situación peligrosa.
de 13 amperios BS1362.
Dispositivo de seguridad para sobrecalentamiento
Su aspirador viene equipado con un dispositivo de seguridad que apaga el aparato en el supuesto de
salida de aire están bloqueadas. Espere al menos 15 minutos a que se restablezca el sistema de protección
antes de intentar volver a encender el aspirador. Si el aspirador sigue sin funcionar o el dispositivo de seguridad
E

13
ADVERTENCIA:
Este aparato no ha sido diseñado para su uso por parte de personas (niños inclusive) con las capacidades
hayan sido instruidos en el uso del mismo por una persona responsable de su seguridad.
Supervise a los niños con el fin de garantizar que no juegan con el aparato.
MONTAJE
IMPORTANTE:
Lea el apartado «Instrucciones de seguridad importantes» antes de utilizar el aparato.
NOTA: extraiga siempre el enchufe de la toma de red antes de instalar o extraer accesorios.
1. Inserte el conector de la manguera (3) en la conexión (11) hasta que quede correctamente ajustado.
2. Ajuste la longitud del tubo metálico telescópico (1) presionando el bloqueo del tubo (6) y tirando del tubo
telescópico hasta la longitud deseada. El tubo se bloqueará automáticamente al soltar el bloqueo. Véase la
fig. 2.
3. Fije el extremo del tubo metálico telescópico (1) a la empuñadura (4) de la manguera flexible (2). Véase la
fig. 3.
Fijación de los accesorios
4. Fije el accesorio cepillo para suelos (7) en el extremo del tubo metálico telescópico (1). Véase la fig. 4.
pueden fijarse en el tubo telescópico metálico (1) o directamente en la empuñadura de la manguera (4).
FUNCIONAMIENTO
1. Tire del cable hasta la longitud deseada. No tire del cable en exceso.
PRECAUCIÓN:
Tire del cable hasta la longitud máxima indicada por la marca de color amarillo. No tire nunca del cable hasta
2. Inserte el enchufe en la toma eléctrica.
presionar el botón de apagado/encendido (18). Véase la fig. 5.
Control de la potencia de succión
1. La potencia de succión se puede ajustar mediante el regulador del caudal de aspiración (5). Cierre el
regulador para obtener una succión total o ábralo para obtener una succión reducida. Véase la fig. 6.
2. Gire el regulador de potencia (18) para ajustar la potencia de la unidad. Véase la fig. 5.
Almacenamiento
cable automáticamente. Véase la fig. 5.
Posición normal
2. Enganche el accesorio cepillo para suelos (7) en la ranura dispuesta en la parte posterior del aspirador.
Véase la fig. 7.
Posición vertical
3. Enganche el accesorio cepillo para suelos (7) en la ranura dispuesta en la parte inferior del aspirador.
Véase la fig. 8.

14
E
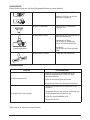
VACIADO DEL DEPÓSITO DE POLVO
NOTA:
Compruebe siempre si hay accesorios o tubos bloqueados y siga las instrucciones de limpieza de los filtros
para obtener un rendimiento óptimo. Véase fig. 9.
1. Desenchufe el aspirador de la toma eléctrica.
2. Extraiga la manguera flexible del aspirador presionando los ganchos de fijación y tirando hacia fuera.
Véase la fig. 10.
3. Extraiga con cuidado el depósito de polvo (15) presionando el botón de liberación del depósito (14).
Véase la fig. 11.
4. Asegúrese de que sujeta el depósito de polvo (15) en posición horizontal. Utilice el botón apertura del
depósito del polvo (21). Vacíe el compartimento de polvo en el cubo de la basura. Véase la fig. 12.
5. Limpie el interior del depósito de polvo (15) utilizando un trapo seco o húmedo. Asegúrese de que el
depósito de polvo esté completamente seco antes de montarlo y utilizarlo.
LIMPIEZA DEL FILTRO
Limpieza del filtro del depósito de polvo
extraiga el filtro Hepa (13) y enjuáguelo con agua tibia. Seque completamente el filtro del colector antes de
volver a colocarlo. Véanse figs. 13 - 15.
1. Extraiga el filtro Hepa (13) del depósito de polvo (15) girando la cubierta en sentido contrario a las
agujas del reloj. Véase la fig. 13.
2. Extraiga la cubierta del filtro del depósito (15). Véase la fig. 14.
3. Limpie la cubierta y el filtro Hepa (13) con agua caliente y jabón. Asegúrese de que el recipiente esté
completamente seco antes de montarlo. Véase la fig. 15.
4. Vuelva a colocar el filtro Hepa (13) y el depósito de polvo (15) en la unidad del mismo modo en que se
extrajeron.
NOTA: se recomienda limpiar el filtro Hepa (13) y el filtro de salida (19) a la vez en intervalos periódicos.
Limpieza del filtro de salida
1. Extraiga la cubierta del filtro de salida (19) tirando de la lengüeta. Extraiga el filtro y límpielo en agua
caliente con jabón. Asegúrese de que el filtro de salida (19) esté totalmente seco antes de montarlo.
Véanse las figs. 16 y 17.
2. Vuelva a colocar el filtro de salida y la cubierta en la unidad del mismo modo en que se extrajeron.
Véanse las figs. 16 y 17.
NOTAS:
- Se recomienda limpiar el filtro del depósito y el filtro de salida a la vez en intervalos periódicos.
LIMPIEZA DEL TUBO METÁLICO TELESCÓPICO
1. Desencaje y extraiga la cubierta de plástico de la parte inferior del aspirador. Véanse las figs. 18 y 19.
2. Retire cualquier elemento que bloquee el tubo metálico telescópico. Véase la fig. 19.
3. Vuelva a fijar la cubierta de plástico en la unidad. Véase la fig. 19.
NOTA: se recomienda limpiar el tubo metálico telescópico en intervalos periódicos.

15
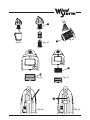
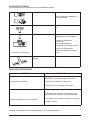
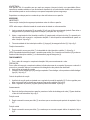
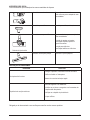
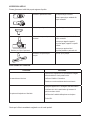
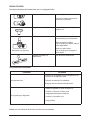
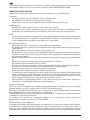
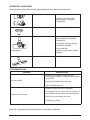
ACCESORIOS DE TOBERA
Fije los accesorios que se adecuen a sus necesidades de limpieza.
Accesorio cepillo-tobera Para aspirar esquinas y ranuras.
Gire el cepillo para adaptarlo a
sus necesidades.
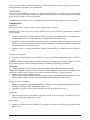
Accesorio para tapicería
etc.
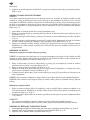
Selector de tipo de suelo
Accesorio-cepillo para suelos Ajuste los selectores para
adaptarlos a sus necesidades:
Posición de alfombras o
alfombrillas:
alfombrillas o superficies suaves.
Posición de suelos duros:
Para limpiar baldosas o suelos
duros.
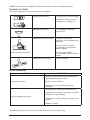
Accesorio cepillo para
parquet
Para todo tipo de parquet.
RESOLUCIÓN DE PROBLEMAS
PROBLEMA CORRECCIÓN
La máquina no funciona.
- Compruebe que el aparato esté correctamente
enchufado y que la toma eléctrica funcione.
- Compruebe el fusible o el interruptor.
- Llévelo a un servicio técnico autorizado.
La potencia de succión se ha reducido.
- Apague el aparato y desenchúfelo.
herramientas de limpieza no estén bloqueados.
- Compruebe que el depósito de polvo no esté lleno.
- Limpie los filtros.
Gracias por demostrarnos su confianza al elegir uno de nuestros productos.

16
GB
you enjoy your new PALSON WINDSTORM vacuum cleaner.
IMPORTANT SAFETY INSTRUCTIONS
Read all instructions before using the appliance and save them for future reference.
Location
- Do not use or store the device outside.
- Do not store the unit near hot ovens or heating appliances.
- Store the unit in a dry environment where there is no risk of its being damaged.
Power Cord
- Do not let the power cord become too tight or pass over the device.
Children
- This product is not permitted for use by children or other people without assistance or supervision if
do not play with the product.
Other safety considerations
- Never use the device without the HEPA filter installed.
- Never use the device in the presence of explosive liquids or vapor.
substances. Never vacuum acid or asbestos dust.
- Always unplug the unit from the electrical outlet after use and before cleaning.
- Do not leave device running while unattended.
- Never modify the unit in any way.
- Electrical device repairs must be carried out by qualified personnel only.
- Repairs that are not carried out by professionals can be dangerous.
- Use only replacement parts and original accessories.
- Do not touch electrical appliances with wet hands.
static shocks in the receptacle. These shocks are completely harmless and are not associated with
regulations.
Electrical Requirements
must be AC (alternating current).
to perform their replacement.
a dangerous situation.
Overheating safety device
Your vacuum comes equipped with a safety device that turns off the unit in the event of overheating. If the
safety system to be reestablished before attempting to turn on the vacuum cleaner again. If the vacuum
service center them to examine or repair.

17
WARNING:
concerning the use of the device by a person who is responsible for their safety.
Supervise children to ensure they do not play with the device.
ASSEMBLY
IMPORTANT:
Read the “Important Safety Instructions” section before using the device.
NOTE: Always remove the plug from the outlet before installing or removing accessories.
1. Insert the hose connector (3) in the connection (11) until it is properly adjusted. To remove the flexible
2. Adjust the length of the telescopic metal tube (1) putting pressure on the tube block (6) and pulling the
telescopic tube to the desired length. The tube will lock automatically when you release the lock. See fig. 2.
3. Secure the end of the telescopic metal tube (1) to the handle (4) of the flexible hose (2). See fig. 3.
Affixing accessories
4. Set the floor brush attachment (7) at the end of the telescopic metal tube (1). See fig. 4.
can be affixed to the telescopic metal tube (1) or directly to the hose handle (4).
OPERATION
1. Pull the cord to the desired length. Do not pull the excess cord.
CAUTION:
Pull the cord to the maximum length indicated by the yellow flag. Never pull the cord up to the red flag since
the cord winding mechanism may be damaged.
2. Insert the plug into the electrical outlet.
fig. 5.
Suction power control
1. Suction power can be adjusted by the vacuum flow controller (5). Close the suction controller for full
suction or open it for diminished suction. See fig. 6.
2. Turn the power controller (18) to adjust the unit’s power. See fig. 5.
Storage
automatically. See fig. 5.
Normal position
2. Hook in the floor brush attachment (7) to the available groove on the back of the vacuum. See fig. 7.
Upright Position
3. Hook in the floor brush attachment (7) to the available groove on the lower part of the vacuum See fig. 8.

18
GB
EMPTYING THE DUST RECEPTACLE
NOTE:
blocked tubes and follow the instructions for cleaning the filters to obtain optimum performance. See fig. 9.
1. Unplug the vacuum from the electrical outlet.
fashion. See fig. 10.
4. Make sure that the dust receptacle is held (15) in an upright position. Use the dust receptacle button
(21). Empty the dust compartment into the garbage. See fig. 12.
5. Clean the inside of the dust receptacle (15) using a dry or damp towel. Make sure the dust receptacle
is completely dry before you install and use it.
CLEANING THE FILTER
Cleaning the dust receptacle filter
filter (13) and rinse it with warm water. Completely dry the receptacle filter before affixing it again. See
Figs. 13 - 15.
1. Remove the dust receptacle (15) HEPA filter (13) turning the cover in a counter-clockwise direction. See
fig. 13.
2. Remove the filter receptacle cover (15). See fig. 14.
3. Clean the cover and the Hepa filter with hot water and soap. Make sure the container is completely dry
before putting it together. See fig. 15.
4. Put the Hepa filter (13) and the dust receptacle (15) back into place in the unit just as it was
removed.
NOTE: Cleaning the Hepa filter (13) and the output filter (19) at the same time is recommended on a
periodic basis.
Cleaning the output filter
1. Remove the output filter cover (19) pulling the latch. Take out the filter and clean it in hot water with
soap. Make sure the output filter (19) is completely dry before setting it up. See Figs. 16 and 17.
2. Put the output filter and the cover back in the unit just as it was removed. See Figs. 16 and 17.
NOTES:
- Cleaning the filter receptacle and output filter is recommended on a periodic basis.
TELESCOPIC METAL TUBE CLEANING
1. Disengage and remove the plastic cover from the bottom of the vacuum cleaner. See Figs. 18 and 19.
2. Remove anything that blocks the telescopic metal tube. See fig. 19.
3. Reattach the plastic cover on the unit. See fig. 19.
NOTE Cleaning the telescopic metal tube on a regular basis is recommended

19
NOZZLE ACCESSORIES
Attach accessories to suit your cleaning needs.
Brush-nozzle accessory To vacuum corners and grooves.
Turn the brush to adapt it to your needs.
Upholstery accesso
Floor type selector
Floor brush accessory Adjust the switches to adapt them to
your needs:
Carpet or mat positions:
surfaces.
Position of hard floors:
To clean tile or hard floors.
For all types of flooring.
TROUBLESHOOTING
PROBLEM SOLUTION
The machine does not work.
- Verify that the device is properly connected and that the
electrical outlet works.
- Check the fuse or breaker.
- Take it to authorized technical service.
The suction power is reduced.
- Turn off and unplug the device.
not blocked.
- Make sure the dust receptacle is not full.
- Clean the filters.
Thank you for showing your confidence in us by choosing one of our products.

20
F
Nous espérons que vous profiterez bien de votre nouvel aspirateur WINDSTORM de PALSON.
IMPORTANTES INSTRUCTIONS DE SÉCURITÉ
Lisez toutes les instructions avant d’utiliser l’appareil et conservez-les pour de futures consultations.
Utilisation et stockage
- Ne pas utiliser ou stocker l’appareil à l’extérieur.
- Ne pas stocker l’appareil près de fours chauds ou d’appareils de chauffage.
Câble de courant
un technicien qualifié pour éviter tout danger.
Enfants
- Ce produit n’a pas été conçu pour les enfants ou d’autres personnes sans assistance ou supervision si leur état
pour s’assurer qu’ils ne jouent pas avec le produit.
Autres considérations de sécurité
- Ne pas utiliser l’appareil sans son filtre Hepa.
liquides.
- Ne jamais utiliser l’appareil en présence de liquides ou de vapeurs explosives.
substances volatiles. Ne jamais aspirer d’acides ou de poussière d’asbeste.
- Toujours débrancher l’appareil du réseau électrique après son utilisation ou avant son nettoyage.
- Ne pas laisser l’appareil en fonctionnement sans surveillance.
- Ne jamais modifier l’appareil d’aucune sorte.
- Les réparations d’appareils électriques doivent être réalisées uniquement par un personnel qualifié.
- Les réparations non réalisées para des professionnels peuvent s’avérer dangereuses.
- Utiliser uniquement des pièces de rechange et des accessoires originaux.
- Ne jamais manipuler d’appareils électriques avec les mains mouillées.
peuvent générer des petites charges statiques dans le dépôt. Ces charges sont complètement inoffensives et ne
Conditions électriques
doit être CA (courant alternatif).
qualifié pour les remplacer.
donné qu’elle pourrait provoquer une situation dangereuse.
Dispositif de sécurité contre la surchauffe
Votre aspirateur est équipé d’un dispositif de sécurité qui éteint l’appareil en cas de surchauffe. En cas d’arrêt de
protection soit rétabli avant d’essayer de rallumer l’aspirateur. Si l’aspirateur ne fonctionne toujours pas ou que le
examen ou sa réparation.
Sayfa yükleniyor...
Sayfa yükleniyor...
Sayfa yükleniyor...
Sayfa yükleniyor...
Sayfa yükleniyor...
Sayfa yükleniyor...
Sayfa yükleniyor...
Sayfa yükleniyor...
Sayfa yükleniyor...
Sayfa yükleniyor...
Sayfa yükleniyor...
Sayfa yükleniyor...
Sayfa yükleniyor...
Sayfa yükleniyor...
Sayfa yükleniyor...
Sayfa yükleniyor...
Sayfa yükleniyor...
Sayfa yükleniyor...
Sayfa yükleniyor...
Sayfa yükleniyor...
Sayfa yükleniyor...
Sayfa yükleniyor...
Sayfa yükleniyor...
Sayfa yükleniyor...
Sayfa yükleniyor...
Sayfa yükleniyor...
Sayfa yükleniyor...
Sayfa yükleniyor...
Sayfa yükleniyor...
Sayfa yükleniyor...
Sayfa yükleniyor...
Sayfa yükleniyor...
Sayfa yükleniyor...
Sayfa yükleniyor...
Sayfa yükleniyor...
Sayfa yükleniyor...
Sayfa yükleniyor...
Sayfa yükleniyor...
Sayfa yükleniyor...
Sayfa yükleniyor...
Sayfa yükleniyor...
Sayfa yükleniyor...
Sayfa yükleniyor...
Sayfa yükleniyor...
-
 1
1
-
 2
2
-
 3
3
-
 4
4
-
 5
5
-
 6
6
-
 7
7
-
 8
8
-
 9
9
-
 10
10
-
 11
11
-
 12
12
-
 13
13
-
 14
14
-
 15
15
-
 16
16
-
 17
17
-
 18
18
-
 19
19
-
 20
20
-
 21
21
-
 22
22
-
 23
23
-
 24
24
-
 25
25
-
 26
26
-
 27
27
-
 28
28
-
 29
29
-
 30
30
-
 31
31
-
 32
32
-
 33
33
-
 34
34
-
 35
35
-
 36
36
-
 37
37
-
 38
38
-
 39
39
-
 40
40
-
 41
41
-
 42
42
-
 43
43
-
 44
44
-
 45
45
-
 46
46
-
 47
47
-
 48
48
-
 49
49
-
 50
50
-
 51
51
-
 52
52
-
 53
53
-
 54
54
-
 55
55
-
 56
56
-
 57
57
-
 58
58
-
 59
59
-
 60
60
-
 61
61
-
 62
62
-
 63
63
-
 64
64


Palson WINDSTORM Operating Instructions Manual
- Kategori
- Elektrikli süpürgeler
- Tip
- Operating Instructions Manual
diğer dillerde
- español: Palson WINDSTORM
- français: Palson WINDSTORM
- italiano: Palson WINDSTORM
- Deutsch: Palson WINDSTORM
- português: Palson WINDSTORM
- English: Palson WINDSTORM
- русский: Palson WINDSTORM
- Nederlands: Palson WINDSTORM