
ITALY
MADE IN
W
A
R
R
A
N
T
Y
•
G
A
R
A
N
T
I
E
•
G
A
R
A
N
Z
I
A
•
G
A
R
A
N
T
I
A
•
G
A
R
A
N
T
I
E
•
G
A
R
A
N
T
I
E
•
Y
E
A
R
S
•
A
N
S
•
A
N
N
I
•
A
Ñ
O
S
•
A
N
O
•
J
A
H
R
E
•
3
FG00901M07- ver. 1 - 0 9/2 017
VIDEO
ENTRY PANEL
English
Français
Italiano
Español
Português
Deutsch
Türk
LIVIPR
PROGRAMMING MANUAL

M1
BOUT
M2
SW3
PROG
PROG
A
1 2 3
4
5
F
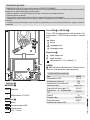
Page 2 - Manual FG00901M07 - vers. 1 - 09/2017- The contents of this manual may be changed, at any time, and without notice.
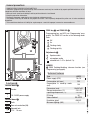
PROG key 3 and PROG LED 4
Programming key and LED (see 'Programming' para-
graph). The PROG LED can be in the following condi-
tions:
O
On
Flashing slowly
Flashing quickly
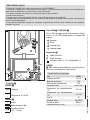
Adjustments 5
Speaker audio
microphone audio
solenoid lock 1÷10 s. (default 1 s)
JUMPER
6 SW3: Enabling/disabling intercom function (see
'Programming' paragraph).
Technical features
Type
LIVIPR
Power supply (VDC) 16÷18
Consumption (mA max) 250
Consumption in stand-by mode
(mA) 100
Dimensions (mm) 99x207x30
Storage temperature (°C)
-25/+70
Operating temperature (°C)
-15/+50
IP Rating
54
Video standard
PAL/NTSC
Resolution (pixel) 680x12
Minimum lighting (LUX)
1
Functions A
Terminal board 1
BOUT Busbar
+16-18 VDC power supply
–
Terminal board 2
–Earth
Door release button (NA)
–
Solenoid lock
12 V - 1 A max
General precautions
• Important safety instructions: READ CAREFULLY!
• Installation, programming, commissioning and maintenance must only be carried out by expert qualified technicians in full
compliance with the regulations in force.
• Wear anti-static shoes and clothing if working on the electronic circuit board.
• Keep this precaution information.
• Disconnect the power supply during any cleaning or maintenance work.
• The product must only be used for the purpose for which it was expressly designed. Any other use is to be considered
dangerous.
• The manufacturer declines all liability for any damage as a result of improper, incorrect or unreasonable use.

1
G
F
M1
BOUT
M2
SW3
PROG RESET
PROG
M1
BOUT
M2
SW3
PROG PROG
PROG
>3’’
<6’’
BOUT
PROG
PROG
M2
BOUT
PROG
PROG
M2
M1
BOUT
PROG
M2
M1
BOUT
PROG
M2
M1
BOUT
PROG
M2
33 A
3 B
4
beep
M1
BOUT
M2
SW3
PROG RESET
PROG
M1
BOUT
M2
SW3
PROG PROG
PROG
<1’’
2
5
Page 3 - Manual FG00901M07 - vers. 1 - 09/2017- The contents of this manual may be changed, at any time, and without notice.
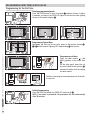
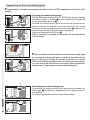
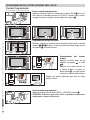
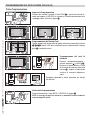
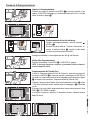
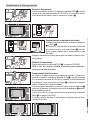
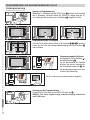
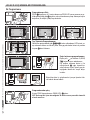
Continue, repeating the same operations for all the oth-
er receivers.
Exiting Programming
Press the PROG key briefly: the PROG LED switches o G.
NOTE: If no action is performed, the procedure will end automatically
after 30 minutes.
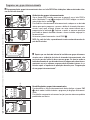
Programming call keys
Press the door release and
AUX2 buttons at the same time
5.
On the entry panel, press the call
key to be linked to the receiver 6:
a beep will confirm that the setting
has been stored.
Entering programming mode
Press the PROG key for at least 3 seconds 1 and then release it (within
6 seconds), as soon as the PROG LED lights up and the key back lighting
flashes as illustrated in figure 2.
PROGRAMMING ENTRY PANELS WITH LIVI-AS
Programming for the first time
Programming Type of Keys
Hold down the first key on the entry panel in the position shown C/
CACB until the back lighting LEDs stop flashing 4 and stay on.

E
M1
BOUT
M2
SW3
PROG RESET
PROG
M1
BOUT
M2
SW3
PROG PROG
PROG
>3’’
<6’’
BOUT
PROG
PROG
M2
2
M1
BOUT
M2
SW3
PROG RESET
PROG
M1
BOUT
M2
SW3
PROG PROG
PROG
<1’’
F
M1
BOUT
M2
SW3
PROG RESET
PROG
M1
BOUT
M2
SW3
PROG PROG
PROG
>3’’
<6’’
BOUT
PROG
PROG
M2
G
M1
BOUT
PROG
M2
M1
BOUT
PROG
M2
8 9
1
3
4beep
Page 4 - Manual FG00901M07 - vers. 1 - 09/2017- The contents of this manual may be changed, at any time, and without notice.
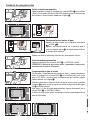
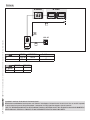
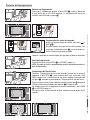
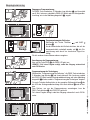
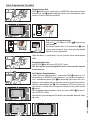
Continue, repeating the same operations for all the other receivers.
Exiting Programming
Press the PROG button briefly E. The PROG LED switches o.
NOTE: If no action is performed, the procedure will end automatically
after 30 minutes.
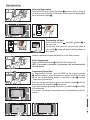
Programming Type of Keys
In "Programming Call Keys", press the PROG key for at least 3 seconds
F and then release it (within 6 seconds) as soon as the PROG LED lights
up and the key back lighting flashes as illustrated in figure G, entering
"Programming Type of Keys".
Press the first key on the entry panel in the position shown 8 until the
back lighting LEDs stop flashing I and stay on.
At the end, to exit programming, briefly press the PROG key E: the PROG
LED switches o.
If no action is performed, the procedure will end automatically after 30
minutes.
Programming call keys
Press the door release and AUX2 buttons C at
the same time.
On the entry panel, press the call key to be linked to
the receiver 4: a beep will confirm that the setting has
been stored.
Going into Programming
Press the PROG key for at least 3 seconds 1 and then release it (within 6
seconds) as soon as the PROG LED flashes and the key back lighting lights
up as illustrated in figure 2.
Reprogramming

1
2
M1
BOUT
SW3
PROG RESET
PROG
M2
M1
BOUT
SW3
PROG RESET
PROG
M2
>8’’
<11’’
M1
BOUT
SW3
PROG RESET
PROG
M1
BOUT
M2
SW3
PROG PROG
PROG
M2
M1
BOUT
SW3
PROG
RESET
PROG
M2
M1
BOUT
SW3
PROG RESET
PROG
M2
<1’’
4
M1
BOUT
SW3
PROG
RESET
PROG
M2
M1
BOUT
SW3
PROG
RESET
PROG
M2
1
2
3
3 beep
Page 5 - Manual FG00901M07 - vers. 1 - 09/2017- The contents of this manual may be changed, at any time, and without notice.
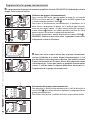
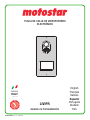
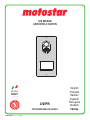
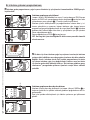
Deactivating intercommunicating groups
To deactivate the intercom function, you simply have to disconnect the
SW3 jumper 1; by doing this, programming of the intercom system is
also inhibited.
To reactivate this function you must restore factory settings.
y Once a receiver has been included in an intercommunicating group
by assigning the intercom call button, it cannot be excluded from this
group. If you want to change the intercom call button on a receiver
which has already been programmed as an intercommunicating receiv-
er, or you want to add new receivers to the group, repeat the operations
detailed under “Programming an intercommunicating group”.
Assigning intercommunicating groups
With the SW3 jumper inserted, press the PROG key for at least 8 seconds
and release it (within 11 seconds) 1 as soon as the PROG LED flashes and
the key back lighting comes on 2.
To enable the intercom function, go to the receiver that you want to pro-
gramme, and press the intercom call key you want to call from: a beep
will sound to show that programming has taken place 3. Repeat for all
receivers to be included in the intercommunicating group.
At the end, briefly press the PROG key 4.
NOTE: If no action is performed, the procedure will end automatically
after 30 minutes.
Programming an intercommunicating group
y Programming an intercommunicating group must be carried out AFTER assigning the call key to all of the
receivers.

LIVI-AS
2
2
2
1
LIVIPR
2
1
LIVIPR
2
+
BOUT
-
M1
LIVI-AS
A
+
–
M2
-
-
M2
1
LIVIMN-B
LIVIMN-N
LIVIMN-B
LIVIMN-N
CL.RESM/S
1
2
CL.RESM/S
+
BOUT
-
+
-
LOCAL
BUS
+
BOUT
-
+
-
LOCAL
BUS
M1 M1
Page 6 - Manual FG00901M07 - vers. 1 - 09/2017- The contents of this manual may be changed, at any time, and without notice.
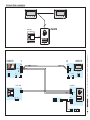
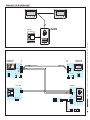
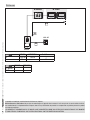
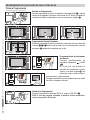
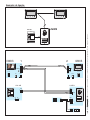
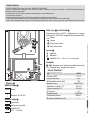
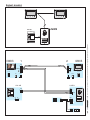
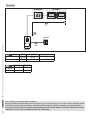
Connection examples

La
La
N° Master N° Slave
Lb
LIVIPR
LIVI-AS
VCM/1D UTP CAT5
N° Master 1 1
N° Slave 5 1
VCM/1D UTP/CAT 5 2 x 2,5 mm2
La ≤100 m ≤30 m –
Lb ≤25 m – ≤60 m
Page 7 - Manual FG00901M07 - vers. 1 - 09/2017- The contents of this manual may be changed, at any time, and without notice.
This product complies with the relevant directives in force.
Decommissioning and disposal. Dispose of the packaging and the device at the end of its life cycle responsibly, in compliance
with the laws in force in the country where the product is used. The recyclable components are marked with a symbol and the
material's ID marker.
THE DATA AND INFORMATION SHOWN IN THIS MANUAL ARE TO BE CONSIDERED AS SUBJECT TO CHANGE AT ANY TIME AND
WITHOUT THE NEED FOR ANY ADVANCE WARNING. MEASUREMENTS, UNLESS OTHERWISE INDICATED, ARE IN MILLIMETRES.
Distances

www.motostar-smarthome.com
contact@motostar-smarthome.com
è un marchio registrato di
Label Habitat SaS - 10 rue Léo Lagrange - 27950 Saint Marcel - France
Page 8 - Manual FG00901M07 - vers. 1 - 09/2017- The contents of this manual may be changed, at any time, and without notice.

ITALY
MADE IN
W
A
R
R
A
N
T
Y
•
G
A
R
A
N
T
I
E
•
G
A
R
A
N
Z
I
A
•
G
A
R
A
N
T
I
A
•
G
A
R
A
N
T
I
E
•
G
A
R
A
N
T
I
E
•
Y
E
A
R
S
•
A
N
S
•
A
N
N
I
•
A
Ñ
O
S
•
A
N
O
•
J
A
H
R
E
•
3
FG00901M07- ver. 1 - 0 9/2 017
PORTIER VIDÉO
EXTERNE
English
Français
Italiano
Español
Português
Deutsch
Türk
LIVIPR
MANUEL DE PROGRAMMATION

M1
BOUT
M2
SW3
PROG
PROG
A
1 2 3
4
5
F
Page 2 - Manuel FG00901M07 - vers. 1 - 09/2017- Le contenu de ce manuel est susceptible de subir des modifications à tout moment et sans aucun préavis.
Touche PROG 3 et LED PROG 4
Touche et LED de programmation (voir paragraphe «
Programmation »). La LED PROG peut apparaître dans
l’un des états suivants :
Éteint
Allumé
Clignotement lent
Clignotement rapide
Réglages 5
Audio haut-parleur
Audio microphone
Serrure de verrouillage électrique 1 à 10 s (par
défaut 1 s)
CAVALIER
6 SW3 : Activation/désactivation de la fonction d'inter-
communication (voir paragraphe « Programmation »).
Caractéristiques techniques
Type
LIVIPR
Alimentation (VDC) 16 - 18
Absorption (mA max.) 250
Absorption en mode veille (mA)
100
Dimensions (mm)
99x207x30
Température de stockage (°C)
-25/+70
Température de fonctionnement (°C)
-15/+50
Degré IP 54
Standard vidéo
PAL/NTSC
Résolution (pixels)
680x12
Éclairage minimum (LUX) 1
Fonctions A
Bornier 1
BOUT Montant
+Alimentation 16-18 VDC
–
Bornier 2
–Masse
Bouton ouvre-porte (NO)
–
Serrure de verrouillage électrique
12 V - 1 A max.
Instructions générales
• Instructions importantes pour la sécurité des personnes : À LIRE ATTENTIVEMENT !
• L’installation, la programmation, la mise en service et l'entretien doivent être eectués par du personnel qualifié et dans le
plein respect des normes en vigueur.
• Porter des vêtements et des chaussures antistatiques avant d'intervenir sur la carte électronique.
• Conserver ces instructions.
• Toujours couper le courant électrique durant les opérations de nettoyage ou d'entretien.
• Ce produit ne devra être destiné qu'à l'utilisation pour laquelle il a été expressément conçu. Toute autre utilisation est à
considérer comme dangereuse.
• Le fabricant décline toute responsabilité en cas d'éventuels dommages provoqués par des utilisations impropres, incor-
rectes et déraisonnables.

1
G
F
M1
BOUT
M2
SW3
PROG RESET
PROG
M1
BOUT
M2
SW3
PROG PROG
PROG
>3’’
<6’’
BOUT
PROG
PROG
M2
BOUT
PROG
PROG
M2
M1
BOUT
PROG
M2
M1
BOUT
PROG
M2
M1
BOUT
PROG
M2
33 A
3 B
4
beep
M1
BOUT
M2
SW3
PROG RESET
PROG
M1
BOUT
M2
SW3
PROG PROG
PROG
<1’’
2
5
Page 3 - Manuel FG00901M07- vers. 1 - 09/2017- Le contenu de ce manuel est susceptible de subir des modifications à tout moment et sans aucun préavis.
Répéter ces mêmes opérations pour tous les autres
postes internes.
Sortie du mode programmation
Appuyer brièvement sur la touche PROG : la LED PROG s’éteint G.
REMARQUE. À défaut de toute autre action, la procédure termine auto-
matiquement au bout de 30 minutes.
Programmation des touches
d’appel
Appuyer en même temps sur les
boutons ouvre-porte et AUX2
5.
Appuyer, sur le poste externe, sur
la touche d’appel à associer au
poste interne 6 : un signal sonore
confirme la mémorisation eective.
Entrée en mode programmation
Appuyer pendant au moins 3 secondes sur la touche PROG 1 et la relâ-
cher (dans les 6 secondes) dès que la LED PROG s’allume et que le rétroé-
clairage des touches clignote comme indiqué sur la figure 2.
PROGRAMMATION DES POSTES EXTERNES AVEC LIVI-AS
Première Programmation
Programmation du type de touche
Maintenir enfoncée la première touche du poste externe dans la position
indiquée C/CACB jusqu’à ce que les voyants du rétroéclairage cessent
de clignoter 4 et restent allumés.

E
M1
BOUT
M2
SW3
PROG RESET
PROG
M1
BOUT
M2
SW3
PROG PROG
PROG
>3’’
<6’’
BOUT
PROG
PROG
M2
2
M1
BOUT
M2
SW3
PROG RESET
PROG
M1
BOUT
M2
SW3
PROG PROG
PROG
<1’’
F
M1
BOUT
M2
SW3
PROG RESET
PROG
M1
BOUT
M2
SW3
PROG PROG
PROG
>3’’
<6’’
BOUT
PROG
PROG
M2
G
M1
BOUT
PROG
M2
M1
BOUT
PROG
M2
8 9
1
3
4beep
Page 4 - Manuel FG00901M07 - vers. 1 - 09/2017- Le contenu de ce manuel est susceptible de subir des modifications à tout moment et sans aucun préavis.
Répéter ces mêmes opérations pour tous les autres postes internes.
Sortie du mode programmation
Appuyer brièvement sur la touche PROG E : la LED PROG s’éteint.
REMARQUE. À défaut de toute autre action, la procédure termine auto-
matiquement au bout de 30 minutes.
Programmation du type de touche
En phase de « Programmation des touches d’appel », appuyer pendant au
moins 3 secondes sur la touche PROG F et la relâcher (dans les 6 s) dès
que la LED PROG s’allume et que le rétroéclairage des touches clignote
comme indiqué sur la figure G.
Maintenir enfoncée la première touche du poste externe dans la position
indiquée 8 jusqu’à ce que les voyants du rétroéclairage cessent de cligno-
ter I et restent allumés.
Pour sortir, à la fin, du mode programmation, appuyer brièvement sur la
touche PROG E : la LED PROG s’éteint.
À défaut de toute autre action, la procédure termine automatiquement au
bout de 30 minutes.
Programmation des touches d’appel
Appuyer en même temps sur les boutons ouvre-porte
et AUX2 C.
Appuyer, sur le poste externe, sur la touche d’appel à
associer au poste interne 4 : un signal sonore confirme
la mémorisation eective.
Entrée en mode programmation
Appuyer pendant au moins 3 secondes sur la touche PROG 1 et la relâcher
(dans les 6 secondes) dès que la LED PROG clignote et que le rétroéclairage
des touches s’allume comme indiqué sur la figure 2.
Procédure de reprogrammation

1
2
M1
BOUT
SW3
PROG RESET
PROG
M2
M1
BOUT
SW3
PROG RESET
PROG
M2
>8’’
<11’’
M1
BOUT
SW3
PROG RESET
PROG
M1
BOUT
M2
SW3
PROG PROG
PROG
M2
M1
BOUT
SW3
PROG
RESET
PROG
M2
M1
BOUT
SW3
PROG RESET
PROG
M2
<1’’
4
M1
BOUT
SW3
PROG
RESET
PROG
M2
M1
BOUT
SW3
PROG
RESET
PROG
M2
1
2
3
3 beep
Page 5 - Manuel FG00901M07- vers. 1 - 09/2017- Le contenu de ce manuel est susceptible de subir des modifications à tout moment et sans aucun préavis.
Désactivation des groupes intercommunicants
Pour désactiver la fonction d’intercommunication, il sut de désactiver le
cavalier SW3 1 pour pouvoir désactiver également la programmation du
groupe intercommunicant.
Pour rétablir cette fonction, il sut de réinitialiser les paramètres d’usine.
y Après avoir inclus un poste interne dans un groupe intercommuni-
cant par l’attribution de la touche d’appel intercommunicant, il n’est
plus possible de l’exclure du groupe en question. Pour modifier la touche
d’appel intercommunicant d’un poste interne déjà programmé comme
intercommunicant, à savoir pour ajouter au groupe de nouveaux postes
internes, il sut de répéter la séquence d’opérations décrite pour la «
Programmation d’un groupe intercommunicant ».
Attribution des groupes intercommunicants
Avec le cavalier SW3 activé, appuyer pendant au moins 8 s sur la touche
PROG et la relâcher (dans les 11 s) 1 dès que la led PROG clignote et que
le rétroéclairage des touches s’allume 2.
Pour activer le fonctionnement intercommunicant, se positionner sur le
poste interne à programmer et appuyer sur le bouton d’appel intercom-
municant avec lequel l’appeler : un signal sonore confirmera la program-
mation eective 3. Répéter ces mêmes opérations pour tous les autres
postes internes à inclure dans le groupe intercommunicant.
Au terme de ces opérations, appuyer brièvement sur la touche PROG 4.
REMARQUE. À défaut de toute autre action, la procédure termine auto-
matiquement au bout de 30 minutes.
Programmation d’un groupe intercommunicant
y La programmation du groupe intercommunicant doit être eectuée PAR LA SUITE à l’attribution de la touche
d’appel à tous les postes internes.

LIVI-AS
2
2
2
1
LIVIPR
2
1
LIVIPR
2
+
BOUT
-
M1
LIVI-AS
A
+
–
M2
-
-
M2
1
LIVIMN-B
LIVIMN-N
LIVIMN-B
LIVIMN-N
CL.RESM/S
1
2
CL.RESM/S
+
BOUT
-
+
-
LOCAL
BUS
+
BOUT
-
+
-
LOCAL
BUS
M1 M1
Page 6 - Manuel FG00901M07 - vers. 1 - 09/2017- Le contenu de ce manuel est susceptible de subir des modifications à tout moment et sans aucun préavis.
Exemples de branchement

La
La
N° Master N° Slave
Lb
LIVIPR
LIVI-AS
VCM/1D UTP CAT5
N° Master 1 1
N° Slave 5 1
VCM/1D UTP/CAT 5 2 x 2,5 mm2
La ≤100 m ≤30 m –
Lb ≤25 m – ≤60 m
Page 7 - Manuel FG00901M07- vers. 1 - 09/2017- Le contenu de ce manuel est susceptible de subir des modifications à tout moment et sans aucun préavis.
Le produit est conforme aux directives de référence en vigueur.
Démantèlement et élimination. Ne pas jeter les emballages et l'appareil dans la nature à la fin du cycle de vie, mais veuillez les élimi-
ner conformément à la réglementation en vigueur dans le Pays d'utilisation du produit. Les composants recyclables portent le symbole
et le sigle du matériau.
LES DONNÉES ET INFORMATIONS DE CE MANUEL SONT CONSIDÉRÉES COMME SUSCEPTIBLES DE MODIFICATIONS À TOUT MOMENT
ET SANS PRÉAVIS. LES MESURES, SAUF AUTRES INDICATIONS, SONT EXPRIMÉES EN MILLIMÈTRES.
Distances

www.motostar-smarthome.com
contact@motostar-smarthome.com
è un marchio registrato di
Label Habitat SaS - 10 rue Léo Lagrange - 27950 Saint Marcel - France
Page 8 - Manuel FG00901M07- vers. 1 - 09/2017- Le contenu de ce manuel est susceptible de subir des modifications à tout moment et sans aucun préavis.

ITALY
MADE IN
W
A
R
R
A
N
T
Y
•
G
A
R
A
N
T
I
E
•
G
A
R
A
N
Z
I
A
•
G
A
R
A
N
T
I
A
•
G
A
R
A
N
T
I
E
•
G
A
R
A
N
T
I
E
•
Y
E
A
R
S
•
A
N
S
•
A
N
N
I
•
A
Ñ
O
S
•
A
N
O
•
J
A
H
R
E
•
3
FG00901M07- ver. 1 - 0 9/2 017
POSTO ESTERNO
VIDEOCITOFONICO
English
Français
Italiano
Español
Português
Deutsch
Türk
LIVIPR
MANUALE DI PROGRAMMAZIONE
Pag. TM - Manuale FG00901M07 - ver. 1 - 0 9/2017 - I contenuti del manuale sono da ritenersi suscettibili di modifica in qualsiasi momento senza obbligo di preavviso.

M1
BOUT
M2
SW3
PROG
PROG
A
1 2 3
4
5
F
Pag. 2 - Manuale FG00901M07 - ver. 1 - 09/2017- I contenuti del manuale sono da ritenersi suscettibili di modifica in qualsiasi momento senza obbligo di preavviso.
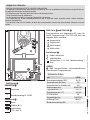
Avvertenze generali
• Importanti istruzioni per la sicurezza delle persone: LEGGERE AT TENTAMENTE!
• L’installazione, la programmazione, la messa in servizio e la manuten zione devono essere eettuate da personale qualificato
ed esperto e nel pieno rispetto delle normative vigenti.
• Indossare indumenti e calzature antistatiche nel caso di intervento sulla scheda elettronica.
• Conservare queste avvertenze.
• Togliere sempre l’alimentazione elettrica durante le operazioni di pulizia o di manutenzione.
• Il prodotto deve essere destinato solo all’uso per il quale è stato espressamente studiato. Ogni altro uso è da considerarsi
pericoloso.
• Il costruttore non può comunque essere considerato responsabile per eventuali danni derivanti da usi impropri, erronei ed
irragionevoli.
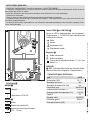
Funzioni A
Morsettiera 1
BOUT Montante
+Alimentazione 16-18 VDC
–
Morsettiera 2
–Massa
Pulsante apriporta (NA)
–
Elettroserratura
12 V - 1 A max
Tasto PROG 3 e LED PROG 4
Tasto e LED di programmazione (vedi paragrafo ‘Pro-
grammazione’). Il LED PROG può assumere i seguenti
stati:
Spento
Acceso
Lampeggio lento
Lampeggio veloce
Regolazioni 5
Audio altoparlante
audio microfono
elettroserratura 1÷10 s. (default 1 s)
JUMPER
6 SW3: Abilitazione/disabilitazione funzione interco-
municante (vedi paragrafo ‘Programmazione’).
Caratteristiche tecniche
Tipo
LIVIPR
Alimentazione (VDC) 16÷18
Assorbimento (mA max) 250
Assorbimento in stand by (mA)
100
Dimensioni (mm)
99x207x30
Temperatura di stoccaggio (°C)
-25/+70
Temperatura di funzionamento
(°C)
-15/+50
Grado IP
54
Standard video
PAL/NTSC
Risoluzione (pixel) 680x12
Illuminazione minima (LUX)
1

1
G
F
M1
BOUT
M2
SW3
PROG RESET
PROG
M1
BOUT
M2
SW3
PROG PROG
PROG
>3’’
<6’’
BOUT
PROG
PROG
M2
BOUT
PROG
PROG
M2
M1
BOUT
PROG
M2
M1
BOUT
PROG
M2
M1
BOUT
PROG
M2
33 A
3 B
4
beep
M1
BOUT
M2
SW3
PROG RESET
PROG
M1
BOUT
M2
SW3
PROG PROG
PROG
<1’’
2
5
Pag. 3 - Manuale FG00901M07 - ver. 1 - 09/2017- I contenuti del manuale sono da ritenersi suscettibili di modifica in qualsiasi momento senza obbligo di preavviso.
Programmazione del Tipo dei Tasti
Tenere premuto sul primo tasto del posto esterno nella posizione indicata
C/CACB finchè i LED della retroilluminazione smetteranno di lampeg-
giare 4 rimanendo accesi.
PROGRAMMAZIONE DEI POSTI ESTERNI CON LIVI-AS
Prima Programmazione
Ingresso in Programmazione
Premere per almeno 3 secondi il tasto PROG 1 e rilasciarlo (entro 6 se-
condi) non appena il LED PROG si accende e la retroilluminazione dei tasti
lampeggia come illustrato in figura 2.
Programmazione dei tasti di
chiamata
Premere contemporaneamente i
pulsanti apriporta e AUX2 5.
Premere sul posto esterno il tasto
di chiamata da associare al derivato
interno 6: seguirà un’indicazione
acustica di avvenuta memorizza-
zione.
Uscita dalla Programmazione
Premere brevemente il tasto PROG: il LED PROG si spegne G.
NOTA. In assenza di qualsiasi manovra, la procedura termina automati-
camente dopo 30 minuti.
Proseguire ripetendo le stesse operazioni per tutti gli
altri derivati.

E
M1
BOUT
M2
SW3
PROG RESET
PROG
M1
BOUT
M2
SW3
PROG PROG
PROG
>3’’
<6’’
BOUT
PROG
PROG
M2
2
M1
BOUT
M2
SW3
PROG RESET
PROG
M1
BOUT
M2
SW3
PROG PROG
PROG
<1’’
F
M1
BOUT
M2
SW3
PROG RESET
PROG
M1
BOUT
M2
SW3
PROG PROG
PROG
>3’’
<6’’
BOUT
PROG
PROG
M2
G
M1
BOUT
PROG
M2
M1
BOUT
PROG
M2
8 9
1
3
4beep
Pag. 4 - Manuale FG00901M07 - ver. 1 - 09/2017- I contenuti del manuale sono da ritenersi suscettibili di modifica in qualsiasi momento senza obbligo di preavviso.
Procedura di Riprogrammazione
Ingresso in Programmazione
Premere per almeno 3 secondi il tasto PROG 1 e rilasciarlo (entro 6 s) non
appena il LED PROG lampeggia e la retroilluminazione dei tasti si accende
come illustrato in figura 2.
Programmazione dei tasti di chiamata
Premere contemporaneamente i pulsanti apriporta
e AUX2 C.
Premere sul posto esterno il tasto di chiamata da as-
sociare al derivato interno 4: seguirà un’indicazione
acustica di avvenuta memorizzazione.
Proseguire ripetendo le stesse operazioni per tutti gli altri derivati.
Uscita dalla Programmazione
Premere brevemente il tasto PROG E: il LED PROG si spegne.
NOTA. In assenza di qualsiasi manovra, la procedura termina automati-
camente dopo 30 minuti.
Programmazione del Tipo dei Tasti
In fase di “Programmazione dei Tasti di Chiamata”, premere per almeno 3
secondi il tasto PROG F e rilasciarlo (entro 6 s) non appena il LED PROG si
accende e la retroilluminazione dei tasti lampeggia come illustrato in figura
G, entrando nella procedura “Programmazione del Tipo dei Tasti”.
Premere il primo tasto del posto esterno nella posizione indicata 8 finchè
i LED della retroilluminazione smetteranno di lampeggiare I rimanendo
accesi.
Al termine, per uscire dalla programmazione, premere brevemente il tasto
PROG E: il LED PROG si spegne.
In assenza di qualsiasi manovra, la procedura termina automaticamente
dopo 30 minuti.
Sayfa yükleniyor...
Sayfa yükleniyor...
Sayfa yükleniyor...
Sayfa yükleniyor...
Sayfa yükleniyor...
Sayfa yükleniyor...
Sayfa yükleniyor...
Sayfa yükleniyor...
Sayfa yükleniyor...
Sayfa yükleniyor...
Sayfa yükleniyor...
Sayfa yükleniyor...
Sayfa yükleniyor...
Sayfa yükleniyor...
Sayfa yükleniyor...
Sayfa yükleniyor...
Sayfa yükleniyor...
Sayfa yükleniyor...
Sayfa yükleniyor...
Sayfa yükleniyor...
Sayfa yükleniyor...
Sayfa yükleniyor...
Sayfa yükleniyor...
Sayfa yükleniyor...
Sayfa yükleniyor...
Sayfa yükleniyor...
Sayfa yükleniyor...
Sayfa yükleniyor...
Sayfa yükleniyor...
Sayfa yükleniyor...
Sayfa yükleniyor...
Sayfa yükleniyor...
Sayfa yükleniyor...
Sayfa yükleniyor...
Sayfa yükleniyor...
Sayfa yükleniyor...
-
 1
1
-
 2
2
-
 3
3
-
 4
4
-
 5
5
-
 6
6
-
 7
7
-
 8
8
-
 9
9
-
 10
10
-
 11
11
-
 12
12
-
 13
13
-
 14
14
-
 15
15
-
 16
16
-
 17
17
-
 18
18
-
 19
19
-
 20
20
-
 21
21
-
 22
22
-
 23
23
-
 24
24
-
 25
25
-
 26
26
-
 27
27
-
 28
28
-
 29
29
-
 30
30
-
 31
31
-
 32
32
-
 33
33
-
 34
34
-
 35
35
-
 36
36
-
 37
37
-
 38
38
-
 39
39
-
 40
40
-
 41
41
-
 42
42
-
 43
43
-
 44
44
-
 45
45
-
 46
46
-
 47
47
-
 48
48
-
 49
49
-
 50
50
-
 51
51
-
 52
52
-
 53
53
-
 54
54
-
 55
55
-
 56
56


diğer dillerde
- italiano: CAME LITHOS
- Deutsch: CAME LITHOS
- português: CAME LITHOS