Triton Tools T41200BS Kullanma talimatları
- Kategori
- Güç zımpara makineleri
- Tip
- Kullanma talimatları

Version date: 05.10.17
tritontools.com
1200W Belt Sander 100mm
Operating and Safety Instructions
Bedienings- en
veiligheidsvoorschriften
Instruções de
Operação e Segurança
Instructions d’utilisation
et consignes de sécurité
Instrukcja obsługi
i bezpieczeństwa
Gebrauchs- und
Sicherheitsanweisung
Инструкции по эксплуатации и
правила техники безопасности
Istruzioni per l’uso
e la sicurezza
Kezelési és
biztonsági utasítások
Instrucciones de
uso y de seguridad
Provozní a
bezpečnostní pokyny
Prevádzkové a
bezpečnostné pokyny
Çalıma ve
Güvenlik Talimatları
T4 1200BS
490239_Z1MANPRO2.indd 1 05/10/2017 09:31

2
1
3
5
4
2
6
7
8
1
2 9
3
1045
7
3
490239_Z1MANPRO2.indd 2 05/10/2017 09:31

3
2 1
10
3
13
16 15 14
11
12
13
1
111312
490239_Z1MANPRO2.indd 3 05/10/2017 09:31

4
GB
17
20
18
x2
21
19
490239_Z1MANPRO2.indd 4 05/10/2017 09:31

5
GB
A
D
G
B
E
H
C
F
490239_Z1MANPRO2.indd 5 05/10/2017 09:32

6
GB
Original Instructions
Wear hearing protection
Wear eye protection
Wear breathing protection
Wear head protection
Wear hand protection
Read instruction manual
DO NOT use in rain or damp environments!
WARNING: Moving parts can cause crush and cut injuries.
Class II construction (double insulated for additional protection)
Environmental Protection
Waste electrical products should not be disposed of with household waste.
Please recycle where facilities exist. Check with your local authority or retailer
for recycling advice.
Conforms to relevant legislation and safety standards.
Caution!
Toxic fumes or gases!
Description of Symbols
The rating plate on your tool may show symbols. These represent important information about
the product or instructions on its use.
Specification
Model no: T41200BS
Voltage: 220–240V, 50/60Hz
Power cable length: 2.6m
Input power: 1200W
Wheel speed: 2500/min
Belt speed under no load: 200–400m/min
Protection class:
IP number: IP20
Sanding area: 100 x 156mm
Sanding belt size: 100 x 610mm
Sander dimensions (L x W x H): 410 x 181 x 181mm
Weight: 6kg
Sound and vibration information:
Sound pressure L
PA
: 95.4dB(A)
Sound power L
WA
: 106.4dB(A)
Uncertainty K: 3dB
Weighted vibration a
h
(main handle): 4.92m/s
2
Weighted vibration a
h
(front handle): 6.70m/s
2
Uncertainty K: 1.5m/s
2
As part of our ongoing product development, specifications of Triton products may
alter without notice.
The sound intensity level for the operator may exceed 85dB(A) and sound protection
measures are necessary.
WARNING: Always wear ear protection where the sound level exceeds 85dB(A) and limit the
time of exposure if necessary. If sound levels are uncomfortable, even with ear protection, stop
using the tool immediately and check the ear protection is correctly fitted and provides the
correct level of sound attenuation for the level of sound produced by your tool.
WARNING: User exposure to tool vibration can result in loss of sense of touch, numbness,
tingling and reduced ability to grip. Long-term exposure can lead to a chronic condition. If
necessary, limit the length of time exposed to vibration and use anti-vibration gloves. Do not
operate the tool with hands below a normal comfortable temperature, as vibration will have a
greater effect. Use the figures provided in the specification relating to vibration to calculate the
duration and frequency of operating the tool.
Sound and vibration levels in the specification are determined according to EN60745 or
similar international standards. The figures represent normal use for the tool in normal
working conditions. A poorly maintained, incorrectly assembled, or misused tool, may produce
increased levels of noise and vibration. www.osha.europa.eu provides information on sound
and vibration levels in the workplace that may be useful to domestic users who use tools for
long periods of time.
Thank you for purchasing this Triton tool. This manual contains information necessary
for safe and effective operation of this product. This product has unique features and,
even if you are familiar with similar products, it is necessary to read this manual
carefully to ensure you fully understand the instructions. Ensure all users of the tool
read and fully understand this manual.
Introduction
490239_Z1MANPRO2.indd 6 05/10/2017 09:32

7
GB
General Safety
WARNING: Read all safety warnings and all instructions. Failure to follow the warnings and
instructions may result in electric shock, fire and/or serious injury.
WARNING: This appliance is not intended for use by persons (including children) with
reduced, physical or mental capabilities or lack of experience or knowledge unless they
have been given supervision or instruction concerning use of the appliance by a person
responsible for their safety. Children must be supervised to ensure that they do not play
with the appliance.
Save all warnings and instructions for future reference.
The term “power tool” in the warnings refers to your mains-operated (corded) power tool or
battery-operated (cordless) power tool.
1) Work area safety
a) Keep work area clean and well lit. Cluttered or dark areas invite accidents.
b) Do not operate power tools in explosive atmospheres, such as in the presence of
flammable liquids, gases or dust. Power tools create sparks which may ignite the dust or
fumes.
c) Keep children and bystanders away while operating a power tool. Distractions can
cause you to lose control.
2) Electrical safety
a) Power tool plugs must match the outlet. Never modify the plug in any way. Do not
use any adapter plugs with earthed (grounded) power tools. Unmodified plugs and
matching outlets will reduce risk of electric shock.
b) Avoid body contact with earthed or grounded surfaces, such as pipes, radiators,
ranges and refrigerators. There is an increased risk of electric shock if your body is
earthed or grounded.
c) Do not expose power tools to rain or wet conditions. Water entering a power tool will
increase the risk of electric shock.
d) Do not abuse the cord. Never use the cord for carrying, pulling or unplugging the
power tool. Keep cord away from heat, oil, sharp edges or moving parts. Damaged or
entangled cords increase the risk of electric shock.
e) When operating a power tool outdoors, use an extension cord suitable for outdoor
use. Use of a cord suitable for outdoor use reduces the risk of electric shock.
f) If operating a power tool in a damp location is unavoidable, use a residual current
device (RCD) protected supply. Use of an RCD reduces the risk of electric shock.
3) Personal safety
a) Stay alert, watch what you are doing and use common sense when operating a power
tool. Do not use a power tool while you are tired or under the influence of drugs,
alcohol or medication. A moment of inattention while operating power tools may result in
serious personal injury.
b) Use personal protective equipment. Always wear eye protection. Protective equipment
such as dust mask, non-skid safety shoes, hard hat, or hearing protection used for
appropriate conditions will reduce personal injuries.
c) Prevent unintentional starting. Ensure the switch is in the off-position before
connecting to power source and/or battery pack, picking up or carrying the tool.
Carrying power tools with your finger on the switch or energising power tools that have the
switch on invites accidents.
d) Remove any adjusting key or wrench before turning the power tool on. A wrench or a
key left attached to a rotating part of the power tool may result in personal injury.
e) Do not overreach. Keep proper footing and balance at all times. This enables better
control of the power tool in unexpected situations.
f) Dress properly. Do not wear loose clothing or jewellery. Keep your hair, clothing and
gloves away from moving parts. Loose clothes, jewellery or long hair can be caught in
moving parts.
g) If devices are provided for the connection of dust extraction and collection facilities,
ensure these are connected and properly used. Use of dust collection can reduce dust-
related hazards.
4) Power tool use and care
a) Do not force the power tool. Use the correct power tool for your application. The
correct power tool will do the job better and safer at the rate for which it was designed.
b) Do not use the power tool if the switch does not turn it on and off. Any power tool that
cannot be controlled with the switch is dangerous and must be repaired.
c) Disconnect the plug from the power source and/or the battery pack from the power
tool before making any adjustments, changing accessories, or storing power tools.
Such preventive safety measures reduce the risk of starting the power tool accidentally.
d) Store idle power tools out of the reach of children and do not allow persons
unfamiliar with the power tool or these instructions to operate the power tool. Power
tools are dangerous in the hands of untrained users.
e) Maintain power tools. Check for misalignment or binding of moving parts, breakage
of parts and any other condition that may affect the power tool’s operation. If
damaged, have the power tool repaired before use. Many accidents are caused by
poorly maintained power tools.
f) Keep cutting tools sharp and clean. Properly maintained cutting tools with sharp cutting
edges are less likely to bind and are easier to control.
g) Use the power tool, accessories and tool bits etc. in accordance with these
instructions, taking into account the working conditions and the work to be
performed. Use of the power tool for operations different from those intended could result
in a hazardous situation.
5) Service
a) Have your power tool serviced by a qualified repair person using only identical
replacement parts. This will ensure that the safety of the power tool is maintained.
Sanding Tool Safety
WARNING!
• Hold the power tool by insulated handles or gripping surfaces only, because the
sanding belt/sheet may contact its own cord. Cutting a “live” wire may make exposed
metal parts of the power tool ‘live’ and could give the operator an electric shock.
• Use clamps or another practical way to secure the workpiece to a stable platform.
Holding the workpiece by hand or against the body makes it unstable and may lead to
loss of control.
• Recommendation that the tool always be supplied via a residual current device with
a rated residual current of 30 mA or less.
• If the replacement of the supply cord is necessary, this has to be done by the
manufacturer or his agent in order to avoid a safety hazard.
a. ALWAYS wear appropriate protective equipment, including a dust mask with a
minimum FFP2 rating, eye protection and ear defenders
b. Ensure all people in the vicinity of the work area are also equipped with suitable
personal protective equipment
c. Take special care when sanding some woods (such as beech, oak, mahogany and
teak), as the dust produced is toxic and can cause extreme reactions
d. NEVER use to process any materials containing asbestos. Consult a qualified
professional, if you are uncertain whether an object contains asbestos
e. DO NOT sand magnesium or alloys containing a high percentage of magnesium
f. Be aware of paint finishes or treatments that may have been applied to the material
that is being sanded. Many treatments can create dust that is toxic, or otherwise
harmful. If working on a building constructed prior to 1960, there is an increased chance of
encountering lead-based paints
g. The dust produced when sanding lead-based paints is particularly hazardous to
children, pregnant women, and people with high blood pressure. DO NOT allow these
people near to the work area, even if wearing appropriate personal protective equipment
h. Whenever possible, use a vacuum dust extraction system to control dust and waste
i. Be especially careful when using a machine for both wood and metal sanding.
Sparks from metal can easily ignite wood dust. ALWAYS clean your machine thoroughly
to reduce the risk of fire
j. Empty the dust bag or container (where applicable) frequently during use, before
taking breaks and after completion of sanding. Dust may be an explosion hazard. DO
NOT throw sanding dust into an open fire. Spontaneous combustion may occur when oil or
water particles come into contact with dust particles. Dispose of waste materials carefully
and in accordance with local laws and regulations.
k. Work surfaces and sandpaper can become very hot during use. If there is evidence of
burning (smoke or ash), from the work surface, stop and allow the material to cool.
DO NOT touch work surface or sandpaper until they have had time to cool
l. DO NOT touch the moving sandpaper
m. ALWAYS switch off before you put the sander down
n. DO NOT use for wet sanding. Liquids entering the motor housing can cause severe electric
shocks
o. ALWAYS unplug the sander from the mains power supply before changing or
replacing sandpaper
Even when this tool is used as prescribed it is not possible to eliminate all residual
risk factors. If you are in any doubt as to safe use of this tool, do not use it
490239_Z1MANPRO2.indd 7 05/10/2017 09:32

8
GB
Product Familiarisation
1. Front Handle
2. Rear Handle
3. Mains Cord
4. Dust Extraction Port
5. Drive Belt Cover
6. Clamp Hole
7. Tracking Adjustment Knob
8. Sanding Belt
9. Lock-On Button
10. On/Off Trigger Switch
11. Speed Adjustment Dial
12. Vented Motor Cover
13. Brush Cover
14. Front Belt Roller
15. Belt Tension Lever
16. Drive Roller
Included Accessories:
17. Bench-Mounting Mat
18. 2 x Extra Sanding Belts
19. 2 x Inversion Clamp
20. Dust Collection Bag
21. Spare Drive Belt
Intended Use
Medium to heavy-duty belt sander for removing large amounts of material. For use on soft and
hard wood, and similar materials.
Unpacking Your Tool
• Carefully unpack and inspect your new tool. Familiarise yourself with all its features and
functions
• Ensure that all parts of the tool are present and in good condition. If any parts are missing
or damaged, have such parts replaced before attempting to use this tool
Before Use
WARNING: Ensure the tool is disconnected from the power supply before attaching or
changing any accessories, or making any adjustments.
Note: This sander is supplied fully assembled. It can be used immediately out of the box.
Connecting the Dust Collection Bag
• Connecting the tool to a vacuum cleaner or workshop dust extraction system is the
preferred method of dust extraction
• If vacuum dust extraction is unavailable, you must fit the supplied Dust Collection Bag (20)
to the Dust Extraction Port (4)
1. Locate the bayonet fitting, push on the Dust Collection Bag (Image A) and rotate until
locked. Ensure the Dust Collection Bag’s zip is closed
2. To remove the Dust Collection Bag, rotate outwards to disengage the bayonet, then pull off
WARNING: Remove and DO NOT use the Dust Collection Bag when sanding metal. Hot metal
particles and sparks could ignite residual wood dust, or cause the Dust Collection Bag to catch
fire. Always connect the sander to a vacuum cleaner or workshop dust extraction system when
sanding metal. Always clean the tool THOROUGHLY when switching from sanding wood to
sanding wood to sanding metal, and vice versa.
Selecting the right grade of sanding belt
• Different grades of sanding belt can be purchased from your local Triton stockist. Typical
grades are: Coarse (40 Grit), Medium (80 and 100 Grit) and Fine (120 Grit)
• Use Coarse grade to remove rough finishes, Medium grade to smooth the work, and Fine
grade for finishing
• Carry out a trial run on a scrap piece of material to determine the optimum grades of belt
for a particular job
• In order to take full advantage of your sander, always purchase good quality belts
Note: After sanding with a belt sander, an orbital sander can be used to provide a smoother
surface finish. This process will, however, lead to the loss of wood grain detail. Additional
sanding with an orbital sander is advisable if you plan to paint the wooden surface, or if you do
not need to maintain the visibility of the wood grain.
Attaching a sanding belt
WARNING: Always disconnect from the power supply before carrying out any inspection,
maintenance or cleaning.
1. Pull the Belt Tension Lever (15) to release the tension on the belt then slide off the old belt
(Image B)
2. Check the replacement belt is well jointed and is not frayed at the edges
3. Slip the new belt into position (Image C), making sure the rotation arrow on the inside of the
belt is pointing in the same direction as the arrow on the side of the sander
4. Push the Belt Tension Lever in (Image D) to increase the tension on the belt
5. Plug the sander into a power point and, maintaining a firm grip on the sander, squeeze the
On/Off Trigger Switch (10) and allow the belt to rotate for a short period
6. Whilst the belt is running, adjust the Tracking Adjustment Knob (7) to align the belt to the
centre of the Drive Roller (16). Repeat until the belt is correctly aligned (only slight rotation
of the knob is required to track the belt), then squeeze the On/Off Trigger Switch for a few
seconds to allow the belt to adjust. Run the sander for a minute or so to ensure the correct
alignment is achieved before using the sander on a workpiece
WARNING: Do not continue to use the sander if the sanding belt is worn or damaged.
WARNING: Do not use the same sanding belt for wood and metal. Metal particles become
embedded in the belt and will scour a wooden surface.
Operation
Switching ON and OFF
1. Press and hold the On/Off Trigger Switch (10) to activate the belt sander
2. Release the On/Off Trigger Switch to stop the belt sander
3. To lock the belt sander ON, press the On/Off Trigger Switch to activate the belt sander and
press the Lock-On Button (9) (Image E) to lock the On/Off Trigger Switch ON
4. To de-activate, press the On/Off Trigger Switch, which clicks the Lock-On Button out, and
release the On/Off Trigger Switch to stop the belt sander
Adjusting the speed
• The speed can be adjusted to suit the material that requires sanding
• To adjust the speed, move the Speed Adjustment Dial (11) to the desired speed (Image F)
Note: When the Speed Adjustment Dial is set to the lowest speed setting ‘1’ the speed is
200m/min; when the Speed Adjustment Dial is set to the highest speed setting ‘7’ the speed
is 400m/min.
Sanding
WARNING: Always wear eye protection, an adequate dust mask, hearing protection, and
suitable gloves when working with this tool.
Note: Always use clamps to secure your workpiece to the workbench wherever possible.
WARNING: Do not use this sander for sanding magnesium.
Note: Always ensure the belt is in good condition.
1. Connect the tool to the power supply
2. Squeeze the On/Off Trigger Switch (10) and allow the belt to reach the desired speed before
lowering the belt on to the surface of the workpiece
3. If you require continuous operation, press the Lock-On Button (9)
4. Lower the unit onto the surface of the workpiece and apply slight pressure
5. Sand in the direction of the grain, in parallel, with overlapping strokes (Image G)
6. To remove paint or smooth very rough wood, sand across the grain at 45° in two directions,
and then finish in the direction of the grain
7. Lift the sander off the workpiece before switching off the power
8. Remember to keep hands away from the moving sanding belt, as it will continue to run for a
short time after the machine is switched OFF
Note: For optimum dust removal, empty the Dust Collection Bag (20) when it is no more than
half full.
WARNING: Do not use the Dust Collection Bag when sanding metal. The hot metal particles
could cause residual wood dust of the bag itself to catch fire. A vacuum cleaner adaptor can
be used to connect a household vacuum cleaner or workshop dust extraction system to the
sander. The adaptor fits into the Dust Extraction Port (4).
Using the Inversion Clamp set
• The Inversion Clamps (19) set enables use of the Triton Belt Sander in an inverted position
(Image H). The sander must only be used in an inverted position when clamped securely to
a suitable structure with a solid, flat work surface
1. Invert the machine and place on a solid, flat work surface. Ensure the underside is flat and
there is sufficient access to accommodate the length of the G clamp bases
2. Insert the Inversion Clamps fully into the fixing positions on the sander. Ensure the vertical
threaded section of each Inversion Clamp is tight up against the edge of the work surface
3. Tighten the butterfly nuts so that the sander is securely clamped to the work surface
4. Fit the Dust Collection Bag (20) or compatible dust extraction system
5. Turn on the sander and use the Lock-On Button (9) to keep the sander running continuously
490239_Z1MANPRO2.indd 8 05/10/2017 09:32

9
GB
6. Check that the sanding belt is securely fixed to the sander and that it is correctly aligned
while the tool is operating. If necessary, switch the sander OFF and re-fix to the sander
WARNING: DO NOT use the sander inverted unless it is securely clamped to the work surface.
Note: When the belt sander is being clamped, use the Bench-Mounting Mat (17) beneath the
belt sander to protect the work surface from damage and to prevent the belt sander from
moving.
Accessories
• A full range of different grit sanding belts and accessories is available from your Triton
stockist. Spare parts can be obtained from toolsparesonline.com
Maintenance
WARNING: Always disconnect from the power supply before carrying out any inspection,
maintenance or cleaning.
Emptying the dust collection bag (if fitted)
WARNING: Always switch the belt sander OFF and disconnect from the power supply before
detaching the Dust Collection Bag (20) or dust extraction system.
1. To remove the Dust Collection Bag, rotate outwards to disengage the bayonet, then pull off
(Image A)
2. Unzip the Dust Collection Bag, empty, and refit (see ‘Connecting the Dust Collection Bag’)
Note: If the sanding dust contains harmful substances, such as particles from old paint,
varnish, surface coatings etc, always dispose of in accordance with laws and regulations.
Note: For optimum dust removal, empty the Dust Collection Bag when it is no more than
half full.
Note: Always clean the tool THOROUGHLY when switching from sanding wood to sanding metal
and vice versa.
General inspection
• Regularly check that all the fixing screws are tight. They may vibrate loose over time
• Inspect the mains cord of the tool, prior to each use, for damage or wear. Repairs should
be carried out by an authorised Triton service centre. This advice also applies to extension
cords used with this tool; always check for wear or damage and see the manufacturer of
the product for repairs, if possible
Cleaning
• Keep your tool clean at all times. Dirt and dust will cause internal parts to wear quickly and
shorten the machine’s service life. Clean the body of your machine with a soft brush, or
dry cloth. If available, use clean, dry, compressed air to blow through the ventilation holes
• Clean the tool casing with a soft damp cloth using a mild detergent. Do not use alcohol,
petrol or strong cleaning agents
• Never use caustic agents to clean plastic parts
Lubrication
• Slightly lubricate all moving parts at regular intervals with a suitable spray lubricant
Brushes
• Over time the carbon brushes inside the motor may become worn
• Excessively worn brushes may cause loss of power, intermittent failure, or visible sparking
• If you suspect that the brushes may be worn, both brushes will need replacing
simultaneously
Replacing the brushes:
WARNING: Ensure that the belt sander is switched OFF and the mains power cord is
unplugged from the power source before attempting to replace the brushes.
1. Locate the Vented Motor Cover (12) on the belt sander and the two screw-in Brush Covers
(13)
2. Remove the Brush Covers with a flat-tipped screwdriver, then remove the two brushes
3. Note the notches on the brush ends, which align with the fitment in the Brush Cover holes,
and place the new brush inside then screw the Brush Cover back in
Note: Fitting the new brushes can be done one at a time, but it is recommended that both
brushes be replaced during the same session.
4. Once both brushes have been replaced, plug the belt sander in to the power socket and
switch ON. Run the belt sander to test that the replacement has worked
5. If there is no power, retry from step 1. If there is still no power after a second attempt to fit
the brushes, see your Triton service technician
Changing the drive belt
Note: A spare drive belt is supplied with the sander. Further replacements and other spare
parts are available from your Triton stockist or from toolsparesonline.com.
1. Using a Phillips screwdriver, remove the screws holding the Drive Belt Cover (5) in place
2. Remove the worn belt by easing it off the bottom, larger drive pulley, and then lift away
3. Clean all dust and debris away, if any
4. Place the new drive belt over the top drive pulley and push onto the larger puller, then rotate
the belt until it is on both pulleys and located in the grooves of each pulley
5. Replace the Drive Belt Cover and screw the fixing screws tight
6. Test the belt sander on a low speed. If fitted correctly, the belt sander is ready to use
Storage
• Store this tool carefully in a secure, dry place out of the reach of children
Disposal
Always adhere to national regulations when disposing of power tools that are no longer
functional and are not viable for repair.
• Do not dispose of power tools, or other waste electrical and electronic equipment (WEEE),
with household waste
• Contact your local waste disposal authority for information on the correct way to dispose
of power tools
490239_Z1MANPRO2.indd 9 05/10/2017 09:32

10
GB
Troubleshooting
Problem Possible cause Solution
No function when On/Off Trigger Switch (10) is operated
No power Check power supply
Defective On/Off Trigger Switch
Replace the On/Off Trigger at an authorised Triton service
centre
Sander pulls to the side during operation
Off-centre sanding belt
Adjust the belt Tracking Adjustment Knob (7) to align the
belt. If problem persists, refit the belt as instructed in ‘Fitting
a sanding belt’
Loose sanding belt
Ensure the Belt Tension Lever (15) is securely closed. If
problem persists, refit the belt as instructed in ‘Fitting a
sanding belt’
Belt sander running despite not touching the On/Off Trigger
Switch
Lock-On Button (9) activated
To stop the machine, squeeze and release the On/Off
Trigger Switch
490239_Z1MANPRO2.indd 10 05/10/2017 09:32

11
GB
Guarantee
To register your guarantee visit our web site at
www.tritontools.com* and enter your details.
Your details will be included on our mailing list (unless indicated otherwise) for
information on future releases. Details provided will not be made available to any
third party.
Purchase Record
Date of Purchase: ___ / ___ / ____
Model: T41200BS Retain your receipt as proof of purchase art pr
Triton Precision Power Tools guarantees to the purchaser of this product that if any part
proves to be defective due to faulty materials or workmanship within 3 YEARS from the
date of original purchase,
Triton will repair, or at its discretion replace, the faulty part free of charge.
This guarantee does not apply to commercial use nor does it extend to normal wear and
tear or damage as a result of accident, abuse or misuse.
* Register online within 30 days.
Terms & conditions apply.
This does not affect your statutory rights oves to be defecti
Notified body: TUV SUD
The technical documentation is kept by: Triton Tools
Date: 04/07/2016
Signed:
Mr Darrell Morris
Managing Director
Name and address of the manufacturer:
Powerbox International Limited, Company No. 06897059.
Registered address: Powerbox Int. Ltd. Somerset, BA22 8HZ, UK
CE Declaration of Conformity
The undersigned: Mr Darrell Morris
as authorised by: Triton Tools
Declares that:
This declaration has been issued under the sole responsibility of the manufacturer.
The object of the declaration is in conformity with the relevant Union harmonisation
Legislation.
Identification code: T41200BS
Description: 1200W Belt Sander
Conforms to the following directives and standards:
• Machinery Directive 2006/42/EC
• EMC Directive 2014/30/EU
• RoHS Directive 2011/65/EU
• EN60745-1:2009+A11:2010
• EN60745-2-4:2009+A11:2011
• EN55014-1:2006+A1:2009+A2:2011
• EN55014-2:1997+A1:2001+A2:2008
• EN61000-3-2:2014
• EN61000-3-3:2013
490239_Z1MANPRO2.indd 11 05/10/2017 09:32

12
GB
12
NL
Specificaties
Model nr.: T41200BS
Spanning: 220 V–240 V, 50/60 Hz
Stroomsnoer lengte: 2,6 m
Ingangsvermogen: 1200 W
Band snelheid: 2500 min
-1
Onbelaste snelheid: 200–400 min
-1
Beschermingsklasse:
Beschermingsgraad: IP20
Schuuroppervlak: 100 x 156 mm
Schuurband afmetingen: 100 x 610 mm
Machine afmetingen (L x B x H): 410 x 181 x 181 mm
Gewicht: 6 kg
Geluid en trilling
Geluidsdruk L
PA
: 95,4 dB(A)
Geluidsvermogen L
WA
: 106,4 dB(A)
Onzekerheid K: 3 dB(A)
Trilling A
H
(Hoofdhandvat): 4,92 m/s
2
Trilling A
H
(Hulphandvat): 6,70 m/s
2
Onzekerheid: 1,5 m/s
2
Met het oog op onze aanhoudende productontwikkeling kunnen de specificaties
van Triton producten zonder voorafgaande kennisgeving worden gewijzigd
De geluidsintensiteit voor de bediener kan 85 dB(A) overschrijden en de
gehoorbescherming is noodzakelijk.
WAARSCHUWING: Bij een geluidsintensiteit van 85 dB(A) of hoger is het dragen van
gehoorbescherming en het limiteren van de blootstellingstijd vereist. Bij oncomfortabel
hoge geluidsniveaus, zelfs met het dragen van gehoorbescherming, stopt u het gebruik
van de machine onmiddellijk. Controleer de pasvorm en het geluiddempingsniveau van de
bescherming.
WAARSCHUWING: Blootstelling aan trilling resulteert mogelijk in gevoelloosheid, tinteling en
een vermindert gripvermogen. Langdurige blootstelling kan leiden tot chronische condities.
Limiteer de blootstellingsduur en draag anti-vibratie handschoenen. Vibratie heeft een grotere
invloed op handen met een temperatuur lager dan een normale, comfortabele temperatuur.
Maak gebruik van de informatie in de specificaties voor het bereken van de gebruiksduur en
frequentie van de machine.
Geluid- en trillingsniveaus in de specificatie zijn vastgesteld volgens EN60745 of een
gelijksoortige internationale norm. De waarden gelden voor een normaal gebruik in normale
werkomstandigheden. Een slecht onderhouden, onjuist samengestelde of onjuist gebruikte
machine produceert mogelijk hogere geluids- en trillingsniveaus. www.osha.europa.eu biedt
informatie met betrekking tot geluids- en trillingsniveaus op de werkplek wat mogelijk nuttig is
voor regelmatige gebruikers van machines.
Beschrijving symbolen
Op het gegevensplaatje van uw gereedschap kunnen zich symbolen bevinden. Deze
vertegenwoordigen belangrijke productinformatie en gebruiksinstructies.
Introductie
Hartelijk dank voor de aanschaf van dit Triton- gereedschap. Deze instructies bevatten
informatie die u nodig hebt voor een veilige en doeltreffende bediening van dit product.
Dit product heeft unieke kenmerken. Zelfs als u bekend bent met gelijksoortige
producten dient u deze handleiding zorgvuldig door te lezen, zodat u in staat bent
alle voordelen te benutten. Houd deze handleiding bij de hand en zorg ervoor dat alle
gebruikers van dit gereedschap de handleiding hebben gelezen en volledig hebben
begrepen.
Vertaling van de originele instructies
Draag gehoorbescherming
Draag een veiligheidsbril
Draag een stofmasker
Draag een veiligheidshelm
Draag handschoenen
Lees de handleiding
Gebruik niet de regen of in vochtige omstandigheden!
WAARSCHUWING: Bewegende delen kunnen ernstig letsel veroorzaken.
Beschermingsklasse II (dubbel geïsoleerd)
Milieubescherming
Elektrische producten mogen niet met het normale huisvuil worden weggegooid.
Indien de mogelijkheid bestaat, dient u het product te recyclen. Vraag de
plaatselijke autoriteiten of winkelier om advies betreffende recyclen.
Voldoet aan de relevante wetgeving en veiligheidsnormen
Voorzichtig!
Toxic fumes or gases!
490239_Z1MANPRO2.indd 12 05/10/2017 09:32

13
GB
13
NL
Algemene veiligheid
WAARSCHUWING Lees alle bediening- en veiligheidsvoorschriften. Het niet opvolgen van
alle voorschriften die hieronder vermeld staan, kan resulteren in een elektrische schok, brand
en/of ernstig letsel.
WAARSCHUWING: De machine is niet geschikt voor gebruik door personen met een
verminderde mentale of fysieke gesteldheid of een gebrek aan ervaring, tenzij de persoon
wordt begeleid of geïnstrueerd door een persoon verantwoordelijk voor de veiligheid
Bewaar deze voorschriften voor toekomstig gebruik.
De term “elektrisch gereedschap” in alle hieronder vermelde waarschuwingen heeft
betrekking op uw elektrische gereedschap dat op de stroom is aangesloten (met een snoer) of
met een accu wordt gevoed (snoerloos).
1) Veiligheid in de werkruimte
a) Houd de werkruimte schoon en zorg voor een goede verlichting. Rommelige en donkere
ruimtes leiden vaak tot ongelukken.
b) Werk niet met elektrisch gereedschap in explosieve omgevingen, bijvoorbeeld in de
aanwezigheid van ontvlambare vloeistoffen, gassen of stof. Elektrisch gereedschap
brengt vonken teweeg die stof of dampen kunnen doen ontbranden.
c) Houd kinderen en omstanders uit de buurt wanneer u elektrisch gereedschap bedient.
Door afleiding kunt u de controle over het gereedschap verliezen.
2) Elektrische veiligheid
a) De stekkers van het elektrische gereedschap moeten passen bij het stopcontact. Pas
de stekker niet aan. Gebruik geen adapterstekkers bij geaard elektrisch gereedschap.
Het gebruik van ongewijzigde stekkers en passende stopcontacten vermindert het risico op
een elektrische schok.
b) Vermijd lichamelijk contact met geaarde oppervlakken zoals pijpen, radiatoren,
fornuizen en koelkasten. Het risico op een elektrische schok neemt toe als uw lichaam
geaard wordt.
c) Laat elektrisch gereedschap niet nat worden. Wanneer elektrisch gereedschap nat
wordt, neemt het risico op een elektrische schok toe.
d) Beschadig het snoer niet. Gebruik het snoer nooit om het elektrisch gereedschap te
dragen, te trekken of om de stekker uit het stopcontact te trekken. Houd het snoer uit
de buurt van hitte, olie, scherpe randen of bewegende delen. Een beschadigd of in de
knoop geraakt snoeren verhoogt het risico op een elektrische schok toe.
e) Wanneer u elektrisch gereedschap buiten gebruikt, maak dan gebruik van een
verlengsnoer dat geschikt is voor gebruik buitenshuis. Gebruik een verlengsnoer dat
geschikt is voor gebruik buitenshuis om het risico op een elektrische schok te verminderen.
f) Indien het onvermijdelijk is elektrisch gereedschap te gebruiken in een vochtige
omgeving, gebruik dan een energiebron met een aard lek beveiliging (Residual
Currency Device). Het gebruik van een RCD vermindert het risico op een elektrische schok.
g) WAARSCHUWING: Wanneer de machine in Australië of Nieuw-Zeeland gebruikt wordt,
met een lekstroom van 30 mA of lager, is het gebruik van een aardlekschakelaar
aanbevolen
3) Persoonlijke veiligheid
a) Blijf alert en gebruik uw gezonde verstand wanneer u elektrisch gereedschap
bedient. Gebruik het elektrisch gereedschap niet wanneer u vermoeid bent of onder
invloed van drugs, alcohol of medicijnen. Onoplettendheid tijdens het bedienen van
elektrisch gereedschap kan leiden tot ernstig letsel.
b) Maak gebruik van persoonlijke bescherming. Draag altijd een veiligheidsbril.
Passende bescherming voor de omstandigheden, zoals een stofmasker, niet-slippende
veiligheidsschoenen een helm of gehoorbescherming, vermindert het risico op persoonlijk
letsel.
c) Zorg ervoor dat het apparaat niet per ongeluk wordt gestart. Controleer of de
schakelaar in de ‘uit’ stand staat voordat u de stekker in het stopcontact steekt. Het
dragen van elektrisch gereedschap met uw vinger op de schakelaar of het aansluiten op
de stroom van elektrisch gereedschap met de schakelaar ingeschakeld kan tot ongelukken
leiden.
d) Verwijder alle stel- of moersleutels voordat u het elektrische gereedschap
inschakelt. Een moer- of stelsleutel die zich op een draaiend onderdeel van het elektrische
gereedschap bevindt, kan leiden tot letsel.
e) Reik niet te ver. Blijf altijd stevig en in balans staan. Zo houdt u meer controle over het
elektrische gereedschap in onverwachte situaties.
f) Draag geschikte kleding. Draag geen loshangende kleding of sieraden. Houd haren,
kleding en handschoenen uit de buurt van bewegende delen. Loshangende kleding,
sieraden en los hangende haren kunnen vast komen te zitten in bewegende delen.
g) Als er onderdelen voor stofafvoer- en stofverzameling worden meegeleverd, sluit deze
dan aan en gebruik deze op de juiste wijze. Het gebruik van deze onderdelen kan het
risico op stofgerelateerde ongelukken verminderen.
4) Gebruik en verzorging van elektrisch gereedschap
a) Forceer elektrisch gereedschap niet. Gebruik elektrisch gereedschap dat geschikt
is voor het werk dat u wilt uitvoeren. Geschikt elektrisch gereedschap werkt beter en
veiliger op een passende snelheid.
b) Gebruik het elektrische gereedschap niet als de schakelaar het apparaat niet in- en
uitschakelt. Elektrisch gereedschap dat niet bediend kan worden met de schakelaar is
gevaarlijk en moet gerepareerd worden.
c) Haal de stekker uit het stopcontact voordat u instellingen aanpast, toebehoren
verwisselt of het elektrische gereedschap opbergt. Dergelijke voorzorgsmaatregelen
verminderen het risico op het per ongeluk starten van het elektrische gereedschap.
d) Berg elektrisch gereedschap dat niet in gebruik is op buiten bereik van kinderen
en laat mensen die niet bekend zijn met het elektrische gereedschap of met deze
instructies het elektrische gereedschap niet bedienen. Elektrisch gereedschap is
gevaarlijk in de handen van onervaren gebruikers.
e) Onderhoud uw elektrisch gereedschap. Controleer op foutieve uitlijning of het
vastslaan van bewegende delen, gebroken onderdelen en elke andere afwijking die
de werking van het elektrische gereedschap zou kunnen beïnvloeden. Indien het
elektrische gereedschap beschadigd is, moet u het laten repareren voordat u het
weer gebruikt. Veel ongelukken worden veroorzaakt door slecht onderhouden elektrisch
gereedschap.
f) Houd snijwerktuigen scherp en schoon. Goed onderhouden snijwerktuigen met scherpe
messen slaan minder snel vast en zijn gemakkelijker te bedienen.
g) Gebruik het elektrische gereedschap, toebehoren en onderdelen, etc. volgens deze
instructies en volgens bestemming voor het specifieke type elektrisch gereedschap,
en houd daarbij rekening met de werkomstandigheden en het uit te voeren werk.
Gebruik van elektrisch gereedschap voor werkzaamheden die verschillen van die waarvoor
het apparaat bestemd is, kan leiden tot gevaarlijke situaties.
5) Onderhoud
a) Laat uw elektrische gereedschap onderhouden door een gekwalificeerde vakman en
gebruik alleen identieke vervangstukken. Zo bent u er zeker van dat de veiligheid van
het elektrische gereedschap gewaarborgd blijft.
Veiligheid schuurmachines
Voorzichtig!
Houdt de machine bij de geïsoleerde handvaten vast. Wanneer de machine door een
stroomsnoer schuurt komen onderdelen mogelijk onder stroom te stoom te staan wat kan
resulteren in elektrische schok
• Klem het werkstuk op een stevige werkbank vast. Wanneer u het werkstuk met
de hand vasthoudt of tegen uw lichaam klemt, verliest u mogelijk de controle over de
machine
• Het is aanbevolen de machine via een aardlekschakelaar met een maximale
lekstroom van 30 mA aan te sluiten op een stroombron
• Laat het stroomsnoer wanneer nodig bij een geautoriseerd Silverline service center
vervangen om de kans op persoonlijk letsel te voorkomen
a) Draag te allen tijde de juiste bescherming. Draag een stofmasker (minimale
beschermingswaarde FFP2), veiligheidsbril en gehoorbescherming
b) Het is de verantwoordelijkheid van de gebruiker om ervoor te zorgen dat personen
die zich in de nabijheid van de werkruimte bevinden ook met de gepaste persoonlijke
bescherming zijn uitgerust
c) Neem speciale voorzorgen bij het schuren van bepaalde houtsoorten (zoals beuk, eik,
mahonie en teak), omdat het stof dat daarbij vrijkomt giftig is en bij bepaalde personen
extreme reacties kan teweegbrengen
d) Bewerk geen materiaal wat asbest bevat. Neem contact op met een gekwalificeerd
persoon wanneer u enigszins onzeker bent of materiaal asbest bevat
e) Schuur geen magnesium of legeringen met een hoog magnesiumgehalte
f) Ben bewust van verf op andere behandelingen op het te schuren materiaal. Vele
behandelingen produceren schadelijk zaagsel. Bij werkzaamheden aan een gebouw van
vóór 1960 is de kans op loodhoudende verf groter.
g) Het stof dat vrijkomt bij het afschuren van loodhoudende verf is vooral gevaarlijk
voor kinderen, zwangere vrouwen en personen met hoge bloeddruk. Laat deze
personen de werkplaats niet betreden, zelfs niet met de juiste beschermende kleding
h) Gebruik wanneer mogelijk een stofafzuigsysteem om stof en afval onder controle te
houden
i) Wees vooral voorzichtig wanneer u de machine voor zowel het schuren van
hout als het schuren van metaal gebruikt. Vonken van de metaalbewerking kunnen
houtschuurstof gemakkelijk doen ontbranden. Maak uw machine altijd grondig schoon om
de kans op brand te verkleinen
j) De stofzak dient tijdens gebruik regelmatig, en na elk gebruik geleegd te worden.
Zaagsel is mogelijk een explosierisico. Gooi zaagsel niet in open vuur. Wanneer
stofdeeltjes in contact komen met water of oliedeeltjes ontstaat mogelijk spontane
ontbranding
k) Werkvlakken en schuurpapier kunnen tijdens het gebruik erg heet worden. Leg het
werk even stil als het werkvlak tekenen van brand (rook of as) vertoont, en laat het
materiaal afkoelen. Raak het werkvlak of schuurpapier niet aan voordat het is afgekoeld.
l) Raak het bewegende schuurpapier niet aan
m) Schakel de machine uit voordat u het neerlegt
n) Gebruik geen nat schuurpapier. Vloeistoffen gaan mogelijk de motor in wat kan resulteren
in elektrische schok
o) Ontkoppel de machine van de stroomtoevoer voor het maken van enige aanpassingen
en/of het verwisselen van schuurpapier
p) Zelfs wanneer het gereedschap gebruikt wordt zoals is voorgeschreven, is het niet
mogelijk alle resterende risicofactoren te elimineren. Gebruik de machine bij enige
twijfel niet
490239_Z1MANPRO2.indd 13 05/10/2017 09:32

14
GB
14
NL
Productbeschrijving
1. Hulphandvat
2. Hoofdhandvat
3. Stroomsnoer
4. Stofpoort
5. Aandrijfriem beschermkap
6. Klemgat
7. Band verstelknop
8. Schuurband
9. Aan-stand vergrendelknop
10. Aan/uit trekker schakelaar
11. Snelheidcontroleknop
12. Geventileerde motorbehuizing
13. Koolstofborsteldoppen
14. Voorste schuurband roller
15. Band spanhendel
16. Aandrijfroller
Inbegrepen accessoires:
17. Werkbank montagemat
18. 2 x extra schuurbanden
19. 2 x schuurklemmen
20. Stofzak
21. Reserve aandrijfriem
Gebruiksdoel
Middel tot ‘Heavy-Duty’ bandschuurmachine, voor het verwijderen van grote hoeveelheden
materiaal, op zowel harde als zachte houtsoorten en soortgelijke materialen
Het uitpakken van uw gereedschap
• Pak uw toestel / gereedschap uit. Inspecteer het en zorg dat u met alle kenmerken en
functies vertrouwd raakt
• Controleer of alle onderdelen aanwezig zijn en in goede staat verkeren. Als er onderdelen
ontbreken of beschadigd zijn, zorg dan dat deze vervangen worden voor u dit toestel /
gereedschap gebruikt
Voor gebruik
WAARSCHUWING: Zorg ervoor dat de machine ontkoppeld is van de stroombron
voordat enige accessoires bevestigd of vervangen worden
Let op: De machine wordt volledig samengesteld geleverd en kan onmiddellijk gebruikt
worden
Het aansluiten van het stof ontginningssysteem
• Het aansluiten van de machine op een stofzuiger of werkplaats ontginningssysteem is de
verkozen methode
• Wanneer vacuüm ontginning niet verkrijgbaar is, sluit u de inbegrepen stofzak (20) op de
stofpoort (4) aan:
1. Druk de stofzak op de bajonetaansluiting (afb. A) en draai om deze in plaats te
vergrendelen. Zorg ervoor dat de stofzak rits gesloten is
2. Om de stofzak te verwijderen, draait u deze de andere kant op en trekt u deze van de
machine
WAARSCHUWING: Bij het schuren van metaal mag de stofzak niet gebruikt worden. Hete
metaaldeeltjes en vonken kunnen het resterende hout schuurstof doen ontbranden. Sluit
de machine te allen tijde op een stofzuiger of werkplaats ontginningssysteem aan. Bij het
schakelen van het schuren van metaal naar het schuren van hout (en andersom) maakt u de
machine grondig schoon
Het selecteren van een schuurband met de juiste
korrelgrofte
• Schuurbanden zijn verkrijgbaar met verschillende korrelgroftes. Veel gebruikte
korrelgroftes zijn: ruw (korrel 40), medium (korrel 80 en 100) en fijn (korrel 120)
• Gebruik een grove korrel om ruwe afdeklagen te verwijderen, een medium korrel om het
werkstuk glad te maken en een fijne korrel om een werkstuk af te werken
• Test de machine op een stuk afvalmateriaal om te bepalen wat de beste korrelgrofte voor
een specifiek werk is
• Voor een optimaal gebruik van uw schuurmachine raden wij aan altijd goede kwaliteit
schuurbanden te kopen
Let op: Voor het verkrijgen van een goede afwerking gebruikt u na het schuren met de
bandschuurmachine een vlakschuurmachine. Dit proces verwijdert het houtnerf detail. Het
schuren met een vlakschuurmachine is aanbevolen wanneer het oppervlak geschilderd gaat
worden
Het bevestigen van een schuurband
WAARSCHUWING: Schakel de schuurmachine uit en trek de stekker uit het stopcontact voor
het uitvoeren van inspectie, onderhoud en schoonmaak
1. Klap de band spanhendel (15) naar rechts om de spanning van de band te verslappen en de
oude band van de machine af te schuiven (Afb. B)
2. Controleer of de nieuw te plaatsen band een goede lasverbinding heeft en de randen niet
gerafeld zijn
3. Schuif de nieuwe band op zijn plaats (Afb. C) met de pijl aan de binnenkant van de band
waarbij de punt in dezelfde richting wijst als de pijl aan de zijkant van de schuurmachine
4. Klap de band spanhendel naar links (Afb. D) om de band opnieuw te spannen
5. Steek de stekker in het stopcontact en druk de aan-/uit trekker schakelaar (10) in, terwijl u
de schuurmachine omhoog houdt. Laat de band korte tijd draaien
6. Terwijl de band draait verstelt u de band verstelknop (7) om de band-loop op de
aandrijfcilinder te centreren. Draai de verstelknop tot de band-loop correct gecentreerd
is (u hoeft de knop maar licht te draaien om de band bij te stellen), en druk de trekker
schakelaar voor een aantal seconden in om de band te verstellen. Laat de schuurmachine
ongeveer een minuut draaien om er zeker van te zijn dat de band-loop correct gecentreerd
is, voordat u de schuurmachine op een werkstuk zet
WAARSCHUWING: Gebruik de schuurmachine niet met een versleten of beschadigde
schuurband
WAARSCHUWING: Gebruik verschillende schuurbanden voor hout en metaal. Metalen deeltjes
komen vast te zitten in de band en kunnen krassen op hout achter laten.
Gebruik
Het in- en uitschakelen van de machine
1. Druk de trekker schakelaar (10) in om de schuurmachine te starten
2. Laat de trekker schakelaar los om de machine uit te schakelen
3. Druk de trekker schakelaar en de aan-stand vergrendelknop (9) in, om de machine in de
aan-stand te vergrendelen (Afb. E)
4. Door de schakelaar weer in te drukken en los te laten, schakelt u de schuurmachine uit
Het aanpassen van de snelheid
• De snelheid kan veranderd worden afhankelijk van het te schuren materiaal
• U wijzigt de snelheid door de variabele snelheidscontroleknop (11) te bewegen tot de juiste
snelheid bereikt is voor het te schuren materiaal (Afb. F)
Let op: Wanneer de snelheidcontroleknop in de laagste stand ‘1’ gesteld is bedraagt de
bandsnelheid 200 min-1. Wanneer de snelheidcontroleknop in de hoogste stand ‘7’ gesteld is
bedraagt de bandsnelheid 400 min
-1
.
Schuren
WAARSCHUWING: Bij het gebruik van de machine is het dragen van een veiligheidsbril, een
stofmasker, gehoorbescherming en geschikte handschoenen aanbevolen
Let op: Klem het werkstuk wanneer mogelijk op de werkbank vast
WAARSCHUWING: Gebruik de machine niet voor het schuren van magnesium
Let op: Zorg ervoor dat de schuurband in goede staat verkeerd
1. Sluit de machine op de stroombron aan
2. Druk de trekker schakelaar (10) in en laat de band op snelheid komen voordat u de machine
op het oppervlak zet
3. Druk de vergrendelknop (9) in voor het behouden van een continue snelheid
4. Houdt de schuurmachine met lichte druk op het oppervlak
5. Schuur met de houtnerf mee in parallel overlappende banen (Afb. G)
6. Voor het verwijderen van verf of het gladmaken van zeer ruw hout, schuurt u in twee
richtingen met een hoek van 45° over het hout. Daarna werkt u het oppervlak parallel met
de nerf mee af
7. Verwijder de schuurmachine van het werkstuk voordat u deze uitschakelt
8. Houd uw handen altijd uit de buurt van de draaiende band. De band blijft korte tijd na het
uitschakelen van de machine doordraaien
Let op: Voor optimale stofontginning leegt u de stofzak wanneer deze halfvol is
WAARSCHUWING: Gebruik de stofzak niet bij het schuren van metalen. De hete metaaldeeltjes
kunnen achtergebleven houtstof of de zak zelf doen ontbranden. Er kan een stofzuigeradapter
gebruikt worden om een huishoudstofzuiger of bedrijfsafzuigsysteem op de schuurmachine
aan te sluiten. De adapter past op de stofpoort (4)
Het gebruik van de klemmen set
• De klemmen set (19) maakt het mogelijk de schuurmachine op zijn kop te gebruiken (Afb.
H). De machine mag alleen in deze positie gebruikt worden wanneer deze veilig en stevig
gemonteerd kan worden op een vast en plat werkoppervlak
1. Draai de machine om en plaats deze op een plat werkoppervlak. Zorg ervoor dat er genoeg
ruimte is voor het plaatsen van de G-vormige klemmen
2. Zorg ervoor dat de verticale rug van de klemmen in contact staat met de rand van het
werkoppervlak
490239_Z1MANPRO2.indd 14 05/10/2017 09:32

15
GB
15
NL
3. Draai de vlindermoeren strak vast zodat de schuurmachine stevig op het werkoppervlak
staat
4. Verbind de stofzak (20) met de stofpoort van de machine
5. Start de machine en vergrendel deze in de aan-stand
6. Laat de band een aantal seconden onbelast lopen zodat u de montage van de machine
op de werkbank kunt controleren. Maak zo nodig aanpassingen, maar niet voordat u de
machine uitgeschakeld hebt en de schuurband volledig tot stilstand is gekomen
WAARSCHUWING: Gebruik de machine enkel in omgekeerde positie wanneer deze goed is
vastgeklemd
Let op: Wanneer de machine vastgeklemd wordt, gebruikt u de mat (17) onder de machine om
het oppervlak te beschermen tegen beschadiging en om beweging van de machin tijdens
genruik te voorkomen
Accessoires
• Verschillende accessoires, waaronder schuurbanden met verschillende korrelgroften,
zijn verkrijgbaar bij uw Triton handelaar. Reserveonderdelen zijn verkrijgbaar via www.
toolsparesonline.com
Onderhoud
WAARSCHUWING: Ontkoppel de machine van de stroombron voordat u enig onderhoud of
schoonmaak uitvoert
Het legen van de stofzak (wanneer bevestigd)
WAARSCHUWING: Schakel de machine uit en ontkoppel deze van de stroomtoevoer voordat u
de stofzak (20) ontkoppeld
1. Om de stofzak te ontkoppelen, draait en trekt u deze van de eenheid
2. Open de stofzak, leeg de zak en bevestig de zak terug op de eenheid
Let op: Wanneer het schuursel schadelijke deeltjes bevat als oude verf, vernis, coatings, etc.,
verwijderd u het schuursel volgens de plaatselijke wetten en regulaties
WAARSCHUWING Voor een optimale stofontginning leegt u de zak voordat deze halfvol is
Let op: Maak de machine grondig schoon wanneer u schakelt van het schuren van hout naar
het schuren van metaal (en andersom)
Algemene inspectie
• Controleer regelmatig of alle bevestigingsschroeven vastzitten
• Het voedingssnoer van de machine en eventuele verlengsnoeren moeten regelmatig op
breuken gecontroleerd worden. Als het snoer beschadigd is moet het door een erkend
vakman vervangen worden
Schoonmaak
• Houd uw machine schoon. Zorg ervoor dat afval zich niet ophoopt op de onderdelen van
het gereedschap. Verwijder stof en vuil en zorg ervoor dat de ventilatiegaten nooit verstopt
raken. Gebruik een zachte borstel of een droge doek om de machine te reinigen. Gebruik
wanneer mogelijk zuivere, droge perslucht om door de luchtgaten te blazen
• Maak de behuizing van de machine met een vochtige doek en een licht
schoonmaakmiddel schoon. Gebruik geen alcohol of bijtende stoffen
• Gebruik geen oplosmiddelen voor het schoonmaken van plastic onderdelen
Smeren
• De bewegende delen van de machine horen regelmatig licht gemeerd te worden
Koolstofborstels
• Na verloop van tijd zullen de koolborstels in de motor verslijten.
• Bij overmatige slijtage van de borstels verliest de motor mogelijk vermogen, start het niet
meer, en/ of produceert het overmatig vonken.
• De borstels dienen in paren vervangen te worden
Het vervangen van de koolstofborstels
WAARSCHUWING: Zorg er voor dat de machine is uitgeschakeld en ontkoppeld is van
de stroombron voordat u de borstels vervangt
1. Vind de geventileerde motorbehuizing (12) en de twee schoef koolstofborsteldoppen (13)
2. Verwijder de doppen met een sleufschroevendraaier en verwijder de koolstofborstels
3. De inkepingen op de uiteinden van de koolstofborstels lijnen uit met de gaten. Plaats de
borstels in de gaten en schroef de doppen vast7
Let op: Vervang de borstel één voor één maar altijd in paren
4. Wanneer de koolstofborstels vervangen zijn, sluit u de machine op de stroombron aan en
schakelt u de machine in om te controleren of deze werkt
5. Als de machine niet werkt, herhaalt u bovenstaande stappen. Als de machine daarna nog
niet werkt, neemt u contact op met een Triton service center
Het vervangen van de aandrijfriem
Let op: Een reserve aandrijfriem is inbegrepen. Verdere vervangende onderdelen zijn
verkrijgbaar bij uw Triton handelaar of via www.toolsparesonline.com
1. Met een kruiskopschroevendraaier verwijdert u de schroef die de aandrijfriem bescherming
(5) op zijn plaats houdt.
2. Verwijder de versleten riem door hem los te schroeven van de onderste brede aandrijfrol.
3. Verwijder stof en materiaalresten.
4. Plaats de nieuwe aandrijfriem over de bovenste aandrijfrol en duw deze over de bredere rol,
draai de riem tot deze in de groeven van elke rol zit.
5. Plaats de aandrijfriem bescherming terug en schroef de bevestigingsschroef goed vast
6. Test de macine met een lage bandsnelheid. Bij een juiste bevestiging is de machine klaar
voor gebruik
Opberging
• Berg de machine op een droge en veilige plek, buiten het bereik van kinderen op
Verwijdering
Bij de verwijdering van elektrische machines neemt u de nationale voorschriften in acht.
• Elektrische en elektronische apparaten mogen niet met uw huishoudelijk afval worden
weggegooid
• Neem contact op met uw gemeente voor informatie betreffende de verwijdering van
elektrisch gereedschap
490239_Z1MANPRO2.indd 15 05/10/2017 09:32

16
GB
16
NL
Probleemopsporing
Probleem Mogelijke oorzaak Oplossing
De machine werkt niet wanneer de trekker schakelaar (10)
ingeknepen wordt
Geen stroom Controleer de stroombron
Defecte trekker schakelaar
Laat de schakelaar bij een geautoriseerd service center
vervangen
De machine trekt naar een kant tijdens gebruik
Onjuiste schuurband uitlijning
Lijn de schuurband met behulp van de band verstelknop (7)
uit. Als het probleem niet is opgelost, neemt u contact op
met een geautoriseerd service center
Losse schuurband
Zorg ervoor dat de schuurband spanhendel (!5) volledig
gesloten is
De schuurband draait zonder het inknijpen van de trekker
schakelaar
De aan-stand vergrendelknop (9) is vergrendelt
Knijp de trekker schakelaar in en laat deze gelijk weer los
om de machine uit te schakelen
490239_Z1MANPRO2.indd 16 05/10/2017 09:32

17
GB
17
NL
Garantie
Om uw garantie te registreren, gaat u naar onze website op www.tritontools.com* en
voert u uw gegevens in.
Uw gegevens worden opgeslagen in onze mailinglist (tenzij u anders aangeeft) voor
informatie over nieuwe producten. De ingevulde gegevens worden aan geen enkele
andere partij beschikbaar gesteld.
Aankoopgegevens
Datum van aankoop: ___ / ___ / ____
Model: T41200BS
Bewaar uw aankoopbon als aankoopbewijs rt pr
Triton Precision Power Tools garandeert de koper van dit product dat indien een
onderdeel defect is vanwege fouten in materiaal of uitvoering binnen 3 jaar na de datum
van de oorspronkelijke aankoop,
Triton het defecte onderdeel gratis repareert of, naar eigen inzicht, vervangt.
Deze garantie heeft geen betrekking op commercieel gebruik en strekt zich niet uit tot
normale slijtage of schade ten gevolge van een ongeluk, verkeerd gebruik of misbruik.
* Registreer online binnen 30 dagen.
Algemene voorwaarden van toepassing.
Keuringsinstantie: TÜV Rheinland Co., Ltd
De technische documentatie wordt bijgehouden door: Triton Tools
Datum: 04-07-2016
Handtekening:
Darrell Morris
Algemeen directeur
Naam en adres van fabrikant:
Powerbox International Limited, handelsregister nummer 06897059.
Geregistreerd adres: Powerbox Int. Ltd. Somerset, BA22 8HZ, Verenigd Koninkrijk
EG-verklaring van overeenstemming
De ondergetekende: Mr. Darrell Morris
Gemachtigd door: Triton Tools
Verklaart dat:
Deze verklaring wordt verstrekt onder de volledige verantwoordelijkheid van de fabrikant.
Het hierboven beschreven voorwerp is conform de desbetreffende communautaire
harmonisatiewetgeving
Identificatienummer: T41200BS
Beschrijving: 1200 W bandschuurmachine
Voldoet aan de volgende richtlijnen:
• Machinerichtlijn 2006/42/EG
• Elektromagnetische verenigbaarheid 2014/30/EU
• RoHS-richtlijn 2011/65/EG
• EN60745-1:2009+A11:2010
• EN60745-2-4:2009+A11:2011
• EN55014-1:2006+A1:2009+A2:2011
• EN55014-2:1997+A1:2001+A2:2008
• EN61000-3-2:2014
• EN61000-3-3:2013
490239_Z1MANPRO2.indd 17 05/10/2017 09:32

18
GB
18
FR
Caractéristiques techniques
ATTENTION : Portez toujours des protections sonores lorsque le niveau d’intensité est
supérieur à 85 dB(A) et limitez le temps d’exposition si nécessaire. Si l’intensité sonore
devient inconfortable, même avec les protections, arrêtez immédiatement d’utiliser l’appareil,
vérifiez que les protections sont bien en places et adaptés avec le niveau sonore produit
par l’appareil.
ATTENTION : L’exposition de l’utilisateur aux vibrations peut engendrer une perte du toucher,
des engourdissements, des picotements et ainsi réduire la capacité de préhension. De longues
expositions peuvent également provoquer ces symptômes de façon chronique. Si nécessaire,
limitez le temps d’exposition aux vibrations et portez des gants anti-vibrations. N’utilisez pas
cet appareil lorsque la température de vos mains est en dessous des températures normales,
car l’effet vibratoire en est accentué. Référez-vous au cas de figures des caractéristiques
relatives aux vibrations pour calculer le temps et fréquence d’utilisation de l’appareil.
Les niveaux sonores et vibratoires des caractéristiques techniques sont déterminés en fonction
de la norme EN60745 ou autres normes internationales. Ces données correspondent à un
usage normale de l’appareil, et ce dans des conditions de travail normales. Un appareil mal
entretenu, mal assemblé ou mal utilisé peut augmenter les niveaux sonores et vibratoires. Pour
plus d’informations sur la directive des émissions sonores et vibratoires, visitez le site
http://osha.europa.eu/fr.
Port de protection auditive
Port de lunettes de sécurité
Port de masque respiratoire
Port de casque
Port de gants
Lire le manuel d’instructions
NE PAS utiliser sous la pluie ou dans un environnement humide !
ATTENTION : les pièces mobiles peuvent occasionner écrasements et
coupures.
Construction de classe II (Double isolation pour une protection supplémentaire)
Protection de l’environnement
Les appareils électriques usagés ne doivent pas être jetés avec les ordures
ménagères. Veuillez les recycler dans les centres prévus à cet effet. Pour de plus
amples informations, veuillez contacter votre municipalité ou point de vente.
Conforme à la réglementation et aux normes de sécurité pertinentes.
Attention !
Émanation de fumées ou de gaz toxiques !
Description des symboles
La plaque signalétique figurant sur votre outil peut présenter des symboles. Ces symboles
constituent des informations importantes relatives au produit ou des instructions concernant
son utilisation.
Introduction
Nous vous remercions d’avoir choisi cet équipement Triton. Ces instructions contiennent
les informations nécessaires pour vous en garantir un fonctionnement efficace et en toute
sécurité. Veuillez lire attentivement ce manuel pour vous assurer de tirer pleinement avantage
des caractéristiques uniques de votre nouvel équipement.
Gardez ce manuel à portée de main et assurez-vous que tous les utilisateurs l’aient lu et bien
compris avant toute utilisation. Conservez-le pour toute référence ultérieure.
Traduction des instructions originales
Numéro de modèle : T41200BS
Tension : 220 V–240 V, 50/60 Hz
Longueur du cordon d’alimentation : 2,6 m
Puissance d’entrée : 1 200 W
Vitesse des roues : 2 500 tr/min
Vitesse à vide : 200 – 400 m/min
Classe de protection :
Indice de protection : IP20
Surface de ponçage : 100 x 156 mm
Dimensions de la bande abrasive : 100 x 610 mm
Dimensions de la ponceuse (L x l x H) : 410 x 181 x 181 mm
Poids : 6 kg
Informations sur le niveau d’intensité sonore et vibratoire:
Pression acoustique L
PA
: 95,4 dB(A)
Puissance acoust L
WA
: 106,4 dB(A)
Incertitude K: 3 dB
Vibration pondérée a
h
(poignée principale): 4,92 m/s
2
Vibration pondérée a
h
(poignée avant): 6,70 m/s
2
Incertitude K: 1,5 m/s
2
Du fait de l’évolution constante de nos produits, les caractéristiques des produits
Triton peuvent changer sans notification préalable.
L’intensité sonore peut dépasser 85 dB(A) et il est nécessaire que l’utilisateur porte
des protections auditives.
490239_Z1MANPRO2.indd 18 05/10/2017 09:32

19
GB
19
FR
Consignes de sécurité générales
relatives à l’utilisation d’appareils
électriques
AVERTISSEMENT : Veuillez lire toutes les consignes de sécurité et toutes les
instructions. Le non-respect des instructions et consignes de sécurité peut entraîner un
risque de décharge électrique, d’incendie et/ou se traduire par des blessures graves.
AVERTISSEMENT : Cet appareil n’est pas prévu pour être utilisé par des personnes
(enfants y compris) ayant des capacités mentales ou physiques réduites ou manquant
d’expérience à moins qu’ils soient supervisés ou qu’une personne responsable de leur
sécurité leur donne des instructions concernant l’utilisation de cet appareil.
Veuillez conserver ces instructions et consignes de sécurité pour référence ultérieure.
L’expression « appareil/outil électrique » employée dans les présentes consignes recouvre
aussi bien les appareils filaires à brancher sur secteur que les appareils sans fils fonctionnant
avec batterie.
1. Sécurité sur la zone de travail
a. Maintenir une zone de travail propre et bien éclairée. Des zones encombrées et mal
éclairées sont sources d’accidents.
b. Ne pas utiliser d’outils électriques dans des environnements explosifs, tels qu’à
proximité de liquides, de gaz ou de poussières inflammables. Les outils électriques
produisent des étincelles susceptibles d’enflammer la poussière ou les vapeurs présentes.
c. Éloigner les enfants et toute personne se trouvant à proximité pendant l’utilisation
d’un outil électrique. Ceux-ci pourraient vous distraire et vous faire perdre la maîtrise
de l’appareil.
2. Sécurité électrique
a. Les prises des outils électriques doivent correspondre aux prises du secteur. Ne
modifiez jamais la prise en aucune façon. N’utilisez jamais d’adaptateur avec les
outils électriques mis à la terre. Des prises non modifiées, adaptées aux boîtiers de prise
de courant, réduiront les risques de décharge électrique.
b. Éviter le contact corporel avec les surfaces mises à la terre telles que tuyaux,
radiateurs, cuisinières et réfrigérateurs. Le risque de décharge électrique est plus
important si votre corps est mis à la terre.
c. Ne pas exposer votre outil électrique à la pluie ou à l’humidité. L’infiltration d’eau dans
un outil électrique augmentera le risque de décharge électrique.
d. Ne pas maltraiter le cordon électrique. N’utilisez jamais le cordon électrique pour
porter, tirer ou débrancher l’outil électrique. Conservez le cordon électrique à l’écart
de la chaleur, de l’essence, de bords tranchants ou de pièces en mouvement. Un
cordon électrique endommagé ou entortillé accroît le risque de décharge électrique.
e. Au cas où l’outil électroportatif serait utilisé à l’extérieur, servez-vous d’une rallonge
appropriée à une utilisation en extérieur. Cela réduit le risque de décharge électrique.
f. Si une utilisation de l’outil dans un environnement humide ne peut être évitée, utilisez
une alimentation protégée par un disjoncteur différentiel. L’utilisation d’un disjoncteur
différentiel réduit le risque de décharge électrique.
g. Lorsqu’utilisé en Australie ou en Nouvelle Zélande, il est recommandé que cet appareil
soit toujours alimenté via un disjoncteur différentiel ayant un courant résiduel de 30 mA
ou moins.
3. Sécurité des personnes
a. Rester vigilant et faire preuve de sens lors de la manipulation de l’outil. Ne pas utiliser
d’outil électrique en état de fatigue ou sous l’influence de drogues, d’alcool ou de
médicaments. Un moment d’inattention pendant l’utilisation d’un outil électrique peut se
traduire par des blessures graves.
b. Porter des équipements de protection. Porter toujours des lunettes de protection. Le
port d’équipements de protection tels que des masques à poussières, des chaussures de
sécurité antidérapantes, un casque de sécurité ou des protections antibruit, selon le travail
à effectuer, réduira le risque de blessures aux personnes.
c. Éviter tout démarrage accidentel. S’assurer que l’interrupteur marche-arrêt soit en
position d’arrêt (Off) avant de brancher l’outil sur l’alimentation secteur. Porter un outil
électrique tout en maintenant le doigt posé sur l’interrupteur ou brancher un outil électrique
dont l’interrupteur est sur la position de marche (On) est source d’accidents.
d. Enlever toute clé ou tout instrument de réglage avant de mettre l’outil électrique en
marche. Une clé ou un instrument de réglage laissé fixé à un élément en rotation de l’outil
électrique peut entraîner des blessures physiques.
e. Ne pas essayer d’atteindre une zone hors de portée. Se tenir toujours en position
stable et conserver l’équilibre. Cela permet de mieux contrôler l’outil électrique dans des
situations inattendues.
f. Porter des vêtements appropriés. Ne pas porter de vêtements amples ou des bijoux
pendants. Les vêtements amples, les bijoux pendants ou les cheveux longs peuvent être
happés par les pièces en mouvement.
g. Si l’outil est pourvu de dispositifs destinés au raccord d’équipements d’extraction et
de récupération de la poussière/sciure, s’assurer qu’ils soient bien fixés et utilisés
correctement. L’utilisation de ces dispositifs peut réduire les risques dus à la poussière.
4. Utilisation et entretien des outils électriques
a. Ne pas surcharger l’outil électrique. Utiliser l’outil électrique approprié au travail
à effectuer. Un outil électrique adapté et employé au rythme pour lequel il a été conçu
permettra de réaliser un travail de meilleure qualité et dans de meilleures conditions de
sécurité.
b. Ne pas utiliser un outil électrique dont l’interrupteur marche-arrêt est hors service.
Tout outil électrique dont la commande ne s’effectue plus par l’interrupteur marche-arrêt
est dangereux et doit être réparé.
c. Débrancher l’outil électrique avant d’effectuer tout réglage, changement d’accessoire
ou avant de le ranger. De telles mesures préventives réduiront les risques de démarrage
accidentel.
d. Ranger les outils électriques inutilisés hors de portée des enfants et ne pas permettre
l’utilisation de ces outils aux personnes novices ou n’ayant pas connaissance de
ces instructions. Les outils électriques sont dangereux dans les mains d’utilisateurs
inexpérimentés.
e. Veiller à l’entretien des outils électriques. Vérifier que les éléments rotatifs soient bien
alignés et non grippés. S’assurer de l’absence de pièces cassées ou endommagées
susceptibles de nuire au bon fonctionnement de l’outil. Si l’outil électrique est
endommagé, le faire réparer avant toute utilisation. De nombreux accidents sont causés
par l’utilisation d’outils électriques mal entretenus.
f. Garder les outils de coupe affûtés et propres. Des outils de coupe bien entretenus,
aux tranchants bien affûtés, sont moins susceptibles de se gripper et sont plus faciles à
contrôler.
g. Utiliser l’outil électrique, les accessoires et les outils à monter, etc., conformément
à ces instructions et selon l’utilisation prévue pour le type d’outil donné, en tenant
compte des conditions de travail et de la tâche à réaliser. Toute utilisation de cet outil
électrique autre que celle pour laquelle il a été conçu peut entraîner des situations à risque
et entraînerait une annulation de sa garantie.
5. Entretien
a. Ne faire réparer l’outil électrique que par un réparateur qualifié utilisant uniquement
des pièces de rechange identiques. Cela permettra d’assurer la sécurité continue de
cet outil électrique.
Consignes de sécurité relatives aux
outils de ponçage
AVERTISSEMENT !
• Tenez l’outil électrique uniquement par ses poignées ou surfaces de préhension
isolées, en effet, la bande ou la feuille abrasive pourrait entrer en contact avec le
câble d’alimentation de l’appareil. La coupure du câble sous tension pourrait mettre
l’appareil sous tension et occasionner un choc électrique chez l’utilisateur.
• Utilisez un serre-joint ou un étau pour maintenir la pièce de travail sur une surface
stable. Tenir la pièce de travail à la main ou contre le corps la rend instable et peut causer
une perte de contrôle.
• Il est fortement recommandé d’alimenter l’appareil par le biais d’un disjoncteur
différentiel dont le courant résiduel nominal est de 30 mA ou moins.
• S’il est nécessaire de remplacer le cordon d’alimentation, cela doit être fait par le
fabricant ou un de ses agents agréés pour éviter tout danger.
a. Portez TOUJOURS des équipements de sécurité appropriés, parmi lesquels un masque
anti-poussières d’une protection minimale FFP2, des lunettes de sécurité et un
casque anti-bruit.
b. Il vous appartient de veiller à ce que les personnes se trouvant à proximité de votre
zone de travail soient également protégées par des équipements adéquats.
c. Prenez des précautions particulières lors du ponçage de certaines essences de bois
(le hêtre, le chêne, l’acajou et le teck, par exemple) car la poussière produite est
toxique et peut provoquer des réactions aiguës chez certaines personnes.
d. Ne vous servez jamais de cet outil pour travailler sur des matériaux contenant de
l’amiante. Consultez un professionnel qualifié si vous ne savez pas si un objet contient de
l’amiante.
e. Ne poncez pas le magnésium ni les alliages qui en contiennent une proportion élevée.
f. Tenez compte des peintures de finition et des traitements qui peuvent avoir été
appliqués sur la matière à poncer. De nombreux traitements peuvent produire une
poussière toxique ou dangereuse pour la santé. Si vous travaillez dans un bâtiment dont la
construction est antérieure à 1960, sachez que la présence de peintures à base de plomb
est fort probable.
g. La poussière produite par le ponçage des peintures à base de plomb est
particulièrement dangereuse pour les enfants, les femmes enceintes et les personnes
atteintes d’hypertension. Assurez-vous que ces personnes se tiennent à l’écart de la zone
de travail, même si elles portent un équipement de protection adéquat.
h. Dans la mesure du possible, employez un système d’extraction des poussières pour
mieux contrôler la dispersion des poussières.
i. Observez la plus grande prudence lors de l’utilisation d’un même appareil pour
poncer le bois et le métal. Les étincelles du métal peuvent aisément enflammer les
poussières de bois. Nettoyez TOUJOURS l’outil complètement pour réduire le risque
d’incendie.
j. Videz régulièrement le sac ou bac à poussière durant l’utilisation, avant de prendre
une pause et après avoir fini de poncer. La poussière peut représenter un risque
d’explosion. N’incinérez pas la poussière de ponçage. Une combustion spontanée peut se
produire lorsque des particules d’huile ou d’eau entrent en contact avec les particules de
poussière. Éliminez les déchets de ponçage avec précaution et conformément aux lois et
régulations locales.
490239_Z1MANPRO2.indd 19 05/10/2017 09:32

20
GB
20
FR
k. Les surfaces de travail et le papier abrasif peuvent atteindre des températures très
élevées au cours du travail ; en cas de signe de combustion (fumée ou cendre) de la
surface de travail, arrêtez l’opération en cours et attendez que le matériel refroidisse.
Ne touchez pas la surface de travail ni le papier abrasif avant qu’ils n’aient eu le temps de
refroidir.
l. Ne touchez pas la feuille de ponçage lorsqu’elle est en mouvement.
m. Éteignez toujours l’appareil avant de le déposer.
n. Ne vous servez pas de cet outil pour le ponçage humide. Les liquides qui entrent dans
le boîtier moteur peuvent causer des chocs électriques graves.
o. Débranchez toujours l’appareil avant de procéder au changement ou à l’installation
d’un accessoire. Même lorsque l’outil est utilisé comme indiqué, il est impossible
d’éliminer tous les facteurs de risque résiduels. Si vous avez des doutes quant à la manière
sûre et correcte de procéder, il est recommandé de ne pas utiliser cet outil.
Se familiariser avec le produit
1. Poignée avant
2. Poignée arrière
3. Cordon d’alimentation
4. Tubulure d’extraction des poussières
5. Cache de la courroie de transmission
6. Trou de la pince de serrage
7. Bouton de centrage de la bande
8. Bande abrasive
9. Bouton de marche continue
10. Commutateur à gâchette marche/arrêt
11. Variateur de vitesse
12. Capot du moteur avec évents
13. Cache d’accès aux balais de charbon
14. Rouleau avant de la bande
15. Levier de tension de la bande
16. Rouleau d’entraînement
Accessoires inclus :
17. Support pour le montage sur établi
18. 2 Bandes abrasives de rechange
19. 2 Pinces d’inversion
20. Sac à poussières
21. Courroie de transmission de rechange
Usage conforme
Ponceuse à bande pour réaliser des ponçages moyens à intensifs afin de retirer une grande
quantité de matériau aussi bien sur bois tendre que dur et autres matériaux similaires.
Déballage
• Déballez le produit avec soin. Veillez à retirer tout le matériau d’emballage et familiarisez-
vous avec toutes les caractéristiques du produit.
• Si des pièces sont endommagées ou manquantes, faites-les réparer ou remplacer avant
d’utiliser l’appareil.
Avant utilisation
ATTENTION : Assurez-vous que l’outil est éteint et débranché de la source
d’alimentation avant de procéder à la pose ou au retrait d’un accessoire, ou de réaliser toute
opération de réglage, de nettoyage ou d’entretien.
Remarque : Cette ponceuse est livrée entièrement assemblée. Elle est par conséquent
immédiatement prête à l’emploi.
Branchement du dispositif d’extraction des poussières
• Brancher l’appareil sur un aspirateur ou sur un dispositif d’extraction des poussières
d’atelier est le moyen recommandé pour l’extraction des poussières.
• Si un dispositif d’extraction des poussières n’est pas disponible, vous devez installer le sac
à poussières (20) fourni sur la tubulure d’extraction des poussières (4) :
1. Utilisez le système baïonnette, en poussant le sac à poussière (Image A) et en tournant
jusqu’à ce que la baïonnette soit verrouillée. Assurez-vous que la fermeture-éclair du sac
soit bien fermée.
2. Pour retirer le sac à poussières, désengagez la baïonnette en la tournant vers l’extérieur
puis en tirant dessus.
ATTENTION : Retirez et N’utilisez PAS le sac à poussières lors du ponçage du métal. Les
particules encore chaudes de métal et les étincelles produites peuvent enflammer les résidus
de poussières de bois ou mettre le feu au sac. Branchez toujours la ponceuse sur un système
d’extraction des poussières d’atelier ou un aspirateur lorsque vous poncez du métal. Nettoyez
toujours complètement l’appareil lorsque vous passez d’un ponçage du bois au ponçage du
métal et vice versa.
Sélection de la granulométrie de la bande abrasive
• Il existe des bandes de grains différents disponibles chez votre revendeur Triton. Les
granulométries les plus courantes sont : grain gros (grain 40), grain moyen (grains 80 et
100), et grain fin (grain 120).
• Utilisez le gros grain pour une finition grossière, le grain moyen pour adoucir et le grain
fin pour la finition.
• Il est conseillé de faire un essai sur un petit morceau de matériau pour vérifier si la bande
abrasive est la mieux adaptée à la tâche à réaliser.
• Pour tirer le meilleur de votre ponceuse, procurez-vous toujours des bandes abrasives
de bonne qualité.
Remarque : Après un ponçage à la ponceuse à bande, une ponceuse orbitale peut être utilisée
pour parfaire la finition. Cependant, ce processus entraîne la perte du détail du grain du bois.
Utiliser en plus une ponceuse orbitale est recommandé si vous avez l’intention de peindre la
surface de bois, ou si vous ne souhaitez pas conserver la visibilité du grain du bois.
Pose d’une bande abrasive
ATTENTION : Débranchez toujours l’appareil de sa source d’alimentation avant d’effectuer une
inspection, entretien ou nettoyage.
1. Relevez le levier de tension de la bande (15) pour relâcher la tension de la bande et pour la
dégager (Image B).
2. Vérifiez que le raccord de la bande de rechange est solide et que ses bords ne s’effilochent
pas.
3. Installez la nouvelle bande (Image C) en vous assurant que la flèche imprimée à l’intérieur
de la bande indique la même direction que celle figurant sur le côté de la ponceuse.
4. Rabaissez le levier de tension de la bande (Image D) pour tendre la bande.
5. Branchez la ponceuse et, en la tenant fermement, appuyez sur la gâchette marche/arrêt (9)
pour laisser tourner la bande pendant un court instant.
6. Pendant que la bande tourne, centrez-la bien sur le rouleau (16) au moyen du bouton de
centrage (7). Réitérez cette procédure jusqu’à ce que la bande soit correctement centrée.
Une faible rotation du bouton suffit pour la déplacer.
Laissez-la tourner après chaque réglage afin qu’elle prenne sa place. Faites tourner la
ponceuse pendant une minute environ pour vérifier le bon centrage de la bande avant de
l’utiliser sur une pièce d’ouvrage.
ATTENTION : Cessez toute utilisation lorsque la bande est usée ou endommagée.
ATTENTION : N’utilisez pas la même bande à poncer pour le bois et le métal. Les particules de
métal s’incrusteront dans la bande et viendront rayer la surface du bois.
Instructions d’utilisation
Mise en marche/arrêt
1. Appuyez sur le commutateur à gâchette marche/arrêt (10) et maintenez appuyé pour mettre
la ponceuse en marche.
2. Pour arrêter votre ponceuse, il vous suffit de relâcher le commutateur à gâchette.
3. Il est possible de mettre la ponceuse en mode de marche continue en appuyant sur le
commutateur à gâchette et en enfonçant le bouton de marche continue (9) (Image E).
4. Pour désactiver le mode de marche continue, appuyez sur le commutateur à gâchette
marche/arrêt, ce qui va désengager le bouton de marche continue, puis, relâchez le
commutateur à gâchette pour éteindre votre ponceuse à bande.
Réglage de la vitesse
• La vitesse peut être ajustée pour être adaptée au matériau à poncer.
• Pour régler la vitesse, faites tourner le variateur de vitesse (11) jusqu’à ce que la bonne
vitesse soit atteinte (Image F).
Remarque : Lorsque le variateur de vitesse est en position « 1 » indiquant la vitesse la plus
basse, la vitesse est de 200 m/min ; lorsque le variateur de vitesse est en position « 7 »
indiquant la vitesse la plus élevée, la vitesse est de 400 m/min.
Ponçage
ATTENTION : Portez toujours des protections oculaires et auditives, un masque respiratoire
adéquat et des gants appropriés lorsque vous utilisez cet appareil.
Remarque : Si possible, utilisez toujours un système de serrage pour immobiliser la pièce de
travail sur l’établi.
ATTENTION : N’utilisez pas cette ponceuse pour poncer du magnésium.
Remarque : Assurez-vous toujours que la bande abrasive soit toujours en bon état.
1. Branchez l’appareil sur le secteur.
2. Appuyez sur le commutateur à gâchette (10) et laissez la bande atteindre la vitesse voulue
avant de poser l’outil sur la surface à poncer.
3. Appuyez sur le bouton de marche continue (9) si vous souhaitez travailler pendant une
période prolongée.
4. Abaissez l’outil sur la surface en appliquant une légère pression.
5. Poncez dans le sens du fil en effectuant des courses parallèles chevauchantes (Image G).
6. Pour enlever de la peinture ou aplanir un bois très rugueux, poncez en travers du fil à 45°
dans les deux sens puis finissez dans le sens du fil.
490239_Z1MANPRO2.indd 20 05/10/2017 09:32
Sayfa yükleniyor...
Sayfa yükleniyor...
Sayfa yükleniyor...
Sayfa yükleniyor...
Sayfa yükleniyor...
Sayfa yükleniyor...
Sayfa yükleniyor...
Sayfa yükleniyor...
Sayfa yükleniyor...
Sayfa yükleniyor...
Sayfa yükleniyor...
Sayfa yükleniyor...
Sayfa yükleniyor...
Sayfa yükleniyor...
Sayfa yükleniyor...
Sayfa yükleniyor...
Sayfa yükleniyor...
Sayfa yükleniyor...
Sayfa yükleniyor...
Sayfa yükleniyor...
Sayfa yükleniyor...
Sayfa yükleniyor...
Sayfa yükleniyor...
Sayfa yükleniyor...
Sayfa yükleniyor...
Sayfa yükleniyor...
Sayfa yükleniyor...
Sayfa yükleniyor...
Sayfa yükleniyor...
Sayfa yükleniyor...
Sayfa yükleniyor...
Sayfa yükleniyor...
Sayfa yükleniyor...
Sayfa yükleniyor...
Sayfa yükleniyor...
Sayfa yükleniyor...
Sayfa yükleniyor...
Sayfa yükleniyor...
Sayfa yükleniyor...
Sayfa yükleniyor...
Sayfa yükleniyor...
Sayfa yükleniyor...
Sayfa yükleniyor...
Sayfa yükleniyor...
Sayfa yükleniyor...
Sayfa yükleniyor...
Sayfa yükleniyor...
Sayfa yükleniyor...
Sayfa yükleniyor...
Sayfa yükleniyor...
Sayfa yükleniyor...
Sayfa yükleniyor...
Sayfa yükleniyor...
Sayfa yükleniyor...
Sayfa yükleniyor...
Sayfa yükleniyor...
Sayfa yükleniyor...
Sayfa yükleniyor...
Sayfa yükleniyor...
Sayfa yükleniyor...
Sayfa yükleniyor...
Sayfa yükleniyor...
Sayfa yükleniyor...
Sayfa yükleniyor...
-
 1
1
-
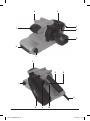 2
2
-
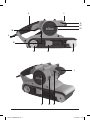 3
3
-
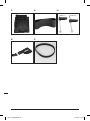 4
4
-
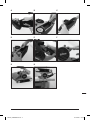 5
5
-
 6
6
-
 7
7
-
 8
8
-
 9
9
-
 10
10
-
 11
11
-
 12
12
-
 13
13
-
 14
14
-
 15
15
-
 16
16
-
 17
17
-
 18
18
-
 19
19
-
 20
20
-
 21
21
-
 22
22
-
 23
23
-
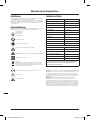 24
24
-
 25
25
-
 26
26
-
 27
27
-
 28
28
-
 29
29
-
 30
30
-
 31
31
-
 32
32
-
 33
33
-
 34
34
-
 35
35
-
 36
36
-
 37
37
-
 38
38
-
 39
39
-
 40
40
-
 41
41
-
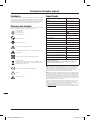 42
42
-
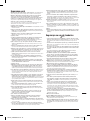 43
43
-
 44
44
-
 45
45
-
 46
46
-
 47
47
-
 48
48
-
 49
49
-
 50
50
-
 51
51
-
 52
52
-
 53
53
-
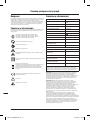 54
54
-
 55
55
-
 56
56
-
 57
57
-
 58
58
-
 59
59
-
 60
60
-
 61
61
-
 62
62
-
 63
63
-
 64
64
-
 65
65
-
 66
66
-
 67
67
-
 68
68
-
 69
69
-
 70
70
-
 71
71
-
 72
72
-
 73
73
-
 74
74
-
 75
75
-
 76
76
-
 77
77
-
 78
78
-
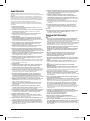 79
79
-
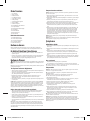 80
80
-
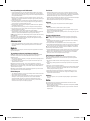 81
81
-
 82
82
-
 83
83
-
 84
84


Triton Tools T41200BS Kullanma talimatları
- Kategori
- Güç zımpara makineleri
- Tip
- Kullanma talimatları
diğer dillerde
- slovenčina: Triton Tools T41200BS Návod na používanie
- español: Triton Tools T41200BS Instrucciones de operación
- français: Triton Tools T41200BS Mode d'emploi
- italiano: Triton Tools T41200BS Istruzioni per l'uso
- polski: Triton Tools T41200BS Instrukcja obsługi
- Deutsch: Triton Tools T41200BS Bedienungsanleitung
- português: Triton Tools T41200BS Instruções de operação
- Nederlands: Triton Tools T41200BS Handleiding
Diğer belgeler
-
Triton TSPST450 Kullanici rehberi
-
Ryobi EBS800V El kitabı
-
Ryobi ESS280RV El kitabı
-
Hitachi SB 8V2 Handling Instructions Manual
-
Ryobi ERO2412VHG El kitabı
-
Stanley SB90 Kullanım kılavuzu
-
-
Makita MT941 El kitabı
-
Meister MBS600-1 Translation Of The Original Instructions
-
Makita 9921 Kullanım kılavuzu