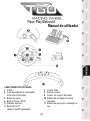
Thrustmaster 4160588 4160589 4169067 4160590 Kullanım kılavuzu
- Tip
- Kullanım kılavuzu


1/10
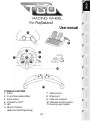
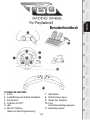
For: PlayStation®3
User manual
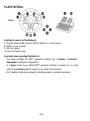
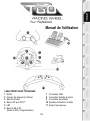
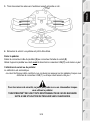
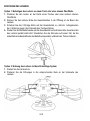
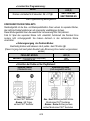
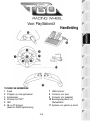
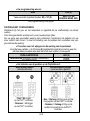
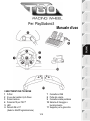
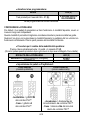
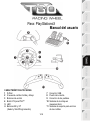
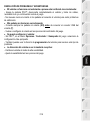
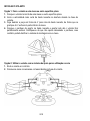
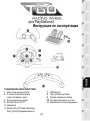
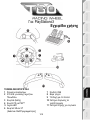
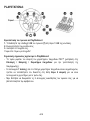
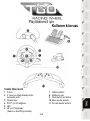
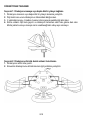
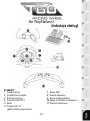
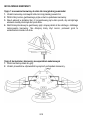
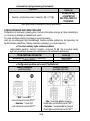
TECHNICAL FEATURES
1 D-Pad
2 2 Up & Down paddle shifters
3 Action buttons
4 PS button for PS3™
5 LED
6 SE and ST buttons
(Select and Start/Programming)
7 USB connector
8 Wheel’s port
9 Pedal set’s connector
10 Table/desk mounting system
11 Knee-top support system

2/10
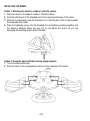
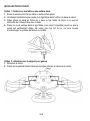
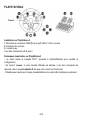
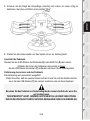
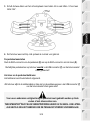
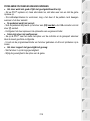
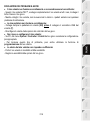
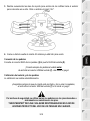
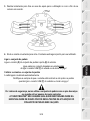
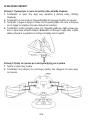
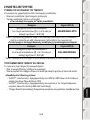
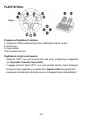
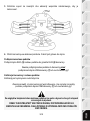
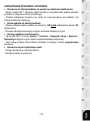
INSTALLING THE WHEEL
Option 1: Attaching the wheel to a table or other flat surface
1. Place the wheel on the edge of a table or other flat surface.
2. Insert the shorter end of the threaded rod into the opening at the base of the wheel.
3. Slide the V-shaped piece onto the threaded rod, so that the jaws of the V clamp against
the underside of the table.
4. Place the tightening screw onto the threaded rod, and tighten everything together until
the wheel is perfectly stable. Be sure not to over-tighten the screw, as you risk
damaging the mounting system and/or the table.
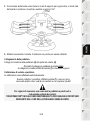
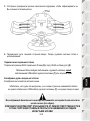
Option 2: Using the wheel with the knee-top support system
1. Turn the wheel upside down.
2. Place the stops in the corresponding notches on the underside of the wheel.

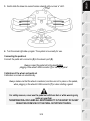
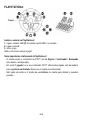
3/10
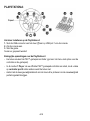
3. Gently slide the knee-top support wings outward until you hear a “click”.
4. Turn the wheel right-side up again. The system is now ready for use.
Connecting the pedal set
Connect the pedal set’s connector (9) to the wheel’s port (8).
Always connect the pedal set to the wheel before
plugging in the wheel's USB connector (7) or starting a game!
Calibration of the wheel and pedal set
Calibration is carried out automatically.
Always make sure that the wheel is centered, and be sure not to press on the pedals,
when plugging in the wheel’s USB connector (7) or when starting a game!
For safety reasons, never use the pedal set with bare feet or while wearing only
socks on your feet.
THRUSTMASTER
®
DISCLAIMS ALL RESPONSIBILITY IN THE EVENT OF INJURY
RESULTING FROM USE OF THE PEDAL SET WITHOUT SHOES.

4/10
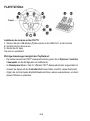
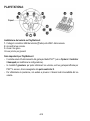
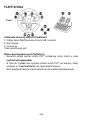
PLAYSTATION®3
Installing the wheel on PlayStation
®3
1. Plug the wheel’s USB connector (7) into USB port 1 on the console.
2. Switch on your console.
3. Start your game.
You are now ready to play!
Important notes regarding PlayStation
®3
- The wheel emulates the PS3™ gamepad controller (go to Options / Controller /
Gamepads to modify the configuration).
- In 1 player mode: if your official PS3™ gamepad controller is powered on, you must
switch it to controller port 2 in order for your wheel to be functional.
- Don’t hesitate to test out your wheel’s 2 sensitivity modes, to optimize its precision.

5/10
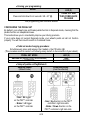
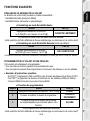
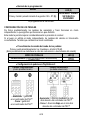
ADVANCED FUNCTIONS
ADJUSTING THE WHEEL’S SENSITIVITY
Your wheel’s steering features 2 sensitivity modes:
- Normal sensitivity (the default mode)
- High sensitivity (must be selected)
• To switch to High sensitivity mode:
Action
LED (5)
Simultaneously press and release:
the D-Pad (1) + the 2 L1 & R1 paddle shifters (2).
FLASHES SLOWLY
Your wheel’s steering is now more sensitive.
(This procedure must be carried out following every restart or disconnection of your wheel)
• To return to Normal sensitivity mode (the default mode):
Action
LED (5)
Simultaneously press and release:
the D-Pad (1) + the 2 L1 & R1 paddle shifters (2).
DOES NOT FLASH
Your wheel’s steering has now returned to Normal sensitivity (the default mode).
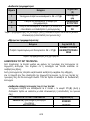
PROGRAMMING THE WHEEL AND THE PEDALS
Your wheel is fully programmable:
- All action buttons can be swapped.
- All buttons can be programmed onto the paddle shifters or onto the pedals.
• Examples of possible uses:
- On PS3™, programming L2/R2 or L3/R3 onto the 2 Up & Down paddle shifters (L1/R1).
- On PS3™, programming the Cross/Square buttons onto the pedals (L2/R2 by default).
- Switching different buttons for greater accessibility.
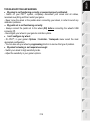
• Programming procedure:
Steps
Action
LED (5)
1
Simultaneously press and release: SE + ST (6).
OFF
2 Press and release the button to program.
FLASHES
QUICKLY
3
Press and release the button or pedal on which you want
to place your function.
ON
Your programming has now been carried out.
(This procedure must be carried out following every restart or disconnection of your wheel)

6/10
• Erasing your programming:
Action
LED (5)
Press and hold down for 2 seconds: SE + ST (6).
TURNS OFF AND
THEN COMES BACK
ON AGAIN
Your programming has now been erased.
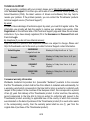
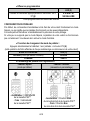
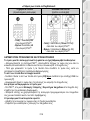
CONFIGURING THE PEDAL SET
By default, your wheel’s gas and brake pedals function in Separate mode, meaning that the
pedals function on independent axes.
This mode allows you to considerably improve your driving precision.
If your game does not support Separate mode, your wheel's pedal set will not function
properly. You will then have to switch to Combined mode.
• Pedal set mode changing procedure:
Simultaneously press and release: the 2 pedals + the PS button (4).
(This procedure must be carried out following every restart or disconnection of your wheel)
PEDAL SET MODE
LED (5)
SEPARATE (default mode: recommended)
RED
COMBINED
GREEN
• Setup of pedals on PlayStation®3:
Separate pedals
(default mode)
Combined pedals
(must be selected)
- Gas = R2 trigger
on the PS3™ controller
- Brake = L2 trigger
on the PS3™ controller
- Gas = Up direction on the PS3™
controller’s right mini-stick
- Brake = Down direction on the
PS3™ controller’s right mini-stick

7/10
TROUBLESHOOTING AND WARNING
• My wheel is not functioning correctly or seems improperly calibrated:
- Switch off your PS3™ system, completely disconnect your wheel and all cables,
reconnect everything and then restart your game.
- Never move the wheel or the pedals when connecting your wheel, in order to avoid any
calibration problems.
• My pedal set is not functioning correctly:
- Always connect the pedal set to the wheel (9/8) before connecting the wheel's USB
connector (7).
- Reconfigure your wheel in your game's controller options.
• I can't configure my wheel:
- On PS3™, in your game’s Options / Controller / Gamepads menu: select the most
appropriate configuration.
- You can also use your wheel’s programming function to resolve this type of problem.
• My wheel's steering is not responsive enough:
- Switch your wheel to High sensitivity mode.
- Adjust the sensitivity in your game’s options.

8/10
TECHNICAL SUPPORT
If you encounter a problem with your product, please go to http://ts.thrustmaster.com and
click Technical Support. From there you will be able to access various utilities (Frequently
Asked Questions (FAQ), the latest versions of drivers and software) that may help to
resolve your problem. If the problem persists, you can contact the Thrustmaster products
technical support service (“Technical Support”):
By email:
In order to take advantage of technical support by email, you must first register online. The
information you provide will help the agents to resolve your problem more quickly. Click
Registration on the left-hand side of the Technical Support page and follow the on-screen
instructions. If you have already registered, fill in the Username and Password fields and
then click Login.
By telephone (if you do not have Internet access):
Days and hours of operation and telephone numbers are subject to change. Please visit
http://ts.thrustmaster.com for the most up-to-date Technical Support contact information.
United Kingdom
08450800942
Charged at local rate
Monday to Friday from 8 a.m. to 7 p.m.
Denmark
80887690
Free
Monday to Friday from 9 a.m. to 8 p.m.
(English)
Sweden
0200884567
Free
Monday to Friday from 9 a.m. to 8 p.m.
(English)
Finland
0800 913060
Free
Monday to Friday from 10 a.m. to 9 p.m.
(English)
Consumer warranty information
Worldwide, Guillemot Corporation S.A. (hereinafter “Guillemot”) warrants to the consumer
that this Thrustmaster product shall be free from defects in materials and workmanship, for
a warranty period which corresponds to the time limit to bring an action for conformity with
respect to this product. In the countries of the European Union, this corresponds to a period
of two (2) years from delivery of the Thrustmaster product. In other countries, the warranty
period corresponds to the time limit to bring an action for conformity with respect to the
Thrustmaster product according to applicable laws of the country in which the consumer
was domiciled on the date of purchase of the Thrustmaster product (if no such action exists
in the corresponding country, then the warranty period shall be one (1) year from the
original date of purchase of the Thrustmaster product).

9/10
Notwithstanding the above, rechargeable batteries are covered by a warranty period of six
(6) months from the date of original purchase.
Should the product appear to be defective during the warranty period, immediately contact
Technical Support, who will indicate the procedure to follow. If the defect is confirmed, the
product must be returned to its place of purchase (or any other location indicated by
Technical Support).
Within the context of this warranty, the consumer’s defective product shall, at Technical
Support’s option, be either repaired or replaced. If permitted under applicable law, the full
liability of Guillemot and its subsidiaries (including for consequential damages) is limited to
the repair or replacement of the Thrustmaster product. If permitted under applicable law,
Guillemot disclaims all warranties of merchantability or fitness for a particular purpose. The
consumer’s legal rights with respect to laws applicable to the sale of consumer goods are
not affected by this warranty.
This warranty shall not apply: (1) if the product has been modified, opened, altered, or has
suffered damage as a result of inappropriate or abusive use, negligence, an accident,
normal wear, or any other cause unrelated to a material or manufacturing defect (including,
but not limited to, combining the Thrustmaster product with any unsuitable element,
including in particular power supplies, rechargeable batteries, chargers, or any other
elements not supplied by Guillemot for this product); (2) in the event of failure to comply
with the instructions provided by Technical Support; (3) to software, said software being
subject to a specific warranty; (4) to consumables (elements to be replaced over the
product’s lifespan: disposable batteries, audio headset or headphone ear pads, for
example); (5) to accessories (cables, cases, pouches, bags, wrist-straps, for example); (6) if
the product was sold at public auction.
This warranty is nontransferable.
Liability
If permitted under applicable law, Guillemot Corporation S.A. (hereinafter “Guillemot”) and
its subsidiaries disclaim all liability for any damages caused by one or more of the following:
(1) the product has been modified, opened or altered; (2) failure to comply with assembly
instructions; (3) inappropriate or abusive use, negligence, an accident (an impact, for
example); (4) normal wear. If permitted under applicable law, Guillemot and its subsidiaries
disclaim all liability for any damages unrelated to a material or manufacturing defect with
respect to the product (including, but not limited to, any damages caused directly or
indirectly by any software, or by combining the Thrustmaster product with any unsuitable
element, including in particular power supplies, rechargeable batteries, chargers, or any
other elements not supplied by Guillemot for this product).

10/10
COPYRIGHT
© 2014 Guillemot Corporation S.A. All rights reserved. Thrustmaster® is a registered
trademark of Guillemot Corporation S.A.
“ ”, “PlayStation”, “ ”, and “ ” are registered trademarks of Sony
Computer Entertainment Inc. All rights reserved.
All other trademarks and brand names are hereby acknowledged and are the property of
their respective owners. Illustrations not binding. Contents, designs and specifications are
subject to change without notice and may vary from one country to another. Made in China.
ENVIRONMENTAL PROTECTION RECOMMENDATION
At the end of its working life, this product should not be disposed of with
standard household waste (EU and Turkey), but rather dropped off at a
collection point for the disposal of Waste Electrical and Electronic
Equipment (WEEE) for recycling, or recycled in accordance with
applicable local laws.
This is confirmed by the symbol found on the product, user manual or
packaging.
Depending on their characteristics, the materials may be recycled. Through recycling and
other forms of processing Waste Electrical and Electronic Equipment, you can make a
significant contribution towards helping to protect the environment.
Please contact your local authorities for information on the collection point nearest you.
www.thrustmaster.com
*Applicable to EU and Turkey only
*
*
*

1/10
Pour : PlayStation
®3
Manuel de l'utilisateur
CARACTÉRISTIQUES TECHNIQUES
1 D-Pad
2 2 leviers de vitesses Up & Down
3 Boutons d’action
4 Bouton PS pour PS3™
5 LED
6 Boutons SE et ST
(Select et Start / Programmation)
7 Connecteur USB
8 Connecteur femelle du volant
9 Connecteur du pédalier
10 Système de fixation à la table
11 Support pour genoux

2/10
INSTALLATION DU VOLANT
Option 1 : fixation sur une table ou une surface plane
1. Placez le volant au bord d’une table ou autre surface plane.
2. Introduisez l’extrémité la plus courte de la tige filetée dans l’orifice à la base du volant.
3. Faites glisser la pièce en forme de V dans la tige filetée de façon à ce que les
mâchoires du V fassent étau avec la table.
4. Placez la vis de serrage dans la tige filetée, puis vissez l’ensemble jusqu’à ce que le
volant soit parfaitement stable. Ne serrez pas trop fort la vis, car vous risquez
d’endommager le système de fixation ou la table.
Option 2 : utilisation avec le support pour genoux
1. Retournez le volant.
2. Placez les taquets de fixation dans les encoches prévues en dessous du volant.

3/10
3. Tirez doucement les ailes vers l’extérieur jusqu’à entendre un clic.
4. Retournez le volant. Le système est prêt à être utilisé.
Relier le pédalier
Reliez le connecteur mâle du pédalier (9) au connecteur femelle du volant (8)
Reliez toujours le pédalier au volant avant de brancher le connecteur USB (7) ou de lancer un jeu !
Calibration du volant ou du pédalier
La calibration est automatique.
Le volant doit toujours être centré et vous ne devez pas appuyer sur les pédales lorsque vous
branchez le connecteur USB (7) ou lorsque vous lancez votre jeu !
Pour des raisons de sécurité, ne jouez pas pieds nus ou en chaussettes lorsque
vous utilisez le pédalier.
THRUSTMASTER
®
DECLINE TOUTE RESPONSABILITE EN CAS DE BLESSURE
SUITE A UNE UTILISATION DU PEDALIER SANS CHAUSSURES.

4/10
PLAYSTATION®3
Installation sur PlayStation
®3
1. Branchez le connecteur USB (7) sur le port USB n°1 de la console.
2. Allumez votre console.
3. Lancez le jeu.
Vous êtes maintenant prêt à jouer !
Remarques importantes sur PlayStation
®3
- Le volant émule la manette PS3™ (accédez à Options/Manette pour modifier la
configuration).
- En mode 1 Joueur, si votre manette officielle est allumée, il est alors nécessaire de
basculer celle-ci en port manette 2 afin que votre volant soit fonctionnel.
- N’hésitez pas à tester les 2 modes de sensibilité de votre volant afin d’optimiser sa précision.

5/10
FONCTIONS AVANCEES
REGLAGE DE LA SENSIBILITE DU VOLANT
La direction de votre volant possède 2 modes de sensibilité :
- Sensibilité Normale (mode par défaut)
- Sensibilité Haute (nécessite un paramétrage)
• Paramétrage en mode Sensibilité Haute :
Action
LED (5)
Appuyez simultanément et relâchez :
le D-Pad (1) + les 2 leviers L1 et R1 (2)
CLIGNOTE LENTEMENT
La direction de votre volant est désormais plus sensible.
(cette opération doit être effectuée à chaque redémarrage ou déconnexion de votre volant)
• Paramétrage en mode Sensibilité Normale (mode par défaut) :
Action
LED (5)
Appuyez simultanément et relâchez :
le D-Pad (1) + les 2 leviers L1 et R1 (2)
NE CLIGNOTE PAS
La direction de votre volant est revenue en sensibilité normale (qui est le mode par défaut)
PROGRAMMATION DU VOLANT ET DES PEDALES
Votre volant est entièrement programmable :
- Tous les boutons d’action peuvent être permutés entre eux.
- Tous les boutons peuvent être programmés sur les leviers de vitesses ou sur les pédales.
• Exemples d’applications possibles :
- Sur PS3™, programmer L2/R2 ou L3/R3 sur les 2 leviers de vitesses Up et Down (L1/R1).
- Sur PS3™, programmer les boutons Croix/Carré sur les pédales (L2/R2 par défaut).
- Inverser différents boutons pour plus d’accessibilité.
• Procédure de programmation
Etapes
Action
LED (5)
1
Appuyez simultanément et relâchez : SE + ST (6)
ETEINT
2 Pressez et relâchez le bouton à programmer.
CLIGNOTE
RAPIDEMENT
3
Pressez et relâchez le bouton ou la pédale
sur lequel/laquelle vous souhaitez placer votre
fonction.
ALLUME
Votre programmation est désormais effectuée.
(cette opération doit être effectuée à chaque redémarrage ou déconnexion de votre volant)

6/10
• Effacer sa programmation
Action
LED (5)
Pressez et maintenez appuyé pendant 2 secondes : SE +
ST (6)
S’ETEINT ET
SE RALLUME
Votre programmation est désormais effacée.
CONFIGURATION DU PEDALIER
Par défaut, les commandes d’accélérateur et de frein de votre volant fonctionnent en mode
Séparé, ce qui signifie que les pédales fonctionnent sur des axes indépendants.
Ce mode permet d’améliorer considérablement la précision de votre pilotage.
Si votre jeu ne supporte pas le mode Séparé, le pédalier de votre volant ne fonctionnera
pas correctement. Vous devez alors activer le mode Combiné.
• Procédure de changement de mode du pédalier :
Appuyez simultanément et relâchez : les 2 pédales + le bouton PS (4)
(cette opération doit être effectuée à chaque redémarrage ou déconnexion de votre volant)
MODE DU PEDALIER
LED (5)
SEPARE (mode par défaut conseillé)
ROUGE
COMBINE
VERTE
• Paramétrage du pédalier sur PlayStation®3
Pédalier Séparé
(mode par défaut)
Pédalier Combiné
(nécessite un paramétrage)
- Accélérateur = Gâchette R2
de la manette PS3™
- Frein = Gâchette L2
de la manette PS3™
- Accélérateur = Direction Haut
du mini-stick droit de la manette PS3™
- Frein = Direction Bas
du mini-stick droit de la manette PS3™

7/10
DEPANNAGE ET AVERTISSEMENT
• Mon volant ne fonctionne pas correctement ou semble mal calibré :
- Eteignez votre système PS3™, déconnectez entièrement votre volant et tous les câbles,
rebranchez et relancez votre jeu.
- Ne bougez jamais le volant et les pédales lorsque vous branchez votre volant, afin
d’éviter tout problème de calibration.
• Mon pédalier ne fonctionne pas correctement :
- Branchez toujours le pédalier sur le volant (9/8) avant de brancher le connecteur USB (7)
du volant.
- Reconfigurez votre volant dans les options contrôleur de votre jeu.
• Je n’arrive pas à configurer mon volant :
- Sur PS3™, dans le menu Options / Contrôleur / Manettes de votre jeu : choisissez la
configuration la plus appropriée.
- Vous pouvez également utiliser la fonction programmation de votre volant pour résoudre
ce type de problème.
• La direction de mon volant n’est pas assez réactive :
- Basculez votre volant en mode sensibilité Haute.
- Ajustez la sensibilité dans les options de votre jeu.

8/10
SUPPORT TECHNIQUE
Si vous rencontrez un problème avec votre produit, rendez-vous sur le site
http://ts.thrustmaster.com et cliquez sur Support Technique. Vous aurez alors accès à
différents services (Foire Aux Questions (FAQ), dernières versions des pilotes et logiciels)
susceptibles de résoudre votre problème. Si le problème persiste, vous pouvez contacter le
support technique des produits Thrustmaster (« Support Technique ») :
Par e-mail :
Pour bénéficier du support technique par e-mail, vous devez d’abord vous enregistrer en
ligne. Les informations fournies vont permettre aux techniciens de résoudre plus
rapidement votre problème. Cliquez sur Enregistrement à gauche de la page Support
technique et suivez les instructions à l’écran. Si vous êtes déjà enregistré, renseignez les
champs Nom d’utilisateur et Mot de passe puis cliquez sur Connexion.
Par téléphone (si vous n’avez pas d’accès Internet) :
Jours, horaires et numéros de téléphone susceptibles de changer. Veuillez consulter
http://ts.thrustmaster.com pour obtenir une liste à jour.
France
02 99 93 21 33
Numéro fixe France Telecom non
surtaxé.
Tarif selon opérateur
Du lundi au vendredi de 9h à 20h
Suisse
0842 000 022
Tarif d’une communication locale
Du lundi au vendredi de 9h à 20h
Belgique
078 16 60 56
Tarif d’une communication
nationale
Du lundi au vendredi de 9h à 20h
Luxembourg
80028612
Gratuit
Du lundi au vendredi de 9h à 20h
Informations relatives à la garantie aux consommateurs
Dans le monde entier, Guillemot Corporation S.A. (ci-après « Guillemot ») garantit au
consommateur que le présent produit Thrustmaster est exempt de défaut matériel et de vice de
fabrication, et ce, pour une période de garantie qui correspond au délai pour intenter une action en
conformité de ce produit. Dans les pays de l’Union Européenne, ce délai est de deux (2) ans à
compter de la délivrance du produit Thrustmaster. Dans les autres pays, la durée de la période de
garantie correspond au délai pour intenter une action en conformité du produit Thrustmaster selon
la législation en vigueur dans le pays où le consommateur avait son domicile lors de l’achat du

9/10
produit Thrustmaster (si une telle action en conformité n’existe pas dans ce pays alors la période
de garantie est de un (1) an à compter de la date d’achat d’origine du produit Thrustmaster).
Nonobstant ce qui précède, les batteries sont garanties six (6) mois à compter de la date
d’achat d’origine.
Si, au cours de la période de garantie, le produit semble défectueux, contactez
immédiatement le Support Technique qui vous indiquera la procédure à suivre. Si le défaut
est confirmé, le produit devra être retourné à son lieu d’achat (ou tout autre lieu indiqué par
le Support Technique).
Dans le cadre de la garantie, le consommateur bénéficiera, au choix du Support
Technique, du remplacement ou de la réparation du produit défectueux. Lorsque la loi
applicable l’autorise, toute responsabilité de Guillemot et ses filiales (y compris pour les
dommages indirects) se limite à la réparation ou au remplacement du produit Thrustmaster.
Lorsque la loi applicable l’autorise, Guillemot exclut toutes garanties de qualité marchande
ou d’adaptation à un usage particulier. Les droits légaux du consommateur au titre de la
législation applicable à la vente de biens de consommation ne sont pas affectés par la
présente garantie.
Cette garantie ne s’appliquera pas : (1) si le produit a été modifié, ouvert, altéré, ou a subi des
dommages résultant d’une utilisation inappropriée ou abusive, d’une négligence, d’un accident,
de l’usure normale, ou de toute autre cause non liée à un défaut matériel ou à un vice de
fabrication (y compris, mais non limitativement, une combinaison du produit Thrustmaster avec
tout élément inadapté, notamment alimentations électriques, batteries, chargeurs, ou tous
autres éléments non-fournis par Guillemot pour ce produit) ; (2) en cas de non respect des
instructions du Support Technique ; (3) aux logiciels, lesdits logiciels faisant l’objet d’une
garantie spécifique ; (4) aux consommables (éléments à remplacer pendant la durée de vie du
produit : piles, coussinets de casque audio, par exemple) ; (5) aux accessoires (câbles, étuis,
housses, sacs, dragonnes, par exemple) ; (6) si le produit a été vendu aux enchères publiques.
Cette garantie n’est pas transférable.
Responsabilité
Lorsque la loi applicable l’autorise, Guillemot Corporation S.A. (ci-après « Guillemot ») et ses
filiales excluent toute responsabilité pour tous dommages causés par un ou plusieurs des faits
suivants: (1) le produit a été modifié, ouvert, altéré, (2) l’irrespect des instructions de montage,
(3) l’utilisation inappropriée ou abusive, la négligence, l’accident (un choc, par exemple), (4)
l’usure normale du produit. Lorsque la loi applicable l’autorise, Guillemot et ses filiales excluent
toute responsabilité pour tout dommage dont la cause n’est pas liée à un défaut matériel ou à
un vice de fabrication du produit (y compris, mais non limitativement, tout dommage causé
directement ou indirectement par tout logiciel, ou par une combinaison du produit Thrustmaster
avec tout élément inadapté, notamment alimentations électriques, batteries, chargeurs, ou tous
autres éléments non-fournis par Guillemot pour ce produit).
Sayfa yükleniyor...
Sayfa yükleniyor...
Sayfa yükleniyor...
Sayfa yükleniyor...
Sayfa yükleniyor...
Sayfa yükleniyor...
Sayfa yükleniyor...
Sayfa yükleniyor...
Sayfa yükleniyor...
Sayfa yükleniyor...
Sayfa yükleniyor...
Sayfa yükleniyor...
Sayfa yükleniyor...
Sayfa yükleniyor...
Sayfa yükleniyor...
Sayfa yükleniyor...
Sayfa yükleniyor...
Sayfa yükleniyor...
Sayfa yükleniyor...
Sayfa yükleniyor...
Sayfa yükleniyor...
Sayfa yükleniyor...
Sayfa yükleniyor...
Sayfa yükleniyor...
Sayfa yükleniyor...
Sayfa yükleniyor...
Sayfa yükleniyor...
Sayfa yükleniyor...
Sayfa yükleniyor...
Sayfa yükleniyor...
Sayfa yükleniyor...
Sayfa yükleniyor...
Sayfa yükleniyor...
Sayfa yükleniyor...
Sayfa yükleniyor...
Sayfa yükleniyor...
Sayfa yükleniyor...
Sayfa yükleniyor...
Sayfa yükleniyor...
Sayfa yükleniyor...
Sayfa yükleniyor...
Sayfa yükleniyor...
Sayfa yükleniyor...
Sayfa yükleniyor...
Sayfa yükleniyor...
Sayfa yükleniyor...
Sayfa yükleniyor...
Sayfa yükleniyor...
Sayfa yükleniyor...
Sayfa yükleniyor...
Sayfa yükleniyor...
Sayfa yükleniyor...
Sayfa yükleniyor...
Sayfa yükleniyor...
Sayfa yükleniyor...
Sayfa yükleniyor...
Sayfa yükleniyor...
Sayfa yükleniyor...
Sayfa yükleniyor...
Sayfa yükleniyor...
Sayfa yükleniyor...
Sayfa yükleniyor...
Sayfa yükleniyor...
Sayfa yükleniyor...
Sayfa yükleniyor...
Sayfa yükleniyor...
Sayfa yükleniyor...
Sayfa yükleniyor...
Sayfa yükleniyor...
Sayfa yükleniyor...
Sayfa yükleniyor...
Sayfa yükleniyor...
Sayfa yükleniyor...
Sayfa yükleniyor...
Sayfa yükleniyor...
Sayfa yükleniyor...
Sayfa yükleniyor...
Sayfa yükleniyor...
Sayfa yükleniyor...
Sayfa yükleniyor...
Sayfa yükleniyor...
Sayfa yükleniyor...
Sayfa yükleniyor...
Sayfa yükleniyor...
Sayfa yükleniyor...
Sayfa yükleniyor...
Sayfa yükleniyor...
Sayfa yükleniyor...
Sayfa yükleniyor...
Sayfa yükleniyor...
Sayfa yükleniyor...
Sayfa yükleniyor...
Sayfa yükleniyor...
Sayfa yükleniyor...
Sayfa yükleniyor...
Sayfa yükleniyor...
Sayfa yükleniyor...
Sayfa yükleniyor...
Sayfa yükleniyor...
Sayfa yükleniyor...
Sayfa yükleniyor...
-
 1
1
-
 2
2
-
 3
3
-
 4
4
-
 5
5
-
 6
6
-
 7
7
-
 8
8
-
 9
9
-
 10
10
-
 11
11
-
 12
12
-
 13
13
-
 14
14
-
 15
15
-
 16
16
-
 17
17
-
 18
18
-
 19
19
-
 20
20
-
 21
21
-
 22
22
-
 23
23
-
 24
24
-
 25
25
-
 26
26
-
 27
27
-
 28
28
-
 29
29
-
 30
30
-
 31
31
-
 32
32
-
 33
33
-
 34
34
-
 35
35
-
 36
36
-
 37
37
-
 38
38
-
 39
39
-
 40
40
-
 41
41
-
 42
42
-
 43
43
-
 44
44
-
 45
45
-
 46
46
-
 47
47
-
 48
48
-
 49
49
-
 50
50
-
 51
51
-
 52
52
-
 53
53
-
 54
54
-
 55
55
-
 56
56
-
 57
57
-
 58
58
-
 59
59
-
 60
60
-
 61
61
-
 62
62
-
 63
63
-
 64
64
-
 65
65
-
 66
66
-
 67
67
-
 68
68
-
 69
69
-
 70
70
-
 71
71
-
 72
72
-
 73
73
-
 74
74
-
 75
75
-
 76
76
-
 77
77
-
 78
78
-
 79
79
-
 80
80
-
 81
81
-
 82
82
-
 83
83
-
 84
84
-
 85
85
-
 86
86
-
 87
87
-
 88
88
-
 89
89
-
 90
90
-
 91
91
-
 92
92
-
 93
93
-
 94
94
-
 95
95
-
 96
96
-
 97
97
-
 98
98
-
 99
99
-
 100
100
-
 101
101
-
 102
102
-
 103
103
-
 104
104
-
 105
105
-
 106
106
-
 107
107
-
 108
108
-
 109
109
-
 110
110
-
 111
111
-
 112
112
-
 113
113
-
 114
114
-
 115
115
-
 116
116
-
 117
117
-
 118
118
-
 119
119
-
 120
120
-
 121
121


Thrustmaster 4160588 4160589 4169067 4160590 Kullanım kılavuzu
- Tip
- Kullanım kılavuzu
diğer dillerde
- español: Thrustmaster 4160588 4160589 4169067 4160590 Manual de usuario
- français: Thrustmaster 4160588 4160589 4169067 4160590 Manuel utilisateur
- italiano: Thrustmaster 4160588 4160589 4169067 4160590 Manuale utente
- Deutsch: Thrustmaster 4160588 4160589 4169067 4160590 Benutzerhandbuch
- português: Thrustmaster 4160588 4160589 4169067 4160590 Manual do usuário
İlgili makaleler
-
Thrustmaster 4160334 Kullanım kılavuzu
-
-
-
-
-
-
Thrustmaster t150 Kullanım kılavuzu
-
Thrustmaster 2969097 2961061 Kullanım kılavuzu
-
-