Silvercrest SRRP 3.7 A1 Operating Instructions Manual
- Kategori
- Tıraş makinesi aksesuarları
- Tip
- Operating Instructions Manual

HOYER Handel GmbH
Tasköprüstraße 3
DE-22761 Hamburg
DEUTSCHLAND
Status of information · Informationernes stand · Version des informations
Stand van de informatie · ǾȝİȡȠȝȘȞȓĮȑțįȠıȘȢʌȜȘȡȠijȠȡȚȫȞ
Stand der Informationen:
ROTARY SHAVER SRRP 3.7 A1
Bedienungsanleitung
ROTATIONSRASIERER
DE
AT
CH
IAN 291947
Mode d'emploi
RASOIR À TÊTES
ROTATIVES
FR
BE
IAN 291947
11/2017 ID: SRRP 3.7 A1_17_V1.10
BE
NL
GR
CY
DE
GB
IE
NI
DK
FR
Gebruiksaanwijzing
ROTEREND
SCHEERAPPARAAT
NL
BE
Operating instructions
ROTARY SHAVER
GB
IE
NI
Betjeningsvejledning
BARBERMASKINE
DK
ȅįȘȖȓĮȤȡȒıȘȢ
ȆǼȇǿȈȉȇȅĭǿȀǾȄȊȇǿȈȉǿȀǾ
ȂǾȋǹȃǾ
GR
CY
GB
IE
NI
DK
BE
CY
B5RWDWLRQVUDVLHUHUB3UHPLXPB88IP6HLWH'LHQVWDJ1RYHPEHU

English.............................................. 2
Dansk............................................. 30
Français.......................................... 58
Nederlands..................................... 88
ƧnjnjLjǎNJNjƽ ...................................... 116
Deutsch ........................................ 146
BBB5RWDWLRQVUDVLHUHUB3UHPLXPB%ERRN6HLWH)UHLWDJ1RYHPEHU

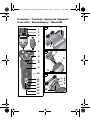
Overview / Oversigt / Aperçu de l'appareil /
Overzicht / ƧǑNJǔNjǝǑLjǔLj / Übersicht
17
|
8
9
3
B
1
2
3
5
6
7
8
9
10
11
12
13
14
15
4
16
1
3
2
18
C
A
BBB5RWDWLRQVUDVLHUHUB3UHPLXPB%ERRN6HLWH)UHLWDJ1RYHPEHU

2
GB
Contents
1. Overview ...................................................... 3
2. Intended purpose .......................................... 5
3. Safety instructions ......................................... 5
4. Items supplied ............................................ 11
5. Charging ..................................................... 12
6. Operation ................................................... 13
6.1 Before switching on for the first time................ 13
6.2 Transport lock .............................................. 14
6.3 Changing the attachments ............................. 14
6.4 Pushing on/removing the comb attachment...... 15
6.5 Shaving....................................................... 15
6.6 Cutting hairlines and beard ........................... 16
6.7 Trimming nose and ear hair........................... 17
7. Cleaning and care ....................................... 18
7.1 Shaver ........................................................ 18
7.2 Shaving attachment / blade unit .................... 18
7.3 Beard trimmer attachment.............................. 20
8. Disposal ...................................................... 21
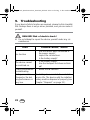
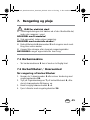
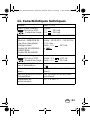
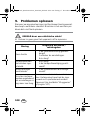
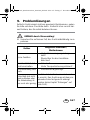
9. Troubleshooting .......................................... 22
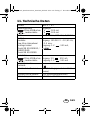
10.Ordering accessories ................................... 23
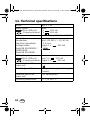
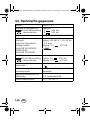
11.Technical specifications ................................ 24
12.Warranty of the HOYER Handel|GmbH ........ 27
BBB5RWDWLRQVUDVLHUHUB3UHPLXPB%ERRN6HLWH)UHLWDJ1RYHPEHU

3
GB
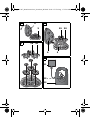
1. Overview
1 Adjustable comb attachment for the beard
trimmer attachment
2
3 4 5 6 mm Marking on comb attachment
3 Beard trimmer attachment
4 Nose hair trimmer
5 Blade unit with shaving heads (3x)
6 Shaving attachment
7 Release button of the shaving attachment
8 Motor unit for attachments
9 Shaver
10 On/off switch
11 00/... /100% Status display of the battery capacity
12 Plug symbol
flashing red: battery almost empty
is lit red during charging process: the bat-
tery is being charged
13 Lock symbol flashes: shows the transport
lock
14 Cleaning symbol: is lit briefly when
switched on / flashes after 30 minutes of
shaving time as a reminder of the required
regular cleaning
15 Micro USB port
16 Charging contacts
17 Protective cap
18 S Marking at the beard trimmer attachment
BBB5RWDWLRQVUDVLHUHUB3UHPLXPB%ERRN6HLWH)UHLWDJ1RYHPEHU

4
GB
Rear fold-out page:
19 Locking wheel
20 Holder for shaving heads
21 Plug-in power unit with Micro USB plug
22 Connecting socket for plug-in power unit
23 Battery charger
Not shown:
24 Cleaning brush
25 storage pouch
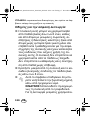
Thank you for your trust!
Congratulations on your new rotary shaver.
For a safe handling of the device and in order to get to know the
entire scope of features:
• Thoroughly read these user instructions prior to
initial use.
• Above all, observe the safety instructions!
• The device should only be used as described in
these user instructions.
• Keep these user instructions for reference.
• If you pass the device on to someone else, please
include this copy of the user instructions.
We hope you enjoy your new rotary shaver!
BBB5RWDWLRQVUDVLHUHUB3UHPLXPB%ERRN6HLWH)UHLWDJ1RYHPEHU

5
GB
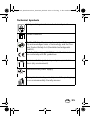
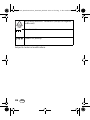
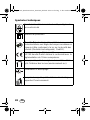
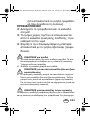
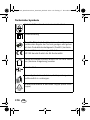
Symbols on your device
Suitable for washing under running water.
2. Intended purpose
The rotary shaver is intended exclusively for cutting human hair.
Only use the device for dry hair.
The device is designed for private home use and must not be used
for commercial purposes. The device must only be used indoors.
Foreseeable misuse
WARNING! Risk of material damage!
~
Do not use the device to cut artificial hair or animal hair.
3. Safety instructions
Warnings
If necessary, the following warnings will be used in these user in-
structions:
DANGER! High risk: failure to observe this warning
may result in injury to life and limb.
WARNING! Moderate risk: failure to observe this warning may
result in injury or serious material damage.
CAUTION: low risk: failure to observe this warning may result
in minor injury or material damage.
NOTE: circumstances and specifics that must be observed when
handling the device.
BBB5RWDWLRQVUDVLHUHUB3UHPLXPB%ERRN6HLWH)UHLWDJ1RYHPEHU

6
GB
Instructions for safe operation
~ This device can be used by children from the
age of 8 and people with restricted physical,
sensory or intellectual abilities or people
without adequate experience and/or under-
standing, if they are supervised or instructed
on how to use this device safely and if they
are aware of the resulting hazards. Children
must not play with the device. Cleaning and
maintenance by the user must not be per-
formed by children without supervision.
~ Keep children under the age of 8 away from
the device and the power cable.
~ This symbol indicates that you can
clean the shaver under running water.
DANGER!
Disconnect the device from
the plug-in power unit prior to doing
so. Only use the included original pow-
er unit for mains operation.
WARNING!
~ Keep the power unit and the cable dry!
~
The hand-held part must be disconnected from
the power cable before it is cleaned in water.
~
The battery may only be charged with the orig-
inal accessory (plug-in power unit).
BBB5RWDWLRQVUDVLHUHUB3UHPLXPB%ERRN6HLWH)UHLWDJ1RYHPEHU

7
GB
DANGER for children
~ Children must not play with packing material. Do not allow
children to play with plastic bags. There is a risk of suffoca-
tion.
~ Keep the device out of the reach of children.
DANGER to and from pets and livestock
~ Electrical devices can represent a hazard to pets and live-
stock. In addition, animals can also cause damage to the
device. For this reason you should keep animals away from
electrical devices at all times.
DANGER! Risk of electric shock due to
moisture
These safety instructions apply to the power unit and the device
connected to the power unit. In battery mode, the shaver is pro-
tected against strong jets of water (protection type IPX6), but must
not be immersed in water.
~ Do not use this device in the vicinity of bathtubs, showers,
washbasins or other vessels containing water.
~ Protect the device from moisture, water drops and water
splashes.
~ Never touch the device with wet hands.
~ The device, the battery charger and the plug-in power unit
must not fall into water or other liquids and must not be
rinsed under running water.
~ If the device has fallen into water, pull out the plug-in power
unit immediately, and only then remove the device from the
water. Do not use the device again, but have this checked
by a specialist.
BBB5RWDWLRQVUDVLHUHUB3UHPLXPB%ERRN6HLWH)UHLWDJ1RYHPEHU

8
GB
~ Should liquid enter the device, have it checked before start-
ing the device up again.
~ If the device is used in a bathroom, the power unit must be
pulled out after use, as the proximity of water represents a
hazard, even when the device is switched off.
~ Installation of a residual current device (FI/RCD) with a rat-
ed residual operating current of no more than 30 mA is rec-
ommended to provide additional protection. Ask your
electrician for advice. The installation should only be carried
out by a qualified electrician.
DANGER! Risk of electric shock
~ Do not start using the device if the device, the battery charg-
er or the plug-in power unit show visible damage, or if the
device has previously been dropped.
~ Connect the plug-in power unit to the device/battery charger
before plugging it into a wall socket.
~
Lay the cable of the plug-in power unit such that no one can
step on it, get caught on it, or trip over it.
~ Only connect the plug-in power unit to a properly installed
easy to access wall socket which supplies voltage matching
the rating plate. The wall socket must continue to be easily
accessible after the device is plugged in.
~ Ensure that the cable of the plug-in power unit cannot be
damaged by sharp edges or hot surfaces. Do not wrap the
cable around the device (risk of cable damage!)
~ Ensure that the cable is not trapped or crushed.
~ When removing the plug-in power unit from the wall socket,
always pull the plug-in power unit and never the cable.
BBB5RWDWLRQVUDVLHUHUB3UHPLXPB%ERRN6HLWH)UHLWDJ1RYHPEHU

9
GB
~ Pull the plug-in power unit out of the wall socket, …
… after each charging process,
… if there is a fault,
… before connecting the device to the plug-in power unit,
… before you clean the device and
… during thunderstorms.
~ To avoid any risk, do not make modifications to the device.
Repairs must be carried out by a specialist workshop or the
Service Centre.
DANGER from batteries
~ Protect the battery against mechanical damages.
Fire|hazard!
~ Do not expose the device to direct sunshine or heat. The am-
bient temperature should not be lower than -10 °C and high-
er than +40 °C.
~ The charge contacts on the device must not be connected by
metallic objects.
~ The battery may only be charged with the original accessory
(power unit).
~ Should the electrolyte solution leak out of the battery, avoid
contact with eyes, mucous membranes and skin. Rinse imme-
diately with plenty of clean water and consult a doctor. The
electrolyte solution can cause irritation.
~ The device is provided with a lithium-ion battery.
- The battery cannot be removed!
- This device must not be opened!
- The device with the installed battery must be disposed of
properly.
BBB5RWDWLRQVUDVLHUHUB3UHPLXPB%ERRN6HLWH)UHLWDJ1RYHPEHU

10
GB
WARNING! Risk of injury from cutting
~ The points of the beard trimmer attachment are sharp. Han-
dle with care.
~ Do not use the device if the attachment shows damages.
~ Switch off the device before pinning up or changing the at-
tachments and each time before cleaning.
~ Only insert the tip of the nose hair trimmer slightly into the
nose. For ears, it may only be applied to the outer ear. Nev-
er insert the device into the ear.
WARNING! Risk of injury
~ Place the cable in such a way that no one trips over it or
steps on it.
~ Do not use the device on open wounds, cuts, sunburn or blis-
ters.
WARNING! Risk of material damage
~ Use the original accessories only.
~ Never place the device on hot surfaces (e.g. hot plates) or
near heat sources or open fire.
~ Do not cover the power unit to prevent overheating.
~ The battery charger is fitted with non-slip silicon feet. As fur-
niture is coated with a variety of different varnishes and
acrylics and treated with different cleaning agents, we can-
not rule out that some of these substances could damage
and soften the rubber feet. If necessary, place a non-slip mat
under the battery charger.
~ The blade unit of the shaving attachment can be cleaned us-
ing water. Do not use any other liquids.
~ Do not use any astringent or abrasive cleaning agents.
BBB5RWDWLRQVUDVLHUHUB3UHPLXPB%ERRN6HLWH)UHLWDJ1RYHPEHU

11
GB
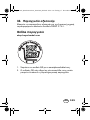
4. Items supplied
1shaver|9
1 plug-in power unit with Micro USB plug|21
1 battery charger|23
1 shaving attachment|6
1 nose hair trimmer|4
1 beard trimmer attachment|3
1 adjustable (3, 4, 5, 6 mm) comb attachment|1 for the beard
trimmer attachment|3
1 cleaning brush|24
1 storage pouch|25
1 protective cap|17
1 copy of the user instructions
BBB5RWDWLRQVUDVLHUHUB3UHPLXPB%ERRN6HLWH)UHLWDJ1RYHPEHU

12
GB
5. Charging
WARNING! Risk of material damage!
~ The battery must only be charged using the plug-in power
unit|21 supplied. Charging the battery via other devices is
not permitted. The devices could be damaged.
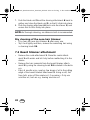
NOTES:
• Before the device is used for the first time, and during the fol-
lowing three charging procedures, the device should be
charged for 90 minutes in each case.
• The capacity/charging state of the battery|11 is displayed
in percent (00, 05, 10, ... ,100% in increments of 5%).
• When the batteries are almost empty, the plug symbol|12
flashes in red. The device can then only be used for a short
time without being connected to the electricity supply.
• It takes about 5 minutes to charge the device sufficiently for
one shave.
• When the battery is fully charged, the device can be used
for approximately 60 minutes without being connected to the
power supply.
1. Switch off the device with the on/off switch|10 if necessary.
2. Insert the small Micro USB plug of the plug-in power unit|21
into the connecting socket|22 of the battery charger|23.
3. For a secure and safe footing position the battery charg-
er|23 on a smooth, heat-resistant surface.
4. Put the rotary shaver|9 into the battery charger|23.
5. Insert the plug-in power unit|21 into an easily accessible
wall socket, the voltage of which corresponds to the rating
plate of the plug-in power unit. The wall socket must continue
to be easily accessible after the device is plugged in.
BBB5RWDWLRQVUDVLHUHUB3UHPLXPB%ERRN6HLWH)UHLWDJ1RYHPEHU

13
GB
6. The plug symbol|12 is lit red and the battery is charged.
When the battery is fully charged, 100% is displayed.
When the battery is fully charged, the device can be used
for approximately 60 minutes without being connected to
the power supply.
NOTE: the rotary shaver|9 can also be charged without a bat-
tery charger|23 only using the plug-in power unit|21. For this
purpose, insert the small Micro USB plug of the plug-in power
unit|21 directly into the Micro USB port|15 of the rotary shaver.
6. Operation
6.1 Before switching on for the first time
CAUTION:
~ After unpacking, there could still be oil residues on the shav-
ing heads|5 of the shaving attachment|6. Remove these with
an absorbent, lint-free cloth before using the device for the
first time.
Regardless of the charging state of the battery, the rotary shaver|
9
can always be used in mains operation.
1. Before switching to mains operation, ensure that the device
is switched off.
2. Insert the small Micro USB plug of the plug-in power unit|21
into the Micro USB port|15 of the rotary shaver.
BBB5RWDWLRQVUDVLHUHUB3UHPLXPB%ERRN6HLWH)UHLWDJ1RYHPEHU

14
GB
3. Insert the plug-in power unit|21 into an easily accessible
wall socket, the voltage of which corresponds to the rating
plate of the plug-in power unit.
4. Figure A: push the protective cap|17 downwards off the
shaving attachment|6.
5. Switch on the device with the on/off switch|10.
6.2 Transport lock
If the transport lock is activated, the lock symbol|13 flashes.
• Press and hold the on/off switch|10 for approx. 4 seconds,
in order to switch the transport lock on/off.
• Connecting the plug-in power unit|
21 deactivates the trans-
port lock, which cannot be activated during mains opera-
tion.
6.3 Changing the attachments
WARNING! Risk of injury!
~ Switch off the shaver|9, before you attach or remove the at-
tachments.
1. Figure A: slide the protective cap|17 onto the shaving at-
tachment|6 from below, with the opening first.
2. Figure B: remove the attachment|3,|4 or|6 from the shav-
er|9.
3. Figure B: insert the guide (see dotted line) of the attach-
ments|3,|4 or|6 into the recess of the motor unit for attach-
ments|8, and press the attachment onto the shaver|9 until it
audibly clicks firmly into place.
BBB5RWDWLRQVUDVLHUHUB3UHPLXPB%ERRN6HLWH)UHLWDJ1RYHPEHU

15
GB
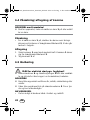
6.4 Pushing on/removing the comb
attachment
WARNING! Risk of injury!
~ Switch off the device before replacing or changing a comb
attachment|1.
Pushing on
• In order to attach the comb attachment|1, push it over the
guide rails on the side of the device onto the beard trimmer
attachment|3, until it is heard to click into place.
Removing
1. Push the comb attachment|1 upwards using a moderate
amount of force. The comb attachment|1 separates from the
beard trimmer attachment|3.
2. Remove the comb attachment|1.
6.5 Shaving
DANGER! Risk of electric shock due to
moisture!
~ The shaver|9 and the plug-in power unit|21 are not water-
proof and are therefore not allowed to be used in a shower/
bath.
WARNING!
~ Do not use the device on open wounds, cuts, sunburn or blis-
ters.
~ Do not place excessive pressure on the shaving heads|5.
They are thin and can be damaged easily.
BBB5RWDWLRQVUDVLHUHUB3UHPLXPB%ERRN6HLWH)UHLWDJ1RYHPEHU

16
GB
NOTES:
• Shaving is possible both in battery mode and in mains oper-
ation.
• Initial use may cause temporary irritation or redness of the
skin, as the skin has to adjust to shaving. This is normal and
usually lasts between 2 to 4 weeks.
• Hold the blade unit|5 parallel to the surface of the skin, and
gently move it over your face using circular motions.
• Shave against the direction of your beard growth.
• Stretch your skin in complicated areas, such as the chin, to
achieve better results.
• Switch off the device after shaving, clean the parts carefully
(Chapter "Cleaning and care" on page 18) and to protect
the shaving heads|5, slide the protective cap|17 onto the
shaving attachment|6 from below.
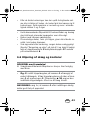
6.6 Cutting hairlines and beard
WARNING! Risk of injury!
~ The points of the beard trimmer attachment|3 are sharp.
Handle with care.
• Figure C: adjust the cutting length at the comb attach-
ment|1 according to the desired hair length. Read the cut-
ting length on the side of the comb attachment|1 at the
marking|2. The arrow symbol S|18 indicates which cutting
length is set. Now, shorten your beard step-by-step.
NOTE: ensure that the comb attachment|1 is still firmly attached
to the device after adjustment.
BBB5RWDWLRQVUDVLHUHUB3UHPLXPB%ERRN6HLWH)UHLWDJ1RYHPEHU

17
GB
• Use the device only with the beard trimmer attachment|3
and without comb attachment|1, to cut beard and hairline.
In this way you can cut hair lengths of 1-2 mm evenly.
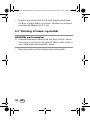
6.7 Trimming nose and ear hair
WARNING! Risk of injury!
~ Only insert the tip of the nose hair trimmer|4 slightly into the
nose. For ears, it may only be applied to the outer ear. Nev-
er insert the device into the ear.
• Switch the device on and trim the nose and ear hair careful-
ly.
BBB5RWDWLRQVUDVLHUHUB3UHPLXPB%ERRN6HLWH)UHLWDJ1RYHPEHU

18
GB
7. Cleaning and care
DANGER! Risk of electric shock!
~ The hand-held part must be disconnected from the power ca-
ble before it is cleaned in water.
WARNING! Risk of injury!
~ Always switch off the device before cleaning it.
WARNING! Risk of material damage!
~ The blade unit|5 of the shaving attachment|6 can be
cleaned using water. Do not use any other liquids.
~ Do not use any astringent or abrasive cleaning agents.
NOTE: clean the device after every use.
7.1 Shaver
• Wipe down the housing of the shaver|9 with a damp cloth.
7.2 Shaving attachment / blade unit
Dry cleaning of the shaving attachment
1. Clean the 3 shaving heads|5 after each shave using the
cleaning brush|24.
2. Press the release button|7 on the shaving attachment|6, so
that the blade unit|5 opens.
3. Carefully tap the blade unit|5 to empty it.
4. Remove the hair remnants by using the cleaning brush|24.
BBB5RWDWLRQVUDVLHUHUB3UHPLXPB%ERRN6HLWH)UHLWDJ1RYHPEHU
Sayfa yükleniyor ...
Sayfa yükleniyor ...
Sayfa yükleniyor ...
Sayfa yükleniyor ...
Sayfa yükleniyor ...
Sayfa yükleniyor ...
Sayfa yükleniyor ...
Sayfa yükleniyor ...
Sayfa yükleniyor ...
Sayfa yükleniyor ...
Sayfa yükleniyor ...
Sayfa yükleniyor ...
Sayfa yükleniyor ...
Sayfa yükleniyor ...
Sayfa yükleniyor ...
Sayfa yükleniyor ...
Sayfa yükleniyor ...
Sayfa yükleniyor ...
Sayfa yükleniyor ...
Sayfa yükleniyor ...
Sayfa yükleniyor ...
Sayfa yükleniyor ...
Sayfa yükleniyor ...
Sayfa yükleniyor ...
Sayfa yükleniyor ...
Sayfa yükleniyor ...
Sayfa yükleniyor ...
Sayfa yükleniyor ...
Sayfa yükleniyor ...
Sayfa yükleniyor ...
Sayfa yükleniyor ...
Sayfa yükleniyor ...
Sayfa yükleniyor ...
Sayfa yükleniyor ...
Sayfa yükleniyor ...
Sayfa yükleniyor ...
Sayfa yükleniyor ...
Sayfa yükleniyor ...
Sayfa yükleniyor ...
Sayfa yükleniyor ...
Sayfa yükleniyor ...
Sayfa yükleniyor ...
Sayfa yükleniyor ...
Sayfa yükleniyor ...
Sayfa yükleniyor ...
Sayfa yükleniyor ...
Sayfa yükleniyor ...
Sayfa yükleniyor ...
Sayfa yükleniyor ...
Sayfa yükleniyor ...
Sayfa yükleniyor ...
Sayfa yükleniyor ...
Sayfa yükleniyor ...
Sayfa yükleniyor ...
Sayfa yükleniyor ...
Sayfa yükleniyor ...
Sayfa yükleniyor ...
Sayfa yükleniyor ...
Sayfa yükleniyor ...
Sayfa yükleniyor ...
Sayfa yükleniyor ...
Sayfa yükleniyor ...
Sayfa yükleniyor ...
Sayfa yükleniyor ...
Sayfa yükleniyor ...
Sayfa yükleniyor ...
Sayfa yükleniyor ...
Sayfa yükleniyor ...
Sayfa yükleniyor ...
Sayfa yükleniyor ...
Sayfa yükleniyor ...
Sayfa yükleniyor ...
Sayfa yükleniyor ...
Sayfa yükleniyor ...
Sayfa yükleniyor ...
Sayfa yükleniyor ...
Sayfa yükleniyor ...
Sayfa yükleniyor ...
Sayfa yükleniyor ...
Sayfa yükleniyor ...
Sayfa yükleniyor ...
Sayfa yükleniyor ...
Sayfa yükleniyor ...
Sayfa yükleniyor ...
Sayfa yükleniyor ...
Sayfa yükleniyor ...
Sayfa yükleniyor ...
Sayfa yükleniyor ...
Sayfa yükleniyor ...
Sayfa yükleniyor ...
Sayfa yükleniyor ...
Sayfa yükleniyor ...
Sayfa yükleniyor ...
Sayfa yükleniyor ...
Sayfa yükleniyor ...
Sayfa yükleniyor ...
Sayfa yükleniyor ...
Sayfa yükleniyor ...
Sayfa yükleniyor ...
Sayfa yükleniyor ...
Sayfa yükleniyor ...
Sayfa yükleniyor ...
Sayfa yükleniyor ...
Sayfa yükleniyor ...
Sayfa yükleniyor ...
Sayfa yükleniyor ...
Sayfa yükleniyor ...
Sayfa yükleniyor ...
Sayfa yükleniyor ...
Sayfa yükleniyor ...
Sayfa yükleniyor ...
Sayfa yükleniyor ...
Sayfa yükleniyor ...
Sayfa yükleniyor ...
Sayfa yükleniyor ...
Sayfa yükleniyor ...
Sayfa yükleniyor ...
Sayfa yükleniyor ...
Sayfa yükleniyor ...
Sayfa yükleniyor ...
Sayfa yükleniyor ...
Sayfa yükleniyor ...
Sayfa yükleniyor ...
Sayfa yükleniyor ...
Sayfa yükleniyor ...
Sayfa yükleniyor ...
Sayfa yükleniyor ...
Sayfa yükleniyor ...
Sayfa yükleniyor ...
Sayfa yükleniyor ...
Sayfa yükleniyor ...
Sayfa yükleniyor ...
Sayfa yükleniyor ...
Sayfa yükleniyor ...
Sayfa yükleniyor ...
Sayfa yükleniyor ...
Sayfa yükleniyor ...
Sayfa yükleniyor ...
Sayfa yükleniyor ...
Sayfa yükleniyor ...
Sayfa yükleniyor ...
Sayfa yükleniyor ...
Sayfa yükleniyor ...
Sayfa yükleniyor ...
Sayfa yükleniyor ...
Sayfa yükleniyor ...
Sayfa yükleniyor ...
Sayfa yükleniyor ...
Sayfa yükleniyor ...
Sayfa yükleniyor ...
Sayfa yükleniyor ...
Sayfa yükleniyor ...
Sayfa yükleniyor ...
Sayfa yükleniyor ...
Sayfa yükleniyor ...
Sayfa yükleniyor ...
Sayfa yükleniyor ...
Sayfa yükleniyor ...
Sayfa yükleniyor ...
-
 1
1
-
 2
2
-
 3
3
-
 4
4
-
 5
5
-
 6
6
-
 7
7
-
 8
8
-
 9
9
-
 10
10
-
 11
11
-
 12
12
-
 13
13
-
 14
14
-
 15
15
-
 16
16
-
 17
17
-
 18
18
-
 19
19
-
 20
20
-
 21
21
-
 22
22
-
 23
23
-
 24
24
-
 25
25
-
 26
26
-
 27
27
-
 28
28
-
 29
29
-
 30
30
-
 31
31
-
 32
32
-
 33
33
-
 34
34
-
 35
35
-
 36
36
-
 37
37
-
 38
38
-
 39
39
-
 40
40
-
 41
41
-
 42
42
-
 43
43
-
 44
44
-
 45
45
-
 46
46
-
 47
47
-
 48
48
-
 49
49
-
 50
50
-
 51
51
-
 52
52
-
 53
53
-
 54
54
-
 55
55
-
 56
56
-
 57
57
-
 58
58
-
 59
59
-
 60
60
-
 61
61
-
 62
62
-
 63
63
-
 64
64
-
 65
65
-
 66
66
-
 67
67
-
 68
68
-
 69
69
-
 70
70
-
 71
71
-
 72
72
-
 73
73
-
 74
74
-
 75
75
-
 76
76
-
 77
77
-
 78
78
-
 79
79
-
 80
80
-
 81
81
-
 82
82
-
 83
83
-
 84
84
-
 85
85
-
 86
86
-
 87
87
-
 88
88
-
 89
89
-
 90
90
-
 91
91
-
 92
92
-
 93
93
-
 94
94
-
 95
95
-
 96
96
-
 97
97
-
 98
98
-
 99
99
-
 100
100
-
 101
101
-
 102
102
-
 103
103
-
 104
104
-
 105
105
-
 106
106
-
 107
107
-
 108
108
-
 109
109
-
 110
110
-
 111
111
-
 112
112
-
 113
113
-
 114
114
-
 115
115
-
 116
116
-
 117
117
-
 118
118
-
 119
119
-
 120
120
-
 121
121
-
 122
122
-
 123
123
-
 124
124
-
 125
125
-
 126
126
-
 127
127
-
 128
128
-
 129
129
-
 130
130
-
 131
131
-
 132
132
-
 133
133
-
 134
134
-
 135
135
-
 136
136
-
 137
137
-
 138
138
-
 139
139
-
 140
140
-
 141
141
-
 142
142
-
 143
143
-
 144
144
-
 145
145
-
 146
146
-
 147
147
-
 148
148
-
 149
149
-
 150
150
-
 151
151
-
 152
152
-
 153
153
-
 154
154
-
 155
155
-
 156
156
-
 157
157
-
 158
158
-
 159
159
-
 160
160
-
 161
161
-
 162
162
-
 163
163
-
 164
164
-
 165
165
-
 166
166
-
 167
167
-
 168
168
-
 169
169
-
 170
170
-
 171
171
-
 172
172
-
 173
173
-
 174
174
-
 175
175
-
 176
176
-
 177
177
-
 178
178
-
 179
179


Silvercrest SRRP 3.7 A1 Operating Instructions Manual
- Kategori
- Tıraş makinesi aksesuarları
- Tip
- Operating Instructions Manual
Diğer dillerde
- français: Silvercrest SRRP 3.7 A1
- Deutsch: Silvercrest SRRP 3.7 A1
- English: Silvercrest SRRP 3.7 A1
- dansk: Silvercrest SRRP 3.7 A1
- Nederlands: Silvercrest SRRP 3.7 A1
İlgili Makaleler
-
Silvercrest SFR 3.7 A1 Operating Instructions Manual
-
-
Silvercrest SHBS 600 A1 Operating Instructions Manual
-
-
-
-
Silvercrest SECM 12 A1 Operating Instructions Manual
-
-
-