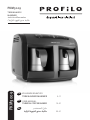
PROFILO PKM3009 Kullanım kılavuzu
- Kategori
- Kahve yapanlar
- Tip
- Kullanım kılavuzu

PKM3009
KULLANIM KILAVUZU
TÜRK KAHVESİ MAKİNESİ
USER MANUAL
TURKISH COFFEE MAKER
TR
EN
AR
2–11
12–21
22–31
turkish coee maker
PKM3009
TÜRK KAHVESİ
MAKİNESİ
/

2
Değerli Müşterilerimiz!
Cihazımızı satın aldığnız için teşekkür ederiz. PROFiLO
ürünlerinin kullanıcıları arasına hoş geldiniz.
Demlenmiş kahve kalitesini ve ürünün kullanım kolaylığını
takdir edeceğinizden kesinlikle eminiz.
Lütfen ilgili kullanma kılavuzunu dikkatle okuyunuz.
Özellikle güvenlik talimatlarına dikkat edilmelidir.
Kullanma kılavuzunu ileriki kullanımlarda yararlanabilmek
için saklamanızı rica ederiz.
Güvenli kullanım talimatları
TEHLİKE! / UYARI!
Yaralanma riski
Cihaz 8 yaş ve üstü çocuklar tarafından
tarafından güvenliklerinden sorumlu
bir kişinin gözetimi altında veya
olası riskler anlaşıldıktan ve cihazın
güvenli kullanımına ilişkin talimatlar
anlatıldıktan sonra kullanılabilir.
Cihazın temizliği veya bakım işlemleri
8 yaşını tamamlamış ve başlarında
uygun gözetimci sağlanıldığı zaman
çocuklar tarafından yapılabilir. Cihazı
ve güç kaynağının kablosunu 8 yaş
altı çocukların ulaşamayacağı bir
yerde saklamak gerekir.
Cihaz, deneyim ve donanım bilgi
eksikliği olan kişiler, ziksel veya
zihinsel engelliler tarafından kullanıl-
dığında güvenliklerinden sorumlu bir
kişinin gözetimi sağlanmalıdır.
Çocuklar cihazla oynamamalıdır.
Cihazı çocukların yakınında
kullandığınız zaman dikkatli olun.
Eğer güç kablosu, koruma veya
tutacak arızalı ise, cihazı kullanmayın.
Eğer güç kablosu arızalı ise,
tehlikeyi önlemek için yetkili servis
merkezi veya yetkili teknik personel
tarafından tamir edilmelidir.
Cihazın onarımlarını sadece eğitimli
personel yapabilir. Yanlış onarım
kullanıcı için ciddi tehlikelere neden
olabilir. Arızalanması durumunda,
yetkili servis teknisyenine başvurun.
Cihazı temizlemeden önce ve kahve
yapma esnasında herhangi bir
sorunun oluşması durumunda, ilk
olarak cihazı kapatıp, şini prizden
çıkarın.
Cihaz depolanmadan, parçaları
sökülmeden ve temizlenmeden önce
soğumalıdır.
Damlayan kahve altına ellerinizi
doğrudan koymanız, yanıklara veya
yaralanmalara yol açabilir.
Güç kablosunu ıslatmayın, suya
daldırmayın.
Kablosu sarılı iken cihazı kullanmayın.
Fişi ıslak elle prize takmayın.
Kablonun masa veya tezgah
kenarından asılmasına ve sıcak
yüzeylere değmesine izin vermeyin.
Cezveden kahve içmeyin.
Cezveleri hep tutacaklardan tutun.
Cezveler sıcakken hiçbir parçasına
dokunmayın.
Isıtıcı sıcakken cezvelerin metal
parçalarına ve ısıtıcının yüzeyine
dokunmayın.
Cihazı suya veya herhangi bir sıvıya
daldırmayın.
Cihazı sadece normal oda
sıcaklığında ve deniz seviyesinden
en fazla 2000 m yükseklikte kullanın.
TR
DİKKAT!
Cihaz zarar görebilir
Cihazı daima sağlam, düz bir yüzeye yerleştirin.
Su tankı sadece temiz, soğuk su ile doldurulmalıdır.
Su tankının maksimum kapasitesini aşmayın.
Su tankına sıcak su koymayın.

3
Güç kablosunun, cihazın sıcak parçalarına değmesine
izin vermeyin.
Fişi prize takmadan veya prizden çıkarmadan önce
cihazı hep (ON/OFF düğmesi ile) kapatın. Bağlantı
kablosuna asılarak şi prizinden çıkartmayın.
Cihaz uzun süre kullanılmadığı zaman veya
temizlenmeden önce kapatılmalı, şi prizden çıkarılmalı.
Eğer uzatma kablosu nitelikli teknisyen veya servis
personeli tarafından kontrol edilmedi ise, cihaz ile
birlikte kullanılmamalıdır.
Cihazı kullanırken, şini, cihazın levhası üzerinde
belirtilen voltaj ile uyumlu, topraklanmış bir elektrik
prizine (alternatif akım) takın.
Cihaz ayrı uzaktan kumanda sistemi ile veya harici bir
sayaç aracılığıyla çalışmak üzere tasarlanmamıştır.
Cihazı sıcak yüzeylere veya sıcak objelerin yakınına
yerleştirmeyin.
Orijinallerden başka cezveleri kullanmayın.
Isıtıcı yüzeyi ve cezvelerin alt yüzeyini (metal kısmını)
hiçbir zaman bulaşık teli ile silmeyin.
Su tankını ve cezveleri bulaşık makinesinde yıkamayın.
Cihazı buhar kaynaklarından saklayın ve buharlı
ortamda kullanmayın.
Su tankına süt gibi sudan başka bir sıvıyı koymayın.
Cezveleri ocak gibi başka bir ısıtıcı yüzey üzerinde
kullanmayın.
Cezvelere kahve ve şeker hariç hiçbir şey koymayın,
su cezvelere otomatik olarak doldurulur.
ÖNERİLER
Ürünle ilgili bilgiler ve kullanıma
dair öneriler
Bu cihaz sadece evde ve ev ortamında kullanılmak
için tasarlanmıştır. Gastronomi işi amaçlı kullanılması
durumunda, garanti koşulları değişmektedir.
Cihaz, 4-37°C sıcaklığında ve %80 nem şartlarında
kullanılmak üzere tasarlanmıştır.
Üretimden dolayı, ilk kullanımdan önce cihaz buhar ve
koku çıkarabilir. Bu olay cihaz için normaldir. İlk birkaç
kullanımdan sonra geçecektir.
Teknik özellikler
Teknik özellikler ürün levhası üzerinde verilir.
Su tankı kapasitesi: maks. 1.4 lt
Güç kablosunun uzunluğu: 88 cm

4
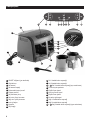
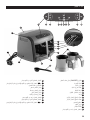
Cihaz parçaları
1
ON/OFF düğmesi (yan tarafında)
2
Güç kablosu
3
Su haznesi
4
Su haznesi kapağı
5
Dokunmatik kontrol paneli
6
Pişirme sensörü
7
Su püskürtme çıkışı
8
Sol ısıtıcı yüzey koruması
9
Sağ ısıtıcı yüzey koruması
10
Isıtıcı yüzeyler
11
Cezveler
12
Ölçü kaşığı
13
Sol 1 bardak kahve seçeneği
14
Sol 2 bardak kahve seçeneği
13
+
14
Sol 3 bardak kahve seçeneği (aynı anda basın)
15
Fincan boyutu ayarlama
16
Küçük ncan işareti
17
Orta boy ncan işareti
18
Büyük ncan işareti
19
Su seviye göstergesi
20
Sağ 1 bardak kahve seçeneği
21
Sağ 2 bardak kahve seçeneği
20
+
21
Sağ 3 bardak kahve seçeneği (aynı anda basın)
5
1
2
3
4
12
8
9
171613 211514 19 18 20
11
10
6
7
6
7

5
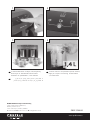
İlk kullanımdan önce
Cihazı ilk defa kullanmadan önce, bütün aksesuarlarını,
yumuşak deterjanlı sıcak suda yıkayın.
İlk kullanım esnasında, cezvelerin, su tankının ve kaşığın,
küçük miktarda sirke katkılı suda üç kere yıkanması tavsiye
edilir. Ardından, cihaz temiz suda durulanmalıdır.
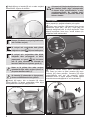
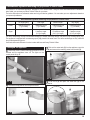
Tankı 3 kere doldurup yerine takın; tankın doğru takıldığından
emin olun.
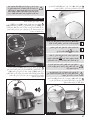
şek. 1
İlk kullanım esnasında iki taraftaki 3 ncan seçeneğini
kullanarak cezveler ile sadece su kaynatın. Kaynatılmış suyu
dökün, boş cezveleri tekrar yerleştirin. Bu işlemi üç kere aha
tekrar edin.
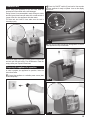
Cihazın kullanıma hazırlanması
Cihazınızı kullanıma hazırlamak için, aşağıdaki talimatları
yerine getirin:
1
Cihazı uygun bir güç kaynağına bağlayın (veriler ürün
etiketinde bulunmaktadır).
şek. 2
2
ON/OFF düğmesine (1) basıp, cihaz hazır olana kadar,
birkaç saniye bekleyin. Ekrandaki sembollerin ışığı yanacaktır.
şek. 3
3
Su haznesini (3) cihazdan ayırarak veya cihazda
bırakarak içine su koyun.
şek. 4
şek. 5

6
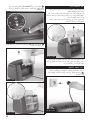
4
Kapağı (4) açıp, su haznesini (3), min. ve maks. seviyeleri
arasında temiz, soğuk su ile doldurun.
şek. 6
Hazneye (3) bakarak su seviyesini görebilirsiniz
(min. ve maks. seviyesi).
Su seviyesi min. seviyesinden daha yüksek
olduğunda su işareti (19) mavi renkle yanar.
Su seviyesi min. seviyesinden daha düşük
olduğunda cihaz çalışmayacak ve kahve
yapmayacak, su işareti (19) ise kırmızı
renk ile yanıp sönecektir. Bu durumda su
haznesine daha fazla su koymanız gerekir (3).
Hazne su ile dolmuş iken maks. seviyesi
aşılmamalıdır. Eğer maks. seviyesi aşılırsa, su
çıkışından damlama olabilir (7).
Su haznesini (3) çıkarmadan su koyuyorsanız,
cihaza su dökülmemesine özen gösterin.
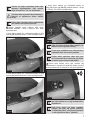
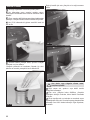
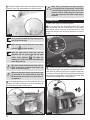
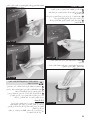
5
Kapağı (4) kapatıp, dolu su haznesini (3) cihazın
üzerine yerleştirin. Su tankını yerleştirdikten sonra, doğru
takıldığından emin olmak için aşağıya bastırın.
şek. 7
Su haznesinin (3) doğru takıldığından emin olun,
aksi takdirde pompa doğru çalışmayacaktır.
Su haznesi doğru yerleştirilmediyse, su akışı
gerçekleşemeyecektir. Bu durumda kahve
normalden daha az su içerecektir. Kahve tadı
fazla acı olacaktır.
Kahve yapma
Kahve yapmak için, aşağıdaki talimatları yerine getirin:
1
Fincan ayarı kontrolüne (15) basarak ncan boyunu
seçebilirsiniz (küçük (16) / orta (17) / büyük (18)). Her
seçeneğe bastığınızda sesli bir sinyal duyulacaktır. Cihaz
kapatılıp açıldığında, ncan boyu, sonraki kullanım için,
değiştirilene kadar hatırlanacaktır.
şek. 8
2
Sayfadaki tabloda tavsiye edilen miktarlarda, bir/
iki/üç ncan için kahve ve şekeri cezvelere (11) koyun.
Cezveleri (11) cihaza yerleştirin. Cezvelerin (11) doğru
yerleştirildiğinden emin olun (dik yerleştirilip, pişirme
haznesinin duvarı ile temas etmelidir. Cezveler pişirme
haznesinin duvarına değdiğinde “tık” sesi duyulacaktır.).
şek. 9

7
Cezveler (11) doğru yerleştirilene kadar cihaz
çalışmaya başlamayacaktır. Eğer cezveler
doğru yerleştirilirse, “tık” sesi duyulacaktır.
Cezvelere kahve koymadan cihazı kullanmayın.
Kahvesiz su kaynatmanız cihazın ömrünü
kısaltır.
Pişirme işlemi, parmağınızı ncan sembollerinden
geri çektikten sonra çalışmaya başlar.
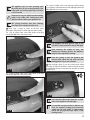
3
Yapmak istediğiniz kahve miktarına bağlı olarak,
dokunmatik paneldeki 1 ncan, 2 ncan ya da 3 ncan
seçeneğine basın.
1 ncan kahve yapmak için, dokunmatik panelin sol (13)
veya sağ (20) tarafında bulunan 1 ncan seçeneğine basın.
şek. 10
2 ncan kahve yapmak için, dokunmatik panelin sol (14)
veya sağ (21) tarafında bulunan 2 ncan seçeneğine basın.
şek. 11
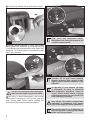
3 ncan kahve yapmak için, dokunmatik panelin sol
(13)+(14) veya/ve sağ (20)+(21) tarafında bulunan 1 ncan
ve 2 ncan (1+2 birlikte) seçeneğine basın.
şek. 12
Cihaz, bir seferde 6 ncan kahve yapabilir (sol
tarafta 3 ncan, sağ tarafta 3 ncan).
Fincan sayısı seçildikten sonra cihaz çalışmaya
başlamadan önce mavi renk ile yanacaktır.
Pişirme işlemi sonlanınca cihaz sesli uyarı
verir. Sonrasında ncan seçiminize göre ncan
sembolleri yanıp sönmeye başlayacaktır.
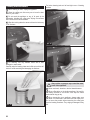
4
Pişirme işlemi bittikten sonra, eğer cezveleri (11)
kaldırmazsanız, (cezveler (11) kaldırılana kadar) ışık yanıp
sönmeye devam eder, 5 saniyede bir sesli sinyal gelecektir.
şek. 13
Aynı anda cihazın sol ve sağ tarafında kahve
yapabilirsiniz.
Farklı ncan boyları için kahve yapılabilir.
Örneğin, aynı anda sağ pişirme haznesine
“1 küçük ncan kahve” ve sol pişirme haznesinde
“3 adet büyük ncan kahve” yapılabilir.

8
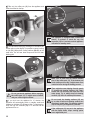
5
Cezveleri (11) cihazdan çıkartıp, kahveyi ncana koyun.
şek. 14
6
Ekranda bastığınız seçeneğe 3 saniye basılı tutarak
pişirme işlemini iptal edebilirsiniz. Aynı anda sağ (13) (14)
ve sol (20) (21) pişirme haznelerindeki pişirme işlemini iptal
edebilirsiniz. Üç sinyal duyulduktan sonra semboller pembe
renk ile yanıp sönecektir.
şek. 15
Cezveleri (11) boşaltmadan cihazı çalıştırmayın.
Kahve cezveden taşabilir veya çok sulu olabilir.
7
Eğer cihazı 10 dakika kullanmazsanız, cihaz otomatik
olarak bekleme moduna geçip, orta boy ncan işareti (17)
yanıp sönmeye başlar. Pişirme işlemine başlamak için,
ncan ayarına (15) 3 saniye basarak cihazı çalıştırın.
şek. 16
Cihaz, çocuk kilidi fonksiyonuna sahiptir.
Etkinleştirmek için, ncan ayarı kontrolüne (15)
3 saniye basmanız yeterlidir.
şek. 17
Cezvelerin (11) alt metal kısmını temizleyip
kurutmayı unutmayın. Eğer cezvenin altı kuru
değilse, pişirme sırasında istenmeyen sesler
çıkarabilir.
Su çıkışından (7) ısıtıcı yüzeylere (10) doğru
su damlayabilir. Bu durum, su pompasında
kalan damlalardan kaynaklanan, normal bir
süreçtir. Cİhazın ömrünü uzatmak ve pişirme
performansını korumak için ısıtıcı yüzeyleri (10)
ara ara temizlemeyi unutmayın.
Isıtıcı yüzeyler (10) tamamen kuruyana kadar
dokunmayın ve temizlemeyin. Isıtıcı yüzeyler
(10) çok sıcak olduğu için derinizi yakabilirsiniz.
Eğer cezveler sıcak bir sıvı ile doldurulup (11)
cihaz içine koyulursa, 3 ncan pişirme sembolü
pembe renk ile yanıp sönebilir.

9
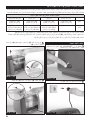
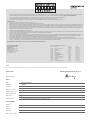
Türk kahvesi için tavsiye edilen ölçüler:
Bu ürün, Türk kahvesi yapan, otomatik bir cihazdır. Aşağıdaki tabloda bulunan ölçüleri takip ederek, ideal, damak zevkinize
uygun Türk kahvesi yapabilirsiniz.
Aşağıdaki talimatlar örnek değerler olup, sadece tavsiye olarak verilmiştir. Özel tercihinize göre farklı ölçüler kullanabilirsiniz.
Türk kahvesi için tavsiye edilen ölçüler
Şekersiz (sade) Az şekerli Orta şekerli Çok şekerli
Kahve 1 ölçü kaşığı (7 g kahve) 1 ölçü kaşığı (7 g kahve) 1 ölçü kaşığı (7 g kahve) 1 ölçü kaşığı (7 g kahve)
Şeker -
1 şeker küpü /
1 çay kaşığı şeker
(2-3 g şeker)
1,5 şeker küpü /
1,5 çay kaşığı şeker
(3-4,5 g şeker)
2 şeker küpü /
2 çay kaşığı şeker
(4,5-6 g şeker)
Yukarıdaki ölçüler, orta boy ncanlar ve sadece bir kişi (1 ncan seçeneği) içindir.
Cihaz, su tankında bulunan ölçü kaşığı (12) ile birlikte gelir. Yukarıdaki ölçüler, sadece üründen çıkan ölçü kaşığı ile birlikte geçerlidir.
Lezzetli, bol köpüklü Türk kahvesi yapmak için, taze kahve ve soğuk su kullanın.
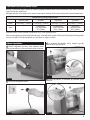
Cihazın kapatılması
1
ON/OFF düğmesine (1) basıp, cihaz kapatılana kadar
birkaç saniye bekleyin. Kontrol panelindeki ışıklar sönecektir.
şek. 18
2
Cihazı güç kaynağından çıkarın.
şek. 19
3
Su haznesini (3) cihazdan söküp, kapağını açın (4),
haznede kalan suyu (3) dökün.
şek. 20
4
Kapağı (4) kapatıp, su haznesini (3) cihazdaki yerine
yerleştirin.
şek. 21

10
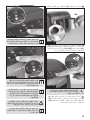
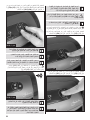
Temizlik ve bakım
1
Temizliğe başlamadan önce cihazı prizden çıkarın.
2
Her kullanımdan sonra cezveleri mutlaka yıkayın.
Yıkanmayan cezvelerdeki kahve kalıntıları kahvenizin tadını
bozabilir.
3
Cihazı, cezveler dahil hiçbir parçasını bulaşık makinesinde
yıkamayın. Yüzeylerin nemli bir bezle silinmesi tavsiye edilir.
4
Her 15-20 kullanımda bir pişirme sensörünü nemli bir
bez ile silin.
şek. 22
5
Temizlikte sadece yumuşak bezler, aşındırıcı olmayan
deterjanlar ve ılık su kullanın.
Yüzeylerin çizilmesini ve bozulmasını önlemek için ısıtıcı
plakaları ve cezveleri yumuşak bir bez ile dikkatli silin.
şek. 23
Daha iyi temizlik için ısıtıcı yüzeyinin sol ve sağ korumasını
sökün.
şek. 24
şek. 25
Sert bezler veya süngerler cihazın metal
parçalarını çizebilir.
6
Hiçbir zaman sert, aşındırıcı veya alkollü temizlik
deterjanları kullanmayın.
7
Eğer ısıtıcı yüzeylere kahve dökülürse, yüzeylerin
soğumasını bekleyin. Ardından, kahve lekeleri kurumadan
önce silin.
8
Cihazı taşıdığınızda, su tankında ve cezvelerde suyun
kalmadığından emin olun. Cezveleri kaynama haznelerinden
sökmeden önce ürünü hareket ettirmeyin. Eğer düşerlerse,
bozulabilir.

11
Isıtıcı yüzeyler (10) ve pişirme sensörünün (6)
penceresi periyodik olarak nemli bir bez ile
temizlenmelidir.
Elden çıkartılması
Ambalajı çevre dostu bir şekilde elden çıkarın.
Bu ürün 2012/19/EU sayılı Atık Elektrikli
ve Elektronik Ekipmanlar Direkti’ne göre
etiketlenmiştir. Ulusal yönetmelik (Türkiye
Resmi Gazetesi No:28300 Tarih: 22.05.2012)
Avrupa genelinde geçerli olan, ürünlerin geri
toplanması ve geri dönüştürülmesi ile ilgili yapıyı belirtir.
Lütfen cihazı aldığınız mağazadan güncel imha etme yolları
hakkında bilgi alınız.
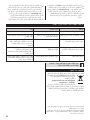
Teknik servisi çağırmadan önce bunu yapmanız gerekir
SORUN OLASI NEDENİ ÇÖZÜMÜ
Fincanda su yok. Su haznesi seviyesini kontrol edin. Su haznesini 3 kere çıkarıp takın.
Fincan sembolüne basıldığında
3 sinyal duyulur.
Su haznesinde su yok veya su seviyesi
minimum seviyeden düşük.
Su haznesini minimum ve maksimum
seviye arasında soğuk su ile doldurun.
Pişirme sırasında ncan sembolleri
kırmızı renk ile yanıp sönüyor ve
3 sinyal duyuluyor.
Cihaz aşırı ısınmış. Cihazı kapatıp soğuyana kadar bekleyin.
Soğuduktan sonra Isıtıcı yüzeyi
temizleyin. Cezvenin iç ve dış alt kısmını
(metal parçaları) temizleyin.
Pişirme sırasında ncan sembolleri
pembe renk ile yanıp sönüyor ve
3 sinyal duyuluyor.
Pişirme sensörü kirli veya karışımdaki
kahve miktarı fazla düşüktür.
Pişirme sensörünü nemli bir bez ile
temizleyip, daha fazla kahve koyun.
Eğer arıza devam ederse, çağrı merkezini
arayın.
Kahve taştı. Pişirme sensörü ve ısıtıcı yüzeyler
kirlenmiş.
Pişirme sensörünü ve ısıtıcı yüzeyleri
nemli bir bez ile temizleyin. Eğer arıza
devam ederse, çağrı merkezini arayın.
Üreticiler cihazın amacına uygun olmayan veya uygunsuz
kullanımından kaynaklanan zararlardan sorumlu değildir.
Üretici yasalara, normlara, direktiere, ya da yapısal nedenlere, ticari,
estetik, ve diğerlerine uyum amacıyla, önceden haber vermeden,
herhangi bir zamanda ürün değiştirme hakkını saklı tutar.
KİREÇ TEMİZLEME
Cihazınızda arıtılmış su veya doğal kaynak suyu kullanmanızı
tavsiye ederiz. Cihazınızda oluşan kirecin periyodik olarak
temizlenmesi gerekir. Kullanım sıklığına bağlı olarak, cihazın
üzerindeki kirecin 3-6 ayda bir temizlenmesini tavsiye ederiz.
Cihazınızda oluşan kireci temizlemek için:
Cihazınızın su tankına 2 su bardağı (360 ml.) sirke veya
kahve makineleri için üretilen kireç çözücü tablet veya
sıvı ile doldurun.
Kalan kısmını max. seviyeye kadar su ile doldurun.
(Kahve veya şeker ilave etmeden) Sadece tanktaki
karışım ile 3 küçük ncan seçeneğinde çalıştırın, işlem
bittikten sonra cezvedeki kireçli suyu dökün.
Bu işlemi üçer defa sağ ve sol bölmeler için tekrarlayın.
Daha sonra su tankındaki su-sirke karışımını dökerek
tankı duruladıktan sonra sadece temiz su ile doldurun ve
her iki bölmede 3 küçük ncan seçerek ikişer defa daha
su kaynatın.
Son olarak cezvelerinizi ve su tankını durulayın.

12
Dear Customer!
Congratulations on your choice of our appliance, and
welcome among the users of PROFiLO products.
In order to achieve best possible results we recommend
using exclusively original PROFiLO accessories. They have
been specially designed for this product.
Please read this user manual carefully. Pay special
attention to important safety instructions. Keep this user
manual for future reference.
Operational safety guidelines
DANGER! / WARNING!
Health hazard
This appliance can be used by
children aged from 8 years and
above if they have been given
supervision or instruction concerning
use of the appliance in a safe way
and if they understand the hazards
involved. Cleaning and user
maintenance shall not be made
by children unless they are older
than 8 and supervised. Keep the
appliance and its cord out of reach of
children aged less than 8 years.
Appliances can be used by persons
with reduced physical, sensory
or mental capabilities or lack of
experience and knowledge if they
have been given supervision or
instruction concerning use of
the appliance in a safe way and
understand the hazards involved.
Children shall not play with the
appliance.
Be careful when using the appliance
around children.
Do not operate the appliance if its
power cord, housing or the handle
are damaged.
If the power cord is damaged, in
order to avoid a hazard it should be
replaced by the manufacturer or by
a specialised service centre or by
a qualied person.
The appliance can only be repaired
by qualied service personnel.
Improper servicing may cause
a serious hazard to the user. In case
of defects please contact a qualied
service center.
Before cleaning the appliance, and
in case of any problems during coffee
making, always turn off the appliance
and pull the plug out of the socket rst.
Leave it to cool down before putting
it away or removing pieces and
before cleaning the appliance.
Do not place your hands underneath
steam, hot water or poured coffee,
as it may lead to scalds and burns.
Do not wet or immerse the power
cord plug in water.
Do not operate the appliance with
the cable still coiled.
Do not connect the plug into the
outlet with wet hands.
Do not let the cable hang over the
edge of the table or work-top, nor let
it come into contact with hot surfaces.
Do not drink the coffee directly from
the coffee pots.
Always hold the coffee pots from
their handles. Do not touch to any
surfaces of coffee pots when it is hot.
Do not touch the metal parts of the
coffee pots and the surface of the
heater when it is hot.
Do not immerse the appliance in
water or any other liquid.
Only use the appliance indoors at
room temperature and up to 2000 m
above sea level.
EN

13
CAUTION!
Not observance can result in
damage to possessions
Always place the appliance on a stable, at surface.
The water tank should be lled with clean and cold
water only. Do not go over the maximum capacity of
the water tank.
Do not put hot water into the water tank.
Do not allow the power cord to touch any hot parts of
the appliance.
Always turn off the appliance (by means of the ON/OFF
switch) before plugging it in or out. You should not
unplug the appliance by pulling the power cable – grab
only the plug instead.
If the appliance is not used for a longer time or is going
to be cleaned, always remember to turn it off and
unplug it.
Do not use an extension cord with the appliance,
unless it is checked by a qualied technician or service
staff member.
The appliance should be plugged into a power socket
with alternating current equipped with a safety pin, and
voltage compatible with the one given on the rating
plate of the appliance.
The appliance is not designed to work with exterior
time switches or separate remote control systems.
Do not place the appliance on hot surfaces or near hot
objects.
Do not use different coffee pots than original one.
Never scratch heating surface and bottom (metalic
part) of the coffee pots with wire wool.
Do not wash the water tank and coffee pots in
dishwasher.
Keep your appliance away from steam sources and try
not to use it in steamy environments.
Never put any other liquid than the water in the water
tank (no milk).
Do not use the coffee pots on any other heating
surfaces (stove etc.).
Do not put anything into the coffee pots other than
coffee and sugar; water lls into the coffee pots
automatically.
SUGGESTION
Information on the product and
suggestions for its use
This appliance is intended for domestic use only.
In case it is used for gastronomic business purposes,
warranty terms and conditions change.
The appliance is designed to work in 4-37°C 80%
relative humidity.
Technical data
The technical data is given on the rating plate of the
appliance.
Water tank capacity: max 1.4 l
Lenght of the supply cord: 88 cm
Due the production technology applied, your appliance
might emit steam and odor at the rst use. This is
normal for your appliance. It will recover after the rst
few uses.

14
Appliance parts
1
ON/OFF switch (on the side)
2
Supply cord
3
Water tank
4
Water tank lid
5
Control panel
6
Cooking detection sensor
7
Nozzle
8
Left cover of heating surface
9
Right cover of heating surface
10
Heating surfaces
11
Coffee pots
12
Measuring spoon
13
Left 1cup coffee option
14
Left 2cups coffee option
13
+
14
Left 3cups coffee option (touching at the same time)
15
Cup size controller
16
Small cup indicator
17
Medium cup indicator
18
Large cup indicator
19
Water (level) indicator
20
Right 1cup coffee option
21
Right 2cups coffee option
20
+
21
Right 3cups coffee option (touching at the same
time)
5
1
2
3
4
12
8
9
171613 211514 19 18 20
11
10
6
7
6
7

15
Before rst use
Before using your appliance for the rst time, wash all
accessories in warm water with a mild detergent.
During rst use it is recommended to wash coffee pots, water
tank and spoon three times with water with a small amount of
vinegar. After this, rinse appliance with clean water.
Fill water tank and insert 3 times make sure the tank is
inserted properly.
pic. 1
For the rst usage touch 3cups cooking option on both sides
and wait until the end boiling. Pour boiled water. Place the
empty coffee pots. Repeat it three times.
Preparing the appliance for operation
In order to prepare your appliance for operation, follow the
instructions below.
1
Connect the appliance to a suitable power source (data
on the nameplate).
pic. 2
2
Press the ON/OFF switch (1) and wait a few seconds
until the appliance is ready to operate. Icons on the display
will turn on.
pic. 3
3
Take out the water tank (3) from the appliance or leave it
in the appliance and pour with water.
pic. 4
pic. 5

16
4
Open the lid (4) and ll the water tank (3) with appropriate
amount of fresh, cold water between min and max levels.
pic. 6
You can check the water level by looking on the
tank (3) (min max level).
When the water level is above min. level, water
indicator (19) lights up blue.
When the water level is under min. level the
appliance will not operate and will not brew
coffee, water indicator (19) lights up
blinking red. In this case, you must add water
to the water tank (3).
Max level should not be passed when water is
lled. If max level is passed water drops can
come out of the nozzle (7).
While pouring water directly into the water tank
(3) mounted on the device (without removing
the water tank) be careful not to spill water on
the appliance.
5
Close the lid (4) and place the lled water tank (3) on the
appliance. After placing the water tank correctly please push
the tank down to be sure it tted properly.
pic. 7
Water tank (3) should be inserted correctly if
not, pump will not work properly. If water tank
is not tted well, water ow cannot occur. This
situation causes coffee mixture to have less
water than expected. The coffee’s taste will be
too bitter.
Brewing coee
To brew coffee, follow the instructions below.
1
You can select cup size (small (16) / medium (17) / large
(18)) by pressing cup size controller (15). For each press,
there will be one bip. Cup size will be memorized for next
usage until changed, even though the appliance is turned off
and on.
pic. 8
2
Put coffee and sugar into the coffee pots (11) for one/two/
three cups according to the amounts recommended in below
table. Place the coffee pots (11) into the appliance. Make sure
to insert the coffee pots (11) correctly (Straight and till they hit
the wall of the cooking station. You will hear click sound when
coffee pots hits the wall of the cooking station.).
pic. 9

17
The appliance will not start operating until
the coffee pots (11) are correctly placed. If the
coffee pots are correctly placed you will hear
a “click” sound.
Please do not use your appliance without adding
coffee in the coffee pots. Cooking just water
(without coffee) reduces your appliance life.
The cooking functions start after releasing
your nger from cooking function icons.
3
Touch 1cup or 2cups or 3cups on the front panel
according to the quantity of coffee cups you wish to make.
For 1 cup of coffee, touch 1cup coffee option on left (13)
or/and right (20) side of the control panel.
pic. 10
For 2 cups of coffee, touch 2cup coffee option on left (14)
or/and right (21) side of the control panel.
pic. 11
For 3 cups of coffee, touch 1cup and 2cups coffee options
(1+2 together) at the same time on left (13)+(14) or/and right
(20)+(21) side of the control panel.
pic. 12
The appliance can brew up to 6 cups in one
operation (3 cups on the left, 3 cups on the right).
Upon choosing the number of cups, and
touching the cooking options, the appliance
will give a blue light before starting.
Once the cooking is done, the appliance will
emit an audio signal and cup icons will start
blinking based on your cup selection.
4
After cooking is done, if you do not pick up the coffee
pots (11), the light will continue to blink at intervals and will
give audio signal every 5 seconds (until you take the coffee
pots (11) out).
pic. 13
You can brew coffee at the same time on both
sides of the appliance (left and right).
It is possible to prepare coffee for different cup
sizes. For example, cooking at the same time
“small cup size 1cup coffee” in right cooking
station and “big cup size 3cups coffee” in left
cooking station.

18
5
Take out the coffee pots (11) from the appliance and
serve the coffee into the cup.
pic. 14
6
You can cancel cooking by touching for 3 seconds to the
chosen option on the display. It is possible to cancel cooking
at right (13) (14) and left cooking stations (20) (21) at the
same time. You will hear three beeps and icons will start
blinking pink.
pic. 15
Do not operate the appliance before emptying
the coffee pots (11). It might cause overow
and your coffee might be diluted.
7
If you don’t use the appliance for 10 minutes, the
appliance will automatically switch to standby mode and
medium cup indicator (17) will start to blink. To start brewing,
touch the cup size controller (15) for 3 seconds and the
appliance will be on.
pic. 16
The appliance is equipped with a child lock
feature. To activate it, touch the cup size
controller (15) for 3 seconds, and the appliance
will switch to standby mode.
pic. 17
Make sure to clean and dry bottom metallic
part of the coffee pots (11). If the bottom part
of the coffee pot is not dry, it might cause some
undesired noise during the heating process.
There might be some dripping from the nozzle
(7) towards the heating surfaces (10). That’s
normal and it is caused by the drops left in the
water pump. Try to always keep the heating
surfaces (10) clean for a better performance.
Do not touch the heating surfaces (10) nor
try to clean it before the heating surfaces are
completely cooled down. The heating surfaces
(10) are very hot, you might burn your skin.
If the coffee pots (11) are put in the appliance
with hot liquid inside, 3cups cooking option
icons might blink pink.

19
Recommended ingredient measurings for preparation of Turkish Coee
This product is an automated appliance, designed to cook Turkish Coffee. Using the sizes and measurements indicated on
below table, you can brew your ideal, Turkish Coffee for your taste.
The below instructions are reference values and only provided as guidance. You can make your own adjustments based on
your personal preference.
Recommended ingredient measurings for preparation of Turkish Coffee
No sugar (plain) Little sugar Medium sugar Very sugary
Coffee
1 measuring spoon
(7 g of coffee)
1 measuring spoon
(7 g of coffee)
1 measuring spoon
(7 g of coffee)
1 measuring spoon
(7 g of coffee)
Sugar -
1 sugar cube /
1 teaspoon sugar
(2-3 g of sugar)
1.5 sugar cubes /
1.5 teaspoon sugar
(3-4,5 g of sugar)
2 sugar cubes /
2 teaspoon sugar
(4,5-6 g of sugar)
The above measurings are the recommended dosages for medium sized cups and for one person (1cup cooking option) only.
The appliance is equipped with a measuring spoon (12) placed in the water tank. The above measurings are only valid with
the provided measuring spoon.
Use fresh coffee and cold water in order to make delicious and foamy Turkish Coffee.
Turning o the appliance
1
Presss the ON/OFF switch button (1) and wait for a few
seconds until the appliance turns off. The lights on the
control panel will go off.
pic. 18
2
Disconnect the appliance from the power source.
pic. 19
3
Take out the water tank (3) from the appliance, open the
lid (4) and remove the remaining water from the tank (3).
pic. 20
4
Close the lid (4) and place the water tank (3) on the
appliance.
pic. 21

20
Cleaning and maintenance
1
Before starting to clean, unplug the appliance.
2
Clean the coffee pots after every use to have the best
taste for your coffee.
3
Do not wash the appliance or any of its parts in the
dishwasher, including the coffee pots. Wiping the surfaces
with a moist cloth is recommended.
4
Wipe the cooking detection sensor with moist cloth every
15-20 services.
pic. 22
5
For cleaning, use only delicate cloths with a mild
detergent or warm water.
Carefully wipe the heating plates and coffee pots with a soft
clothe to avoid scratching and damaging the surfaces.
pic. 23
For better cleaning take out left and right cover of heating
surface.
pic. 24
pic. 25
Sharp cloths or sponges may scratch the metal
parts of the appliance.
6
Never use harsh, abrasive or alcohol-based cleaners.
7
When coffee drips on the heating surfaces, rst wait for
the heating surfaces to cool down. Then wipe the coffee
stains before they get dry.
8
When transporting your appliance, always make sure
that there is no water left in the water tank and coffee pots.
Do not move the product without removing the coffee pots
from the brewing chambers. They might get damaged if they
fall.
Sayfa yükleniyor...
Sayfa yükleniyor...
Sayfa yükleniyor...
Sayfa yükleniyor...
Sayfa yükleniyor...
Sayfa yükleniyor...
Sayfa yükleniyor...
Sayfa yükleniyor...
Sayfa yükleniyor...
Sayfa yükleniyor...
Sayfa yükleniyor...
Sayfa yükleniyor...
Sayfa yükleniyor...
Sayfa yükleniyor...
-
 1
1
-
 2
2
-
 3
3
-
 4
4
-
 5
5
-
 6
6
-
 7
7
-
 8
8
-
 9
9
-
 10
10
-
 11
11
-
 12
12
-
 13
13
-
 14
14
-
 15
15
-
 16
16
-
 17
17
-
 18
18
-
 19
19
-
 20
20
-
 21
21
-
 22
22
-
 23
23
-
 24
24
-
 25
25
-
 26
26
-
 27
27
-
 28
28
-
 29
29
-
 30
30
-
 31
31
-
 32
32
-
 33
33
-
 34
34


PROFILO PKM3009 Kullanım kılavuzu
- Kategori
- Kahve yapanlar
- Tip
- Kullanım kılavuzu
diğer dillerde
- English: PROFILO PKM3009 User manual
İlgili makaleler
Diğer belgeler
-
Bosch TKM3003 Kullanım kılavuzu
-
-
-
Beko TKM8961A Kullanım kılavuzu
-
Arnica Köpüklü Stil User Manuals
-
Fakir SM El kitabı
-
-
-
Fakir Babila Kullanım kılavuzu
-
Arzum BREWTIME DELUX AR 3081 Kullanım kılavuzu