Makita DHW080 Kullanım kılavuzu
- Kategori
- Yüksek basınçlı temizleyiciler
- Tip
- Kullanım kılavuzu

DHW080
EN Cordless High Pressure
Washer INSTRUCTION MANUAL 10
FR Nettoyeur Haute Pression à
Batterie MANUEL D’INSTRUCTIONS 23
DE Akku Hochdruckreiniger BETRIEBSANLEITUNG 38
IT Idropulitrice ad alta pressione
a batteria ISTRUZIONI PER L’USO 53
NL Accuhogedrukreiniger GEBRUIKSAANWIJZING 68
ES Hidrolavadora Inalámbrica de
Alta Presión
MANUAL DE
INSTRUCCIONES 82
PT Lavadora de Alta Pressão a
Bateria MANUAL DE INSTRUÇÕES 96
DA Batteridrevet højtryksrenser BRUGSANVISNING 110
EL
123
TR
KULLANMA KILAVUZU 137

1
2
Fig.1
1
2
3
Fig.2
1
2
Fig.3
1 2 1
Fig.4
1
2
3
1122
Fig.5
Fig.6
Fig.7
3
2
1
Fig.8
2

1 2
3
4 5 6
8
7
Fig.9
1
Fig.10
1
Fig.11
1
Fig.12
1
2
Fig.13
1
2
3
4
Fig.14
3

4
3
1
2
Fig.15
2
1
3
Fig.16
1
Fig.17
1
2
Fig.18
1
2
Fig.19
1
2
3
Fig.20
4

12
3
Fig.21
1
2
3
Fig.22
2
1
3
Fig.23
1
2
Fig.24
1
Fig.25
1
2
2
Fig.26
12
Fig.27
5

Fig.28
1
2
Fig.29
1
2
3
1122
Fig.30
1
Fig.31
Fig.32
Fig.33
Fig.34
1
2
Fig.35
6

1
2
2
3
Fig.36
1
Fig.37
123
Fig.38
1
2
Fig.39
1
23
Fig.40
1
23456
7
8
9
Fig.41
Fig.42
Fig.43
7

Fig.44
Fig.45
Fig.46
Fig.47
Fig.48
Fig.49
Fig.50
Fig.51
8

2 3
1
Fig.52
Fig.53
Fig.54
9

10 ENGLISH
ENGLISH (Original instructions)
WARNING
• Machines shall not be used by children. Children should be
supervised to ensure that they do not play with the machine.
• This machine is not intended for use by persons (including chil-
dren) with reduced physical, sensory, or mental capabilities, or
lack of experience and knowledge.
•
This machine has been designed for use with the cleaning agent sup-
plied or recommended by the manufacturer. The use of other cleaning
• During use of high pressure cleaners, aerosols may be formed.
Inhalation of aerosols can be hazardous to health.
• Depending on the application, shielded nozzles can be used
for high pressure cleaning, which will reduce the emission of
hydrous aerosols dramatically. However, not all applications
allow the use of such a device. If shielded nozzles are not appli-
cable for the protection against aerosols, a respiratory mask of
class FFP 2 or equivalent may be needed, depending on the
cleaning environment.
• The employer shall perform a risk assessment in order to spec-
ify the necessary protective measures regarding aerosols,
depending on the surface to be cleaned and its environment.
Respiratory masks of class FFP 2, an equivalent or higher are
suitable for the protection against hydrous aerosols.
•
High pressure jets can be dangerous if subject to misuse. The jet must
not be directed at persons, live electrical equipment or the machine itself.
• Do not use the machine within range of persons unless they
wear protective clothing.
• Do not direct the jet against yourself or others in order to clean
clothes or foot-wear.
•
• High pressure cleaners shall not be used by children or
untrained personnel.
•
recommended by the manufacturer.

11 ENGLISH
• To ensure machine safety, use only original spare parts from the
manufacturer or approved by the manufacturer.
•
are removed before carrying out any work on the tool.
• Do not use the machine if important parts of the machine are
damaged, e.g. safety devices, high pressure hoses, trigger gun.
• Always remove the battery cartridges when leaving the machine
unattended.
•
Comply with the requirements of the local water supply company.
• For European countries:
According to EN12729 (BA), the appliance can also be con-
valve with drain facility is installed in the supply hose.
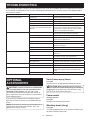
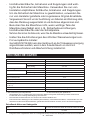
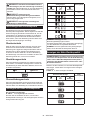
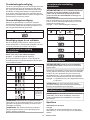
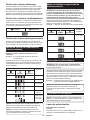
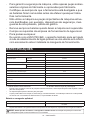
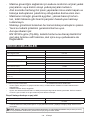
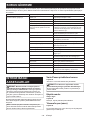
SPECIFICATIONS
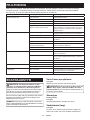
Model: DHW080
Max. feed volume *1 6.3 L/min
*2 High mode 5.5 L/min
Low mode 4.0 L/min
Max. permissible pressure 8.0 MPa
Working pressure *2 High mode 5.5 MPa
Low mode 3.0 MPa
Max. feed pressure 1.0 MPa
Max. feed temperature 40 °C
Max. suction height 1 m
Rated voltage D.C. 36 V
Dimensions
(L x W x H)
438 mm x 218 mm x 269 mm
Weight 7.1 kg - 7.7 kg
Water protection IPX5
*1 : When using the washing brush. *2 : When using the spray lance.
without notice.
-
est combination, according to EPTA-Procedure 01/2014, are shown in the table.
Applicable battery cartridge and charger
Battery cartridge BL1815N / BL1820B / BL1830B / BL1840B / BL1850B / BL1860B
Charger DC18RC / DC18RD / DC18RE / DC18SD / DC18SE / DC18SF /
DC18SH
• Some of the battery cartridges and chargers listed above may not be available depending on your region of
residence.
WARNING: Only use the battery cartridges and chargers listed above. Use of any other battery cartridges

12 ENGLISH
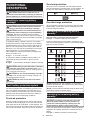
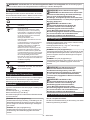
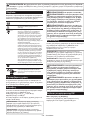
Symbols
The followings show the symbols which may be used
for the equipment. Be sure that you understand their
meaning before use.
Read the instruction manual.
Take particular care and attention.
Ni-MH
Li-ion
Only for EU countries
Due to the presence of hazardous com-
ponents in the equipment, waste electrical
and electronic equipment, accumulators
and batteries may have a negative impact
on the environment and human health.
Do not dispose of electrical and electronic
appliances or batteries with household
waste!
In accordance with the European Directive
on waste electrical and electronic equip-
ment and on accumulators and batteries
and waste accumulators and batteries,
as well as their adaptation to national law,
waste electrical equipment, batteries and
accumulators should be stored separately
and delivered to a separate collection point
for municipal waste, operating in accor-
dance with the regulations on environmen-
tal protection.
This is indicated by the symbol of the
crossed-out wheeled bin placed on the
equipment.
Do not connect to a potable water faucet.
Do not direct the jet at people including
yourself, animals, and live electrical
equipments.
Intended use
This tool is intended for cleaning stubborn dirt by using
water jet. This tool is intended for household use.
Noise
The typical A-weighted noise level determined accord-
ing to EN60335-2-79:
Sound pressure level (LpA) : 70.9 dB(A)
Uncertainty (K) : 3.6 dB(A)
The noise level under working may exceed 80 dB (A).
NOTE: The declared noise emission value(s) has
been measured in accordance with a standard test
method and may be used for comparing one tool with
another.
NOTE: The declared noise emission value(s)
may also be used in a preliminary assessment of
exposure.
WARNING: Wear ear protection.
WARNING: The noise emission during actual
value(s) depending on the ways in which the
tool is used especially what kind of workpiece is
processed.
WARNING: Be sure to identify safety mea-
sures to protect the operator that are based on an
estimation of exposure in the actual conditions of
use (taking account of all parts of the operating
cycle such as the times when the tool is switched
trigger time).
Vibration
The vibration total value (tri-axial vector sum) deter-
mined according to EN60335-2-79:
Vibration emission (ah) : 2.5 m/s2 or less
Uncertainty (K) : 1.5 m/s2
NOTE: The declared vibration total value(s) has been
measured in accordance with a standard test method
and may be used for comparing one tool with another.
NOTE: The declared vibration total value(s) may also
be used in a preliminary assessment of exposure.
WARNING: The vibration emission during
declared value(s) depending on the ways in which
the tool is used especially what kind of workpiece
is processed.
WARNING: Be sure to identify safety mea-
sures to protect the operator that are based on an
estimation of exposure in the actual conditions of
use (taking account of all parts of the operating
cycle such as the times when the tool is switched
trigger time).
EC Declaration of Conformity
For European countries only
The EC declaration of conformity is included as Annex A
to this instruction manual.
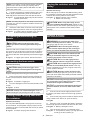
WARNINGS
WARNING: Read all safety warnings and
all instructions. Failure to follow the warnings and
serious injury.
Save all warnings and instruc-
tions for future reference.
WARNING – When using this product, basic pre-
cautions should always be followed, including the
following:

13 ENGLISH
Work area safety
1. Keep operating area clear of all persons.
2.
Do not overreach or stand on unstable supports.
Keep good footing and balance at all times.
3. Always place the high pressure washer body
on a level and stable surface. Avoid areas
where the ejected water will run or pool.
4. Before cleaning, check the surroundings and
objects to be cleaned. High pressure jets can
scrape away paint or other surface treatments
including toxic chemicals. Take the preventive
measures if necessary.
5. Be careful not to trip over by the hose of the
high pressure washer. Always be aware of the
6.
During use, a small amount of water will come
out from the bottom of the high pressure washer.
Avoid locating the high pressure washer in the
areas where you don't want to wet.
Personal safety
1. To protect against the jet and objects by the
jet, operators should wear appropriate cloth-
ing such as safety boots, safety gloves, safety
helmets with visors, hearing protection, etc.
2. Do not use the high pressure washer within
range of persons unless they wear protective
clothing.
3. To reduce the risk of injury, close supervision
is necessary when the product is used near
children.
4. If connection is made to a potable water sys-
tem, the system shall be protected against
5. -
venter is considered to be non-potable.
Electrical safety
1. Never touch battery cartridges with wet hands.
2.
Do not use the machine if the important parts of
the machine are damaged, e.g. safety devices,
high pressure hoses, or the trigger gun.
Power tool use and care
1. Read all the instructions before using the
product.
2. Know how to stop the high pressure washer
and bleed pressures quickly. Be thoroughly
familiar with the controls.
3. High pressure jets can be dangerous if mis-
used. The jet must not be directed at people,
live electrical equipment, or the machine itself.
4. This machine is not intended for use by per-
sons (including children) with reduced physi-
cal, sensory, or mental capabilities, or lack of
experience and knowledge.
5. Children should be supervised to ensure that
they do not play with the appliance.
6.
This may cause an explosion, intoxication, or
damage to the machine.
7. Do not direct the jet against yourself or others
in order to clean clothes or foot-wear.
8.
are important for the safety of the machine.
-
mended by the manufacturer.
9. Follow the instructions when changing
accessories.
10. Keep handles dry, clean, and free of oil or
grease.
11. Stay alert – watch what you are doing.
12. Do not operate the product when fatigued or
13. Do not run the high pressure washer without
water for longer than one minute. It will dam-
age the motor, resulting in malfunction.
14.
water mains when leaving the high pressure
washer unattended.
15. Be wary of the kickback. The trigger gun
recoils when the high pressure jet is ejected
prevent accidental injuries.
16. Check for damaged or worn parts before use.
Also make sure that the hose is properly con-
nected and there is no leakage during oper-
ation. Operating the machine with functional
defects may cause an accident.
17. This machine has been designed for use with
the cleaning agent supplied or recommended
by the manufacturer. The use of other cleaning
safety of the machine.
18. Do not pull the hose to move the high pressure
washer body. This will damage the hose and
connecting parts and result in a short circuit
or functional defects.
19. Do not put heavy objects on the hose or let
vehicles drive over it.
20. Always discharge the residual pressure in the
trigger gun before disconnecting the hose.
21. When connecting the hose to the water mains,
observe the instructions of your local water-
works department or company.
22. If the high pressure washer is dropped or hits
against an hard object, be sure to check for
damage and crack. Using the high pressure
cause electric shock, which result in personal
injury.
23. During use of high pressure cleaners, aerosols
may be formed. Inhalation of aerosols can be
hazardous to health.
24. Depending on the application, shielded noz-
zles can be used for high pressure cleaning,
which will reduce the emission of hydrous
aerosols dramatically. However, not all appli-
cations allow the use of such a device. If
shielded nozzles are not applicable for the pro-
tection against aerosols, a respiratory mask
of class FFP 2 or equivalent may be needed,
depending on the cleaning environment.
25. The employer shall perform a risk assessment
in order to specify the necessary protective
measures regarding aerosols, depending on
the surface to be cleaned and its environment.
Respiratory masks of class FFP 2, an equiv-
alent or higher are suitable for the protection
against hydrous aerosols.

14 ENGLISH
26. Prevent unintentional starting. Ensure the
to battery pack, picking up or carrying the
appliance.
on the switch or energizing appliance that have
the switch on invites accidents.
27. Disconnect the battery pack from the appli-
ance before making any adjustments, chang-
ing accessories, or storing appliance. Such
preventive safety measures reduce the risk of
starting the appliance accidentally.
28. Do not modify or attempt to repair the appli-
ance or the battery pack except as indicated in
the instructions for use and care.
29. WARNING – Risk of Injection or Injury– Do Not
Direct Discharge Stream At Persons.
Battery tool use and care
1.
the manufacturer. A charger that is suitable for
when used with another battery pack.
2. -
nated battery packs. Use of any other battery
3. When battery pack is not in use, keep it away
from other metal objects, like paper clips,
coins, keys, nails, screws or other small metal
objects, that can make a connection from one
terminal to another. Shorting the battery termi-
4. Under abusive conditions, liquid may be
ejected from the battery; avoid contact. If con-
liquid contacts eyes, additionally seek medical
help. Liquid ejected from the battery may cause
irritation or burns.
5. Do not use a battery pack or tool that is dam-
may exhibit unpredictable behaviour resulting in
6.
excessive temperature.-
perature above 130 °C may cause explosion.
7. Follow all charging instructions and do not
charge the battery pack or tool outside the
-
tions. Charging improperly or at temperatures
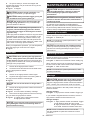
Service
1.
in the manual.
2. To ensure machine safety, use only original
spare parts from the manufacturer or approved
by the manufacturer.
3. Have your high pressure washer serviced by
-
cal replacement parts. This will ensure that
the safety of the high pressure washer is
maintained.
4. In case of breakdown or malfunction of the
high pressure washer, immediately switch
Contact your local dealer or service center.
Additional safety warnings
1. Comply with the requirements of the local
water supply company.
2. Do not use the tool when there is a risk of
lightning.
3. When you use the tool on muddy ground, wet
slope, or slippery place, pay attention to your
footing.
4. Avoid working in poor environment where
increased user fatigue is expected.
5. Do not replace the battery in the rain.
6. Do not submerge the tool into a puddle.
7. Do not leave the tool unattended outdoors in
the rain.
8. When wet leaves or dirt adhere to the suc-
tion mouth (ventilation window) due to rain,
remove them.
9. Do not wash the tool with high pressure water.
10. When washing the tool, do not let water enter
the electrical mechanism such as battery,
motor, and terminals.
11. When storing the tool, avoid direct sunlight
and rain, and store it in a place where it does
not get hot or humid.
12. Perform inspection or maintenance in a place
where rain can be avoided.
13. After using the tool, remove the adhered dirt
and dry the tool completely before storing.
Depending on the season or the area, there is a
risk of malfunction due to freezing.
14. Do not wet the terminal of battery with liquid
such as water, or submerge the battery. Do not
leave the battery in the rain, nor charge, use,
or store the battery in a damp or wet place. If
the terminal gets wet or liquid enters inside of bat-
tery, the battery may be short circuited and there is
15. After removing the battery from the tool or
charger, be sure to attach the battery cover to
the battery and store it in a dry place.
16. Do not replace the battery with wet hands.
Additional safety warnings
1. Comply with the requirements of the local
water supply company.
2. Do not use a corded power supply such as bat-
tery adapter or portable power pack with this
appliance. The cable of such power supply may
hinder the operation and result in personal injury.
SAVE THESE INSTRUCTIONS.
WARNING: DO NOT let comfort or familiarity
with product (gained from repeated use) replace
strict adherence to safety rules for the subject
product.
MISUSE or failure to follow the safety rules stated
in this instruction manual may cause serious
personal injury.

15 ENGLISH
Important safety instructions for
battery cartridge
1. Before using battery cartridge, read all instruc-
tions and cautionary markings on (1) battery
charger, (2) battery, and (3) product using
battery.
2. Do not disassemble or tamper with the battery
cartridge.
or explosion.
3. If operating time has become excessively
shorter, stop operating immediately. It may
result in a risk of overheating, possible burns
and even an explosion.
4. If electrolyte gets into your eyes, rinse them
out with clear water and seek medical atten-
tion right away. It may result in loss of your
eyesight.
5. Do not short the battery cartridge:
(1) Do not touch the terminals with any con-
ductive material.
(2) Avoid storing battery cartridge in a con-
tainer with other metal objects such as
nails, coins, etc.
(3) Do not expose battery cartridge to water
or rain.
A battery short can cause a large current
breakdown.
6. Do not store and use the tool and battery car-
tridge in locations where the temperature may
reach or exceed 50 °C (122 °F).
7. Do not incinerate the battery cartridge even if
it is severely damaged or is completely worn
8. Do not nail, cut, crush, throw, drop the battery
cartridge, or hit against a hard object to the
battery cartridge. Such conduct may result in a
9. Do not use a damaged battery.
10. The contained lithium-ion batteries are subject
to the Dangerous Goods Legislation require-
ments.
For commercial transports e.g. by third parties,
forwarding agents, special requirement on pack-
aging and labeling must be observed.
For preparation of the item being shipped, consult-
ing an expert for hazardous material is required.
Please also observe possibly more detailed
national regulations.
battery in such a manner that it cannot move
around in the packaging.
11. When disposing the battery cartridge, remove
it from the tool and dispose of it in a safe
place. Follow your local regulations relating to
disposal of battery.
12. Use the batteries only with the products
Installing the batteries to
-
sive heat, explosion, or leak of electrolyte.
13. If the tool is not used for a long period of time,
the battery must be removed from the tool.
14. During and after use, the battery cartridge may
take on heat which can cause burns or low
temperature burns. Pay attention to the han-
dling of hot battery cartridges.
15. Do not touch the terminal of the tool imme-
diately after use as it may get hot enough to
cause burns.
16. Do not allow chips, dust, or soil stuck into the
terminals, holes, and grooves of the battery
cartridge. It may result in poor performance or
breakdown of the tool or battery cartridge.
17. Unless the tool supports the use near
high-voltage electrical power lines, do not use
the battery cartridge near high-voltage electri-
cal power lines. It may result in a malfunction or
breakdown of the tool or battery cartridge.
18. Keep the battery away from children.
SAVE THESE INSTRUCTIONS.
CAUTION: Only use genuine Makita batteries.
Use of non-genuine Makita batteries, or batteries that
have been altered, may result in the battery bursting
also void the Makita warranty for the Makita tool and
charger.
Tips for maintaining maximum
battery life
1. Charge the battery cartridge before completely
discharged. Always stop tool operation and
charge the battery cartridge when you notice
less tool power.
2. Never recharge a fully charged battery car-
tridge. Overcharging shortens the battery
service life.
3. Charge the battery cartridge with room tem-
perature at 10 °C - 40 °C (50 °F - 104 °F). Let
a hot battery cartridge cool down before
charging it.
4. When not using the battery cartridge, remove
it from the tool or the charger.
5. Charge the battery cartridge if you do not use
it for a long period (more than six months).

16 ENGLISH
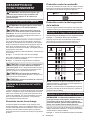
FUNCTIONAL
DESCRIPTION
CAUTION: Always be sure that the tool is
before adjusting or checking function on the tool.
Installing or removing battery
cartridge
CAUTION:
installing or removing of the battery cartridge.
CAUTION: Hold the tool and the battery car-
cartridge. Failure to hold the tool and the battery
and result in damage to the tool and battery cartridge
and a personal injury.
To install the battery cartridge, open the cover while
pushing the lock lever. Align the tongue on the battery
cartridge with the groove in the housing and slip it into
place. Insert it all the way until it locks in place with a
little click. If you can see the red indicator on the upper
side of the button, it is not locked completely.
After installing or removing the battery cartridges, be
sure to close the cover.
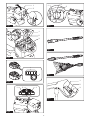
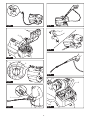
Fig.1: 1. Cover 2. Lock lever
To remove the battery cartridges, lift the battery car-
tridge while pushing the button on the front of the
cartridge.
Fig.2: 1. Red indicator 2. Button 3. Battery cartridge
CAUTION: Always install the battery cartridge
fully until the red indicator cannot be seen. If not,
it may accidentally fall out of the tool, causing injury to
you or someone around you.
CAUTION: Do not install the battery cartridge
forcibly. If the cartridge does not slide in easily, it is
not being inserted correctly.
CAUTION: Be sure to lock the cover before
operating.
The tool is equipped with a tool/battery protection sys-
motor to extend tool and battery life. The tool will auto-
matically stop during operation if the tool or battery is
placed under one of the following conditions:
Overload protection
When the battery is operated in a manner that causes
it to draw an abnormally high current, the tool automat-
ically stops without any indication. In this situation, turn
to become overloaded. Then turn the tool on to restart.
Overheat protection
When the tool is overheated, the tool stops automati-
cally and the battery indicator blinks. In this situation, let
the tool cool down before turning the tool on again.
On Blinking
Overdischarge protection
When the battery capacity is not enough, the tool stops
automatically. In this case, remove the battery from the
tool and charge the battery.
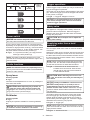
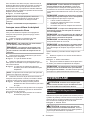
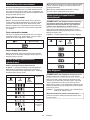
Indicating the remaining battery
capacity
Only for battery cartridges with the indicator
Fig.3: 1. Indicator lamps 2. Check button
Press the check button on the battery cartridge to indi-
cate the remaining battery capacity. The indicator lamps
light up for a few seconds.
Indicator lamps Remaining
capacity
Lighted Blinking
75% to 100%
50% to 75%
25% to 50%
0% to 25%
Charge the
battery.
The battery
may have
malfunctioned.
NOTE: Depending on the conditions of use and the
from the actual capacity.
NOTE:
the battery protection system works.
Indicating the remaining battery
capacity
NOTICE: The battery indicator does not light
when the power switch is in OFF position. To
check the remaining battery capacity, turn the
power switch to high or low pressure mode.
Press the check button to indicate the remaining battery
capacities. The battery indicators correspond to each
battery.
Fig.4: 1. Battery indicator 2. Check button

17 ENGLISH
Battery indicator status Remaining
battery
capacity
On Blinking
50% to 100%
20% to 50%
0% to 20%
Charge the
battery
Power switch
NOTICE: Do not turn the power switch forcibly.
This may cause the switch to malfunction.
Turn the power switch clockwise or counterclockwise
depending on the pressure level. Turn the power switch
clockwise for high pressure mode (2), counterclockwise
the power switch back to the OFF position (0).
Fig.5: 1. Low pressure mode (1) 2. High pressure
mode (2) 3. OFF position (0)
NOTE: The battery indicators will light up for a few
seconds when turning the power switch to high or low
pressure mode.
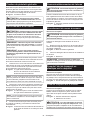
Nozzle functions
NOTE: The standard nozzles vary depending on the
country. Also refer to the OPTIONAL ACCESSORIES
section for other nozzles.
Spray lance
Fig.6
Jet width can be adjusted from 0° to 25° by rotating the
front end of the nozzle.
CAUTION: When adjusting the jet width, do
not rotate the nozzle while pulling it toward the
trigger gun.-
ger gun and cause a personal injury.
Dirt blaster
Fig.7
A spiral jet is ejected. Suitable for removing stubborn
dirt.
NOTICE: Do not use the dirt blaster to clean frag-
ile surfaces such as windows or car bodies.
Trigger operations
Pull the trigger to eject a water jet. The jet continues as
long as the trigger is squeezed.
The trigger can be locked for safe handling of the trigger
gun. To lock the trigger, pull out the stopper and hook it
to the groove on the grip.
Fig.8: 1. Trigger 2. Stopper 3. Groove
NOTICE: To avoid mechanical error in the pres-
sure switch, always leave a two-second interval
between trigger operations.
Safety valve
This appliance is equipped with a safety valve that
prevents undue overpressure. When the trigger is
released, the valve opens and the water recirculates
through the pump inlet.
CAUTION: Do not tamper with or adjust the
safety valve setting.
reservoir
You can supply water from a tank or reservoir instead
of a faucet.
Replace the water hose connector with the suction hose
set. When connecting the suction hose set, disconnect
the inlet of the high pressure washer. Then, connect the
NOTE: When removing/connecting the hose from/to
so that the hose does not rotate with the sleeve.
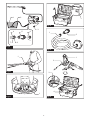
Fig.9: 1. Tank/reservoir 2. Suction hose set
3. Water hose connector 4. Hose 5. Filter
case 6. Inlet on the high pressure washer
7. Hose band 8. Sleeve
CAUTION: When attaching the sleeve to the
hose band.
NOTICE: Always use Makita's suction hose set.
NOTICE: Always keep 1 m (3.28 ft) or less in
height between the inlet of the high pressure
washer and the water surface. Otherwise, the high
pressure washer will be unable to take the water up
into the pump.
To introduce water into the hose, remove the nozzle
from the trigger gun and switch on the high pressure
washer while the trigger is squeezed. Once water is
ejected stably from the trigger gun, release the trigger
and attach the nozzle for your purpose.
Fig.10: 1. Trigger gun
NOTE: When water is not ejected, detach the suction
hose set and soak it in water. Then reconnect it to the
high-pressure washer.
Fig.11: 1. Suction hose set

18 ENGLISH
When using the container as a water tank
You can use the container supplied with the high pres-
1. Empty the container and feed water in it.
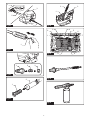
Fig.12: 1. Full water level line
NOTICE: Do not feed water above the full water
level line.
NOTICE: The lid of the container is not a tight
seal type. Be careful not to spill the water in the
container when carrying.
2.
suction hose set.
Fig.13: 1. Hose 2. Filter case
3. Remove the cap on the feed-water inlet and pass
the suction hose set through the inlet as illustrated.
Fig.14: 1. Cap 2. Cap holder 3. Feed-water inlet
4. Suction hose set
NOTE: The cap on the feed-water inlet can be rest on
the cap holder.
4. Remove the water hose connector from the inlet
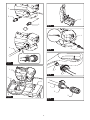
Fig.15: 1. Inlet of the high pressure washer 2. Filter
case 3. Water hose connector 4. Hose
5. Put the high pressure washer onto the container
so that it is secured with the mounts on the lid of the
container.
Fig.16: 1. High pressure washer 2. Lid 3. Air bleed-
ing hole
NOTICE: Pay attention to the handling of the
container when carrying. Carrying the container
with high pressure washer and accessories or water
inside may cause accident or personal injury due to
its own weight.
NOTICE: When carrying the container, do not
shake, turnover, or lean it excessively. Doing so
may cause;
— the water inside spilled out;
from the container or;
— the rotation of the container's wheels hindered.
NOTICE: When carrying the container by the
handle, water may spill out if there is plenty of
water inside.
NOTICE: Water may come out from the air
bleeding hole if the water inside reaches to the air
bleeding hole by tilting the container.
NOTICE: Do not step on the container. The lid
may be broken.
NOTICE:
water for a long time. Doing so may cause the con-
tainer damaged and result in water leakage.
After use, follow the procedure below:
1. Remove the cap on the drain outlet and discharge
water.
Fig.17: 1. Drain outlet
2.
a cloth and then dry the container completely.
NOTICE: Do not store the high pressure washer
and the accessories while the inside of the con-
tainer is wet. Remaining moisture may cause mal-
function and rust.
CAUTION: Always be sure that the tool is
before carrying out any work on the tool.
Connecting the high-pressure hose
Connect the high-pressure hose to the outlet (with the gun
marking). Turn the nut on the high-pressure hose clock-
wise while screwing it onto the screw thread of the outlet.
Fig.18: 1. Outlet 2. Nut
CAUTION: Make sure that the high-pressure
hose is securely connected. A loose connection
personal injury.
Attaching the trigger gun
Connect the high-pressure hose to the inlet on the trigger
gun. Turn the nut on the high-pressure hose clockwise
while screwing it onto the screw thread on the inlet.
Fig.19: 1. Inlet 2. Nut
CAUTION: Make sure that the high-pressure
hose is securely connected. A loose connection
personal injury.
Connecting to a faucet
CAUTION: Always use a pressure-resistant
water hose with ø 13 mm or larger diameter and
break and cause personal injury.
NOTICE: Use a pressure-resistant water hose
as short as possible. The amount of intake water
should be higher than the max feed volume of the
pump.
NOTICE: If you connect to the mains for drink-
meets the regulations in your region.
Prepare a pressure-resistant water hose. Attach the
coupling sleeve to one end and connect the other end
to the faucet as follows.
1.
Remove the nut on the coupling sleeve and pass the
pressure-resistant water hose through the nut. Insert the end
of the hose into the coupling sleeve and then tighten the nut.
Fig.20: 1. Pressure-resistant water hose 2. Nut of
the coupling sleeve 3. Coupling sleeve

19 ENGLISH
NOTE: If you want to connect the pressure-resistant
water hose to the faucet using a coupling sleeve,
prepare another coupling sleeve and attach it to the
other end of the hose.
2. Connect the pressure-resistant water hose to the
water tap joint to secure the hose end with the faucet.
Fig.21: 1. Hose band 2. Water tap joint 3. Pressure-
resistant water hose
NOTE:
to which you connect. Prepare a suitable commercial-
3. Attach the water hose connector to the inlet (with
the faucet marking) and then insert the coupling sleeve.
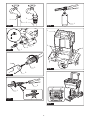
Fig.22: 1. Coupling sleeve 2. Water hose connector
3. Inlet on the high pressure washer
nozzle
CAUTION: Always lock the trigger of the
nozzle.
Insert the end of the nozzle into the slot on the trigger
gun and turn it in the direction of the arrow as shown in
the reverse direction while pressing it toward the trigger
gun.
Fig.23: 1. Trigger gun 2. Slot 3. End of the nozzle
Connecting the foam nozzle
Optional accessory
CAUTION: Always lock the trigger of the
nozzle.
Prepare detergent before using the foam nozzle.
1. Remove the nozzle from the tank by rotating the
nozzle counterclockwise. Attach the nozzle to the trig-
ger gun.
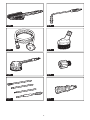
Fig.24: 1. Nozzle 2. Trigger gun
2. Pour the detergent into the tank and install it to the
nozzle.
Fig.25: 1. Tank
NOTICE: Always use neutral detergent. Acidic or
alkaline detergent may damage the tank or nozzle.
Placing plastic carrying case onto
the container
Optional accessory
You can place Makita plastic carrying case on the top
of the container. Put the plastic carrying case onto the
container so that it is secured with the mounts on the lid
of the container.
Fig.26: 1. Plastic carrying case 2. Mount
Placing the container onto the
trolley
Optional accessory
When carrying the container with Makita trolley, place
the container in position. Be sure that the bottom of the
Fig.27: 1. Bottom surface of the container
2. Platform of the trolley
CAUTION: When using the trolley, do not
Doing so may
lose the balance and result in personal injury or cause
deformation of the container which leads to water
leakage.
OPERATION
WARNING: Do not touch the water jet or
direct it toward yourself or others. The water jet is
dangerous and can hurt you or others.
WARNING: When shooting the water jet,
never hold the object that you are cleaning or
place your hands and feet near the water jet.
CAUTION: Stay alert to the rebound of the
water jet and blown objects. Do not bring the
nozzle to the object closer to 30 cm .
CAUTION: Do not run the high pressure
washer without water for longer than 1 minute.
CAUTION: Do not operate the high pressure
washer for a extended period of time. This may
cause vibration disorder.
CAUTION: Be aware of the direction of the
wind. If the detergent gets into your eyes or mouth,
rinse with fresh water immediately and seek medical
attention if necessary.
NOTICE: Avoid using the high pressure washer
for longer than 1 hour. After using it for 1 hour,
leave a same length of intermission.
NOTICE: To protect the mechanism of the high
pressure washer, do not use water hotter than
40°C.
1. Connect one end of the high-pressure hose to
the trigger gun and the other end to the high pressure
washer.
2. Connect the high pressure washer and the faucet
using a water hose. After that, open the faucet.
Fig.28
3. Open the cover and install the battery cartridges
into the high pressure washer and then lock the cover.
Fig.29: 1. Battery cartridge 2. Cover
4. Turn the power switch to your desired mode.
Fig.30: 1. Low pressure mode (1) 2. High pressure
mode (2) 3. OFF position (0)

20 ENGLISH
5. To eject a water jet, unlock the stopper and
squeeze the trigger. The jet continues as long as the
trigger is squeezed.
Fig.31: 1. Stopper
CAUTION: The
trigger gun recoils when you pull the trigger.
CAUTION: Always hold the trigger gun by the
grip and barrel when ejecting water jet.
NOTICE: Be careful not to pull the trigger gun
forcibly during operation. It may cause the high
pressure washer to fall over.
NOTICE: When suspending the operation for a
and squeeze the trigger to discharge the remain-
ing water fully.
If the high pressure washer is left for a long time while
maintaining high pressure, it may not restart. In this
-
ply water from a faucet to the inlet and squeeze the
trigger with keeping the water supply for a while. And
then, switch on the high pressure washer.
When you suspend the operation, you can temporarily
Fig.32
After use
CAUTION: After operating the high pressure
washer, always perform the procedure described
in this manual. Residual pressure in the trigger gun
or high pressure washer can cause personal injury or
damage to the pump inside.
1.
2. Close the faucet and disconnect the water hose
from the high pressure washer.
Fig.33
3. Switch on the high pressure washer again.
4. Squeeze the trigger until the remaining water in
the high pressure washer is discharged.
Fig.34
NOTICE: Do not run the motor for longer than 1
minute.
5.
the battery cartridges.
Fig.35: 1. Power switch 2. Battery cartridge
6. Disconnect the high-pressure hose from the trig-
ger gun and the high pressure washer.
Fig.36: 1. Trigger gun 2. High-pressure hose
3. High-pressure washer
NOTICE: To prevent the high-pressure hose from
being damaged, remove the remaining water in
the hose before storing.
MAINTENANCE & STORAGE
CAUTION: Always be sure that the tool is
before attempting to perform inspection or
maintenance.
NOTICE: Never use gasoline, benzine, thinner,
alcohol or the like. Discoloration, deformation or
cracks may result.
To maintain product SAFETY and RELIABILITY,
repairs, any other maintenance or adjustment should
be performed by Makita Authorized or Factory Service
Centers, always using Makita replacement parts.
Cleaning the nozzle
Use the cleaner pin to remove dirt from or unclog the nozzle.
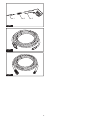
Fig.37: 1. Cleaner pin
NOTE: To maintain the optimal performance, clean
the nozzle periodically.
NOTICE: Do not remove dirt or debris forcibly.
This may result in personal injury or damage to the
ejection hole causing deviated jet angles or poor
performance.
Detach the water hose connector and remove dirt and
Fig.38:
1. Water hose connector 2. Filter 3. Sealing ring
When using the suction hose set (optional accessory), take
Fig.39: 1. Filter 2. Filter case
NOTE: To maintain the optimal performance, clean
Storage
CAUTION: Always store in an indoor location
where the temperature does not go below freez-
ing. If the high pressure washer freezes and malfunc-
tions, contact your local service center for repairs.
Store the accessories in the side pocket of the high
pressure washer.
Storage example
Fig.40:
1. High-pressure hose 2. Nozzle 3. Trigger gun
If your model is supplied with the container, store the
high pressure washer and accessories in it.
Storage example
Fig.41:
1. High pressure washer 2. Nozzle 3. Trigger
gun 4. Washing brush 5. Foam nozzle
6. High-pressure hose 7. Charger 8. Suction
hose set 9. Pressure-resistant water hose
NOTE: Some accessories shown in the illustra-
tion are supplied as optional accessories in some
countries.
Sayfa yükleniyor...
Sayfa yükleniyor...
Sayfa yükleniyor...
Sayfa yükleniyor...
Sayfa yükleniyor...
Sayfa yükleniyor...
Sayfa yükleniyor...
Sayfa yükleniyor...
Sayfa yükleniyor...
Sayfa yükleniyor...
Sayfa yükleniyor...
Sayfa yükleniyor...
Sayfa yükleniyor...
Sayfa yükleniyor...
Sayfa yükleniyor...
Sayfa yükleniyor...
Sayfa yükleniyor...
Sayfa yükleniyor...
Sayfa yükleniyor...
Sayfa yükleniyor...
Sayfa yükleniyor...
Sayfa yükleniyor...
Sayfa yükleniyor...
Sayfa yükleniyor...
Sayfa yükleniyor...
Sayfa yükleniyor...
Sayfa yükleniyor...
Sayfa yükleniyor...
Sayfa yükleniyor...
Sayfa yükleniyor...
Sayfa yükleniyor...
Sayfa yükleniyor...
Sayfa yükleniyor...
Sayfa yükleniyor...
Sayfa yükleniyor...
Sayfa yükleniyor...
Sayfa yükleniyor...
Sayfa yükleniyor...
Sayfa yükleniyor...
Sayfa yükleniyor...
Sayfa yükleniyor...
Sayfa yükleniyor...
Sayfa yükleniyor...
Sayfa yükleniyor...
Sayfa yükleniyor...
Sayfa yükleniyor...
Sayfa yükleniyor...
Sayfa yükleniyor...
Sayfa yükleniyor...
Sayfa yükleniyor...
Sayfa yükleniyor...
Sayfa yükleniyor...
Sayfa yükleniyor...
Sayfa yükleniyor...
Sayfa yükleniyor...
Sayfa yükleniyor...
Sayfa yükleniyor...
Sayfa yükleniyor...
Sayfa yükleniyor...
Sayfa yükleniyor...
Sayfa yükleniyor...
Sayfa yükleniyor...
Sayfa yükleniyor...
Sayfa yükleniyor...
Sayfa yükleniyor...
Sayfa yükleniyor...
Sayfa yükleniyor...
Sayfa yükleniyor...
Sayfa yükleniyor...
Sayfa yükleniyor...
Sayfa yükleniyor...
Sayfa yükleniyor...
Sayfa yükleniyor...
Sayfa yükleniyor...
Sayfa yükleniyor...
Sayfa yükleniyor...
Sayfa yükleniyor...
Sayfa yükleniyor...
Sayfa yükleniyor...
Sayfa yükleniyor...
Sayfa yükleniyor...
Sayfa yükleniyor...
Sayfa yükleniyor...
Sayfa yükleniyor...
Sayfa yükleniyor...
Sayfa yükleniyor...
Sayfa yükleniyor...
Sayfa yükleniyor...
Sayfa yükleniyor...
Sayfa yükleniyor...
Sayfa yükleniyor...
Sayfa yükleniyor...
Sayfa yükleniyor...
Sayfa yükleniyor...
Sayfa yükleniyor...
Sayfa yükleniyor...
Sayfa yükleniyor...
Sayfa yükleniyor...
Sayfa yükleniyor...
Sayfa yükleniyor...
Sayfa yükleniyor...
Sayfa yükleniyor...
Sayfa yükleniyor...
Sayfa yükleniyor...
Sayfa yükleniyor...
Sayfa yükleniyor...
Sayfa yükleniyor...
Sayfa yükleniyor...
Sayfa yükleniyor...
Sayfa yükleniyor...
Sayfa yükleniyor...
Sayfa yükleniyor...
Sayfa yükleniyor...
Sayfa yükleniyor...
Sayfa yükleniyor...
Sayfa yükleniyor...
Sayfa yükleniyor...
Sayfa yükleniyor...
Sayfa yükleniyor...
Sayfa yükleniyor...
Sayfa yükleniyor...
Sayfa yükleniyor...
Sayfa yükleniyor...
Sayfa yükleniyor...
Sayfa yükleniyor...
Sayfa yükleniyor...
Sayfa yükleniyor...
Sayfa yükleniyor...
Sayfa yükleniyor...
Sayfa yükleniyor...
Sayfa yükleniyor...
Sayfa yükleniyor...
Sayfa yükleniyor...
Sayfa yükleniyor...
-
 1
1
-
 2
2
-
 3
3
-
 4
4
-
 5
5
-
 6
6
-
 7
7
-
 8
8
-
 9
9
-
 10
10
-
 11
11
-
 12
12
-
 13
13
-
 14
14
-
 15
15
-
 16
16
-
 17
17
-
 18
18
-
 19
19
-
 20
20
-
 21
21
-
 22
22
-
 23
23
-
 24
24
-
 25
25
-
 26
26
-
 27
27
-
 28
28
-
 29
29
-
 30
30
-
 31
31
-
 32
32
-
 33
33
-
 34
34
-
 35
35
-
 36
36
-
 37
37
-
 38
38
-
 39
39
-
 40
40
-
 41
41
-
 42
42
-
 43
43
-
 44
44
-
 45
45
-
 46
46
-
 47
47
-
 48
48
-
 49
49
-
 50
50
-
 51
51
-
 52
52
-
 53
53
-
 54
54
-
 55
55
-
 56
56
-
 57
57
-
 58
58
-
 59
59
-
 60
60
-
 61
61
-
 62
62
-
 63
63
-
 64
64
-
 65
65
-
 66
66
-
 67
67
-
 68
68
-
 69
69
-
 70
70
-
 71
71
-
 72
72
-
 73
73
-
 74
74
-
 75
75
-
 76
76
-
 77
77
-
 78
78
-
 79
79
-
 80
80
-
 81
81
-
 82
82
-
 83
83
-
 84
84
-
 85
85
-
 86
86
-
 87
87
-
 88
88
-
 89
89
-
 90
90
-
 91
91
-
 92
92
-
 93
93
-
 94
94
-
 95
95
-
 96
96
-
 97
97
-
 98
98
-
 99
99
-
 100
100
-
 101
101
-
 102
102
-
 103
103
-
 104
104
-
 105
105
-
 106
106
-
 107
107
-
 108
108
-
 109
109
-
 110
110
-
 111
111
-
 112
112
-
 113
113
-
 114
114
-
 115
115
-
 116
116
-
 117
117
-
 118
118
-
 119
119
-
 120
120
-
 121
121
-
 122
122
-
 123
123
-
 124
124
-
 125
125
-
 126
126
-
 127
127
-
 128
128
-
 129
129
-
 130
130
-
 131
131
-
 132
132
-
 133
133
-
 134
134
-
 135
135
-
 136
136
-
 137
137
-
 138
138
-
 139
139
-
 140
140
-
 141
141
-
 142
142
-
 143
143
-
 144
144
-
 145
145
-
 146
146
-
 147
147
-
 148
148
-
 149
149
-
 150
150
-
 151
151
-
 152
152
-
 153
153
-
 154
154


Makita DHW080 Kullanım kılavuzu
- Kategori
- Yüksek basınçlı temizleyiciler
- Tip
- Kullanım kılavuzu
diğer dillerde
- español: Makita DHW080 Manual de usuario
- français: Makita DHW080 Manuel utilisateur
- italiano: Makita DHW080 Manuale utente
- Deutsch: Makita DHW080 Benutzerhandbuch
- português: Makita DHW080 Manual do usuário
- dansk: Makita DHW080 Brugermanual
- Nederlands: Makita DHW080 Handleiding
İlgili makaleler
-
Makita HW001G Kullanım kılavuzu
-
Makita HW1200 Kullanım kılavuzu
-
-
-
-
Makita DLM Series Kullanım kılavuzu
-
-
-
Makita DVC865L Kullanım kılavuzu
-
Makita DKT360 Kullanım kılavuzu