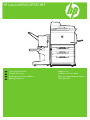
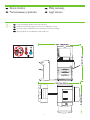
HP LaserJet M9040/M9050 Multifunction Printer series Hızlı başlangıç Kılavuzu
- Kategori
- Yazdır
- Tip
- Hızlı başlangıç Kılavuzu

HP LaserJet M9040/M9050 MFP
EN
Getting Started Guide Read me First
Δ
EL
RU
Başlangıç Kılavuzu
Önce Beni Oku
TR

Copyright and License
© 2008 Copyright Hewlett-Packard Development Company, L.P.
Reproduction, adaptation or translation without prior written permission is
prohibited, except as allowed under the copyright laws.
The information contained herein is subject to change without notice.
The only warranties for HP products and services are set forth in the express
warranty statements accompanying such products and services. Nothing
herein should be construed as constituting an additional warranty. HP shall
not be liable for technical or editorial errors or omissions contained herein.
Part number: CC395-90921
Edition 1, 4/2008
FCC Regulations
This equipment has been tested and found to comply with the limits for a
Class B digital device, pursuant to Part 15 of the FCC rules. These limits
are designed to provide reasonable protection against harmful interference
in a residential installation. This equipment generates, uses, and can
radiate radio-frequency energy. If this equipment is not installed and used
in accordance with the instructions, it may cause harmful interference to
radio communications. However, there is no guarantee that interference will
not occur in a particular installation. If this equipment does cause harmful
interference to radio or television reception, which can be determined by
turning the equipment off and on, correct the interference by one or more of
the following measures:
• Reorient or relocate the receiving antenna.
• Increase separation between equipment and receiver.
•
Connect equipment to an outlet on a circuit different from that to which
the receiver is located.
• Consult your dealer or an experienced radio/TV technician.
Any changes or modifications to the product that are not expressly approved
by HP could void the user’s authority to operate this equipment. Use of a
shielded interface cable is required to comply with the Class B limits of Part
15 of FCC rules. For more regulatory information, see the electronic user
guide. Hewlett-Packard shall not be liable for any direct, indirect, incidental,
consequential, or other damage alleged in connection with the furnishing or
use of this information.
Trademark Credits
Windows® is a U.S. registered trademark of Microsoft Corporation.

EN
EN
EN
EN
EN
EN
EN
EN
1
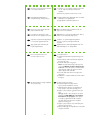
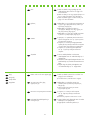
Overview
Unpack the Device
Setup the Device
Install Windows software
Device location
Install Mac software
Set up embedded digital send
In-box documentation
µ µµ
µ µ
µ
µ Windows
µ Mac
EL
EL
EL
EL
EL
EL
EL
EL
Windows
Mac
RU
RU
RU
RU
RU
RU
RU
RU
Genel Bakış
Katıştırılmış dijital göndermeyi ayarlama
Ürünle birlikte verilen belgeler
Aygıt konumu
Aygıtı Ambalajından Çıkarma
Aygıtı Kurma
Windows yazılımını yükleme
Mac yazılımını yükleme
TR
TR
TR
TR
TR
TR
TR
TR

EN
EN
2
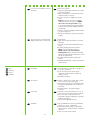
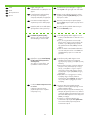
Getting Started Guide
Wall Poster
• Control Panel information
• Device features
Software/Customer information CD
• User Guide
• Install Notes
• Hp Jet Direct
• Embedded Web Server
• Software Drivers
HP Digital Sending Software 4.X CD
• Trial version of DSS Advanced Features
In-box documentation
µ µ
•
• Δ
CD µ/
•
• µ
• Hp Jet Direct
• µµ µ Web
• µµ µ
CD µ HP Digital Sending Software 4.X
• µ µ DSS
EL
EL
•
•
Software/Customer information CD
•
•
• Hp Jet Direct
• Web-
•
HP Digital Sending Software 4.X CD
• DSS Advanced Features
RU
RU
Ürünle birlikte verilen belgeler
Başlangıç Kılavuzu
Duvar Posteri
• Kontrol Paneli bilgileri
• Aygıtın özellikleri
Yazılım/Müşteri bilgileri CD’si
• Kullanım Kılavuzu
• Yükleme Notları
• Hp Jet Direct
• Katıştırılmış Web Sunucusu
• Yazılım Sürücüleri
HP Digital Sending Software 4.X CD’si
• DSS Advanced Features deneme sürümü
TR
TR

1
EN
EN
3
Device location
Select a well-ventilated, dust-free area to position the Device.
µ µ , , .
EL
EL
.
RU
RU
Aygıt konumu
Aygıtı yerleştirmek için iyi havalandırmalı, tozsuz bir alan seçin.
TR
TR

2
EN
EN
4
110-volt models
• 110 to 127 volts
• 50/60 Hz
Current:
• 15 Amps
220-volt models
• 220 to 240 volts
• 50/60 Hz
Current:
• 8 Amps
Power/Current specifications.
/µ.
110 volt
• 110 127 volt
• 50/60 Hz
µ:
• 15 Amps
220 volt
• 220 240 volt
• 50/60 Hz
µ:
• 8 Amps
EL
EL
T
110
• 110 127
• 50/60
:
• 15
220
• 220 240
• 50/60
:
• 8
RU
RU
Güç/Akım özellikleri.
110 volt ile çalışan
modeller
• 110 ila 127 volt
• 50/60 Hz
Akım:
• 15 Amp
220 volt ile çalışan
modeller
• 220 ila 240 volt
• 50/60 Hz
Akım:
• 8 Amp
TR
TR

3
EN
EN
5
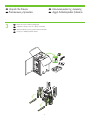
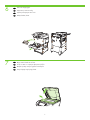
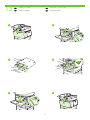
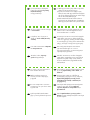
Unpack the Device
Remove the outer box and the packing foam.
.
EL
EL
.
RU
RU
Aygıtı Ambalajından Çıkarma
Dış kutuyu ve ambalaj köpüklerini çıkartın.
TR
TR

4
5
EN
EN
6
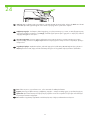
Install the ramps.
Use two people to gently roll the device off of the pallet.
µ.
µ µ .
EL
EL
.
RU
RU
Rampaları takın.
Aygıtı paletten dikkatli bir şekilde indirmek için iki kişi birlikte çalışmalıdır.
TR
TR

6
7
EN
EN
7
Remove the shipping tape.
Open scanner lid and remove foam.
.
.
EL
EL
.
.
RU
RU
Nakliye bandını çıkartın.
Tarayıcı kapağını açıp köpüğü çıkartın.
TR
TR

10
8
9
EN
EN
EN
8
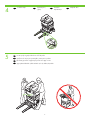
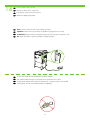
Clean scanner glass with a dry, lint-free cloth.
Unlock the scanner.
Remove protective film from control panel.
µ .
.
.
EL
EL
EL
, .
.
RU
RU
RU
Tarayıcı camını kuru ve lif bırakmayan bir bezle temizleyin.
Tarayıcının kilidini açın.
Kontrol panelindeki koruyucu filmi çıkarın.
TR
TR
TR

11
EN
EN
EN
EN
EN
9
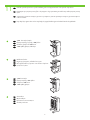
3,000 - sheet stacker/stapler.
Multifunction finisher.
3,000 sheet stacker.
Install the optional output device. Specific installation guides are shipped with each of the optional output devices.
8-bin mailbox.
µ 3.000 .
8 .
µ / 3.000 .
µ µ .
. µ µ
.
EL
EL
EL
EL
EL
/ 3000 .
.
3000 .
8 .
.
.
RU
RU
RU
RU
RU
3.000 sayfalık yığınlayıcı/zımbalayıcı.
Çok işlevli son işlemci.
3.000 sayfalık yığınlayıcı.
8 bölmeli posta kutusu.
İsteğe bağlı çıkış aygıtını takın. Her bir isteğe bağlı çıkış aygıtıyla birlikte aygıta özel takma kılavuzları da gelmektedir.
TR
TR
TR
TR
TR

12
EN
EN
10
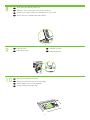
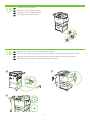
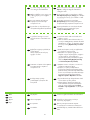
Set up the Device
Change the control panel language overlay (if necessary).
µ
( ).
EL
EL
.
RU
RU
Aygıtı Kurma
Kontrol paneli dil kaplamasını değiştirin (gerekiyorsa).
TR
TR

13
1 2
3 4
5 6
EN
11
Install the print cartridge.
.
EL
.
RU
Yazıcı kartuşunu takın.
TR

14
EN
EN
EN
12
Do not connect a USB cable until prompted during software installation.
NOTE: Connection required for Device network features and utilities.
Connect a Network cable (optional).
: µµ .
().
USB µ , µ.
EL
EL
EL
.
().
USB- .
RU
RU
RU
NOT: Aygıtın ağ özellikleri ve yardımcı programlar için bağlantı gereklidir.
Ağ kablosunu bağlayın (isteğe bağlı).
Yazılım yükleme sırasında sorulana kadar USB kablosunu bağlamayın.
TR
TR
TR

15
16
1
2
3
EN
EN
13
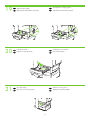
Lock the wheels on the printer stand.
Plug in the power cord, turn on the device and wait for green ready light.
.
, µ µ.
EL
EL
.
, , .
RU
RU
Yazıcının sehpasındaki tekerlekleri kilitleyin.
Elektrik kablosunu fişe takın, aygıtı açın ve yeşil hazır ışığının yanmasını bekleyin.
TR
TR

17
18
EN
EN
14
Open paper tray(s).
Set language, date and time. If prompted, select your language, the date, and the time. Follow the instructions on the control panel
touch screen.
.
, µµ . , , µµ .
.
EL
EL
() .
, . , .
.
RU
RU
Kağıt tepsisini (tepsilerini) açın.
Dil, tarih ve saati ayarlayın. Sorulması halinde, dilinizi, tarihi ve saati seçin. Kontrol panelinin dokunmatik ekranındaki yönergeleri
uygulayın.
TR
TR

19
20
21
EN
EN
EN
15
Load the print media.
Close paper tray(s).
Adjust the paper guide(s).
µ .
.
µ .
EL
EL
EL
.
() .
.
RU
RU
RU
Baskı ortamını yükleyin.
Kağıt tepsisini (tepsilerini) kapatın.
Kağıt kılavuzunu (kılavuzlarını) ayarlayın.
TR
TR
TR

22
EN
16
To connect to a network: By default, an IP Address will automatically be assigned using DHCP. To assign a static IP address for a
network connection, do the following: On the control panel touch Administration. Scroll to and touch Initial Setup, and then touch
Networking and I/O. Touch Embedded Jetdirect, and touch TCP/IP. Touch IPV4 Settings, touch Config Method, and then touch Manual.
Touch Save. Touch Manual Settings, touch IP Address, type in the assigned IP address. Touch OK, and then touch Save.
: , µ µ IP µ DHCP. µ
IP µ , : , Administration (Δ). µ
Initial Setup ( µ) , , Networking and I/O (Δ /).
Embedded Jetdirect (µµ Jetdirect) TCP/IP. IPV4 Settings (µ IPV4), Config Method
( µ µ) , , Manual ( µ). Save (). Manual
Settings ( µ µ), IP Address (Δ IP), . OK
Save ().
EL
: IP- DHCP.
IP-, .
. , /.
Jetdirect, TCP/IP. IPV4, , .
. , IP-, IP-. OK, — .
RU
Ağa bağlanmak için: Varsayılan olarak, DHCP kullanılarak otomatik olarak bir IP Adresi atanır. Bir ağ bağlantısı için statik IP
adresi atamak istiyorsanız, aşağıdakileri uygulayın: Kontrol panelinde Yönetim seçeneğine dokunun. İlk Kurulum seçeneğine gidin
ve dokunun; ardından Ağ ve G/Ç seçeneğine dokunun. Katıştırılmış Jetdirect ve ardından TCP/IP’ye dokunun. IPV4 Ayarları’na,
Yapılandırma Yöntemi’ne ve sonra da El ile’ye dokunun. Kaydet’e dokunun. El ile Ayarlar’a, IP Adresi’ne dokunun ve atanan IP adresini
yazın. OK’e ve ardından Kaydet’e dokunun.
TR

23
EN
17
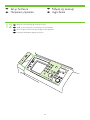
Verify functionality by printing a configuration page. From the control panel, A) scroll to and touch Administration. B) Touch
Information. C) Touch Configuration/Status Pages. D) Touch Configuration Page. E) Touch Print. If you are connected using a network
cable, the IP address will be on the Jetdirect page, under “TCP/IP”. IP is needed for software to install. Save the configuration page
printout for use during the software installation.
µ µ. , A)
Administration (Δ). B) Information (). ) Configuration/Status Pages (
µ/). Δ) Configuration Page ( µ). E) Print ().
µ , IP Jetdirect, “TCP/IP”. IP
µ. µ, µ
µ.
EL
, . )
. ) . ) /. )
. ) . , IP- Jetdirect
«TCP/IP». IP- .
.
RU
İşlevleri doğrulamak için bir yapılandırma sayfası yazdırın. Kontrol panelinde, A) Yönetim seçeneğine gelip dokunun. B) Bilgi’ye
dokunun. C) Yapılandırma Durumu Sayfaları’na dokunun. D) Yapılandırma Sayfası’na dokunun. E) Yazdır’a dokunun. Bağlantıyı
ağ kablosu ile yapmış olmanız halinde, IP adresi, “TCP/IP” altında, Jetdirect sayfasında olacaktır. Yazılımın yüklenebilmesi için IP
gereklidir. Yapılandırma sayfasının çıkışını yazılımın yüklenmesi sırasında kullanmak üzere saklayın.
TR

24
EN
EN
18
Verify copy. Place configuration page, print side-down, in the ADF (Automatic Document Feeder), and press the Start button. The ADF
will automatically feed the paper through the scanner and the copied page will be ejected into the output bin.
Note: If there are print or copy verification issues - refer to User Guide for additional information.
µ: µ – .
. µ, µ , ADF (µ µ
) µ . ADF µ µ
.
EL
EL
. .
.
. ,
(), .
.
RU
RU
Not: Yazdırma ve kopyalamayı doğrulamada sorunlarla karşılaşırsanız, ek bilgi için Kullanım Kılavuzu’na başvurun.
Kopyalamayı doğrulayın. Yapılandırma sayfasını, yazılı tarafı aşağı gelecek şekilde ADF’ye (Otomatik Belge Besleyici) yerleştirin ve
Başlat düğmesine basın. ADF, belgeyi otomatik olarak tarayıcıdan geçirecek ve kopyalanan sayfa çıkış bölmesine çıkartılacaktır.
TR
TR
Sayfa yükleniyor...
Sayfa yükleniyor...
Sayfa yükleniyor...
Sayfa yükleniyor...
Sayfa yükleniyor...
Sayfa yükleniyor...
Sayfa yükleniyor...
Sayfa yükleniyor...
Sayfa yükleniyor...
Sayfa yükleniyor...
Sayfa yükleniyor...
Sayfa yükleniyor...
Sayfa yükleniyor...
Sayfa yükleniyor...
Sayfa yükleniyor...
Sayfa yükleniyor...
Sayfa yükleniyor...
Sayfa yükleniyor...
Sayfa yükleniyor...
Sayfa yükleniyor...
-
 1
1
-
 2
2
-
 3
3
-
 4
4
-
 5
5
-
 6
6
-
 7
7
-
 8
8
-
 9
9
-
 10
10
-
 11
11
-
 12
12
-
 13
13
-
 14
14
-
 15
15
-
 16
16
-
 17
17
-
 18
18
-
 19
19
-
 20
20
-
 21
21
-
 22
22
-
 23
23
-
 24
24
-
 25
25
-
 26
26
-
 27
27
-
 28
28
-
 29
29
-
 30
30
-
 31
31
-
 32
32
-
 33
33
-
 34
34
-
 35
35
-
 36
36
-
 37
37
-
 38
38
-
 39
39
-
 40
40


HP LaserJet M9040/M9050 Multifunction Printer series Hızlı başlangıç Kılavuzu
- Kategori
- Yazdır
- Tip
- Hızlı başlangıç Kılavuzu
diğer dillerde
İlgili makaleler
-
HP LaserJet M3035 Multifunction Printer series Hızlı başlangıç Kılavuzu
-
HP LaserJet M4345 Multifunction Printer series Hızlı başlangıç Kılavuzu
-
-
HP Color LaserJet CM6049f Multifunction Printer series Yükleme Rehberi
-
-
HP LaserJet M5025 Multifunction Printer series Hızlı başlangıç Kılavuzu
-
-
HP LaserJet M5035 Multifunction Printer series Hızlı başlangıç Kılavuzu
-
HP Color LaserJet CP3505 Printer series Hızlı başlangıç Kılavuzu
-