Tefal CLIPSO ESSENTIAL El kitabı
- Kategori
- Düdüklü tencereler
- Tip
- El kitabı

EN
FR
EL
TR
AR
FA
CLIPSO
®
ESSENTIAL
Pressure cooker
Autocuiseur
Χύτρα ταχύτητας
Düdüklü tencere
User’s Manual
Guide de l'utilisateur
Εγχειρίδιο χρήσης
Kullanım talimatları
www.tefal.com
ØÔ∑OÒV «ùß∑FLU‰
œß∑u¸«∞FLq ≥UÈ «ß∑HUœÁ
©Mπd… {Gj
œ¥@ “ËœÄd
F
A
C
E
C
O
T
E
C
O
U
V
E
R
C
L
E
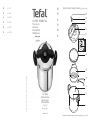
Description / Description / ¶ÂÚÈÁÚ·Ê‹ /
Tanımlama /
*•ºV «∞Luœ¥q/ °d ©∂o ±b‰
ËÅn √§e«¡ «∞LM∑Z / ®dÕ
*depending on model / selon modèle / ανάλογα με το μοντέλο / modele göre değişir /
February 2014 - Réf. : 4138028 - Realization : Espace Graphique.
EN p. 2 - 17
FR p. 18 - 33
EL p. 34 - 50
TR p. 51 - 68
AR p. 69 - 85
FA p. 86 - 101

fig. 2fig. 1
fig. 5 fig. 6 fig. 8
fig. 9
fig. 14
fig. 15 fig. 16
fig. 17 fig. 18 fig. 19 fig. 20
fig. 7*
fig. 11
fig. 10 fig. 12
fig. 13
mini
fig. 3 fig. 4
*•ºV «∞Luœ¥q/ °d ©∂o ±b‰
*depending on model / selon modèle / ανάλογα με το μοντέλο / modele göre değişir /
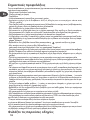
IMPORTANT SAFEGUARDS
For your safety, this device complies with the applicable standards and regulations:
- Pressure vessel appliance
- Materials in contact with food
- Environment
• This product has been designed for domestic use only.
• Any commercial use, inappropriate use or failure to comply with the instructions, the
manufacturer accepts no responsibility and the guarantee will not apply.
• Take time to read all of the instructions and always refer back to the “User's Guide”.
• As with any cooking appliance, ensure close supervision if you are using the pressure cooker with
children nearby.
• Do not put your pressure cooker into a hot oven.
• When the pressure cooker is under pressure, take great care when moving it. Do not touch the
hot surfaces. Use the handles and knobs. Wear gloves if necessary.
• Regularly check that the pan handles are fixed properly. Tighten if necessary.
• Do not use your pressure cooker for any purpose other than that for which it is designed.
• Your pressure cooker cooks under pressure. Burns could result from boiling over if not used
properly. Make sure that the pressure cooker is properly closed before bringing it up to pressure.
Refer to section “Closing”.
• Always make sure that the valve is in the decompression position before opening your
pressure cooker.
• Never force the pressure cooker open. Make sure that the internal pressure has returned to normal.
Refer to section “Safety”.
• Never use your pressure cooker without liquid: this could cause serious damage. Always make
sure that there is enough liquid in it during cooking.
• Use heat source(s) that are compatible with your pressure cooker, in line with the
instructions for use.
• Never make milk-based recipes (such as rice pudding, semolina pudding ...) in your pressure cooker.
• Do not use rock salt in your pressure cooker, but rather add table salt when the cooking is nearly
finished.
• Never fill your pressure cooker more than two-thirds full (maximum fill mark).
• For food that expands during cooking, like rice or dried vegetables or stewed fruit, etc., never fill your
pressure cooker more than half full. For certain soups like pumpkin or courgette, give your pressure
cooker a few minutes to cool down, then cool it down fully by placing it under cold running water.
• After cooking meat which has an outer layer of skin (such as ox tongue), which could swell due
to the effects of pressure, do not pierce the skin after cooking if it appears swollen: you could get
burnt. Pierce it before cooking.
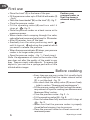
• When cooking food with a thick texture (chick peas, rhubarb, stewed fruit, etc.) the pressure cooker
should be shaken slightly before opening to ensure that the food does not spurt out.
• Always check that valves are clear before use. Refer to section “Before cooking”.
• Do not use the pressure cooker to fry under pressure using oil.
• Do not interfere with the safety systems, except for cleaning and maintenance in accordance
with instructions.
• Use only original TEFAL spare parts suitable for your model. Particularly, use a TEFAL pan and lid.
• Alcohol vapours are flammable. Bring to a boil for about 2 minutes before placing the lid. Watch
your appliance when preparing alcohol-based recipes.
• Do not use your pressure cooker to store acidic or salty food before and after cooking to avoid
damaging your pan.
• You can use the pan to cook food without the lid. Do not use the lid if you do not intend the food
to be cooked under pressure.
KEEP THESE INSTRUCTIONS
EN
2

3
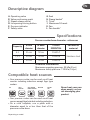
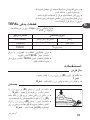
Specifications
Pressure cooker base diameter - references
Technical information:
Maximum operating pressure: 55 kPa:(8 psi)
Maximum safety pressure: 110 kPa:(16 psi)
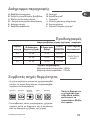
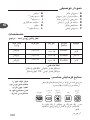
Compatible heat sources
• Your pressure cooker can be used on all heat
sources including induction except Aga type
cookers.
• Your pressure cooker can be used on all heat
sources except Aga hobs but including induction.
• On a solid hotplate, use a plate with a
diameter equal to or less than that of the
pressure cooker base.
Capacity
Ø Pan
diameter
Ø Base
diameter
CLIPSO
ESSENTIAL
Pan and lid
material
6 L 24 cm 18 cm P44247
Stainless steel7,5 L 24 cm 18 cm P43948
9 L 24 cm 18 cm P44249
Never heat your pan
when empty, as you
risk damaging your
product.
GAS SOLID
HOTPLATE
GLASS CERAMIC
RADIANT HALOGEN
INDUCTION
ELECTRIC
COIL
Descriptive diagram
A. Operating valve
B. Valve positioning mark
C. Steam release outlet
D. Lid opening/closing button
E. Pressure indicator
F. Safety valve
G. Seal
H. Steam basket*
I. Trivet*
J. Maximum fill mark
K. Pan
L. Pan handle*
*depending on model
EN

4
•On ceramic and halogen hobs, make sure that
the base of the pan is clean and dry.
• On gas, the flame should not extend beyond
the diameter of the pan.
For all heat sources, make sure that your
pressure cooker is well centered.
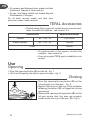
TEFAL Accessories
• The following Clipso pressure cooker accessories are avai-
lable. Contact the helpline - see contact list.
-
• To replace parts or for repairs, contact the
helpline - see contact list.
• Use only original TEFAL parts suitable for your
model.
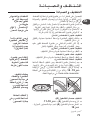
Use
Opening
• Press the opening button (D) on the lid - fig. 1.
• Lift the lid keeping the button pressed down - fig. 2.
Closing
• Press the opening/closing button (D) on the
lid and place it on the pan - fig. 3.
• Apply a little force on the top of the lid before
releasing the button (D) to trigger the locking
mechanism.
• Release the opening/closing button (D) on the
lid and ensure that the jaws are properly
locked under the rim of the pan (K)
- fig. 4.
Accessories Reference number
Gasket
6L - 7,5L - 9L
X1010006
Steam basket*
6L - 7,5L - 9L
792654
Trivet*
792691
*depending on model
EN

5
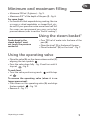
Minimum and maximum filling
• Minimum 250 ml (2 glasses) - fig. 5.
• Maximum 2/3
rd
of the depth of the pan (J) - fig. 6.
For some foods:
• For foodstuffs that expand during cooking, like rice
or soups or dried vegetables or stewed fruit, etc.,
do not fill your pressure cooker more than half full.
For soups, we recommend you carry out a fast
pressure release (refer to section "End of cooking").
Using the steam basket*
• Pour 750 ml of water into the base of the
pan (K).
• Place the trivet* (I) in the base of the pan.
• Place the basket* (H) on the trivet* - fig. 7.
Using the operating valve
• Place the valve (A) on the steam release outlet (C)
aligning the two symbols .
• Press the valve down fully - fig. 8 and turn until it
stops at - fig. 9.
To cook food:
• Turn the valve positioning mark until it stops
at .
To remove the operating valve (when it is no
longer pressurised):
• Press down on the operating valve (A) and align
the two symbols - fig. 10.
• Remove it - fig. 11.
Food placed in the
steam basket* must
not touch the pressure
cooker lid.
*depending on model
EN

6
First use
• Place the trivet* (I) in the base of the pan.
• Fill the pressure cooker up to 2/3rd full with water (J)
- fig. 6.
• Place the steam basket* (H) on the trivet* (I) - fig. 7.
• Close the pressure cooker.
• Fit the operating valve (A) and turn until it
stops at - fig. 9.
• Place the pressure cooker on a heat source set to
maximum power.
• When steam starts escaping through the valve,
reduce the heat source and set a timer for 20 minutes.
• After 20 minutes, turn off the heat.
• Gradually turn the valve positioning mark
until it stops at adjusting the speed at which
you want to release the pressure.
• When the pressure indicator (E) drops, your pressure
cooker is no longer under pressure.
• Open the pressure cooker - fig. 1 - 2 and rinse it.
Note: the appearance of stains on the inside of the
pan does not alter the quality of the metal in any
way. They are simply scale deposits. To remove the
deposits, you can use a sponge pad with a little
diluted white vinegar.
Before cooking
• Every time you use your cooker, first visually check
in good daylight that the steam release outlet
(C) is not blocked - fig. 12.
• Also check that the safety valve (F) moves freely
- (refer to section “Cleaning and maintenance”).
• Fill the pressure cooker with the food and the neces-
sary amount of liquid for cooking (see Minimum and
Maximum filling' section..
• Close the pressure cooker
- fig. 3 - 4.
• Fit the operating valve (A) - fig. 8.
• Press the valve down fully and turn until it stops at
- fig. 9.
• Make sure that the pressure cooker is properly
closed before bringing it up to pressure.
• Place the pressure cooker on a heat source set to
maximum power.
*depending on model
Position your
pressure cooker so
that the steam is
released away from
you.
EN

7
During cooking
• When steam escapes through the operating
valve continuously, and a regular hissing
sound (PSCHHHT) is heard, reduce the heat
source.
• Set a timer for the cooking time stated in your
recipe.
• During cooking, check that the valve murmurs
regularly. If there is not enough steam, in-
crease the heat source slightly; if there is too
much steam, reduce the heat source.
End of cooking
To release the steam:
• After the heat has been turned off you have two
alternatives:
- Slow pressure release:
• Gradually turn the operating valve (A) adjusting
the speed at which you want to release the pres-
sure until it stops at . Make sure that the cooker
is positioned so that the steam is directed away
from you.
• When the pressure indicator (E) drops again,
your pressure cooker is no longer under pressure.
This method is used for stews, vegetables, meat
joints and fish dishes. If you notice any food or li-
quid start to spray out from the valve when you
are releasing steam, set the selector to cooking po-
sition then wait a minute and then gradually
turn the operating valve again, making sure that
nothing else spurts out.
- Fast pressure release:
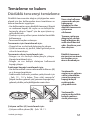
• Place your pressure cooker in a sink under cold
running water, directing the flow onto the metal
part of the lid
- fig. 13.
• When the pressure indicator (E) drops again,
your pressure cooker is no longer under pressure.
The pressure indicator
(E) prevents you from
opening the pressure
cooker if it still under
pressure.
If the pressure indicator
(E) does not drop, place
the base of your
pressure cooker into a
sink filled with cold
water - fig. 13.
Never interfere with the
pressure indicator.
The pressure indicator
(E) prevents the pressure
cooker from increasing
in pressure if it is not
properly closed.
As with any cooking ap-
pliance, watch over it
carefully especially if you
are using your pressure
cooker around children.
Steam is very hot as it
exits the steam release
outlet.
If food or liquid starts
to spray out while you
are releasing the steam,
return the operating
valve (A) to cooking po-
sition then release
the steam using the
fast pressure release
method described
opposite.
EN

8
Turn off the water and then, turn the positioning mark
of the operating valve (A) until it stops at .
• You can open the pressure cooker - fig. 1 - 2.
This method is used for soups, rice, pasta, cake and pud-
ding mixes, recipes containing rice or pasta and recipes
with a high liquid content.
If in doubt about which method of pressure release is cor-
rect, use the fast pressure release method.
• When cooking frothy or starchy foods, do not release
the pressure by turning the operating valve (A). Ins-
tead lift the pressure cooker away from the heat
source, leave the operating valve (A) in the cooking po-
sition and let the cooker cool slowly at room tempera-
ture (takes about 15 minutes) until the pressure
indicator drops down. Reduce the recommended coo-
king time a little.
• You can open the pressure cooker - fig. 1 - 2.
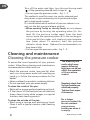
Cleaning and maintenance
Cleaning the pressure cooker
To ensure the correct operation of your pressure
cooker, follow these cleaning and maintenance
recommendations after each use.
• Wash the pressure cooker (pan and lid) after
each use using warm water with washing-up
liquid in it. Follow the same procedure for the
basket*.
• Never use bleach or products containing chlorine.
• Do not overheat your pan when empty.
To clean the inside of the pan:
• Wash with a sponge pad and washing-up liquid.
• If the interior of the steel pan has an iridescent
sheen, clean it using white vinegar or a special
stainless steel cleaning product.
To clean the outside of the pan:
• Wash using a sponge and washing-up liquid.
Clean it with a special stainless steel cleaning
product.
*depending on model
Regularly check that
the pan handles are
attached properly.
Tighten them again
if necessary.
The browning and
marks which may
appear following
long term use do not
affect the operation
of the pressure
cooker.
For a longer
pressure cooker life,
do not overheat
your pressure
cooker pan when it
is empty.
EN

9
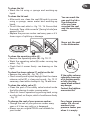
To clean the lid:
• Wash the lid using a sponge and washing-up
liquid.
To clean the lid seal:
• After each use, clean the seal (G) and its groove
using a sponge, warm water and washing-up
liquid..
• To refit the seal, refer to
- fig. 13 - 14. Ensure that
the words “face côté couvercle” [facing lid side] are
against the lid.
• Replace the pressure cooker seal every year or if it
shows signs of splitting or damage.
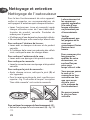
To clean the operating valve (A) :
• Remove the operating valve (A)
- fig. 10 -11.
• Wash the operating valve (A) under running tap
water - fig. 15.
• Check that it moves freely: see drawing on the
right.
To clean the steam release (C) outlet on the lid:
• Remove the valve (A) - fig. 10 - 11.
• Check visually and in plain daylight that the steam
release outlet (C) is clear and round - fig. 12. If
necessary, clean with a toothpick - fig. 16 and rinse.
To clean the safety valve (F):
• Clean the part of the safety valve located inside
the lid by placing it under running water.
• Check its correct operation by pressing hard, using
a cotton bud, on the pin, which should move freely
- fig. 17.
To change the seal of your pressure cooker:
• Change the seal of your pressure cooker every
year or if it has any splits or is damaged.
• Always use an original TEFAL seal suitable for
your model.
If the safety valve ac-
cidentally comes out
of its housing partly
or fully, this may
cause a leak without
any danger.
Contact the helpline -
see contact list.
For a longer pressure
cooker life, do not
overheat your
pressure cooker pan
when it is empty.
Never put the seal
in the dishwasher.
You can wash the
pan and the lid in
the dishwasher
after you have
removed the seal
and the operating
valve.
EN

10
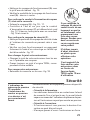
To store your pressure cooker:
• Turn the lid over on the pan - fig. 18.
Safety
Your pressure cooker is fitted with several safety
devices:
• Closing safety:
- The jaws must be in contact with the rim of the lid.
If this is not the case, there is steam leakage from
the pressure indicator and the pressure cooker will
not build up pressure.
• Opening safety:
- If the pressure cooker is under pressure, the
opening button cannot be pressed.
- Never try to force the pressure cooker open.
- Above all do not interfere with the pressure
indicator.
- Make sure that the internal pressure has fallen.
• Two safety devices operate to prevent overpres-
sure:
- First device: the safety valve (F) releases the
pressure and steam escapes
- fig. 19.
- Second device: the seal allows steam to escape
from between the lid and the pan - fig. 20.
If one of the overpressure safety systems is
triggered:
• Turn off the heat source.
• Let the pressure cooker cool down completely.
• Open it (refer to section “Opening”).
• Check and clean the operating valve (A), the
steam release outlet (C), the safety valve (F) and
the seal (G).
• If, after these checks and cleaning, your product
leaks or no longer works, take it to a TEFAL
Approved Service Centre. Contact the Customer
Relations Helpline - see contact list.
The pressure
indicator (E) prevents
from opening the
pressure cooker if it
still under pressure.
The pressure
indicator (E) prevents
you the pressure
cooker from
increasing in
pressure if is still
under pressure.
You must have your
pressure cooker checked
in a TEFAL Approved
Service Centre after 10
years of use.
EN

11
Recommendations for use
1 - Steam is very hot when it leaves the operating
valve.
2 - As soon as the pressure indicator rises, you can
no longer open your pressure cooker.
3 - As with any cooking utensil, ensure close
supervision if you are using the pressure
cooker near children.
4 - Watch out for the jet of steam.
5 - To move the pressure cooker, use the two pan
handles.
6 - Never leave food in your pressure cooker.
7 - Never use bleach or products containing
chlorine, as these will alter the quality of the
and steam stainless steel.
8 - Do not leave the lid soaking in water.
9 - Change the seal every year or if it has any
splits or is damaged.
10 - You must only clean your pressure cooker
when it is cold and empty.
11 - It is essential to have your pressure cooker
checked in a TEFAL Approved Service Centre
after 10 years of use. Contact the Customer
Relations Helpline - see contact list.
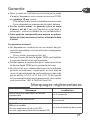
Guarantee
• TEFAL pressure cookers have a 10 year guarantee from
the date of purchase against any faulty materials or
workmanship related to the pot or any premature
damage of the metal base provided the product is used
in accordance with the manufacturer's recommended
product instructions. This guarantee does not include any
damage due to inappropriate use or resulting from
knocks, falls or by placing the product in the oven.
• It should be noted that the normal life of the gasket,
pressure control, valves, handles or locking indicator seal
is limited. These parts are excluded from the guarantee
and will require periodic renewal. It should also be noted
that for models with an electronic timer, the timer is
guaranteed for the first year only. Accessories such as the
basket, trivet and steam basket are also guaranteed for
12 months only.
EN

12
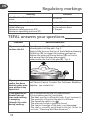
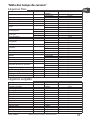
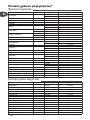
TEFAL answers your questions
Regulatory markings
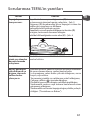
Problems Recommendations
If you are unable
to close the lid:
Press the opening/closing button (D) on the
lid and place it on the pan - fig. 3.
Apply a little force on the top of the lid before releasing
the button (D) to trigger the locking mechanism.
Release the opening/closing button (D) on the lid
and ensure that the jaws are properly
locked under the rim of the pan (K) - fig. 4
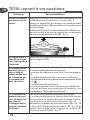
If your pressure
cooker has been
heated under pres-
sure without any
liquid in it:
Have your pressure cooker checked by a TEFAL Appro-
ved Service Centre. Contact the Customer Relations
Helpline - see contact list.
If the pressure in-
dicator has not
risen and nothing
is escaping
through the valve
during cooking:
This is normal during the first few minutes.
If this problem persists, check that:
- The heat source is sufficiently high; if not, increase it.
- The quantity of liquid in the pan is sufficient.
- The operating valve is on
.
- The pressure cooker is properly closed.
- The seal or the edge of the pan is not damaged.
- The seal is correctly positioned in the lid, (refer to
section “Cleaning and Maintenance”)
Marking Location
Identification of manufacturer or commercial
brand
On the lid
Production year and batch Inside of the lid
Capacity
Model reference
Maximum safety pressure (PS)
Maximum operating pressure (PF)
On the exterior base
of the pan
EN

13
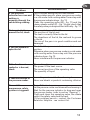
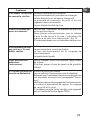
Problems
Recommendations
If the pressure
indicator has risen and
nothing is
escaping through the
valve during cooking:
This is normal during the first few minutes.
If the problem persists, place your pressure cooker
in a sink under cold running water from a tap until
the pressure indicator drops - fig. 13.
Clean the operating valve (A) - fig. 15 and the
steam release outlet (C) - fig. 16 and check that
the safety valve pin drops without difficulty - fig. 17.
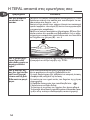
If steam leaks from
around the lid, check:
The correct closure of the lid.
The position of the lid seal.
The seal is correctly fitted in the lid.
The cleanliness of the lid, the seal and its groove
in the lid.
The rim of the pan is in good condition and not
damaged.
If you are unable to
open the lid:
Check that the pressure indicator is in the lowered
position.
Otherwise, place your pressure cooker in a sink under
cold running water from a tap until the pressure
indicator drops - fig. 13.
Never interfere with the pressure indicator.
If the food is not
cooked or is burned,
check:
The cooking time.
The power of the heat source.
The correct position of the operating valve.
The quantity of liquid.
If food has burned in
the pressure cooker:
Leave the pan to soak before cleaning it.
Never use bleach or products containing chlorine.
If one of the
overpressure safety
systems is triggered:
Turn off the heat source.
Let the pressure cooker cool down without moving it.
Wait for the pressure indicator to drop and open
the pressure cooker. (refer to section “Opening ”).
Check and clean the operating valve, the steam
outlet, the safety valve and the seal.
If the problem persists, contact the Customer
Relations Helpline - see contact list.
EN

14
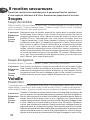
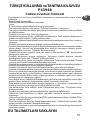
Delicious Recipes
All the recipes are intended for 4 people. For pressure cookers with a
capacity of less than 6 litres, reduce the proportions by a third.
Soup
Lentil Soup
500 gm lentil, 50 gm white rice, 6 glasses of water, ½ teaspoon salt, ½ teaspoon cumin
powder, finely chopped onion, 1 dessert spoonful (10 ml) oil, ½ small bunch finely chopped
parsley, toasted bread (optional).
Clean and wash the lentils before you put them in the Pressure cooker with
750 ml cold water. Close the pressure cooker. As soon as the valve starts
to whistle, reduce the heat and leave to cook for 30 min. Release the
pressure using the fast release method. During this time, fry the chopped
onion in the oil. Pour the lentils with their liquid into a electric blender, and
process for 2 minutes then sieve to remove the skins. Pour them into the
pressure cooker, add the fried onions and the rice, stir with a wooden spoon
on medium heat, when it boils, fit the lid and close the pressure cooker. As
soon as the valve starts to whistle, reduce the heat and leave to cook for
the specified time. Release the pressure using the fast release method.
Open the lid, add the pepper, salt, and cumin and then the parsley. Stir.
Serve with toasted bread.
Vegetable Soup
4 potatoes 1 leek , 4 carrots, 1 turnip, 1litre of water, salt, pepper.
Peel and wash the vegetables.Cut the potatoes and the turnip into large
dice. Thinly slice the carrots and the leek. Pour 1 litre of water into the
pressure cooker, and then add the vegetables, the salt and the pepper. Seal
the pressure cooker. As soon as the valve begins to whistle, reduce the heat
and cook for the recommended amount of time. Decompress under water.
Poultry
Stuffed chicken
2 whole 'chickens each weighing 1 kg, ¼ cup pine kernels, ¼ cup peeled pistachio, 250 gm
minced meat, 1 glass of rice, 2 glasses of water, ½ cup oil, 1 tea spoon of flour, 1 teaspoon
of each : salt, pepper, cinnamon, turmeric, cardamon powder, 1 laurel leaf.
Heat the oil in the pressure cooker on a high heat and brown the pine
kernels and keep aside. Then brown the pistachios and set aside. Fry the
minced meat on all sides and add the salt with ½ the quantity of the
pepper, then pour in 250 ml of water. Wash the rice and drain it, then add
it to the meat, and stir. Close the pressure cooker bring to full pressure and
then lower the heat and cook on medium heat for 25 minutes. While
cooking wash the chicken and clean the inside. When the rice is ready, mix
it with pine kernels, pistachios and pepper. Stuff the chicken with rice, and
close the opening of the chicken by securing with string. Put the 2 chickens
in the pressure cooker, add the bay leaf and 250 ml of water. After boiling,
remove the scum, add salt and close the pressure cooker. Bring to full
Serves 4.
Preparation:
30 min.
Cooking:
20 min.
Serves 4.
Preparation:
20 min.
Cooking:
25 min
+ 30 min
+ 10 min.
in oven
Serves 4.
Preparation:
15 min.
Cooking:
10 min.
EN

15
pressure and then cook on low heat for 30 minutes. As soon as it is done,
take out the chicken and put them on an oven tray brushed with a little
oil, cook in a preheated oven at 180 C for 10-15 minutes to brown. While
cooking, prepare the gravy. Put one teaspoon of flour in the liquid from
the cooked chicken, stir on medium heat until thickened.
Serve in a big dish decorated with chopped parsely. Gravy is optional.
Variation: you can stir fry vermicelli in oil before adding to the gravy to cook.
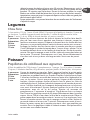
Vegetables
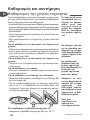
Stuffed Cabbage
1 whole cabbage weighing 1.5 kg, ¼ cup oil, 8 garlic gloves, peeled and crushed, ½ glass of
lemon juice, 1 tablespoon ful of tomato puree, 1 teaspoon of dry mint, 375 ml of water..
Stuffing: 1 ½ glasses of rice, 500 g minced meat, salt, pepper, cinnamon.
Cut the thick ribs off the cabbage and separate the leaves, boil in water for one
minute, and keep 5 large leaves aside, cut the remaining leaves into medium
size pieces. Prepare the stuffing and stuff the cabbage remaining leaves (spread
the leaf out flat and put the stuffing in its centre then fold). Arrange the stuffed
cabbage leaves inside the pressure cooker then add the oil. Dissolve the tomato
puree in 375 ml of water, add the garlic and the dried mint and pour in the
pressure cooker. Close the pressure cooker. As soon as the valve starts to whistle,
reduce the heat and leave to cook for 15 minutes. Release the pressure.
Carefully transfer the cooked stuffed cabbage and liquid into a large dish.
Serve with yogurt.
Fish*
Citrus cod parcels
4 cod fillet steaks each weighing 150 g, 1 grapefruit, 1 orange, the juice of 1 lime, 2 tomatoes,
1 onion, 2 chopped shallots, 60 g butter, a few leaves of fresh basil, salt and pepper, 750 mls of
water.
Cut the tomatoes into slices. Peel the onion and chop into very small pieces.
Peel the grapefruit and the orange and remove the pith. Separate into
segments, making sure that you keep all the juice.
Take four sheets of aluminum foil and place 3 slices of tomato on the
centre of each sheet, slightly overlapping one another. Cover with some
of the onion and the chopped shallots. Add a few leaves of basil and place
the cod fillets on top. Lift up the edges of each parcel in order to pour 1
dessert spoonful of grapefruit/orange juice on top of the fish without
spilling. Add a few drops of lime juice, and season with salt and pepper.
Arrange 1 wedge of grapefruit, 2 wedges of orange and 15 g fresh butter
on top of each fish fillet. Close the parcels firmly before placing them
gently in the steam basket. Pour 750 ml of water into the pressure cooker.
Place the steam basket on its stand inside the pressure cooker, making sure
that it is not touching the water. Close the pressure cooker. As soon as the
valve starts to whistle, reduce the heat and leave to cook for the specified
time. Immerse the pressure cooker into a bowl of cold water to cool it down
quickly before opening. Remove the steam basket from the pressure cooker
and gently place 1 cod parcel onto each plate. Open the parcels at the
table using scissors. They can be served with an avocado salad.
Serves 5.
Preparation:
30 min.
Cooking:
15 min.
Serves 4.
Preparation:
25 min.
Cooking:
7 min.
EN
*depending on model

16
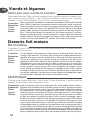
Meat & vegetables
Peas with meat & tomatos
2 kg washed fresh peas, 500 g. meat cut into medium size cubes, 3 carrots (diced or thinly
sliced), 1 ½ kg fresh tomatoes, 4 garlic gloves, salt, pepper, cinnamon, 60 ml of vegetable oil,
375 ml water, 1 small bunch fresh coriander (finely chopped).
Peel and cut the tomato and process in a blender. Boil the meat in 450 ml
water in the pressure cooker without the lid on, remove the scum. Close
the pressure cooker. As soon as the valve starts to whistle, reduce the heat
and leave to cook for 20 minutes. Remove the meat and keep warm, clean
the pressure cooker, then add the carrots, peas, oil and put it on a medium
heat and cook for 5 minutes without the lid on. Add the tomato, garlic,
coriander, and the 375 ml water, then close the pressure cooker. As soon
as the valve starts to whistle, reduce the heat and leave to cook for 15
minutes. Serve with hot rice.
Home made desserts
Sweet Rice
1 cup of rice, 5 glasses water, 2 cups of sugar, 600 gm white cheese, 5 pieces of arabic musk,
½ glass of rose water.
If the cheese is salty, cut it in to thin slices and soak in water, change the
water every 15 minutes unto the cheese becomes sweet, drain and keep
aside. Wash the rice several times. Pour water into the pressure cooker then
add the rice and stir. Close the pressure cooker. As soon as the valve starts
to whistle, reduce the heat and leave to cook for 45 minutes. Put the rice
in a blender to make it smooth. Then put the rice in the pressure cooker
on medium heat, stir with a wooden ladle, add the sugar and stir. If the
rice is too hard add ½ glass (60 ml) of water. Close the pressure cooker. As
soon as the valve starts to whistle, reduce the heat and leave to cook for
60 minutes. Add the musk powder with one spoon of sugar then the rose
water and stir. Add the cheese slowly step by step to dissolve in the mixture.
Pour in dishes and serve.
Mufattaqah
500 g sesame juice, 500 g rice, 1 kg sugar, ¼ glass turmeric, ½ teaspoon cinnamon, 5 glasses
water, 1 cup of pine kernels.
Wash the rice several times and soak in warm water for 3 hours. Drain the
rice and put it in the pressure cooker, on high heat, add the turmeric, and
10 glasses of water, stir a little. When it boils close the pressure cooker. As
soon as the valve starts to whistle, reduce the heat and leave to cook for
30 minutes. Add the sesame juice, the sugar, and the cinnamon, stir well
with a wooden ladle, then put the pressure cooker on the heat, stir the
mixture until boiling. Close the pressure cooker. As soon as the valve starts
to whistle, reduce the heat and leave to cook for 60 minutes. Open the
pressure cooker and put it on low heat and stir the Mufattaqah with a
wooden ladle to prevent sticking, stir continuously for 45 minutes (depends
on Quality of sesame oil) until it becomes one full unit and the yellow oil
(sesame oil) of the Mufattaqah comes out. Add the pine kernels, mix it.
Pour in dishes and let it cool, then serve.
Serves 10.
Preparation:
20 min.
Cooking:
180 min.
Serves 7.
Preparation:
20 min.
Cooking:
90 min.
Serves 5.
Preparation:
15 min.
Cooking:
40 min.
EN

17
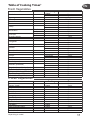
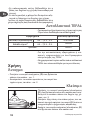
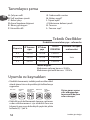
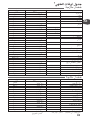
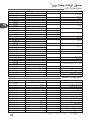
Cooking Time
Artichoke
- steam*
18 min.
- immersion**
15 min.
Asparagus
- immersion
5 min.
Beets - steam
20 - 30 min.
Broccoli
3 min.
Carottes
6 min.
Celery
- steam
6 min.
- immersion
10 min.
Mushrooms
sliced - steam
1 min.
whole
- immersion
1 ½ min.
Chou vert
sliced
6 min.
whole
7 min.
Brussels sprouts
7 min.
Cauliflower
- immersion
3 min.
Courgettes
- steam
6 ½ min.
- immersion
2 min.
Endives
12 min.
Spinach
- steam
5 min.
- immersion
3 min.
Semi-dried beans
- immersion
20 min.
Green beans
7 min.
Turnips
- steam
7 min.
- immersion
6 min.
Peas
1 ½ min.
Leeks
2 ½ min.
Pumkin (puree)
8 min.
Potatoes (quartered)
- steam
10 min.
- immersion
6 min.
Flageolet beans (dried pulses)
- immersion
45 min.
Green lentils (dried vegetable)
- immersion
10 min.
Split peas (dried vegetable)
- immersion
14 min.
Rice (dried vegetable)
- immersion
7 min.
Wheat (dried vegetable)
15 min.
Cooking Time
Broccoli
-
steam
3 min.
Carrots (sliced)
- steam
6 min.
Baby carrots (whole)
- steam
10 min.
Mushrooms
- steam
6 min.
Brussels sprouts - immersion
6 min.
Cauliflower
- steam
5 min.
Courgettes
- steam
11 min.
Spinach (leaves)
9 min.
Flageolet beans
- steam
12 min.
Artichoke hearts
- steam
6 min.
Butter beans
- steam
8 min.
Flat beans
- steam
6 min.
Extra-fine green beans
- steam
6 min.
Peas
- steam
4 min.
Leeks (sliced)
- steam
24 min.
Fresh Vegetables
Table of Cooking Times*
Frozen Vegetables
*steam = in the steam basket **immersion = in water
EN
*depending on model

18
Précautions importantes
Pour votre sécurité, cet appareil est conforme aux normes et réglementations applicables :
- Directive des Équipements sous Pression
- Matériaux en contact avec les aliments
- Environnement
• Cet appareil a été conçu pour un usage domestique.
• Prenez le temps de lire toutes les instructions et reportez-vous toujours au “Guide de
l’utilisateur”.
• Comme pour tout appareil de cuisson, assurez une étroite surveillance surtout si vous
utilisez l’autocuiseur à proximité d’enfants.
• Ne mettez pas votre autocuiseur dans un four chaud.
• Déplacez votre autocuiseur sous pression avec un maximum de précautions. Ne
touchez pas les surfaces chaudes. Utilisez les poignées et boutons. Utilisez des gants,
si nécessaire.
• Vérifiez régulièrement que les poignées de la cuve sont correctement fixées. Revissez-
les si besoin.
• N’utilisez pas votre autocuiseur dans un autre but que celui auquel il est destiné.
• Votre autocuiseur cuit sous pression. Des blessures par ébouillantage peuvent résulter
d’une utilisation inadéquate. Assurez-vous que l’autocuiseur est convenablement
fermé avant de le mettre en service. Voir paragraphe “Fermeture”.
• Assurez-vous que la soupape est en position de décompression (
) avant d’ouvrir
votre autocuiseur.
• N’ouvrez jamais l’autocuiseur en force. Assurez-vous que la pression intérieure est
retombée. Voir paragraphe “Sécurité”.
• N’utilisez jamais votre autocuiseur sans liquide, cela le détériorerait gravement.
Assurez-vous qu’il y a toujours suffisamment de liquide pendant la cuisson.
• Utilisez la(les) source(s) de chaleur compatible(s), conformément aux instructions
d’utilisation.
• Ne réalisez jamais de recette à base de lait dans votre autocuiseur.
• N’utilisez pas de gros sel dans votre autocuiseur, ajoutez du sel fin en fin de cuisson.
• Ne remplissez pas votre autocuiseur au-delà des 2/3 (repère maximum de
remplissage).
• Pour les aliments qui se dilatent pendant la cuisson, comme le riz, les légumes
déshydratés, ou les compotes, ... ne remplissez pas votre autocuiseur au-delà de la
moitié de sa capacité. Pour certaines soupes à base de potirons, courgettes, …laissez
refroidir votre autocuiseur quelques minutes, puis effectuez un refroidissement sous
eau froide.
• Après cuisson de viandes qui comportent une peau superficielle (ex. langue de
bœuf…), qui risque de gonfler sous l’effet de la pression, ne piquez pas la viande
tant que la peau présente un aspect gonflé ; vous risqueriez d’être ébouillanté. Nous
vous conseillons de piquer la viande avant cuisson.
• Dans le cas d’aliments pâteux (pois cassés, rhubarbe…), l’autocuiseur doit être
légèrement secoué avant ouverture pour que ces aliments ne giclent pas à l’extérieur.
• Vérifiez que les soupapes ne sont pas obstruées avant chaque utilisation. Voir
paragraphe “Avant la cuisson”.
• N’utilisez pas votre autocuiseur pour frire sous pression avec de l’huile.
• N’intervenez pas sur les systèmes de sécurité au-delà des consignes de nettoyage et
d’entretien.
• N’utilisez que des pièces d’origine TEFAL correspondant à votre modèle. En
particulier, utilisez une cuve et un couvercle TEFAL.
• Les vapeurs d’alcool sont inflammables. Portez à ébullition environ 2 minutes avant
de mettre le couvercle. Surveillez votre appareil dans le cadre des recettes à base
d’alcool.
• N’utilisez pas votre autocuiseur pour stocker des aliments acides ou salés avant et
après cuisson au risque de dégrader votre cuve.
Conservez ces instructions
FR

19
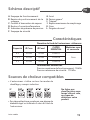
Caractéristiques
Diamètre du fond de l’autocuiseur - références
Informations normatives :
Pression supérieure de fonctionnement : 55 kPa
Pression maximum de sécurité : 110 kPa
Sources de chaleur compatibles
• L’autocuiseur s’utilise sur tous les modes de
chauffage y compris induction.
• Sur plaque électrique, employez une plaque de
diamètre égal ou inférieur à celui du fond de
l’autocuiseur.
Capacité Ø Cuve Ø Fond
CLIPSO
ESSENTIAL
Matériau cuve
et couvercle
6 L 24 cm 18 cm P44247
Inox7,5 L 24 cm 18 cm P43948
9 L 24 cm 18 cm P44249
Ne faites pas
chauffer votre cuve
lorsqu’elle est vide,
au risque de
détériorer votre
produit.
Schéma descriptif
A. Soupape de fonctionnement
B. Repère de positionnement de la
soupape
C. Conduit d’évacuation de vapeur
D. Bouton d’ouverture/fermeture
E. Indicateur de présence de pression
F. Soupape de sécurité
G. Joint
H. Panier vapeur*
I. Trépied*
J. Repère maximum de remplissage
K. Cuve
L. Poignée de cuve*
*selon modèle
FR

20
• Sur table vitrocéramique, assurez-vous que le fond
de la cuve est propre et net.
• Sur gaz, la flamme ne doit pas déborder du dia-
mètre de la cuve.
Sur tous les foyers, veillez à ce que votre auto-
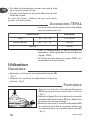
cuiseur soit bien centré.
Accessoires TEFAL
• Les accessoires de votre autocuiseurdisponibles
dans le commerce sont :
-
• Pour le changement d’autres pièces ou
réparations, faites appel aux Centres de Service
Agréés TEFAL.
• N’utilisez que des pièces d’origine TEFAL cor-
respondant à votre modèle.
Utilisation
Ouverture
• Appuyez sur le bouton d’ouverture/fermeture (D)
- fig. 1.
•Soulevez le couvercle en maintenant le bouton
enfoncé - fig. 2.
Fermeture
• Appuyez sur le bouton d'ouverture/fermeture
(D) du couvercle et positionnez-le sur la cuve
- fig. 3.
• Exercez un léger effort sur le dessus du couvercle
avant de relâcher le bouton (D) pour déclencher
le mécanisme de verrouillage.
• Relâchez le bouton d'ouverture/fermeture (D)
du couvercle et veillez à ce que les mâchoires
se referment bien sous le rebord de la cuve (K)
- fig. 4.
Accessoires Référence
Joint
6L - 7,5L - 9L
X1010006
Panier vapeur*
6L - 7,5L - 9L
792654
Trépied*
792691
*selon modèle
FR
Sayfa yükleniyor...
Sayfa yükleniyor...
Sayfa yükleniyor...
Sayfa yükleniyor...
Sayfa yükleniyor...
Sayfa yükleniyor...
Sayfa yükleniyor...
Sayfa yükleniyor...
Sayfa yükleniyor...
Sayfa yükleniyor...
Sayfa yükleniyor...
Sayfa yükleniyor...
Sayfa yükleniyor...
Sayfa yükleniyor...
Sayfa yükleniyor...
Sayfa yükleniyor...
Sayfa yükleniyor...
Sayfa yükleniyor...
Sayfa yükleniyor...
Sayfa yükleniyor...
Sayfa yükleniyor...
Sayfa yükleniyor...
Sayfa yükleniyor...
Sayfa yükleniyor...
Sayfa yükleniyor...
Sayfa yükleniyor...
Sayfa yükleniyor...
Sayfa yükleniyor...
Sayfa yükleniyor...
Sayfa yükleniyor...
Sayfa yükleniyor...
Sayfa yükleniyor...
Sayfa yükleniyor...
Sayfa yükleniyor...
Sayfa yükleniyor...
Sayfa yükleniyor...
Sayfa yükleniyor...
Sayfa yükleniyor...
Sayfa yükleniyor...
Sayfa yükleniyor...
Sayfa yükleniyor...
Sayfa yükleniyor...
Sayfa yükleniyor...
Sayfa yükleniyor...
Sayfa yükleniyor...
Sayfa yükleniyor...
Sayfa yükleniyor...
Sayfa yükleniyor...
Sayfa yükleniyor...
Sayfa yükleniyor...
Sayfa yükleniyor...
Sayfa yükleniyor...
Sayfa yükleniyor...
Sayfa yükleniyor...
Sayfa yükleniyor...
Sayfa yükleniyor...
Sayfa yükleniyor...
Sayfa yükleniyor...
Sayfa yükleniyor...
Sayfa yükleniyor...
Sayfa yükleniyor...
Sayfa yükleniyor...
Sayfa yükleniyor...
Sayfa yükleniyor...
Sayfa yükleniyor...
Sayfa yükleniyor...
Sayfa yükleniyor...
Sayfa yükleniyor...
Sayfa yükleniyor...
Sayfa yükleniyor...
Sayfa yükleniyor...
Sayfa yükleniyor...
Sayfa yükleniyor...
Sayfa yükleniyor...
Sayfa yükleniyor...
Sayfa yükleniyor...
Sayfa yükleniyor...
Sayfa yükleniyor...
Sayfa yükleniyor...
Sayfa yükleniyor...
Sayfa yükleniyor...
-
 1
1
-
 2
2
-
 3
3
-
 4
4
-
 5
5
-
 6
6
-
 7
7
-
 8
8
-
 9
9
-
 10
10
-
 11
11
-
 12
12
-
 13
13
-
 14
14
-
 15
15
-
 16
16
-
 17
17
-
 18
18
-
 19
19
-
 20
20
-
 21
21
-
 22
22
-
 23
23
-
 24
24
-
 25
25
-
 26
26
-
 27
27
-
 28
28
-
 29
29
-
 30
30
-
 31
31
-
 32
32
-
 33
33
-
 34
34
-
 35
35
-
 36
36
-
 37
37
-
 38
38
-
 39
39
-
 40
40
-
 41
41
-
 42
42
-
 43
43
-
 44
44
-
 45
45
-
 46
46
-
 47
47
-
 48
48
-
 49
49
-
 50
50
-
 51
51
-
 52
52
-
 53
53
-
 54
54
-
 55
55
-
 56
56
-
 57
57
-
 58
58
-
 59
59
-
 60
60
-
 61
61
-
 62
62
-
 63
63
-
 64
64
-
 65
65
-
 66
66
-
 67
67
-
 68
68
-
 69
69
-
 70
70
-
 71
71
-
 72
72
-
 73
73
-
 74
74
-
 75
75
-
 76
76
-
 77
77
-
 78
78
-
 79
79
-
 80
80
-
 81
81
-
 82
82
-
 83
83
-
 84
84
-
 85
85
-
 86
86
-
 87
87
-
 88
88
-
 89
89
-
 90
90
-
 91
91
-
 92
92
-
 93
93
-
 94
94
-
 95
95
-
 96
96
-
 97
97
-
 98
98
-
 99
99
-
 100
100
-
 101
101


Tefal CLIPSO ESSENTIAL El kitabı
- Kategori
- Düdüklü tencereler
- Tip
- El kitabı
diğer dillerde
İlgili makaleler
-
Tefal P2575034 Kullanım kılavuzu
-
-
-
-
-
Tefal P4442065 Kullanım kılavuzu
-
-
Tefal P4370761 El kitabı
-
-