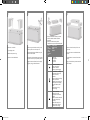
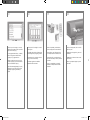
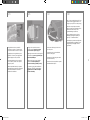
HP DesignJet 4020 Printer series Assembly Instructions
- Tip
- Assembly Instructions

x4
?
In case of difculty, please consult:
- Your printer’s Embedded Web Server
- Using your printer CD
Ek bilgi kaynakları:
- Yazıcınızın Katıştırılmış Web Sunucusu
- Yazıcınızı kullanma CD’si
Další zdroje informací v případě potíží:
- Integrovaný webový server tiskárny
- Disk CD „Using Your Printer“
Probléma esetén a következő helyeken találhat
segítséget:
- A nyomtató beépített webszervere
- “Using Your Printer” (A nyomtató használata)
CD-lemez
Read these instructions carefully...
What you will need for this procedure
- Some of the printer components are bulky, you
will need up to four people to lift them. When
this is necessary, the symbol shown at the bottom
is shown.
- To assemble the printer you will need at least
3 × 5 m (10 × 16 ft) of empty oor space, and
about four hours.
Bu yönergeleri dikkatlice okuyun...
Bu yordam için nelere gereksiniminiz var?
- Yazıcının bazı bileşenleri çok ağır olduğu için,
dört kişi birden kaldırmalıdır. Bu işlemler için bir
simge görüntülenir.
- Yazıcının montajı için etrafında en az 3 x 5 m
boş alan olmalıdır ve işlem yaklaşık iki saat sürer.
Přečtěte si pečlivě následující pokyny…
Co budete potřebovat během tohoto procesu
- Protože jsou některé části tiskárny objemné,
bude možná zapotřebí čtyř lidí pro jejich
zdvižení. V případě potřeby se zobrazí
tento symbol:
- Pro sestavení tiskárny bude potřeba nejméně
3×5 m volného prostoru na zemi a asi dvě
hodiny času.
Kérjük, tanulmányozza át az itt található
utasításokat...
Mire lesz szüksége a nyomtató üzembe
helyezéséhez
- A nyomtató egyes alkatrészei nagyon nehezek,
megemelésükhöz akár négy emberre is szükség
lehet. Ezeket a műveleteket az alábbi ikon jelzi:
- A nyomtató összeszereléséhez legalább 3 x 5 m
szabad terület és két óra szükséges.
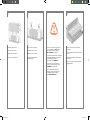
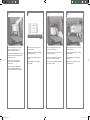
Printer working area
Before you start unpacking, consider where you
are going to put the assembled printer. You should
allow some clear space on all sides of the printer
box. The recommended clearances are shown in
the illustration above.
Yazıcının çalışma alanı
Paketi açmadan önce, yazıcıyı montajı
tamamlandıktan sonra nereye yerleştireceğinize
karar verin. Yazıcının arka ve ön tarafında boş
alan bırakmalısınız. Önerilen boşluklar aşağıdaki
şekilde gösterilmiştir.
Pracovní oblast tiskárny
Před zahájením rozbalování je třeba zvážit
umístění sestavené tiskárny. Před zadní a přední
částí tiskárny by měl být ponechán dostatečný
volný prostor. Doporučené volné místo je
zobrazeno na obrázku.
A nyomtató üzembe helyezésének helye
Mielőtt elkezdené kicsomagolni, gondolja
át, hova fogja elhelyezni a már összeszerelt
nyomtatót. Fontos, hogy a nyomtató háta mögött
és előtt is maradjon szabad terület. Az ajánlott
távolságokat az alábbi ábráról olvashatja le.
HP Designjet 4020/4020ps
Printer Assembly
Instructions
HP Designjet 4020/4020ps
Printer Montaj yönergeleri
HP Designjet 4020/4020ps
Printer Pokyny pro
sestavení
HP Designjet 4020/4020ps
Printer Összeszerelési
útmutató
© 2009 Hewlett-Packard Company
Inkjet Commercial Division
Avenida Graells 501 · 08174
Sant Cugat del Vallès
Barcelona · Spain
All rights reserved
Printed in Germany · Imprimé en Allemagne · Stampato in Germania
10 cm
179 cm
CM766-90004.indd 1 30/01/2009 11:07:42

1 2 3 4
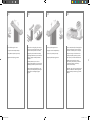
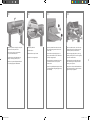
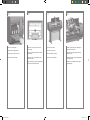
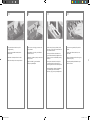
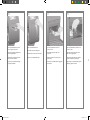
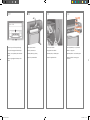
Remove the boxes from the top of the main
printer box.
Ana yazıcı kutusunun üst tarafındaki kutuları
kaldırın.
Sundejte krabice z horní části hlavní krabice
tiskárny.
Vegye le a dobozokat a nyomtatót tartalmazó
doboz tetejéről.
Remove the two side lids.
İki yan kapağı çıkarın.
Odeberte dva postranní kryty.
Távolítsa el a két oldalsó fedelet.
Cut the strap around the boxes carefully, as the
boxes may fall as soon as the strap is cut.
Kutuların etrafındaki şeridi dikkatlice kesin; şerit
kesilince kutular düşebilir.
Řemínek okolo krabic přeřízněte opatrně, protože
po přeříznutí řemínku by mohly krabice spadnout.
Vágja el óvatosan a dobozok körül levõ pántot,
vigyázva, nehogy a dobozok leessenek.
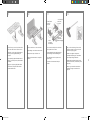
The shapes on the boxes identify the contents.
Kutuların içindekiler üzerindeki şekillerde
gösterilmiştir.
Symboly na krabicích označují obsah.
A dobozokon levő rajzok a dobozok tartalmát jelölik.
Mark on
box
Kutudaki
işaret
Značka
na krabici
Rajz
Contents of box
Kutunun içeriği
Obsah
Tartalom
Printer body
Yazıcı gövdesi
Tělo tiskárny
A nyomtató
Stand and bin assembly
Kaide ve bölme aksamı
Podstavec a zásobník
Állvány és papírtartó egység
Consumables box, including…
Maintenance Kit (keep safe)
Tüketim malzemeleri;
içindekiler:…
Bakım Seti (lütfen bunu saklayın)
Krabice se spotřebním
materiálem včetně soupravy pro
údržbu (bezpečně uschovejte)
Tartozékok doboza, többek
között...
a Karbantartási csomag
(ezt őrizze meg).
Spare box (used later)
Yedek kutu (bu kurulum
yönergelerinin 3. Bölümünde
kullanılır)
Krabice s náhradním materiálem
(viz oddíl 3 těchto pokynů
k instalaci)
Tartalék doboz (amelyre az
Üzembe helyezési útmutató
3. részében lesz szükség)
CM766-90004.indd 2 30/01/2009 11:07:42

5 6 7 8
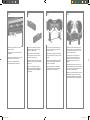
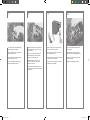
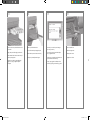
Remove the rst tray from the stand and bin
assembly box.
İlk tepsiyi kaideden ve bölme aksamı kutusundan
çıkarın.
Vyndejte první přihrádku z krabice podstavce
a zásobníku.
Vegye ki az első tálcát az állvány és papírtartó
egység dobozából.
When you are unpacking the leg assembly,
you will see that there is anti-slip material
around two of the wheels on the feet.
DO NOT REMOVE this material yet.
Ayak aksamının paketini açarken, uç tarafındaki
iki tekerleğin etrafında kaymayı engelleyen bir
malzeme olduğunu görürsünüz.
Bu malzemeyi henüz ÇIKARMAYIN.
Při rozbalování noh uvidíte kolem dvou
koleček na spodku protiskluzový materiál.
NESNÍMEJTE ještě tento materiál.
A nyomtatóállvány kicsomagolásakor
látni fogja, hogy az állvány két görgője
csúszásgátló anyaggal van ellátva.
Ezeket MÉG NE TÁVOLÍTSA EL.
Remove the main printer box.
Ana yazıcı kutusunu çıkarın.
Vyndejte hlavní krabici tiskárny.
Távolítsa el a nyomtató dobozát.
Remove the two packing pieces.
İki paketleme parçasını çıkarın.
Odeberte tyto dva prvky obalu.
Távolítsa el az ábrán látható két
csomagolóanyagot.
CM766-90004.indd 3 30/01/2009 11:07:42

9 10 11 12
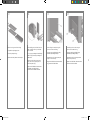
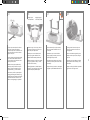
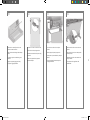
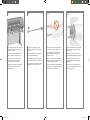
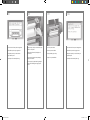
You now need to identify which is the left and
the right side of the cross-brace.
Çapraz desteğin hangisinin sağ hangisinin de
sol taraf olduğunu sizin belirlemeniz gerekir
Nyní potřebujete určit levou a pravou stranu
příčné vzpěry.
Azonosítsa a keresztmerevítő bal és jobb
oldalát.
From the rst tray, remove the two boxes marked
with L and R. Place them on the oor as shown.
İlk tepsiden, L (sol) ve R (sağ) olarak işaretlenmiş
iki kutuyu çıkarın. Aşağıdaki şekildeki gibi
ere koyun.
Z první přihrádky vyndejte dvě krabice označené
písmeny L a R. Položte je na zem podle znázornění
na obrázku.
Vegye le az L (bal) és R (jobb) jelölésű dobozt
az első tálcáról, és helyezze azokat a földre
az ábrán látható módon.
Lower the cross-brace on to the L and R boxes.
Çapraz desteği L ve R kutularının üzerine indirin.
Položte příčnou vzpěru na krabice L a R.
Helyezze a keresztmerevítőt az L és R jelölésű
dobozra.
2 holes/İki delik
Dva otvory/
Két nyílás
Left/Sol
Levá strana/
Bal oldal (Left)
Right/Sağ
Pravá strana/
Jobb oldal (Right)
1 hole/Tek delik
Jeden otvor/
Egy nyílás
Now you will need the bag of screws and the
screwdriver provided. You may notice that the
screwdriver is slightly magnetic.
Bundan sonra sağlanan vida poşetini ve
tornavidayı kullanmanız gerekir. Tornavidanın
biraz manyetik olduğunu dikkat edin.
Budete potřebovat přiložený balíček se šrouby
a šroubovák. Všimněte si, že šroubovák je mírně
magnetický.
Keresse meg a csavarokat és a csavarhúzót
tartalmazó csomagot. A csavarhúzó kissé
mágneses.
CM766-90004.indd 4 30/01/2009 11:07:43

13 14 15 16
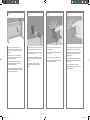
Fix the left leg to the cross-brace using four
screws on the inner side of the leg.
Sol ayağı, ayağın iç tarafındaki dört vidayı
kullanarak çapraz desteğe sabitleyin.
Připevněte levou nohu k příčné vzpěře čtyřmi
šrouby na vnitřní straně nohy.
Rögzítse a bal oldali lábat a keresztmerevítőhöz
négy csavarral a láb belső oldalán.
Remove the two leg covers from the left leg.
Sol ayaktan iki ayak kapağını çıkarın.
Z levé nohy sundejte dva kryty.
Távolítsa el az állvány lábairól a két borítólapot.
Lower the left leg onto the left side of the cross-
brace. The left leg will t only on the left side
of the cross-brace.
S o l a y ağı çapraz desteğin sol tarafına doğru
indirin. Sol ayak yalnızca çapraz desteğin sol
tarafına takılır.
Postavte levou nohu na levou stranu příčné
vzpěry. Levou nohu lze připevnit pouze na
levou stranu příčné vzpěry
Helyezze a bal oldali lábat a keresztmerevítő
bal oldalára. A bal oldali láb csak a
keresztmerevítő bal oldalához illeszkedik.
Fix the left leg to the cross-brace using two
screws on the outer side of the leg.
Sol ayağı, ayağın dış tarafındaki iki vidayı
kullanarak çapraz desteğe sabitleyin.
Připevněte levou nohu k příčné vzpěře dvěma
šrouby na vnější straně nohy.
Rögzítse a bal oldali lábat a keresztmerevítőhöz
két csavarral a láb külső oldalán.
CM766-90004.indd 5 30/01/2009 11:07:43

17 18 19 20
Fix the right leg to the cross-brace using two
screws on the outer side of the leg.
Sağ ayağı, ayağın dış tarafındaki iki vidayı
kullanarak çapraz desteğe sabitleyin.
Připevněte pravou nohu k příčné vzpěře dvěma
šrouby na vnější straně nohy.
Rögzítse a jobb oldali lábat a keresztmerevítőhöz
két csavarral a láb külső oldalán.
Lower the right leg onto the right side of the
cross-brace. The right leg will t only on the
right side of the cross-brace.
Sağ ayağı çapraz desteğin sağ tarafına doğru
indirin. Sağ ayak yalnızca çapraz desteğin sağ
tarafına takılır.
Postavte pravou nohu na pravou stranu příčné
vzpěry. Pravou nohu lze správně připevnit pouze
na pravou stranu příčné vzpěry.
Helyezze a jobb oldali lábat a keresztmerevítő
jobb oldalára. A jobb oldali láb csak a
keresztmerevítő jobb oldalához illeszkedik.
Fix the right leg to the cross-brace using four
screws on the inner side of the leg.
Sağ ayağı, ayağın iç tarafındaki dört vidayı
kullanarak çapraz desteğe sabitleyin.
Připevněte pravou nohu k příčné vzpěře čtyřmi
šrouby na vnitřní straně nohy.
Rögzítse a jobb oldali lábat a keresztmerevítőhöz
négy csavarral a láb belső oldalán.
Position a foot on the left leg. There are pins to
help you to position the foot correctly. Do not
remove the anti-slip material from the wheel.
Sol ayakla, ayak uçlarından birini hizalayın.
Ayağı doğru hizalamanız için pimler mevcuttur.
Kaymayı engelleyen malzemeyi tekerlerden
çıkarmayın.
Na levou nohu umístěte podstavu. Správné
umístění podstavy zajistí čepy. Nesundavejte
protiskluzový materiál z koleček.
Helyezze a talpat a bal oldali lábra. A talp
lábra való pontos felhelyezését peckek segítik.
Ne távolítsa el a csúszásgátló anyagot a
görgőről.
CM766-90004.indd 6 30/01/2009 11:07:43

21 22 23 24
Fix the right foot using four screws.
Sağ ayak ucunu dört vidayla sabitleyin.
Pravou nohu upevněte čtyřmi šrouby.
Rögzítse a jobb talpat négy csavarral.
Fix the left foot using four screws.
Sol ayak ucunu dört vidayla sabitleyin.
Levou podstavu upevněte čtyřmi šrouby.
Rögzítse a bal talpat négy csavarral.
Position a foot on the right leg. There are pins
to help you to position the foot correctly. Do not
remove the anti-slip material from the wheel.
Sağ ayakla ayak uçlarından birini hizalayın.
Ayağı doğru hizalamanız için pimler mevcuttur.
Kaymayı engelleyen malzemeyi tekerlerden
çıkarmayın.
Umístěte podstavu na pravou nohu. Pro
správné umístění podstav jsou k dispozici čepy.
Neodebírejte protiskluzový materiál z koleček.
Helyezze a talpat a jobb oldali lábra. A talp
lábra való pontos felhelyezését peckek segítik.
Ne távolítsa el a csúszásgátló anyagot a
görgőről.
You now need to identify the left and right of the
printer. This information is shown on the foam
end packs. Also identify the rear of the printer.
Şimdi yazıcının sağ ve sol kenarlarını bulun.
Bu bilgi için köpükten yapılmış uç parçalara
bakın. Ayrıca yazıcının arka tarafını da bulun.
Budete muset rozpoznat levou a pravou
stranu tiskárny. Tato informace je zobrazena
na obalovém materiálu z pěnové hmoty.
Určete i zadní část tiskárny.
Ellenőrizze, hogy melyik a nyomtató bal és jobb
oldala. Ezt a habszivacs védőcsomagolás két
végéről olvashatja le. Keresse meg a nyomtató
hátulját is.
CM766-90004.indd 7 30/01/2009 11:07:43

25 26 27 28
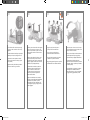
x2
Lift the stand assembly onto the printer body.
The anti-slip material should face to the rear
of the printer.
Kaide aksamını yazıcının üzerine kaldırın.
Kaymayı engelleyen malzeme yazıcının arka
tarafına doğru bakıyor olmalıdır.
Zvedněte sestavený podstavec na tělo tiskárny.
Protiskluzový materiál by měl směřovat k zadní
části tiskárny.
Emelje az állványt a nyomtatóra. A csúszásgátló
anyagnak a nyomtató hátoldala felé kell néznie.
Pull open the protective plastic from the base
of the printer. Please ensure that there is
a three-meter space clear of obstructions to the
rear of the printer. Remove the two desiccant
bags from the printer.
Koruyucu plastiği yazıcının tabanından çekerek
ayırın. Yazıcının arka tarafından itibaren en
az üç metrelik boş alan olmalıdır. Nem emici
poşetleri yazıcıdan çıkarın.
Odstraňte ochranný plast zespodu tiskárny.
Zkontrolujte, zda je za tiskárnou k dispozici
třímetrový prostor bez překážek. Z tiskárny
vyndejte dva sáčky s vysoušecím činidlem.
Húzza szét és nyissa fel a nyomtató aljánál a
műanyag védőcsomagolást. Ellenőrizze, hogy
legalább három méter szabad terület maradjon
a nyomtató hátsó felénél. Távolítsa el a két
nedvszívó csomagolóanyagot a nyomtatóból.
Advance warning: in the next step, make sure
you position the stand pins in the holes in the
center of the printer body brackets.
Önceden uyarı: Bir sonraki adımda, kaide
pimlerini yazıcı gövdesi desteklerinin orta
tarafındaki deliklere hizalamaya dikkat edin.
Předběžné upozornění: V dalším kroku zajistěte,
aby byly čepy podstavce umístěny v otvorech
ve středu konzol těla tiskárny.
Előzetes gyelmeztetés: A következő lépésnél
gyeljen arra, hogy az állványon levő peckeket
a nyomtató középső nyílásaiba helyezze.
3m (9ft)
Left leg/Sol ayak.
Levá noha/Bal láb.
Right leg/Sağ ayak.
Pravá noha/Jobb láb.
Fix the right side of the stand to the printer
using one screw. Make sure that the screw
is fully tightened.
Tek bir vida ile kaidenin sağ tarafını yazıcıya
sabitleyin. Vidanın iyice sıkıştırılmış olduğuna
emin olun.
Připevněte pravou stranu podstavce k tiskárně
pomocí jednoho šroubu. Zkontrolujte, zda je
šroub utažen.
Rögzítse az állvány jobb oldalát a nyomtatóhoz
egy csavarral. Húzza meg a csavart.
CM766-90004.indd 8 30/01/2009 11:07:43

29 30 31 32
x4
Using four people, rotate the printer on
to the spare and consumables boxes.
Dört kişi ile yazıcıyı yedek ve tüketim
malzemeleri kutuları üzerinde döndürün.
Ve čtyřech lidech otočte tiskárnu ke krabicím
s náhradním a spotřebním materiálem.
Négy ember együttesen forgassa rá a nyomtatót
a tartalék dobozra és a tartozékok dobozára.
Fix the left side of the stand to the printer using
two screws. Make sure that the screws are fully
tightened.
İki vida ile kaidenin sol tarafını yazıcıya sabitleyin.
Vidaların iyice sıkıştırılmış olduğuna emin olun.
Připevněte levou stranu podstavce k tiskárně
pomocí jednoho šroubu. Zkontrolujte, zda jsou
šrouby utaženy.
Rögzítse az állvány bal oldalát a nyomtatóhoz
két csavarral. Húzza meg a csavarokat.
Place the spare and consumables boxes against
the rear of the printer box. The arrows on the
boxes must point towards the printer box. Check
that the anti-slip material is still xed to the two
rear wheels.
Yedek ve tüketim malzemeleri kutularını yazıcı
kutusunun arka tarafına yerleştirin. Kutuların
üzerindeki oklar yazıcı kutusunu işaret etmelidir.
Kaymayı engelleyen malzemenin iki arka tekere
sabitlenmiş olup olmadığını denetleyin.
Umístěte krabice s náhradním a spotřebním
materiálem k zadní straně krabice tiskárny.
Šipky na krabici musí ukazovat směrem
ke krabici s tiskárnou. Zkontrolujte, zda je
protiskluzový materiál stále připevněn ke
dvěma zadním kolečkům.
Helyezze a tartalék dobozt és a tartozékok
dobozait a nyomtató dobozának hátoldalához.
A dobozokon levő nyilaknak a nyomtató
doboza felé kell mutatniuk. Ellenőrizze, hogy
a csúszásgátló anyag még mindig rajta van-e
a hátsó görgőkön.
Rotate the printer until its rear rests on the spare
and consumables boxes and the wheels with the
anti-slip material touch the oor.
Yazıcıyı, arka tarafı yedek ve tüketim malzemeleri
kutularına dayanana ve kaymayı engelleyen
malzemeli tekerler yere değene kadar döndürün.
Otáčejte tiskárnu, dokud její zadní strana
nespočine na krabicích s náhradním a spotřebním
materiálem a kolečka s protiskluzovým materiálem
se dotknou podlahy.
Forgassák addig a nyomtatót, amíg az teljesen
biztonságosan ül a tartalék dobozon és a
tartozékok dobozán, úgy, hogy a csúszásgátló
anyaggal bevont görgők érintsék a padlót.
CM766-90004.indd 9 30/01/2009 11:07:44

33 34 35 36
x4
Rotate the printer into an upright position. The
anti-slip material should stop the printer from
sliding forwards.
Yazıcıyı dik duruma getirecek şekilde döndürün.
Kaymayı engelleyen malzemenin yazıcının öne
doğru kaymasını engellemesi gerekir.
Otáčejte tiskárnou, až bude stát na výšku.
Protiskluzový materiál by měl zabránit
posouvání tiskárny dopředu.
Forgassák el a nyomtatót függőleges állásba.
A csúszásgátló anyag nem engedi előre csúszni
a nyomtatót.
Remove the pallet before trying to lift the printer
into an upright position.
Yazıcıyı dik konuma getirmeden önce paleti
kaldırın.
Před zdvižením tiskárny na výšku odeberte
paletu.
Távolítsa el a raklapot, mielõtt megpróbálnák
felállítani a nyomtatót.
Using four people and the hand holds on the
rear of the printer body, carefully lift the printer
into an upright position.
Dört kişiyle ve yazıcının arka tarafındaki el
tutma yerlerini kullanarak yazıcıyı dikkatlice
dik konuma getirin.
Ve čtyřech lidech opatrně zdvihněte tiskárnu
za držadla na zadní části do polohy na výšku.
Négy ember fogja meg a nyomtatót a
hátoldalán levő fogantyúknál, és óvatosan
emeljék a nyomtatót függőleges helyzetbe.
Remove the two foam end packs and the plastic
covering the printer.
İki köpük uç parçasını ve yazıcıyı kapatan plastik
örtüyü çıkarın.
Sundejte oba těsnicí díly z pěnové hmoty a obal
z umělé hmoty.
Távolítsa el a nyomtató két végéről a habszivacsot
és a műanyag borítást.
CM766-90004.indd 10 30/01/2009 11:07:44

37 38 39 40
Remove the anti-slip material from the two rear
wheels on the stand assembly.
Kaymayı engelleyen malzemeyi kaide aksamı
üzerindeki iki arka tekerden ayırın.
Sundejte protiskluzový materiál z obou zadních
koleček na podstavci.
Távolítsa el a csúszásgátló anyagot az állvány
két hátsó görgőjéről.
Position the left leg cover on the front of the left
leg (1), then clip the rear edge (2) into place.
Sol ayak kapağını sağ ayağın ön tarafına getirin
(1), daha sonra arka kenarı yerine tutturun (2).
Umístěte kryt levé nohy před levou nohu (1)
a zaklapněte zadní hranu (2) na místo.
Igazítsa a bal láb borítólapját a bal láb
elejéhez (1), majd pattintsa helyére a hátsó
élét (2).
Position the right leg cover on the front of the right
leg (1), then clip the rear edge (2) into place.
Sağ ayak kapağını sağ ayağın önüne getirin (1),
daha sonra arka kenarı yerine tutturun (2)
Umístěte kryt pravé nohy před pravou nohu (1)
a zaklapněte zadní hranu (2) na místo.
Igazítsa a jobb láb borítólapját a jobb láb
elejéhez (1), majd pattintsa helyére a hátsó
élét (2).
Remove the packing tapes 1 to 8. Open the
printer window and remove the two window
inserts 9 and 10.
Ambalaj bantlarını (1 – 8 ile numaralı) çıkarın.
Yazıcı penceresini açın ve 9 ve 10’a ekleneniki
pencereyi kaldırın.
Sundejte balicí pásky 1 až 8. Otevřete průhledný
kryt tiskárny a odstraňte výplně krytu 9 a 10.
Távolítsa el a csomagoló szalagokat (1-8).
Nyissa ki a nyomtató ablakát, és vegye ki
a két ablakbetétet (9 és 10).
CM766-90004.indd 11 30/01/2009 11:07:44

41 42 43 44
Open the printhead cleaner door and remove
the carriage packing material. Then close the
cleaner door.
Yazıcı kafası temizleyicisi kapağını açın ve
taşıyıcı paket malzemesini çıkarın. Daha sonra
temizleyici kapağını kapatın.
Otevřete dvířka pro čisticí kazetu tiskové hlavy
a odstraňte obal vozíku. Dvířka pro čisticí
kazetu zavřete.
Nyissa fel a nyomtatófej-tisztító ajtót, és távolítsa
el a papírtovábbító csomagolóanyagát. Csukja
be a tisztítóajtót.
Remove the protective covering from the printer
window and the front panel screen.
Koruyucu örtüyü yazıcının penceresinden
ve ön panel ekranından çıkarın.
Sundejte ochranný obal průhledného krytu
tiskárny a obrazovky předního panelu.
Távolítsa el a nyomtató felnyitható ablakának
és az előlap kijelzőjének védőborítását.
Remove the spindle lock.
Mil kilidini çıkarın.
Odstraňte blokovací prvek vřetena.
Távolítsa el az orsórögzítő zárját.
Press the spindle lever down, which will unseat
the right-hand end of the spindle. Remove that
end of the spindle rst, and then the left.
Mil kolunu aşağıya doğru bastırın; milin sağ
tarafını yerinden oynatır. Önce milin sağ tarafını,
sonra da sol tarafını kaldırın.
Stisknutím páčky vřetena dolů uvolněte pravý
konec vřetena. Nejprve sundejte tento konec
vřetena, potom levý konec.
Nyomja le az orsókart, ezáltal kiszabadítva az
orsó jobb végét. Először ezt, majd az orsó bal
végét is emelje ki a rögzítőből.
CM766-90004.indd 12 30/01/2009 11:07:44

45 46 47 48
Use four screws to attach the brackets to the
lower part of the printer legs. (Each bracket
requires two screws.)
Dört vidayla bu parçaları yazıcı bacaklarının
alt kısmına sabitleyin. (Her parça için iki vida
gerekir.)
Pomocí čtyř šroubů připevněte držáky k dolní
části noh tiskárny. (Budete potřebovat dva
šrouby pro každý držák.)
Négy csavarral rögzítse a tartóelemeket a
nyomtató lábainak alsó részéhez. (Mindkét
tartóelemhez 2-2 csavar szükséges.)
Remove the spindle lock foam piece. Then
replace the spindle.
Mil kilidi köpük parçasını çıkarın. Daha sonra
mili değiştirin.
Odeberte pěnový díl blokovacího prvku vřetena.
Potom dejte znovu vřeteno na místo.
Távolítsa el az orsórögzítő habszivacs
csomagolását. Helyezze vissza az orsót.
Remove the two brackets from the box that
contains the stand and the bin. Note: The
brackets are marked L and R.
Sehpa ve bölmenin bulunduğu kutudan
iki montaj parçasını çıkarın. Not: Parçalar
L ve R hareriyle işaretlenmiştir.
Z krabice se stojanem a zásobníkem vyjměte
dva držáky. Poznámka: Držáky jsou označeny
písmeny L a R.
Vegye ki a két tartóelemet az állvány és
papírtartó egység dobozából. Megjegyzés:
A tartóelemek L (bal) és R (jobb) jelöléssel
vannak ellátva.
Attach the two plastic brackets to the top part
of the printer legs. Insert the tab at the bottom
of the bracket into the leg, and then ‘click’ the
top of the bracket into place.
İki plastik parçayı yazıcı bacaklarının üst
kısmına takın. Parçanın altındaki çıkıntıyı
bacaktaki yerine sokun, sonra parçanın üst
kısmının tıklama sesiyle yerine oturmasını
sağlayın.
Připevněte plastové držáky k vrchní části noh
tiskárny. Zasuňte zarážku na dolní straně držáku
do nohy a vrchní část držáku přitlačte k noze,
až s cvaknutím dosedne na místo.
Rögzítse a két műanyag tartóelemet a nyomtató
lábainak felső részéhez. Illessze a műanyag
tartóelem alján található fület a láb nyílásába,
majd pattintsa a helyére a tartóelemek tetejét.
CM766-90004.indd 13 30/01/2009 11:07:45

49 50 51 52
Insert the bin cross-bar into the two plastic
brackets.
Bölme çubuğunu iki plastik parçaya sokun.
Vložte příčnou vzpěru zásobníku do plastových
držáků.
Illessze a papírtartó keresztmerevítőjét a két
műanyag tartóelembe.
Remove the bin assembly from the box that
contains the stand and the bin.
Sehpa ve bölmenin bulunduğu kutudan bölmeyi
çıkarın.
Z krabice se stojanem a zásobníkem vyjměte
zásobník.
Vegye ki a papírtartó egységet az állvány
és papírtartó egység dobozából.
Insert the two bin arms into the bin cross-bar.
İki bölme kolunu bölme çubuğuna sokun.
IZasuňte ramena zásobníku do příčné vzpěry
zásobníku.
Illessze a két papírtartó kart a papírtartó
keresztmerevítőjébe.
Click the ends of both bin arms into the metal
brackets.
Her iki bölme kolunun uçlarını metal parçalara
sokarak yerleştirin.
Zacvakněte konce obou ramen zásobníku do
kovových držáků.
A két papírtartó kar végét illessze a fém
tartóelemekbe.
CM766-90004.indd 14 30/01/2009 11:07:45

53 54 55 56
Use the blue handle to open the bin. HP
recommends that you leave the bin in the closed
position while completing the printer assembly
procedures.
Bölmeyi açmak için mavi renkli kolu kullanın.
HP, yazıcı montajını yaparken bölmeyi kapalı
konumda bırakmanızı önerir.
Zásobník lze otevřít pomocí modrého úchytu.
Během sestavování tiskárny je doporučeno
nechávat zásobník zavřený.
A kék fogantyú segítségével nyissa ki a papírtartót.
A nyomtató összeszerelése alatt a HP azt ajánlja,
tartsa a papírtartót zárt állásban.
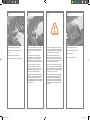
If the power light on the front panel remains off,
press the Power key to switch on the printer.
Ön paneldeki güç ışığı kapalı kalmaya devam
ederse, yazıcıyı açmak için Power (Güç)
düğmesine basın.
Pokud zůstane kontrolka napájení na předním
panelu zhasnuta, zapněte tiskárnu stisknutím
tlačítka Power.
Ha az előlapon továbbra sem világít a
tápellátás jelzőfény, nyomja meg a nyomtató
Tápellátás gombját.
Plug the power cable into the rear of the printer,
then plug the other end into the AC power outlet.
Yazıcı kablosunu yazıcının arka tarafına diğer
ucunu ise duvar prizine takın.
Zapojte napájecí kabel do zadní části tiskárny
a druhý konec kabelu do zásuvky se střídavým
proudem.
Csatlakoztassa a tápkábelt a nyomtató
hátoldalához, a másik végét pedig a fali
aljzatba.
Turn the power switch at the rear of the printer
to the on position.
Yazıcının arka tarafındaki güç anahtarını açık
konuma getirin.
Zapněte vypínač na zadní straně tiskárny.
Állítsa a nyomtató hátoldalán levő tápellátás
kapcsolót bekapcsolt állásba.
CM766-90004.indd 15 30/01/2009 11:07:45

57 58 59 60
Find the ink cartridge door, which is on the left
side of the printer.
Mürekkep kartuşu kapağını bulun; yazıcının sol
tarafındadır.
Najděte dvířka pro inkoustovou kazetu na levé
straně tiskárny.
Keresse meg a tintapatron ajtaját a nyomtató
bal oldalán.
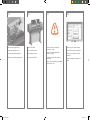
Wait until you see this message (~10 minutes).
Highlight your language using the Up and Down
keys. Press the Select (ü) key.
Şu mesajı görene kadar bekleyin: (~10 dakika).
Yukarı ve Aşağı tuşlarını kullanarak dilinizi
vurgulayın. Seç (ü) düğmesine basın.
Počkejte, až uvidíte tuto zprávu (asi 10 minut)
Označte vybraný jazyk pomocí tlačítek Nahoru
a Dolů. Stiskněte tlačítko Vybrat (ü).
Várjon a fenti üzenet megjelenéséig (kb. 10 perc).
Válassza ki a kívánt n yelvet a Fel és Le gombok
segítségével. Nyomja meg a Kiválasztás (ü)
gombot.
The front panel will now display how to install
the ink supplies.
Ön panelde şimdi mürekkep sarf malzemelerini
nasıl takacağınıza dair yönergeler görüntülenir.
Na předním panelu se nyní zobrazí informace
o tom, jak vložit inkoustové kazety.
Az előlapon megjelennek a tintakellékek
telepítésére vonatkozó utasítások.
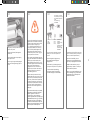
Remove the printheads, printhead cleaners,
and ink cartridges from the consumables box.
Yazıcı kafalarını, yazıcı kafası temizleyicileri
ve mürekkep kartuşlarını kutularından çıkarın.
Vyjměte tiskové hlavy, čisticí kazety tiskových
hlav a inkoustové kazety z krabic se spotřebním
materiálem.
Vegye ki a nyomtatófejeket, a nyomtatófej-
tisztítókat és a tintapatronokat a tartozékok
dobozából.
CM766-90004.indd 16 30/01/2009 11:07:45

61 62 63 64
Slide the ink cartridge drawer out.
Mürekkep kartuşu çekmecesine dışarı çekin.
Vysuňte zásuvku pro inkoustovou kazetu.
Húzza ki a tintapatronókot.
Press the ink cartridge door.
Mürekkep kartuşu kapağına basın.
Stiskněte dvířka pro inkoustovou kazetu.
Nyomja meg a tintapatron ajtaját.
Open the ink cartridge door.
Mürekkep kartuşu kapağını açın.
Otevřete dvířka pro inkoustovou kazetu.
Nyissa ki a tintapatron ajtaját.
To release the ink cartridge drawer, pull the
blue handle down.
Mürekkep kartuşu çekmecesini açmak için,
mavi kolu aşağıya itin.
Uvolněte zásuvku pro inkoustovou kazetu
zatažením za modrý úchyt.
Atintapatronók kioldásához húzza lefelé
a kék kart.
CM766-90004.indd 17 30/01/2009 11:07:45

65 66 67 68
Following the same instructions, install the other
three ink cartridges.
Aynı yönergeleri izleyerek, diğer üç mürekkep
kartuşunu da takın.
Stejným způsobem vložte ostatní tři kazety
s inkoustem.
Ugyanilyen módon helyezze be a további
három tintapatront is.
Place the ink cartridge onto the ink cartridge
drawer. Note that there are marks on the
drawer showing the correct location.
Mürekkep kartuşunu mürekkep kartuşu çekmecesine
yerleştirin. Bu çekmecenin üzerinde doğru konumu
gösteren işaretler vardır.
Umístěte inkoustovou kazetu do zásuvky.
Na zásuvce jsou značky, které ukazují
správné umístění.
Helyezze a tintapatront a tintapatronókra.
A ókon levő jelzések alapján ellenőrizze,
hogyan kell behelyezni helyesen a tintapatront.
Position the ink cartridge at the rear of the
drawer as indicated.
Mürekkep kartuşunu çekmecenin arka tarafına
gösterildiği gibi yerleştirin.
Umístěte inkoustovou kazetu do zadní části
zásuvky.
Helyezze a tintapatront a ók hátuljába,
a jelzett módon.
Push the ink cartridge drawer back into the
printer until it locks into poition.
Mürekkep kartuşu çekmecesini yerine oturana
kadar yazıcının içine itin.
Zatlačte zásuvku pro kazetu s inkoustem zpět
do tiskárny, až zapadne do své polohy.
Tolja vissza a tintapatron ókját a nyomtatóba,
amíg helyére nem kattan.
CM766-90004.indd 18 30/01/2009 11:07:46

69 70 71 72
Remove the packing tape that is holding down
the printhead carriage latch.
Yazıcı kartuşu mandalını aşağıda tutan paket
bantlarını çıkarın.
Odstraňte balicí pásku, která přidržuje západku
vozíku tiskové hlavy.
Távolítsa el a nyomtatófejkocsi zárját rögzítő
ragasztószalagot.
Close the ink cartridge door.
Mürekkep kartuşu kapağını kapatın.
Zavřete dvířka pro kazetu s inkoustem.
Csukja be a tintapatron ajtaját.
Wait (about a minute) until you see this front
panel message.
Bu ön panel mesajını görene kadar (bir dakika
kadar) bekleyin.
Počkejte asi minutu, až se na předním panelu
zobrazí tato zpráva.
Várjon ( körülbelül egy percet), hogy megjelenjen
az előlapon az ábrán látható üzenet.
Open the printer window.
Yazıcının penceresini açın.
Otevřete průhledný kryt tiskárny.
Nyissa fel a nyomtató ablakát.
CM766-90004.indd 19 30/01/2009 11:07:46

73 74 75 76
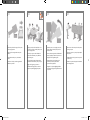
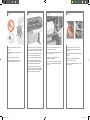
To remove a setup printhead, lift up the blue
handle.
Kurulum yazıcı kafasını çıkarmak için mavi
kolu kaldırın.
Abyste mohli nastavovací tiskovou hlavu vyjmout,
zvedněte modrý úchyt.
A telepítő nyomtatófej eltávolításához nyissa
fel a kék színű kart.
Pull up and release the latch on top of the
carriage assembly.
Taşıyıcı aksamı üzerindeki mandalı çekin ve
serbest bırakın.
Zatáhnutím uvolněte západku navrchu vozíku.
Felfelé húzva oldja ki a kocsi tetején levő zárat.
Lift up the cover. This will give you access to the
setup printheads.
Kapağı kaldırın. Bu, kurulum yazıcı kafalarına
erişmenize izin verir.
Zvedněte kryt. Získáte tím přístup k nastavovacím
tiskovým hlavám.
Nyissa fel a fedelet. Így már hozzáférhet
a telepítő nyomtatófejekhez.
Before removing the setup printheads, look at
the window on top of each one and check that
the printhead contains ink.
Kurulum yazıcı kafalarını çıkarmadan önce,
yazıcı kafalarında mürekkep olduğundan emin
olmak için her birinin üst tarafındaki pencereyi
denetleyin.
Před výměnou nastavovacích tiskových hlav
se podívejte do okénka na každé z nich a
zkontrolujte, zda tisková hlava obsahuje inkoust.
Mielőtt eltávolítaná a telepítő nyomtatófejeket,
a nyomtatófej tetején levő kis ablakban
ellenőrizze, hogy van-e a nyomtatófejben tinta.
CM766-90004.indd 20 30/01/2009 11:07:46
Sayfa yükleniyor...
Sayfa yükleniyor...
Sayfa yükleniyor...
Sayfa yükleniyor...
Sayfa yükleniyor...
Sayfa yükleniyor...
Sayfa yükleniyor...
Sayfa yükleniyor...
Sayfa yükleniyor...
Sayfa yükleniyor...
Sayfa yükleniyor...
Sayfa yükleniyor...
Sayfa yükleniyor...
Sayfa yükleniyor...
-
 1
1
-
 2
2
-
 3
3
-
 4
4
-
 5
5
-
 6
6
-
 7
7
-
 8
8
-
 9
9
-
 10
10
-
 11
11
-
 12
12
-
 13
13
-
 14
14
-
 15
15
-
 16
16
-
 17
17
-
 18
18
-
 19
19
-
 20
20
-
 21
21
-
 22
22
-
 23
23
-
 24
24
-
 25
25
-
 26
26
-
 27
27
-
 28
28
-
 29
29
-
 30
30
-
 31
31
-
 32
32
-
 33
33
-
 34
34


HP DesignJet 4020 Printer series Assembly Instructions
- Tip
- Assembly Instructions
diğer dillerde
- slovenčina: HP DesignJet 4020 Printer series
- English: HP DesignJet 4020 Printer series
İlgili makaleler
-
HP DesignJet 4520 Printer series Assembly Instructions
-
-
-
HP DesignJet T1200 Printer series Assembly Instructions
-
-
-
-
-
HP Color LaserJet 9500 Multifunction Printer series Hızlı başlangıç Kılavuzu
-
HP DESKJET 460 Kullanici rehberi