
ThinkPad eSATA/USB Secure Hard Drive
User Guide


ThinkPad eSATA/USB Secure Hard Drive
User Guide

Note
Before installing the product, be sure to read the information in Appendix B, “Lenovo Limited Warranty,” on page B-1 and
“Before you begin the installation” on page .
Important
For tips to help you use your computer safely, go to:
http://www.lenovo.com/safety
First Edition (January 2010)
© Copyright Lenovo 2010.
LENOVO products, data, computer software, and services have been developed exclusively at private expense and
are sold to governmental entities as commercial items as defined by 48 C.F.R. 2.101 with limited and restricted
rights to use, reproduction and disclosure.
LIMITED AND RESTRICTED RIGHTS NOTICE: If products, data, computer software, or services are delivered
pursuant a General Services Administration ″GSA″ contract, use, reproduction, or disclosure is subject to restrictions
set forth in Contract No. GS-35F-05925.
1-3

Contents
Chapter 1. About the ThinkPad
eSATA/USB Secure Hard Drive ....1-1
Product description ...........1-1
Secure hard drive button panel .......1-2
Chapter 2. Installing the ThinkPad
eSATA/USB Secure Hard Drive ....2-1
Before you begin the installation .......2-1
Installing the secure hard drive .......2-1
Chapter 3. Using the ThinkPad
eSATA/USB Secure Hard Drive ....3-1
Entering and exiting the Standby Mode, Admin
Mode, and User Mode ..........3-1
Entering the Standby Mode ........3-1
Entering the Admin Mode ........3-1
Exiting the Admin Mode.........3-1
Entering the User Mode .........3-1
Exiting the User Mode .........3-2
Password Management ..........3-2
Changing the Admin Password......3-2
Adding a new User Password .......3-3
Deleting the User Password........3-3
Changing the User Password .......3-3
Completely resetting the secure hard drive . . . 3-4
Initializing and formatting the secure hard drive
after a complete reset ...........3-4
Using the ThinkVantage Rescue and Recovery
program with the secure hard drive ......3-5
Hibernating, suspending, or logging off from the
operating system ............3-5
Chapter 4. Troubleshooting .....4-1
Appendix A. Service and Support. . . A-1
Registering your option ..........A-1
Online technical support .........A-1
Telephone technical support ........A-1
Appendix B. Lenovo Limited Warranty B-1
Warranty Information ..........B-4
Suplemento de Garantía para México .....B-5
Appendix C. Notices ........C-1
Recycling information ..........C-2
Trademarks ..............C-2
Appendix D. Electronic emission
notices ..............D-1
Federal Communications Commission Declaration
of Conformity .............D-1
Appendix E. Restriction of Hazardous
Substances Directive (RoHS).....E-1
China RoHS ..............E-1
Turkish statement of compliance .......E-1
© Copyright Lenovo 2010 iii

iv ThinkPad eSATA/USB Secure Hard Drive User Guide

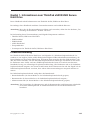
Chapter 1. About the ThinkPad eSATA/USB Secure Hard Drive
This manual provides information about the ThinkPad eSATA/USB Secure Hard Drive.
The appendices of this manual contain warranty information and legal notices.
Note: Before you install and use the option, be sure to read “Before you begin the installation” on page
1-3.
This option package includes:
v ThinkPad eSATA/USB Secure Hard Drive
v USB data cable
v USB power cable
v eSATA data cable
v Carrying case
v ThinkPad eSATA/USB Secure Hard Drive warranty poster
Product description
The ThinkPad eSATA/USB Secure Hard Drive (hereafter called the secure hard drive) is a portable,
light-weight, eSATA, high-speed USB 2.0 standard option that offers high level data security. You can
transfer data through either the USB connector or the eSATA connector on the secure hard drive. In
addition to all the regular eSATA and USB hard disk drive functions, it also provides you with an
easy-to-use full disk encryption solution. All the functions are integrated into the secure hard drive;
therefore, you can manage passwords and access the secure hard drive without using other software
applications.
The secure hard drive has three working modes:
v Standby Mode (In this mode, the secure hard drive is locked.)
v User Mode (In this mode, the secure hard drive is unlocked.)
v Admin Mode (In this mode, the secure hard drive is locked.)
Note: Passwords are required for the Admin Mode and the User Mode. Accordingly, they are called the
Admin Password and the User Password.
© Copyright Lenovo 2010 1-1
®

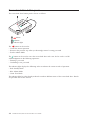
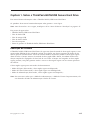
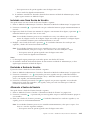
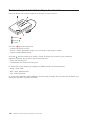
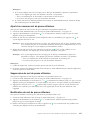
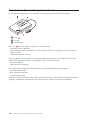
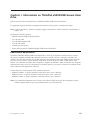
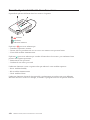
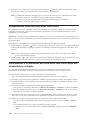
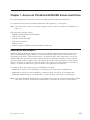
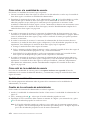
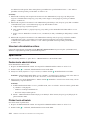
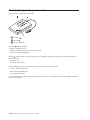
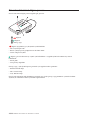
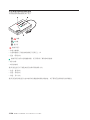
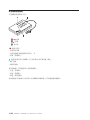
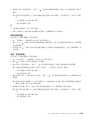
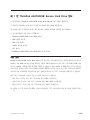
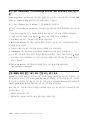
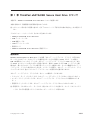
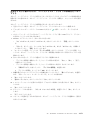
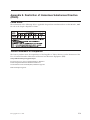
Secure hard drive button panel
The secure hard drive button panel is shown as follows:
OK
1 button
2
button
3 Indicator light
The
button can be used to:
v Cancel the current operation
v Return to the previous step when you knowingly entered a wrong password
v Exit the Admin Mode
The
button can be used to access the secure hard drive and it can also be used as an OK
acknowledgement in the following operations:
v Entering a password
v Confirming a new password
The indicator light displays the following colors to indicate the various modes of operation:
v Red: Standby Mode
v Blue: Admin Mode
v Green: User Mode
The indicator light has other display methods to indicate different status of the secure hard drive. Details
are provided later in this manual.
1-2 ThinkPad eSATA/USB Secure Hard Drive User Guide

Chapter 2. Installing the ThinkPad eSATA/USB Secure Hard
Drive
This chapter provides information about installing the secure hard drive.
Before you begin the installation
Be sure to review the following information before you begin to install and use the secure hard drive.
Attention: Use only the cables that come with this option. You might damage the drive if you use a
cable not included in the option package. The option is designed for portable use without an ac power
adapter. Do not attach an ac power adapter to this drive.
v To avoid damaging your secure hard drive, handle with care. When transporting the drive or when it
is not in use, place it in the carrying case that comes with the option.
v For reliable performance of the secure hard drive, make sure that the USB data cable, the USB power
cable, and the eSATA data cable are attached directly from the drive to the computer USB connectors
or to an ac-powered USB hub. Do not connect the USB cables to a non-powered USB hub.
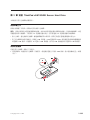
Installing the secure hard drive
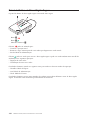
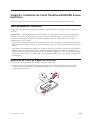
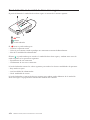
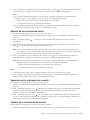
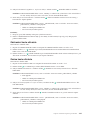
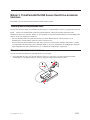
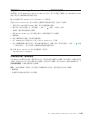
To install the secure hard drive, do the following:
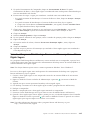
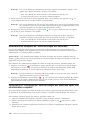
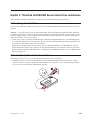
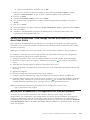
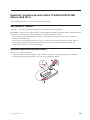
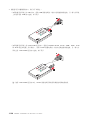
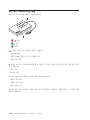
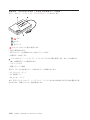
1. Attach one end of the power cable to the secure hard drive, and then attach the other end to an
available USB connector on your computer. The indicator light turns red, as shown:
OK
© Copyright Lenovo 2010 1-3

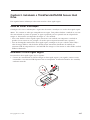
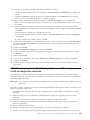
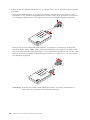
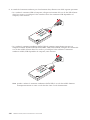
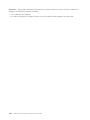
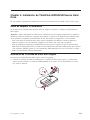
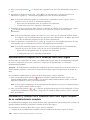
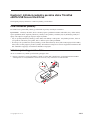
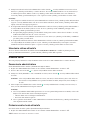
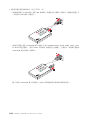
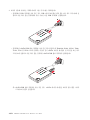
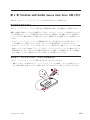
2. Depending on the connector you are using to transfer data, do one of the following:
v If you are using the USB connector on your computer, attach one end of the USB data cable to the
secure hard drive, and then attach the other end to another available USB connector on your
computer, as shown:
OK
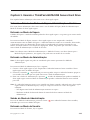
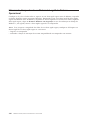
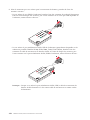
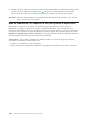
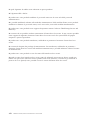
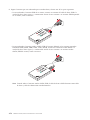
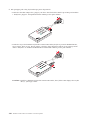
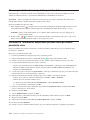
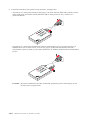
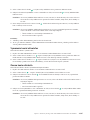
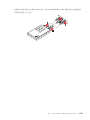
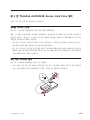
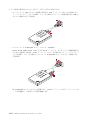
v If you are using the eSATA/USB combo connector on your computer (typically found on ThinkPad
SL410, SL510, T400s, T410s, T510, and W510 notebook computers), attach one end of the eSATA
data cable to the secure hard drive, and then attach the other end to the eSATA/USB combo
connector on your computer, as shown:
OK
Note: When you are using the eSATA/USB combo connector, the eSATA data cable functions as a
data cable and power cable simultaneously.
1-4 ThinkPad eSATA/USB Secure Hard Drive User Guide

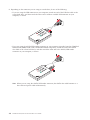
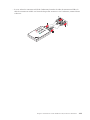
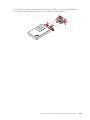
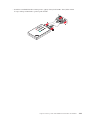
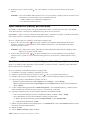
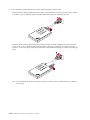
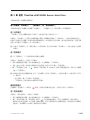
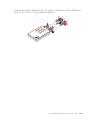
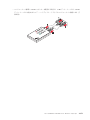
v If you are using the standard eSATA connector on your computer, attach both the USB data cable
and the eSATA data cable to the secure hard drive and your computer, as shown:
OK
Chapter 2. Installing the ThinkPad eSATA/USB Secure Hard Drive 1-5

1-6 ThinkPad eSATA/USB Secure Hard Drive User Guide

Chapter 3. Using the ThinkPad eSATA/USB Secure Hard Drive
This chapter provides information about using the secure hard drive.
Entering and exiting the Standby Mode, Admin Mode, and User Mode
This section provides information about how to enter and exit the Standby Mode, Admin Mode, and User
Mode of your secure hard drive.
Entering the Standby Mode
The Standby Mode is the default working mode of the secure hard drive and is the gateway to other
working modes.
To enter the Standby Mode, attach the secure hard drive to your computer. The drive automatically goes
into Standby Mode and the indicator light turns red. In this mode, the secure hard drive is locked. It
cannot be recognized by the operating system and it does not provide either the regular functions or the
encryption function. However, it enables you to enter and switch between the Admin Mode and the User
Mode.
Note: To switch between the Admin Mode and the User Mode, you are required to switch to the Standby
Mode first, and then you can enter the mode of your choice.
Entering the Admin Mode
Note: The secure hard drive cannot be recognized by the operating system in the Admin Mode.
To enter the Admin Mode, do the following:
1. Attach the secure hard drive to your computer. The indicator light turns red. The secure hard drive
goes into the Standby Mode.
2. Press and hold
+0 for five seconds until the indicator light flashes red. This indicates that you can
enter the Admin Password.
3. Enter the Admin Password and press
. The default Admin Password is 12345678. The secure hard
drive is in Admin Mode when the indicator light has changed to blue.
Note: If the indicator light flashes red for a few seconds, indicating the secure hard drive has returned to
the Standby Mode, go back to step 2. This is due to one of the following conditions:
v You entered an incorrect Admin Password in step 3.
v No activity was detected within two minutes in the Admin Mode.
Exiting the Admin Mode
To exit the Admin Mode, press the button until the indicator light turns red, indicating that you are
in the Standby Mode.
Entering the User Mode
To enter the User Mode, do the following:
1. Attach the secure hard drive to your computer. The indicator light turns red. The secure hard drive
goes into the Standby Mode.
2. Enter the User Password or the Admin Password and press
. The indicator light turns green,
indicating that the secure hard drive is in the User Mode. If the indicator light flashes red, this
© Copyright Lenovo 2010 1-7

indicates that you entered the wrong password. You can either choose to reset your secure hard drive
or try again. For more instructions on resetting your secure hard drive, see “Completely resetting the
secure hard drive” on page 1-10.
Notes:
1. If you incorrectly type the User Password or the Admin Password six consecutive times, the secure
hard drive will no longer respond and the indicator light will turn off. You will need to remove the
secure hard drive and then re-attach it to your computer for additional password attempts.
2. After you incorrectly type the User Password or the Admin Password 50 consecutive times, the secure
hard drive will be locked and the indicator light flashes red quickly. To unlock the secure hard drive,
do the following:
a. Remove the secure hard drive from your computer.
b. Press and hold the 5 button while re-attaching the secure hard drive to your computer. The
indicator light flashes red and green alternately.
c. Press 5278879. The indicator light turns solid red, indicating that the secure hard drive is unlocked
for additional password attempts.
3. After you incorrectly type the User Password or the Admin Password 100 consecutive times, the
secure hard drive will be locked with the indicator light flashing red quickly. The secure hard drive
now has to be completely reset and formatted. See more information in “Completely resetting the
secure hard drive” on page 1-10.
Exiting the User Mode
To exit the User Mode, click the Safely Remove Hardware icon in the notification area on the
desktop, and then remove the secure hard drive from your computer.
Password Management
This section provides information about managing your passwords in the Admin Mode and User Mode.
Changing the Admin Password
You can change the Admin Password by doing the following:
1. Enter the Admin Mode. See “Entering the Admin Mode” on page 1-7.
2. Press and hold
+9 until the indicator light flashes blue.
3. Enter the new password (a minimum of 8 digits and a maximum of 16 digits) and press
. The
indicator light flashes green three times.
Note: If the indicator light flashes red three times, this indicates that the password is less than 8
digits or more than 16 digits. Enter a password that contains 8–16 digits after the indicator light
flashes blue intermittently.
4. Re-enter the new Admin Password and press
. The indicator light stays solid green for three
seconds and the Admin Password is changed successfully.
Notes:
a. If the indicator light flashes red for three times and then blue intermittently, go back to step 3.
This is due to one of the following conditions:
v You waited longer than 10 seconds before entering a password.
v The new password was entered incorrectly.
b. If no activity is detected within two minutes in the Admin Mode, the secure hard drive will return
to the Standby Mode.
1-8 ThinkPad eSATA/USB Secure Hard Drive User Guide
Windows
®
Microsoft
®

Adding a new User Password
You can add a new User Password by doing the following:
1. Enter the Admin Mode. See “Entering the Admin Mode” on page 1-7.
2. Press and hold
+1 until the indicator light flashes blue intermittently.
3. Enter a User Password (a minimum of 8 digits and a maximum of 16 digits) and press
. The
indicator light flashes green three times.
Note: If the indicator light flashes red three times, this indicates that the password is less than 8
digits or more than 16 digits. Enter a password that contains 8–16 digits after the indicator light
flashes blue intermittently.
4. Re-enter the new User Password and press
. If the indicator light stays solid green for three
seconds, the User Password is added successfully.
Note: If the indicator light flashes red for three times and then blue intermittently, go back to step 3.
This is due to one of the following conditions:
v You waited longer than 10 seconds before entering a password.
v The new password was entered incorrectly.
Notes:
1. The secure hard drive enables you to have only one User Password.
2. If no activity is detected within two minutes in the Admin Mode, the secure hard drive will return to
the Standby Mode.
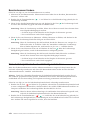
Deleting the User Password
You can delete the User Password by doing the following:
1. Enter the Admin Mode. See “Entering the Admin Mode” on page 1-7.
2. Press and hold 7+8+
for five seconds until the indicator light flashes blue intermittently. After that
the indicator light will flash green for three times and then blue intermittently.
3. Press and hold 7+8+
a second time for five seconds until the indicator light goes on solid green for
three seconds and then back to solid blue. This indicates that the User Password is deleted
successfully.
Changing the User Password
You can change the User Password by doing the following:
1. Enter the User Mode. See “Entering the User Mode” on page 1-7.
2. Press and hold
+1 for five seconds until the indicator light flashes red.
3. Enter the current User Password and press
. The indicator light turns green for three seconds, and
then it will flash blue intermittently.
Note: If the indicator light flashes red intermittently, go back to step 2. This is due to one of the
following conditions:
v You waited longer than 10 seconds before entering a password.
v The new password was entered incorrectly.
4. Enter the new password (a minimum of 8 digits and a maximum of 16 digits) and press
. The
indicator light flashes green three times and then blue intermittently.
Note: If the indicator light flashes red three times, this indicates that the password is less than 8
digits or more than 16 digits. Enter a password that contains 8–16 digits after the indicator light
flashes blue intermittently.
Chapter 3. Using the ThinkPad eSATA/USB Secure Hard Drive 1-9

5. Re-enter the new password and press . When the indicator light stays solid green, this indicates
that the User Password has been changed successfully.
Note: If the indicator light flashes red three times and then blue intermittently, go back to Step 4. This
is due to one of the following conditions:
v You waited longer than 10 seconds before entering a password.
v The new password was entered incorrectly.
Completely resetting the secure hard drive
If you forget all the User Passwords or Admin Passwords, you can perform a complete reset to remove
all the User Passwords, and restore the Admin Password to the default 12345678.
Attention: Completely resetting the secure hard drive will erase all the data on the drive. You will need
to partition and format the secure hard drive with disk management applications.
To perform a complete reset of the secure hard drive, do the following:
1. Press and hold the
button while you attach the secure hard drive to an available USB connector,
eSATA connector, or eSATA/USB combo connector on your computer. The indicator light will flash
blue and red alternately.
Note: If no activity is detected for 30 seconds in this step, the secure hard drive will go into the
Standby Mode.
2. Press and hold
+ +2 for 10 seconds until the indicator light turns solid blue, and then green, and
then red. The drive will need to be removed and reattached before continuing.
Initializing and formatting the secure hard drive after a complete reset
A complete reset of the secure hard drive will erase all information and partition settings. You will need
to initialize and format the secure hard drive.
To initialize your secure hard drive, do the following:
1. After a complete reset, attach the secure hard drive to the computer.
2. Enter the default User Password 12345678 and press
to enter the User Mode.
3. Wait until the operating system successfully installs all the USB device drivers for the secure hard
drive.
4. From the Windows desktop, do one of the following:
v Right-click My computer or Computer, and then click Manage.
v Click Start, move the cursor to My Computer or Computer and right-click it, and then click
Manage
5. In the Computer Management window, click Disk Management. In the Disk Management window,
the secure hard drive is recognized as an unknown device that is uninitialized and unallocated.
6. Do one of the following to make the drive recognized as a basic drive.
v If the Initialize and Convert Disk Wizard window opens, click Next → Next → Finish.
v If the Initialize and Convert Disk Wizard window does not open, do the following:
a. Right-click Unknown Disk, and then select Initialize Disk.
b. In the Initialize Disk window, click OK.
7. Right-click in the blank area under the Unallocated section, and then select New Partition. The
Welcome to the New Partition Wizard window opens.
8. Click Next.
9. Select Primary partition and click Next.
1-10 ThinkPad eSATA/USB Secure Hard Drive User Guide

10. If you need only one partition, accept the default partition size and click Next.
11. Click Next.
12. Create a volume label, select Perform a quick format, and then click Next.
13. Click Finish.
14. Wait until the format process is completed. The secure hard drive will be recognized and it will be
available for use.
Using the ThinkVantage Rescue and Recovery program with the
secure hard drive
If the ThinkVantage Rescue and Recovery program is installed on your computer, you can use the secure
hard drive as a backup storage device through either the USB connector or the eSATA connector on the
secure hard drive.
Note: This function only works with the and Windows 7 operating systems.
To use the secure hard drive as a backup storage device with the Rescue and Recovery program, do the
following:
1. Attach the secure hard drive to your computer through an available USB connector or eSATA
connector.
2. Enter your User Password or Admin Password and press
to enter the User mode.
3. Wait until the operating system recognizes the secure hard drive.
4. Create backups and store them on the secure hard drive using the Rescue and Recovery program.
5. Turn off your computer.
6. Restart your computer with the secure hard drive attached to the computer.
7. Press the ThinkVantage button or F11 to enter the Rescue and Recovery workspace.
8. When the secure hard drive is powered on and ready for use, the indicator light turns solid red. Enter
your User password and press
to enter the User Mode. You can use the secure hard drive to rescue
files or restore your system.
Note: For more information about the Rescue and Recovery program, go to:
http://www.lenovo.com/support
Hibernating, suspending, or logging off from the operating system
Be sure to save and close all the files on your secure hard drive before hibernating, suspending, or
logging off from the Windows operating system. It is recommended that you log off the secure hard drive
manually before hibernating, suspending, or logging off from your system. To log off the secure hard
drive, click Safely Remove Hardware in the notification area on the Windows desktop, and then remove
the secure hard drive from your computer.
Attention: To ensure the data integrity of your secure hard drive, be sure to lock or log off your secure
hard drive if you are:
v away from your computer
v using the switching user function by sharing a computer with others
Chapter 3. Using the ThinkPad eSATA/USB Secure Hard Drive 1-11
Windows Vista
®
®
®

1-12 ThinkPad eSATA/USB Secure Hard Drive User Guide

Chapter 4. Troubleshooting
This section contains troubleshooting information for the secure hard drive. If you encounter any of the
following problems when using the secure hard drive, refer to the corresponding answers.
Q: How do I use the secure hard drive for the first time?
A: You can use it in one of the following ways:
v Enter the Admin Mode with 12345678 (default Admin Password). Then you are able to change the
Admin Password or create a User Password.
v Directly enter the secure User Mode with 12345678 (default Admin Password) to use the secure hard
drive.
Q: Why could I not enter the User Mode after I attached the secure hard drive to the computer and
entered the correct password?
A: Because the secure hard drive needs several seconds to be ready for password input. To solve the
problem, wait for several seconds after you attach the secure hard drive to the computer, and then enter
your password.
Q: What can I do if I forget the User Password?
A: You can create a new User Password. To create a new User Password, do the following:
1. Enter the Admin Mode using the Admin Password .
2. Delete the previous User Password. See “Deleting the User Password” on page 1-9.
3. Create your new User Password. See “Adding a new User Password” on page 1-9.
Q: What can I do if I forget the Admin Password?
A: There is no other way to retrieve the Admin Password except a complete reset of the secure hard
drive. After a complete reset, all data will be lost and you will need to initialize, allocate, and format the
secure hard drive manually. Then you will be able to use the default Admin Password 12345678.
Q: Why did the operating system not recognize the secure hard drive after I completely reset the
computer and entered the User Mode?
A: You need to initialize, allocate, and format the secure hard drive manually. For more information, refer
to “Initializing and formatting the secure hard drive after a complete reset” on page 1-10.
Q: Can I initialize and format the secure hard drive with a Windows user account?
A: No, this is a Windows limitation. You must use the Admin account to initialize and format the secure
hard drive.
Q: How do I use the secure hard drive without a password?
A: As a full disk encryption product, the secure hard drive can never be used without a password.
Q: What encryption algorithm is used in this product?
A: AES 256 bits algorithm.
© Copyright Lenovo 2010 1-13

Q: Why could I not change my User Password that has the same digits as the Admin password?
A: You can change it only in the Admin Mode. In the User Mode, the User Password that has the same
digits created in the Admin Mode cannot be changed or deleted.
Q: Why could I not create recovery media using the ThinkVantage Rescue and Recovery program?
A: Ensure that your secure hard drive can be accessed correctly. If you still cannot create recovery media,
format the secure hard drive with the NTFS file system of your computer and try again.
Q: Why could I not initialize, partition, or format the secure hard drive?
A: Ensure that you have administrator privileges. You can use only the administrator account to initialize,
partition, or format the secure hard drive in the Admin Mode.
Q: Why could the system not boot from the secure hard drive?
A: As this is a secure hard drive, before you use it, you will need several seconds to input a password
and unlock the secure hard drive. When the secure hard drive is unlocked, the system has already
finished the boot process. Therefore, the system could not boot from the secure hard drive.
1-14 ThinkPad eSATA/USB Secure Hard Drive User Guide
Sayfa yükleniyor...
Sayfa yükleniyor...
Sayfa yükleniyor...
Sayfa yükleniyor...
Sayfa yükleniyor...
Sayfa yükleniyor...
Sayfa yükleniyor...
Sayfa yükleniyor...
Sayfa yükleniyor...
Sayfa yükleniyor...
Sayfa yükleniyor...
Sayfa yükleniyor...
Sayfa yükleniyor...
Sayfa yükleniyor...
Sayfa yükleniyor...
Sayfa yükleniyor...
Sayfa yükleniyor...
Sayfa yükleniyor...
Sayfa yükleniyor...
Sayfa yükleniyor...
Sayfa yükleniyor...
Sayfa yükleniyor...
Sayfa yükleniyor...
Sayfa yükleniyor...
Sayfa yükleniyor...
Sayfa yükleniyor...
Sayfa yükleniyor...
Sayfa yükleniyor...
Sayfa yükleniyor...
Sayfa yükleniyor...
Sayfa yükleniyor...
Sayfa yükleniyor...
Sayfa yükleniyor...
Sayfa yükleniyor...
Sayfa yükleniyor...
Sayfa yükleniyor...
Sayfa yükleniyor...
Sayfa yükleniyor...
Sayfa yükleniyor...
Sayfa yükleniyor...
Sayfa yükleniyor...
Sayfa yükleniyor...
Sayfa yükleniyor...
Sayfa yükleniyor...
Sayfa yükleniyor...
Sayfa yükleniyor...
Sayfa yükleniyor...
Sayfa yükleniyor...
Sayfa yükleniyor...
Sayfa yükleniyor...
Sayfa yükleniyor...
Sayfa yükleniyor...
Sayfa yükleniyor...
Sayfa yükleniyor...
Sayfa yükleniyor...
Sayfa yükleniyor...
Sayfa yükleniyor...
Sayfa yükleniyor...
Sayfa yükleniyor...
Sayfa yükleniyor...
Sayfa yükleniyor...
Sayfa yükleniyor...
Sayfa yükleniyor...
Sayfa yükleniyor...
Sayfa yükleniyor...
Sayfa yükleniyor...
Sayfa yükleniyor...
Sayfa yükleniyor...
Sayfa yükleniyor...
Sayfa yükleniyor...
Sayfa yükleniyor...
Sayfa yükleniyor...
Sayfa yükleniyor...
Sayfa yükleniyor...
Sayfa yükleniyor...
Sayfa yükleniyor...
Sayfa yükleniyor...
Sayfa yükleniyor...
Sayfa yükleniyor...
Sayfa yükleniyor...
Sayfa yükleniyor...
Sayfa yükleniyor...
Sayfa yükleniyor...
Sayfa yükleniyor...
Sayfa yükleniyor...
Sayfa yükleniyor...
Sayfa yükleniyor...
Sayfa yükleniyor...
Sayfa yükleniyor...
Sayfa yükleniyor...
Sayfa yükleniyor...
Sayfa yükleniyor...
Sayfa yükleniyor...
Sayfa yükleniyor...
Sayfa yükleniyor...
Sayfa yükleniyor...
Sayfa yükleniyor...
Sayfa yükleniyor...
Sayfa yükleniyor...
Sayfa yükleniyor...
Sayfa yükleniyor...
Sayfa yükleniyor...
Sayfa yükleniyor...
Sayfa yükleniyor...
Sayfa yükleniyor...
Sayfa yükleniyor...
Sayfa yükleniyor...
Sayfa yükleniyor...
Sayfa yükleniyor...
Sayfa yükleniyor...
Sayfa yükleniyor...
Sayfa yükleniyor...
Sayfa yükleniyor...
Sayfa yükleniyor...
Sayfa yükleniyor...
Sayfa yükleniyor...
Sayfa yükleniyor...
Sayfa yükleniyor...
Sayfa yükleniyor...
Sayfa yükleniyor...
Sayfa yükleniyor...
Sayfa yükleniyor...
Sayfa yükleniyor...
Sayfa yükleniyor...
Sayfa yükleniyor...
Sayfa yükleniyor...
Sayfa yükleniyor...
Sayfa yükleniyor...
Sayfa yükleniyor...
Sayfa yükleniyor...
Sayfa yükleniyor...
Sayfa yükleniyor...
Sayfa yükleniyor...
Sayfa yükleniyor...
Sayfa yükleniyor...
Sayfa yükleniyor...
Sayfa yükleniyor...
Sayfa yükleniyor...
Sayfa yükleniyor...
Sayfa yükleniyor...
Sayfa yükleniyor...
Sayfa yükleniyor...
Sayfa yükleniyor...
Sayfa yükleniyor...
Sayfa yükleniyor...
Sayfa yükleniyor...
Sayfa yükleniyor...
Sayfa yükleniyor...
Sayfa yükleniyor...
Sayfa yükleniyor...
Sayfa yükleniyor...
Sayfa yükleniyor...
Sayfa yükleniyor...
Sayfa yükleniyor...
Sayfa yükleniyor...
Sayfa yükleniyor...
Sayfa yükleniyor...
Sayfa yükleniyor...
Sayfa yükleniyor...
Sayfa yükleniyor...
Sayfa yükleniyor...
Sayfa yükleniyor...
Sayfa yükleniyor...
Sayfa yükleniyor...
Sayfa yükleniyor...
Sayfa yükleniyor...
Sayfa yükleniyor...
Sayfa yükleniyor...
Sayfa yükleniyor...
Sayfa yükleniyor...
Sayfa yükleniyor...
Sayfa yükleniyor...
Sayfa yükleniyor...
Sayfa yükleniyor...
Sayfa yükleniyor...
Sayfa yükleniyor...
Sayfa yükleniyor...
Sayfa yükleniyor...
Sayfa yükleniyor...
Sayfa yükleniyor...
Sayfa yükleniyor...
Sayfa yükleniyor...
Sayfa yükleniyor...
Sayfa yükleniyor...
Sayfa yükleniyor...
Sayfa yükleniyor...
Sayfa yükleniyor...
Sayfa yükleniyor...
Sayfa yükleniyor...
Sayfa yükleniyor...
-
 1
1
-
 2
2
-
 3
3
-
 4
4
-
 5
5
-
 6
6
-
 7
7
-
 8
8
-
 9
9
-
 10
10
-
 11
11
-
 12
12
-
 13
13
-
 14
14
-
 15
15
-
 16
16
-
 17
17
-
 18
18
-
 19
19
-
 20
20
-
 21
21
-
 22
22
-
 23
23
-
 24
24
-
 25
25
-
 26
26
-
 27
27
-
 28
28
-
 29
29
-
 30
30
-
 31
31
-
 32
32
-
 33
33
-
 34
34
-
 35
35
-
 36
36
-
 37
37
-
 38
38
-
 39
39
-
 40
40
-
 41
41
-
 42
42
-
 43
43
-
 44
44
-
 45
45
-
 46
46
-
 47
47
-
 48
48
-
 49
49
-
 50
50
-
 51
51
-
 52
52
-
 53
53
-
 54
54
-
 55
55
-
 56
56
-
 57
57
-
 58
58
-
 59
59
-
 60
60
-
 61
61
-
 62
62
-
 63
63
-
 64
64
-
 65
65
-
 66
66
-
 67
67
-
 68
68
-
 69
69
-
 70
70
-
 71
71
-
 72
72
-
 73
73
-
 74
74
-
 75
75
-
 76
76
-
 77
77
-
 78
78
-
 79
79
-
 80
80
-
 81
81
-
 82
82
-
 83
83
-
 84
84
-
 85
85
-
 86
86
-
 87
87
-
 88
88
-
 89
89
-
 90
90
-
 91
91
-
 92
92
-
 93
93
-
 94
94
-
 95
95
-
 96
96
-
 97
97
-
 98
98
-
 99
99
-
 100
100
-
 101
101
-
 102
102
-
 103
103
-
 104
104
-
 105
105
-
 106
106
-
 107
107
-
 108
108
-
 109
109
-
 110
110
-
 111
111
-
 112
112
-
 113
113
-
 114
114
-
 115
115
-
 116
116
-
 117
117
-
 118
118
-
 119
119
-
 120
120
-
 121
121
-
 122
122
-
 123
123
-
 124
124
-
 125
125
-
 126
126
-
 127
127
-
 128
128
-
 129
129
-
 130
130
-
 131
131
-
 132
132
-
 133
133
-
 134
134
-
 135
135
-
 136
136
-
 137
137
-
 138
138
-
 139
139
-
 140
140
-
 141
141
-
 142
142
-
 143
143
-
 144
144
-
 145
145
-
 146
146
-
 147
147
-
 148
148
-
 149
149
-
 150
150
-
 151
151
-
 152
152
-
 153
153
-
 154
154
-
 155
155
-
 156
156
-
 157
157
-
 158
158
-
 159
159
-
 160
160
-
 161
161
-
 162
162
-
 163
163
-
 164
164
-
 165
165
-
 166
166
-
 167
167
-
 168
168
-
 169
169
-
 170
170
-
 171
171
-
 172
172
-
 173
173
-
 174
174
-
 175
175
-
 176
176
-
 177
177
-
 178
178
-
 179
179
-
 180
180
-
 181
181
-
 182
182
-
 183
183
-
 184
184
-
 185
185
-
 186
186
-
 187
187
-
 188
188
-
 189
189
-
 190
190
-
 191
191
-
 192
192
-
 193
193
-
 194
194
-
 195
195
-
 196
196
-
 197
197
-
 198
198
-
 199
199
-
 200
200
-
 201
201
-
 202
202
-
 203
203
-
 204
204
-
 205
205
-
 206
206
-
 207
207
-
 208
208
-
 209
209
-
 210
210


diğer dillerde
- slovenčina: Lenovo 57Y4400 Používateľská príručka
- español: Lenovo 57Y4400 Manual de usuario
- français: Lenovo 57Y4400 Manuel utilisateur
- italiano: Lenovo 57Y4400 Manuale utente
- 日本語: Lenovo 57Y4400 ユーザーマニュアル
- čeština: Lenovo 57Y4400 Uživatelský manuál
- Deutsch: Lenovo 57Y4400 Benutzerhandbuch
- português: Lenovo 57Y4400 Manual do usuário
- English: Lenovo 57Y4400 User manual
İlgili makaleler
-
Lenovo ThinkPad 43R2018 Kullanım kılavuzu
-
Lenovo Y510/Y530/Y710/Y730/V550 6 Cell Battery Kullanım kılavuzu
-
-
Lenovo ThinkPad Series Kullanım kılavuzu
-
-
-
Lenovo 3000 N100 Kullanım kılavuzu
-
-
-
Lenovo ThinkPad T420s Kullanma Kılavuzu