HP LaserJet M4345 Multifunction Printer series Hızlı başlangıç Kılavuzu
- Kategori
- Yazdır
- Tip
- Hızlı başlangıç Kılavuzu

HP LaserJet M4345 MFP
Getting Started Guide
µ
Başlangıç Kılavuzu

Copyright and License
© 2006 Copyright Hewlett-Packard Development Company, L.P.
Reproduction, adaptation or translation without prior written
permission is prohibited, except as allowed under the
copyright laws.
The information contained herein is subject to change
without notice.
The only warranties for HP products and services are set
forth in the express warranty statements accompanying such
products and services. Nothing herein should be construed as
constituting an additional warranty. HP shall not be liable for
technical or editorial errors or omissions contained herein.
Part number: CB425-90960
Edition 1, 10/2006
FCC Regulations
This equipment has been tested and found to comply with the
limits for a Class B digital device, pursuant to Part 15 of the
FCC rules. These limits are designed to provide reasonable
protection against harmful interference in a residential
installation. This equipment generates, uses, and can radiate
radio-frequency energy. If this equipment is not installed and
used in accordance with the instructions, it may cause
harmful interference to radio communications. However, there is
no guarantee that interference will not occur in a particular
installation. If this equipment does cause harmful interference
to radio or television reception, which can be determined by
turning the equipment off and on, correct the interference by
one or more of the following measures:
• Reorient or relocate the receiving antenna.
• Increase separation between equipment and receiver.
• Connect equipment to an outlet on a circuit different from
that to which the receiver is located.
• Consult your dealer or an experienced radio/TV technician.
Any changes or modifications to the printer that are not
expressly approved by HP could void the user’s authority to
operate this equipment. Use of a shielded interface cable is
required to comply with the Class B limits of Part 15 of FCC
rules. For more regulatory information, see the
HP LaserJet M4545MFP printer electronic user guide.
Hewlett-Packard shall not be liable for any direct, indirect,
incidental, consequential, or other damage alleged in
connection with the furnishing or use of this information.

1
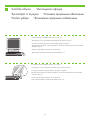
•Overview
•Unpack the device.
•Prepare the hardware.
•Set up the control panel.
•Install the software.
•Prepare the site.
•Install the send fax driver.
•Set up digital send.
•
• .
• .
• .
• .
• .
• .
• .
•
• .
•µ .
•µ .
• µ.
•µ .
• µµ .
•µ .
•
• .
• .
• .
• .
• .
• .
• .
•Genel bakış
•Aygıtı ambalajından çıkarın.
•Donanımı hazırlayın.
•Kontrol panelini ayarlayın.
•Yazılımı yükleyin.
•Yeri hazırlayın.
•Faks gönderme sürücüsünü yükleyin.
•Sayısal gönderme işlevini ayarlayın.
•
•.
• .
• .
• .
• .
• .
• .

1
2
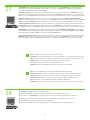
•Prepare the site
•Select a well-ventilated, dust-free area to position the device.
•
• , .
•µ
• µ µ , .
• .
• .
•Yeri hazırlayın
•Aygıtı yerleştirmek için iyi havalandırılan, tozlanmayan bir alan seçin.
• .
• .

2
!
3
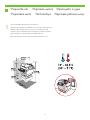
•Unpack the device.
•Install paper tray 3 (+ bundle only).
•Use this guide for the full accessory installation. Disregard the individual guides in the product boxes .
• .
• 3 (+ ).
• .
.
• .
• 3 (+ µ µ).
• µ µ. µµµ
.
• .
• 3 ( ).
• . ,
, .
•Aygıtı ambalajından çıkarın.
•Kağıt tepsisi 3'ü takın (+ yalnızca paket).
•Tüm aksesuarların takılması ile ilgili olarak bu kılavuzdan yararlanın. Ürün kutularındaki diğer kılavuzları dikkate almayın .
•.
• 3 ( + bundle).
• . .

3
4
4
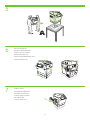
•Unpack the MFP.
•Remove the packaging.
• MFP.
• .
• MFP .
• .
• MFP.
• .
•MFP'yi kutusundan çıkarın.
•Ambalaj malzemelerini çıkarın.
• .
• .

6
7
5
5
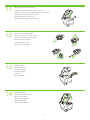
•Remove the shipping tape.
•Install the output bin.
• .
• .
• .
• .
• .
• .
•Taşıma sırasında kullanılan bantları çıkarın.
•Çıkış bölmesini takın.
• .
• .

!
6
•You are done unpacking the device. Now proceed to the next step: Preparing the hardware.
• . : .
• µ . µ µ: µ .
• . : .
•Aygıtın ambalaj malzemelerini çıkarmış oldunuz. Şimdi bir sonraki adıma geçin: Donanımı hazırlayın.
• . : .

9
10
8
7
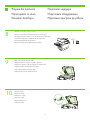
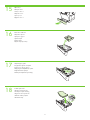
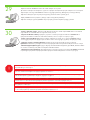
•Prepare the hardware.
•Lift the scanner lid and remove the foam.
•Unlock the scanner.
•Attach the control panel overlay (if necessary).
• .
• .
• .
• ( ).
•µ .
• .
• .
• ( ).
• .
• .
• .
• ( ).
•Donanımı hazırlayın.
•Tarayıcı kapağını kaldırın ve köpüğü çıkarın.
•Tarayıcının kilidini açın.
•Kontrol paneli kaplamasını takın (gerekliyse).
• .
• .
• .
• ( ).

12
13
14
11
8
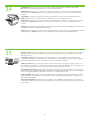
•Remove the toner cartridge packaging.
•Install the cartridge.
•Close the cartridge door.
•Lift the cartridge door and remove the foam.
• .
• .
• .
• .
• .
• .
• .
• .
• .
• .
• .
• .
•Kartuşu takın.
•Kartuş kapağını kapatın.
•Kartuş kapağını kaldırın ve köpüğü çıkarın.
•Toner kartuş ambalajını çıkarın.
• .
• .
• .
• .

15
16
17
18
9
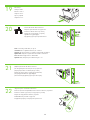
•Open tray 2.
•Remove the cardboard.
•Adjust the paper guides.
•Load the print media.
• .
• 2.
• .
• .
• .
• 2.
•µ .
• µ .
• .
• 2.
• .
• .
•Kartonu çıkarın.
•Tepsi 2'yi açın.
•Kağıt kılavuzlarını ayarlayın.
•Yazdırma ortamını yerleştirin.
• .
• 2.
• .
• .

19
20
22
21
2
1
10
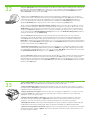
•Connect the network cable to the device.
•Close tray 2.
•Plug in the power cord and turn on the device
•(Optional) Connect the fax cable to the device.
• Note: If connecting a USB cable, see step 27.
• .
• 2.
•
•( ) .
• : USB , . 27.
• .
• 2.
•
•() .
• µ: USB, µ 27.
• .
• 2.
• .
• ().
• . USB . 27.
•Ağ kablosunu aygıta bağlayın.
•Tepsi 2'yi kapatın.
•Elektrik kablosunu prize takın ve aygıtı açın.
•(İsteğe bağlı) Faks kablosunu aygıta bağlayın.
• Not: USB kablosu bağlıyorsanız 27. adıma bakın.
•’ .
• 2.
•’ .
•(’) ’ .
• . USB-, . . 27.

!
11
•You are done preparing the hardware. Proceed with: Set up the control panel.
• . : .
• µ µ . : µ .
• . .
•Donanımı hazırlamış oldunuz. Bir sonraki adım: Kontrol panelini ayarlayın.
• . : .

23
24
12
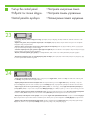
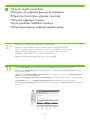
• Set language, date, time, and fax settings (if necessary) . If prompted, select your language, the date, and the time. Follow the instructions on the
control panel.
•Set up the control panel.
• Set the media size and type for the input trays . At the control panel, touch Supplies Status , and then touch Trays . Touch the name of the tray, and
touch Modify to change the media size or type for the tray.
• , , , ( ) . , , .
.
• .
• . , Supplies Status ( ),
Trays (). , Modify (), .
• µ , µµ, µ ( ) . , , µµ
. .
•µ .
• µ µ µ . , Supplies Status ( µ)
µ Trays (∆) . µ µ Modify () µ µ .
• , , ( ) . ,
. .
• .
• .
. .
• Dil, tarih, saat ve faks ayarlarını yapın (gerekliyse) . Sorulduğunda dilinizi, tarihi ve saati seçin. Kontrol panelindeki yönergeleri uygulayın.
•Kontrol panelini ayarlayın.
• Giriş tepsileri için ortam boyutunu ve türünü ayarlayın . Kontrol panelinde Supplies Status (Sarf Malzemeleri Durumu) seçeneğine ve ardından Trays (Tepsi-
ler) seçeneğine dokunun. Tepsinin adına dokunun ve ardından tepsinin ortam boyutunu veya türünü değiştirmek için Modify (Değiştir) seçeneğine dokunun.
• , , ( ) . ( ’ ) ,
. .
• .
• ( ) . Supplies Status ( ),
Trays (). , Modify () .

25
13
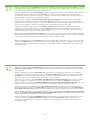
• Find the IP address . On the control panel, touch Network Address , and then touch Print to print the Jetdirect configuration page.
The IP address is on the Jetdirect page, under “TCP/IP”. Note: You might need to assign an IP address depending on the type of network
that is installed. See “Configure an IP address (if necessary)” on the next page, for more information.
• Note: If the address location displays a series of zeros, make sure that you are connected to the network and reprint the configuration
page.
• IP . Network Address ( ) Print (),
Jetdirect. IP Jetdirect, “TCP/IP”.
: IP . . “Configure an IP
address (if necessary)” ( IP ( )) .
• : , ,
.
• IP . , Network Address (∆ ) µ Print ()
µ Jetdirect. IP Jetdirect, “TCP/IP”.
µ: µ IP µ µ.
, “∆µ µ IP ( )” µ .
• µ: µ µ µ, µ
µ.
• IP . ,
Jetdirect. IP Jetdirect «TCP/IP». . ,
IP . . «
IP ( )» .
• . , ,
.
• IP adresini bulun . Jetdirect yapılandırma sayfasını yazdırmak için kontrol panelinde Network Address (Ağ Adresi) seçeneğine ve ardın-
dan Print (Yazdır) seçeneğine dokunun. IP adresi Jetdirect sayfasında, "TCP/IP" bölümünün altındadır. Not: Yüklü ağ türüne bağlı olarak
bir IP adresi atamanız gerekebilir. Daha fazla bilgi almak için bir sonraki sayfada “IP adresi yapılandırma (gerekliyse)" bölümüne
bakın.
• Not: Adres konumunda bir dizi sıfır görüntüleniyorsa ağa bağlı olduğunuzdan emin olun ve yapılandırma sayfasını yeniden yazdırın.
• IP- . Network Address ( ), Print ()
Jetdirect. IP- Jetdirect «TCP/IP». . ,
IP- ( ). . « IP- ( )»
.
• . , ’ .

26
14
• Configure the IP address (if necessary) . On the control panel, touch Administration . Scroll to and touch Initial Setup , and then touch
Networking and I/O . Touch Embedded Jetdirect , touch TCP/IP , and then touch IPV4 Settings . Touch Manual Settings , and then enter the
IP Address , Subnet Mask , and Default Gateway .
• IP ( ) . Administration ().
Initial Setup ( ), Networking and I/O ( I/O).
Embedded Jetdirect ( Jetdirect), TCP/IP , IPV4 Settings (IPV4 ).
Manual Settings ( ), IP Address (IP ), Subnet Mask (Subnet ), Default
Gateway ( ).
• ∆µ IP ( ) . , Administration (∆) .
(Initial Setup) µ Networking and I/O (∆ I/O) . Embedded
Jetdirect (µµ Jetdirect) , TCP/IP µ IPV4 Settings (µ IPV4) . Manual Settings ( µ µ)
µ IP , µ µ .
• IP ( ) . .
, / . Jetdirect ,
TCP/IP , IPV4 .
IP , .
• IP adresini yapılandırın (gerekliyse) . Kontrol panelinde Administration (Yönetim) seçeneğine dokunun. Initial Setup (İlk Ayar) seçene-
ğine gidin ve dokunun; ardından Networking and I/O (Ağ bağlantısı ve I/O) seçeneğine dokunun. Embedded Jetdirect (Katıştırılmış
Jetdirect) , TCP/IP ve ardından IPV4 Settings (IPV4 Ayarları) seçeneğine dokunun. Manual Settings (Elle Ayarlar) seçeneğine dokunun ve
ardından IP Address (IP Adresi) , Subnet Mask (Alt Ağ Maskesi) ve Default Gateway (Varsayılan Ağ Geçidi) değerlerini girin.
• IP- ( ) . Administration (). Initial
Setup ( ), Networking and I/O ( /). Jetdirect ,
TCP/IP IPV4 . IP- , .

!
15
•You are done with the setup of the control panel. Now move to your computer and proceed with: Install the software.
• . : .
• µ µ . , µ : µ.
• . .
•Kontrol panelini ayarlama işlemini yapmış oldunuz. Şimdi bilgisayarınıza geçip bir sonraki adımla devam edin: Yazılımı yükleyin.
• . ’ :

16
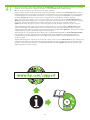
•For Macintosh software installation instructions, go to step 29.
•For Windows® software installation instructions, go to step 27.
•Install the software.
• Macintosh 29.
• Windows® 27.
• .
• µ.
• µ Macintosh, µ 29.
• µ Windows®, µ 27.
• Macintosh
29.
• Windows®
27.
• .
•Macintosh yazılım yükleme yönergeleri için 29. adıma geçin.
•Yazılımı yükleyin.
•Windows yazılım yükleme yönergeleri için 27. adıma geçin.
• Macintosh, . . 29.
• Windows®, . . 27.
• .

27
28
17
• Install software. 1) Insert the CD that came with the printer. 2) On the welcome screen, click Install Printer . The Setup Wizard appears.
3) Follow the on screen instructions. Note: If the welcome screen does not appear, click Start and then click Run . Type X:SETUP, where X
corresponds to the CD-ROM drive letter, and then click OK .
• 4) Click Finish . If prompted, restart the computer. 5) Go to step 33.
• Note: For a USB installation do not connect the USB cable until prompted by the software.
• Note: If installing a fax driver, choose the “custom” software install.
• . 1) , . 2) Install Printer (
). . 3) . : ,
Start () Run (). X:SETUP, X , OK .
• 4) Finish (). . 5) 33.
• : USB USB .
• : , “custom” () .
• µ. 1) CD . 2) , Install Printer ( ) .
µ " ". 3) . µ: µ , µ Start
() µ Run () . X:SETUP, X µµ µ CD-ROM µ OK .
• 4) µ Finish () . , . 5) µ 33.
• µ: µ USB, µ USB µ µ.
• µ: µµ , µµ (custom) µ.
• . 1) -, , . 2)
. . 3) . . ,
, . X:SETUP, «X» -, OK .
• 4) . . 5) 33.
• . USB, .
• . .
• Yazılımı yükleyin. 1) Yazıcıyla birlikte verilen CD'yi yerleştirin. 2) Hoş geldiniz ekranında Install Printer (Yazılımı yükle) seçeneğini tıklatın.
Kurulum Sihirbazı görüntülenir. 3) Ekrandaki yönergeleri uygulayın. Not: Hoş geldiniz ekranı görüntülenmezse Başlat 'ı ve ardından Çalıştır 'ı
tıklatın. X:SETUP yazın; burada X, CD-ROM sürücüsü harfidir ve ardından Tamam 'ı tıklatın.
• 4) Son 'u tıklatın. İstenirse bilgisayarı yeniden başlatın. 5) 33. adıma geçin.
• Not: USB yüklemesi için yazılım tarafından istenmeden USB kablosunu bağlamayın.
• Not: Bir faks sürücüsü yüklüyorsanız "özel" yazılım yüklemesini seçin.
• . 1) -, . 2)
Install Printer ( ). ’ . 3) . . ’,
. X:SETUP, X — -, OK .
• 4) . ’ , ’. 5) . 33.
• . USB ’ USB .
• . «custom» ().

30
29
18
• 2) Place the CD in the CD-ROM drive and run the installer. Complete an easy install.
• Connect to a Macintosh computer . 1) Connect a USB cable between the device and the computer. Note: HP does not recommend
using USB hubs. Use a USB cable that is no longer than 2 meters (6.5 feet).
• Note: Install the software before connecting the USB cable. If the USB cable was connected first, perform steps 32-33. If the software installation
was performed first, proceed to step 33.
• 2) . .
• acintosh . 1) USB . : HP
USB . USB , - 2 (6.5 ).
• : USB . USB , 32-33.
, 33.
• 2) CD µ CD-ROM µµ . µ .
• Macintosh . 1) USB µ . µ: HP
µ USB. µ USB µ µ 2 µ (6,5 ).
• µ: µ USB. USB, µ
32-33. µ, µ 33.
• 2) - . .
• Macintosh . 1) USB .
. HP USB. USB 2 .
!
• . USB. USB,
32–33. , 33.
• 2) CD'yi CD-ROM sürücüsüne yerleştirin ve yükleyiciyi çalıştırın. Kolay yüklemeyi tamamlayın.
• Macintosh bilgisayar bağlantısını yapın . 1) Aygıt ve bilgisayar arasında USB kablosu bağlantısını yapın. Not: HP, USB hub'ı kullanma-
nızı önermez. 2 metreden (6,5 feet) daha uzun olmayan bir USB kablosu kullanın.
• Not: USB kablosunu bağlamadan önce yazılımı yükleyin. Önce USB kablosu bağlanmışsa, 32-33. adımları gerçekleştirin. Önce yazılım yükleme
işlemi yapıldıysa 33. adıma geçin.
• 2) - CD-ROM . .
• ’ ’ Macintosh . 1) ’ ’ USB. . HP
USB. USB 2 (6,5 ).
• . ’ USB, . USB ’ ,
. 32-33. , . 33.
Sayfa yükleniyor...
Sayfa yükleniyor...
Sayfa yükleniyor...
Sayfa yükleniyor...
Sayfa yükleniyor...
Sayfa yükleniyor...
Sayfa yükleniyor...
Sayfa yükleniyor...
Sayfa yükleniyor...
Sayfa yükleniyor...
Sayfa yükleniyor...
Sayfa yükleniyor...
Sayfa yükleniyor...
Sayfa yükleniyor...
Sayfa yükleniyor...
Sayfa yükleniyor...
Sayfa yükleniyor...
Sayfa yükleniyor...
Sayfa yükleniyor...
Sayfa yükleniyor...
-
 1
1
-
 2
2
-
 3
3
-
 4
4
-
 5
5
-
 6
6
-
 7
7
-
 8
8
-
 9
9
-
 10
10
-
 11
11
-
 12
12
-
 13
13
-
 14
14
-
 15
15
-
 16
16
-
 17
17
-
 18
18
-
 19
19
-
 20
20
-
 21
21
-
 22
22
-
 23
23
-
 24
24
-
 25
25
-
 26
26
-
 27
27
-
 28
28
-
 29
29
-
 30
30
-
 31
31
-
 32
32
-
 33
33
-
 34
34
-
 35
35
-
 36
36
-
 37
37
-
 38
38
-
 39
39
-
 40
40


HP LaserJet M4345 Multifunction Printer series Hızlı başlangıç Kılavuzu
- Kategori
- Yazdır
- Tip
- Hızlı başlangıç Kılavuzu
diğer dillerde
İlgili makaleler
-
HP LaserJet M4345 Multifunction Printer series Hızlı başlangıç Kılavuzu
-
HP LaserJet M3035 Multifunction Printer series Hızlı başlangıç Kılavuzu
-
HP LaserJet M5035 Multifunction Printer series Hızlı başlangıç Kılavuzu
-
HP LaserJet M5025 Multifunction Printer series Hızlı başlangıç Kılavuzu
-
HP LaserJet M9040/M9050 Multifunction Printer series Hızlı başlangıç Kılavuzu
-
HP Color LaserJet CP3505 Printer series Hızlı başlangıç Kılavuzu
-
-
-
-