

1/12
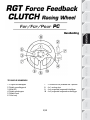
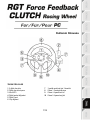
User Manual
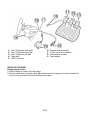
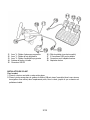
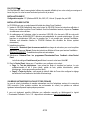
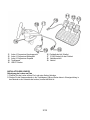
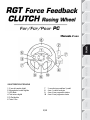
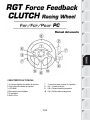
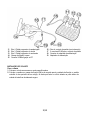
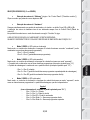
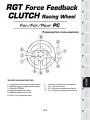
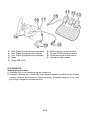
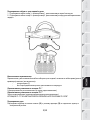
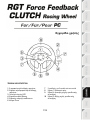
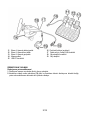
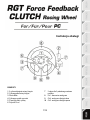
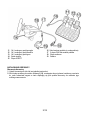
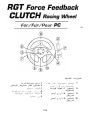
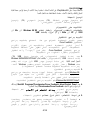
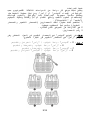
TECHNICAL FEATURES
1 2 digital gearshift levers
2 Digital gearshift knob
3 Mode LED
4 Digital action buttons
5 Digital D-pad
6 Force button
7 2 connectors for 3 pedals pedal set
8 Axis 1: Analog steering wheel
9 Axis 4: Progressive left lever
10 Axis 5: Progressive right lever

2/12
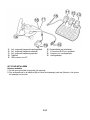
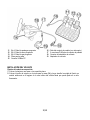
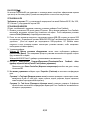
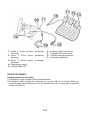
11 Axis 4: Progressive clutch pedal
12 Axis 3: Progressive brake pedal
13 Axis 2: Progressive gas pedal
14 Table clamp
15 USB PC connector
16 Pedal set cable (with switch)
17 2 RJ45 connectors for pedal set
18 Power adapter connector
19 Power adapter
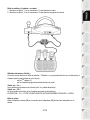
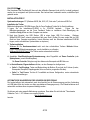
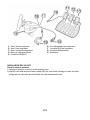
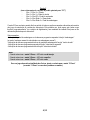
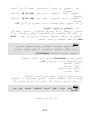
INSTALLING THE WHEEL
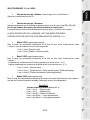
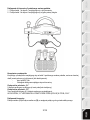
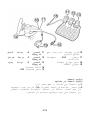
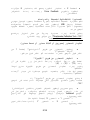
Fixing the wheel in place
1. Place the wheel on a table or other flat surface.
2. Place the clamp screw in the table clamp (14) and then screw the clamping unit counter-clockwise into
the hole on the underside of the wheel until firmly fixed in place.

3/12
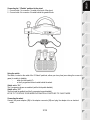
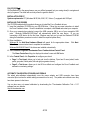
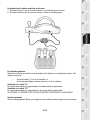
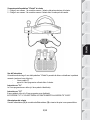
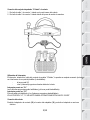
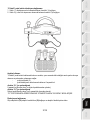
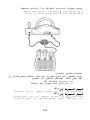
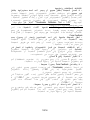
Connecting the “3 Pedals” pedal set to the wheel
1. Connect cable 1 to connector 1 located at the back of the wheel.
2. Connect cable 2 to connector 2 located behind the gearshift knob.
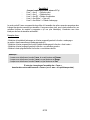
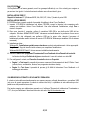
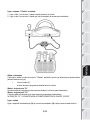
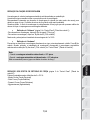
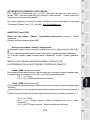
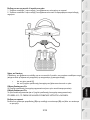
Using the switch
The switch, located on the cable of the “3 Pedals” pedal set, allows you at any time (even during the course of a
game) to enable (or disable):
- either the third pedal (C)
- or the 2 progressive levers located behind the wheel.
Switch set to “2 L”
The 2 progressive levers are enabled (and the third pedal disabled).
Switch set to “3 P”
The third pedal is enabled (and the 2 progressive levers disabled).
IN THE “3 P” POSITION, YOUR WHEEL AUTOMATICALLY SWITCHES TO “5 AXIS” MODE.
Connecting the wheel
Connect the power adapter (19) to the adapter connector (18) and plug the adapter into an electrical
outlet.

4/12
PLAYSTATION
3
On PlayStation®3, in the general menu, use your official gamepad (not your racing wheel) to navigate and
start your games. The wheel will work only when the game is started.
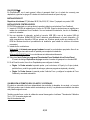
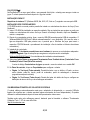
INSTALLATION FOR PC
System requirements: PC (Windows 98 SE, Me, 2000, XP, Vista or 7) equipped with USB port.
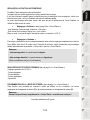
INSTALLING THE DRIVERS
The CD-ROM included with this product allows you to install the Force Feedback drivers.
1. Insert the installation CD-ROM into your CD-ROM drive. Follow the on-screen instructions to install
the Force Feedback drivers. Once the installation is complete, click Finish and restart your computer.
2. Once your computer has restarted, connect the USB connector (15) to one of your computer’s USB
ports. Windows 98/Me/2000/XP/Vista/7 will automatically detect the new device. (If you are
connecting a USB device for the first time, Windows may ask you to insert the Windows CD-ROM
during the installation procedure in order to install the required system files.)
3. Driver installation:
Windows 98: the Add New Hardware Wizard will search for the appropriate drivers. Click Next.
Follow the on-screen instructions to complete the installation.
Windows Me/2000/XP/Vista/7: the drivers are installed automatically.
4. Select Start/All Programs/Thrustmaster/Force Feedback driver/Control Panel.
The Game Controllers dialog box displays the wheel’s name with OK status.
5. In the Control Panel, click Properties to configure your wheel:
• Page 1 = Test input: allows you to test and view the buttons, D-pad and 5 axes (wheel, brake
pedal, gas pedal, clutch pedal, left and right progressive levers).
• Page 2 = Test forces: allows you to test 8 Force effects and configure the Force Feedback and
automatic re-centering settings.
AUTOMATIC CALIBRATION OF WHEEL AND PEDALS
The wheel auto-calibrates independently once the power adapter and USB connector have been
connected (this involves the wheel making movements on its own). The pedals auto-calibrate once they
have been pressed a few times.
You can also carry out manual calibration by downloading the “Thrustmaster Calibration Tool v 1.03”
software from our website:
http://ts.thrustmaster.com

5/12
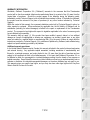
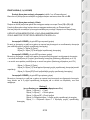
AXIS SELECTION (2, 3 or 5 AXES)
• Axis selection via “Software” (page 1 of the “Control Panel”)
Click the mode you wish to use and then click OK.
• Axis selection via “Hardware”
Press the gas and brake pedals and the Force button simultaneously (13) + (12) + (6).
Axis selection via hardware must always be carried out outside of the Control Panel!
This allows you to select your mode directly in your game’s “Controls” option.
AXIS SELECTION VIA “HARDWARE” IS ONLY AVAILABLE
WHEN THE SWITCH ON YOUR PEDAL SET IS IN THE “2 L” POSITION
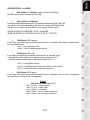
• 2 AXIS mode (LED is orange)
In this mode, your wheel’s gas and brake controls function in “combined” mode (and are combined with
the 2 progressive levers):
- Axis 1 = X axis (Steering wheel)
- Axis 2 = Y axis (Pedals/progressive levers)
• 3 AXIS mode (LED is red)
In this mode, your wheel’s gas and brake controls function in “separate” mode.
= the pedals are combined with the 2 progressive levers (switch set to “2 L”)
= the clutch pedal is combined with the brake pedal (switch set to “3 P”)
- Axis 1 = X axis (Steering wheel)
- Axis 2 = Y axis (Brake pedal / Progressive left lever / Clutch pedal)
- Axis 3 = RZ axis (Gas pedal / Progressive right lever)
• 5 AXIS mode (LED is green)
In this mode, your wheel’s gas and brake controls function in “separate” mode, as do the 2 progressive
levers and the clutch pedal, which are independent:
Option 1
(with pedal set switch set to “2 L”)
- Axis 1 = X axis = Steering wheel
- Axis 2 = Y axis = Brake pedal
- Axis 3 = RZ axis = Gas pedal
- Axis 4 = Slider 1 axis = Progressive right lever
- Axis 5 = Slider 0 axis = Progressive left lever

6/12
Option 2
(with pedal set switch set to “3 P”)
- Axis 1 = X axis = Steering wheel
- Axis 2 = Y axis = Brake pedal
- Axis 3 = RZ axis = Gas pedal
- Axis 4 = Slider 1 axis = Disabled
- Axis 5 = Slider 0 axis = Clutch pedal
The exclusive 5 axis mode allows you to enjoy all of the advanced options offered in most simulation-type
racing games. For the first time ever, you can now manage these new functions “progressively” (as
opposed to digitally), providing full immersion for fans of car racing simulations!
Various examples:
- Assignment of the clutch pedal or progressive left lever to the “clutch” function
(in “manual gearshift with manual clutch” mode)
- Assignment of the progressive right lever or clutch pedal to the “handbrake” function
- Assignment of the progressive left lever to the “left interior view” function
- Assignment of the progressive right lever to the “right interior view” function
Note:
- When you select 2 axis mode, the LED is Orange.
- When you select 3 axis mode, the LED is Red.
- When you select 5 axis mode, the LED is Green.
If your game does not accept all 5 axes, switch your wheel to “3 axis” mode
(or “2 axis” mode, if the problem persists).

7/12
RE-CENTERING FUNCTION SETTING
Wheel re-centering (Auto-center) is disabled by default.
Most recent games now offer their own re-centering mode.
You are strongly advised to disable wheel re-centering (in most cases), to allow the game to handle it. The
Force Feedback will then be of greater quality.
When enabled, re-centering mode is especially useful in games that do not feature Force Feedback or
which use weak re-centering.
• Setting via “Software” (page 2 of the “Control Panel”)
- to disable re-centering, click “By the game”.
- to enable re-centering, click “By the wheel”.
In this mode, you can adjust re-centering intensity from 0 to 100%.
• Setting via “Hardware”
To enable or disable re-centering directly in your game, simply press your wheel’s Force button (6). When
enabled, the intensity of re-centering corresponds to the percentage selected previously in the “By the
wheel” setting of the “Control Panel”.
Note :
- When Auto-center is enabled, the LED flashes.
- When Auto-center is disabled, the LED does not flash
(Recommended mode for Force Feedback games)
FORCE FEEDBACK EFFECTS SETTING (page 2 of the “Control Panel”)
4 settings can be set from 0 to 150 %:
- Master Forces
- Static Forces
- Dynamic Forces
- Aggressiveness
PROGRAMMING THE “GEARBOX” (page 1 of the “Control Panel”)
This function allows you to “separate” (default mode) or “combine” the digital gearshift levers (1) and the
digital gearshift knob (2).
Note :
Always remember to completely close the “Control Panel” before staring your game!
You are now ready to play!

8/12
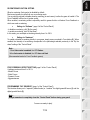
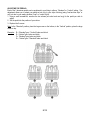
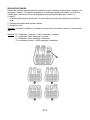
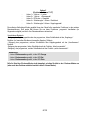
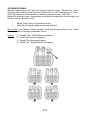
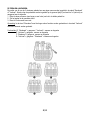
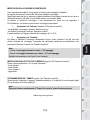
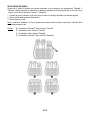
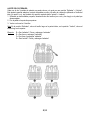
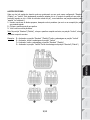
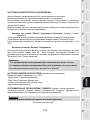
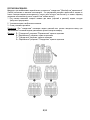
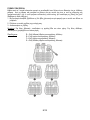
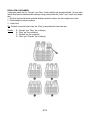
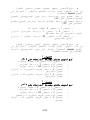
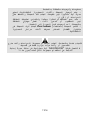
ADJUSTING THE PEDALS:
Each of the 3 aluminum pedals can be positioned to your liking in either a “Standard” or “Vertical” setting. This
adjustment allows you to adapt your pedal set not only to your style of driving (using “heel-and-toe style” or
not), but also to your seating position (“seat” or “cockpit “style).
1. Using a small screwdriver, unscrew the two screws (one short and one long) for the pedal you wish to
adjust.
2. Set the pedal into the position of your choice.
3. Replace the 2 screws.
Note: In the “Standard” position, place the large screw on the bottom; in the “Vertical” position, place the large
screw on top.
Examples: D = “Standard” gas / “Vertical” brake and clutch
E = “Vertical” gas, brake and clutch
F = “Standard” gas, brake and clutch
G = “Vertical” gas / “Standard” brake and clutch

9/12
TROUBLESHOOTING
- My wheel doesn’t work correctly or appears to be improperly calibrated. Switch off your PC,
completely disconnect your wheel, reconnect all the cables (including power adapter and pedal set),
switch your PC back on and restart the game.
If the calibration problem persists, download the “Thrustmaster Calibration Tool v 1.03 ” manual calibration
software available on our website: http://ts.thrustmaster.com
- My wheel moves by itself during the game. This is normal and is the re-centering function featured in
some games. To stop these movements, just place your hands on the wheel or reduce the Force
Feedback intensity.
- My wheel stays turned to one side (left or right) after launching a game. This is normal in some
games. The wheel will re-center itself once you have identified it as a wheel in the game’s setup options.
- My wheel is detected by my computer but doesn’t work in the game. Access your game’s options
interface to configure your wheel. Please refer to your game’s user manual or online help for more
information.
- My game doesn’t accept 5 axis mode.
Select 3 axis mode (or 2 axis mode, if the problem persists), then configure your wheel again in your
game’s options interface.
- Force Feedback doesn’t react properly.
In the Thrustmaster Control Panel, reset all forces to their default values (= to 100%) and disable
automatic re-centering (the LED should not be flashing).
In some games you will also have to reverse the forces (select “Negative Forces” in the game’s options or
set the slider to “-100%”). In other games forces should not be reversed (in this case select “Positive
Forces” or “+100%”).
- My pedals or levers are not functioning properly.
Your game does not accept the axis mode you have selected. Exit the game and select a new axis mode.
Re-launch the game and then configure your wheel again in your game’s options interface.
SAFETY RECOMMENDATIONS AND INFORMATION
- When connecting the wheel and during auto-calibration: to prevent any incorrect calibration,
never turn the wheel, press the pedals or buttons.
- When not in use for extended periods and to avoid any unwanted power consumption or
deterioration, disconnect the wheel’s power adapter. Reconnect it before going back to the
game.
- Your wheel features Force Feedback: NEVER leave the wheel within the reach of young
children, especially during the auto-calibration phases.
For safety reasons, never use the pedal set with bare feet or while wearing only socks
on your feet.
THRUSTMASTER
®
DISCLAIMS ALL RESPONSIBILITY IN THE EVENT OF INJURY RESULTING
FROM USE OF THE PEDAL SET WITHOUT SHOES.

10/12
TECHNICAL SUPPORT
If you encounter a problem with your product, please go to http://ts.thrustmaster.com and click Technical
Support. From there you will be able to access various utilities (Frequently Asked Questions (FAQ), the
latest versions of drivers and software) that may help to resolve your problem. If the problem persists,
you can contact the Thrustmaster products technical support service (“Technical Support”):
By email:
In order to take advantage of technical support by email, you must first register online. The information
you provide will help the agents to resolve your problem more quickly. Click Registration on the left-hand
side of the Technical Support page and follow the on-screen instructions. If you have already registered,
fill in the Username and Password fields and then click Login.
By telephone (if you do not have Internet access):
United Kingdom
08450800942
Charged at local rate
Monday to Saturday from 8 a.m. to 7 p.m.
United States
1-866-889-5036
Free
Monday to Friday from 9 a.m. to 8 p.m.
Saturday from 8 a.m. to 2 p.m.
(Eastern Standard Time)
Monday to Friday from 6 a.m. to 5 p.m.
Saturday from 5 a.m. to 11 a.m.
(Pacific Standard Time)
Canada
1-866-889-2181
Free
Monday to Friday from 9 a.m. to 8 p.m.
Saturday from 8 a.m. to 2 p.m.
(Eastern Standard Time)
Monday to Friday from 6 a.m. to 5 p.m.
Saturday from 5 a.m. to 11 a.m.
(Pacific Standard Time)
Denmark
80887690
Free
Monday to Saturday from 9 a.m. to 8 p.m.
(English)
Sweden
0200884567
Free
Monday to Saturday from 9 a.m. to 8 p.m.
(English)
Finland
0800 913060
Free
Monday to Saturday from 10 a.m. to 9 p.m.
(English)
Hours of operation and telephone numbers are subject to change. Please visit http://ts.thrustmaster.com
for the most up-to-date Technical Support contact information.

11/12
WARRANTY INFORMATION
Worldwide, Guillemot Corporation S.A. (“Guillemot”) warrants to the consumer that this Thrustmaster
product will be free from material defects and manufacturing flaws for a period of two (2) years from the
original date of purchase. Should the product appear to be defective during the warranty period,
immediately contact Technical Support, who will indicate the procedure to follow. If the defect is confirmed,
the product must be returned to its place of purchase (or any other location indicated by Technical
Support).
Within the context of this warranty, the consumer’s defective product will, at Technical Support’s option, be
either repaired or replaced. Where authorized by applicable law, the full liability of Guillemot and its
subsidiaries (including for indirect damages) is limited to the repair or replacement of the Thrustmaster
product. The consumer’s legal rights with respect to legislation applicable to the sale of consumer goods
are not affected by this warranty.
This warranty shall not apply: (1) if the product has been modified, opened, altered, or has suffered
damage as a result of inappropriate or abusive use, negligence, an accident, normal wear, or any other
cause not related to a material defect or manufacturing flaw; (2) in the event of failure to comply with the
instructions provided by Technical Support; (3) to software not published by Guillemot, said software being
subject to a specific warranty provided by its publisher.
Additional warranty provisions
In the United States of America and in Canada, this warranty is limited to the product’s internal mechanism
and external housing. Any applicable implied warranties, including warranties of merchantability and
fitness for a particular purpose, are hereby limited to two (2) years from the date of purchase and are
subject to the conditions set forth in this limited warranty. In no event shall Guillemot Corporation S.A. or
its affiliates be liable for consequential or incidental damage resulting from the breach of any express or
implied warranties. Some States/Provinces do not allow limitation on how long an implied warranty lasts or
exclusion or limitation of incidental/consequential damages, so the above limitation may not apply to you.
This warranty gives you specific legal rights, and you may also have other legal rights which vary from
State to State or Province to Province.

12/12
COPYRIGHT
© 2012 Guillemot Corporation S.A. All rights reserved. Thrustmaster® is a registered trademark of
Guillemot Corporation S.A. Windows® is a registered trademark of Microsoft Corporation in the United
States and/or other countries. Pentium® is a registered trademark of Intel Corporation. All other
trademarks and brand names are hereby acknowledged and are property of their respective owners.
Illustrations not binding. Contents, designs and specifications are subject to change without notice and
may vary from one country to another. Made in China.
TouchSense® Technology licensed from Immersion Corporation. Protected by one or more of the following
patents:
U.S. Patents: 5831408, 5844392, 5857986, 5907487, 5959613, 6020875, 6088017, 6104158, 6246390,
6252583, 6271833, 6275213, 6278439, 6343349, 6400352, 6411276, 6424333, 6715045, 6801008,
7131073, 7199790, 7209117, 7299321, 7327348, 7345672, and 7502011.
ENVIRONMENTAL PROTECTION RECOMMENDATION
At the end of its working life, this product should not be disposed of with standard
household waste, but rather dropped off at a collection point for the disposal of Waste
Electrical and Electronic Equipment (WEEE) for recycling.
This is confirmed by the symbol found on the product, user manual or packaging.
Depending on their characteristics, the materials may be recycled. Through recycling
and other forms of processing Waste Electrical and Electronic Equipment, you can
make a significant contribution towards helping to protect the environment.
Please contact your local authorities for information on the collection point nearest you.
Retain this information. Colours and decorations may vary.
This product conforms to all standards regarding children 14 years of age and older. This product is not
suitable for use by children less than 14 years of age.
www.thrustmaster.com

1/12
Manuel de l’utilisateur
CARACTÉRISTIQUES TECHNIQUES
1 2 leviers numériques de changement de vitesse
2 Poignée numérique de changement de vitesse
3 Voyant lumineux Mode
4 Boutons d’actions numériques
5 Croix multidirectionnelle numérique
6 Bouton Force
7 2 Connecteurs pour le pédalier 3 pédales
8 Axe n° 1 : Roue du volant analogique
9 Axe n° 4 : Levier progressif gauche
10 Axe n° 5 : Levier progressif droit

2/12
11 Axe n° 4 : Pédale d’embrayage progressive
12 Axe n° 3 : Pédale de frein progressive
13 Axe n° 2 : Pédale d’accélération progressive
14 Système de fixation à la table
15 Connecteur USB PC
16 Câble du pédalier (avec bouton switch)
17 2 Connecteurs RJ45 pour le pédalier
18 Connecteur pour l’adaptateur secteur
19 Adaptateur secteur
INSTALLATION DU VOLANT
Fixer le volant
1. Placez le volant sur une table ou autre surface plane.
2. Placez la vis de serrage dans le système de fixation (14) puis vissez l’ensemble (dans le sens inverse
des aiguilles d’une montre) dans l’emplacement prévu, sous le volant, jusqu’à ce que ce dernier soit
parfaitement stable.

3/12
Relier le pédalier « 3 pédales » au volant
1. Branchez le câble n° 1 sur le connecteur n°1 situé derrière le volant
2. Branchez le câble n° 2 sur le connecteur n°2 situé derrière la poignée de vitesse
Utilisation du bouton « Switch »
Ce bouton qui est situé sur le câble du pédalier « 3 Pédales », vous permettra d’activer (ou de désactiver) à
n’importe quel moment (même en cours de jeu) :
- soit la 3
ème
pédale (C)
- soit les 2 palettes progressives situées derrière le volant.
Switch sur « 2 L » :
Les 2 palettes progressives sont activées (et la 3
ème
pédale désactivée).
Switch sur « 3 P »
La 3ème pédale est activée (et les 2 palettes progressives désactivées).
EN POSITION « 3 P », VOTRE VOLANT BASCULE AUTOMATIQUEMENT EN MODE « 5 AXES ».
Relier le volant
Reliez l’adaptateur secteur (19) au connecteur pour l’adaptateur (18) et branchez l’adaptateur sur le
secteur.

4/12
PLAYSTATION
3
Sur PlayStation®3, dans le menu général, utilisez votre manette officielle (et non votre volant) pour naviguer et
lancer vos jeux. Le volant ne sera fonctionnel qu’une fois le jeu lancé.
INSTALLATION SUR PC
Configuration requise : PC (Windows 98 SE, Me, 2000, XP, Vista et 7) équipé d'un port USB.
INSTALLATION DES PILOTES
Le CD-ROM fourni avec ce produit permet d'installer les pilotes Force Feedback.
1. Insérez le CD-ROM d'installation dans votre lecteur de CD-ROM. Suivez les instructions affichées à
l'écran pour installer les pilotes Force Feedback. Une fois l'installation terminée, cliquez sur Terminer
et redémarrez votre ordinateur.
2. Au redémarrage de l'ordinateur, reliez le connecteur USB (15) à l'un des ports USB de votre unité
centrale. Windows 98/Me/2000/XP/7 détectera automatiquement le nouveau périphérique. (Si vous
branchez un périphérique USB pour la première fois, il est possible que, pendant l'installation,
Windows vous demande d'insérer le CD-ROM Windows afin d'installer les fichiers système
nécessaires.)
3. Installation des pilotes :
Windows 98 : l'Assistant Ajout de nouveau matériel se charge de rechercher pour vous les pilotes
appropriés. Cliquez sur Suivant. Suivez les instructions affichées à l'écran pour terminer l'installation.
Windows Me/2000/XP/7 : l'installation des pilotes est automatique.
4. Sélectionnez Démarrer/Tous les programmes/Thrustmaster/Force Feedback driver/Control
Panel.
La boîte de dialogue Contrôleurs de jeu affichera le nom du volant avec l'état OK.
5. Dans le Control Panel, cliquez sur « Propriétés » pour configurer votre volant :
• Page 1 = Test du périphérique : vous permet de tester et visualiser les boutons, la croix
multidirectionnelle et les 5 axes (volant, pédale de frein, pédale d’accélération, pédale
d’embrayage, leviers progressifs gauche et droit).
• Page 2 = Tester les forces : vous permet de tester 8 effets de Force et de configurer le réglage
des effets de ForceFeedback et des effets d’Autocentrage.
CALIBRAGE AUTOMATIQUE DU VOLANT ET DES PEDALES
La roue du volant s’autocalibre de manière automatique une fois l’adaptateur secteur et le connecteur
USB connectés. (Cette opération entraîne des mouvements du volant.) Les pédales se calibrent
également automatiquement après quelques pressions.
Il vous est également possible d’effectuer une calibration manuelle en téléchargeant le logiciel
« Thrustmaster Calibration Tool v 1.03 » disponible à cette adresse : http://ts.thrustmaster.com

5/12
SELECTION DES AXES (2, 3 ou 5 AXES)
• Sélection des axes par « Software » (dans la page 1 du « Control Panel »)
Cliquez sur le mode désiré puis sur Ok.
• Sélection des axes par « Hardware »
Appuyez simultanément sur les 2 pédales accélérateur et frein et sur le bouton force (12) + (13) + (6)
Le choix par hardware doit toujours être effectué en dehors du control panel !
Il vous permettra de choisir votre mode directement dans les options « Contrôles » de votre jeu.
LA SELECTION DES AXES PAR « HARDWARE » EST UNIQUEMENT DISPONIBLE
LORSQUE LE BOUTON SWITCH DE VOTRE PEDALIER EST EN POSITION « 2 L ».
• Mode 2 AXES (voyant lumineux orange)
Dans ce mode, les commandes d’accélérateur et de frein de votre volant fonctionnent en mode
« combiné » (et sont couplées avec les 2 leviers progressifs) :
- L’axe 1 = Axe X (Roue du volant)
- L’axe 2 = Axe Y (Pédales / Leviers progressif)
• Mode 3 AXES (voyant lumineux rouge)
Dans ce mode, les commandes d’accélérateur et de frein de votre volant fonctionnent en mode
« séparé » :
- les pédales sont couplées avec les 2 leviers progressifs (si le switch est sur « 2 L »),
- la pédale d’embrayage est couplée avec la pédale de frein (si le switch est sur « 3 L »).
- L’axe 1 = Axe X (Roue du volant)
- L’axe 2 = Axe Y (Pédale de frein / Levier progressif gauche / Pédale d’embrayage
- L’axe 3 = Axe RZ (Pédale d’accélérateur /Levier progressif droit)
• Mode 5 AXES (voyant lumineux vert)
Dans ce mode, les commandes d’accélérateur et de frein de votre volant fonctionnent en mode « séparé »
ainsi que les 2 leviers progressifs et la pédale d’embrayage qui sont alors indépendants.
Possibilité 1
(lorsque le switch du pédalier est sur « 2 L »)
- L’axe 1 = Axe X = Roue du volant
- L’axe 2 = Axe Y = Pédale de frein
- L’axe 3 = Axe RZ = Pédale d’accélérateur
- L’axe 4 = Axe Slider 1 = Levier progressif droit
- L’axe 5 = Axe Slider 0 = Levier progressif gauche

6/12
Possibilité 2
(lorsque le switch du pédalier est sur « 3 P »)
- L’axe 1 = Axe X = Roue du volant
- L’axe 2 = Axe Y = Pédale de frein
- L’axe 3 = Axe RZ = Pédale d’accélérateur
- L’axe 4 = Axe Slider 1 = Non actif
- L’axe 5 = Axe Slider 0 = Pédale d’embrayage
Le mode exclusif 5 axes vous permettra de profiter de l’ensemble des options avancées proposées dans
la plupart des jeux de course de type simulation. Vous pourrez alors gérer, pour la toute première fois, ces
nouvelles fonctions de manière « progressive » (et non plus numérique). L’immersion sera alors
totale pour les fans de simulation automobile !
Exemples divers :
- Attribution de la pédale d’embrayage ou du levier progressif gauche à la fonction « embrayage »
(en mode « vitesse manuelle avec embrayage manuel »)
- Attribution du levier progressif droit ou de la pédale d’embrayage à la fonction « frein à main »
- Attribution du levier progressif gauche à la fonction « vue intérieure gauche »
- Attribuer le levier progressif droite à la fonction « vue intérieure droite »
Remarque :
- Lorsque vous sélectionnez le mode 2 axes, le voyant lumineux est Orange.
- Lorsque vous sélectionnez le mode 3 axes le voyant lumineux est Rouge
- Lorsque vous sélectionnez le mode 5 axes le voyant lumineux est Vert
Si votre jeu n’accepte pas l’ensemble des « 5 axes »,
basculez alors votre volant en mode « 3 axes » (ou « 2 axes » si le problème persiste).

7/12
REGLAGE DE LA FONCTION AUTOCENTRAGE
Par défaut, l’autocentrage du volant est désactivé.
La plupart des jeux récents proposent leur propre mode d’auto-centrage.
Il est donc fortement conseillé (dans la majorité des cas) de désactiver l’auto-centrage du volant, pour
laisser le jeu le gérer. Le Force Feedback sera alors de meilleure qualité.
Le mode auto-centrage activé sera surtout utile dans les jeux n’utilisant pas de Force Feedback ou
utilisant un faible retour au centre.
• Réglage par « Software » (dans la page 2 du « Control Panel »)
- pour désactiver l’auto-centrage, cliquez sur « Via le jeu ».
- pour activer l’auto-centrage, cliquez sur « Via le volant ».
Dans ce mode, vous pouvez régler l’intensité du retour au centre de 0 à 100 %.
• Réglage par « Hardware »
Pour activer ou désactiver l’auto-centrage directement dans votre jeu, appuyez simplement sur le bouton
Force (6) de votre volant. En mode activé, l’intensité du retour au centre correspondra au pourcentage
attribué précédemment au paramètre « Via le volant » dans le « Control Panel ».
Remarque :
- Auto-centrage activé, le voyant lumineux clignote.
- Auto-centrage désactivé, le voyant lumineux ne clignote pas.
(Mode conseillé dans les jeux ForceFeedback)
REGLAGE DES EFFETS FORCE FEEDBACK (dans la page 2 du « Control Panel »)
4 réglages possibles de 0 à 150 % :
- Forces principales
- Forces statiques
- Forces dynamiques
- Agressivité
PROGRAMMATION DE LA « BOITE DE VITESSE » (dans la page 1 du « Control Panel »)
Cette fonction vous permettra de « séparer » (mode par défaut) ou de « combiner » les leviers
numériques de changement de vitesse (1) et la poignée numérique de changement de vitesse (2).
Remarque :
Pensez à toujours fermer complètement le « Control Panel » avant de lancer votre jeu !
Vous êtes maintenant prêt à jouer !
Sayfa yükleniyor...
Sayfa yükleniyor...
Sayfa yükleniyor...
Sayfa yükleniyor...
Sayfa yükleniyor...
Sayfa yükleniyor...
Sayfa yükleniyor...
Sayfa yükleniyor...
Sayfa yükleniyor...
Sayfa yükleniyor...
Sayfa yükleniyor...
Sayfa yükleniyor...
Sayfa yükleniyor...
Sayfa yükleniyor...
Sayfa yükleniyor...
Sayfa yükleniyor...
Sayfa yükleniyor...
Sayfa yükleniyor...
Sayfa yükleniyor...
Sayfa yükleniyor...
Sayfa yükleniyor...
Sayfa yükleniyor...
Sayfa yükleniyor...
Sayfa yükleniyor...
Sayfa yükleniyor...
Sayfa yükleniyor...
Sayfa yükleniyor...
Sayfa yükleniyor...
Sayfa yükleniyor...
Sayfa yükleniyor...
Sayfa yükleniyor...
Sayfa yükleniyor...
Sayfa yükleniyor...
Sayfa yükleniyor...
Sayfa yükleniyor...
Sayfa yükleniyor...
Sayfa yükleniyor...
Sayfa yükleniyor...
Sayfa yükleniyor...
Sayfa yükleniyor...
Sayfa yükleniyor...
Sayfa yükleniyor...
Sayfa yükleniyor...
Sayfa yükleniyor...
Sayfa yükleniyor...
Sayfa yükleniyor...
Sayfa yükleniyor...
Sayfa yükleniyor...
Sayfa yükleniyor...
Sayfa yükleniyor...
Sayfa yükleniyor...
Sayfa yükleniyor...
Sayfa yükleniyor...
Sayfa yükleniyor...
Sayfa yükleniyor...
Sayfa yükleniyor...
Sayfa yükleniyor...
Sayfa yükleniyor...
Sayfa yükleniyor...
Sayfa yükleniyor...
Sayfa yükleniyor...
Sayfa yükleniyor...
Sayfa yükleniyor...
Sayfa yükleniyor...
Sayfa yükleniyor...
Sayfa yükleniyor...
Sayfa yükleniyor...
Sayfa yükleniyor...
Sayfa yükleniyor...
Sayfa yükleniyor...
Sayfa yükleniyor...
Sayfa yükleniyor...
Sayfa yükleniyor...
Sayfa yükleniyor...
Sayfa yükleniyor...
Sayfa yükleniyor...
Sayfa yükleniyor...
Sayfa yükleniyor...
Sayfa yükleniyor...
Sayfa yükleniyor...
Sayfa yükleniyor...
Sayfa yükleniyor...
Sayfa yükleniyor...
Sayfa yükleniyor...
Sayfa yükleniyor...
Sayfa yükleniyor...
Sayfa yükleniyor...
Sayfa yükleniyor...
Sayfa yükleniyor...
Sayfa yükleniyor...
Sayfa yükleniyor...
Sayfa yükleniyor...
Sayfa yükleniyor...
Sayfa yükleniyor...
Sayfa yükleniyor...
Sayfa yükleniyor...
Sayfa yükleniyor...
Sayfa yükleniyor...
Sayfa yükleniyor...
Sayfa yükleniyor...
Sayfa yükleniyor...
Sayfa yükleniyor...
Sayfa yükleniyor...
Sayfa yükleniyor...
Sayfa yükleniyor...
Sayfa yükleniyor...
Sayfa yükleniyor...
Sayfa yükleniyor...
Sayfa yükleniyor...
Sayfa yükleniyor...
Sayfa yükleniyor...
Sayfa yükleniyor...
Sayfa yükleniyor...
Sayfa yükleniyor...
Sayfa yükleniyor...
Sayfa yükleniyor...
Sayfa yükleniyor...
Sayfa yükleniyor...
Sayfa yükleniyor...
Sayfa yükleniyor...
Sayfa yükleniyor...
Sayfa yükleniyor...
Sayfa yükleniyor...
Sayfa yükleniyor...
Sayfa yükleniyor...
Sayfa yükleniyor...
Sayfa yükleniyor...
-
 1
1
-
 2
2
-
 3
3
-
 4
4
-
 5
5
-
 6
6
-
 7
7
-
 8
8
-
 9
9
-
 10
10
-
 11
11
-
 12
12
-
 13
13
-
 14
14
-
 15
15
-
 16
16
-
 17
17
-
 18
18
-
 19
19
-
 20
20
-
 21
21
-
 22
22
-
 23
23
-
 24
24
-
 25
25
-
 26
26
-
 27
27
-
 28
28
-
 29
29
-
 30
30
-
 31
31
-
 32
32
-
 33
33
-
 34
34
-
 35
35
-
 36
36
-
 37
37
-
 38
38
-
 39
39
-
 40
40
-
 41
41
-
 42
42
-
 43
43
-
 44
44
-
 45
45
-
 46
46
-
 47
47
-
 48
48
-
 49
49
-
 50
50
-
 51
51
-
 52
52
-
 53
53
-
 54
54
-
 55
55
-
 56
56
-
 57
57
-
 58
58
-
 59
59
-
 60
60
-
 61
61
-
 62
62
-
 63
63
-
 64
64
-
 65
65
-
 66
66
-
 67
67
-
 68
68
-
 69
69
-
 70
70
-
 71
71
-
 72
72
-
 73
73
-
 74
74
-
 75
75
-
 76
76
-
 77
77
-
 78
78
-
 79
79
-
 80
80
-
 81
81
-
 82
82
-
 83
83
-
 84
84
-
 85
85
-
 86
86
-
 87
87
-
 88
88
-
 89
89
-
 90
90
-
 91
91
-
 92
92
-
 93
93
-
 94
94
-
 95
95
-
 96
96
-
 97
97
-
 98
98
-
 99
99
-
 100
100
-
 101
101
-
 102
102
-
 103
103
-
 104
104
-
 105
105
-
 106
106
-
 107
107
-
 108
108
-
 109
109
-
 110
110
-
 111
111
-
 112
112
-
 113
113
-
 114
114
-
 115
115
-
 116
116
-
 117
117
-
 118
118
-
 119
119
-
 120
120
-
 121
121
-
 122
122
-
 123
123
-
 124
124
-
 125
125
-
 126
126
-
 127
127
-
 128
128
-
 129
129
-
 130
130
-
 131
131
-
 132
132
-
 133
133
-
 134
134
-
 135
135
-
 136
136
-
 137
137
-
 138
138
-
 139
139
-
 140
140
-
 141
141
-
 142
142
-
 143
143
-
 144
144
-
 145
145
-
 146
146
-
 147
147


Thrustmaster 2965019 2970028 2960677 2969085 Kullanım kılavuzu
- Tip
- Kullanım kılavuzu
- Bu kılavuz aynı zamanda aşağıdakiler için de uygundur:
diğer dillerde
- español: Thrustmaster 2965019 2970028 2960677 2969085 Manual de usuario
- français: Thrustmaster 2965019 2970028 2960677 2969085 Manuel utilisateur
- italiano: Thrustmaster 2965019 2970028 2960677 2969085 Manuale utente
- polski: Thrustmaster 2965019 2970028 2960677 2969085 Instrukcja obsługi
- Deutsch: Thrustmaster 2965019 2970028 2960677 2969085 Benutzerhandbuch
- português: Thrustmaster 2965019 2970028 2960677 2969085 Manual do usuário
İlgili makaleler
-
Thrustmaster 2960697 2962061 4160529 4161069 Kullanım kılavuzu
-
-
-
-
-
Thrustmaster 2960726 Kullanım kılavuzu
-
Thrustmaster 4069006 4060051 4068007 Kullanım kılavuzu
-
-
Thrustmaster t150 Kullanım kılavuzu
-
Thrustmaster 2969097 2961061 Kullanım kılavuzu