Thrustmaster Thrustmaster T3PA Add-On (PS4, XOne & PC) Kullanım kılavuzu
- Tip
- Kullanım kılavuzu


1/18
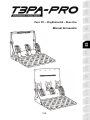
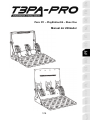
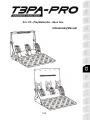
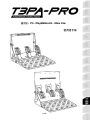
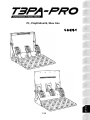
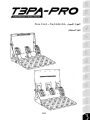
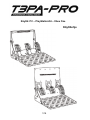
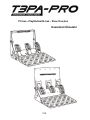
For: PC – PlayStation®4 – Xbox One
User Manual

2/18
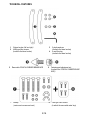
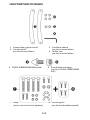
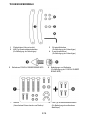
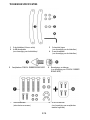
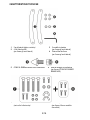
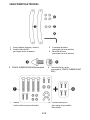
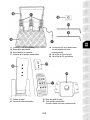
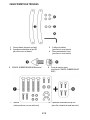
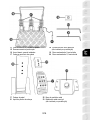
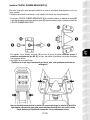
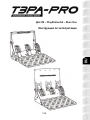
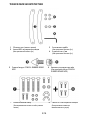
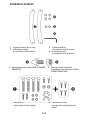
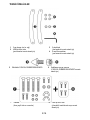
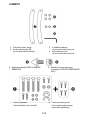
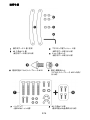
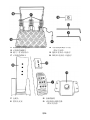
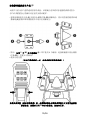
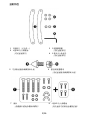
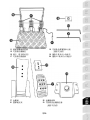
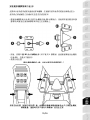
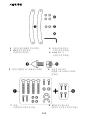
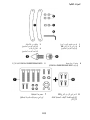
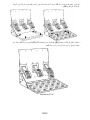
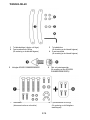
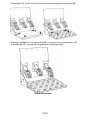
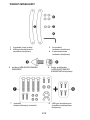
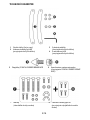
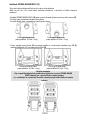
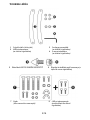
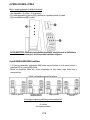
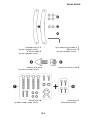
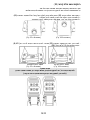
TECHNICAL FEATURES
1 2 lateral arches (left and right)
2 4 M8-type Allen screws
(to attach the lateral arches)
3 2 plastic washers
(to attach the lateral arches)
4 6 mm Allen key
(to attach the lateral arches)
5 Removable CONICAL RUBBER BRAKE MOD
6 Fastening and adjustment nut
(to attach the CONICAL RUBBER BRAKE
MOD)
7 Backup
(various extra screws and nuts)
8 4 M3-type Allen screws
(to attach the removable metal stop)

3/18
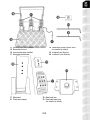
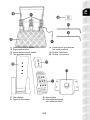
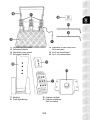
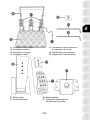
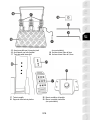
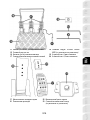
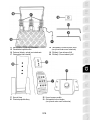
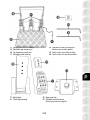
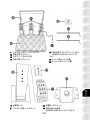
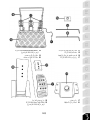
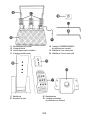
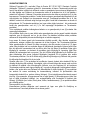
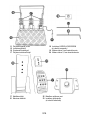
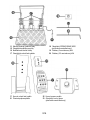
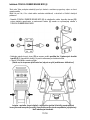
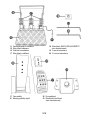
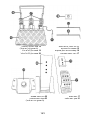
11 Pedal set cable and connector
15 Removable foot rest
16 Lateral arches when installed
17 Removable pedal heads
18 Removable SPRING BRAKE MOD
(not installed by default)
19 Included 2 mm Allen key
20 Included 2.5 mm Allen key
17 Metal head
21 Plastic head support
22 Metal pedal arm
23 Removable metal stop
(not installed by default)

4/18
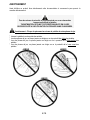
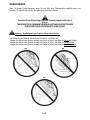
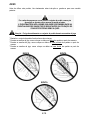
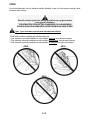
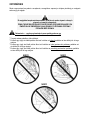
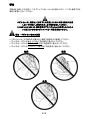
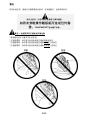
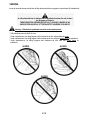
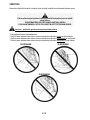
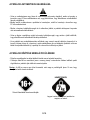
WARNING
Before using this product, be sure to read these instructions carefully and save them for future reference.
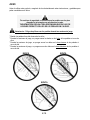
For safety reasons, never use the pedal set with bare feet or while wearing
only socks on your feet.
THRUSTMASTER® DISCLAIMS ALL RESPONSIBILITY IN THE EVENT OF
INJURY RESULTING FROM USE OF THE PEDAL SET WITHOUT SHOES.
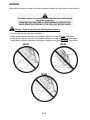
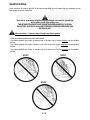
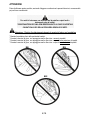
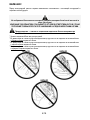
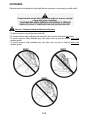
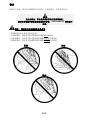
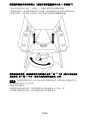
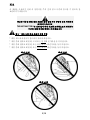
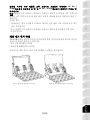
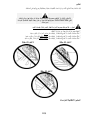
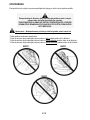
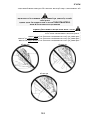
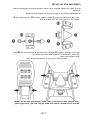
Warning – Pedal set pinching hazard during gaming sessions
* Keep the pedal set out of the reach of children.
* During gaming sessions, never place your fingers or thumbs on or near the sides of the pedals.
* During gaming sessions, never place your fingers or thumbs on or near the rear base of the pedals.
* During gaming sessions, never place your fingers or thumbs on or near the front base of the pedals.
NEVER
NEVER
NEVER

5/18
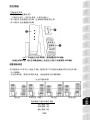
AUTOMATIC CALIBRATION OF PEDALS
IMPORTANT:
- Never connect or disconnect the pedal set from the base of the wheel when the wheel is
connected to the console or PC, or during gaming sessions, to avoid calibration problems.
= Always connect the pedal set to the wheel before connecting the wheel to the console or PC.
- Once the wheel has self-calibrated and the game has started, the pedals automatically calibrate
themselves after being pressed a few times.
- Never press on the pedals when the wheel is self-calibrating or when your game is starting up, to
avoid calibration problems.
- If the pedals are not functioning correctly or appear to be improperly calibrated, power off your
console, completely disconnect your wheel, then reconnect all of the cables (including the power
supply cable and the pedal set cable), power the console back on and restart your game.
ATTACHING THE PEDAL SET TO A COCKPIT
- Attach the pedal set using the small screw threads located on the underside of the pedal set.
- Screw M6 screws (not included) into the cockpit’s pedal support plate and into the small screw
threads located on the underside of the pedal set.
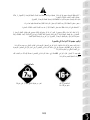
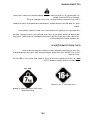
Important: The length of the M6 screws must not exceed the thickness of the cockpit’s pedal
support plate plus an additional 10 mm, to avoid damaging the pedal set’s internal components.
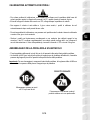
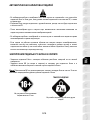
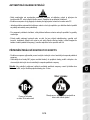
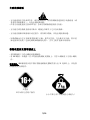
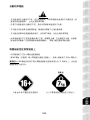
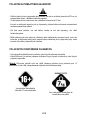
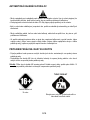
To be handled only by users
16 years of age or older
HEAVY PRODUCT
Be careful not to drop the product on
yourself or on anyone else!

6/18
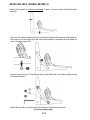
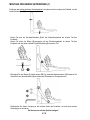
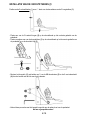
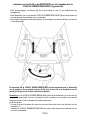
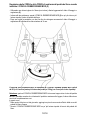
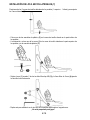
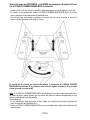
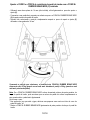
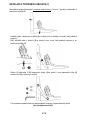
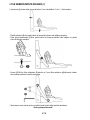
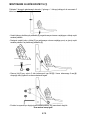
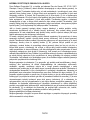
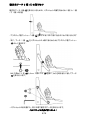
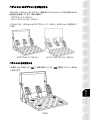
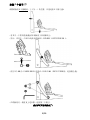
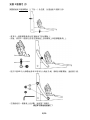
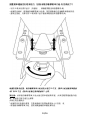
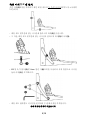
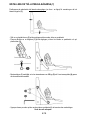
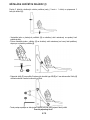
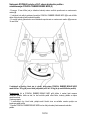
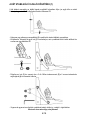
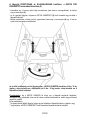
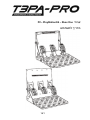
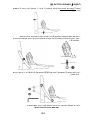
INSTALLING THE 2 LATERAL ARCHES (1)
Positions of the pedal set’s 2 lateral screw threads (1 upper + 1 lower) in order to attach the 2 lateral
arches (1):
- Place one of the plastic washers (3) on the screw thread located on the lower part of the pedal set.
- Next, place one of the arches (1) on the screw thread located on the upper part of the pedal set
and on the plastic washer (3).
- Attach the arch (1) using 2 of the M8-type Allen screws (2) and the 6 mm Allen key (4) by turning
the screws clockwise.
- Repeat this procedure on the other side of the pedal set to attach the second arch.
You are now ready to play!

7/18
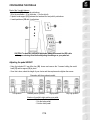
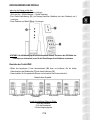
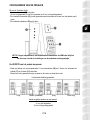
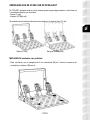
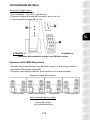
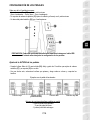
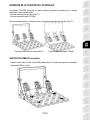
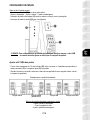
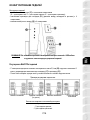
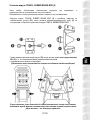
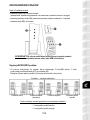
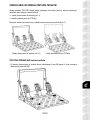
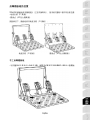
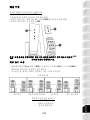
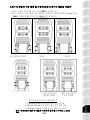
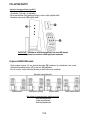
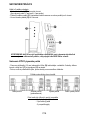
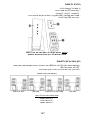
CONFIGURING THE PEDALS
Each of the 3 pedals features:
- A metal head (17) with several perforations
(9 for the accelerator – 6 for the brake – 6 for the clutch)
- A plastic head support (21) (between the head and the arm) with 4 perforations
- A metal pedal arm (22) with 4 perforations
CAUTION: To avoid any calibration problems, always disconnect the USB cable
from your steering wheel before adjusting the settings on your pedal set.
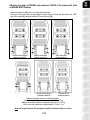
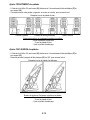
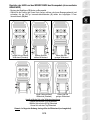
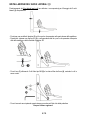
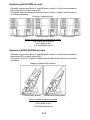
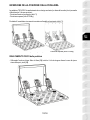
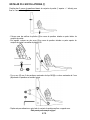
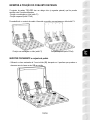
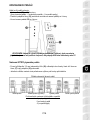
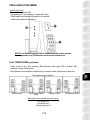
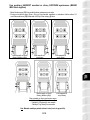
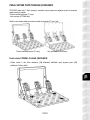
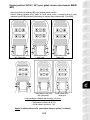
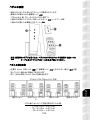
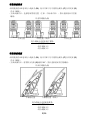
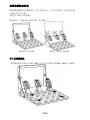
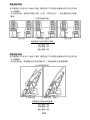
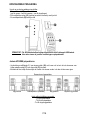
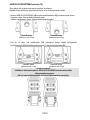
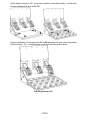
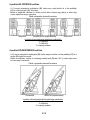
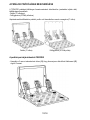
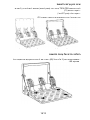
Adjusting the pedal HEIGHT
- Using the included 2.5 mm Allen key (20), loosen and remove the 2 screws holding the metal
head (17) and its support (21) in place.
- Once this is done, select the height of your choice and then replace and re-tighten the screws.
Examples with the accelerator pedal:
Low position
Medium position (default)
High position
Very high position
Number of possible height positions per pedal:
- 4 for the accelerator pedal
- 2 for the brake pedal
- 2 for the clutch pedal

8/18
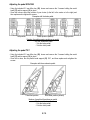
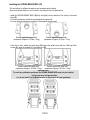
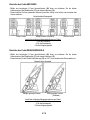
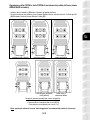
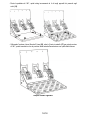
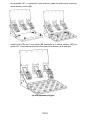
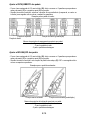
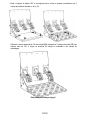
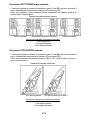
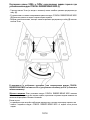
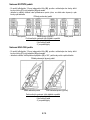
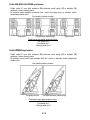
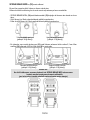
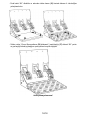
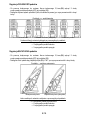
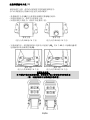
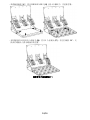
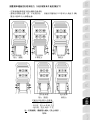
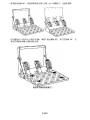
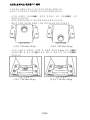
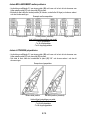
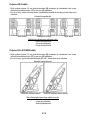
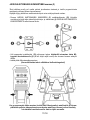
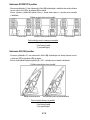
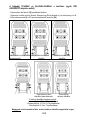
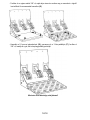
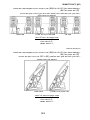
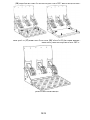
Adjusting the pedal SPACING
- Using the included 2.5 mm Allen key (20), loosen and remove the 2 screws holding the metal
head (17) and its support (21) in place.
- Once this is done, select the position of your choice (to the left, in the center or to the right) and
then replace and re-tighten the screws.
Examples with the brake pedal:
Left position Center position (default) Right position
Number of possible spacing positions per pedal:
- 3 for the accelerator pedal
- 3 for the brake pedal
- 3 for the clutch pedal
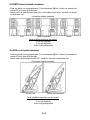
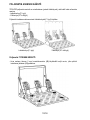
Adjusting the pedal TILT
- Using the included 2.5 mm Allen key (20), loosen and remove the 2 screws holding the metal
head (17) and its support (21) in place.
- Once this is done, turn the plastic head support (21) 180°, and then replace and re-tighten the
screws.
Examples with the accelerator pedal:
Less tilted position More tilted position (default)
Number of possible tilt positions per pedal:
- 2 for the accelerator pedal
- 2 for the brake pedal
- 2 for the clutch pedal

9/18
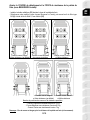
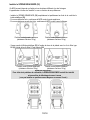
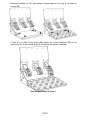
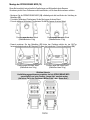
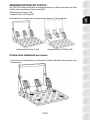
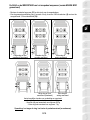
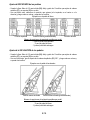
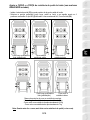
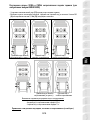
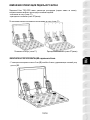
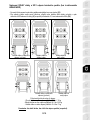
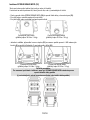
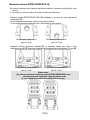
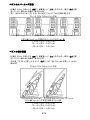
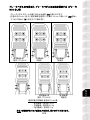
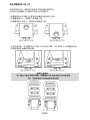
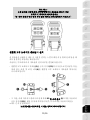
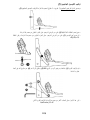
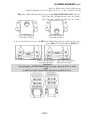
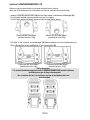
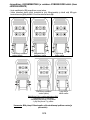
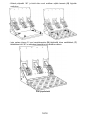
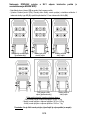
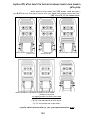
Adjusting the range of TRAVEL and resistance FORCE of the brake pedal (with
no BRAKE MOD installed)
- Install the metal stop (23) at the rear of the brake pedal arm.
- Select your choice of position (Long, Medium or Short range of travel), and then tighten the 4 M3-
type Allen screws (8) using the included 2.5 mm Allen key (20).
Long travel and strong Medium travel and Short travel and
resistance (default) medium resistance weak resistance
Long travel and strong Short travel and
resistance (default) weak resistance
Number of possible travel or resistance positions:
- Long travel with resistance of approximately 22 lbs / 10 kg
- Medium travel with resistance of approximately 18.7 lbs / 8.5 kg
- Short travel with resistance of approximately 15.4 lbs / 7 kg
Note: the longer the travel, the stronger the pedal’s resistance (and vice versa).

10/18
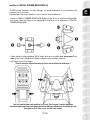
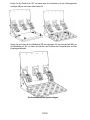
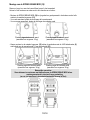
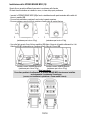
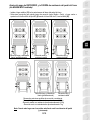
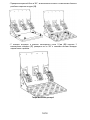
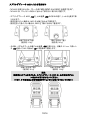
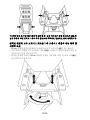
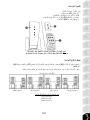
Installing the SPRING BRAKE MOD (18)
This mod allows for different sensations and resistance when braking.
Users must decide whether or not to install it according to their own preferences.
- Install the SPRING BRAKE MOD (18) fully and tightly into the bottom of the cavity in the metal
stop (23).
- For strong resistance: position the mod against the upper wall.
- For even stronger resistance: position the mod against the lower wall.
Position against the upper wall Position against the lower wall
(resistance of approx. 30.9 lbs / 14 kg) (resistance of approx. 35.2 lbs / 16 kg)
- Once this is done, attach the metal stop (23) behind the pedal’s arm with the 4 M3-type Allen
screws (8), using the included 2.5 mm Allen key (20).
Position against the upper wall Position against the lower wall
(resistance of approx. 30.9 lbs / 14 kg) (resistance of approx. 35.2 lbs / 16 kg)
Important note:
To avoid any calibration problems, the SPRING BRAKE MOD must only be installed
in the Long range of travel position
(i.e. do not install it in the Medium range or Short range of travel positions)

11/18
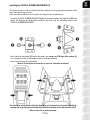
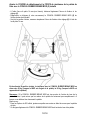
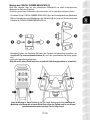
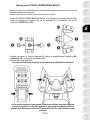
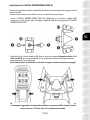
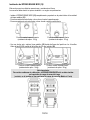
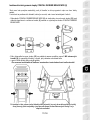
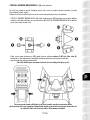
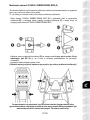
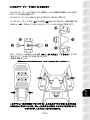
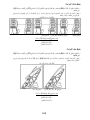
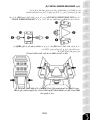
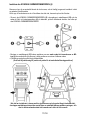
Installing the CONICAL RUBBER BRAKE MOD (5)
This mod provides you with an authentic feel when braking, and ultra-progressive resistance at the
end of the pedal’s range of travel.
Users must decide whether or not to install it according to their own preferences.
- Screw the CONICAL RUBBER BRAKE MOD (5) into the screw thread in the metal stop (23), then
tighten the fastening and adjustment nut (6) on the back, onto the protruding screw of the
CONICAL RUBBER BRAKE MOD.
- Next, attach the metal stop (23) behind the pedal’s arm using only 2 M3-type Allen screws (8)
(i.e. not using 4 screws), in the position shown in the diagrams below
= in the Very long range of travel position
(Be sure to follow this point exactly, to avoid any calibration problems!)
Once installed in this position (the Very long range of travel position), the metal stop slightly
overlaps the large black piece of metal sheet behind the pedals, and is attached with only 2
Allen screws: this is perfectly normal.

12/18
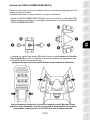
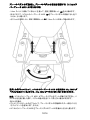
Adjusting the range of TRAVEL and resistance FORCE of the brake pedal with
the CONICAL RUBBER BRAKE MOD (5) installed
- Using a 14 mm open-end wrench (not included), slightly loosen the fastening and adjustment nut (6).
- Depending on your preference, move the CONICAL RUBBER BRAKE MOD (5) a bit closer to or
farther away from the back of the brake pedal.
- Once you have selected the position, simply re-tighten the fastening and adjustment nut (6) using
the 14 mm open-end wrench.
Depending on the position you have selected, the resistance of the CONICAL RUBBER
BRAKE MOD will be between 44 lbs / 20 kg (when the mod is farther away from the pedal)
and 66 lbs / 30 kg (when the mod is closer to the pedal).
Please note: If the CONICAL RUBBER BRAKE MOD is too close to the back of the brake pedal’s
arm, it may happen that the pedal’s values do not completely return to zero when you release the
pedal very lightly.
If that is the case:
* In the options of the game you are playing, add a small dead zone at the start of the brake pedal’s
range of travel; or
* Move the CONICAL RUBBER BRAKE MOD a bit farther away from the back of the brake pedal’s
arm.

13/18
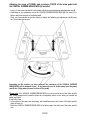
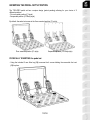
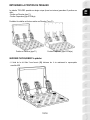
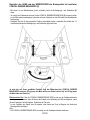
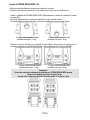
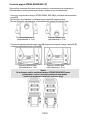
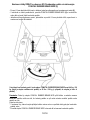
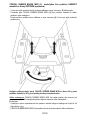
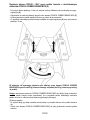
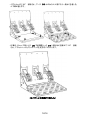
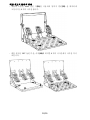
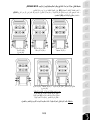
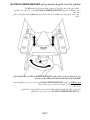
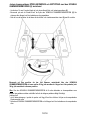
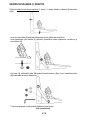
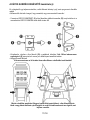
INVERTING THE PEDAL SET’S POSITION
The T3PA-PRO pedal set has a unique design (patent pending) allowing for your choice of 2
different positions:
- Floor-mounted position (F1-style)
- Suspended position (GT/Rally-style)
By default, the pedal set comes in the floor-mounted position (F1-style).
Floor-mounted position (F1-style) Suspended position (GT/Rally-style)
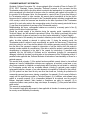
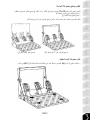
PHYSICALLY INVERTING the pedal set
- Using the included 2 mm Allen key (19), unscrew the 4 screws holding the removable foot rest
(15) in place.

14/18
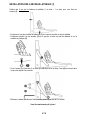
- Turn the pedal set 180°, then replace and retighten the screws in the 4 screw threads located on
the arch (16).
- Using the included 2.5 mm Allen key (20), unscrew the 3 metal heads (17) to turn them over 180°,
and swap the positions of the accelerator head and the clutch head.
You are now ready to play!

15/18
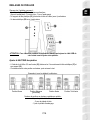
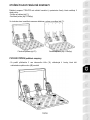
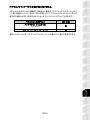
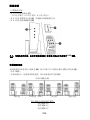
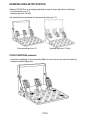
ELECTRONICALLY SWAPPING the accelerator and clutch pedals
When you physically invert the pedal set’s position, simply press the MODE button (located on the
base of your wheel) to swap the accelerator and clutch pedals electronically (the LED color indicates
the position you have selected).
PEDAL SET POSITION
LED COLOR
FLOOR-MOUNTED (F1-style)
(by default)
RED
SUSPENDED (GT/Rally-style)
GREEN
The selected position is then immediately stored in the wheel’s internal memory.

16/18
CONSUMER WARRANTY INFORMATION
Worldwide, Guillemot Corporation S.A., whose registered office is located at Place du Granier, B.P.
97143, 35571 Chantepie, France (hereinafter “Guillemot”) warrants to the consumer that this
Thrustmaster product shall be free from defects in materials and workmanship, for a warranty period
which corresponds to the time limit to bring an action for conformity with respect to this product. In
the countries of the European Union, this corresponds to a period of two (2) years from delivery of
the Thrustmaster product. In other countries, the warranty period corresponds to the time limit to
bring an action for conformity with respect to the Thrustmaster product according to applicable laws
of the country in which the consumer was domiciled on the date of purchase of the Thrustmaster
product (if no such action exists in the corresponding country, then the warranty period shall be one
(1) year from the original date of purchase of the Thrustmaster product).
Notwithstanding the above, rechargeable batteries are covered by a warranty period of six (6)
months from the date of original purchase.
Should the product appear to be defective during the warranty period, immediately contact
Technical Support, who will indicate the procedure to follow. If the defect is confirmed, the product
must be returned to its place of purchase (or any other location indicated by Technical Support).
Within the context of this warranty, the consumer’s defective product shall, at Technical Support’s
option, be either replaced or returned to working order. If, during the warranty period, the
Thrustmaster product is subject to such reconditioning, any period of at least seven (7) days during
which the product is out of use shall be added to the remaining warranty period (this period runs
from the date of the consumer’s request for intervention or from the date on which the product in
question is made available for reconditioning, if the date on which the product is made available for
reconditioning is subsequent to the date of the request for intervention). If permitted under
applicable law, the full liability of Guillemot and its subsidiaries (including for consequential
damages) is limited to the return to working order or the replacement of the Thrustmaster product. If
permitted under applicable law, Guillemot disclaims all warranties of merchantability or fitness for a
particular purpose.
This warranty shall not apply: (1) if the product has been modified, opened, altered, or has suffered
damage as a result of inappropriate or abusive use, negligence, an accident, normal wear, or any
other cause unrelated to a material or manufacturing defect (including, but not limited to, combining
the Thrustmaster product with any unsuitable element, including in particular power supplies,
rechargeable batteries, chargers, or any other elements not supplied by Guillemot for this product);
(2) if the product has been used for any use other than home use, including for professional or
commercial purposes (game rooms, training, competitions, for example); (3) in the event of failure to
comply with the instructions provided by Technical Support; (4) to software, said software being
subject to a specific warranty; (5) to consumables (elements to be replaced over the product’s
lifespan: disposable batteries, audio headset or headphone ear pads, for example); (6) to
accessories (cables, cases, pouches, bags, wrist-straps, for example); (7) if the product was sold at
public auction.
This warranty is nontransferable.
The consumer’s legal rights with respect to laws applicable to the sale of consumer goods in his or
her country are not affected by this warranty.

17/18
Additional warranty provisions
During the warranty period, Guillemot shall not provide, in principle, any spare parts, as Technical
Support is the only party authorized to open and/or recondition any Thrustmaster product (with the
exception of any reconditioning procedures which Technical Support may request that the
consumer carry out, by way of written instructions – for example, due to the simplicity and the lack
of confidentiality of the reconditioning process – and by providing the consumer with the required
spare part(s), where applicable).
Given its innovation cycles and in order to protect its know-how and trade secrets, Guillemot shall
not provide, in principle, any reconditioning notification or spare parts for any Thrustmaster product
whose warranty period has expired.
In the United States of America and in Canada, this warranty is limited to the product’s internal
mechanism and external housing. In no event shall Guillemot or its affiliates be held liable to any
third party for any consequential or incidental damages resulting from the breach of any express or
implied warranties. Some States/Provinces do not allow limitation on how long an implied warranty
lasts or exclusion or limitation of liability for consequential or incidental damages, so the above
limitations or exclusions may not apply to you. This warranty gives you specific legal rights, and you
may also have other rights which vary from State to State or Province to Province.
Liability
If permitted under applicable law, Guillemot Corporation S.A. (hereinafter “Guillemot”) and its
subsidiaries disclaim all liability for any damages caused by one or more of the following: (1) the
product has been modified, opened or altered; (2) failure to comply with assembly instructions; (3)
inappropriate or abusive use, negligence, an accident (an impact, for example); (4) normal wear; (5)
the use of the product for any use other than home use, including for professional or commercial
purposes (game rooms, training, competitions, for example). If permitted under applicable law,
Guillemot and its subsidiaries disclaim all liability for any damages unrelated to a material or
manufacturing defect with respect to the product (including, but not limited to, any damages caused
directly or indirectly by any software, or by combining the Thrustmaster product with any unsuitable
element, including in particular power supplies, rechargeable batteries, chargers, or any other
elements not supplied by Guillemot for this product).
FCC STATEMENT
1. This device complies with Part 15 of the FCC Rules. Operation is subject to the following two
conditions:
(1) This device may not cause harmful interference, and
(2) This device must accept any interference received, including interference that may cause
undesired operation.
2. Changes or modifications not expressly approved by the party responsible for compliance could
void the user's authority to operate the equipment.

18/18
COPYRIGHT
© 2019 Guillemot Corporation S.A. All rights reserved. Thrustmaster® is a registered trademark of
Guillemot Corporation S.A. PlayStation® is a registered trademark of Sony Interactive Entertainment
Inc. Microsoft® is a registered trademark of Microsoft Corporation in the United States and/or other
countries. All other trademarks are the property of their respective owners. Illustrations not binding.
Contents, designs and specifications are subject to change without notice and may vary from one
country to another. Made in China.
ENVIRONMENTAL PROTECTION RECOMMENDATION
In the European Union: At the end of its working life, this product should not be
disposed of with standard household waste, but rather dropped off at a collection
point for the disposal of Waste Electrical and Electronic Equipment (WEEE) for
recycling.
This is confirmed by the symbol found on the product, user manual or packaging.
Depending on their characteristics, the materials may be recycled. Through
recycling and other forms of processing Waste Electrical and Electronic
Equipment, you can make a significant contribution towards helping to protect the
environment.
Please contact your local authorities for information on the collection point nearest you.
For all other countries: Please adhere to local recycling laws for electrical and electronic equipment.
Retain this information. Colours and decorations may vary.
Plastic fasteners and adhesives should be removed from the product before it is used.
www.thrustmaster.com
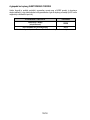
*Applicable to EU and Turkey only
TECHNICAL SUPPORT
https://support.thrustmaster.com
*
*

1/18
Pour : PC – PlayStation®4 – Xbox One
Manuel de l’utilisateur
Sayfa yükleniyor...
Sayfa yükleniyor...
Sayfa yükleniyor...
Sayfa yükleniyor...
Sayfa yükleniyor...
Sayfa yükleniyor...
Sayfa yükleniyor...
Sayfa yükleniyor...
Sayfa yükleniyor...
Sayfa yükleniyor...
Sayfa yükleniyor...
Sayfa yükleniyor...
Sayfa yükleniyor...
Sayfa yükleniyor...
Sayfa yükleniyor...
Sayfa yükleniyor...
Sayfa yükleniyor...
Sayfa yükleniyor...
Sayfa yükleniyor...
Sayfa yükleniyor...
Sayfa yükleniyor...
Sayfa yükleniyor...
Sayfa yükleniyor...
Sayfa yükleniyor...
Sayfa yükleniyor...
Sayfa yükleniyor...
Sayfa yükleniyor...
Sayfa yükleniyor...
Sayfa yükleniyor...
Sayfa yükleniyor...
Sayfa yükleniyor...
Sayfa yükleniyor...
Sayfa yükleniyor...
Sayfa yükleniyor...
Sayfa yükleniyor...
Sayfa yükleniyor...
Sayfa yükleniyor...
Sayfa yükleniyor...
Sayfa yükleniyor...
Sayfa yükleniyor...
Sayfa yükleniyor...
Sayfa yükleniyor...
Sayfa yükleniyor...
Sayfa yükleniyor...
Sayfa yükleniyor...
Sayfa yükleniyor...
Sayfa yükleniyor...
Sayfa yükleniyor...
Sayfa yükleniyor...
Sayfa yükleniyor...
Sayfa yükleniyor...
Sayfa yükleniyor...
Sayfa yükleniyor...
Sayfa yükleniyor...
Sayfa yükleniyor...
Sayfa yükleniyor...
Sayfa yükleniyor...
Sayfa yükleniyor...
Sayfa yükleniyor...
Sayfa yükleniyor...
Sayfa yükleniyor...
Sayfa yükleniyor...
Sayfa yükleniyor...
Sayfa yükleniyor...
Sayfa yükleniyor...
Sayfa yükleniyor...
Sayfa yükleniyor...
Sayfa yükleniyor...
Sayfa yükleniyor...
Sayfa yükleniyor...
Sayfa yükleniyor...
Sayfa yükleniyor...
Sayfa yükleniyor...
Sayfa yükleniyor...
Sayfa yükleniyor...
Sayfa yükleniyor...
Sayfa yükleniyor...
Sayfa yükleniyor...
Sayfa yükleniyor...
Sayfa yükleniyor...
Sayfa yükleniyor...
Sayfa yükleniyor...
Sayfa yükleniyor...
Sayfa yükleniyor...
Sayfa yükleniyor...
Sayfa yükleniyor...
Sayfa yükleniyor...
Sayfa yükleniyor...
Sayfa yükleniyor...
Sayfa yükleniyor...
Sayfa yükleniyor...
Sayfa yükleniyor...
Sayfa yükleniyor...
Sayfa yükleniyor...
Sayfa yükleniyor...
Sayfa yükleniyor...
Sayfa yükleniyor...
Sayfa yükleniyor...
Sayfa yükleniyor...
Sayfa yükleniyor...
Sayfa yükleniyor...
Sayfa yükleniyor...
Sayfa yükleniyor...
Sayfa yükleniyor...
Sayfa yükleniyor...
Sayfa yükleniyor...
Sayfa yükleniyor...
Sayfa yükleniyor...
Sayfa yükleniyor...
Sayfa yükleniyor...
Sayfa yükleniyor...
Sayfa yükleniyor...
Sayfa yükleniyor...
Sayfa yükleniyor...
Sayfa yükleniyor...
Sayfa yükleniyor...
Sayfa yükleniyor...
Sayfa yükleniyor...
Sayfa yükleniyor...
Sayfa yükleniyor...
Sayfa yükleniyor...
Sayfa yükleniyor...
Sayfa yükleniyor...
Sayfa yükleniyor...
Sayfa yükleniyor...
Sayfa yükleniyor...
Sayfa yükleniyor...
Sayfa yükleniyor...
Sayfa yükleniyor...
Sayfa yükleniyor...
Sayfa yükleniyor...
Sayfa yükleniyor...
Sayfa yükleniyor...
Sayfa yükleniyor...
Sayfa yükleniyor...
Sayfa yükleniyor...
Sayfa yükleniyor...
Sayfa yükleniyor...
Sayfa yükleniyor...
Sayfa yükleniyor...
Sayfa yükleniyor...
Sayfa yükleniyor...
Sayfa yükleniyor...
Sayfa yükleniyor...
Sayfa yükleniyor...
Sayfa yükleniyor...
Sayfa yükleniyor...
Sayfa yükleniyor...
Sayfa yükleniyor...
Sayfa yükleniyor...
Sayfa yükleniyor...
Sayfa yükleniyor...
Sayfa yükleniyor...
Sayfa yükleniyor...
Sayfa yükleniyor...
Sayfa yükleniyor...
Sayfa yükleniyor...
Sayfa yükleniyor...
Sayfa yükleniyor...
Sayfa yükleniyor...
Sayfa yükleniyor...
Sayfa yükleniyor...
Sayfa yükleniyor...
Sayfa yükleniyor...
Sayfa yükleniyor...
Sayfa yükleniyor...
Sayfa yükleniyor...
Sayfa yükleniyor...
Sayfa yükleniyor...
Sayfa yükleniyor...
Sayfa yükleniyor...
Sayfa yükleniyor...
Sayfa yükleniyor...
Sayfa yükleniyor...
Sayfa yükleniyor...
Sayfa yükleniyor...
Sayfa yükleniyor...
Sayfa yükleniyor...
Sayfa yükleniyor...
Sayfa yükleniyor...
Sayfa yükleniyor...
Sayfa yükleniyor...
Sayfa yükleniyor...
Sayfa yükleniyor...
Sayfa yükleniyor...
Sayfa yükleniyor...
Sayfa yükleniyor...
Sayfa yükleniyor...
Sayfa yükleniyor...
Sayfa yükleniyor...
Sayfa yükleniyor...
Sayfa yükleniyor...
Sayfa yükleniyor...
Sayfa yükleniyor...
Sayfa yükleniyor...
Sayfa yükleniyor...
Sayfa yükleniyor...
Sayfa yükleniyor...
Sayfa yükleniyor...
Sayfa yükleniyor...
Sayfa yükleniyor...
Sayfa yükleniyor...
Sayfa yükleniyor...
Sayfa yükleniyor...
Sayfa yükleniyor...
Sayfa yükleniyor...
Sayfa yükleniyor...
Sayfa yükleniyor...
Sayfa yükleniyor...
Sayfa yükleniyor...
Sayfa yükleniyor...
Sayfa yükleniyor...
Sayfa yükleniyor...
Sayfa yükleniyor...
Sayfa yükleniyor...
Sayfa yükleniyor...
Sayfa yükleniyor...
Sayfa yükleniyor...
Sayfa yükleniyor...
Sayfa yükleniyor...
Sayfa yükleniyor...
Sayfa yükleniyor...
Sayfa yükleniyor...
Sayfa yükleniyor...
Sayfa yükleniyor...
Sayfa yükleniyor...
Sayfa yükleniyor...
Sayfa yükleniyor...
Sayfa yükleniyor...
Sayfa yükleniyor...
Sayfa yükleniyor...
Sayfa yükleniyor...
Sayfa yükleniyor...
Sayfa yükleniyor...
Sayfa yükleniyor...
Sayfa yükleniyor...
Sayfa yükleniyor...
Sayfa yükleniyor...
Sayfa yükleniyor...
Sayfa yükleniyor...
Sayfa yükleniyor...
Sayfa yükleniyor...
Sayfa yükleniyor...
Sayfa yükleniyor...
Sayfa yükleniyor...
Sayfa yükleniyor...
Sayfa yükleniyor...
Sayfa yükleniyor...
Sayfa yükleniyor...
Sayfa yükleniyor...
Sayfa yükleniyor...
Sayfa yükleniyor...
Sayfa yükleniyor...
Sayfa yükleniyor...
Sayfa yükleniyor...
Sayfa yükleniyor...
Sayfa yükleniyor...
Sayfa yükleniyor...
Sayfa yükleniyor...
Sayfa yükleniyor...
Sayfa yükleniyor...
Sayfa yükleniyor...
Sayfa yükleniyor...
Sayfa yükleniyor...
Sayfa yükleniyor...
Sayfa yükleniyor...
Sayfa yükleniyor...
Sayfa yükleniyor...
Sayfa yükleniyor...
Sayfa yükleniyor...
Sayfa yükleniyor...
Sayfa yükleniyor...
Sayfa yükleniyor...
Sayfa yükleniyor...
Sayfa yükleniyor...
Sayfa yükleniyor...
Sayfa yükleniyor...
Sayfa yükleniyor...
Sayfa yükleniyor...
Sayfa yükleniyor...
Sayfa yükleniyor...
Sayfa yükleniyor...
Sayfa yükleniyor...
Sayfa yükleniyor...
Sayfa yükleniyor...
Sayfa yükleniyor...
Sayfa yükleniyor...
Sayfa yükleniyor...
Sayfa yükleniyor...
Sayfa yükleniyor...
Sayfa yükleniyor...
Sayfa yükleniyor...
Sayfa yükleniyor...
Sayfa yükleniyor...
Sayfa yükleniyor...
Sayfa yükleniyor...
Sayfa yükleniyor...
Sayfa yükleniyor...
Sayfa yükleniyor...
Sayfa yükleniyor...
Sayfa yükleniyor...
Sayfa yükleniyor...
Sayfa yükleniyor...
Sayfa yükleniyor...
Sayfa yükleniyor...
Sayfa yükleniyor...
Sayfa yükleniyor...
Sayfa yükleniyor...
Sayfa yükleniyor...
Sayfa yükleniyor...
Sayfa yükleniyor...
Sayfa yükleniyor...
Sayfa yükleniyor...
Sayfa yükleniyor...
Sayfa yükleniyor...
Sayfa yükleniyor...
Sayfa yükleniyor...
Sayfa yükleniyor...
Sayfa yükleniyor...
Sayfa yükleniyor...
Sayfa yükleniyor...
Sayfa yükleniyor...
Sayfa yükleniyor...
Sayfa yükleniyor...
Sayfa yükleniyor...
Sayfa yükleniyor...
Sayfa yükleniyor...
Sayfa yükleniyor...
Sayfa yükleniyor...
Sayfa yükleniyor...
Sayfa yükleniyor...
Sayfa yükleniyor...
Sayfa yükleniyor...
Sayfa yükleniyor...
Sayfa yükleniyor...
Sayfa yükleniyor...
Sayfa yükleniyor...
Sayfa yükleniyor...
Sayfa yükleniyor...
Sayfa yükleniyor...
Sayfa yükleniyor...
Sayfa yükleniyor...
Sayfa yükleniyor...
Sayfa yükleniyor...
Sayfa yükleniyor...
Sayfa yükleniyor...
Sayfa yükleniyor...
Sayfa yükleniyor...
Sayfa yükleniyor...
Sayfa yükleniyor...
Sayfa yükleniyor...
-
 1
1
-
 2
2
-
 3
3
-
 4
4
-
 5
5
-
 6
6
-
 7
7
-
 8
8
-
 9
9
-
 10
10
-
 11
11
-
 12
12
-
 13
13
-
 14
14
-
 15
15
-
 16
16
-
 17
17
-
 18
18
-
 19
19
-
 20
20
-
 21
21
-
 22
22
-
 23
23
-
 24
24
-
 25
25
-
 26
26
-
 27
27
-
 28
28
-
 29
29
-
 30
30
-
 31
31
-
 32
32
-
 33
33
-
 34
34
-
 35
35
-
 36
36
-
 37
37
-
 38
38
-
 39
39
-
 40
40
-
 41
41
-
 42
42
-
 43
43
-
 44
44
-
 45
45
-
 46
46
-
 47
47
-
 48
48
-
 49
49
-
 50
50
-
 51
51
-
 52
52
-
 53
53
-
 54
54
-
 55
55
-
 56
56
-
 57
57
-
 58
58
-
 59
59
-
 60
60
-
 61
61
-
 62
62
-
 63
63
-
 64
64
-
 65
65
-
 66
66
-
 67
67
-
 68
68
-
 69
69
-
 70
70
-
 71
71
-
 72
72
-
 73
73
-
 74
74
-
 75
75
-
 76
76
-
 77
77
-
 78
78
-
 79
79
-
 80
80
-
 81
81
-
 82
82
-
 83
83
-
 84
84
-
 85
85
-
 86
86
-
 87
87
-
 88
88
-
 89
89
-
 90
90
-
 91
91
-
 92
92
-
 93
93
-
 94
94
-
 95
95
-
 96
96
-
 97
97
-
 98
98
-
 99
99
-
 100
100
-
 101
101
-
 102
102
-
 103
103
-
 104
104
-
 105
105
-
 106
106
-
 107
107
-
 108
108
-
 109
109
-
 110
110
-
 111
111
-
 112
112
-
 113
113
-
 114
114
-
 115
115
-
 116
116
-
 117
117
-
 118
118
-
 119
119
-
 120
120
-
 121
121
-
 122
122
-
 123
123
-
 124
124
-
 125
125
-
 126
126
-
 127
127
-
 128
128
-
 129
129
-
 130
130
-
 131
131
-
 132
132
-
 133
133
-
 134
134
-
 135
135
-
 136
136
-
 137
137
-
 138
138
-
 139
139
-
 140
140
-
 141
141
-
 142
142
-
 143
143
-
 144
144
-
 145
145
-
 146
146
-
 147
147
-
 148
148
-
 149
149
-
 150
150
-
 151
151
-
 152
152
-
 153
153
-
 154
154
-
 155
155
-
 156
156
-
 157
157
-
 158
158
-
 159
159
-
 160
160
-
 161
161
-
 162
162
-
 163
163
-
 164
164
-
 165
165
-
 166
166
-
 167
167
-
 168
168
-
 169
169
-
 170
170
-
 171
171
-
 172
172
-
 173
173
-
 174
174
-
 175
175
-
 176
176
-
 177
177
-
 178
178
-
 179
179
-
 180
180
-
 181
181
-
 182
182
-
 183
183
-
 184
184
-
 185
185
-
 186
186
-
 187
187
-
 188
188
-
 189
189
-
 190
190
-
 191
191
-
 192
192
-
 193
193
-
 194
194
-
 195
195
-
 196
196
-
 197
197
-
 198
198
-
 199
199
-
 200
200
-
 201
201
-
 202
202
-
 203
203
-
 204
204
-
 205
205
-
 206
206
-
 207
207
-
 208
208
-
 209
209
-
 210
210
-
 211
211
-
 212
212
-
 213
213
-
 214
214
-
 215
215
-
 216
216
-
 217
217
-
 218
218
-
 219
219
-
 220
220
-
 221
221
-
 222
222
-
 223
223
-
 224
224
-
 225
225
-
 226
226
-
 227
227
-
 228
228
-
 229
229
-
 230
230
-
 231
231
-
 232
232
-
 233
233
-
 234
234
-
 235
235
-
 236
236
-
 237
237
-
 238
238
-
 239
239
-
 240
240
-
 241
241
-
 242
242
-
 243
243
-
 244
244
-
 245
245
-
 246
246
-
 247
247
-
 248
248
-
 249
249
-
 250
250
-
 251
251
-
 252
252
-
 253
253
-
 254
254
-
 255
255
-
 256
256
-
 257
257
-
 258
258
-
 259
259
-
 260
260
-
 261
261
-
 262
262
-
 263
263
-
 264
264
-
 265
265
-
 266
266
-
 267
267
-
 268
268
-
 269
269
-
 270
270
-
 271
271
-
 272
272
-
 273
273
-
 274
274
-
 275
275
-
 276
276
-
 277
277
-
 278
278
-
 279
279
-
 280
280
-
 281
281
-
 282
282
-
 283
283
-
 284
284
-
 285
285
-
 286
286
-
 287
287
-
 288
288
-
 289
289
-
 290
290
-
 291
291
-
 292
292
-
 293
293
-
 294
294
-
 295
295
-
 296
296
-
 297
297
-
 298
298
-
 299
299
-
 300
300
-
 301
301
-
 302
302
-
 303
303
-
 304
304
-
 305
305
-
 306
306
-
 307
307
-
 308
308
-
 309
309
-
 310
310
-
 311
311
-
 312
312
-
 313
313
-
 314
314
-
 315
315
-
 316
316
-
 317
317
-
 318
318
-
 319
319
-
 320
320
-
 321
321
-
 322
322
-
 323
323
-
 324
324
-
 325
325
-
 326
326
-
 327
327
-
 328
328
-
 329
329
-
 330
330
-
 331
331
-
 332
332
-
 333
333
-
 334
334
-
 335
335
-
 336
336
-
 337
337
-
 338
338
-
 339
339
-
 340
340
-
 341
341
-
 342
342
-
 343
343
-
 344
344
-
 345
345
-
 346
346
-
 347
347
-
 348
348
-
 349
349
-
 350
350
-
 351
351
-
 352
352
-
 353
353
-
 354
354
-
 355
355
-
 356
356
-
 357
357
-
 358
358
-
 359
359
-
 360
360
-
 361
361
-
 362
362
-
 363
363
-
 364
364
-
 365
365
-
 366
366
-
 367
367
-
 368
368
-
 369
369
-
 370
370
-
 371
371


Thrustmaster Thrustmaster T3PA Add-On (PS4, XOne & PC) Kullanım kılavuzu
- Tip
- Kullanım kılavuzu
diğer dillerde
İlgili makaleler
-
Thrustmaster 4060065 Kullanım kılavuzu
-
Thrustmaster 2969097 2961061 Kullanım kılavuzu
-
-
-
-
Thrustmaster 2960726 Kullanım kılavuzu
-
-
-
-
Thrustmaster 4060121 Kullanım kılavuzu