
SST1800
English Page 03
French Page 16
Russian Page 30
Ukrainian Page 45
Turkish Page 60
ﺔﻴﺑﺮﻌﻟﺍ Page 86

ENGLISH (Original instructions)
2
19
A
17
16
6
20
21b
4
3 2
12
18
11
10
22
9
1
21a
7
8
5
15
14

(Original instructions) ENGLISH
3
INTENDED USE
Your STANLEY SST1800 Table Saw is designed for the slitting
and cross-cutting of all types of timber commensurate with the
machine’s size. This tool is intended for professional use.
WARNING! When using electric tools basic safety
precautions should be followed to reduce the risk of
fire, electric shock and personal injury including the
following.
Read all these instructions before attempting to operate this
product and save these instructions
SAFETY INSTRUCTIONS
General power tool safety warnings
WARNING! Read all safety warnings,
instructions, illustrations and specifications
provided with this power tool. Failure to follow all
instructions listed below may result in electric shock,
fire and/or serious injury.
Save all warnings and instructions for future reference.
The term “power tool” in the warnings refers to your
mains-operated (corded) power tool or battery-operated
(cordless) power tool.
1. Work area safety
a. Keep work area clean and well lit. Cluttered or dark areas
invite accidents.
b. Do not operate power tools in explosive atmospheres,
such as in the presence of flammable liquids, gases or
dust. Power tools create sparks which may ignite the dust
or fumes.
c. Keep children and bystanders away while operating a
power tool. Distractions can cause you to lose control.
2. Electrical safety
a. Power tool plugs must match the outlet. Never modify
the plug in any way. Do not use any adapter plugs with
earthed (grounded) power tools. Unmodified plugs and
matching outlets will reduce risk of electric shock.
b. Avoid body contact with earthed or grounded surfaces
such as pipes, radiators, ranges and refrigerators.
There is an increased risk of electric shock if your body is
earthed or grounded.
c. Do not expose power tools to rain or wet conditions.
Water entering a power tool will increase the risk of electric
shock.
d. Do not abuse the cord. Never use the cord for carrying,
pulling or unplugging the power tool. Keep cord away
from heat, oil, sharp edges or moving parts. Damaged
or entangled cords increase the risk of electric shock.
e. When operating a power tool outdoors, use an
extension cord suitable for outdoor use. Use of a cord
suitable for outdoor use reduces the risk of electric shock.
f. If operating a power tool in a damp location is unavoid-
able, use a residual current device (RCD) protected
supply. Use of an RCD reduces the risk of electric shock.
3. Personal safety
a. Stay alert, watch what you are doing and use common
sense when operating a power tool. Do not use a
power tool while you are tired or under the influence of
drugs, alcohol or medication. A moment of inattention
while operating power tools may result in serious personal
injury.
b. Use personal protective equipment. Always wear eye
protection. Protective equipment such as a dust mask,
non-skid safety shoes, hard hat, or hearing protection used
for appropriate conditions will reduce personal injuries.
c. Prevent unintentional starting. Ensure the switch is in
the off-position before connecting to power source
and/or battery pack, picking up or carrying the tool.
Carrying power tools with your finger on the switch or
energising power tools that have the switch on invites
accidents.
d. Remove any adjusting key or wrench before turning
the power tool on. A wrench or a key left attached to a
rotating part of the power tool may result in personal injury.
e. Do not overreach. Keep proper footing and balance at
all times. This enables better control of the power tool in
unexpected situations.
f. Dress properly. Do not wear loose clothing or
jewellery. Keep your hair and clothing away from
moving parts. Loose clothes, jewellery or long hair can be
caught in moving parts.
g. If devices are provided for the connection of dust
extraction and collection facilities, ensure these are
connected and properly used. Use of dust collection can
reduce dust-related hazards.
h. Do not let familiarity gained from frequent use of tools
allow you to become complacent and ignore tool
safety principles. A careless action can cause severe
injury within a fraction of a second.
4. Power tool use and care
a. Do not force the power tool. Use the correct power tool
for your application. The correct power tool will do the job
better and safer at the rate for which it was designed.
b. Do not use the power tool if the switch does not turn it
on and off. Any power tool that cannot be controlled with
the switch is dangerous and must be repaired.
c. Disconnect the plug from the power source and/or
remove the battery pack, if detachable from the power
tool before making any adjustments, changing
accessories, or storing power tools. Such preventive
safety measures reduce the risk of starting the power tool
accidentally.
d. Store idle power tools out of the reach of children and
do not allow persons unfamiliar with the power tool or
these instructions to operate the power tool. Power
tools are dangerous in the hands of untrained users.
e. Maintain power tools and accessories. Check for
misalignment or binding of moving parts, breakage of
parts and any other condition that may affect the
power tools operation. If damaged, have the power tool
repaired before use. Many accidents are caused by
poorly maintained power tools.
f. Keep cutting tools sharp and clean. Properly maintained
cutting tools with sharp cutting edges are less likely to bind
and are easier to control.
g. Use the power tool, accessories and tool bits etc. in
accordance with these instructions, taking into
account the working conditions and the work to be
performed. Use of the power tool for operations different
from those intended could result in a hazardous situation.
h. Keep handles and grasping surfaces dry, clean and
free from oil and grease. Slippery handles and grasping
surfaces do not allow for safe handling and control of the
tool in unexpected situations.

ENGLISH (Original instructions)
4
block when this distance is less than 50 mm. “Work
helping” devices will keep your hand at a safe distance
from the saw blade.
e. Use only the push stick provided by the manufacturer
or constructed in accordance with the instructions.
This push stick provides sufficient distance of the hand
from the saw blade.
f. Never use a damaged or cut push stick. A damaged
push stick may break causing your hand to slip into the
saw blade.
g. Do not perform any operation “freehand”. Always use
either the rip fence or the mitre gauge to position and
guide the workpiece. “Freehand” means using your
hands to support or guide the workpiece, in lieu of a rip
fence or mitre gauge. Freehand sawing leads to
misalignment, binding and kickback.
h. Never reach around or over a rotating saw blade.
Reaching for a workpiece may lead to accidental contact
with the moving saw blade.
i. Provide auxiliary workpiece support to the rear and/or
sides of the saw table for long and/or wide
workpieces to keep them level. A long and/or wide
workpiece has a tendency to pivot on the table’s edge,
causing loss of control, saw blade binding and kickback.
j. a Feed workpiece at an even pace. Do not bend or
twist the workpiece. If jamming occurs, turn the tool
off immediately, unplug the tool then clear the jam.
Jamming the saw blade by the workpiece can cause
kickback or stall the motor.
k. Do not remove pieces of cut-off material while the saw
is running. The material may become trapped between
the fence or inside the saw blade guard and the saw
blade pulling your fingers into the saw blade. Turn the saw
off and wait until the saw blade stops before removing
material.
l. Use an auxiliary fence in contact with the table top
when ripping workpieces less than 2 mm thick. A thin
workpiece may wedge under the rip fence and create
kickback.
3) Kickback Causes and Related Warnings
Kickback is a sudden reaction of the workpiece due to a
pinched, jammed saw blade or misaligned line of cut in the
workpiece with respect to the saw blade or when a part of the
workpiece binds between the saw blade and the rip fence or
other fixed object.
Most frequently during kickback, the workpiece is lifted from
the table by the rear portion of the saw blade and is propelled
towards the operator. Kickback is the result of saw misuse
and/or incorrect operating procedures or conditions and can
be avoided by taking proper precautions as given below.
a Never stand directly in line with the saw blade. Always
position your body on the same side of the saw blade
as the fence. Kickback may propel the workpiece at high
velocity towards anyone standing in front and in line with
the saw blade.
b Never reach over or in back of the saw blade to pull or
to support the workpiece. Accidental contact with the
saw blade may occur or kickback may drag your fingers
into the saw blade.
c. Never hold and press the workpiece that is being cut
off against the rotating saw blade. Pressing the
5. Service
a. Have your power tool serviced by a qualified repair
person using only identical replacement parts. This will
ensure that the safety of the power tool is maintained.
SAFETY INSTRUCTIONS FOR TABLE SAWS
1) Guarding Related Warnings
a. Keep guards in place. Guards must be in working
order and be properly mounted. A guard that is loose,
damaged, or is not functioning correctly must be repaired
or replaced.
b. Always use saw blade guard, riving knife for every
through–cutting operation. For through-cutting
operations where the saw blade cuts completely through
the thickness of the workpiece, the guard and other safety
devices help reduce the risk of injury.
c. Immediately reattach the guarding system after
completing an operation (such as rabbeting or
resawing cuts) which requires removal of the guard or
riving knife. The guard and riving knife help to reduce the
risk of injury.
d. Make sure the saw blade is not contacting the guard,
riving knife or the workpiece before the switch is
turned on. Inadvertent contact of these items with the
saw blade could cause a hazardous condition.
e. Adjust the riving knife as described in this instruction
manual. Incorrect spacing, positioning and alignment can
make the riving knife ineffective in reducing the likelihood
of kickback.
f. For the riving knife to work, they must be engaged in
the workpiece. The riving knife is ineffective when cutting
workpieces that are too short to be engaged with the
riving knife. Under these conditions a kickback cannot be
prevented by the riving knife .
g. Use the appropriate saw blade for the riving knife. For
the riving knife to function properly, the saw blade
diameter must match the appropriate riving knife and the
body of the saw blade must be thinner than the thickness
of the riving knife and the cutting width of the saw blade
must be wider than the thickness of the riving knife.
2) Cutting Procedures Warnings
a. DANGER: Never place your fingers or hands
in the vicinity or in line with the saw blade. A
moment of inattention or a slip could direct your
hand towards the saw blade and result in serious
personal injury.
b. Feed the workpiece into the saw blade only against
the direction of rotation. Feeding the workpiece in the
same direction that the saw blade is rotating above the
table may result in the workpiece, and your hand, being
pulled into the saw blade.
c. Never use the mitre gauge to feed the workpiece when
ripping and do not use the rip fence as a length stop
when cross cutting with the mitre gauge. Guiding the
workpiece with the rip fence and the mitre gauge at the
same time increases the likelihood of saw blade binding
and kickback.
d. When ripping, always apply the workpiece feeding
force between the fence and the saw blade. Use a
push stick when the distance between the fence and
the saw blade is less than 150 mm, and use a push

(Original instructions) ENGLISH
5
h. Never use damaged or incorrect saw blade mounting
means such as flanges, saw blade washers, bolts or
nuts. These mounting means were specially designed for
your saw, for safe operation and optimum performance.
i. Never stand on the table saw, do not use it as a
stepping stool. Serious injury could occur if the tool is
tipped or if the cutting tool is accidentally contacted.
j. Make sure that the saw blade is installed to rotate in
the proper direction. Do not use grinding wheels, wire
brushes, or abrasive wheels on a table saw. Improper
saw blade installation or use of accessories not
recommended may cause serious injury.
Additional Safety Rules for Saw Benches
WARNING: Cutting plastics, sap coated wood, and
other materials may cause melted material to
accumulate on the blade tips and the body of the
saw blade, increasing the risk of blade overheating
and binding while cutting.
• Make sure that the blade rotates in the correct direction
and that the teeth are pointing to the front of the saw
bench.
• Be sure all clamp handles are tight before starting any
operation.
• Be sure all blade and flanges are clean and the larger face
of the clamp washer is against the blade. Tighten the arbor
nut securely.
• Make sure that the riving knife is adjusted to the correct
distance from the blade.
• Never operate the saw without the upper and lower guards
in place.
• Do not apply lubricants to the blade when it is running.
• Always keep the push stick in its store place when not in
use.
• Do not use the guard for handling or transportation.
• Do not exert side pressure on the saw blade.
• Never cut light alloy. The machine is not designed for this
application.
• Do not use abrasive disc or diamond cutting wheels.
• Rabbeting, slotting or grooving is not allowed.
• In case of machine failure, immediately switch the machine
off and remove from the power source. Report the failure
and mark the machine in suitable form which prevents that
other persons use the defective machine.
• When the saw blade is blocked due to abnormal feed force
during cutting, ALWAYS switch the machine off and
remove from the power source. Remove the workpiece
and ensure that the saw blade runs free. Turn the machine
on and start a new cutting operation with reduced feed
force.
• NEVER attempt to cut a stack of loose pieces of material
which could cause loss of control or kickback. Support all
materials securely.
• Take care that the blade guard is properly positioned.
When sawing, it must always face against the workpiece.
Saw Blades
• Do not use saw blades that do not conform to the
dimensions stated in the Technical Data. Do not use any
spacers to make a blade fit onto the spindle. Use only the
blades specified in this manual, complying with EN847-1, if
intended for wood and similar materials.
workpiece being cut off against the saw blade will create a
binding condition and kickback.
d. Align the fence to be parallel with the saw blade. A
misaligned fence will pinch the workpiece against the saw
blade and create kickback.
e. Use a featherboard to guide the workpiece against the
table and fence when making nonthrough cuts such as
rabbeting or resawing cuts. A featherboard helps to
control the workpiece in the event of a kickback.
f. Use extra caution when making a cut into blind areas
of assembled workpieces. The protruding saw blade may
cut objects that can cause kickback.
g. Support large panels to minimise the risk of saw blade
pinching and kickback. Large panels tend to sag under
their own weight. Support(s) must be placed under all
portions of the panel overhanging the table top.
h. Use extra caution when cutting a workpiece that is
twisted, knotted, warped or does not have a straight
edge to guide it with a mitre gauge or along the fence.
A warped, knotted, or twisted workpiece is unstable and
causes misalignment of the kerf with the saw blade,
binding and kickback.
i. Never cut more than one workpiece, stacked vertically
or horizontally. The saw blade could pick up one or more
pieces and cause kickback.
j. When restarting the saw with the saw blade in the
workpiece, centre the saw blade in the kerf so that the
saw teeth are not engaged in the material. If the saw
blade binds, it may lift up the workpiece and cause
kickback when the saw is restarted.
k. Keep saw blades clean, sharp, and with sufficient set.
Never use warped saw blades or saw blades with
cracked or broken teeth. Sharp and properly set saw
blades minimise binding, stalling and kickback.
4) Table Saw Operating Procedure Warnings
a. Turn off the table saw and disconnect the power cord
when removing the table insert, changing the saw
blade or making adjustments to the riving knife, or
saw blade guard, and when the machine is left
unattended. Precautionary measures will avoid accidents.
b. Never leave the table saw running unattended.Turn it
off and don’t leave the tool until it comes to a
complete stop. An unattended running saw is an
uncontrolled hazard.
c. Locate the table saw in a well-lit and level area where
you can maintain good footing and balance. It should
be installed in an area that provides enough room to
easily handle the size of your workpiece. Cramped,
dark areas, and uneven slippery floors invite accidents.
d. Frequently clean and remove sawdust from under the
saw table and/or the dust collection device.
Accumulated sawdust is combustible and may self-ignite.
e. The table saw must be secured. A table saw that is not
properly secured may move or tip over.
f. Remove tools, wood scraps, etc. from the table before
the table saw is turned on. Distraction or a potential jam
can be dangerous.
g. Always use saw blades with correct size and shape
(diamond versus round) of arbour holes. Saw blades
that do not match the mounting hardware of the saw will
run off-centre, causing loss of control.

ENGLISH (Original instructions)
6
• The maximunm speed of the saw blade shall always be
greater than or at least equal to the speed marked on the
rating plate of the tool.
• The saw blade diameter must be in accordance with the
markings on rating plate of the tool.
• Consider applying specially designed noisereduction
blades.
• Do not use high steel (HS) saw blades.
• Do not use cracked or damaged saw blades.
• Ensure that the chosen saw blade is suitable for the
material to be cut.
• Always wear gloves for handling saw blades and rough
material. Saw blades should be carried in a holder
wherever practicable.
Power connections
Before connecting the machine to the power line, make sure
the switch (8) is in the “OFF” position and be sure that the
electric current is of the same characteristics as indicated on
the machine. All line connections should make good contact.
Running on low voltage will damage the machine.
DANGER! Do not expose the machine to rain or
operate the machine in damp locations.
Before connecting the machine to the power source, make
sure the switch is in the “OFF” position.
SAFETY OF OTHERS
• This appliance is not intended for use by persons
(including children) with reduced physical, sensory or
mental capabilities, or lack of experience and knowledge,
unless they have been given supervision or instruction
concerning use of the appliance by a person responsible
for their safety.
• Children should be supervised to ensure that they do not
play with the appliance.
RESIDUAL RISKS
Additional residual risks may arise when using the tool which
may not be included in the enclosed safety warnings. These
risks can arise from misuse, prolonged use etc. In spite of the
application of the relevant safety regulations and the
implementation of safety devices, certain risks cannot be
avoided. These are:
• Injuries caused when changing any parts, blades or
accessories.
• Injuries caused by prolonged use of a tool. When using
any tool for prolonged periods ensure you take regular
breaks.
• Impairment of hearing.
• Health hazards caused by breathing dust developed when
using your tool (example: working with wood, especially
oak, beech and MDF.)
ELECTRICAL SAFETY
Your tool needs to be earthed. Always check that the main
voltage corresponds to the voltage on the rating plate.
WARNING
! If the power cord is damaged, it must
be replaced by the manufacturer, authorized
STANLEY Service Center or an equally qualified
person in order to avoid damage or injury. If the
power cord is replaced by an equally qualified
person, but not authorized by STANLEY, the
warranty will not be valid.
USING AN EXTENSION CABLE
If it is necessary to use an extension cable, please use an
approved extension cable that fits the tool’s power input
specifications. The minimum cross-sectional area of the
conducting wire is 1.5 sq. mm. Cables should be untangled
before reeling up.
Cable cross-sectional
area (mm
2
)
Cable rated current
(Ampere)
0.75 6
1.00 10
1.50 15
2.50 20
4.00 25
Voltage Amperes Cable rated current (Ampere)
110-127 0 - 2.0 6 6 6 6 6 10
2.1 - 3.4 6 6 6 6 15 15
3.5 - 5.0 6 6 10 15 20 20
5.1 - 7.0 10 10 15 20 20 25
7.1 - 12.0 15 15 20 25 25 -
12.1 - 20.0 20 20 25 - - -
220-240 0 - 2.0 6 6 6 6 6 6
2.1 - 3.4 6 6 6 6 6 6
3.5 - 5.0 6 6 6 6 10 15
5.1 - 7.0 10 10 10 10 15 15
7.1 - 12.0 15 15 15 15 20 20
12.1 - 20.0 20 20 20 20 25 -
Cable length (m)
7.5 15 25 30 45 60

(Original instructions) ENGLISH
7
5. Rip fence
6. Mitre guage
7. Transportation wheels
8. On/Off switch
9. Leg stand
10. Bevel adjustment locking knob
11. Blade elevation handle
12. Leg stand locking knob
13. Blade tilting wheel
14. Locking handle for extension table
15. Locking handle for rip fence
16. Extension table
17. Spanner wrench
18. Guide rail
19. Push stick
20. Table insert
21. Groove (a)
21. Groove (b)
22. Overloaded protector
ASSEMBLY (Fig A1, A2, A3, A4)
There are three positions on the machine for different use,
standing, folding and transporting. The legs are locked using
twist knobs which lock/unlock in either direction and have a
central unlocked position.
1. Start with the saw standing on its wheels (A1), unlock the
upper legs. Swing up the legs and lock (A2) then unlock
the lower legs.
2. Lift the table from the end (A3), allowing the lower leg to
swing into place. Swing the leg fully into place and lock
(A4).
3. There is a adjustable spring leg as shown in Fig.A5. You
can rotate it clockwise or anti-clockwise for your desired
length. (A5)
LABELS ON TOOL
The label on your tool may include the following symbols:
Position of Date Code
The Date Code, which also includes the year of manufacture,
is printed into the housing.
Example:
2017 XX JN
Year of manufacturing
PACKAGE CONTENTS
The package contains:
1 table saw
1 60T saw blade
1 Blade guard
1 Miter gauge
1 Rip fence
1 Extraction hose
1 Hose adapter
2 Spanner wrench
1 Push stick
1 Narrow Material Fence
1 Instruction manual
• Check for damage to the tool, parts or accessories which
may have occurred during transport.
• Take the time to thoroughly read and understand this
manual prior to operation.
FEATURES (Fig. A)
This tool includes some or all of the following features.
1. Saw table
2. Blade guard
3. Riving knife
4. Saw blade
WARNING! To reduce the risk of injury, the user
must read the instruction manual before use.
Wear ear protection.
Wear safety glasses or goggles.
V Volts
Direct Current
A Amperes n
0
No-Load Speed
Hz Hertz
Class II Construction
W Watts
Earthing Terminal
min minutes
Safety Alert Symbol
Alternating
Current
/min.
Revolutions or
Reciprocation per
minute
A1

ENGLISH (Original instructions)
8
Folding instructions (Fig B1, B2, B3, B4)
Hold and support the table edge, unlock the legs at the wheel
end (B1).Lower the wheels to the ground, allowing the legs to
swing under (B2).Stand the table on end, fold up and lock the
lower legs, unlock the upper legs (B3). Swing down the legs
and lock (B4).
A5
A4
A2
A3
B1
2
1
3
B2
1
B3
2
1
3

(Original instructions) ENGLISH
9
Riving knife set-up (Fig E, F, G)
WARNING! Disconnect the mains cable! The
setup of the riving knife (3) must be checked
before each use.
1. Set the saw blade (4) to the max. cutting depth, put it at 00
position and lock it
2. Remove the table insert (20) (Fig. E)
WARNING! For transport reasons, the riving
knife (3) was fixed in the lower position before
initial commissioning. Only work with the
machine if the riving knife (3) is in the upper
position. Fitting the riving knife (3) in the upper
position is as follows:
3. Loosen the locking handle (f) and push the riving knife (3)
in the upper position (Fig.F)
To Transport The Table Saw (Fig C1, C2)
The upper legs could be locked in the vertical position for
use as a trolley handle.
WARNING! Cover the upper part of the saw blade during
transportation, for example by the guard.
Handle assembly (Fig D)
Place washer (e), housing (b), washer (c) and hex nut (d) on
the bolt (a) to assemble the handle (11)
204
E
B4
2
1
C1
C2
d
c
b
e
a
11
D

ENGLISH (Original instructions)
10
Saw blade assembly/replacement (Fig E, H, I)
1. WARNING: Ensure the machine is disconnected from the
power source. Wear the safety gloves.
2. Disassemble the saw blade guard (2) (Fig. H.)
3. Remove the table insert (20) (Fig. E).
4. Loosen the nut by placing the spanner wrench (17) on the
nut and countering with another spanner wrench (17) on
the flange (Fig. I).
5. WARNING! Turn the nut in the rotational direction of the
saw blade.
6. Remove the outer flange and take out the saw blade from
the inner flange, with diagonally downwards movement.
7. Carefully clean the flange with a cloth before fixing the
new saw blade.
8. Insert the new saw blade and fasten the outer flange. The
outer flange has a Φ30mm raised boss which fits in side
the blade bore.
WARNING! The teeth of a new blade are very sharp and can
be dangerous. Make sure the teeth point down at the front of
the table, aligned with the arrow marked on the saw blade
guard (2).
9. Attach the table insert (20) and the saw blade guard (2)
again and set them.
10. Before working, check the functionality of the guards.
On/Off switch (Fig. J)
- To switch the machine on, press the green start “I” button.
- To switch the machine off, press the red stop “O” button.
Cutting depth (Fig J)
Turn the blade elevation handle (11) to set the blade to the
required cutting depth.
4. The gap between the saw blade (4) teeth and the riving
knife should be around 3mm to 5mm (Fig.G)
5. R-tighten the mounting screw (f) and fix the table insert
(20)
WARNING! Ensure the machine is disconnected
from the power source. Never use the machine
without the table insert; Immediately replace the
table insert when worn or damaged
Saw blade guard assembly (Fig H)
1. Fasten the saw blade guard (2) to the riving knife (3) with
the bolt (g).
2. Place the rear extraction hose (h) on the extraction
adapter on the saw blade guard (2).
3. Disassembly in reverse order.
G
f
34
F
2 3
g
h
H
17
17
I
8
11
10
J

(Original instructions) ENGLISH
11
Setting the cutting width (Fig. M)
- The rip fence (5) is used for lengthwise cutting of wood.
- Place the rip fence (5) on the guide rail (18) to the right or
left of the saw blade.
- 2 scales (k/l) on the guide rail (18) to show the gap
between fence rail and saw blade (4)
When the cutting width less than 300mm, means table no
extended, refer to scale (k). The red mark of sight-glass (m)
shows the required cutting width setup;
When cutting width more than 300mm need table extended,
refer to scale (l). Ensure the red mark of sight-glass (m) at
300mm and lock the rip fence, then the pointer (aa) aim at
scale (l) value shows the required cutting width setup.
Extension table (Fig N)
- The extension table (16) could be used for particularly
wide workpieces.
- Loosen the locking handle (14) and pull out the table width
extension.
- Turn anti-clockwise; to increase the cutting depth
- Turn Clockwise; to reduce the cutting depth
After each new adjustment it is advisable to carry out a trial
cut in order to check the set dimensions.
Setting the angle (Fig J)
Set the required bevel angle from 0 to 45 degree Before cutting,
ensure the saw blade (4) and mitre gauge (6) no collision
- Loose the Bevel adjustment locking knob (10).
- Set up the desired angle then lock the knob again.
Narrow material fence mounting (Fig K)
- The Narrow Material Fence (i) of the rip fence (5) has two
guiding surface with different heights.
- Depending on the thickness of the material to be cut, the
higher side of the Narrow Material Fence (i) has to be
used for thick material (work piece thickness above 25mm)
and the lower side of the fence rail for thin material (work
piece thickness below 25mm).
- For the adjustment, loosen the bolts on the side of the rip
fence (5) and push the Narrow Material Fence (i) on the
guide, depending on the required position.
- Tighten the bolts again.
Rip fence mounting (Fig L)
- Fix the rip fence (5) at the back side and press the locking
handle (15) downwards.
- When disassembling, pull the locking handle up and
remove the rip fence (5).
- The rip fence could be locked setting with the rear knurled
nut.
i5
K
515
L
N
14 16
M
5
18 k l
aa
m

ENGLISH (Original instructions)
12
Caution: (Fig Q)
- Always use the push stick (19) when ripping small
workpieces (fig. Q)
- Do not cut excessively small workpieces.
Cross Cutting
- Lock the miter gauge (6) at 0 degree
- Set the bevel angle to 0 degree
- Adjust the saw blade (4) height
- Hold the workpiece flat on the table (1) and against the
fence. Keep the workpiece away from the blade.
- Keep both hands away from the path of the saw blade.
- Switch the machine on and allow the saw blade to reach
full speed.
- Hold the workpiece tightly again the fence and slowly
move the workpiece together with the fence assembly until
the workpiece comes underneath the upper blade guard.
Allow the teeth to cut, and do not force the workpiece
through the saw blade. The saw blade speed should be
kept constant.
After completing the cut, switch the machine off, allow the saw
blade to stop and remove the workpiece
- Push the and the workpiece toward the blade in order to
make the cut.
Important: Never push or hold the cut-off-side
workpiece.
Cross stop (Fig O)
- Push the miter gauge (6) into a slot (21 a/b) on the saw
table.
- Loosen the locking handle (n).
- Rotate the miter gauge (6) until the required angle is set.
The scale (p) shows the set angle.
- Re-tighten the locking handle (n)
USE
Working instructions
After each new adjustment it is advisable to carry out a trial in
order to check the set dimensions. After switching on the saw,
wait for the blade to reach its maximum speed of rotation
before commencing with the cut.
Secure long workpiece against falling off at the end of the cut
(e.g. with a roller stand etc.) Take extra care when starting the
cut! Never use the equipment without the suction function.
Regularly check and clean the suction channels.
Making longitudinal cuts (Fig P)
Longitudinal cutting (also known as slitting) is when you use
the saw to cut along the grain of the wood. Press one edge of
the workpiece against the parallel stop (5)” to be replaced to
“rip fence (5) while the flat side on the saw table (1).
The blade guard (2) must always be lowered over the
workpiece. When you make a longitudinal cut, never adopt a
working position that is in line with cutting direction.
- Set the in accordance with the workpiece height and the
desired width.
- Switch on the saw.
- Place your hands (with fingers closed) flat on the
workpiece and push the workpiece along the and into the
blade (4).
- Guide at the side with your left or right hand (depending
on the position) only as far as the front edge of the saw
blade guard (2).
- Always push the workpiece through to the end of the riving
knife (3)
- The offcut piece remains on the saw table (4) until the
blade (4) is back in its position of rest.
- Secure long workpiece against falling off at the end of the
cut ) with a roller stand etc.
O
6 21an
p
5 2
4
3
1
P
19
Q

(Original instructions) ENGLISH
13
6
S
Blade jamming handling (Fig U)
- Ensure the machine is disconnected from the power
source.
- Remove the wookpiece at first. Warning: Be careful of
your hands not toughing the saw blade.
- Press the overloaded protector (22) and connect the plug
again, the machine can be resumed to work. (Fig. U)
Applications
1. Make sure the kerf is made on the scrap side of the
measuring line.
2. Cut the wood with the finished side up.
3. Always have a proper support for the wood as it comes
out of the blade.
4. Make a test cut for important cuts.
5. Always use the correct blade depth setting. The top of the
blade teeth should clear the top of the material being cut
by 1⁄8” (3 mm) to 1⁄4” (6 mm).
6. Inspect the work-piece for knots or nails before beginning
a cut. Remove any loose knots with a hammer.
7. Always use clean, sharp, properly-set blades. Never make
a cut with a dull blade.
8. When making a cut, use steady, even pressure. Never
force a cut.
9. DO NOT cut wet or warped lumber.
10. Always hold your work-piece firmly with both hands or use
a push stick.
MAINTENANCE
Remove the plug from the socket before carrying out any
adjustment, servicing or maintenance. Keep tools sharp and
clean for better and safer performane. Inspect tool cords
periodically and if damaged, have repaired by an authorized
service facility. Your power tool requires no additional
lubrication or maintenance. There are no user serviceable
parts in your power tool. Never use water or chemical cleaners
to clean your power tool. Wipe clean with a dry cloth. Always
store your power tool in a dry place. Keep the motor ventilation
slots clean. Keep all working controls free of dust. If you see
some sparks flashing in the ventilation slots, this is normal and
will not damage your power tool. If the supply cord is damaged,
it must be replaced by the manufacturer, its service agent or
similarly qualified persons in order to avoid a hazard.
Bevel cuts (Fig R)
Bevel cuts must always be made using the rip fence (5).
- Set the blade (4) to the desired angle.
- Proceed as for cross cutting
Cutting particle boards
To prevent the cutting edges from cracking when working with
particle boards, the saw blade must be higher than the
workpiece height.
Auxiliary tools stored (Fig S,T)
Auxiliary tools can be stored on the machine Miter gauge (6)
could be put on hook as Fig S showed. Blade guard (2) and
push stick (19) could be put on hook as Fig T showed.
R
621a 21b4
2
19
T
22
U

ENGLISH (Original instructions)
14
IMPORTANT! To assure product SAFETY and
RELIABILITY, repairs, maintenance and adjustment
(other than those listed in this manual) should be
performed by authorized service centers or other
qualified service personnel, always using identical
replacement parts.
DUST EXTRACTION
Dust from materials such as lead-containing coatings and some
wood types, can be harmful to one’s health. Breathing-in the dust
can cause allergic reactions and/or lead to respiratory infections of
the user or bystanders. Certain dust, such as oak or beech dust, is
considered carcinogenic, especially in connection with woodtreat-
ment additives.
Observe the relevant regulations in your country for the materials to
be worked.
The vacuum cleaner must be suitable for the material being
worked.
When vacuuming dry dust that is especially detrimental to health or
carcinogenic, use dust class M vacuum cleaner.
The machine is provided with a dust collection port at the rear of the
machine suitable for use with dust extraction equipment featuring
35 mm nozzles. The blade guard assembly also features a dust
collection port for 35 mm nozzles.
• During all operations, connect a dust extraction device
designed in accordance with the relevant regulations regarding
dust emission.
• Ensure that the dust extraction hose in use is suitable for the
application and material being cut. Ensure proper hose
management.
• A splitter accessory is available to connect both ports to a
single dust extractor.
• Be aware that man-made materials such as chipboard or MDF
produce more dust particles during cutting than natural timber.
CLEANING (FIG. A)
WARNING: Blow dirt and dust out of the main housing
with dry air as often as dirt is seen collecting in and
around the air vents. Wear approved eye protection and
approved dust mask when performing this procedure.
WARNING: Never use solvents or other harsh
chemicals for cleaning the non-metallic parts of the tool.
These chemicals may weaken the materials used in
these parts. Use a cloth dampened only with water and
mild soap. Never let any liquid get inside the tool; never
immerse any part of the tool into a liquid.
WARNING: To reduce the risk of injury, regularly clean
the table top and ventilation slots.
WARNING: To reduce the risk of injury, regularly clean
the dust collection system.
WARNING: To reduce the risk of serious personal
injury, do not use the saw without reattaching the
dust access door.
The blade guard (2) and throat plate must be placed in position
before operating the saw.
Before use, carefully inspect upper and lower blade guards as well
as the dust extraction tube to determine that it will operate properly.
Ensure that chips, dust or work piece particles cannot lead to
blockage of one of the functions.
In case workpiece fragments are jammed between saw blade and
guards, disconnect the machine from the power supply and follow
the instructions given in section Saw blade assembly /
replacement. Remove the jammed parts and reassemble the saw
blade.
Keep the ventilation slots clear and regularly clean the housing with
a soft cloth.
Regularly clean the dust collection system:
ACCESSORIES
We recommend that you purchase your accessories from the
same store that sold you the tool. Use good quality accessories
marked with a well- known brand name. Choose the type
according to the work you intend to undertake. Refer to the
accessory packaging for further details. Store personnel can
assist you and offer advice.
PROTECTING THE ENVIRONMENT
Separate collection. This product must not be disposed
of with normal household waste.
Should you find one day that your STANLEY product needs
replacement, or if it is of no further use to you, do not dispose of it
with household waste. Make this product available for separate
collection.
STANLEY provides a facility for the collection and
recycling of STANLEY products once they have
reached the end of their working life. To take advantage
of this service please return your product to any
authorised repair agent who will collect them on our
behalf.
You can check the location of your nearest authorised repair agent
by contacting your local STANLEY office at the address indicated
in this manual. Alternatively, a list of authorised STANLEY repair
agents and full details of our after-sales service and contacts are
available on the Internet at: www.2helpU.com.
NOTES
STANLEY’s policy is one of continuous improvement to our
products and as such, we reserve the right to change product
specifications without prior notice. Standard equipment and
accessories may vary by country. Product specifications may differ
by country.
Complete product range may not be available in all countries.
Contact your local STANLEY dealers for range availability
SERVICE INFORMATION
STANLEY offers a full network of company-owned and
authorized service locations. All STANLEY Service Centers are
staffed with trained personnel to provide customers with
efficient and reliable power tool service.

For more information about our authorized service centers and
if you need technical advice, repair, or genuine factory
replacement parts, contact the STANLEY location nearest you.
TECHNICAL DATA
Noise Values
The total noise values determined in accordance with
NOISE
The declared noise emission values stated in the technical data
and the declaration of conformity have been measured in
accordance with a standard test method provided by EN 62841
and may be used for comparing one tool with another. The
declared noise emission value may also be used in a
preliminary assessment of exposure.
WARNING! The noise emission value during actual
use of the power tool can differ from the declared
value depending on the ways in which the tool is
used. The noise level may increase above the level
stated.
When assessing noise exposure to determine safety measures
required by 2002/44/EC to protect persons regularly using
power tools in employment, an estimation of noise exposure
should consider, the actual conditions of use and the way the
tool is used, including taking account of all parts of the
operating cycle such as the times when the tool is switched off
and when it is running idle in addition to the trigger time.
TWO YEARS WARRANTY
If your STANLEY product becomes defective due to faulty
materials or workmanship within 24 months from the date of
purchase, STANLEY guarantees to replace all defective parts
free of charge or – at our discretion – replace the unit free of
charge provided that:
• The product has not been misused and has been used in
accordance with the instruction manual;
• The product has been subject to fair wear and tear;
• Repairs have not been attempted by unauthorized persons;
• Proof of purchase is produced;
• The STANLEY product is returned complete with all original
components;
• The product hasn’t been used for hire purposes.
If you wish to make a claim, contact your seller or check the
location of your nearest authorised STANLEY repair agent in
the STANLEY catalogue or contact your local STANLEY office
at the address indicated in this manual. A list of authorised
STANLEY repair agents and full details of our after sales
service is available on the internet at: www.2helpU.com
SST1800
TABLE SAW
Type 2
Voltage V
AC
220-240
Frequency Hz 50-60
Power input W 1800
No-load speed
min
-1
4800
Blade diameter mm 254
Bore Size mm 30
Blade kerf mm 2.8
Blade body thickness mm 1.8
Riving knife thickness mm 2.5
Table size mm 560x680
Max. cutting depth at 45º mm 50
Max. cutting depth at 90º mm 80
Blade bevel range 0 - 45º
Weight kg 28.8
Level of sound pressure according to EN62841;
Sound pressure (L
pA
) dB(A) 87.5
Sound pressure uncertainty (K
pA
) dB(A) 3
Sound power (L
WA
) dB(A) 103.5
Sound power uncertainty (K
WA
) dB(A) 3
EC declaration of conformity
MACHINERY DIRECTIVE
SST1800 - Table Saw
STANLEY declares that these products described under
"technical data" are in compliance with: 2006/42/EC,
EN62841-1:2015+AC:2015,
EN62841-3-1:2014+AC:2015 + A11:2017.
These products also comply with Directive 2014/30/EU and
2011/65/EU. For more information, please contact STANLEY
at the following address or refer to the back of the manual.
The undersigned is responsible for compilation of the
technical file and makes this declaration on behalf of
STANLEY.
Becky Cotsworth
Director – Outdoor Products Group
STANLEY FATMAX Europe, Egide Walschaertsstraat14-18,
2800 Mechelen, Belgium
10.2019
(Original instructions) ENGLISH
15

FRANÇAIS (Traduction des instructions initiales)
16
USAGE PRÉVU
Votre scie sur table SST1800 de STANLEY est conçue pour le
découpage et le tronçonnage de tous les types de bois adaptés à la
taille de la machine. Cet outil est destiné à une utilisation profession-
nelle.
AVERTISSEMENT! L’utilisation d’outils électriques
requiert le respect de consignes de sécurité de base,
notamment celles indiquées ci-après, afin de réduire les
risques d’incendie, d’électrocution et de blessure.
Lisez attentivement toutes les instructions avant de faire fonctionner
cet outil et conservez ces instructions.
CONSIGNES DE SÉCURITÉ
Avertissements de sécurité générale concernant l’outil
électrique
Les définitions ci-dessous définissent le niveau de gravité de chaque
mention d’avertissement. Veuillez lire le manuel et prêter attention à
ces symboles.
AVERTISSEMENT ! Lisez tous les avertissements de
sécurité, les instructions, les illustrations et les
spécifications fournies avec cet outil électrique. Le
non-respect de ces avertissements et de ces instructions
peut provoquer un incendie, une électrocution et/ou de
graves blessures.
Conservez ces avertissements et ces instructions à titre de
référence ultérieure.
Le terme « outil électrique » dans les avertissements fait référence à
votre outil électrique alimenté par le courant (avec cordon
d’alimentation) ou fonctionnant sur batterie (sans cordon).
1. Sécurité de l’aire de travail
a. Travaillez dans un endroit propre et bien éclairé. Les zones
encombrées et sombres peuvent entraîner des accidents.
b. Ne mettez pas en marche votre outil électrique dans un
environnement explosif, ou en présence de liquides
inflammables, de gaz, ou de poussières. La mise en marche de
l’outil crée des étincelles qui peuvent enflammer les poussières
ou vapeurs.
c. Éloignez les enfants et les personnes présentes de la zone
lorsque l’outil est en fonctionnement. Toute distraction peut
vous faire perdre le contrôle de l’outil.
2. Sécurité électrique
a. Les fiches de l’outil électrique doivent correspondre à la
prise secteur. Ne modifiez jamais la fiche, de quelque
manière que ce soit. N’utilisez pas d’adaptateurs avec des
outils ayant une prise de terre (mis à la terre). Des fiches non
modifiées et raccordées aux prises murales correspondantes
réduiront les risques de choc électrique.
b. Évitez le contact direct avec les surfaces mises à la terre ou
mises à la masse comme les canalisations, les radiateurs, les
cuisinières et les réfrigérateurs. Le risque de choc électrique
augmente si votre corps est mis à la terre ou à la masse.
c. N’utilisez pas d’outils électriques dans des environne
ments pluvieux ou humides. Si de l’eau s’introduit dans
un outil électrique, le risque de choc électrique augmentera.
d. Ne malmenez pas le cordon d’alimentation. N’utilisez jamais
le cordon pour transporter, tirer ou débrancher
l’outil électrique. Veillez à garder le cordon éloigné des
sources de chaleur, des huiles, des rebords coupants ou des
pièces mobiles. Les câbles endommagés ou entremêlés
augmentent le risque de choc électrique.
e. Lorsqu’un outil électrique est utilisé à l’extérieur,
utilisez uniquement une rallonge spécialement prévue à cet
effet. L’usage d’une rallonge adaptée à l’utilisation en extérieur
réduit le risque de choc électrique.
f. Habillez-vous correctement. Ne portez pas de vêtements
amples ou de bijoux. Gardez vos cheveux, vos vêtements et
vos gants éloignés des pièces mobiles. Tenez vos cheveux,
vêtements et gants éloignés des pièces mobiles. Les vêtements
amples, les bijoux ou les cheveux longs peuvent être happés par
les pièces mobiles.
3. Sécurité personnelle
a. Soyez vigilant, regardez bien ce que vous faites et faites
preuve de bon sens lorsque vous utilisez l’outil électrique.
N’utilisez pas d’outil électrique si vous êtes sous l’influence
de drogues, d’alcool ou de médicaments. Un instant
d’inattention pendant l’utilisation d’outils électriques peut
entraîner des blessures graves.
b. Utilisez un équipement de protection individuel. Utilisez
toujours une protection oculaire. L’utilisation d’équipements de
protection tels que les masques anti-poussière, les chaussures
de sécurité antidérapantes, les casques de sécurité ou les
protections auditives dans des conditions appropriées réduiront
les risques de blessures corporelles.
c. Évitez les démarrages intempestifs. Veillez à ce que
l’interrupteur soit en position d’arrêt avant de brancher l’outil
à une source d’alimentation et/ou une batterie, de ramasser
l’outil ou de le transporter. Transporter les outils électriques
avec le doigt sur l’interrupteur ou brancher les outils électriques
avec l’interrupteur en position de marche peut entraîner des
accidents.
d. Retirez toute clé à molette ou autre clé de réglage avant de
mettre l’outil électrique en marche. Laissez une clé à molette
ou une clé sur une partie rotative de l’outil électrique peut
engendrer des blessures corporelles.
e. Ne vous penchez pas trop. Gardez en permanence une
position stable et un bon équilibre. Cela permet un meilleur
contrôle de l’outil électrique dans des situations imprévues.
f. Portez des vêtements appropriés. Ne portez pas de
vêtements amples ou de bijoux. Tenez vos cheveux,
vêtements et gants éloignés des pièces mobiles. Les
vêtements amples, les bijoux ou les cheveux longs peuvent être
happés par les pièces mobiles.
g. Si des dispositifs destinés au raccordement d’installations
d’extraction et de recueil de la poussière sont fournis,
assurez-vous qu’ils sont correctement raccordés et utilisés.
L’utilisation de cet outil peut réduire les dangers associés à la
présence de poussières.
h. Ne pensez pas que la familiarité que vous avez acquise en
utilisant fréquemment des outils vous permet d’être
complaisant et d’ignorer les principes de sécurité
concernant l’utilisation des outils. Une action imprudente peut
causer de graves blessures en une fraction de seconde.
4. Utilisation et entretien de l’outil électrique
a. Ne forcez pas l’outil électrique. Utilisez l’outil
électrique adapté à votre travail. L’outil adapté est plus
efficace et moins dangereux s’il est utilisé à la vitesse pour
laquelle il a été conçu.

(Traduction des instructions initiales) FRANÇAIS
17
b. N’utilisez pas l’outil si l’interrupteur ne le met pas en
position de marche et d’arrêt. Tout outil qui ne peut être
contrôlé par l’interrupteur est dangereux et doit être réparé.
c. Débrancher la fiche de l'alimentation source et / ou la
batterie de la outil électrique avant de faire
ajustements, changement d'accessoires, ou stockage
d'outils électriques. Ces mesures de sécurité préventives
réduisent le risque de démarrage accidentel de l’outil
électrique.
d. Conservez les outils électriques inutilisés hors de la
portée des enfants et ne laissez pas de personnes non
familiarisées avec l’outil ou ces instructions utiliser
l’outil électrique. Les outils électriques sont dangereux
pour les utilisateurs inexpérimentés.
e. Maintenir les outils électriques. Vérifiez la dérive
d’alignement ou l’attache des pièces mobiles, toute
possibilité de rupture de pièces et tout état pouvant
affecter l’outil lors de son utilisation. Si l’outil est
endommagé, faites-le réparer avant de l’utiliser. De
nombreux accidents sont dus à des outils électriques mal
entretenus.
f. Maintenez les outils de coupe aiguisés et propres. Les
outils de coupe bien entretenus aux bords aiguisés sont
moins susceptibles de se coincer et plus faciles à contrôler.
g. Utilisez l’outil électrique, les accessoires et les mèches
de l’outil etc., conformément à ces instructions en
prenant en compte les conditions de travail et la tâche
à réaliser. L’utilisation de l’outil électrique pour des
opérations différentes de celles pour lesquelles il a été
conçu peut entraîner une situation dangereuse.
h. Maintenez les poignées et les surfaces de préhension
sèches, propres et exemptes d’huile et de graisse. Des
poignées et des surfaces de préhension glissantes ne
permettent pas de manipuler l’outil en toute sécurité et de
le contrôler dans des situations inattendues.
5. Réparation
a. Faites réparer votre outil électrique par un réparateur
agréé utilisant uniquement les pièces de rechange
identiques. Cela permettra de garantir la sécurité de l’outil
électrique.
CONSIGNES DE SÉCURITÉ POUR LES SCIES
SUR TABLE
1) Avertissements liés à la protection
a. Gardez les protège-lame en place. Les protège-lame doivent
être en bon état et installés correctement. Un protège-lame qui
est lâche, endommagé ou qui ne f o n c t i o n n e
pas correctement doit être réparé ou remplacé.
b. Utilisez toujours le protège-lame et le couteau diviseur pour
chaque découpe. Pour les opérations de découpe où la lame de
scie traverse toute l’épaisseur de la pièce, le protège-lame et tous
les autres dispositifs de sécurité aident à réduire le risque de
blessure.
c. Rattachez immédiatement le système de protège-lame après
les coupes (telle que les feuillures ou les refentes) qui
nécessitent le démontage du protège-lame ou du couteau
diviseur. Le protège-lame et le couteau diviseur aident à réduire
le risque de blessure.
d. Assurez-vous que la lame ne touche pas le protège-lame, le
couteau diviseur ou la pièce à découper avant de mettre
l’outil en marche. Tout contact par inadvertance avec ces pièces
avec la lame de scie peut provoquer des conditions dangereuses.
e. Réglez le couteau diviseur comme décrit dans ce manuel
d’utilisation. Tout espacement, positionnement ou alignement
incorrect peut empêcher le couteau diviseur de réduire la
probabilité d’un recul soudain de la pièce à découper.
f. Pour que le couteau diviseur soit efficace, il doit être engagé
dans la pièce à couper. Le couteau diviseur est inefficace lors
de la coupe de pièces trop courtes pour atteindre le couteau
diviseur. Dans ces conditions, le couteau diviseur ne peut
empêcher le recul éventuel de la pièce.
g. Utilisez la lame de scie appropriée pour le couteau diviseur.
Pour que le couteau diviseur fonctionne, le diamètre de lame doit
correspondre au couteau diviseur utilisé, l’épaisseur du corps de
la lame doit être inférieure à celle du couteau diviseur et la largeur
de coupe de la lame doit être supérieure à l’épaisseur du couteau
diviseur.
2) Avertissements relatifs aux procédures de coupe
a. DANGER : Ne placez jamais vos doigts ou vos
mains à proximité ou dans le prolongement de la
lame de scie. Lors d’un moment d’inattention ou d’un
glissement, votre main pourrait se diriger vers la lame
de la scie, entraînant de graves blessures
personnelles.
b. Introduisez uniquement la pièce dans la lame de scie de
façon uniquement dans le sens opposé à la rotation. Le fait
d’introduire la pièce dans le même sens que celui de la lame de
scie tournant au-dessus de la table peut happer la pièce et votre
main dans la lame de scie.
c. N’utilisez jamais le guide à onglet pour pousser la pièce lors
de la refente et n’utilisez pas le guide de refente comme
butée de longueur lors d’une coupe transversale à l’aide d’un
guide à onglets. Lorsque la pièce est guidée avec le guide de
refente et le guide à onglet en même temps, les chances de
grippage de la lame et de recul subit sont plus grandes.
d. Lors d’une refente de la pièce, appliquez toujours une force
de poussée entre le guide et la lame de scie. Utilisez un bâton
poussoir lorsque la distance entre le guide et la lame de scie
est inférieure à 150 mm et utilisez un bloc de poussée
lorsque cette distance est inférieure à 50 mm. Des «
accessoires d’assistance » vous aideront à garder votre main à
une distance de sécurité de la lame de scie.
e. Utilisez uniquement le bâton poussoir fourni par le fabricant
ou conçu conformément aux instructions. Ce bâton poussoir
fournit une distance suffisante entre votre main et la lame de scie.
f. N’utilisez jamais un bâton poussoir endommagé ou coupé.
Un bâton poussoir endommagé peut se briser et entraîner votre
main dans la lame de scie.
g. N’effectuez aucune opération « à mains levées ». Utilisez
toujours soit un guide de refente ou un guide à onglet pour
positionner et guider la pièce. Travailler « à mains levées »
signifie que vous utilisez vos mains pour soutenir ou guider la
pièce, au lieu d’un guide de refente ou d’un guide à onglet. Le
sciage à main levée entraîne généralement un mauvais
alignement, un grippage de la lame et le recul soudain de la
pièce.

h. N’atteignez jamais l’autre côté de la lame de scie en étendant
votre corps au-dessus ou autour de la lame de scie. Toucher la
pièce à découper en passant son corps ainsi peut entraîner un
contact accidentel avec la lame de scie en mouvement.
i. Prévoyez un support de pièce auxiliaire à l’arrière et/ou sur les
côtés de la table de sciage pour les pièces longues et/ou
larges afin de les maintenir horizontales. Une pièce longue et/ou
large a tendance à pivoter autour du bord de la table, vous pouvez
ainsi perdre le contrôle, la lame de scie peut gripper et la pièce peut
reculer subitement.
j. Poussez la pièce dans la lame de scie à une vitesse uniforme.
Ne pliez pas et ne tordez pas la pièce. Si les copeaux
s’accumulent, arrêtez immédiatement l’outil, débranchez-le,
puis éliminez l’accumulation de copeaux. Une accumulation de
copeaux peut bloquer la lame et causer le recul de la pièce ou faire
caler le moteur.
k. Ne retirez pas les morceaux de matériau coupé lorsque la scie
est en marche. Le matériau peut se coincer entre le guide ou
l’intérieur du protège-lame et la lame de scie attirant vos doigts
dans la lame de scie. Éteignez la scie et attendez que la lame de
scie s’arrête avant de retirer le matériau coincé.
l. Utilisez un guide auxiliaire en contact avec le dessus de la
table lors de la refente de pièces d’une épaisseur inférieure à 2
mm. Une pièce mince peut se coincer sous le guide de refente et
reculer subitement.
3) Causes de recul et avertissements connexes
Le recul est une réaction soudaine de la pièce due à une lame de scie
pincée ou coincée ou une ligne de coupe mal alignée dans la pièce par
rapport à la lame de scie ou lorsqu’une partie de la pièce se coince
entre la lame de scie et le guide de refendre ou un autre objet fixe.
Le plus souvent, lors d’un recul, la pièce est soulevée de la table par la
partie arrière de la lame de scie et est propulsée vers l’opérateur. Le
recul résulte d’un mauvais usage de la scie et/ou de l’inobservation des
procédures d’utilisation et peut être évité en suivant les précautions
appropriées indiquées ci-dessous.
a. Ne vous tenez jamais directement dans le prolongement de la
lame de scie. Placez toujours votre corps du même côté de la
lame que le guide. Le recul peut propulser la pièce à grande
vitesse vers une personne se tenant devant et dans le
prolongement de la lame de scie.
b. Ne tendez jamais la main sur ou derrière la lame de scie pour
tirer ou tenir la pièce à couper. Vous pouvez entrer accidentelle-
ment avec la lame de scie ou un recul peut se produire entraînant
vos doigts dans la lame de scie.
c. Ne tenez et n’appuyez jamais la pièce à couper sur la lame de
scie en rotation. Le fait d’appuyer la pièce coupée contre la lame
de scie créera une condition de grippage et de recul.
d. Réglez le guide pour qu’il soit parallèle à la lame de scie. Un
guide mal réglé pince la pièce contre la lame de scie et crée un
recul.
e. Utilisez un cale-guide pour guider la pièce contre la table et le
guide lors de coupes non traversantes comme des feuillures
ou des refentes. Un cale-guide aide à contrôler la pièce en cas de
recul.
f. Faites très attention lorsque vous coupez des zones aveugles
de pièces assemblées. La partie en saillie de la lame peut couper
des objets pouvant causer des effets de reculs.
g. Soutenez les grands panneaux pour minimiser les risques de
pincement de la lame et d’effet de recul. Les grands panneaux
ont tendance à fléchir sous leur propre poids. Les supports
doivent être placés sous toutes les parties du panneau dépassant
du dessus de la table.
h. Faites très attention lorsque vous coupez une pièce tordue,
nouée, voilée ou sans bord rectiligne pour la guider avec un
guide à onglet ou le long du guide de refente. Une pièce voilée,
nouée ou tordue est instable et provoque un désalignement du trait
de scie avec la lame de scie, entraînant un grippage de la lame et
un recul de la pièce.
i. Ne coupez jamais plus d’une pièce empilée verticalement ou
horizontalement. La lame de scie peut attraper un ou plusieurs
morceaux et causer un recul.
j. Lors du redémarrage d’une scie dans la pièce à découper,
centrez la lame dans le trait de scie afin que les dents de scie
ne soient pas engagées dans le matériau. Si la scie se grippe
dans la pièce, elle peut soulever celle-ci et causer un recul lors de
son redémarrage.
k. Gardez les lames de scie propres, tranchantes et bien
installées. N’utilisez jamais de lame de scie voilée ou avec des
dents fissurées ou cassées. Des lames de scie aiguisées et
correctement installées minimisent les grippages de lame, les
calages de la machine et le recul de la pièce.
4) Avertissements relatifs aux procédures d’utilisation de la scie
sur table a.
Éteignez la scie sur table et débranchez le cordon d’alimentation
lorsque vous retirez le passe-lame de la table, remplacez la lame
de scie ou effectuez des réglages sur le couteau diviseur ou le
protège-lame de scie, et lorsque la machine est laissée sans
surveillance. Ces mesures de précaution éviteront les accidents.
b. Ne laissez jamais la scie sur table fonctionner sans surveillance.
Éteignez l’outil et ne vous éloignez pas de l’outil tant qu’il n’est
pas complètement arrêté. Une scie tournant sans surveillance
présente un danger incontrôlé.
c. Placez la scie sur table dans une zone bien éclairée et plane,
où vous pourrez garder une position stable et équilibrée. Elle
doit être installée dans une zone où vous pourrez manipuler
facilement la pièce que vous voulez couper. Les zones
sombres et exiguës et les sols glissants inégaux sont propices aux
accidents.
d. Nettoyez et enlevez souvent la sciure de bois sous la table de
la scie et/ou le dispositif collecteur de poussière. La sciure de
bois accumulée est combustible et peut s’enflammer d’elle-même.
e. La scie sur table doit être sécurisée. Une scie sur table mal
fixée peut bouger ou se renverser.
f. Retirez les outils, les morceaux de bois, etc. de la table avant
d’allumer la scie sur table. Des distractions ou un blocage
potentiel peuvent être dangereux.
g. Utilisez toujours des lames ayant un alésage de montage
dont la taille et la forme (losange versus rond) correspondent
à celles de l’arbre de montage. Les lames de scie qui ne
correspondent pas à l’arbre de montage tourneront de façon
excentrique, entraînant une perte de contrôle.
h. N’utilisez jamais des accessoires de montage de lame, tels
que des brides, des rondelles de lame de scie, des boulons
ou des écrous, qui sont endommagés ou incorrects. Ces
accessoires de montage ont été spécialement conçus pour votre
scie, afin qu’elle fonctionne en toute sécurité et qu’elle ait des
performances optimales.
FRANÇAIS (Traduction des instructions initiales)
18

i. Ne vous tenez jamais sur la scie sur table et ne l’utilisez pas
comme échelle. Des blessures graves peuvent survenir si l’outil
est incliné ou si vous touchez accidentellement la lame de
coupe.
j. Assurez-vous que la lame de scie est montée de façon à
tourner dans le bon sens. N’utilisez pas de meules, de
brosses métalliques ou de meules abrasives sur une scie
sur table. L’installation d’une lame de scie non conforme ou
l’utilisation d’accessoires non recommandés peuvent causer des
blessures graves.
Règles de sécurité supplémentaires pour les bancs de
scie
AVERTISSEMENT : La découpe de plastique, de bois
recouvert de sève et d’autres matériaux peut provoquer
l’accumulation de matière fondue sur les pointes et le
corps de la lame de scie, augmentant ainsi le risque de
surchauffe de la lame et de grippage durant la coupe.
• Assurez-vous que la lame tourne dans le bon sens et que les
dents pointent vers l’avant du banc de scie.
• Assurez-vous que toutes les poignées de serre-joint sont serrées
avant de commencer toute coupe.
• Assurez-vous que toutes les lames et les brides sont propres et
que la plus grande face de la rondelle de serrage est contre la
lame. Serrez bien l’écrou sur l’arbre.
• Assurez-vous que le couteau diviseur est réglé à la bonne
distance de la lame.
• N’utilisez jamais la scie sans les protège-lame supérieur et
inférieur en place.
• Ne mettez pas de lubrifiant sur la lame lorsqu’elle tourne.
• Gardez toujours le bâton poussoir dans son compartiment de
stockage lorsqu’il n’est pas utilisé.
• N’utilisez pas le protège-lame pour manipuler ou transporter la
scie sur table.
• N’exercez pas de pression latérale sur la lame de scie.
• Ne coupez jamais des alliages légers. La machine n’est ps
conçue pour cette application.
• N’utilisez pas de disques abrasifs ni de lames diamantées.
• L’usinage de feuillures, de rainures ou de fentes n’est pas
autorisé.
• En cas d’accident ou de panne de la machine, mettez-la
immédiatement hors tension et débranchez-la de l’alimentation
électrique. Signalez la panne et marquez la machine de façon
appropriée pour empêcher toute autre personne d’utiliser la
machine défectueuse.
• Lorsque la lame de scie se grippe après avoir forcé la lame trop
énergétiquement dans la pièce, éteignez TOUJOURS la
machine et débranchez-la de l’alimentation électrique. Retirez la
pièce et assurez-vous que la lame de scie tourne librement.
Allumez la machine et démarrez une nouvelle coupe en
réduisant la force de pénétration exercée sur la lame.
• N’essayez JAMAIS de couper une pile de morceaux de matériau
en vrac pouvant provoquer une perte de contrôle ou un rebond.
Soutenez tous les matériaux à découper de façon sécurisée.
• Veillez à ce que le protège-lame soit correctement positionné.
Lors du sciage, il doit toujours s’appuyer contre la pièce.
Lames de scie
• N’utilisez pas de lames de scie non conformes aux dimensions
indiquées dans les caractéristiques techniques. N’utilisez pas
(Traduction des instructions initiales) FRANÇAIS
19
d’entretoise pour pouvoir monter la lame sur la broche. Utilisez
uniquement les lames spécifiées dans ce manuel, conformes à
la norme EN847-1, qui sont destinées au bois et à des
matériaux similaires.
• La vitesse maximale de la lame de scie doit toujours être
supérieure ou au moins égale à la vitesse indiquée sur la plaque
signalétique de l’outil.
• Le diamètre de la lame de scie doit être conforme aux
indications de la plaque signalétique de l’outil.
• Envisagez d’utiliser des lames spécialement conçues pour
réduire le niveau sonore.
• N’utilisez pas des lames de scie en acier à vitesse élevée (HS).
• N’utilisez pas des lames fissurées ou endommagées.
• Sélectionnez la bonne lame adaptée au matériau à découper.
• Portez toujours des gants pour manipuler les lames de scie et
les matériaux bruts. Les lames de scie doivent être transportées
dans un support dans la mesure du possible.
Branchements d’alimentation
Avant de brancher l’outil électrique sur le secteur, assurez-vous que
le ou les interrupteurs sont dans la position « ARRÊT » et que le
courant correspond à la valeur nominale indiquée sur la plaque
signalétique. Tous les branchements d’alimentation doivent réaliser
un bon contact. L’usage d’une tension inférieure à la tension
nominale endommagera l’outil.
DANGER ! N’exposez pas la machine à la pluie et
n’utilisez pas la machine dans des endroits humides.
Avant de connecter la machine à une alimentation électrique,
assurez-vous que l’interrupteur est dans la position «ARRÊT».
SÉCURITÉ D’AUTRUI
• Cet outil n’est pas prévu pour être utilisé par des
personnes (y compris les enfants) présentant des capacités
physiques, sensorielles ou mentales réduites, ou manquant
d’expérience et de connaissances, sans surveillance ou sans
avoir reçu d’instructions concernant l’utilisation de l’outil de la
part d’une personne responsable de leur sécurité.
• Les enfants doivent être surveillés pour s’assurer qu’ils ne jouent
pas avec l’outil.
RISQUES RÉSIDUELS
Il se peut que des risques résiduels additionnels non inclus dans les
avertissements de sécurité du présent manuel surviennent lors de
l’utilisation de l’appareil. Ces risques peuvent résulter d’un mauvais
usage, d’un usage prolongé, etc. Même en appliquant les consignes
de sécurité appropriées et en mettant en place des dispositifs de
sécurité, certains risques résiduels ne peuvent être évités. Ces
risques sont les suivants :
• Des blessures provoquées par le contact avec des pièces
mobiles / rotatives.
• Des blessures provoquées lors du changement des pièces,
lames ou accessoires.
• Des blessures provoquées par un usage prolongé de l’outil.
Assurez-vous de prendre régulièrement des pauses lors d’un
usage prolongé d’un outil.
• Troubles de l’audition.
• Il existe des risques pour la santé causés par l’inhalation de
poussières qui se développent lors de l’utilisation de votre outil
(exemple : travailler avec du bois, en particulier du chêne, du
hêtre ou du MDF).

FRANÇAIS (Traduction des instructions initiales)
20
SÉCURITÉ ÉLECTRIQUE
Votre outil doit être mis à la terre. Vérifiez toujours que la tension
du secteur correspond à celle de la plaque signalétique.
AVERTISSEMENT ! Si le cordon d’alimentation est
endommagé, il doit être remplacé par le fabricant ou
un centre de réparation agréé STANLEY ou encore
une personne tout aussi qualifiée afin d’éviter tout
accident ou blessure. En cas de remplacement du
cordon d’alimentation par une personne tout aussi
qualifiée mais non agréée par STANLEY, la garantie
ne sera plus valable.
UTILISATION D’UNE RALLONGE
S’il est nécessaire d’utiliser une rallonge, utilisez une rallonge
homologuée capable de transmettre le courant spécifié sur
l’outil. La section transversale minimale du fil conducteur est
de 1,5 mm². Les câbles doivent être démêlés avant de les
enrouler.
Position du code de la date
Le code de la date, qui comporte également l’année de
fabrication, est imprimé sur le logement.
Exemple :
2017 XX JN
Année de fabrication
ÉTIQUETTES SUR L’OUTIL
L’étiquette apposée sur votre outil peut afficher les symboles
suivants :
Portez des lunettes de sécurité ou des
lunettes-masque.
AVERTISSEMENT ! AFIN DE RÉDUIRE LE RISQUE DE
BLESSURE, L’UTILISATEUR DOIT LIRE LE MANUEL
D’INSTRUCTION AVANT L’UTILISATION DE L’OUTIL.
Portez des protège-oreilles.
V Volts
Courant continu
A Ampères n
0
Vitesse à vide
Hz Hertz
Construction de classe II
W Watts
Borne de terre
min minutes
Symbole d’alerte de
sécurité
Courant
alternatif
/min.
Tours ou mouvements
alternatifs par minute
Section transversale
du câble (mm
2
)
Intensité nominale du
câble (Ampère)
0,75 6
1,00 10
1,50 15
2,50 20
4,00 25
Longueur du câble (m)
7,5 15 25 30 45 60
Tension Ampères
Intensité nominale du câble (Ampère)
110-127 0 - 2,0 6 6 6 6 6 10
2,1 - 3,4 6 6 6 6 15 15
3,5 - 5,0 6 6 10 15 20 20
5,1 - 7,0 10 10 15 20 20 25
7,1 - 12,0 15 15 20 25 25 -
12,1 - 20,0 20 20 25 - - -
220-240 0 - 2,0 6 6 6 6 6 6
2,1 - 3,4 6 6 6 6 6 6
3,5 - 5,0 6 6 6 6 10 15
5,1 - 7,0 10 10 10 10 15 15
7,1 - 12,0 15 15 15 15 20 20
12,1 - 20,0 20 20 20 20 25 -
CONTENU DE L’ENSEMBLE
L’ensemble contient :
1 scie sur table
1 lame de scie 60T
1 protège-lame
1 guide à onglet
1 guide de refente
1 tuyau d’aspiration
1 adaptateur de tuyau
2 clés de serrage
1 bâton poussoir
1 Montage du guide pour matériaux
1 manuel d’instruction
• Vérifiez que l’outil, les pièces détachées et les
accessoires n’ont pas été endommagés durant le
transport.
• Prenez le temps de bien lire et comprendre ce manuel
avant d’utiliser l’outil.
CARACTÉRISTIQUES (Fig. A)
Cet outil présente certaines ou toutes les caractéristiques
suivantes.
1. Scie sur table
2. Protège-lame
Sayfa yükleniyor...
Sayfa yükleniyor...
Sayfa yükleniyor...
Sayfa yükleniyor...
Sayfa yükleniyor...
Sayfa yükleniyor...
Sayfa yükleniyor...
Sayfa yükleniyor...
Sayfa yükleniyor...
Sayfa yükleniyor...
Sayfa yükleniyor...
Sayfa yükleniyor...
Sayfa yükleniyor...
Sayfa yükleniyor...
Sayfa yükleniyor...
Sayfa yükleniyor...
Sayfa yükleniyor...
Sayfa yükleniyor...
Sayfa yükleniyor...
Sayfa yükleniyor...
Sayfa yükleniyor...
Sayfa yükleniyor...
Sayfa yükleniyor...
Sayfa yükleniyor...
Sayfa yükleniyor...
Sayfa yükleniyor...
Sayfa yükleniyor...
Sayfa yükleniyor...
Sayfa yükleniyor...
Sayfa yükleniyor...
Sayfa yükleniyor...
Sayfa yükleniyor...
Sayfa yükleniyor...
Sayfa yükleniyor...
Sayfa yükleniyor...
Sayfa yükleniyor...
Sayfa yükleniyor...
Sayfa yükleniyor...
Sayfa yükleniyor...
Sayfa yükleniyor...
Sayfa yükleniyor...
Sayfa yükleniyor...
Sayfa yükleniyor...
Sayfa yükleniyor...
Sayfa yükleniyor...
Sayfa yükleniyor...
Sayfa yükleniyor...
Sayfa yükleniyor...
Sayfa yükleniyor...
Sayfa yükleniyor...
Sayfa yükleniyor...
Sayfa yükleniyor...
Sayfa yükleniyor...
Sayfa yükleniyor...
Sayfa yükleniyor...
Sayfa yükleniyor...
Sayfa yükleniyor...
Sayfa yükleniyor...
Sayfa yükleniyor...
Sayfa yükleniyor...
Sayfa yükleniyor...
Sayfa yükleniyor...
Sayfa yükleniyor...
Sayfa yükleniyor...
Sayfa yükleniyor...
Sayfa yükleniyor...
Sayfa yükleniyor...
Sayfa yükleniyor...
-
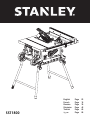 1
1
-
 2
2
-
 3
3
-
 4
4
-
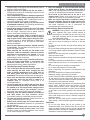 5
5
-
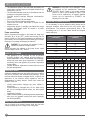 6
6
-
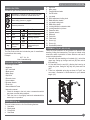 7
7
-
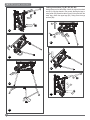 8
8
-
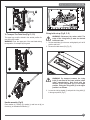 9
9
-
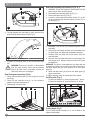 10
10
-
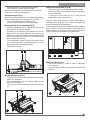 11
11
-
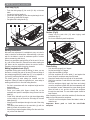 12
12
-
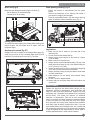 13
13
-
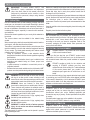 14
14
-
 15
15
-
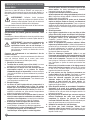 16
16
-
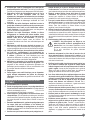 17
17
-
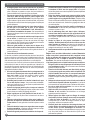 18
18
-
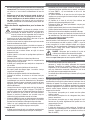 19
19
-
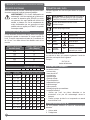 20
20
-
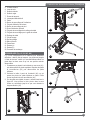 21
21
-
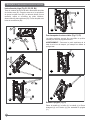 22
22
-
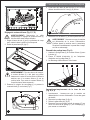 23
23
-
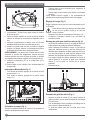 24
24
-
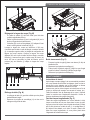 25
25
-
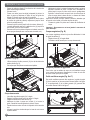 26
26
-
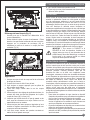 27
27
-
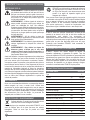 28
28
-
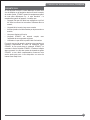 29
29
-
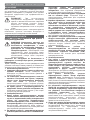 30
30
-
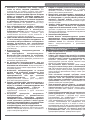 31
31
-
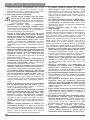 32
32
-
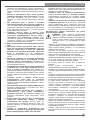 33
33
-
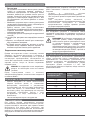 34
34
-
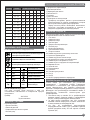 35
35
-
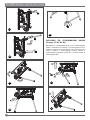 36
36
-
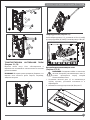 37
37
-
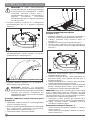 38
38
-
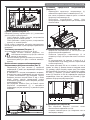 39
39
-
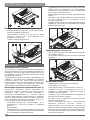 40
40
-
 41
41
-
 42
42
-
 43
43
-
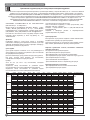 44
44
-
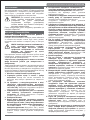 45
45
-
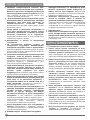 46
46
-
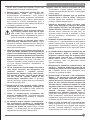 47
47
-
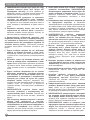 48
48
-
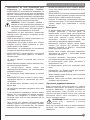 49
49
-
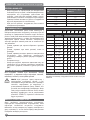 50
50
-
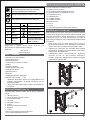 51
51
-
 52
52
-
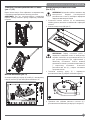 53
53
-
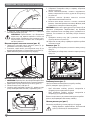 54
54
-
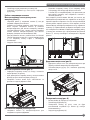 55
55
-
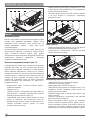 56
56
-
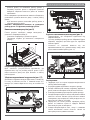 57
57
-
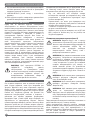 58
58
-
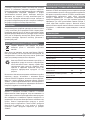 59
59
-
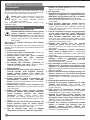 60
60
-
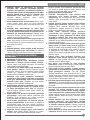 61
61
-
 62
62
-
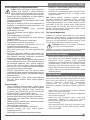 63
63
-
 64
64
-
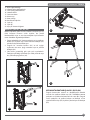 65
65
-
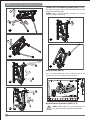 66
66
-
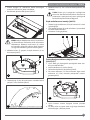 67
67
-
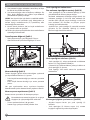 68
68
-
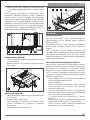 69
69
-
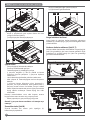 70
70
-
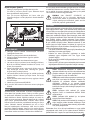 71
71
-
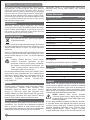 72
72
-
 73
73
-
 74
74
-
 75
75
-
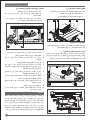 76
76
-
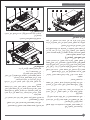 77
77
-
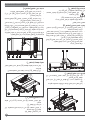 78
78
-
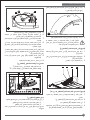 79
79
-
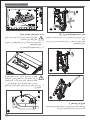 80
80
-
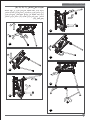 81
81
-
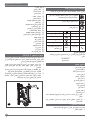 82
82
-
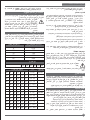 83
83
-
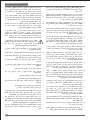 84
84
-
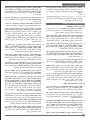 85
85
-
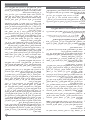 86
86
-
 87
87
-
 88
88


diğer dillerde
- français: Stanley SST1800 Manuel utilisateur
- English: Stanley SST1800 User manual
- русский: Stanley SST1800 Руководство пользователя
İlgili makaleler
-
Stanley SFMCS701 Kullanım kılavuzu
-
Stanley KFFMES301 Kullanım kılavuzu
-
Stanley SM18 Kullanım kılavuzu
-
-
-
-
-
-
Stanley SSC22 Kullanım kılavuzu
Diğer belgeler
-
Skil 5066MA Kullanım kılavuzu
-
Skil 5740 CA Kullanım kılavuzu
-
Makita MLT100N Table Saw Kullanım kılavuzu
-
Hikoki C6U2 Kullanım kılavuzu
-
-
Skil 5255 AA El kitabı
-
DeWalt DWE7485 Kullanım kılavuzu
-
DeWalt DWE7492 Kullanım kılavuzu
-
-
DeWalt DCS7485 El kitabı