Mitsubishi Electric MSZ-LN25VGW Split Type Air Conditioners Kullanım kılavuzu
- Kategori
- Split sistem klimalar
- Tip
- Kullanım kılavuzu

SPLIT-TYPE AIR CONDITIONERS
Türkçe
Svenska
Dansk
Português
Ελληνικά
Italiano
Español
Nederlands
Français
Deutsch
English
OPERATING INSTRUCTIONS For user
• To use this unit correctly and safely, be sure to read these operating in-
structions before use.
ÇALIŞTIRMA TALİMATLARI Kullanıcı için
• Bu üniteyi doğru ve güvenli bir biçimde kullanmak için, kullanmadan
önce bu işletim talimatlarını okuduğunuzdan emin olun.
BRUKSANVISNING För användaren
• Läs bruksanvisningen innan enheten tas i bruk så att den används sä-
kert och på rätt sätt.
BETJENINGSVEJLEDNING Til kunden
• Læs denne betjeningsvejledningen før brug, så enheden bruges korrekt
og sikkert.
INSTRUÇÕES DE OPERAÇÃO Para o utilizador
• Para utilizar esta unidade correctamente e com segurança, certi quese
de que lê estas instruções de operação antes da utilização.
ΟΔΗΓΙΕΣ ΛΕΙΤΟΥΡΓΙΑΣ Για το χρήστη
• Για να χρησιμοποιήσετε αυτή τη μονάδα σωστά και με ασφάλεια, βεβαι-
ωθείτε ότι έχετε διαβάσει αυτό το εγχειρίδιο οδηγιών πριν από τη χρή-
ση.
LIBRETTO D’ISTRUZIONI Per gli utenti
• Per utilizzare correttamente ed in tutta sicurezza questo apparecchio,
leggere il presente libretto d’istruzioni prima dell’uso.
MANUAL DE INSTRUCCIONES Para los clientes
• Para utilizar esta unidad de forma correcta y segura, lea previamente
estas instrucciones de funcionamiento.
BEDIENINGSINSTRUCTIES Voor de klant
• Om dit apparaat correct en veilig te kunnen gebruiken moet u deze be-
dieningsinstructies voor gebruik eerst doorlezen.
NOTICE D’UTILISATION A l’attention des clients
• Pour avoir la certitude d’utiliser cet appareil correctement et en toute
sécurité, veuillez lire cette notice d’instructions avant de mettre le clima-
tiseur sous tension.
BEDIENUNGSANLEITUNG Für den Anwender
• Für einen sicheren und ordnungsgemäßen Gebrauch des Geräts unbe-
dingt diese Bedienungsanleitung vor der Inbetriebnahme durchlesen.
English is original.
Übersetzung des
Originals
Traduction du texte
d’origine
Vertaling van het
origineel
Traducción del
original
Traduzione
dell’originale
Μετάφραση του
αρχικού
Tradução do
original
Oversættelse af
den originale tekst
Översättning från
originalet
Orijinalin çevirisi
Български
РЪКОВОДСТВО ЗА ЕКСПЛОАТАЦИЯ За потребителя
• За правилната и безопасна употреба на уреда, прочетете насто-
ящото ръководство за експлоатация преди употреба.
Версията на английски
език е оригинал.
Polski
INSTRUKCJA OBSŁUGI
Informacja dla użytkownika
• Aby prawidłowo i bezpiecznie korzystać z urządzenia, należy wcześniej
przeczytać niniejszą instrukcję obsługi.
Językiem oryginału
jest język angielski.
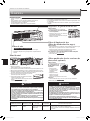
MSZ-LN25VGW MSZ-LN35VGW MSZ-LN50VGW MSZ-LN60VGW
MSZ-LN25VGV MSZ-LN35VGV MSZ-LN50VGV MSZ-LN60VGV
MSZ-LN25VGR MSZ-LN35VGR MSZ-LN50VGR MSZ-LN60VGR
MSZ-LN25VGB MSZ-LN35VGB MSZ-LN50VGB MSZ-LN60VGB
INDOOR UNIT
JG79Y181H01_cover.indd 1 2016/10/26 14:15:40

En-1
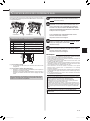
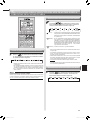
● OPERATING INSTRUCTIONS ●
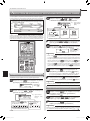
WARNING
Do not connect the power cord to an intermediate point, use an
extension cord, or connect multiple devices to a single AC outlet.
• This may cause overheating, fi re, or electric shock.
Make sure the power plug is free of dirt and insert it securely into
the outlet.
• A dirty plug may cause fi re or electric shock.
Do not bundle, pull, damage, or modify the power cord, and do not
apply heat or place heavy objects on it.
• This may cause fi re or electric shock.
• Since rotating parts and parts which could cause an electric shock are used in this product,
be sure to read these “Safety Precautions” before use.
• Since the cautionary items shown here are important for safety, be sure to observe them.
• After reading this manual, keep it together with the installation manual in a handy place
for easy reference.
Marks and their meanings
WARNING : Incorrect handling could cause serious hazard, such as death, serious
injury, etc. with a high probability.
CAUTION : Incorrect handling could cause serious hazard depending on the
conditions.
Do not turn the breaker OFF/ON or disconnect/connect the power
plug during operation.
• This may create sparks, which can cause fi re.
• After the indoor unit is switched OFF with the remote controller, make
sure to turn the breaker OFF or disconnect the power plug.
Do not expose your body directly to cool air for a prolonged length
of time.
• This could be detrimental to your health.
Meanings of symbols used in this manual
: Be sure not to do.
: Be sure to follow the instruction.
: Never insert your fi nger or stick, etc.
: Never step onto the indoor/outdoor unit and do not put anything on them.
: Danger of electric shock. Be careful.
: Be sure to disconnect the power supply plug from the power outlet.
: Be sure to shut off the power.
: Risk of fi re.
: Never touch with wet hand.
: Never splash water on the unit.
SAFETY PRECAUTIONS
CONTENTS
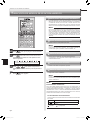
Meanings of symbols displayed on indoor unit and/or outdoor unit
WARNING
(Risk of fi re)
This unit uses a fl ammable refrigerant.
If refrigerant leaks and comes in contact with fi re or heating part, it will create harmful gas and there is risk of fi re.
Read the OPERATING INSTRUCTIONS carefully before operation.
Service personnel are required to carefully read the OPERATING INSTRUCTIONS and INSTALLATION MANUAL before operation.
Further information is available in the OPERATING INSTRUCTIONS, INSTALLATION MANUAL, and the like.
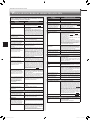
■SAFETY PRECAUTIONS 1
■DISPOSAL 3
■NAME OF EACH PART 4
■PREPARATION BEFORE OPERATION 5
■I-SEE OPERATION 6
■SELECTING OPERATION MODES 7
■FAN SPEED AND AIRFLOW DIRECTION ADJUSTMENT 8
■AIRFLOW CONTROL MODE 9
■ABSENCE DETECTION 9
■I-SAVE OPERATION 10
■ECONO COOL OPERATION 10
■NIGHT MODE OPERATION 11
■AIR PURIFYING OPERATION 11
■POWERFUL OPERATION 12
■TIMER OPERATION (ON/OFF TIMER) 12
■WEEKLY TIMER OPERATION 13
■OPERATION LOCK 14
■EMERGENCY OPERATION 14
■AUTO RESTART FUNCTION 14
■CLEANING 15
■Wi-Fi INTERFACE SETTING UP 16
■WHEN YOU THINK THAT TROUBLE HAS OCCURRED 17
■WHEN THE AIR CONDITIONER IS NOT GOING TO BE USED FOR A LONG TIME 19
■INSTALLATION PLACE AND ELECTRICAL WORK 19
■SPECIFICATIONS 20
JG79Y181H01_en.indd 1 2016/10/26 14:15:54

En-2
The unit should not be installed, relocated, disassembled, altered,
or repaired by the user.
• An improperly handled air conditioner may cause fi re, electric shock,
injury, or water leakage, etc. Consult your dealer.
• If the power supply cord is damaged, it must be replaced by the manu-
facturer or its service agent in order to avoid a hazard.
When installing, relocating, or servicing the unit, make sure that
no substance other than the specifi ed refrigerant (R32) enters the
refrigerant circuit.
• Any presence of foreign substance such as air can cause abnormal
pressure rise and may result in explosion or injury.
•
The use of any refrigerant other than that specifi ed for the system will cause
mechanical failure, system malfunction, or unit breakdown. In the worst case,
this could lead to a serious impediment to securing product safety.
This appliance is not intended for use by persons (including children)
with reduced physical, sensory or mental capabilities, or lack of ex-
perience and knowledge, unless they have been given supervision or
instruction concerning use of the appliance by a person responsible
for their safety.
Children should be supervised to ensure that they do not play with
the appliance.
Do not insert your fi nger, a stick, or other objects into the air inlet
or outlet.
• This may cause injury, since the fan inside rotates at high speeds during
operation.
In case of an abnormal condition (such as a burning smell), stop the
air conditioner and disconnect the power plug or turn the breaker OFF.
• A continued operation in the abnormal state may cause a malfunction,
fi re, or electric shock. In this case, consult your dealer.
When the air conditioner does not cool or heat, there is a possibility of refrig-
erant leakage. If any refrigerant leakage is found, stop operations and venti-
late the room well and consult your dealer immediately. If a repair involves
recharging the unit with refrigerant, ask the service technician for details.
• The refrigerant used in the air conditioner is not harmful. Normally, it
does not leak. However, if refrigerant leaks and comes in contact with
fi re or heating part of such a fan heater, kerosene heater, or cooking
stove, it will create harmful gas and there is risk of fi re.
The user should never attempt to wash the inside of the indoor unit.
Should the inside of the unit require cleaning, contact your dealer.
• Unsuitable detergent may cause damage to plastic material inside
the unit, which may result in water leakage. Should detergent come in
contact with electrical parts or the motor, it will result in a malfunction,
smoke, or fi re.
• The appliance shall be stored in a room without continuously operating
ignition sources (for example: open fl ames, an operating gas appliance
or an operating electric heater).
• Be aware that refrigerants may not contain an odour.
• Do not use means to accelerate the defrosting process or to clean the
appliance, other than those recommended by the manufacturer.
• Do not pierce or burn.
The indoor unit must be installed in rooms which exceed the fl oor
space specifi ed. Please consult your dealer.
• LN25/35(HZ): 1.7 m²
• LN50: 2.5 m²
• LN50HZ/60: 3.9 m²
This appliance is intended to be used by expert or trained users in
shops, in light industry and on farms, or for commercial use by lay
persons.
Do not touch the air purifying device from the top of the indoor unit
during operation.
CAUTION
Do not touch the air inlet or the aluminum fi ns of the indoor/outdoor
unit.
• This may cause injury.
Do not use insecticides or fl ammable sprays on the unit.
• This may cause a fi re or deformation of the unit.
Do not expose pets or houseplants to direct airfl ow.
• This may cause injury to the pets or plants.
Do not place other electric appliances or furniture under the indoor/
outdoor unit.
• Water may drip down from the unit, which may cause damage or
malfunction.
Do not leave the unit on a damaged installation stand.
• The unit may fall and cause injury.
Do not step on an unstable bench to operate or clean the unit.
• This may cause injury if you fall down.
Do not pull the power cord.
• This may cause a portion of the core wire to break, which may cause
overheating or fi re.
SAFETY PRECAUTIONS
Do not charge or disassemble the batteries, and do not throw them
into a fi re.
•
This may cause the batteries to leak, or cause a fi re or explosion.
Do not operate the unit for more than 4 hours at high humidity (80%
RH or more) and/or with windows or outside door left open.
• This may cause the water condensation in the air conditioner, which
may drip down, wetting or damaging the furniture.
• The water condensation in the air conditioner may contribute to growth
of fungi, such as mold.
Do not use the unit for special purposes, such as storing food,
raising animals, growing plants, or preserving precision devices
or art objects.
• This may cause deterioration of quality, or harm to animals and plants.
Do not expose combustion appliances to direct airfl ow.
• This may cause incomplete combustion.
Never put batteries in your mouth for any reason to avoid accidental
ingestion.
• Battery ingestion may cause choking and/or poisoning.
Before cleaning the unit, switch it OFF and disconnect the power plug
or turn the breaker OFF.
• This may cause injury, since the fan inside rotates at high speeds during
operation.
When the unit will be unused for a long time, disconnect the power
plug or turn the breaker OFF.
• The unit may accumulate dirt, which may cause overheating or fi re.
Replace all batteries of the remote controller with new ones of the
same type.
• Using an old battery together with a new one may cause overheating,
leakage, or explosion.
If the battery fl uid comes in contact with your skin or clothes, wash
them thoroughly with clean water.
•
If the battery fl uid comes in contact with your eyes, wash them thoroughly
with clean water and immediately seek medical attention.
Ensure that the area is well-ventilated when the unit is operated
together with a combustion appliance.
• Inadequate ventilation may cause oxygen starvation.
Turn the breaker OFF when you hear thunder and there is a possibility
of a lightning strike.
• The unit may be damaged if lightning strikes.
After the air conditioner is used for several seasons, perform inspec-
tion and maintenance in addition to normal cleaning.
• Dirt or dust in the unit may create an unpleasant odor, contribute to
growth of fungi, such as mold, or clog the drain passage, and cause
water to leak from the indoor unit. Consult your dealer for inspection
and maintenance, which require specialized knowledge and skills.
Do not operate switches with wet hands.
• This may cause electric shock.
Do not clean the air conditioner with water or place an object that
contains water, such as a fl ower vase, on it.
• This may cause fi re or electric shock.
Do not step on or place any object on the outdoor unit.
• This may cause injury if you or the object falls down.
IMPORTANT
Dirty fi lters cause condensation in the air conditioner which will contribute to the
growth of fungi such as mold. It is therefore recommended to clean air fi lters every
2 weeks.
Before starting the operation, ensure that the horizontal vanes are in the closed posi-
tion. If operation starts when the horizontal vanes are in the open position, they may
not return to the correct position.
JG79Y181H01_en.indd 2 2016/10/26 14:15:54

En-3
● OPERATING INSTRUCTIONS ●
SAFETY PRECAUTIONS
WARNING
(Improper handling may have serious consequences, including serious
injury or death.)
This appliance can be used by children aged from 8 years and above
and persons with reduced physical, sensory or mental capabilities or
lack of experience and knowledge if they have been given supervi-
sion or instruction concerning use of the appliance in a safe way and
understand the hazards involved.
Children shall not play with the appliance. Cleaning and user mainte-
nance shall not be made by children without supervision.
Do not use the Wi-Fi interface nearby the medical electrical equipment
or people who have a medical device such as a cardiac pacemaker
or an implantable cardioverter-defi brillator.
• It can cause an accident due to malfunctions of the medical equipment
or device.
Do not install the Wi-Fi interface nearby the automatic control devices
such as automatic doors or fi re alarms.
• It can cause accidents due to malfunctions.
Do not touch the Wi-Fi interface with wet hands.
• It can cause damage to the device, electric shock, or fi re.
Do not splash water on the Wi-Fi interface or use it in a bathroom.
• It can cause damage to the device, electric shock, or fi re.
When the Wi-Fi interface is dropped, or the holder or cable is dam-
aged, disconnect the power supply plug or turn the breaker OFF.
• It may cause fi re or electric shock. In this case, consult your dealer.
CAUTION
(Improper handling may have consequences, including injury or damage
to building.)
Do not step on unstable stepstool to set up or clean the Wi-Fi interface.
• It may cause injury if you fall down.
Do not use the Wi-Fi interface nearby other wireless devices, micro-
waves, cordless phones, or facsimiles.
• It can cause malfunctions.
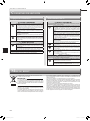
Your MITSUBISHI ELECTRIC product is designed and manufactured with high
quality materials and components which can be recycled and/or reused.
This symbol means that electrical and electronic equipment, batteries and
accumulators, at their end-of-life, should be disposed of separately from your
household waste.
If a chemical symbol is printed beneath the symbol (Fig. 1), this chemical sym-
bol means that the battery or accumulator contains a heavy metal at a certain
concentration. This will be indicated as follows:
Hg: mercury (0.0005%), Cd: cadmium (0.002%), Pb: lead (0.004%)
In the European Union there are separate collection systems for used electrical
and electronic products, batteries and accumulators.
Please, dispose of this equipment, batteries and accumulators correctly at your
local community waste collection/recycling centre.
Please, help us to conserve the environment we live in!
Note:
This symbol mark is for EU countries only.
This symbol mark is according to the directive 2012/19/
EU Article 14 Information for users and Annex IX, and/
or to the directive 2006/66/EC Article 20 Information for
end-users and Annex II.
To dispose of this product, consult your dealer.
DISPOSAL
Fig. 1
For Wi-Fi interface
WARNING
Consult your dealer for installing the air conditioner.
• It should not be installed by the user since installation requires specialized
knowledge and skills. An improperly installed air conditioner may cause
water leakage, fi re, or electric shock.
Provide a dedicated power supply for the air conditioner.
• A non-dedicated power supply may cause overheating or fi re.
Do not install the unit where fl ammable gas could leak.
• If gas leaks and accumulates around the outdoor unit, it may cause an
explosion.
Earth the unit correctly.
• Do not connect the earth wire to a gas pipe, water pipe, lightning rod, or
a telephone earth wire. Improper earthing may cause electric shock.
CAUTION
Install an earth leakage breaker depending on the installation location
of the air conditioner (such as highly humid areas).
• If an earth leakage breaker is not installed, it may cause electric shock.
Ensure that the drain water is properly drained.
• If the drain passage is improper, water may drip down from the indoor/
outdoor unit, wetting and damaging the furniture.
In case of an abnormal condition
Immediately stop operating the air conditioner and consult your dealer.
For installation
JG79Y181H01_en.indd 3 2016/10/26 14:15:54

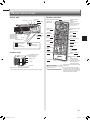
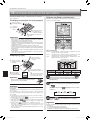
En-4
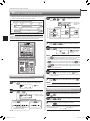
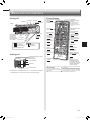
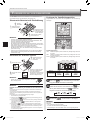
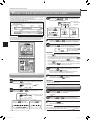
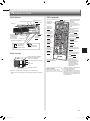
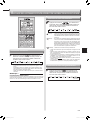
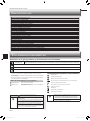
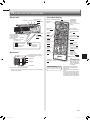
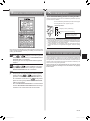
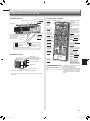
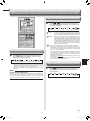
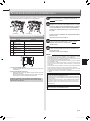
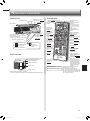
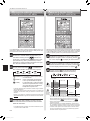
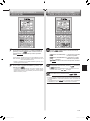
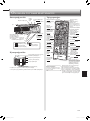
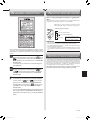
Operation indicator lamp
Remote control
receiving section
Emergency op-
eration switch
Page 14
Horizontal
vane
Air inlet
Air fi lter
Air cleaning fi lter
(Deodorizing fi lter,
black and Silver-
ionized air purifi er
fi lter, blue, option)
Front panel
NAME OF EACH PART
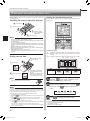
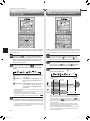
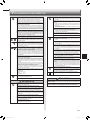
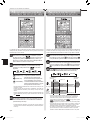
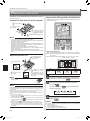
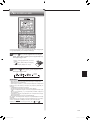
Indoor unit Remote controller
Remote controller
Signal transmitting
section
Distance of signal :
About 6 m
Beep(s) is (are) heard from
the indoor unit when the
signal is received.
Operation dis-
play section
OFF/ON (stop/operate)
button
Temperature
buttons Page 7
Operation
select button
Page 7
ECONO COOL
button Page 10
FAN speed control
button Page 8
VANE control button
Page 8, 14
TIME, TIMER set but-
tons
Page 5, 12
Increase time
Decrease time
CLOCK button
Page 5
RESET button Page 5
Lid
Slide the lid down
to open the remote
controller. Slide it down
further to get to the
weekly timer buttons.
When the remote controller is not used,
place it near this unit.
Only use the remote controller provided
with the unit.
Do not use other remote controllers.
If 2 or more indoor units are installed in
proximity to one another, an indoor unit
that is not intended to be operated may
respond to the remote controller.
i-save button
Page 10
WEEKLY TIMER set
buttons Page 5, 13
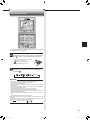
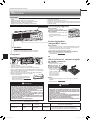
Air outlet
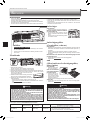
Outdoor unit
Outdoor units may be different in appearance.
Air purifying
device Page 15
Air inlet (back and side)
Refrigerant piping
Drainage hose
Air outlet
Drain outlet
WIDE VANE
button Page 8
PURIFIER button
Page 11
DIRECTION
Page 9
POWERFUL
button Page 12
NIGHT MODE
button
Page 11
SENSOR
(i-see) button
Page 6
i-see sensor
Page 6
(Air purifying)
(Power)
Spec name plate *1
Wi-Fi interface
Page 16
Spec name plate *1
*1 The manufacturing year and month are indicated on the spec name plate.
Battery replacement indicator Page 5
JG79Y181H01_en.indd 4 2016/10/26 14:15:55

En-5
● OPERATING INSTRUCTIONS ●
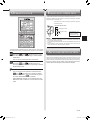
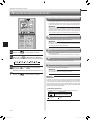
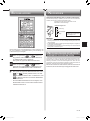
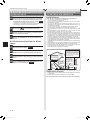
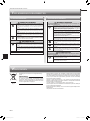
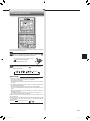
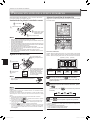
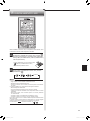
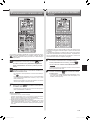
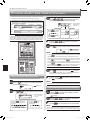
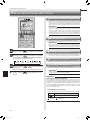
Installation position:
Left: Distance to objects (wall, cabinet, etc.) is less than 50 cm to the left
Center: Distance to objects (wall, cabinet, etc.) is more than 50 cm to the left
and right
Right: Distance to objects (wall, cabinet, etc.) is less than 50 cm to the right
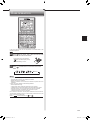
Setting the installation position
Be sure to set the remote controller in accordance with the installed position of
the indoor unit.
Before operation: Insert the power supply plug into the power outlet and/or
turn the breaker on.
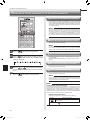
Installing the remote controller batteries
1.
Remove the front lid.
2. Insert the negative
pole of AAA alkaline
batteries fi rst.
3. Install the front lid.
4.
Press RESET.
Setting current time
1. Press CLOCK.
4. Press CLOCK again.
2. Press either the TIME button
or the TIMER buttons to set
the time.
Each press increases/decreas-
es the time by 1 minute (10
minutes when pressed longer).
3. Press the DAY button
to set the day.
Area Left Center Right
Remote controller
display
(Left) (Center) (Right)
PREPARATION BEFORE OPERATION
Hold down on the remote controller for 2 sec-
onds to enter the position setting mode.
Select the target installation position by pressing .
(Each press of the displays the positions in
order:)
Press to complete the position setting.
Note:
The installation position can be set only when all the following conditions are met:
• The remote controller is powered off.
• Weekly timer is not set.
• Weekly timer is not being edited.
1
2
3
(Center) (Right) (Left)
Note:
• Make sure the polarity of the batteries is correct.
• Do not use manganese batteries and leaking batteries. The remote controller
could malfunction.
• Do not use rechargeable batteries.
• The battery replacement indicator lights up when the battery is running low.
In about 7 days after the indicator starts lights up, the remote controller stops
working.
• Replace all batteries with new ones of the same type.
• Batteries can be used for approximately 1 year. However, batteries with ex-
pired shelf lives last shorter.
• Press RESET gently using a thin instrument.
If the RESET button is not pressed, the remote controller may not operate
correctly.
Note:
• Press CLOCK gently using a thin instrument.
Note:
How to set remote controller exclusively for a particular indoor unit
A maximum of 4 indoor units with wireless remote controllers can be used in a room.
To operate the indoor units individually with each remote controller, assign a number
to each remote controller according to the number of the indoor unit.
This setting can be set only when all the following conditions are met:
• The remote controller is powered OFF.
(1) Hold down button on the remote controller for 2 seconds to enter the pairing
mode.
(2) Press button again and assign a number to each remote controller.
Each press of button advances the number in the following order: 1 → 2 →
3 → 4.
(3) Press button to complete the pairing setting.
After you turn the breaker ON, the remote controller that fi rst sends a signal to an
indoor unit will be regarded as the remote controller for the indoor unit.
Once they are set, the indoor unit will only receive the signal from the assigned
remote controller afterwards.
JG79Y181H01_en.indd 5 2016/10/26 14:15:56

En-6
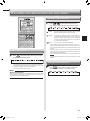
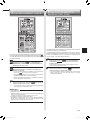
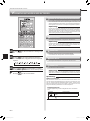
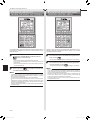
I-SEE OPERATION
Press during COOL, DRY, HEAT and AUTO mode
to activate the i-see control mode.
• Press gently using a thin instrument.
• lights. (Operation display section)
• The default setting is “active”.
2Press several times to cancel the i-see control
mode.
Note:
Any person at the following places cannot be detected:
• Along the wall on which the air conditioner is installed
• Directly under the air conditioner
• Where any obstacle, such as furniture, is between the person and the air
conditioner
A person may not be detected in the following situations:
• Room temperature is high.
• A person wears heavy clothes and his/her skin is not exposed.
• A heating element of which temperature changes significantly is present.
• Some heat sources, such as a small child or pet, may not be sensed.
• A heat source and the air conditioner are more than 6 m apart.
• A heat source does not move for a long time.
Do not touch the i-see sensor. This may cause malfunction of the i-see sensor.
The intermittent operating sound is a normal sound produced when the i-see
sensor is moving from side to side.
Refer to page 9 “Absence Detection” for and .
1
2
In the i-see control mode, the room temperature is controlled based on the
sensible temperature.
Cancel
JG79Y181H01_en.indd 6 2016/10/26 14:15:56

En-7
● OPERATING INSTRUCTIONS ●
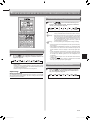
AUTO mode (Auto change over)
The unit selects the operation mode according to the difference between the
room temperature and the set temperature. During AUTO mode, the unit
changes mode (COOL↔HEAT) when the room temperature is about 2°C
away from the set temperature for more than 15 minutes.
Note:
Auto Mode is not recommended if this indoor unit is connected to a MXZ
type outdoor unit. When several indoor units are operated simultaneously,
the unit may not be able to switch operation mode between COOL and
HEAT. In this case, the indoor unit becomes standby mode (Refer to table
of Operation indicator lamp).
COOL mode
Enjoy cool air at your desired temperature.
Note:
Do not operate COOL mode at very low outside temperatures (less than
-10°C). Water condensed in the unit may drip and wet or damage furni-
ture, etc.
DRY mode
Dehumidify your room. The room may be cooled slightly.
Temperature cannot be set during DRY mode.
HEAT mode
Enjoy warm air at your desired temperature.
FAN mode
Circulate the air in your room.
Note:
After COOL/DRY mode operation, it is recommended to operate in the
FAN mode to dry inside the indoor unit.
Note:
Multi system operation
Two or more indoor units can be operated by one outdoor unit. When several
indoor units are operated simultaneously, cooling/dry/fan and heating opera-
tions cannot be done at the same time. When COOL/DRY/FAN is selected with
one unit and HEAT with another or vice versa, the unit selected last goes into
standby mode.
Operation indicator lamp
The operation indicator lamp shows the operation state of the unit.
Indication Operation state
Standby mode (only during multi system operation)
Lit Blinking
1Press to start the operation.
2Press to select operation mode. Each press
changes mode in the following order:
3Press or to set the temperature.
Each press raises or lowers the temperature by 1°C.
Press to stop the operation.
SELECTING OPERATION MODES
(AUTO) (COOL) (DRY) (HEAT) (FAN)
JG79Y181H01_en.indd 7 2016/10/26 14:15:57

En-8
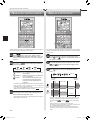
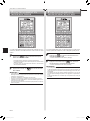
Press to select fan speed. Each press changes
fan speed in the following order:
• Two short beeps are heard from the indoor unit when set to AUTO.
• Use higher fan speed to cool/heat the room quicker. It is recommended
to lower the fan speed once the room is cool/warm.
• Use lower fan speed for quiet operation.
Note:
Multi system operation
When several indoor units are operated simultaneously by one outdoor unit for
heating operation, the temperature of the airfl ow may be low. In this case, it is
recommended to set the fan speed to AUTO.
(AUTO) (Silent) (Low) (Med.) (High) (Super High)
Press to select airfl ow direction. Each
press changes airfl ow direction in the following order:
(AUTO) .........The vane is set to the most effi cient airfl ow direction. COOL/
DRY/FAN: horizontal position. HEAT: position (4).
(Manual) .......For efficient air conditioning, select the upper position for
COOL/DRY, and the lower position for HEAT. If the lower
position is selected during COOL/DRY, the vane automatically
moves to the upward position (1) after 0.5 to 1 hour to prevent
any condensation from dripping.
(Swing) .........The vane moves up and down intermittently.
• Two short beeps are heard from the indoor unit when set to AUTO.
• Always use the remote controller when changing the direction of air-
flow. Moving the horizontal vanes with your hands causes them to mal-
function.
• When the breaker is turned on, the horizontal vanes’ position will be
reset in about a minute, then the operation will start. The same is true
in the emergency cooling operation.
• When the horizontal vanes seem to be in an abnormal position, see
page 17 .
• The right and left horizontal vanes set to the same level may not align
perfectly.
(AUTO) (1) (2) (3) (4) (5) (SWING)
FAN SPEED AND AIRFLOW DIRECTION ADJUSTMENT
Press to select airfl ow direction. Each press
changes airfl ow direction in the following order:
(
SWING
)
Left-right Airflow direction
Fan speed direction
Up-down Airflow direction
JG79Y181H01_en.indd 8 2016/10/26 14:15:57

En-9
● OPERATING INSTRUCTIONS ●
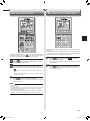
Airfl ow Control mode offers air conditioning according to a location of
an occupant in a room detected by i-see Sensor.
1Press during COOL, DRY, HEAT or AUTO
mode to activate the AIRFLOW CONTROL mode. This
mode is only available when the i-see control mode is
effective.
2Each press of changes AIRFLOW CONTROL
in the following order:
(INDIRECT) : An occupant will be less exposed to
direct airfl ow.
(DIRECT) : Mainly the vicinity of an occupant will
be air-conditioned.
(EVEN) : The unit learns the area where an
occupant spend most of the time,
and evens out the temperature of
that area.
• Horizontal and vertical airflow directions will be automatically selected.
• When more than a couple of people are in a room, the AIRFLOW
CONTROL mode may work less effectively.
• If you still feel uncomfortable with the air direction determined by the
INDIRECT mode, adjust the air direction manually. Page 8
3Cancelling the i-see control mode automatically can-
cels the AIRFLOW CONTROL mode.
• The AIRFLOW CONTROL mode is also cancelled when the VANE or
WIDE VANE buttons is pressed.
AIRFLOW CONTROL MODE
This function automatically changes the operation to No occupancy
energy-saving mode or No occupancy Auto-OFF mode when nobody
is in the room.
ABSENCE DETECTION
1To activate this No occupancy energy-saving mode,
press until appears on the operation display of
the remote controller.
2To activate this No occupancy Auto-OFF mode, press
until appears on the operation display of the
remote controller.
3Press again to cancel the ABSENCE DETEC-
TION.
• Even if the unit is turned OFF due to No occupancy Auto-OFF mode,
the display of the remote controller remains to indicate the unit is in
operation. Press then press again to restart opera-
tion.
• When OFF timer is set, a priority is given to OFF timer.
• No occupancy energy saving mode or No occupancy Auto-OFF mode
are not available during POWERFUL operation.
• The unit will not be turned off if no one is detected during normal
operation mode, even though No occupancy Auto-OFF mode is acti-
vated.
(INDIRECT) (DIRECT) (EVEN) (OFF)
Energy-
saving
mode
Auto-OFF
mode
No
occupancy
detected Occupancy
detected
About
10 min.
Normal Normal
Normal
About 1 HR.
Saving energy Saving more
Turn OFF
Saving energy
Cancel
JG79Y181H01_en.indd 9 2016/10/26 14:15:58

En-10
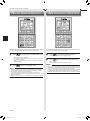
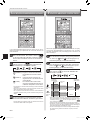
I-SAVE OPERATION
1Press during COOL, ECONO COOL, or HEAT
mode to select i-save mode.
2Set the temperature, fan speed, and airfl ow direction.
• The same setting is selected from the next time by simply pressing
.
• Two settings can be saved. (One for COOL/ECONO COOL, one for
HEAT)
• Select the appropriate temperature, fan speed, and airflow direction
according to your room.
Press again to cancel i-save operation.
• i-save operation also is cancelled when the MODE or POWERFUL
button is pressed.
A simplifi ed set back function enables to recall the preferred (preset)
setting with a single push of the button. Press the button again
and you can go back to the previous setting in an instance.
ECONO COOL OPERATION
Press during COOL mode page 7 to start
ECONO COOL operation.
The unit performs swing operation vertically in various cycles according to the
temperature airflow.
Press again to cancel ECONO COOL operation.
• ECONO COOL operation is also cancelled when the VANE or POW-
ERFUL button is pressed.
Swing airfl ow (change of airfl ow) makes you feel cooler than station-
ary airfl ow.
The set temperature and the airfl ow direction are automatically changed
by the microprocessor. It is possible to perform cooling operation with
keeping comfort. As a result energy can be saved.
Note:
Example of use:
1. Low energy mode
Set the temperature 2°C to 3°C warmer in COOL and cooler in HEAT mode.
This setting is suitable for unoccupied room, and while you are sleeping.
2. Saving frequently used settings
Save your preferred setting for COOL/ECONO COOL and HEAT. This ena-
bles you to select your preferred setting with a single push of the button.
JG79Y181H01_en.indd 10 2016/10/26 14:15:59

En-11
● OPERATING INSTRUCTIONS ●
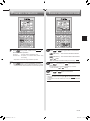
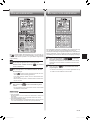
NIGHT MODE OPERATION
Press during operation to activate NIGHT mode.
• The operation indicator lamp dims.
• The beep sound will be disabled except that emitted when the opera-
tion is started or stopped.
• Noise level of the outdoor unit will be lower than that mentioned in
SPECIFICATIONS.
Press again to cancel NIGHT mode.
Note:
• Noise level of the outdoor unit may not change after start-up of the unit, dur-
ing the protection operation, or depending on other operating conditions.
• The fan speed of the indoor unit will not change.
•
The operation indicator lamp will be hard to be seen in a bright room.
•
Operating POWERFUL operation during NIGHT mode will increase the noise
level of the outdoor unit.
•
Noise level of the outdoor unit will not decrease during Multi system operation.
AIR PURIFYING OPERATION
Press to start AIR PURIFYING operation.
• AIR PURIFYING lamp turns on. (Display section)
Press again to cancel AIR PURIFYING opera-
tion.
• AIR PURIFYING lamp turns off. (Display section)
Note:
• Never touch the air purifying device during operation. Although the air pu-
rifying device is safety-conscious design, touching this device could be the
cause of trouble as this device discharge high voltage electricity.
• A “hissing” sound may be heard during the air purifying operation. This sound
is produced when plasma is being discharged. This is not a malfunction.
• Air purifying lamp does not turn on if the front panel is not closed completely.
In the AIR PURIFYING operation, the indoor unit built-in device reduces
airborne fungi, viruses, mold, and allergens.
NIGHT mode changes the brightness of the operation indicator, disables
the beep sound and limits the noise level of the outdoor unit.
JG79Y181H01_en.indd 11 2016/10/26 14:15:59

En-12
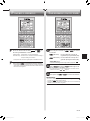
Press during COOL or HEAT mode page 7 to
start POWERFUL operation.
Fan speed : Exclusive speed for POWERFUL mode
Horizontal vane : Set position, or downward airflow position during
AUTO setting
• Temperature cannot be set during POWERFUL operation.
Press again to cancel POWERFUL operation.
• POWERFUL operation is also cancelled automatically in 15 minutes,
or when the OFF/ON, FAN, ECONO COOL or i-save button is pressed.
POWERFUL OPERATION
1Press or during operation to set the timer.
(ON timer) : The unit turns ON at the set time.
(OFF timer) : The unit turns OFF at the set time.
* or blinks.
*
Make sure that the current time and day are set correctly.
Page 5
2Press (Increase) and (Decrease) to set the
time of timer.
Each press increases or decreases the set time by 10 minutes.
• Set the timer while or is blinking.
3Press or again to cancel timer.
Note:
• ON and OFF timers can be set together. mark indicates the order of timer
operations.
• If power failure occurs while ON/OFF timer is set, see page 14 “Auto restart
function”.
TIMER OPERATION (ON/OFF TIMER)
JG79Y181H01_en.indd 12 2016/10/26 14:16:00

En-13
● OPERATING INSTRUCTIONS ●
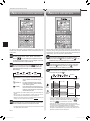
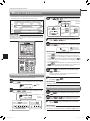
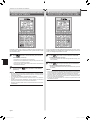
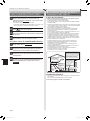
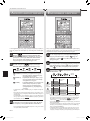
WEEKLY TIMER OPERATION
• A maximum of 4 ON or OFF timers can be set for individual days of the week.
• A maximum of 28 ON or OFF timers can be set for a week.
Setting the weekly timer
* Make sure that the current time and day are set correctly.
1Press to enter the weekly timer setting mode.
2Press and to select setting day and number.
3Press , , and to set ON/OFF, time, and
temperature.
Press and to continue setting the timer for
other days and/or numbers.
4Press to complete and transmit the weekly timer
setting.
Note:
• Press to transmit the setting information of weekly timer to the indoor
unit. Point the remote controller toward the indoor unit for 3 seconds.
• When setting the timer for more than one day of the week or one number,
does not have to be pressed per each setting. Press once
after all the settings are complete. All the weekly timer settings will be saved.
• Press to enter the weekly timer setting mode, and press and hold
for 5 seconds to erase all weekly timer settings. Point the remote
controller toward the indoor unit.
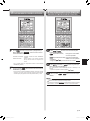
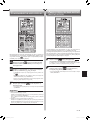
5Press to turn the weekly timer ON. ( lights.)
* When the weekly timer is ON, the day of the week whose timer setting
is complete, will light.
Press again to turn the weekly timer OFF. (
goes out.)
Note:
The saved settings will not be cleared when the weekly timer is turned OFF.
Checking weekly timer setting
1Press to enter the weekly timer setting mode.
* blinks.
2Press or to view the setting of the particular
day or number.
Press to exit the weekly timer setting.
Note:
When all days of the week are selected to view the settings and a different set-
ting is included among them, will be displayed.
* which was blink-
ing goes out, and the
current time will be
displayed.
* blinks.
Note:
The simple ON/OFF timer setting is available while the weekly timer is on. In
this case, the ON/OFF timer has priority over the weekly timer; the weekly timer
operation will start again after the simple ON/OFF timer is complete.
E.g. : Runs at 24°C from waking up to leaving home, and runs at 27°C from
getting home to going to bed on weekdays.
Runs at 27°C from waking up late to going bed early on weekends.
Setting1 Setting2 Setting3 Setting4
Setting1 Setting2
6:00 8:30 17:30 22:00
8:00 21:00
24°C 27°C
ON OFF ON OFF
ON OFF
Mon
Fri
~
Sat
Sun
~
27°C
Pressing selects the day of
the week to be set.
Pressing selects
the setting number.
* All days can be selected.
E.g. : [Mon Tue ... Sun]
and [1] are selected.
E.g. : [ON], [6:00]
and [24°C] are
selected.
Pressing selects
ON/OFF timer.
Pressing deletes
timer setting.
Pressing
adjusts the time.
Pressing
adjusts the tem-
perature.
* Hold down the button to change the time quickly.
JG79Y181H01_en.indd 13 2016/10/26 14:16:01

En-14
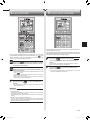
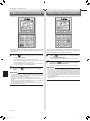
This function locks operation mode only. Other functions, such as OFF/
ON, temperature setting, or airfl ow direction adjustment, are available.
1Hold down and simultaneously for 2 sec-
onds while the unit is not operating to enable OPERA-
TION LOCK.
The icon for the locked operation mode blinks.
2Hold down and simultaneously for 2
seconds again while the unit is not operating to disable
OPERATION LOCK.
• The icon for the locked operation mode blinks when
and are held down to enable or disable
OPERATION LOCK or is pressed during opera-
tion while OPERATION LOCK is enabled.
• AIR PURIFYING operation is not available when OP-
ERATION LOCK is enabled in a mode other than FAN
mode.
Operation indicator lamp
When the remote controller cannot be used...
Emergency operation can be activated by pressing the emergency operation
switch (E.O.SW) on the indoor unit.
Each time the E.O.SW is pressed, the operation changes in
the following order:
If a power failure occurs or the main power is turned off during operation, “Auto
restart function” automatically starts operation in the same mode as the one set
with the remote controller just before the shutoff of the main power. When timer is
set, timer setting is cancelled and the unit starts operation when power is resumed.
If you do not want to use this function, please consult the service repre-
sentative because the setting of the unit needs to be changed.
Set temperature : 24°C
Fan speed : Medium
Horizontal vane : Auto
Emergency COOL
Emergency HEAT
Stop
Note:
• The fi rst 30 minutes of operation is test run. Temperature control does not
work, and fan speed is set to High.
• In the emergency heating operation, the fan speed gradually rises to blow out
warm air.
• In the emergency cooling operation, the horizontal vanes’ position will be
reset in about a minute, then the operation will start.
OPERATION LOCK EMERGENCY OPERATION
AUTO RESTART FUNCTION
JG79Y181H01_en.indd 14 2016/10/26 14:16:02

En-15
● OPERATING INSTRUCTIONS ●
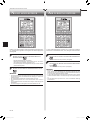
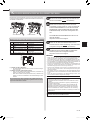
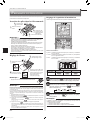
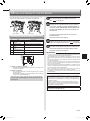
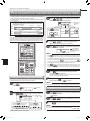
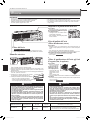
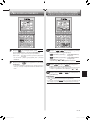
1. Open the front panel.
Note: You cannot remove the front panel.
2. Rotate the stoppers as indicated by the arrows until they click.
3. Lower the front panel slowly and it will be held open with the stoppers.
4. Pinch the tabs on the fi lters; slightly push them up
and pull down toward you to remove the fi lters.
5. Close the front panel securely and press the posi-
tions indicated by the arrows.
6. Clean the front panel without detaching it from the
unit.
• Wipe with a soft dry cloth.
• Use the dedicated SOFT DRY CLOTH. Parts Number MAC-1001CL-E
• Do not soak the front panel in water.
Instructions:
CLEANING
• Switch off the power supply or turn off the breaker before cleaning.
• Be careful not to touch the metal parts with your hands.
• Do not use benzine, thinner, polishing powder, or insecticide.
• Use only diluted mild detergents.
• Do not use a scrubbing brush, a hard sponge, or the like.
• Do not soak or rinse the horizontal vane.
• Do not use water hotter than 50°C.
• Do not expose parts to direct sunlight, heat, or fi re to dry.
• Do not apply excessive force on the fan as it may cause cracks or breakage.
Air fi lter
• Clean every 2 weeks
• Remove dirt by a vacuum cleaner, or rinse with water.
• After washing with water, dry it well in shade.
Important
• Clean the fi lters regularly for best performance and to
reduce power consumption.
• Dirty fi lters cause condensation in the air conditioner
which will contribute to the growth of fungi such as
mold. It is therefore recommended to clean air fi lters
every 2 weeks.
• Do not touch the i-see sensor.
• The air purifying device does not function for safety for
a couple minutes after the operation starts or the front
panel is opened/closed.
• Do not disassemble the air purifying device.
• Do not touch any parts other than the frame of the air
purifying device.
Front panel
Air purifying device
Every 3 months:
• Remove dirt by a vacuum cleaner.
When dirt cannot be removed by
vacuum cleaning:
•
Soak the fi lter together with its frame in
lukewarm water and rinse it.
• After washing, dry it well in shade.
and
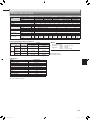
This information is based on REGULATION (EU) No 528/2012
MODEL NAME Treated Article
(Parts name)
Active Substances
(CAS No.) Property Instruction for Use
(Safe handling information)
MAC-2390FT-E FILTER Silver zinc zeolite
(130328-20-0) Antibacterial
• Use this product in line with the instruction manual indications and
for the intended purpose only.
• Do not put into mouth. Keep away from children.
Air cleaning fi lter
(Deodorizing fi lter, black)
Every 3 months:
• Remove dirt by a vacuum cleaner, or soak the framed fi lter in lukewarm
water (30 to 40°C) for about 15 minutes. Rinse well.
• After washing, dry it well in shade.
• Deodorizing feature recovers by cleaning the fi lter.
When dirt or smell cannot be removed by cleaning:
• Replace it with a new air cleaning fi lter.
• Parts Number MAC-3010FT-E
(Silver-ionized air purifi er fi lter, blue,
option)
Every 3 months:
• Remove dirt by a vacu-
um cleaner.
When dirt cannot be
removed by
vacuum cleaning:
•
Soak the fi lter and its
frame in lukewarm wa-
ter before rinsing it.
•
After washing, dry it well
in shade.
Install all tabs
of the air fi lter.
Every year:
• Replace it with a new air cleaning fi lter for best performance.
• Parts Number MAC-2390FT-E
Important
• The surface of the indoor unit is easily scratched, so never
rub or hit the unit with something hard. Also, when installing
or removing the front panel, handle it with care to prevent
scratches on it.
• Do not use abrasive cleaner to prevent scratches on the sur-
face of the indoor unit.
• It is very easy to get fi ngerprints on the surface of the indoor
unit. When fi ngerprints are noticeable, gently wipe them off
with a soft dry cloth.
• When using a commercially available chemical impregnated
cloth, follow its instructions.
• Do not leave the front panel open for a prolonged time.
2
3
2
3
stopper
1
1
4
4
JG79Y181H01_en.indd 15 2016/10/26 14:16:03

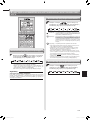
En-16
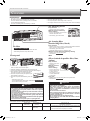
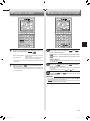
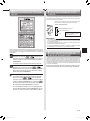
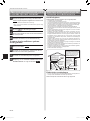
Wi-Fi INTERFACE SETTING UP
This Wi-Fi interface, communicates the status information and controls
the commands from the MELCloud by connecting to an indoor unit.
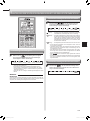
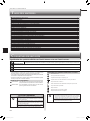
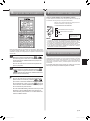
Wi-Fi interface introduction
No. Item Description
1 MODE switch It selects modes.
2 RESET switch It resets the system and ALL settings.
3 ERR LED (Orange) It shows the network error state.
4 NET LED (Green) It shows the network state.
5 MODE LED (Orange) It shows the Access point mode state.
6 UNIT LED (Green) It shows the indoor unit state.
RESET
ERR
NET
MODE
UNIT
MODE
3
4
5
6
21
(1) MODE switch
• The MODE switch is used for selecting modes in confi gurations.
(2) RESET switch
• Hold down the RESET switch for 2 seconds to reboot the system.
• Hold down the RESET switch for 14 seconds to initialize the Wi-Fi interface
to the factory default.
When the Wi-Fi interface is reset to the factory default, ALL the con-
fi guration information will be lost. Take great care in implementing this
operation.
1Open the front panel and remove the Wi-Fi inter-
face. Page 15 (Front panel)
2Set up a connection between the Wi-Fi interface and
the router. Refer to the SETUP MANUAL and SETUP
QUICK REFERENCE GUIDE provided with the unit.
For SETUP MANUAL, please go to the website below.
http://www.melcloud.com/Support
3Put the Wi-Fi interface back and close the front panel
after the setup is completed. Page 15 (Front panel)
4For MELCloud User Manual, please go to the website
below.
http://www.melcloud.com/Support
Note:
• Ensure that the Router supports the WPA2-AES encryption setting before
starting the Wi-Fi interface setup.
• The End user should read and accept the terms and conditions of the Wi-Fi
service before using this Wi-Fi interface.
• To complete connection of this Wi-Fi interface to the Wi-Fi service, the Rout-
er may be required.
• This Wi-Fi interface will not commence transmission of any operational data
from the system until the End user registers and accepts the terms and con-
ditions of the Wi-Fi service.
• This Wi-Fi interface should not be installed and connected to any Mitsubishi
Electric system which is to provide application critical cooling or heating.
• Please write down the information regarding the Wi-Fi interface setting on the
last page of this manual, when you set up this Wi-Fi interface.
• At the time of relocation or disposal, reset the Wi-Fi interface to the factory
default.
Mitsubishi Electric’s Wi-Fi interface is designed for communication to
Mitsubishi Electric’s MELCloud Wi-Fi service.
Third party Wi-Fi interfaces cannot be connected to MELCloud.
Mitsubishi Electric is not responsible for any (i) underperformance of a
system or any product;
(ii) system or product fault; or (iii) loss or damage to any system or product;
which is caused by or arises from connection to and/or use of any third
party Wi-Fi interface or any third party Wi-Fi service with Mitsubishi Electric
equipment.
For the latest information regarding MELCloud from Mitsubishi Electric
Corporation, please visit www.MELCloud.com.
Wi-Fi interface Wi-Fi interface
JG79Y181H01_en.indd 16 2016/10/26 14:16:03

En-17
● OPERATING INSTRUCTIONS ●
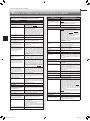
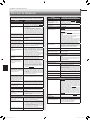
Even if these items are checked, when the unit does not recover from the
trouble, stop using the air conditioner and consult your dealer.
Symptom Explanation & Check points
Indoor Unit
The unit cannot be operated. • Is the breaker turned on?
• Is the power supply plug connected?
• Is the ON timer set? Page 12
The horizontal vane does not
move. • Are the horizontal vane and the vertical vane
installed correctly?
• Is the fan guard deformed?
• When the breaker is turned on, the horizontal
vanes’ position will be reset in about a minute.
After the reset has completed, the normal hori-
zontal vanes’ operation resumes. The same is
true in the emergency cooling operation.
The unit cannot be operated for
about 3 minutes when restarted. • This protects the unit according to instructions
from the microprocessor. Please wait.
Mist is discharged from the air
outlet of the indoor unit. •
The cool air from the unit rapidly cools moisture
in the air inside the room, and it turns into mist.
The swing operation of the HORI-
ZONTAL VANE is suspended for a
while, then restarted.
• This is for the swing operation of the HORIZON-
TAL VANE to be performed normally.
When SWING is selected in
COOL/DRY/FAN mode, the
lower horizontal vane does not
move.
• It is normal that the lower horizontal vane does
not move when SWING is selected in COOL/
DRY/FAN mode.
The airfl ow direction changes
during operation.
The direction of the horizontal
vane cannot be adjusted with
the remote controller.
• When the unit is operated in COOL or DRY
mode, if the operation continues with air blow-
ing down for 0.5 to 1 hour, the direction of the
airfl ow is automatically set to upward position
to prevent water from condensing and dripping.
• In the heating operation, if the airfl ow tem-
perature is too low or when defrosting is being
done, the horizontal vane is automatically set
to horizontal position.
The operation stops for about
10 minutes in the heating
operation.
• Outdoor unit is in defrost.
Since this is completed in max. 10 minutes,
please wait. (When the outside temperature is
too low and humidity is too high, frost is formed.)
The unit starts operation by
itself when the main power is
turned on, but hasn’t received
sign from the remote controller.
• These models are equipped with an auto
restart function. When the main power is
turned off without stopping the unit with the
remote controller and is turned on again, the
unit starts operation automatically in the same
mode as the one set with the remote control-
ler just before the shutoff of the main power.
Refer to “Auto restart function”. Page 14
The two horizontal vanes touch
each other. The horizontal
vanes are in an abnormal posi-
tion. The horizontal vanes do
not return to the correct “close
position”.
Perform one of the following:
•
Turn off and on the breaker. Make sure the hori-
zontal vanes move to the correct “close position”.
• Start and stop the emergency cooling operation
and make sure the horizontal vanes move to the
correct “close position”.
In COOL/DRY mode, when the
room temperature reaches near
the set temperature, the outdoor
unit stops, then the indoor unit
operates at low speed.
• When the room temperature deviates from the
set temperature, the indoor fan starts running
according to the settings on the remote control-
ler.
The indoor unit discolors over
time. • Although plastic turns yellow due to the infl uence
of some factors such as ultraviolet light and
temperature, this has no effect on the product
functions.
The operation indicator lamp is
dim. The unit does not beep. • Is the NIGHT mode set?
Multi system
The indoor unit which is not
operating becomes warm and a
sound, similar to water fl owing,
is heard from the unit.
• A small amount of refrigerant continues to fl ow
into the indoor unit even though it is not operat-
ing.
When heating operation is
selected, operation does not
start right away.
• When operation is started during defrosting of
outdoor unit is done, it takes a few minutes (max.
10 minutes) to blow out warm air.
Outdoor Unit
The fan of the outdoor unit does
not rotate even though the com-
pressor is running. Even if the
fan starts to rotate, it stops soon.
• When the outside temperature is low during
cooling operation, the fan operates intermittently
to maintain suffi cient cooling capacity.
Water leaks from the outdoor
unit. • During COOL and DRY operations, pipe or pipe
connecting sections are cooled and this causes
water to condense.
• In the heating operation, water condensed on
the heat exchanger drips down.
• In the heating operation, the defrosting operation
makes ice forming on the outdoor unit melt and
drip down.
White smoke is discharged from
the outdoor unit. • In the heating operation, vapor generated by the
defrosting operation looks like white smoke.
Symptom Explanation & Check points
Remote controller
The display on the remote
controller does not appear or it
is dim. The indoor unit does not
respond to the remote control
signal.
• Are the batteries exhausted? Page 5
• Is the polarity (+, -) of the batteries correct?
Page 5
• Are any buttons on the remote controller of other
electric appliances being pressed?
The operation mode cannot be
changed. • Disable the OPERATION LOCK.
Does not cool or heat
The room cannot be cooled or
heated suffi ciently. • Is the temperature setting appropriate?
Page 7
• Is the fan setting appropriate? Please change
fan speed to High or Super High. Page 8
• Are the fi lters clean? Page 15
•
Is the fan or heat exchanger of the indoor unit clean?
• Are there any obstacles blocking the air inlet or
outlet of the indoor or outdoor unit?
• Is a window or door open?
• It may take a certain time to reach the setting
temperature or may not reach that depending on
the size of the room, the ambient temperature,
and the like.
• Is the NIGHT mode set?
The room cannot be cooled
suffi ciently. • When a ventilation fan or a gas cooker is used
in a room, the cooling load increases, resulting
in an insuffi cient cooling effect.
• When the outside temperature is high, the cooling
effect may not be suffi cient.
The room cannot be heated
suffi ciently. • When the outside temperature is low, the heating
effect may not be suffi cient.
Air does not blow out soon in
the heating operation. • Please wait as the unit is preparing to blow out
warm air.
Airfl ow
The air from the indoor unit
smells strange. • Are the fi lters clean? Page 15
• Is the fan or heat exchanger of the indoor unit
clean?
• The unit may suck in an odor adhering to the
wall, carpet, furniture, cloth, etc. and blow it out
with the air.
Sound
Cracking sound is heard. • This sound is generated by the expansion/con-
traction of the front panel, etc. due to change in
temperature.
“Burbling” sound is heard. • This sound is heard when the outside air is
absorbed from the drain hose by turning on the
range hood or the ventilation fan, making water
fl owing in the drain hose to spout out.
This sound is also heard when the outside air
blows into the drain hose in case the outside
wind is strong.
Mechanical sound is heard
from the indoor unit. • This is the switching sound in turning on/off the
fan or the compressor.
The sound of water fl owing is
heard. • This is the sound of refrigerant or condensed
water fl owing in the unit.
Hissing sound is sometimes
heard. • This is the sound when the fl ow of refrigerant
inside the unit is changed.
Timer
Weekly timer does not operate
according to settings. • Is the ON/OFF timer set? Page 12
• Transmit the setting information of the weekly
timer to the indoor unit again. When the infor-
mation is successfully received, a long beep will
sound from the indoor unit. If information fails to
be received, 3 short beeps will be heard. Ensure
information is successfully received. Page 13
• When a power failure occurs and the main power
turns off, the indoor unit built-in clock will be
incorrect. As a result, the weekly timer may not
work normally.
Be sure to place the remote controller where
the signal can be received by the indoor unit.
Page 5
The unit starts/stops the opera-
tion by itself. • Is the weekly timer set? Page 13
Wi-Fi interface
When error occurs during con-
nection setup or operation. Refer to the SETUP MANUAL.
For SETUP MANUAL, please go to the website
below.
http://www.melcloud.com/Support
WHEN YOU THINK THAT TROUBLE HAS OCCURRED
JG79Y181H01_en.indd 17 2016/10/26 14:16:04

En-18
In the following cases, stop using the air conditioner and consult your dealer.
• When water leaks or drips from the indoor unit.
• When the operation indicator lamp blinks.
• When the breaker trips frequently.
• The remote control signal is not received in a room where an electronic ON/OFF type fl uorescent lamp (inverter-type fl uorescent lamp, etc.) is used.
• Operation of the air conditioner interferes with radio or TV reception. An amplifi er may be required for the affected device.
• When an abnormal sound is heard.
• When any refrigerant leakage is found.
WHEN YOU THINK THAT TROUBLE HAS OCCURRED
JG79Y181H01_en.indd 18 2016/10/26 14:16:04

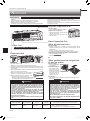
En-19
● OPERATING INSTRUCTIONS ●
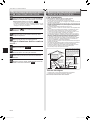
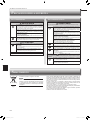
Installation place
Avoid installing the air conditioner in the following places.
• Where there is much machine oil.
• Salty places such as the seaside.
• Where sulfi de gas is generated such as hot spring, sewage, waste water.
•
Where oil is splashed or where the area is fi lled with oily smoke (such as cooking areas
and factories, in which the properties of plastic could be changed and damaged).
• Where there is high-frequency or wireless equipment.
• Where the air from the outdoor unit air outlet is blocked.
•
Where the operation sound or air from the outdoor unit bothers the house next door.
• The mounting height of indoor unit 1.8 m to 2.3 m is recommended. If it is
impossible, please consult your dealer.
• Do not operate the air conditioner during interior construction and fi nishing
work, or while waxing the fl oor. Before operating the air conditioner, ventilate
the room well after such work is performed. Otherwise, it may cause volatile
elements to adhere inside the air conditioner, resulting in water leakage or
scattering of dew.
• Do not use the Wi-Fi interface nearby the medical electrical equipment or peo-
ple who have a medical device such as a cardiac pacemaker or an implantable
cardioverter-defi brillator.
It can cause an accident due to malfunctions of the medical equipment or
device.
• This equipment should be installed and operated with a minimum distance of
20 cm between the device and the user or bystanders.
• Do not use the Wi-Fi interface nearby other wireless devices, microwaves,
cordless phones, or facsimiles.
It can cause malfunctions.
Electrical work
• Provide an exclusive circuit for the power supply of the air conditioner.
• Be sure to observe the breaker capacity.
If you have any questions, consult your dealer.
INSTALLATION PLACE AND
ELECTRICAL WORK
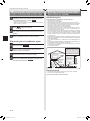
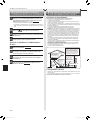
1Operate by COOL mode with the highest temperature
set or FAN mode for 3 to 4 hours. Page 7
• This dries the inside of the unit.
• Moisture in the air conditioner contributes to favorable conditions for
growth of fungi, such as mold.
2Press to stop the operation.
3Turn off the breaker and/or disconnect the power sup-
ply plug.
4Remove all batteries from the remote controller.
When using the air conditioner again:
1Clean the air fi lter. Page 15
2Check that the air inlet and outlet of the indoor and
outdoor units are not blocked.
3Check that the earth is connected correctly.
4Refer to the “PREPARATION BEFORE OPERATION”,
and follow the instructions. Page 5
WHEN THE AIR CONDITIONER IS NOT
GOING TO BE USED FOR A LONG TIME
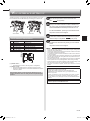
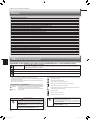
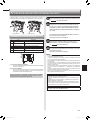
To prevent the effects
of a fl uorescent lamp,
keep as far apart as
possible.
wall, etc.
Inverter-type
fl uorescent lamp
Keep a space
to prevent
the picture
distortion or
the noise.
1 m
or
more
Radio
100 mm or
more
TV
Cordless
phone or
Portable
phone 3 m or more
1 m
or more
The installation location of the outdoor
unit should be at least 3 m away from
the antennas for TV sets, radios, etc. In
areas where the reception is weak, pro-
vide greater space between the outdoor
unit and the antenna of the affected
device if operation of the air conditioner
interferes with radio or TV reception.
(25, 35, 50VG/50HZ, 60)
200/500 mm or more
For the optimum ef-
fi ciency and to extend
the life time of using,
the outdoor unit
should be installed in
a well-ventilated dry
place.
JG79Y181H01_en.indd 19 2016/10/26 14:16:04
Sayfa yükleniyor...
Sayfa yükleniyor...
Sayfa yükleniyor...
Sayfa yükleniyor...
Sayfa yükleniyor...
Sayfa yükleniyor...
Sayfa yükleniyor...
Sayfa yükleniyor...
Sayfa yükleniyor...
Sayfa yükleniyor...
Sayfa yükleniyor...
Sayfa yükleniyor...
Sayfa yükleniyor...
Sayfa yükleniyor...
Sayfa yükleniyor...
Sayfa yükleniyor...
Sayfa yükleniyor...
Sayfa yükleniyor...
Sayfa yükleniyor...
Sayfa yükleniyor...
Sayfa yükleniyor...
Sayfa yükleniyor...
Sayfa yükleniyor...
Sayfa yükleniyor...
Sayfa yükleniyor...
Sayfa yükleniyor...
Sayfa yükleniyor...
Sayfa yükleniyor...
Sayfa yükleniyor...
Sayfa yükleniyor...
Sayfa yükleniyor...
Sayfa yükleniyor...
Sayfa yükleniyor...
Sayfa yükleniyor...
Sayfa yükleniyor...
Sayfa yükleniyor...
Sayfa yükleniyor...
Sayfa yükleniyor...
Sayfa yükleniyor...
Sayfa yükleniyor...
Sayfa yükleniyor...
Sayfa yükleniyor...
Sayfa yükleniyor...
Sayfa yükleniyor...
Sayfa yükleniyor...
Sayfa yükleniyor...
Sayfa yükleniyor...
Sayfa yükleniyor...
Sayfa yükleniyor...
Sayfa yükleniyor...
Sayfa yükleniyor...
Sayfa yükleniyor...
Sayfa yükleniyor...
Sayfa yükleniyor...
Sayfa yükleniyor...
Sayfa yükleniyor...
Sayfa yükleniyor...
Sayfa yükleniyor...
Sayfa yükleniyor...
Sayfa yükleniyor...
Sayfa yükleniyor...
Sayfa yükleniyor...
Sayfa yükleniyor...
Sayfa yükleniyor...
Sayfa yükleniyor...
Sayfa yükleniyor...
Sayfa yükleniyor...
Sayfa yükleniyor...
Sayfa yükleniyor...
Sayfa yükleniyor...
Sayfa yükleniyor...
Sayfa yükleniyor...
Sayfa yükleniyor...
Sayfa yükleniyor...
Sayfa yükleniyor...
Sayfa yükleniyor...
Sayfa yükleniyor...
Sayfa yükleniyor...
Sayfa yükleniyor...
Sayfa yükleniyor...
Sayfa yükleniyor...
Sayfa yükleniyor...
Sayfa yükleniyor...
Sayfa yükleniyor...
Sayfa yükleniyor...
Sayfa yükleniyor...
Sayfa yükleniyor...
Sayfa yükleniyor...
Sayfa yükleniyor...
Sayfa yükleniyor...
Sayfa yükleniyor...
Sayfa yükleniyor...
Sayfa yükleniyor...
Sayfa yükleniyor...
Sayfa yükleniyor...
Sayfa yükleniyor...
Sayfa yükleniyor...
Sayfa yükleniyor...
Sayfa yükleniyor...
Sayfa yükleniyor...
Sayfa yükleniyor...
Sayfa yükleniyor...
Sayfa yükleniyor...
Sayfa yükleniyor...
Sayfa yükleniyor...
Sayfa yükleniyor...
Sayfa yükleniyor...
Sayfa yükleniyor...
Sayfa yükleniyor...
Sayfa yükleniyor...
Sayfa yükleniyor...
Sayfa yükleniyor...
Sayfa yükleniyor...
Sayfa yükleniyor...
Sayfa yükleniyor...
Sayfa yükleniyor...
Sayfa yükleniyor...
Sayfa yükleniyor...
Sayfa yükleniyor...
Sayfa yükleniyor...
Sayfa yükleniyor...
Sayfa yükleniyor...
Sayfa yükleniyor...
Sayfa yükleniyor...
Sayfa yükleniyor...
Sayfa yükleniyor...
Sayfa yükleniyor...
Sayfa yükleniyor...
Sayfa yükleniyor...
Sayfa yükleniyor...
Sayfa yükleniyor...
Sayfa yükleniyor...
Sayfa yükleniyor...
Sayfa yükleniyor...
Sayfa yükleniyor...
Sayfa yükleniyor...
Sayfa yükleniyor...
Sayfa yükleniyor...
Sayfa yükleniyor...
Sayfa yükleniyor...
Sayfa yükleniyor...
Sayfa yükleniyor...
Sayfa yükleniyor...
Sayfa yükleniyor...
Sayfa yükleniyor...
Sayfa yükleniyor...
Sayfa yükleniyor...
Sayfa yükleniyor...
Sayfa yükleniyor...
Sayfa yükleniyor...
Sayfa yükleniyor...
Sayfa yükleniyor...
Sayfa yükleniyor...
Sayfa yükleniyor...
Sayfa yükleniyor...
Sayfa yükleniyor...
Sayfa yükleniyor...
Sayfa yükleniyor...
Sayfa yükleniyor...
Sayfa yükleniyor...
Sayfa yükleniyor...
Sayfa yükleniyor...
Sayfa yükleniyor...
Sayfa yükleniyor...
Sayfa yükleniyor...
Sayfa yükleniyor...
Sayfa yükleniyor...
Sayfa yükleniyor...
Sayfa yükleniyor...
Sayfa yükleniyor...
Sayfa yükleniyor...
Sayfa yükleniyor...
Sayfa yükleniyor...
Sayfa yükleniyor...
Sayfa yükleniyor...
Sayfa yükleniyor...
Sayfa yükleniyor...
Sayfa yükleniyor...
Sayfa yükleniyor...
Sayfa yükleniyor...
Sayfa yükleniyor...
Sayfa yükleniyor...
Sayfa yükleniyor...
Sayfa yükleniyor...
Sayfa yükleniyor...
Sayfa yükleniyor...
Sayfa yükleniyor...
Sayfa yükleniyor...
Sayfa yükleniyor...
Sayfa yükleniyor...
Sayfa yükleniyor...
Sayfa yükleniyor...
Sayfa yükleniyor...
Sayfa yükleniyor...
Sayfa yükleniyor...
Sayfa yükleniyor...
Sayfa yükleniyor...
Sayfa yükleniyor...
Sayfa yükleniyor...
Sayfa yükleniyor...
Sayfa yükleniyor...
Sayfa yükleniyor...
Sayfa yükleniyor...
Sayfa yükleniyor...
Sayfa yükleniyor...
Sayfa yükleniyor...
Sayfa yükleniyor...
Sayfa yükleniyor...
Sayfa yükleniyor...
Sayfa yükleniyor...
Sayfa yükleniyor...
Sayfa yükleniyor...
Sayfa yükleniyor...
Sayfa yükleniyor...
Sayfa yükleniyor...
Sayfa yükleniyor...
Sayfa yükleniyor...
Sayfa yükleniyor...
Sayfa yükleniyor...
Sayfa yükleniyor...
Sayfa yükleniyor...
Sayfa yükleniyor...
Sayfa yükleniyor...
Sayfa yükleniyor...
Sayfa yükleniyor...
Sayfa yükleniyor...
Sayfa yükleniyor...
Sayfa yükleniyor...
Sayfa yükleniyor...
Sayfa yükleniyor...
Sayfa yükleniyor...
Sayfa yükleniyor...
Sayfa yükleniyor...
Sayfa yükleniyor...
Sayfa yükleniyor...
Sayfa yükleniyor...
Sayfa yükleniyor...
Sayfa yükleniyor...
Sayfa yükleniyor...
Sayfa yükleniyor...
Sayfa yükleniyor...
Sayfa yükleniyor...
Sayfa yükleniyor...
Sayfa yükleniyor...
-
 1
1
-
 2
2
-
 3
3
-
 4
4
-
 5
5
-
 6
6
-
 7
7
-
 8
8
-
 9
9
-
 10
10
-
 11
11
-
 12
12
-
 13
13
-
 14
14
-
 15
15
-
 16
16
-
 17
17
-
 18
18
-
 19
19
-
 20
20
-
 21
21
-
 22
22
-
 23
23
-
 24
24
-
 25
25
-
 26
26
-
 27
27
-
 28
28
-
 29
29
-
 30
30
-
 31
31
-
 32
32
-
 33
33
-
 34
34
-
 35
35
-
 36
36
-
 37
37
-
 38
38
-
 39
39
-
 40
40
-
 41
41
-
 42
42
-
 43
43
-
 44
44
-
 45
45
-
 46
46
-
 47
47
-
 48
48
-
 49
49
-
 50
50
-
 51
51
-
 52
52
-
 53
53
-
 54
54
-
 55
55
-
 56
56
-
 57
57
-
 58
58
-
 59
59
-
 60
60
-
 61
61
-
 62
62
-
 63
63
-
 64
64
-
 65
65
-
 66
66
-
 67
67
-
 68
68
-
 69
69
-
 70
70
-
 71
71
-
 72
72
-
 73
73
-
 74
74
-
 75
75
-
 76
76
-
 77
77
-
 78
78
-
 79
79
-
 80
80
-
 81
81
-
 82
82
-
 83
83
-
 84
84
-
 85
85
-
 86
86
-
 87
87
-
 88
88
-
 89
89
-
 90
90
-
 91
91
-
 92
92
-
 93
93
-
 94
94
-
 95
95
-
 96
96
-
 97
97
-
 98
98
-
 99
99
-
 100
100
-
 101
101
-
 102
102
-
 103
103
-
 104
104
-
 105
105
-
 106
106
-
 107
107
-
 108
108
-
 109
109
-
 110
110
-
 111
111
-
 112
112
-
 113
113
-
 114
114
-
 115
115
-
 116
116
-
 117
117
-
 118
118
-
 119
119
-
 120
120
-
 121
121
-
 122
122
-
 123
123
-
 124
124
-
 125
125
-
 126
126
-
 127
127
-
 128
128
-
 129
129
-
 130
130
-
 131
131
-
 132
132
-
 133
133
-
 134
134
-
 135
135
-
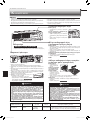 136
136
-
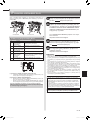 137
137
-
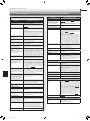 138
138
-
 139
139
-
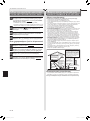 140
140
-
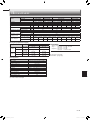 141
141
-
 142
142
-
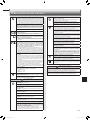 143
143
-
 144
144
-
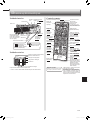 145
145
-
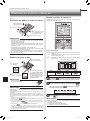 146
146
-
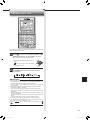 147
147
-
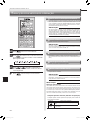 148
148
-
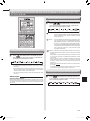 149
149
-
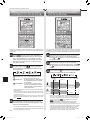 150
150
-
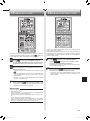 151
151
-
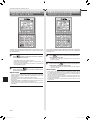 152
152
-
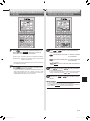 153
153
-
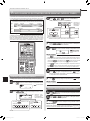 154
154
-
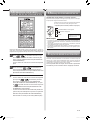 155
155
-
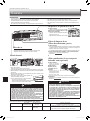 156
156
-
 157
157
-
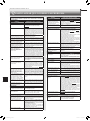 158
158
-
 159
159
-
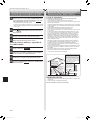 160
160
-
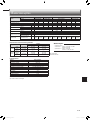 161
161
-
 162
162
-
 163
163
-
 164
164
-
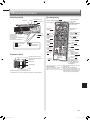 165
165
-
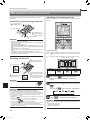 166
166
-
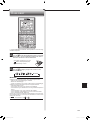 167
167
-
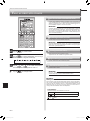 168
168
-
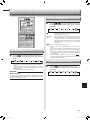 169
169
-
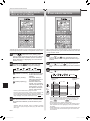 170
170
-
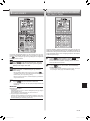 171
171
-
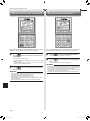 172
172
-
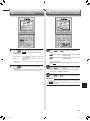 173
173
-
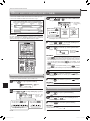 174
174
-
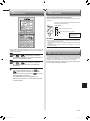 175
175
-
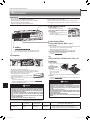 176
176
-
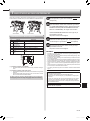 177
177
-
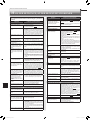 178
178
-
 179
179
-
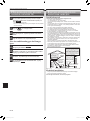 180
180
-
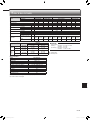 181
181
-
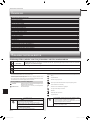 182
182
-
 183
183
-
 184
184
-
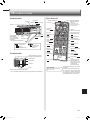 185
185
-
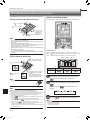 186
186
-
 187
187
-
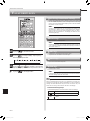 188
188
-
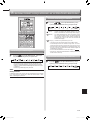 189
189
-
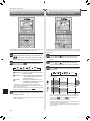 190
190
-
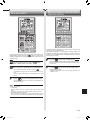 191
191
-
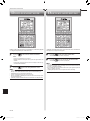 192
192
-
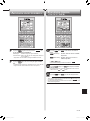 193
193
-
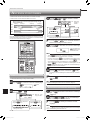 194
194
-
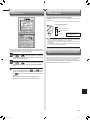 195
195
-
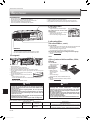 196
196
-
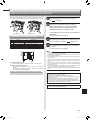 197
197
-
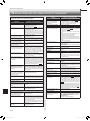 198
198
-
 199
199
-
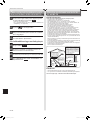 200
200
-
 201
201
-
 202
202
-
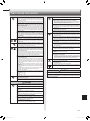 203
203
-
 204
204
-
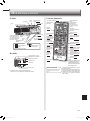 205
205
-
 206
206
-
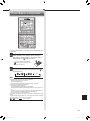 207
207
-
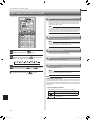 208
208
-
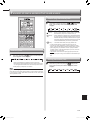 209
209
-
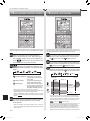 210
210
-
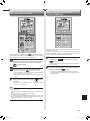 211
211
-
 212
212
-
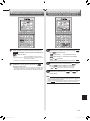 213
213
-
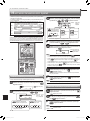 214
214
-
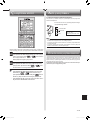 215
215
-
 216
216
-
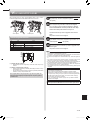 217
217
-
 218
218
-
 219
219
-
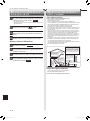 220
220
-
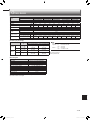 221
221
-
 222
222
-
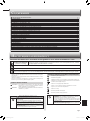 223
223
-
 224
224
-
 225
225
-
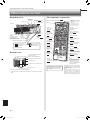 226
226
-
 227
227
-
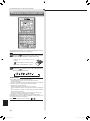 228
228
-
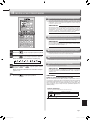 229
229
-
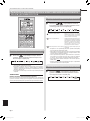 230
230
-
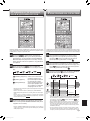 231
231
-
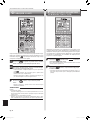 232
232
-
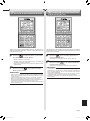 233
233
-
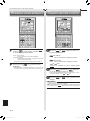 234
234
-
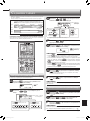 235
235
-
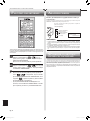 236
236
-
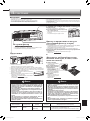 237
237
-
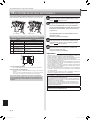 238
238
-
 239
239
-
 240
240
-
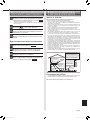 241
241
-
 242
242
-
 243
243
-
 244
244
-
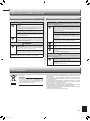 245
245
-
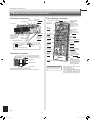 246
246
-
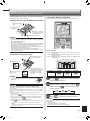 247
247
-
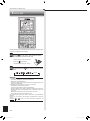 248
248
-
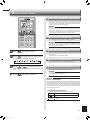 249
249
-
 250
250
-
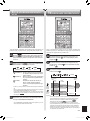 251
251
-
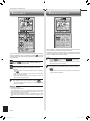 252
252
-
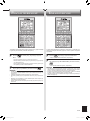 253
253
-
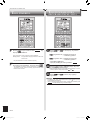 254
254
-
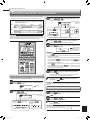 255
255
-
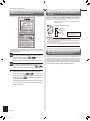 256
256
-
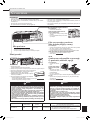 257
257
-
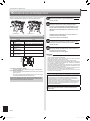 258
258
-
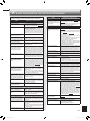 259
259
-
 260
260
-
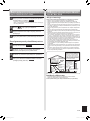 261
261
-
 262
262
-
 263
263
-
 264
264


Mitsubishi Electric MSZ-LN25VGW Split Type Air Conditioners Kullanım kılavuzu
- Kategori
- Split sistem klimalar
- Tip
- Kullanım kılavuzu
diğer dillerde
- français: Mitsubishi Electric MSZ-LN25VGW Split Type Air Conditioners Manuel utilisateur
- italiano: Mitsubishi Electric MSZ-LN25VGW Split Type Air Conditioners Manuale utente
- Deutsch: Mitsubishi Electric MSZ-LN25VGW Split Type Air Conditioners Benutzerhandbuch
- português: Mitsubishi Electric MSZ-LN25VGW Split Type Air Conditioners Manual do usuário
- dansk: Mitsubishi Electric MSZ-LN25VGW Split Type Air Conditioners Brugermanual
- Nederlands: Mitsubishi Electric MSZ-LN25VGW Split Type Air Conditioners Handleiding
İlgili makaleler
Diğer belgeler
-
LG ATNH12GRLE2.ENWABTK Kullanici rehberi
-
Daikin ATXF25A5V1BB Kullanım kılavuzu
-
Mitsubishi MXZ-2D33VA-E2 El kitabı
-
-
-
Bosch CLC6001i-Set 25 E Yükleme Rehberi
-
LG DC18RH Kullanım kılavuzu
-
LG S09ETK Kullanici rehberi
-
Thermex Kanalv TD 250/100 Yükleme Rehberi
-
Dometic RTX1000, RTX2000, SPX1200TC, SPX1200IC Kullanma talimatları