Stanley SCH121S2K Kullanım kılavuzu
- Kategori
- Kablosuz kombi matkaplar
- Tip
- Kullanım kılavuzu

(Original Instructions) ENGLISH
SCH121
English Page 04
Russian Page 13
Ukrainian Page 25
Turkish Page 36

2
ENGLISH (Original Instructions)
5
8
2
1
6
7
11
3
9
4
A
B
7
10
SC122

3
(Original Instructions) ENGLISH
6
7
3
9
4
C D
E F
G H

4
ENGLISH (Original Instructions)
INTENDED USE
Your STANLEY SCH121 Li-Ion Hammer Drill has been
designed for light fastening and drilling in wood/metal/
brickwork, and screwdriving applications. This tool is
intended for professional use.
SAFETY INSTRUCTIONS
General power tool safety warnings
WARNING! Read all safety warnings,
instructions, illustrations and specifications
provided with this power tool. Failure to follow
all instructions listed below may result in electric
shock, fire and/or serious injury.
Save all warnings and instructions for future reference.
The term “power tool” in the warnings refers to your mains-
operated (corded) power tool or battery-operated (cordless)
power tool.
1. Work area safety
a. Keep work area clean and well lit. Cluttered or dark
areas invite accidents.
b. Do not operate power tools in explosive
atmospheres, such as in the presence of flammable
liquids, gases or dust. Power tools create sparks
which may ignite the dust or fumes.
c. Keep children and bystanders away while
operating a power tool. Distractions can cause you
to lose control.
2. Electrical safety
a. Power tool plugs must match the outlet. Never
modify the plug in any way. Do not use any adapter
plugs with earthed (grounded) power tools. Unmodified
plugs and matching outlets will reduce risk of electric
shock.
b. Avoid body contact with earthed or grounded
surfaces such as pipes, radiators, ranges and
refrigerators. There is an increased risk of electric
shock if your body is earthed or grounded.
c. Do not expose power tools to rain or wet
conditions. Water entering a power tool will increase
the risk of electric shock.
d. Do not abuse the cord. Never use the cord for
carrying, pulling or unplugging the power tool.
Keep cord away from heat, oil, sharp edges or moving
parts. Damaged or entangled cords increase the risk of
electric shock.
e. When operating a power tool outdoors, use an
extension cord suitable for outdoor use. Use of
a cord suitable for outdoor use reduces the risk of
electric shock.
f. If operating a power tool in a damp location is
unavoidable, use a residual current device (RCD)
protected supply. Use of an RCD reduces the risk of
electric shock.
3. Personal safety
a. Stay alert, watch what you are doing and use
common sense when operating a power tool. Do
not use a power tool while you are tired or under the
influence of drugs, alcohol or medication. A moment of
inattention while operating power tools may result in
serious personal injury.
b. Use personal protective equipment. Always wear
eye protection. Protective equipment such as a dust
mask, non-skid safety shoes, hard hat, or hearing
protection used for appropriate conditions will reduce
personal injuries.
c. Prevent unintentional starting. Ensure the switch is
in the off-position before connecting to power source
and/or battery pack, picking up or carrying the tool.
Carrying power tools with your finger on the switch or
energising power tools that have the switch on invites
accidents.
d. Remove any adjusting key or wrench before
turning the power tool on. A wrench or a key left
attached to a rotating part of the power tool may result
in personal injury.
e. Do not overreach. Keep proper footing and balance at
all times. This enables better control of the power tool
in unexpected situations.
f. Dress properly. Do not wear loose clothing or
jewellery. Keep your hair and clothing away from
moving parts. Loose clothes, jewellery or long hair can
be caught in moving parts.
g. If devices are provided for the connection of dust
extraction and collection facilities, ensure these
are connected and properly used. Use of dust
collection can reduce dust-related hazards.
h. Do not let familiarity gained from frequent use of
tools allow you to become complacent and ignore
tool safety principles. A careless action can cause
severe injury within a fraction of a second.
4. Power tool use and care
a. Do not force the power tool. Use the correct power
tool for your application. The correct power tool will
do the job better and safer at the rate for which it was
designed.
b. Do not use the power tool if the switch does not
turn it on and off. Any power tool that cannot be
controlled with the switch is dangerous and must be
repaired.
c. Disconnect the plug from the power source and/
or remove the battery pack, if detachable from
the power tool before making any adjustments,
changing accessories, or storing power tools.
Such preventive safety measures reduce the risk of
starting the power tool accidentally.
d. Store idle power tools out of the reach of children
and do not allow persons unfamiliar with the
power tool or these instructions to operate the
power tool. Power tools are dangerous in the hands
of untrained users.
e. Maintain power tools and accessories. Check for
misalignment or binding of moving parts, breakage
of parts and any other condition that may affect the
power tools operation. If damaged, have the power
tool repaired before use. Many accidents are caused
by poorly maintained power tools.
f. Keep cutting tools sharp and clean. Properly
maintained cutting tools with sharp cutting edges are
less likely to bind and are easier to control.

5
(Original Instructions) ENGLISH
g. Use the power tool, accessories and tool bits etc. in
accordance with these instructions, taking into account
the working conditions and the work to be performed.
Use of the power tool for operations different from
those intended could result in a hazardous situation.
h. Keep handles and grasping surfaces dry, clean
and free from oil and grease. Slippery handles and
grasping surfaces do not allow for safe handling and
control of the tool in unexpected situations.
5. Battery tool use and care
a. Recharge only with the charger specified by the
manufacturer. A charger that is suitable for one type
of battery pack may create a risk of fire when used with
another battery pack.
b. Use power tools only with specifically designated
battery packs. Use of any other battery packs may
create a risk of injury and fire.
c. When battery pack is not in use, keep it away
from other metal objects, like paper clips, coins,
keys, nails, screws, or other small metal objects,
that can make a connection from one terminal to
another. Shorting the battery terminals together may
cause burns or a fire.
d. Under abusive conditions, liquid may be ejected
from the battery; avoid contact. If contact
accidentally occurs, flush with water. If liquid
contacts eyes, additionally seek medical help.
Liquid ejected from the battery may cause irritation or
burns.
6. Service
a. Have your power tool serviced by a qualified repair
person using only identical replacement parts.
This will ensure that the safety of the power tool is
maintained.
b. Never service damaged battery packs. Service
of battery packs should only be performed by the
manufacturer or authorized service providers.
ADDITIONAL POWER TOOL SAFETY WARNINGS
WARNING! Additional safety warnings for
drills/screwdrivers
• Wear ear protectors when impact drilling. Exposure
to noise can cause hearing loss.
• Use auxiliary handles supplied with the tool. Loss of
control can cause personal injury.
• Hold power tool by insulated gripping surfaces
when performing an operation where the cutting
accessory may contact hidden wiring. Cutting
accessory contacting a “live” wire may make exposed
metal parts of the power tool “live” and could give the
operator an electric shock.
• Hold power tool by insulated gripping surfaces,
when performing an operation where the fastener
may contact hidden wiring. Fasteners contacting a
“live” wire may make exposed metal parts of the power
tool “live” and could give the operator an electric shock.
• Use clamps or another practical way to secure and
support the workpiece to a stable platform. Holding
the work by hand or against your body leaves it unstable
and may lead to loss of control.
• Before drilling into walls, floors or ceilings, check for the
location of wiring and pipes.
• Avoid touching the tip of a drill bit just after drilling, as it
may be hot.
• The intended use is described in this instruction
manual. The use of any accessory or attachment or
performance of any operation with this tool other than
those recommended in this instruction manual may
present a risk of personal injury and/or damage to
property.
SAFETY OF OTHERS
• This tool is not intended for use by persons (including
children) with reduced physical, sensory or mental
capabilities, or lack of experience and knowledge,
unless they have been given supervision or instruction
concerning use of the tool by a person responsible for
their safety.
• Children should be supervised to ensure that they do
not play with the appliance.
RESIDUAL RISKS
Additional residual risks may arise when using the tool
which may not be included in the enclosed safety warnings.
These risks can arise from misuse, prolonged use etc.
Even with the application of the relevant safety regulations
and the implementation of safety devices, certain residual
risks can not be avoided. These include:
• Injuries caused by touching any rotating/moving parts.
• Injuries caused when changing any parts, blades or
accessories.
• Injuries caused by prolonged use of a tool. When using
any tool for prolonged periods ensure you take regular
breaks.
• Impairment of hearing.
• Health hazards caused by breathing dust developed
when using your tool (example:- working with wood,
especially oak, beech and MDF.)
ELECTRICAL SAFETY
The electric motor has been designed for one voltage only.
Always check that the battery pack voltage corresponds
to the voltage on the rating plate. Also make sure that the
voltage of your charger corresponds to that of your mains.
Your STANLEY charger is double insulated in
accordance with EN 60335; therefore no earth
wire is required.
• If the supply cord is damaged, it must be replaced by a
specially prepared cord available through the STANLEY
service organisation.
ADDITIONAL SAFETY INSTRUCTIONS FOR
BATTERIES AND CHARGERS
Save these instructions: This manual contains important
safety and operating instructions for SC122 battery charger.
• Before using charger, read all instructions and
cautionary markings on charger, battery pack, and
product using battery pack.
WARNING: Shock hazard. Do not allow any
liquid to get inside charger. Electric shock may
result.

6
ENGLISH (Original Instructions)
CAUTION: Burn hazard. To reduce the risk
of injury, charge only STANLEY rechargeable
batteries. Other types of batteries may burst
causing personal injury and damage.
CAUTION: Children should be supervised to
ensure that they do not play with the appliance.
NOTICE: Under certain conditions, with the charger plugged
in to the power supply, the charger can be shorted by foreign
material. Foreign materials of a conductive nature such as,
but not limited to, grinding dust, metal chips, steel wool,
aluminum foil, or any buildup of metallic particles should be
kept away from charger cavities. Always unplug the charger
from the power supply when there is no battery pack in the
cavity. Unplug charger before attempting to clean.
• DO NOT attempt to charge the battery pack with any
chargers other than the ones in this manual. The
charger and battery pack are specifically designed to
work together.
• These chargers are not intended for any uses other
than charging STANLEY rechargeable batteries. Any
other uses may result in risk of fire, electric shock or
electrocution.
• Do not expose charger to rain or snow.
• Pull by plug rather than cord when disconnecting
charger. This will reduce risk of damage to electric plug
and cord.
• Make sure that cord is located so that it will not be
stepped on, tripped over, or otherwise subjected to
damage or stress.
• Do not use an extension cord unless it is absolutely
necessary. Use of improper extension cord could result
in risk of fire, electric shock, or electrocution.
• Do not place any object on top of charger or place
the charger on a soft surface that might block the
ventilation slots and result in excessive internal
heat. Place the charger in a position away from any
heat source. The charger is ventilated through slots in
the top and the bottom of the housing.
• Do not operate charger with damaged cord or plug
— have them replaced immediately.
• Do not operate charger if it has received a sharp
blow, been dropped, or otherwise damaged in any
way. Take it to an authorised service centre.
• Do not disassemble charger; take it to an authorised
service centre when service or repair is required.
Incorrect reassembly may result in a risk of electric
shock, electrocution or fire.
• In case of damaged power supply cord the supply cord
must be replaced immediately by the manufacturer, its
service agent or similar qualified person to prevent any
hazard.
• Disconnect the charger from the outlet before
attempting any cleaning. This will reduce the risk
of electric shock. Removing the battery pack will not
reduce this risk.
• NEVER attempt to connect 2 chargers together.
• The charger is designed to operate on standard
household electrical power. Do not attempt to use
it on any other voltage. This does not apply to the
vehicular charger.
Charger
The SC122 charger accept 12V Max / 10.8V Li- Ion
batteries. The charger require no adjustment and are
designed to be as easy as possible to operate.
LABELS ON TOOL
The following symbols are shown on the tool along with the
date code:
WARNING! To reduce the risk of injury, the user
must read the instruction manual.
Always wear safety goggles
Always wear safety hearing protection
Position of date code
The Date Code, which also includes the year of manufacture,
is printed into the housing.
Example:
2017 XX JN
Year of manufacturing
PACKAGE CONTAINS
The package contains:
1 Hammer drill
1 Charger
2 Batteries (S2) or 1 Battery (S1)
1 Instruction manual
NOTE: Battery packs and chargers are not included with
N-models.
• Check for damage to the tool, parts or accessories
which may have occurred during transport.
• Take the time to thoroughly read and understand this
manual prior to operation.
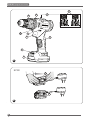
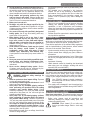
FEATURES (FIG. A)
This appliance includes some or all of the following features.
1. Variable speed trigger switch
2. Forward/reverse button
3. Torque adjustment collar
4. Gear shifter
5. Keyless chuck
6. Battery release button
7. Battery pack
8. LED work light
9. Function collar
ASSEMBLY
WARNING! Before assembly, remove the battery
from the tool.
Charging procedure (Fig. B)
• Plug the charger (10) into an appropriate outlet before
inserting battery pack.
• Insert the battery pack (7) into the charger. The charging
light will blink continuously indicating that the charging
process has started.

7
(Original Instructions) ENGLISH
• The completion of charge will be indicated by the
charging light remaining ON continuously. The pack is
fully charged and may be used at this time or left in the
charger.
NOTE: To ensure maximum performance and life of Li-Ion
batteries, charge the battery pack fully before first use.
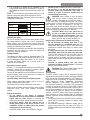
Charging process Refer the tables below for the state of
charge of the battery pack.
State of charge SC122
charging
green blink
fully charged
green light
hot/cold battery
damaged batter y
red blink
red flash
Hot/Cold pack delay
The SC122 charger have a hot/cold delay feature. When
the charger detects a battery that is hot, it automatically
delays charging until the battery has cooled. When the
charger detects a battery that is cold, it automatically delays
charging until the battery has warmed.
The red light will continue to blink and can’t start to charging
procedure. once the battery has cooled, the charger will
resume the charging procedure.
Damaged battery
The charger can detect a weak or damaged battery. The
red LED flashes in the pattern indicated on the label. If you
see this damaged battery blink pattern, do not continue
to charge the battery. Return it to a service center or a
collection site for recycling.
Electronic protection system
STANLEY Li-Ion batteries are designed with an Electronic
Protection System that will protect the battery against
overloading, overheating or deep discharge.
The tool will automatically turn off if the Electronic Protection
System engages. If this occurs, place the Li-Ion battery on
the charger until it is fully charged.
Important safety instructions for all battery packs
When ordering replacement battery packs, be sure to
include catalog number and voltage.
The battery pack is not fully charged out of the carton.
Before using the battery pack and charger, read the safety
instructions below. Then follow charging procedures
outlined.
Read all instructions
• Do not charge or use battery in explosive
atmospheres, such as in the presence of flammable
liquids, gases or dust. Inserting or removing the
battery from the charger may ignite the dust or fumes.
• Never force battery pack into charger. Do not
modify battery pack in any way to fit into a non-
compatible charger as battery pack may rupture
causing serious personal injury.
• Charge the battery packs only in STANLEY chargers.
• DO NOT splash or immerse in water or other liquids.
• Do not store or use the tool and battery pack in
locations where the temperature may reach or
exceed 40 ˚C (105 ˚F) (such as outside sheds or
metal buildings in summer).
WARNING: Never attempt to open the battery
pack for any reason. If battery pack case is
cracked or damaged, do not insert into charger.
Do not crush, drop or damage battery pack. Do not use
a battery pack or charger that has received a sharp blow,
been dropped, run over or damaged in any way (i.e.,
pierced with a nail, hit with a hammer, stepped on). Electric
shock or electrocution may result. Damaged battery packs
should be returned to service centre for recycling.
CAUTION: When not in use, place tool on
its side on a stable surface where it will not
cause a tripping or falling hazard. Some tools
with large battery packs will stand upright on the
battery pack but may be easily knocked over.
Specific safety instructions for lithium ion (LI-Ion)
• Do not incinerate the battery pack even if it is
severely damaged or is completely worn out. The
battery pack can explode in a fire. Toxic fumes and
materials are created when lithium ion battery packs
are burned.
• If battery contents come into contact with the skin,
immediately wash area with mild soap and water.
If battery liquid gets into the eye, rinse water over the
open eye for 15 minutes or until irritation ceases. If
medical attention is needed, the battery electrolyte is
composed of a mixture of liquid organic carbonates and
lithium salts.
• Contents of opened battery cells may cause
respiratory irritation. Provide fresh air. If symptoms
persists, seek medical attention.
WARNING: Burn hazard. Battery liquid may be
flammable if exposed to spark or flame.
Transportation
STANLEY batteries comply with all applicable shipping
regulations as prescribed by industry and legal standards
which include UN Recommendations on the Transport of
Dangerous Goods; International Air Transport Association
(IATA) Dangerous Goods Regulations, International
Maritime Dangerous Goods (IMDG) Regulations, and
the European Agreement Concerning The International
Carriage of Dangerous Goods by Road (ADR). Lithium-
ion cells and batteries have been tested to section 38.3 of
the UN Recommendations on the Transport of Dangerous
Goods Manual of Tests and Criteria. In most instances,
shipping a STANLEY battery pack will be excepted from
being classified as a fully regulated Class 9 Hazardous
material. In general, the two instances that require shipping
Class 9 are:
1. Air shipping more than two STANLEY lithium-ion battery
packs when the package contains only battery packs
(no tools), and
2. Any shipment containing a lithium-ion battery with an
energy rating greater than 100 watt hours (Wh). All
lithiumion batteries have the watt hour rating marked on
the pack.

8
ENGLISH (Original Instructions)
Regardless of whether a shipment is considered excepted
or fully regulated, it is the shipper’s responsibility to consult
the latest regulations for packaging, labeling/marking and
documentation requirements.
Transporting batteries can possibly cause fire if the battery
terminals inadvertently come in contact with conductive
materials. When transporting batteries, make sure that
the battery terminals are protected and well insulated from
materials that could contact them and cause a short circuit.
The information provided in this section of the manual is
provided in good faith and believed to be accurate at the
time the document was created. However, no warranty,
expressed or implied, is given. It is the buyer’s responsibility
to ensure that its activities comply with the applicable
regulations.
Battery pack
Battery type
The SC122 operates on a 12V Max as well as 10.8V battery
packs.
Storage recommendations
1. The best storage place is one that is cool and dry
away from direct sunlight and excess heat or cold. For
optimum battery performance and life, store battery
packs at room temperature when not in use.
2. For long storage, it is recommended to store a fully
charged battery pack in a cool, dry place out of the
charger for optimal results.
NOTE: Battery packs should not be stored completely
depleted of charge. The battery pack will need to be
recharged before use.
Labels on charger and battery pack
In addition to the pictographs used in this manual, the labels
on the charger and the battery pack may show the following
pictographs:
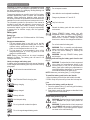
Read instruction manual before use.
See Technical Data for charging time.
Battery charging.
Battery charged.
Battery defective.
Hot/cold pack delay.
Do not probe with conductive objects.
Do not charge damaged battery packs.
Do not expose to water.
Have defective cords replaced immediately.
Charge only between 4 ˚C and 40 ˚C.
Only for indoor use.
Discard the battery pack with due care for the
environment.
Charge STANLEY battery packs only with
designated STANLEY chargers. Charging battery
packs other than the designated STANLEY
batteries with a STANLEY charger may make
them burst or lead to other dangerous situations.
Do not incinerate the battery pack.
WARNING: Prior to assembly and adjustment,
always remove the battery pack. Always switch
off the tool before inserting or removing the
battery pack.
WARNING: Use only STANLEY battery packs
and chargers.
Inserting and removing the battery pack from the tool
(Fig C)
WARNING: To reduce the risk of serious personal
injury, place the forward/reverse button in the
lock-off position or turn tool off and disconnect
battery pack before making any adjustments or
removing/installing attachments or accessories.
An accidental start-up can cause injury.
NOTE: Make sure your battery pack (7) is fully charged.
To install the battery pack into the tool handle
1. Align the battery pack with the rails inside the handle.
2. Slide it firmly into place until you hear the lock snap into
place.
To remove the battery pack from the tool
1. Press the release button (5) and firmly pull the battery
pack out of the tool handle.
2. Insert battery pack into the charger as described in the
charger section of this manual.
USE
Proper hand position (Fig A, H)
WARNING: To reduce the risk of serious personal
injury, ALWAYS use proper hand position as
shown.
WARNING: To reduce the risk of serious personal
injury, ALWAYS hold securely in anticipation of a
sudden reaction. Proper hand position requires
one hand on the main handle (9).

9
(Original Instructions) ENGLISH
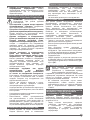
Selecting the direction of rotation (Fig D)
For tightening, use forward (clockwise) rotation. For
loosening, use reverse (counterclockwise) rotation.
• To select forward rotation, push the forward/reverse
slider (2) to the left.
• To select reverse rotation, push the forward/reverse
slider to the right.
• To lock the tool, set the forward/reverse slider into the
centre position.
• When changing the position of the control button, be
sure the trigger is released.
Variable speed trigger switch (Fig A)
To turn the tool on, squeeze the trigger switch (1). To turn
the tool off, release the trigger switch. Your tool is equipped
with a brake. The chuck will stop when the trigger switch is
fully released.
The variable speed switch enables you to select the best
speed for a particular application. The further you squeeze
the trigger, the faster the tool will operate. For maximum tool
life, use variable speed only for starting holes or fasteners
NOTE: Continuous use in variable speed range is not
recommended. It may damage the switch and should be
avoided.
Torque adjustment collar (Fig. A,D)
The torque adjustment collar (3) is clearly marked with
numbers and a drill bit symbol.The collar should be rotated
until the desired setting is located at the top of the tool.
Locators are provided in the collar to eliminate the guess
work when selecting fastening torque.
The higher the number on the collar, the higher the torque
and the larger the fastener which can be driven. To lock the
clutch for drilling operations, move to the drill bit position.
NOTE: When using the drill/driver for drilling holes, be sure
that the torque adjusting collar is set so the figure of the drill
is aligned with the center line on the top ofthe tool. Failure
to do this will allow the clutch to slip while attempting to drill.
Gear shifter (Fig A, D)
The dual range feature of your driver/drill allows you to shift
gears for greater versatility.
To select the low speed, high torque setting, turn the tool
off and permit to stop. Slide the gear shifter (4) forward
(towards the chuck). To select the high speed, low torque
setting, turn the tool off and permit to stop. Slide the gear
shifter back (away from chuck).
NOTE: Do not change gears when the tool is running. If you
are having trouble changing gears, make sure that the dual
range gear shifter is either completely pushed forward or
completely pushed back.
LED work light
The LED work light (8) is located under the the torque
adjustment collar (3) and is activated automatically when
the trigger is depressed. The LED work light will illuminate
when the trigger is partially depressed, before the unit
begins running.
NOTE: The LED worklight is for lighting the immediate work
surface and is not intended to be used as a flashlight.
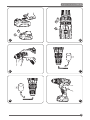
Keyless chuck (Fig E)
Your tool features a keyless chuck with one rotating sleeve
for one-handed operation of the chuck. To insert a drill bit or
other accessory, follow these steps.
1. Lock the trigger in the OFF position as previously
described.
2. Grasp the black sleeve of the chuck with one hand and
use the other hand to secure the tool. Rotate the sleeve
counterclockwise far enough to accept the desired
accessory.
3. Insert the accessory about 19 mm (3/4”) into the chuck
and tighten securely by rotating the chuck sleeve
clockwise with one hand while holding the tool with the
other. Your tool is equipped with an automatic spindle
lock mechanism. This allows you to open and close the
chuck with one hand.
4. To release the accessory, repeat step 2 above.
WARNING: Do not attempt to tighten drill bits (or
any other accessory) by gripping the front part of
the chuck and turning the tool on. Damage to the
chuck and personal injury may result. Always lock
off trigger switch when changing acces sories.
Be sure to tighten chuck with one hand on the chuck sleeve
and one hand holding the tool for maximum tightness.
Chuck removal (Fig F)
Turn the adjustment collar to the “drill” position and gear
shifter to position 1 (low speed). Tighten the chuck around
the shorter end of a hex key (not supplied) of 6.35 mm (1/4”)
or greater size. Using a wooden mallet or similar object,
strike the longer end in the clockwise direction, as shown.
This will loosen the screw inside the chuck.
Open chuck jaws fully, insert screwdriver (or Torx tool if
required) into front of chuck between jaws to engage screw
head. Remove screw by turning clockwise (left-hand-
thread). Place hex key in chuck and tighten, as shown in
Figure F. Using a wooden mallet or similar object, strike key
sharply in the counterclockwise direction. This will loosen
the chuck so that it can be unscrewed by hand.
Chuck installation (Fig G)
Screw the chuck on by hand as far as it will go and insert
screw (left-hand thread). Tighten screw securely. Tighten the
chuck around the shorter end of a 6.35 mm (1/4”) or larger
hex key (not supplied) strike the longer end in the clockwise
direction with a wooden mallet, as shown. Tighten the screw
once again by turning in a counterclockwise direction.
Drill operation
WARNING: To reduce the risk of serious personal
injury, turn tool off and disconnect tool from
power source before making any adjustments or
removing/installing attachments or accessories.
WARNING: To reduce the risk of personal
injury, ALWAYS ensure workpiece is anchored
or clamped firmly. If drilling thin material, use a
wood “back-up” block to prevent damage to the
material.
Turn the collar to the drill bit symbol for drilling. Select the
desired speed/torque range using the gear shifter to match
the speed and torque to the planned operation.
1 Use sharp drill bits only. For WOOD, use twist drill bits,
spade bits, or hole saws. For METAL, use high-speed
steel (HHS) twist drill bits or hole saws.

10
ENGLISH (Original Instructions)
2 Always apply pressure in a straight line with the bit. Use
enough pressure to keep drill biting, but do not push
hard enough to stall the motor or deflect the bit.
3 Hold tool firmly with both hands to control the twisting
action of the drill.
WARNING: The drill may stall if overloaded
causing a sudden twist. Always expect the stall.
Grip the drill firmly with both hands to control the
twisting action and avoid injury.
4 IF DRILL STALLS, it is usually because it is being
overloaded or improperly used. RELEASE TRIGGER
IMMEDIATELY, remove drill bit from work, and
determine cause of stalling. DO NOT CLICK TRIGGER
ON AND OFF IN AN ATTEMPT TO START A STALLED
DRILL — THIS CAN DAMAGE THE DRILL.
5 To minimize stalling or breaking through the material,
reduce pressure on drill and ease the bit through the
last fractional part of the hole.
6 Keep the motor running when pulling the bit back out of
a drilled hole. This will help prevent jamming.
7 With variable speed drills there is no need to center
punch the point to be drilled. Use a slow speed to start
the hole and accelerate by squeezing the trigger harder
when the hole is deep enough to drill without the bit
skipping out.
Hammer drill operation (Fig. D)
1. Turn the collar (9) to the hammer drill symbol.
2. Select the high speed setting by sliding the selector
forward (towards the chuck). Important: Use carbide
tipped or masonry bits only.
3. Drill with just enough force on the hammer to keep it from
bouncing excessively or “rising” off the bit. Too much
force will cause slower drilling speeds, overheating and
lower drilling rate.
4. Drill straight, keeping the bit at a right angle to the work.
Do not exert side pressure on the bit when drilling as
this will cause clogging of the bit flutes and a slower
drilling speed.
5. When drilling deep holes, if the hammer speed starts to
drop off, pull the bit partially out of the hole with tool still
running to help clear debris from the hole.
NOTE: A smooth, even flow of dust from the hole indicates
proper drilling rate.
Operation as a screwdriver
Select the desired speed/torque range using the dual range
gear shifter on the top of tool to match the speed and
torque to the planned operation. Insert the desired fastener
accessory into the chuck as you would any drill bit. Make a
few practice runs in scrap or unseen areas to determine the
proper position of the clutch collar.
Maximum recommended capacities
Low Range–1 Low Range–2
Bits, Metal,
Drilling
6.00 mm 3.00 mm
Wood, Flat,
Boring
19.00 mm 12.00 mm
Hole Saws 19.00 mm 16.00 mm
Brickwork 6.00mm
MAINTENANCE
Your STANLEY power tool has been designed to operate
over a long period of time with a minimum of maintenance.
Continuous satisfactory operation depends upon proper
tool care and regular cleaning.
WARNING: To reduce the risk of serious personal
injury, place the forward/reverse button in the
lockoff position or turn tool off and disconnect
battery pack before making any adjustments or
removing/installing attachments or accessories. An accidental
start-up can cause injury. he charger and battery pack are not
serviceable. There are no serviceable parts inside.
Lubrication
Your power tool requires no additional lubrication.
Cleaning
WARNING: Blow dirt and dust out of the main
housing with dry air as often as dirt is seen
collecting in and around the air vents. Wear
approved eye protection and approved dust
mask when performing this procedure.
WARNING: Never use solvents or other harsh
chemicals for cleaning the non-metallic parts
of the tool. These chemicals may weaken the
materials used in these parts. Use a cloth
dampened only with water and mild soap. Never
let any liquid get inside the tool; never immerse
any part of the tool into a liquid.
Charger cleaning instructions
WARNING: Shock hazard. Disconnect the
charger from the AC outlet before cleaning. Dirt
and grease may be removed from the exterior
of the charger using a cloth or soft non-metallic
brush. Do not use water or any cleaning solutions.
Optional accessories
WARNING! Since accessories, other than those
offered by STANLEY have not been tested
with this product, use of such accessories with
this tool could be hazardous. To reduce the
risk of injury, only STANLEY recommended
accessories should be used with this product.
Consult your dealer for further information on the
appropriate accessories.

11
(Original Instructions) ENGLISH
PROTECTING THE ENVIRONMENT
Separate collection. This product must not be
disposed of with normal household waste.
Should you find one day that your STANLEY product
needs replacement, or if it is of no further use to you, do
not dispose of it with household waste. Make this product
available for separate collection.
STANLEY provides a facility for the collection
and recycling of STANLEY products once they
have reached the end of their working life. To
take advantage of this service please return your
product to any authorised repair agent who will
collect them on our behalf.
You can check the location of your nearest authorised
repair agent by contacting your local STANLEY office at
the address indicated in this manual. Alternatively, a list
of authorised STANLEY repair agents and full details of
our after-sales service and contacts are available on the
Internet at: www.2helpU.com.
Batteries
STANLEY batteries can be recharged many
times. At the end of their useful life, discard
batteries with due care for our environment:
• Run the battery down completely, then remove it from
the tool.
• NiCd, NiMH and Li-Ion batteries are recyclable. Take
them to any authorized repair agent or a local recycling
station.
NOTES
STANLEY’s policy is one of continuous improvement to
our products and as such, we reserve the right to change
product specifications without prior notice. Standard
equipment and accessories may vary by country. Product
specifications may differ by country. Complete product
range may not be available in all countries. Contact your
local STANLEY dealers for range availability
SERVICE INFORMATION
STANLEY offers a full network of company-owned and
authorized service locations. All STANLEY Service Centers
are staffed with trained personnel to provide customers with
efficient and reliable power tool service. For more information
about our authorized service centers and if you need technical
advice, repair, or genuine factory replacement parts, contact
the STANLEY location nearest you.
TECHNICAL DATA
HAMMER DRILL SCH121
Voltage V
DC
12V Max
No-load speed min
-1
0-400/0-1500
Impact rate min
-1
0-6000/0-22500
Max torque Nm 26
Chuck capacity mm 10
Maximum drilling capacity:
Wood mm 20
Metal mm 10
Concrete mm 8
Charger SC122
Input voltage V
AC
220-240
Output voltage V
DC
12
Output Current (DC) A 1.25
Approx. charge time Mins 70(1.5Ah)
Battery SB12S
Voltage
V
DC
12
Capacity Ah 1.5
Type Li-Ion
Level of sound pressure according to EN 60745:
Sound pressure (L
pA
) dB(A) 82
Sound pressure uncertainty (K
pA
) dB(A) 3
Sound power (L
WA
) dB(A) 93
Sound power uncertainty (K
WA
) dB(A) 3
Vibration Total Values ah (Triax Vector Sum)
(a
h
)S m/s
2
0.5
Uncertainty (K) m/s
2
1.5
(a
h
)D m/s
2
1.0
Uncertainty (K) m/s
2
1.5
(a
h
)ID m/s
2
11.7
Uncertainty (K) m/s
2
1.5

12
ENGLISH (Original Instructions)
VIBRATION
The declared vibration emission values stated in the
technical data and the declaration of conformity have been
measured in accordance with a standard test method
provided by EN 60745 and may be used for comparing one
tool with another. The declared vibration emission value
may also be used in a preliminary assessment of exposure.
WARNING! The vibration emission value during
actual use of the power tool can differ from the
declared value depending on the ways in which
the tool is used. The vibration level may increase
above the level stated.
When assessing vibration exposure to determine safety
measures required by 2002/44/EC to protect persons
regularly using power tools in employment, an estimation of
vibration exposure should consider, the actual conditions of
use and the way the tool is used, including taking account
of all parts of the operating cycle such as the times when
the tool is switched off and when it is running idle in addition
to the trigger time.
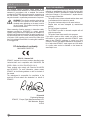
EC declaration of conformity
MACHINERY DIRECTIVE
SCH121 - Hammer Drill
STANLEY declares that these products described under
“technical data” are in compliance with: 2006/42/EC, EN
60745-1:2009 + A11:2010, EN 60745-2-1:2010.
These products also comply with Directive 2014/30/EU
and 2011/65/EU. For more information, please contact
STANLEY at the following address or refer to the back of
the manual.
The undersigned is responsible for compilation of the
technical file and makes this declaration on behalf of
STANLEY.
R.Laverick
Engineering Manager
STANLEY , Europe, Egide Walschaertsstraat14-18,
2800 Mechelen, Belgium
01.2016
TWO YEAR WARRANTY
If your STANLEY product becomes defective due to faulty
materials or workmanship within 24 months from the date
of purchase, STANLEY guarantees to replace all defective
parts free of charge or – at our discretion – replace the unit
free of charge provided that:
• The product has not been misused and has been used
in accordance with the instruction manual;
• The product has been subject to fair wear and tear;
• Repairs have not been attempted by unauthorized
persons;
• Proof of purchase is produced.
• The STANLEY product is returned complete with all
original components
• The product hasn’t been used for hire purposes
If you wish to make a claim, contact your seller or check
the location of your nearest authorised STANLEY repair
agent in the STANLEY catalogue or contact your local
STANLEY office at the address indicated in this manual. A
list of authorised STANLEY repair agents and full details
of our after sales service is available on the internet at:
www.2helpU.com

13
(Перевод с оригинала инструкции) РУССКИЙ
Ваш перфоратор STANLEY SCH121 12 В Li-Ion
предназначен для выполнения операций в лёгком
режиме по сверлению и заворачиванию. Данный
инструмент предназначен для профессионального
использования.
!
,
, ,
,
. Несоблюдение всех
перечисленных ниже инструкций может
привести к поражению электрическим
током, возникновению пожара и/или
получению серьёзной травмы.
. Термин «Электроинструмент»
во всех приведённых ниже указаниях относится к
вашему сетевому (с кабелем) электроинструменту
или аккумуляторному (беспроводному)
электроинструменту.
1.
a.
. Плохое
освещение или беспорядок на рабочем месте
может привести к несчастному случаю.
b. ,
,
,
, . В процессе
работы электроинструменты создают искровые
разряды, которые могут воспламенить пыль или
горючие пары.
c.
. Отвлечение внимания может вызвать у Вас
потерю контроля над рабочим процессом.
2.
a.
.
Ни в коем случае не видоизменяйте вилку
электрического кабеля. Не используйте
соединительные штепсели-переходники,
если в силовом кабеле электроинструмента
есть провод заземления. Использование
оригинальной вилки кабеля и соответствующей
ей штепсельной розетки уменьшает риск
поражения электрическим током.
b.
,
, ,
. Риск поражения
электрическим током увеличивается, если Ваше тело
заземлено.
c.
. Попадание
воды в электроинструмент увеличивает риск
поражения электрическим током.
d.
. Ни в коем случае не используйте
кабель для переноски электроинструмента или
для вытягивания его вилки из штепсельной
розетки. Не подвергайте электрический кабель
воздействию высоких температур и смазочных
веществ; держите его в стороне от острых кромок
и движущихся частей электроинструмента.
Повреждённый или запутанный кабель
увеличивает риск поражения электрическим
током.
e.
,
. Использование кабеля,
пригодного для работы на открытом воздухе,
снижает риск поражения электрическим током.
f.
,
(). Использование УЗО снижает
риск поражения электрическим током.
3.
a.
, ,
,
. Не используйте электроинструмент,
если Вы устали, а также находясь под
действием алкоголя или понижающих реакцию
лекарственных препаратов и других средств.
Малейшая неосторожность при работе с
электроинструментами может привести к
серьёзной травме.
b.
.
. Своевременное
использование защитного снаряжения, а
именно: пылезащитной маски, ботинок на
нескользящей подошве, защитного шлема или
противошумовых наушников, значительно
снизит риск получения травмы.
c. .
Перед тем, как подключить электроинструмент к
сети и/или аккумулятору, поднять или перенести
его, убедитесь, что выключатель находится
в положении «выключено». Не переносите
электроинструмент с нажатым курковым
выключателем и не подключайте к сетевой
розетке электроинструмент, выключатель
которого установлен в положение «включено»,
это может привести к несчастному случаю.
d.
. Регулировочный или
гаечный ключ, оставленный закреплённым на
вращающейся части электроинструмента, может
стать причиной получения тяжёлой травмы.

14
РУССКИЙ (Перевод с оригинала инструкции)
e. .
, . Это
позволит Вам не потерять контроль при работе
электроинструментом в непредвиденной
ситуации.
f. .
. Следите за тем,
чтобы Ваши волосы или одежда находились в
постоянном отдалении от движущихся частей
инструмента. Свободная одежда, украшения или
длинные волосы могут попасть в движущиеся
части инструмента.
g.
,
,
. Использование устройства
пылеудаления значительно снижает риск
возникновения несчастного случая, связанного
с запылённостью рабочего пространства.
h.
,
. Неосторожность и
невнимательность при работе могут привести к
тяжёлым травмам за доли секунды.
4.
a. .
Используйте Ваш инструмент по назначению.
Электроинструмент работает надёжно и
безопасно только при соблюдении параметров,
указанных в его технических характеристиках.
b. , если его
выключатель не устанавливается в положение
включения или выключения. Электроинструмент
с неисправным выключателем представляет
опасность и подлежит ремонту.
c.
/
( ) ,
. Такие меры
предосторожности снижают риск случайного
включения электроинструмента.
d.
,
,
. Электроинструменты
представляют опасность в руках неопытных
пользователей.
e.
. Проверяйте точность
совмещения и легкость перемещения
подвижных частей, целостность деталей и
любых других элементов электроинструмента,
воздействующих на его работу. Не используйте
неисправный электроинструмент, пока он не
будет полностью отремонтирован. Большинство
несчастных случаев являются следствием
недостаточного технического ухода за
электроинструментом.
f.
. Принадлежности
с острыми кромками позволяют избежать
заклинивания и делают работу менее
утомительной.
g. ,
. Использование электроинструмента
не по назначению может создать опасную
ситуацию.
h. ,
,
. Скользкие рукоятки и поверхности
захвата не обеспечивают безопасное обращение
и управление инструментом в неожиданных
ситуациях.
5.
a.
,
. Зарядное устройство,
которое подходит к одному типу аккумуляторов,
может создать риск возгорания в случае его
использования с аккумуляторами другого типа.
b.
. Использование
аккумулятора какой-либо другой марки может
привести к возникновению пожара и получению
травмы.
c.
,
, , , ,
,
,
. Короткое замыкание
контактов аккумулятора может привести к
получению ожогов или возникновению пожара.
d.
();
.
, .
,
. Жидкость, вытекшая
из аккумулятора, может вызвать раздражение
или ожоги.
6.
a.
. Это обеспечит безопасность
вашего электроинструмента в дальнейшей
эксплуатации.

15
(Перевод с оригинала инструкции) РУССКИЙ
b.
. Ремонт
аккумуляторов должен производиться только
производителем или в авторизованном
сервисном центре.
! Дополнительные правила
безопасности при работе дрелями/
винтовёртами
•
. Воздействие
шума может привести к потере слуха.
•
, .
Потеря контроля над инструментом может
привести к получению тяжёлой травмы.
•
,
. Контакт
насадки с находящимся под напряжением
проводом делает не покрытые изоляцией
металлические части электроинструмента также
«живыми», что создаёт опасность поражения
оператора электрическим током.
•
,
.
Контакт крепёжного элемента с находящимся
под напряжением проводом делает не
покрытые изоляцией металлические части
электроинструмента также «живыми», что
создаёт опасность поражения оператора
электрическим током.
•
,
.
Если держать обрабатываемую деталь руками
или с упором в собственное тело, то можно
потерять контроль над инструментом или
обрабатываемой деталью.
• Прежде чем сверлить отверстия в стенах,
полах или потолках, проверьте наличие
электропроводки и трубопроводов.
• Не дотрагивайтесь до наконечника сверла сразу
же после окончания сверления, так как он может
быть горячим.
• Назначение инструмента описывается в данном
руководстве по эксплуатации.
• Использование любых принадлежностей
или приспособлений, а также выполнение
данным инструментом любых видов работ, не
рекомендованных данным руководством по
эксплуатации, может привести к несчастному
случаю и/или повреждению личного имущества.
•
Данное изделие не может использоваться
людьми (включая детей) со сниженными
физическими, сенсорными и умственными
способностями или при отсутствии
необходимого опыта или навыка, за
исключением, если они выполняют работу
под присмотром лица, отвечающего за их
безопасность.
•
Не позволяйте детям играть с инструментом.
При работе данным инструментом возможно
возникновение дополнительных остаточных
рисков, которые не вошли в описанные здесь
правила техники безопасности. Эти риски
могут возникнуть при неправильном или
продолжительном использовании изделия и т.п.
Несмотря на соблюдение соответствующих
инструкций по технике безопасности и
использование предохранительных устройств,
некоторые остаточные риски невозможно
полностью исключить. К ним относятся:
•
Травмы в результате касания вращающихся/
двигающихся частей инструмента.
•
Риск получения травмы во время смены деталей
или насадок.
•
Риск получения травмы, связанный с
продолжительным использованием
инструмента. При использовании инструмента
в течение продолжительного периода времени
делайте регулярные перерывы в работе.
•
Ухудшение слуха.
•
Ущерб здоровью в результате вдыхания пыли
в процессе работы с инструментом (например,
при обработке древесины, в особенности, дуба,
бука и ДВП).
Ваше зарядное устройство защищено
двойной изоляцией, что исключает
потребность в заземляющем проводе.
Всегда проверяйте, соответствует ли
напряжение, указанное на табличке с техническими
параметрами, напряжению электросети. Ни в коем
случае не пытайтесь заменить зарядный блок
стандартным сетевым штепселем.
•
Во избежание несчастного случая замена
повреждённого кабеля питания должна
производиться только на заводе-изготовителе
или в авторизованном сервисном центре
STANLEY.
:
Данное
руководство содержит важные инструкции по
эксплуатации и технике безопасности для зарядного
устройства SC122.
• Перед началом эксплуатации зарядного
устройства прочитайте все инструкции
и ознакомьтесь с предупредительными
символами на зарядном устройстве,
аккумуляторе и продукте, работающем от
аккумулятора.

16
РУССКИЙ (Перевод с оригинала инструкции)
: Опасность поражения
электрическим током. Не допускайте
попадания жидкости внутрь зарядного
устройства. Это может привести к
поражению электрическим током.
: Опасность
получения ожога. Для снижения риска
получения травмы, заряжайте только
перезаряжаемые аккумуляторы марки
STANLEY. Аккумуляторы других марок могут
взорваться, что приведёт к получению
травмы или повреждению зарядного
устройства.
: Не позволяйте детям
играть с устройством.
: В определенных условиях,
когда зарядное устройство подключено к
электросети, оно может быть закорочено
посторонним материалом. Не допускайте
попадания токопроводящих материалов, таких
как шлифовальная пыль, металлическая стружка,
стальная проволока, алюминиевая фольга или
любое скопление металлических частиц, в гнезда
зарядного устройства. Всегда отключайте зарядное
устройство от электросети, если в его гнезде нет
аккумулятора. Отключайте зарядное устройство от
электросети перед чисткой.
•
,
. Зарядное
устройство и аккумулятор специально
разработаны для совместного использования.
•
, STANLEY. Любое
иное использование может привести к
риску возникновения пожара, поражения
электрическим током или смерти от
электрического тока.
•
!
•
, ,
! Это снизит риск
повреждения электрической вилки и кабеля.
•
,
,
,
!
•
!
Использование несоответствующего
удлинительного кабеля может создать
риск возникновения пожара, поражения
электрическим током или смерти от
электрического тока.
•
-
,
! Располагайте зарядное устройство
вдали от источника тепла. Вентиляция зарядного
устройства происходит через прорези,
расположенные в верхней и нижней части его
корпуса.
•
,
–
сразу же заменяйте повреждённые детали.
•
,
! Отнесите его в
авторизованный сервисный центр.
•
;
. Неправильная сборка может
привести к риску поражения электрическим
током или смерти от электрического тока.
•
В случае повреждения электрического
кабеля для предотвращения получения
травмы он должен быть немедленно заменён
производителем, его сервисным агентом или
другим квалифицированным специалистом.
•
.
. Извлечение аккумулятора из зарядного
устройства не приводит к снижению этого риска.
•
2
!
•
.
. Данное указание
не относится к автомобильному зарядному
устройству.
Зарядное устройство SC122 заряжает Li-Ion
аккумуляторы напряжением 12 В макс./10,8
В. Данное зарядное устройство не требует
регулировки и является наиболее простым в
эксплуатации.
Помимо кода даты на инструменте имеются
следующие знаки:
! Полное ознакомление с
руководством по эксплуатации снизит риск
получения травмы.
Всегда работайте в защитных очках.
Всегда используйте устройства для защиты
органов слуха.
Код даты, который также включает в себя год
изготовления, отштампован на поверхности корпуса
инструмента.
Пример:
2017 XX JN
Год изготовления

17
(Перевод с оригинала инструкции) РУССКИЙ
:
В упаковку входят:
1 Перфоратор
1 Зарядное устройство
2 Аккумулятора (С2) или 1 аккумулятор (С1)
1 Руководство по эксплуатации
•
Проверьте инструмент, детали и
дополнительные приспособления на наличие
повреждений, которые могли произойти во
время транспортировки.
• Перед началом работы необходимо
внимательно прочитать настоящее руководство
и принять к сведению содержащуюся в нем
информацию.
(. )
Ваш инструмент может содержать все или некоторые
из перечисленных ниже составных частей:
1. Курковый пусковой выключатель
2. Переключатель направления вращения
(реверса)
3. Муфта установки крутящего момента
4. Переключатель скоростей
5. Быстрозажимной патрон
6. Отпирающая кнопка аккумулятора
7. Аккумулятор
8. Светодиодная подсветка
9. Муфта
! Перед установкой извлеките
из инструмента аккумулятор.
(. )
•
Перед тем как вставить аккумулятор,
подключите вилку зарядного устройства (9) к
соответствующей сетевой розетке.
•
Вставьте аккумулятор (6) в зарядное
устройство. Красный индикатор (зарядки)
начнёт непрерывно мигать, указывая на начало
процесса зарядки.
•
После завершения зарядки красный индикатор
переходит в режим непрерывного свечения.
Аккумулятор полностью заряжен, и его можно
использовать с инструментом или оставить в
зарядном устройстве.
: Для достижения максимальной
производительности и продления срока службы Li-
Ion аккумуляторов, перед первым использованием
полностью зарядите аккумулятор. Состояние
заряда аккумулятора смотрите в приведённой ниже
таблице:
Состояние заряда аккумулятора смотрите в
приведённой ниже таблице:
Состояние заряда SC122
зарядка
мигает зелёный
индикатор
полностью
заряжен
горит зелёный
индикатор
холодный/горячий
аккумулятор
повреждённый
аккумулятор
мигает красный
индикатор
быстро мигает
красный индикатор
/
Зарядное устройство SC122 имеет функцию паузы
для согревания/охлаждения аккумулятора: Если
зарядное устройство определит, что аккумулятор
чрезмерно перегрет, оно автоматически
остановит зарядку, пока аккумулятор не
охладится. Если зарядное устройство определит,
что аккумулятор чрезмерно охлаждён, оно
автоматически остановит зарядку, пока
аккумулятор не согреется. Красный индикатор
продолжит мигать, и процедура зарядки не
будет возобновлена. Как только аккумулятор
охладится, зарядное устройство продолжит
процесс зарядки аккумулятора.
Зарядное устройство способно обнаружить
протечку или наличие неисправности
аккумулятора. В том случае красный светодиод
начнёт мигать по схеме, обозначенной на
этикетке. Если вы видите такое мигание,
оповещающее о неисправности аккумулятора,
остановите зарядку аккумулятора. Верните
аккумулятор в авторизованный сервисный центр
или сдайте в приёмный пункт на переработку.
Аккумуляторы Li-Ion спроектированы по
Электронной Защитной Системе, которая защищает
аккумулятор от перегрузки, перегрева или глубокой
разрядки.
При срабатывании Электронной Защитной Системы
инструмент автоматически отключится. Если это
произошло, поместите Li-Ion аккумулятор в зарядное
устройство до его полной зарядки.
При заказе аккумуляторов для замены, не забывайте
указывать их номер по каталогу и напряжение.
Извлечённый из упаковки аккумулятор заряжен не
полностью.
Перед началом эксплуатации аккумулятора и
зарядного устройства, прочтите нижеследующие
инструкции по безопасности. Затем приступайте к
установленной процедуре зарядки.
•
, ,
, . При установке

18
РУССКИЙ (Перевод с оригинала инструкции)
или извлечении аккумулятора из зарядного
устройства пыль или газы могут воспламениться.
•
.
–
,
.
•
Заряжайте аккумуляторы только зарядными
устройствами STANLEY.
•
и не погружайте в воду или
другие жидкости.
•
,
40° (,
).
: Ни в коем случае не пытайтесь
разобрать аккумулятор. Не вставляйте
в зарядное устройство аккумулятор с
треснувшим или повреждённым корпусом.
Не разбивайте, не бросайте и не ломайте
аккумулятор. Не используйте аккумуляторы или
зарядные устройства, которые подверглись
воздействию резкого удара, удара при падении,
попали под тяжёлый предмет или были повреждены
каким-либо другим образом (например, проткнуты
гвоздём, попали под удар молотка или под ноги). Это
может привести к поражению электрическим током
или смерти от электрического тока. Повреждённые
аккумуляторы должны возвращаться в сервисный
центр на переработку.
: Кладите не
используемый инструмент набок на
устойчивую поверхность в месте, в котором
он не создаёт опасность, что об него
могут споткнуться и упасть. Некоторые
инструменты с аккумуляторами больших
размеров ставятся на аккумулятор в
вертикальном положении, но их легко
опрокинуть.
- (Li-Ion)
•
Не сжигайте аккумулятор, даже если он
сильно повреждён или полностью изношен.
Аккумулятор в огне может взорваться. При
горении ионно-литиевых аккумуляторов
выделяются токсичные пары и частицы.
•
Если содержимое аккумулятора попало на кожу,
немедленно промойте поражённый участок
водой с мягким мылом. Если аккумуляторная
жидкость попала в глаз, промывайте открытый
глаз в течение 15 минут, пока не исчезнет
раздражение. Если необходимо обратиться
за медицинской помощью, медиков следует
поставить в известность, что аккумуляторный
электролит состоит из смеси жидкого
органического карбоната и солей лития.
.
•
Содержимое открытых элементов аккумулятора
может вызывать раздражение органов
дыхания. Обеспечьте приток свежего воздуха.
Если симптомы сохраняются, обратитесь за
медицинской помощью.
: Опасность получения
ожога. Аккумуляторная жидкость может
воспламениться при попадании искры или
пламени.
Аккумуляторы STANLEY соответствуют всем
применимым правилам транспортировки,
прописанным производителем, а также
национальным стандартам, включающим в себя
Рекомендации ООН по перевозке опасных грузов;
правила международной ассоциации воздушного
транспорта (IATA) по перевозке опасных грузов,
правила международного морского кодекса по
опасным грузам (IMDG) и Европейское соглашение
о перевозке опасных грузов автотранспортом (ADR).
Каждый ионно-литиевый элемент или аккумулятор
протестирован в соответствии с требованиями к
испытаниям, указанными в подразделе 38.3 части
по испытаниям и критериям Рекомендаций ООН по
перевозке опасных грузов. В большинстве случаев,
перевозимый аккумулятор STANLEY освобождается
от необходимости быть классифицированным,
поскольку является материалом 9 класса опасности.
Принадлежность к 9 классу опасности учитывается
только в двух случаях:
1. Авиаперевозка более чем двух ионно-литиевых
аккумуляторов STANLEY при наличии в упаковке
только аккумуляторов (без инструментов), и
2. Любой вид перевозки ионно-литиевых
аккумуляторов с удельной мощностью,
превышающей 100 ватт-часов (Втч). Удельная
мощность в ватт-часах указана на корпусе
ионно-литиевого аккумулятора.
Вне зависимости от условий перевозки в
обязанности грузоотправителя входит уточнение и
получение информации о последних действующих
правилах упаковки, маркировки и требований к
документации.
Во время перевозки аккумуляторов существует
риск возгорания при случайном контакте клемм
аккумулятора с токопроводящими материалами. При
перевозке аккумуляторов убедитесь, что клеммы
аккумулятора защищены и надёжно изолированы
от любых материалов, контакт с которыми способен
вызвать короткое замыкание.
Информация данного раздела руководства по
эксплуатации была предоставлена добровольно и
на момент создания документа является полностью
достоверной. Однако не было дано никаких
гарантий - явно выраженных или подразумеваемых.
Деятельность в соответствии с правилами и нормами
полностью является ответственностью покупателя.

19
(Перевод с оригинала инструкции) РУССКИЙ
Зарядное устройство SCH121 заряжает аккумуляторы
напряжением 12 В макс. и 10,8 В.
1. Оптимальным местом для хранения
является холодное и сухое место, вдали
от прямых солнечных лучей и источников
избыточного тепла или холода. Для увеличения
производительности и срока службы храните
не используемые аккумуляторы при комнатной
температуре.
2. Для обеспечения долгого срока службы
аккумуляторов при длительном хранении
рекомендуется убирать полностью заряженные
аккумуляторы в сухое прохладное место вдали
от зарядного устройства.
: Не убирайте на хранение полностью
разряженные аккумуляторы. Перед использованием
аккумулятор потребуется зарядить.
В дополнение к пиктограммам, содержащимся в
данном руководстве по эксплуатации, на зарядном
устройстве и аккумуляторе имеются символы,
которые отображают следующее:
Перед использованием внимательно
прочтите данное руководство по
эксплуатации.
Время зарядки см. в разделе «Технические
характеристики».
Аккумулятор заряжается.
Аккумулятор заряжен.
Аккумулятор неисправен.
Пауза для согревания/охлаждения
аккумулятора.
Не касайтесь токопроводящими
предметами контактов аккумулятора и
зарядного устройства!
Ни в коем случае не пытайтесь заряжать
повреждённый аккумулятор!
Не погружайте аккумулятор в воду.
Немедленно заменяйте повреждённый
сетевой кабель.
Заряжайте аккумулятор при температуре
окружающей среды в пределах 4°С-40°С.
Для использования только внутри
помещений.
Утилизируйте отработанный аккумулятор
безопасным для окружающей среды
способом!
Заряжайте аккумуляторы STANLEY только
зарядными устройствами STANLEY. Зарядка
аккумуляторов других марок зарядными
устройствами STANLEY может привести
к протечке или взрыву аккумулятора и
другим опасным ситуациям.
Не бросайте аккумулятор в огонь.
: Перед сборкой и
регулировкой инструмента всегда
извлекайте аккумулятор. Перед установкой
или снятием аккумулятора всегда
выключайте инструмент.
: Используйте аккумуляторы
и зарядные устройства только марки
STANLEY.
(. )
: Для снижения риска
получения тяжёлой травмы, устанавливайте
переключатель направления движения в
положение блокировки или выключайте
инструмент и извлекайте аккумулятор
перед каждой операцией регулировки
или снятием/установкой принадлежностей
или насадок. Непреднамеренный запуск
инструмента может привести к получению
травмы.
: Убедитесь, что аккумулятор
(6) полностью заряжен.
1. Совместите аккумулятор с бороздками внутри
рукоятки инструмента.
2. Вдвигайте аккумулятор в рукоятку, пока не
услышите, что замок защёлкнулся на месте.
1. Нажмите на отпирающую кнопку (5) и извлеките
аккумулятор из рукоятки инструмента.
2. Вставьте аккумулятор в зарядное устройство,
как описано в разделе «Зарядное устройство»
данного руководства.
(. D)
Для заворачивания используйте вращение
вперед (по часовой стрелке). Для вывинчивания
используйте обратное (против часовой стрелки)
вращение (реверс).
•
Для установки вращения вперёд сдвиньте
переключатель направления вращения (2)
влево.

20
РУССКИЙ (Перевод с оригинала инструкции)
•
Для установки реверса сдвиньте переключатель
направления вращения вправо.
•
Для блокировки электроинструмента,
установите переключатель реверса в среднее
положение.
• При изменении положения кнопки
переключателя не забывайте отпускать
курковый выключатель.
(. A)
Чтобы включить инструмент, нажмите на курковый
пусковой выключатель (1). Для выключения
инструмента отпустите курковый выключатель.
Ваш инструмент оборудован тормозом. Патрон
остановится только после того как курковый
выключатель будет полностью отпущен.
Встроенный переключатель скорости позволяет
выбрать наиболее подходящую скорость для
каждой отдельной операции. Увеличение скорости
регулируется интенсивностью нажатия на курковый
выключатель. В целях продления срока службы
Вашего инструмента используйте максимальную
скорость только на начальном этапе высверливания
отверстий или заворачивания крепёжных элементов.
: Не рекомендуется непрерывно
использовать инструмент во всём диапазоне
скоростей. Это может привести к повреждению
пускового выключателя.
(. , D)
На муфту установки крутящего момента (3)
нанесены цифры и символ сверла. Вращайте муфту
до установки нужного значения в верхней части
инструмента. На муфте предусмотрены указатели
в целях предотвращения неточностей при выборе
крутящего момента. Чем выше цифра на муфте,
тем выше крутящий момент и тем больше размер
крепёжной детали, которую можно завернуть. Для
блокировки муфты в режиме сверления передвиньте
ее на позицию сверла.
: При использовании дрели/
шуруповёрта для высверливания отверстий
убедитесь, что муфта установки крутящего момента
расположена таким образом, чтобы символ сверла
был выровнен по центральной линии в верхней
части инструмента. В противном случае, при начале
сверления муфта будет двигаться.
(. A, D)
2-х скоростной редуктор Вашего инструмента
позволяет легко переключаться с одной скорости
на другую для максимальной универсальности
применения инструмента.
Для установки низкой скорости/высокого крутящего
момента выключите инструмент и дождитесь его
полной остановки.
Переведите переключатель скоростей (4) вперёд
(в направлении патрона). Для установки высокой
скорости/низкого крутящего момента выключите
инструмент и дождитесь его полной остановки.
Переведите переключатель скоростей (4) назад (в
направлении от патрона).
: Не переключайте скорость при
работающем инструменте. Если у Вас возникли
проблемы при переключении скоростей, убедитесь,
что переключатель скоростей полностью переведён
вперёд или назад.
Светодиодная подсветка (8) расположена под муфтой
установки крутящего момента (3) и автоматически
загорается при нажатии на курковый пусковой
выключатель. Светодиодная подсветка загорается при
частично нажатом курковом выключателе, до того, как
инструмент начнёт свою работу.
: Светодиодная подсветка служит для
освещения рабочей поверхности и не предназначена
для использования в качестве фонарика.
(. E)
Ваш инструмент оборудован быстрозажимным
патроном с одной поворотной муфтой для легкой
и быстрой смены насадок одной рукой. Чтобы
вставить сверло или другую насадку, выполните
следующие шаги:
1. Заблокируйте курковый пусковой выключатель
в положение ВЫКЛ., как было описано выше.
2. Обхватите заднюю часть муфты патрона одной
рукой, а другой рукой удерживайте инструмент.
Поворачивайте муфту в направлении против
часовой стрелки, пока она не сдвинется на
расстояние, позволяющее вставить нужную
насадку.
3. Вставьте насадку в патрон на глубину
приблизительно 19 мм и надёжно затяните,
поворачивая муфту патрона по часовой стрелке
одной рукой и удерживая инструмент другой
рукой. Ваш инструмент оборудован механизмом
автоматической блокировки шпинделя. Данный
механизм позволяет открывать и затягивать
патрон одной рукой. Чтобы извлечь насадку,
повторите шаг 2.
: Не пытайтесь закрепить
сверло (или какую-либо другую насадку),
захватив переднюю часть патрона и
одновременно включив инструмент. Это может
привести к повреждению патрона и получению
травмы. При смене насадок всегда блокируйте
курковый выключатель в выключенном положении.
Для надёжной фиксации насадки всегда затягивайте
патрон, поворачивая муфту одной рукой и
удерживая инструмент другой рукой.
(. F)
Поверните муфту установки крутящего момента
на позицию сверла, а переключатель скоростей в
положение 1 (низкая скорость). Зажмите в патроне
короткий конец шестигранного ключа (не входит
в комплект поставки инструмента) диаметром 6,35
мм (1/4”) или более. Деревянным молотком или
похожим предметом ударяйте по длинному концу
ключа, поворачивая его по часовой стрелке, как
показано на рисунке. Таким образом, будет ослаблен
винт внутри патрона.
Полностью раскройте кулачки патрона и вставьте
отвёртку (или звездообразную насадку, если
требуется) в переднюю часть патрона между
кулачками, достигая головки винта. Открутите винт
по часовой стрелке (левая резьба) и извлеките его
Sayfa yükleniyor ...
Sayfa yükleniyor ...
Sayfa yükleniyor ...
Sayfa yükleniyor ...
Sayfa yükleniyor ...
Sayfa yükleniyor ...
Sayfa yükleniyor ...
Sayfa yükleniyor ...
Sayfa yükleniyor ...
Sayfa yükleniyor ...
Sayfa yükleniyor ...
Sayfa yükleniyor ...
Sayfa yükleniyor ...
Sayfa yükleniyor ...
Sayfa yükleniyor ...
Sayfa yükleniyor ...
Sayfa yükleniyor ...
Sayfa yükleniyor ...
Sayfa yükleniyor ...
Sayfa yükleniyor ...
Sayfa yükleniyor ...
Sayfa yükleniyor ...
Sayfa yükleniyor ...
Sayfa yükleniyor ...
Sayfa yükleniyor ...
Sayfa yükleniyor ...
Sayfa yükleniyor ...
Sayfa yükleniyor ...
-
 1
1
-
 2
2
-
 3
3
-
 4
4
-
 5
5
-
 6
6
-
 7
7
-
 8
8
-
 9
9
-
 10
10
-
 11
11
-
 12
12
-
 13
13
-
 14
14
-
 15
15
-
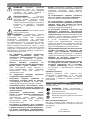 16
16
-
 17
17
-
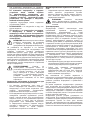 18
18
-
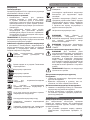 19
19
-
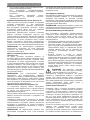 20
20
-
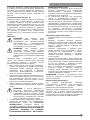 21
21
-
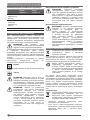 22
22
-
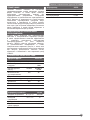 23
23
-
 24
24
-
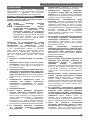 25
25
-
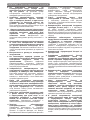 26
26
-
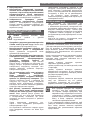 27
27
-
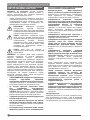 28
28
-
 29
29
-
 30
30
-
 31
31
-
 32
32
-
 33
33
-
 34
34
-
 35
35
-
 36
36
-
 37
37
-
 38
38
-
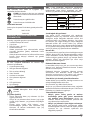 39
39
-
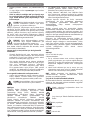 40
40
-
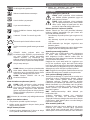 41
41
-
 42
42
-
 43
43
-
 44
44
-
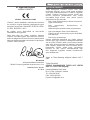 45
45
-
 46
46
-
 47
47
-
 48
48


Stanley SCH121S2K Kullanım kılavuzu
- Kategori
- Kablosuz kombi matkaplar
- Tip
- Kullanım kılavuzu
Diğer dillerde
- English: Stanley SCH121S2K User manual
- русский: Stanley SCH121S2K Руководство пользователя
İlgili Makaleler
-
Stanley SCI121S2K Kullanım kılavuzu
-
-
-
-
-
-
-
-
-
Diğer Belgeler
-
Black & Decker Sbh20 Kullanım kılavuzu
-
Black & Decker BDCDD186 Kullanım kılavuzu
-
DeWalt DCD700 Kullanım kılavuzu
-
-
Triton T20TP02 Kullanici rehberi
-
-
Black & Decker BDCHD18 Kullanım kılavuzu
-
IKEA AA-2393957-6-100 Kullanım kılavuzu
-
IKEA TRIXIG Kullanım kılavuzu
-
Hikoki D10VG Kullanım kılavuzu