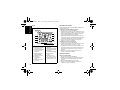
Motorola TALKABOUT T92 H2O El kitabı
- Kategori
- Iki yönlü telsizler
- Tip
- El kitabı

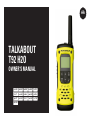
TALKABOUT
T92 H2O
OWNER'S MANUAL
hu-HU pl-PL
nl-NL
fi-FI sv-SE
nb-NO
ru-RU
pt-PT
uk-UA
it-IT
tr-TR
en-US da-DK de-DE es-ES fr-FR


1
English
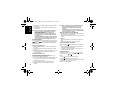
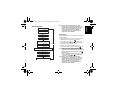
RF ENERGY EXPOSURE AND PRODUCT
SAFETY GUIDE FOR PORTABLE TWO-
WAY RADIOS
ATTENTION!
Before using this product, read the RF Energy Exposure and
Product Safety Guide that ships with the radio which contains
instructions for safe usage and RF energy awareness and
control for compliance with applicable standards and regulation.
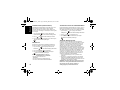
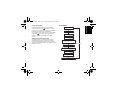
Package Contents
• 2 x TALKABOUT T92 H20 Radio
• 2 x Whistle Belt Clip
• 2 x Power Supply
• 2 x Rechargeable 800mAh NiMH battery pack
• TALKABOUT T92 H20 Manual
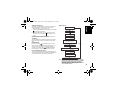
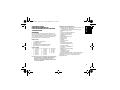
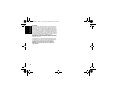
Frequency Chart
Note: *Only Channels one to eight are available by default.
Channels 9 to 16 need to be activated by user before
they can be selected. Channels 9 to 16 should be
used in countries where these frequencies are
allowed by government authorities. Channels 9 to 16
are not allowed in Russia.
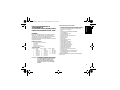
Features and Specifications
• 8 PMR Channels. User expandable to 16 Channels in
countries where allowed by government authorities
• 121 Sub-Codes (38 CTCSS Codes & 83 DCS codes)
• Up to 10 km Range*
• VOX
• Flashlight with WHITE and RED LED
• 20 Selectable Call Tone Alerts
• Backlit LCD Display
• Roger Beep
• Micro USB Connector for charging
• Battery Level Meter
• Channel Monitor
• Channel Scan
• Dual Channel Monitor
• Keypad Lock
• Auto Squelch Control
• Auto Repeat (Scrolling)
• Battery Low Alert
• Battery Low Sleep
• Tone (On/Off)
• Silent Mode (Vibrate Alert)
• Emergency Features
• Water-Activated Flashlight
• IP Rating: IP67
• Power Source: NiMH battery Pack / 3 x AA Alkaline batteries
• Battery Life: 16 Hours (under typical use conditions)
* Range may vary depending on environmental and/or
topographical conditions.
Maintenance
This radio is waterproof to IP-67 standards. It will withstand
submersion up to 1 meter of water for up to 30 minutes, only
when the battery cover and headset accessory port are sealed.
Open the battery compartment door or headset port cover only
when the radio is dry. Installation of batteries and accessories
should be in dry environments only. Ensure battery
compartment and accessory port seals are free of all dirt and
debris. To maintain audio quality, if the radio has been
submerged in water, shake the radio briskly to remove water
trapped inside the speaker grille and microphone port. It is
recommended to rinse the radio with fresh water if it has been
exposed to salt water to preserve the life of the radio.
The charging base and AC adaptor are not waterproof. Do not
expose the charger to rain or snow. Charge the radios only in a
dry location. Do not place wet radios into the charging base.
WARNING: This radio floats with the included NiMH battery
(800mAh). It may not float with other batteries.
Channel Frequency
(MHz)
Channel Frequency
(MHz)
Channel Frequency
(MHz)
1 446.00625 7 446.08125 13 446.15625
2 446.01875 8 446.09375 14 446.16875
3 446.03125 9 446.10625 15 446.18125
4 446.04375 10 446.11875 16 446.19375
5 446.05625 11 446.13125
6 446.06875 12 446.14375
MN002243A01_.book Page 1 Tuesday, March 20, 2018 5:27 PM

English
2
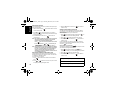
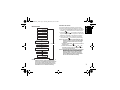
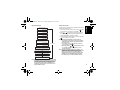
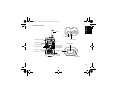
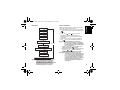
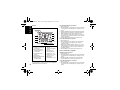
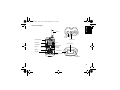
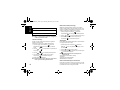
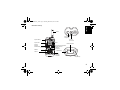
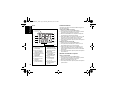
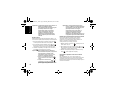
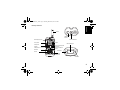
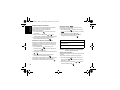
Control and Functions
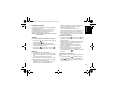
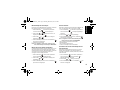
Antenna
Flashlight Button
Screen
PTT Button
Power Button
Menu/Lock
Microphone
Scan/Monitor
Call Tone
Volume/Scroll
Micro-USB
Charging Port
Emergency
Button
Accessory Port
Flashlight LED
Water Sensors
Water Sensors
Speaker
MN002243A01_.book Page 2 Tuesday, March 20, 2018 5:27 PM

3
English
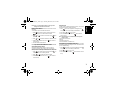
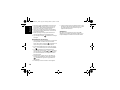
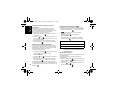
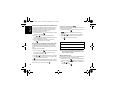
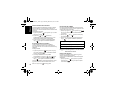
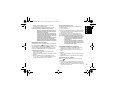
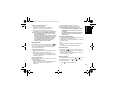
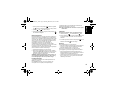
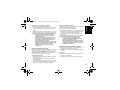
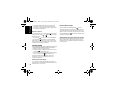
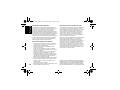
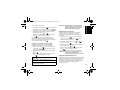
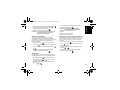
Display
Installing the Batteries
Each radio can either use a one NiMH rechargeable battery
pack or three units of AA Alkaline Battery.
Installing the NiMH Rechargeable Battery Pack
1. Make sure your radio is turned OFF.
2. With the back of the radio facing you, loosen the retaining
screw on the battery door and open the cover.
3. Remove the NiMH battery pack from the clear plastic bag
(do not disassemble or unwrap the battery pack).
4. Insert the NiMH battery pack with the diagram facing you.
(The ribbon should be underneath the battery pack and
should wrap around the right side of the pack for easy
removal).
5. Close the battery cover and tighten the retaining screw on
the battery door.
Installing the Three AA Alkaline Batteries
1. Make sure your radio is turned OFF.
2. With the back of the radio facing you, lift the battery cover
latch up and remove the cover.
3. Insert the three AA Alkaline batteries with (+) and (-) polarity
as shown inside. (The ribbon should be underneath the AA
alkaline batteries and wrap around the right side of the
batteries).
4. Close the battery cover and tighten the retaining screw on
the battery cover.
Removing the Batteries
Removing the NiMH Battery Pack
1. Make sure your radio is turned OFF.
2. With the back of the radio facing you, loosen the retaining
screw on the battery door and open the cover.
3. Remove the NiMH battery pack by pulling the ribbon.
4. Close the battery cover and tighten the retaining screw on
the battery door.
Removing the Three AA Alkaline Batteries
1. Make sure your radio is turned OFF.
2. With the back of the radio facing you, loosen the retaining
screw on the battery door and open the cover.
1. Channel Indicator
2. Receive and Transmit
Indicator
3. Mute [when speaker
volume is set as 0]
4. Dual Channel Monitor
[ON/OFF]
5. Scan Indicator
6. Key Lock Indicator
7. Battery Indicator [3
Battery Levels]
8. Keypad Tone [ON/OFF]
9. Silent Mode (Vibrate
Alert) [ON/OFF]
10. Roger Tone (ON/OFF)
11. Call Tone [1–20]
12. iVOX [OFF, L1, L2,
L3]; VOX [L1, L2, L3]
13. Interference Eliminator
Code [1–121]
2
3
4
5
1
6
7
8
9
11
12
13
10
MN002243A01_.book Page 3 Tuesday, March 20, 2018 5:27 PM

English
4
3. Gently remove each alkaline battery by easing each battery
out individually.
4. Close the battery cover and tighten the retaining screw on
the battery door.
Note: Exercise care when removing NiMH or AA batteries.
Do not use sharp or conductive tools to remove
either of these batteries.
Ensure radio is fully dry before installing and
removing batteries. The battery compartment seal
should be free from dirt or debris before attaching
the battery door.
Remove the batteries before storing your radio for an
extended period of time. Batteries corrode over time
and may cause permanent damage to your radio.
Radio Battery Meter
The Radio Battery icon shows the battery charge level from full
to empty . When the radio has one segment left,
the radio beeps periodically or after releasing the PTT button
(Low Battery Alert).
Battery Capacity Maintenance
1. Charge the NiMH batteries once every three months when
not in use.
2. Remove the battery from the radio after using for storage
purposes.
3. Store the NiMH batteries in a temperature between -20 °C to
35 °C and in low humidity. Avoid damp conditions and
corrosive materials.
Using the Micro-USB Charger
The micro-USB charger is a handy port that allows you to
conveniently charge your NiMH battery pack.
1. Make sure your radio is turned OFF
2. Plug the micro-USB cable into the micro-USB charging port
on your radio. Connect the other end of the micro-USB
charger to wall power outlet.
3. An empty battery will be fully charged in eight hours.
4. The battery meter bar will move when the battery is
charging.
Note: When moving between hot and cold temperatures,
do not charge the NiMH battery pack until the
temperature acclimates (usually about twenty
minutes).
For optimal battery life, remove the radio from the
charger within sixteen hours. Do not store the radio
while connected to the charger.
Attaching and Removing the Belt Clip
1. Attach the belt clip to the TALKABOUT plate at the back of
the radio until the clip clicks in place.
2. Attach the belt clip to pocket or belt strap until the clip clicks
in place.
To Remove
1. Push the release tab on top of the belt clip to release the
latch.
2. Pull the belt clip away from the back of the radio.
Turning your Radio On and Off
Press and hold the Power button to turn the radio ON or
OFF.
1. In the ON position, the radio chirps and briefly shows all
feature icons available on the radio.
2. The display screen then shows the current channel, code
and all features that are enabled.
Setting the Volume
From Standby Mode, press on either or to show the
current value. Press or again to adjust the volume
setting.
1. Press to increase the speaker volume.
2. Press to decrease the speaker volume.
Do not hold the radio close to your ear. If the volume is set to an
uncomfortable level, it could hurt your ear.
Adjust ‘0’ to mute the speaker.
MN002243A01_.book Page 4 Tuesday, March 20, 2018 5:27 PM

5
English
Talking and Listening
All radios in your group must be set to the same channel and
Interference Eliminator Code in order to communicate.
1. Hold your radio 5–8 cm from your mouth.
2. Press and hold the PTT button while speaking. The Transmit
icon appears on the display.
3. Release the PTT button. You can now receive incoming
calls. When you do, the Receive icon appears on the
display.
For maximum clarity, hold the radio 2 to 3 inches away and
avoid covering the microphone while talking.
Talk Range
Your radio is designed to maximize performance and improve
transmission range. Do not use the radios closer than 5 feet
apart.
Monitor Button
Pressing and holding Scan/Monitor button 3 seconds
allows you to listen to the volume level of the radio when you
are not receiving. This allows you to adjust the volume, if
necessary. You can also press Scan/Monitor button to
check the activity on your current channel before you talk.
Push-to-Talk Time-out Timer
To prevent accidental transmissions and save battery life, the
radio emits a continuous warning tone and stops transmitting if
you press the PTT button for 60 seconds continuously.
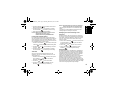
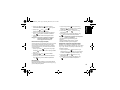
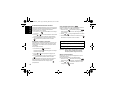
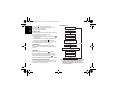
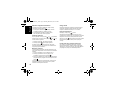
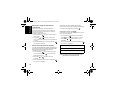
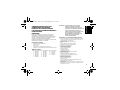
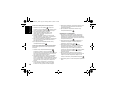
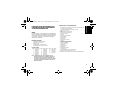
Menu options
Note: *Only Channels one to eight are available by default.
Channels 9 to 16 need to be activated by user before
they can be selected. Channels 9 to 16 should be
used in countries where these frequencies are
allowed by government authorities. Channels 9 to 16
are not allowed in Russia.
Menu Key
Menu Key
Menu Key
Menu Key
Menu Key
Menu Key
Menu Key
Menu Key
Menu Key
Menu Key
Two Way Mode
Channel (1-8)
Sub Code (0-121)
Call Tone (1-20)
Vibrate Alert (On/Off)
Keypad Tones (On/Off)
Talk Confirmation Tones (On/Off)
Dual Watch Channel (1-22)
Dual Watch Interference Eliminator Code
Voice Operated Transmission
(VOX) (Off, L1,L2,L3)
MN002243A01_.book Page 5 Tuesday, March 20, 2018 5:27 PM

English
6
Selecting the Channel
Your radio has eight channels. The channel is the frequency the
radio uses to transmit.
1. With the radio ON, press Menu button until the channel
number starts to flash.
2. Press or to change the channel. Long press on
these keys allows you to scroll through the channels rapidly
to browse the codes.
3. Press PTT button to exit menu or Menu button to
continue set up.
Note: Your radio has eight channels by default. In countries
where 16 channels are allowed, you can activate
Channels 9 to 16 with the following steps:
1.Press Menu until the channel number starts to flash.
2. Press and hold down and simultaneously for
three seconds until you hear a beep and “16 CH” is
displayed briefly.
Note: *Only Channels one to eight are available by default.
Channels 9 to 16 need to be activated by user before
they can be selected. Channels 9 to 16 should be
used in countries where these frequencies are
allowed by government authorities. Channels 9 to 16
are not allowed in Russia.
Selecting the Interference Eliminator Code
Interference Eliminator Codes help minimize interference by
blocking transmissions from unknown sources. Your radio has
121 Interference Eliminator Codes.
To set the code for a channel:
1. Press Menu button twice until the code “9” starts to
flash.
2. Press or to select the code. You can press or hold
to speed up scrolling through the codes.
3. Press the PTT button to exit menu or Menu button to
continue set up.
Setting and Transmitting Call Tones
Your radio can transmit different call tones to other radios in
your group so you can alert them that you want to talk. Your
radio has 20 call tones for you to choose from.
To set a call tone:
1. Press Menu button three times until Call Tone icon
appears. The current call tone setting will flash.
2. Press or to change and listen to the call tone.
3. Press the PTT button to exit menu or Menu button to
continue set up.
In order to transmit your call tone to other radios, set up the
same channel and Interference Eliminator Code on your radio
and press Call Tone button.
Voice Operated Transmission ()
Transmission is initiated by speaking into the microphone of the
radio instead of pushing the PTT button.
1. Press Menu button four times until icon
appears on the display. The current setting (L1-L3) will flash.
2. Press or to select the sensitivity level.
3. Press the PTT button to exit menu or Menu button to
continue set up.
L3 = High Sensitivity for quiet environments
L2 = Medium Sensitivity for most environments
L1 = Low Sensitivity for noisy environments
MN002243A01_.book Page 6 Tuesday, March 20, 2018 5:27 PM

7
English
Note: There is a short delay between the time you start
talking and when the radio transmits.
Dual Channel Monitor
Enables you to scan the current channel and another channel
alternately.
To set another channel and start Dual Channel:
1. Press Menu button five times until the Dual Channel
icon appears. The Dual Channel will flash.
2. Press or to select the channel then press Menu
button.
3. Press or to select the Interference Eliminator Code.
4. Press the PTT button to exit menu or Menu button to
continue set up.
5. The radio starts to Dual Channel.
Note: If you set the same channel and code as the current
channel, Dual Channel Monitor turns OFF.
Silent Mode (Vibrate Alert)
Silent Mode (Vibrate Alert) notifies you that your radio is
receiving a message. This is useful in noisy environments.
When the alert is on, the radio vibrates once every 30 seconds
when you receive a message on the channel and code you set.
1. Press Menu button seven times until Vibracall icon
is displayed. The current setting will flash.
2. Press or to change the setting to On/Off.
3. Press the PTT button to exit menu or Menu button to
continue set up.
Keypad Tones
You may enable or disable the speaker key tones. You will hear
the key tone each time a button is pushed.
1. Press Menu button eight times until Keypad Tone
icon appears. The current setting On/Off will flash.
2. Press either or to turn On/Off.
3. Press the PTT button to confirm or Menu button to
continue set up.
Note: The following are not disabled when the key tone
feature is OFF:
•Transmit time-out alert tone
•Call tone
•Low battery alert tone or
•The transmitted talk confirmation tone
Transmitting a Talk Confirmation Tone
You can set your radio to transmit a unique tone when you finish
transmitting. It is like saying “Roger” or “Over” to let others know
you have finished talking.
1. Press Menu button nine times until the Roger Tone
icon appears. The current setting On/Off flashes.
2. Press or to turn On or Off.
3. Press the PTT button to set or Menu button to continue
set up.
MN002243A01_.book Page 7 Tuesday, March 20, 2018 5:27 PM

English
8
Emergency Alert Mode
The Emergency Alert feature can be used to signal members in
your group of your need for urgent help. T92 H2O radios will
operate in an automatic “hands- free” emergency control mode
for a total of 30 seconds after activating the Emergency Alert.
T92 H2O radios in your group will automatically advance the
speaker volume to the maximum setting and sound a warbling
alert tone for 8 seconds. The alert tone is emitted from your own
radio speaker and the receiving radios in your group. After the 8
second alert, any spoken words or incidental sounds at your
end will be transmitted to the group for 22 seconds. For the 30
second duration of Emergency Alert mode, T92 H2O radio
controls and buttons will be locked to maximize reception of the
emergency message.
1. Press and hold the Emergency Alert button for 3 seconds.
2. Release the button and the alert tone begin to sound. At the
same time, it activates RED LED flash. There is no need to
continue to hold the Emergency Alert button or use PTT for
your message to be transmitted.
WARNING: The Emergency Alert feature should only be
used in the even of an actual emergency. Motorola
Solutions is not responsible if there is no response to the
emergency alert from the receiving group.
Built-in Flashlight
Press the Flashlight button to cycle between OFF, RED Light,
WHITE Light and then back to OFF again.
The Flashlight will turn off when you press the Flashlight button
if the RED Light is left on for more than 3 seconds.
The Flashlight will turn off automatically after 30 minutes of non-
activity if the battery level is below 50%.
Note: Turn off the flashlight when not in use to conserve
battery power.
Keypad Lock
To avoid accidentally changing your radio settings:
1. Press and hold Menu button until Key Lock Indicator
icon displays.
2. You can turn the radio ON and OFF, adjust the volume,
receive, transmit, and monitor channels when in the lock
mode. All other functions remain locked.
3. Press Menu button and hold until Key Lock Indicator
is no longer displayed to unlock the radio.
Scanning
Use the scan function to do the following:
• Search the eight channels for transmissions from unknown
parties.
• Find someone in your group who has accidentally changed
channels or
• To quickly find unused channels for your own use.
There is a priority feature and two modes of scanning (basic
and advanced) to make your search more effective.
• The “Basic Scan” mode uses the channel and code
combinations for each of the eight channels as you have set
them (or with the default code value of 1).
• The “Advance Scan” mode will scan all channels for any and
all codes; detect any code in use and use that code value
temporary for that channel.
• Priority is given to the “Home Channel” (i.e. the channel and
Interference Eliminator Code your radio is set to when you
start the scan). This means the initial channel (and code
settings) is scanned more often than the other seven
channels and your radio will respond quickly to any activity
occurring on the home channel as a priority.
MN002243A01_.book Page 8 Tuesday, March 20, 2018 5:27 PM

9
English
To start Basic Scanning:
1. Press the key briefly. The Scan icon will appear in
the display and the radio will begin to scroll through the
channel and code combinations.
2. When the radio detects channel activities matching the
channel and code combination, the radio will stop scrolling
and you can hear the transmission.
3. Press the PTT button within 5 minutes after the end of the
transmission to respond and talk to the person transmitting.
4. The radio will resume scrolling through the channels 5
seconds after the end of any received activity.
5. Press the Scan/Monitor button briefly to stop scanning.
To start Advanced Scanning:
To set another channel and start Dual Channel Monitor:
1. Press the Scan/Monitor button briefly. The Scan
icon will appear in the display and the radio will begin to
scroll through the channels. No Interference Eliminator
Codes will filter what is heard.
2. When the radio detects channel activities with ANY code (or
NO code), it stops scrolling and you can hear the
transmission. Any Interference Eliminator Code that may be
use by other party will be detected and displayed.
3. When you respond and talk to the person transmitting, press
the PTT button within five seconds after the end of the
transmission.
4. The radio will resume scrolling through the channels 5
seconds after the end of any received activity.
5. Press the Scan/Monitor button briefly to stop scanning.
Scanning Notes:
1. The transmission will be on the “Home Channel” if you press
the PTT button while the radio is scrolling through inactive
channels. You may press the Scan/Monitor button to
stop scanning at any time.
2. You may immediately resume the scan by briefly pressing
the or if the radio stops on an undesired
transmission.
3. You may temporarily remove that channel from the scan list
by pressing and holding or for 3 seconds if the radio
stops repeatedly on an undesired transmission. You may
remove more than one channel this way.
4. Turn the radio OFF and then turn back ON, or EXIT and re-
enter the scanning mode by pressing Scan/Monitor
button to restore and remove channel(s) to the scan list.
5. You cannot remove the “Home Channel” from the scan list.
6. In the Advanced Scan, the detected code will only be used
for one transmission. You must take note of that code, exit
scan and set the detected code on that channel to
permanently use the detected code.
Water Sensor
When the radio comes in contact with water, the WHITE LED
will begin flashing until the battery is dead. Press the Flashlight
button to turn off the flashing LED.
MN002243A01_.book Page 9 Tuesday, March 20, 2018 5:27 PM

English
10
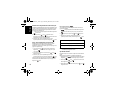
Warranty Information
The authorized Motorola Solutions dealer or retailer where you
purchased your Motorola Solutions two-way radio and/or
original accessories will honour a warranty claim and/or provide
warranty service.
Please return your radio to your dealer or retailer to claim your
warranty service. Do not return your radio to Motorola
Solutions.
In order to be eligible to receive warranty service, you must
present your receipt of purchase or a comparable substitute
proof of purchase bearing the date of purchase. The two-way
radio should also clearly display the serial number. The
warranty will not apply if the type or serial numbers on the
product have been altered, deleted, removed, or made illegible.
What Is Not Covered By The Warranty
• Defects or damage resulting from use of the Product in other
than its normal and customary manner or by not following
the instructions in this user manual.
• Defects or damage from misuse, accident or neglect.
• Defects of damage from improper testing, operation,
maintenance, adjustment, or any alteration or modification of
any kind.
• Breakage or damage to aerials unless caused directly by
defects in material or workmanship.
• Products disassembled or repaired in such a manner as to
adversely affect performance or prevent adequate
inspection and testing to verify any warranty claim.
• Defects or damage due to range.
• Defects or damage due to moisture, liquid or spills.
• All plastic surfaces and all other externally exposed parts
that are scratched or damaged due to normal use.
• Products rented on a temporary basis.
• Periodic maintenance and repair or replacement of parts
due to normal usage, wear and tear.
Copyright Information
The Motorola Solutions products described in this manual may
include copyrighted Motorola Solutions programs, stored
semiconductor memories or other media. Laws in the United
States and other countries preserve for Motorola Solutions,
certain exclusive rights for copyrighted computer programs,
including the exclusive right to copy or reproduce in any form,
the copyrighted Motorola Solutions programs.
Accordingly, any copyrighted Motorola Solutions computer
programs contained in the Motorola Solutions products
described in this manual may not be copied or reproduced in
any manner without express written permission of Motorola
Solutions. Furthermore, the purchase of Motorola Solutions
products shall not be deemed to grant either directly or by
implication, estoppel, or otherwise, any license under the
copyrights, patents or patent applications of Motorola Solutions,
except for the normal non-exclusive royalty free license to use
that arises by operation of law in the sale of a products.
MOTOROLA, MOTO, MOTOROLA SOLUTIONS and the
Stylized M logo are trademarks or registered trademarks of
Motorola Trademark Holdings, LLC and are used under license.
All other trademarks are the property of their respective owners.
© 2016 and 2018 Motorola Solutions, Inc. All rights reserved.
MN002243A01_.book Page 10 Tuesday, March 20, 2018 5:27 PM

1
Dansk
VEJLEDNING OM RF-
ENERGIEKSPONERING OG
PRODUKTSIKKERHED TIL BÆRBARE
TOVEJSRADIOER
OBS!
Inden brug af radioen skal du læse vejledningen om RF-
energieksponering og sikkerhed, der leveres sammen med
radioen. Vejledningen indeholder instruktioner omkring sikker
brug, opmærksomhed omkring forekomst af RF-energi og
kontrol af overholdelse med gældende standarder og
bekendtgørelser.
Pakkens indhold
• 2 x TALKABOUT T92 H20-radioer
• 2 x bælteclips med fløjte
• 2 x Strømforsyning
• 2 x genopladelig 800mAh NiMH-batteripakke
• TALKABOUT T92 H20 Brugervejledning
Frekvenstabel
Bemærk: *Kun kanal et til otte er tilgængelige som
standard. Kanal 9 til 16 skal aktiveres af
brugeren, før de kan vælges. Kanal 9 til 16 skal
anvendes i lande, hvor myndighederne tillader
brug af disse frekvenser. Kanal 9 til 16 må ikke
anvendes i Rusland.
Funktioner og specifikationer
• 8 PMR-kanaler. Kan udvides af brugeren til 16 kanaler i lande, hvor
myndighederne tillader dette
• 121 delkoder (38 CTCSS-koder & 83 DCS-koder)
• Rækkevidde* på op til 10 km
• VOX
• Lommelygte med HVIDE og RØDE indikatorer
• 20 opkaldstonealarmer, som brugeren vælger
• Baggrundsbelyst LCD-skærm
• Modtaget-bip
• Micro-USB-stik til opladning
• Batteriniveaumåler
• Kanalskærm
• Kanalscanning
• Overvågning af to kanaler
• Tastelås
• Automatisk squelch-styring
• Automatisk gentagelse (rulning)
• Advarsel om lavt batteriniveau
• Lavt batteriniveau, slumring
• Tone (til/fra)
• Tilstanden Silent (vibrationsalarm)
• Nødopkaldsfunktioner
• Vandaktiveret lommelygte
• IP-klassificering: IP67
• Strømkilde: NiMH-batteripakke / 3 x AA-alkalinebatterier
• Batteritid: 16 timer (under normale brugsforhold)
* Intervallet kan variere afhængigt af miljømæssige og/eller
topografiske forhold.
Vedligeholdelse
Denne radio er vandtæt i henhold til IP-67-standarder. Den kan
modstå nedsænkning i op til 1 meter vand i op til 30 minutter,
men kun, når batteridækslet og porten til headsettilbehøret er
forseglede. Åbn kun lugen til batterirummet og headsettets
portdæksel, når radioen er tør. Installation af batterier og
tilbehør bør kun finde sted i tørre omgivelser. Sørg for at
forseglingerne til batterirummet og tilbehørsporten er fri for
snavs og urenheder. Hvis radioen er blevet nedsænket i vand,
skal du ryste radioen hurtigt for at fjerne vand fra
højttalergitteret og mikrofonporten for at bevare lydkvaliteten.
Det anbefales at skylle radioen med rent vand, hvis den har
været udsat for saltvand, for at bevare radioens levetid.
Opladerenheden og AC-adapteren er ikke vandtætte. Udsæt
ikke opladeren for regn eller sne. Oplad kun radioer på et tørt
sted. Sæt ikke våde radioer i opladerenheden.
ADVARSEL: Denne radio kan flyde med det medfølgende
NiMH-batteri (800 mAh). Den kan ikke altid flyde med andre
batterier.
K. Frekvens
(MHz)
K. Frekvens
(MHz)
K. Frekvens
(MHz)
1 446,00625 7 446,08125 13 446,15625
2 446,01875 8 446,09375 14 446,16875
3 446,03125 9 446,10625 15 446,18125
4 446,04375 10 446,11875 16 446,19375
5 446,05625 11 446,13125
6 446,06875 12 446,14375
MN002243A01_.book Page 1 Tuesday, March 20, 2018 5:27 PM

Dansk
2
Kontrol og funktioner
Antenne
Knappen
Flashlight
Skærm
PTT-knap
Tænd/
sluk-knap
Menu/Lås
Mikrofon
Scanning/
Overvåg
Opkaldstone
Lydstyrke/Rulle
Micro-USB-
opladerport
Nødopkalds-
knap
Tilbehørsport
Indikator for
lommelygte
Vandsensorer
Vandsensorer
Højttaler
MN002243A01_.book Page 2 Tuesday, March 20, 2018 5:27 PM

3
Dansk
Skærm Installer batterierne
Hver radio kan enten bruge en genopladelig NiMH-batteripakke
eller tre AA-alkalinebatterienheder.
Installer den genopladelige NiMH-batteripakke
1. Sørg for, at radioen er slået FRA.
2. Sørg for, at radioens bagside vender ud mod dig, løsn
holdeskruen på batterilugen, og åbn dækslet.
3. Fjern den genopladelige NiMH-batteripakke fra den
gennemsigtige plastikpose (batteripakken må ikke skilles ad
eller pakkes ud).
4. Sæt NiMH-batteripakken i, så diagrammet vender ud mod
dig. (Båndet skal være under batteripakken og skal vikles
om pakkens højre side, så det nemt kan fjernes).
5. Luk batteridækslet, og stram holdeskruen på batterilugen.
Installer de tre AA-alkalinebatterier
1. Sørg for, at radioen er slået FRA.
2. Sørg for, at radioens bagside vender ud mod dig, løft
batteridækslets lås op, og fjern dækslet.
3. Sæt de tre AA-alkalinebatterier i med (+)- og (-)-polerne som
vist indeni. (Båndet skal være under AA-alkalinebatterierne
og skal vikles rundt om batteriernes højre side, så det nemt
kan fjernes).
4. Luk batteridækslet, og stram holdeskruen på batteridækslet.
Fjern batterierne
Fjern NiMH-batteripakken
1. Sørg for, at radioen er slået FRA.
2. Sørg for, at radioens bagside vender ud mod dig, løsn
holdeskruen på batterilugen, og åbn dækslet.
3. Fjern NiMH-batteripakken ved at trække i båndet.
4. Luk batteridækslet, og stram holdeskruen på batterilugen.
1. Kanalindikator
2. Indikator for send/modtag
3. Lydløs [når lydstyrken for
højttaleren er indstillet til 0]
4. Overvågning af to kanaler
[TIL/FRA]
5. Indikator for scanning
6. Indikator for tastelås
7. Batteriindikator
[3 batteriniveauer]
8. Tastaturtone [TIL/FRA]
9. Tilstanden Silent
(vibrationsalarm)
[TIL/FRA]
10. Modtaget-tone
(TIL/FRA)
11. Opkaldstone [1–20]
12. iVOX [FRA, L1, L2, L3];
VOX [L1, L2, L3]
13. Interferenseliminatorkode
[1–121]
2
3
4
5
1
6
7
8
9
11
12
13
10
MN002243A01_.book Page 3 Tuesday, March 20, 2018 5:27 PM

Dansk
4
Fjern de tre AA-alkalinebatterier
1. Sørg for, at radioen er slået FRA.
2. Sørg for, at radioens bagside vender ud mod dig, løsn
holdeskruen på batterilugen, og åbn dækslet.
3. Fjern forsigtigt hvert alkalinebatteri ved at lempe batterierne
ud enkeltvist.
4. Luk batteridækslet, og stram holdeskruen på batterilugen.
Bemærk: Udvis forsigtighed, når NiMH- og AA-batterier
fjernes. Brug ikke skarpt eller ledende værktøj til
at fjerne disse batterier.
Sørg for, at radioen er helt tør, inden du indsætter
og fjerner batterier. Forseglingen til
batterirummet skal holdes fri for snavs eller
urenheder, inden du monterer batteridækslet.
Fjern batterierne, inden radioen opbevares i en
længere periode. Batterier korroderer med tiden
og kan forårsage permanent skade på din radio.
Radioens batterimåler
Radioens batteriikon viser batteriets opladningsniveau fra fuldt
opladet til afladet . Når radioen har én bjælke
tilbage, kvidrer radioen regelmæssigt, eller efter knappen PTT
slippes (advarsel om lavt batteri).
Vedligeholdelse af batterikapacitet
1. Oplad NiMH-batterierne én gang hver tredje måned, når den
ikke er i brug.
2. Fjern batteriet fra radioen efter brug mhp. opbevaring.
3. Opbevar NiMH-batterierne i en temperatur mellem -20 °C til
35 °C og i lav luftfugtighed. Undgå fugtige forhold og
ætsende stoffer.
Brug af micro-USB-opladeren
Micro-USB-opladeren er et praktisk stik, der gør det nemt for
dig at oplade NiMH-batteripakken.
1. Sørg for, at radioen er slået FRA
2. Indsæt micro-USB-kablet i micro-USB-ladeporten på
radioen. Slut den anden ende af micro-USB-opladeren til en
stikkontakt.
3. Et tomt batteri er fuldt opladet efter otte timer.
4. Bjælken på batterimåleren flytter sig, når batteriet oplades.
Bemærk: Når der skiftes mellem varme og kolde temperaturer,
må NiMH-batteriet ikke oplades, før temperaturen
akklimatiseres (normalt ca. 20 minutter).
For at opnå den optimale batteritid, skal radioen
fjernes fra opladeren inden for 16 timer. Opbevar
ikke radioen, mens den er tilsluttet opladeren.
Påsæt og fjern bælteclipsen
1. Sæt bælteclipsen fast på TALKABOUT-pladen bag på
radioen, indtil clipsen klikker på plads.
2. Sæt bælteclipsen fast på lommen eller bæltestroppen, indtil
clipsen klikker på plads.
Sådan fjernes den
1. Skub på frigørelsestappen øverst på bælteclipsen for at
frigøre låsen.
2. Træk bælteclipsen væk fra bagsiden af radioen.
Sådan slår du radioen Til og Fra
Tryk på tænd/sluk-knappen , og hold den nede for at slå
radioen TIL eller FRA.
1. I TIL-positionen kvidrer radioen og viser kort alle de
funktionsikoner, der findes på radioen.
2. Skærmen viser så den aktuelle kanal, kode og alle
funktioner, der er aktiveret.
MN002243A01_.book Page 4 Tuesday, March 20, 2018 5:27 PM

5
Dansk
Indstilling af lydstyrken
Når radioen er i tilstanden Standby, skal du trykke på enten
eller for at vise den aktuelle kanal. Tryk igen på eller
for at indstille lydstyrken.
1. Tryk på for at øge lydstyrken for højttaleren.
2. Tryk på for at mindske lydstyrken for højttaleren.
Undgå at holde radioen tæt ved øret. Hvis lydstyrken er
indstillet til et ubehageligt niveau, kan det skade dit øre.
Indstil '0' for at sætte højttaleren på lydløs.
TALE OG LYTTE
Alle radioer i gruppen skal være indstillet til samme kanal og
interferenseliminatorkode for at kunne kommunikere.
1. Hold radioen på 5-8 cm afstand af munden.
2. Tryk på tasten PTT, og hold den nede, mens du taler. Ikonet
for transmission vises på skærmen.
3. Slip knappen PTT. Du kan nu modtage indgående opkald.
Når du gør det, vises ikonet for modtag på skærmen.
For at få den bedste lydkvalitet skal du holde radioen to til tre
tommer væk og undgå at holde for mikrofonen, mens du taler.
Rækkevidde for tale
Radioen er designet til at maksimere ydeevnen og forbedre
transmissionsrækkevidden. Brug ikke radioer, der er mindre
end fem fod fra hinanden.
Knappen Monitor
Tryk på knappen Scan/Monitor og hold den nede i tre
sekunder for at kunne høre radioens lydniveau, når du ikke
modtager. Dette giver dig mulighed for at justere lydstyrken,
hvis det er nødvendigt. Du kan også trykke på knappen
Scan/Monitor for at kontrollere aktivitet på den aktuelle kanal,
inden du taler.
Push-to-Talk Time-out timer
For at forhindre utilsigtede transmissioner og for at spare
batteritid, udsender radioen en konstant advarselstone og
standser transmissionen, hvis du trykker på knappen PTT
konstant i tres sekunder.
MN002243A01_.book Page 5 Tuesday, March 20, 2018 5:27 PM

Dansk
6
MENUINDSTILLINGER
Bemærk: *Kun kanal et til otte er tilgængelige som
standard. Kanal 9 til 16 skal aktiveres af
brugeren, før de kan vælges. Kanal 9 til 16 skal
anvendes i lande, hvor myndighederne tillader
brug af disse frekvenser. Kanal 9 til 16 må ikke
anvendes i Rusland.
Sådan vælger du en kanal
Radioen har otte kanaler. Kanalen er den frekvens, som
radioen bruger til at transmittere.
1. Når radioen er tændt, skal du trykke på knappen Menu,
indtil kanalnummeret begynder at blinke.
2. Tryk på eller for at skifte kanal. Et langt tryk på
disse taster giver dig mulighed for hurtigt at rulle igennem
kanalerne for at gennemse koderne.
3. Tryk på knappen PTT for at forlade menuen eller knappen
Menu for at forsætte opsætningen.
Bemærk: Radioen har som standard otte kanaler. I lande,
hvor 16 kanaler er tilladt, kan du aktivere kanal
9 til 16 ved at udføre følgende trin:
1. Tryk på Menu, indtil kanalnummeret begynder at
blinke.
2. Tryk samtidigt på og , og hold dem nede i tre
sekunder, indtil du hører et bip, og "16 CH" vises
kortvarigt.
Bemærk: *Kun kanal et til otte er tilgængelige som
standard. Kanal 9 til 16 skal aktiveres af
brugeren, før de kan vælges. Kanal 9 til 16 skal
anvendes i lande, hvor myndighederne tillader
brug af disse frekvenser. Kanal 9 til 16 må ikke
anvendes i Rusland.
Valg af interferenseliminatorkode
Interferenseliminatorkoder hjælper med at minimere interferens
ved at blokere transmissioner fra ukendte kilder. Radioen har
121 interferenseliminatorkoder.
Sådan angiver du koden for en kanal:
1. Tryk på knappen Menu to gange, indtil koden "9"
begynder at blinke.
Tasten Menu
Tasten Menu
Tasten Menu
Tasten Menu
Tasten Menu
Tasten Menu
Tasten Menu
Tasten Menu
Tasten Menu
Tasten Menu
Tilstanden Two Way
Kanal (1-8/*1-16)
Delkode (0-121)
Opkaldstone (1-20)
Vibrationsalarm (Til/Fra)
Tastaturtoner (Til/Fra)
Talebekræftelsestoner (Til/Fra)
Kanal til dobbelt overvågning (1-22)
Interferenseliminatorkode til dobbelt overvågning
Stemmestyret transmission
(VOX) (Fra, L1,L2,L3)
MN002243A01_.book Page 6 Tuesday, March 20, 2018 5:27 PM

7
Dansk
2. Tryk på eller for at vælge koden. Du kan trykke og
holde nede for at øge hastigheden for rulning i koder.
3. Tryk på knappen PTT for at forlade menuen eller knappen
Menu for at fortsætte opsætningen.
Indstilling og transmission af opkaldstoner
Radioen kan sende forskellige opkaldstoner til andre radioer i
gruppen, så du kan give dem besked om, at du vil tale. Radioen
har 20 opkaldstoner, som du kan vælge imellem.
Sådan indstiller du en opkaldstone:
1. Tryk på knappen Menu tre gange, indtil ikonet for
opkaldstone vises. Den aktuelle opkaldstoneindstilling
blinker.
2. Tryk på eller for at skifte og høre opkaldstonen.
3. Tryk på knappen PTT for at forlade menuen eller knappen
Menu for at fortsætte opsætningen.
For at transmittere dit opkald til andre radioer, skal du indstille
den samme kanal og interferenseliminatorkode på radioen,
og du skal trykke på knappen Call Tone.
Voice Operated Transmission ()
Transmission startes ved at tale ind i mikrofonen på radioen i
stedet for at trykke på knappen PTT.
1. Tryk på knappen Menu 4 gange, indtil ikonet
vises på skærmen. Den aktuelle indstilling (L1-L3) blinker.
2. Tryk på eller for at vælge følsomhedsniveau.
3. Tryk på knappen PTT for at forlade menuen eller knappen
Menu for at fortsætte opsætningen.
Bemærk: Der er en kort forsinkelse mellem det tidspunkt,
du begynder at tale, og det tidspunkt, hvor
radioen begynder at transmittere.
Overvågning af to kanaler
Giver dig mulighed for at scanne den aktuelle kanal og en
anden kanal skiftevis.
Sådan indstiller du en anden kanal og starter to kanaler:
1. Tryk på knappen Menu 5 gange, indtil ikonet for to
kanaler vises. To kanaler blinker.
2. Tryk på eller for at vælge kanal. Tryk derefter på
knappen Menu.
3. Tryk på eller for at vælge interferenseliminatorkode.
4. Tryk på knappen PTT for at forlade menuen eller knappen
Menu for at fortsætte opsætningen.
5. Radioen starter to kanaler.
Bemærk: Hvis du indstiller den samme kanal og kode som
den aktuelle kanal, slår Overvågning af to kanaler
FRA.
L3 = høj følsomhed til stille omgivelser
L2 = medium følsomhed til de fleste omgivelser
L1 = lav følsomhed til støjende omgivelser
MN002243A01_.book Page 7 Tuesday, March 20, 2018 5:27 PM

Dansk
8
Tilstanden Silent (vibrationsalarm)
Tilstanden Silent (vibrationsalarm) underretter dig om, at din
radio modtager en besked. Dette er nyttigt i støjende
omgivelser. Når alarmen er slået til, vibrerer radioen hvert
30. sekund, når du modtager en besked på den kanal og kode,
du har angivet.
1. Tryk på knappen Menu 7 gange, indtil ikonet for
vibrationsopkald vises. Den aktuelle indstilling blinker.
2. Tryk på eller for at skifte indstillingen til Til/Fra.
3. Tryk på knappen PTT for at forlade menuen eller knappen
Menu for at fortsætte opsætningen.
Tastaturtoner
Du kan aktivere eller deaktivere højttalerens tastaturtoner.
Du kan høre tastetonen, hver gang du trykker på en knap.
1. Tryk på knappen Menu 8 gange, indtil ikonet for
tastaturtone vises. Den aktuelle indstilling Til/Fra blinker.
2. Tryk på enten eller for at slå Til/Fra.
3. Tryk på knappen PTT for at bekræfte eller knappen
Menu for at fortsætte opsætningen.
Bemærk: Følgende deaktiveres ikke, når
tastetonefunktionen er slået FRA:
• Alarmtone for Transmit time-out
• Opkaldstone
• Tone for advarsel om lavt batteriniveau eller
• Tone for den transmitterede samtalebekræftelse
Transmission af tonen for samtalebekræftelse
Du kan indstille radioen til at transmittere en unik tone, når du er
færdig med at transmittere. Det er ligesom at sige "Modtaget"
eller "Skifter" for at lade andre vide, at du er færdig med at tale.
1. Tryk på knappen Menu 9 gange, indtil ikonet for
modtaget-tone vises. Den aktuelle indstilling Til/Fra blinker.
2. Tryk på eller for at slå Til eller Fra.
3. Tryk på knappen PTT for at indstille eller på knappen
Menu for at fortsætte opsætningen.
Tilstanden Emergency Alert
Funktionen Emergency Alert kan bruges til at signalere til
medlemmer i gruppen, at du har brug for akut hjælp. T92 H2O-
radioer kører i en automatisk "håndfri" tilstand for styring af
nødsituation i samlet 30 sekunder, efter Emergency Alert er
aktiveret. T92 H2O-radioer i gruppen flytter automatisk
højttalerlydstyrken til den maksimale indstilling og afgiver en
syngende alarmtone i 8 sekunder. Alarmtonen udsendes fra din
egen radiohøjttaler og de modtagende radioer i gruppen. Efter
alarmen på 8 sekunder vil alle talte ord eller tilfældige lyde fra
din ende blive transmitteret til gruppen i 22 sekunder. I de
30 sekunder, som tilstanden Emergency Alert varer, vil T92
H2O-radioens betjeningselementer og knapper låses for at
maksimere modtagelsen af nødmeddelelsen.
1 Tryk på knappen Emergency Alert, og hold den nede i
3 sekunder.
2. Slip knappen, og alarmtonen begynder at lyde. Samtidig
aktiverer den det RØDE indikatorblink. Du behøver ikke
fortsætte med at holde knappen Emergensy Alert nede eller
bruge PTT for at transmittere din besked.
ADVARSEL: Funktionen Emergency Alert må kun bruges i
tilfælde af en virkelig nødsituation. Motorola Solutions er
ikke ansvarlig, hvis der ikke sker reaktion fra
modtagergruppen på nødsituationsalarmen.
MN002243A01_.book Page 8 Tuesday, March 20, 2018 5:27 PM
Sayfa yükleniyor ...
Sayfa yükleniyor ...
Sayfa yükleniyor ...
Sayfa yükleniyor ...
Sayfa yükleniyor ...
Sayfa yükleniyor ...
Sayfa yükleniyor ...
Sayfa yükleniyor ...
Sayfa yükleniyor ...
Sayfa yükleniyor ...
Sayfa yükleniyor ...
Sayfa yükleniyor ...
Sayfa yükleniyor ...
Sayfa yükleniyor ...
Sayfa yükleniyor ...
Sayfa yükleniyor ...
Sayfa yükleniyor ...
Sayfa yükleniyor ...
Sayfa yükleniyor ...
Sayfa yükleniyor ...
Sayfa yükleniyor ...
Sayfa yükleniyor ...
Sayfa yükleniyor ...
Sayfa yükleniyor ...
Sayfa yükleniyor ...
Sayfa yükleniyor ...
Sayfa yükleniyor ...
Sayfa yükleniyor ...
Sayfa yükleniyor ...
Sayfa yükleniyor ...
Sayfa yükleniyor ...
Sayfa yükleniyor ...
Sayfa yükleniyor ...
Sayfa yükleniyor ...
Sayfa yükleniyor ...
Sayfa yükleniyor ...
Sayfa yükleniyor ...
Sayfa yükleniyor ...
Sayfa yükleniyor ...
Sayfa yükleniyor ...
Sayfa yükleniyor ...
Sayfa yükleniyor ...
Sayfa yükleniyor ...
Sayfa yükleniyor ...
Sayfa yükleniyor ...
Sayfa yükleniyor ...
Sayfa yükleniyor ...
Sayfa yükleniyor ...
Sayfa yükleniyor ...
Sayfa yükleniyor ...
Sayfa yükleniyor ...
Sayfa yükleniyor ...
Sayfa yükleniyor ...
Sayfa yükleniyor ...
Sayfa yükleniyor ...
Sayfa yükleniyor ...
Sayfa yükleniyor ...
Sayfa yükleniyor ...
Sayfa yükleniyor ...
Sayfa yükleniyor ...
Sayfa yükleniyor ...
Sayfa yükleniyor ...
Sayfa yükleniyor ...
Sayfa yükleniyor ...
Sayfa yükleniyor ...
Sayfa yükleniyor ...
Sayfa yükleniyor ...
Sayfa yükleniyor ...
Sayfa yükleniyor ...
Sayfa yükleniyor ...
Sayfa yükleniyor ...
Sayfa yükleniyor ...
Sayfa yükleniyor ...
Sayfa yükleniyor ...
Sayfa yükleniyor ...
Sayfa yükleniyor ...
Sayfa yükleniyor ...
Sayfa yükleniyor ...
Sayfa yükleniyor ...
Sayfa yükleniyor ...
Sayfa yükleniyor ...
Sayfa yükleniyor ...
Sayfa yükleniyor ...
Sayfa yükleniyor ...
Sayfa yükleniyor ...
Sayfa yükleniyor ...
Sayfa yükleniyor ...
Sayfa yükleniyor ...
Sayfa yükleniyor ...
Sayfa yükleniyor ...
Sayfa yükleniyor ...
Sayfa yükleniyor ...
Sayfa yükleniyor ...
Sayfa yükleniyor ...
Sayfa yükleniyor ...
Sayfa yükleniyor ...
Sayfa yükleniyor ...
Sayfa yükleniyor ...
Sayfa yükleniyor ...
Sayfa yükleniyor ...
Sayfa yükleniyor ...
Sayfa yükleniyor ...
Sayfa yükleniyor ...
Sayfa yükleniyor ...
Sayfa yükleniyor ...
Sayfa yükleniyor ...
Sayfa yükleniyor ...
Sayfa yükleniyor ...
Sayfa yükleniyor ...
Sayfa yükleniyor ...
Sayfa yükleniyor ...
Sayfa yükleniyor ...
Sayfa yükleniyor ...
Sayfa yükleniyor ...
Sayfa yükleniyor ...
Sayfa yükleniyor ...
Sayfa yükleniyor ...
Sayfa yükleniyor ...
Sayfa yükleniyor ...
Sayfa yükleniyor ...
Sayfa yükleniyor ...
Sayfa yükleniyor ...
Sayfa yükleniyor ...
Sayfa yükleniyor ...
Sayfa yükleniyor ...
Sayfa yükleniyor ...
Sayfa yükleniyor ...
Sayfa yükleniyor ...
Sayfa yükleniyor ...
Sayfa yükleniyor ...
Sayfa yükleniyor ...
Sayfa yükleniyor ...
Sayfa yükleniyor ...
Sayfa yükleniyor ...
Sayfa yükleniyor ...
Sayfa yükleniyor ...
Sayfa yükleniyor ...
Sayfa yükleniyor ...
Sayfa yükleniyor ...
Sayfa yükleniyor ...
Sayfa yükleniyor ...
Sayfa yükleniyor ...
Sayfa yükleniyor ...
Sayfa yükleniyor ...
Sayfa yükleniyor ...
Sayfa yükleniyor ...
Sayfa yükleniyor ...
Sayfa yükleniyor ...
Sayfa yükleniyor ...
Sayfa yükleniyor ...
Sayfa yükleniyor ...
Sayfa yükleniyor ...
Sayfa yükleniyor ...
Sayfa yükleniyor ...
Sayfa yükleniyor ...
Sayfa yükleniyor ...
Sayfa yükleniyor ...
Sayfa yükleniyor ...
Sayfa yükleniyor ...
Sayfa yükleniyor ...
Sayfa yükleniyor ...
Sayfa yükleniyor ...
Sayfa yükleniyor ...
Sayfa yükleniyor ...
Sayfa yükleniyor ...
Sayfa yükleniyor ...
Sayfa yükleniyor ...
Sayfa yükleniyor ...
Sayfa yükleniyor ...
Sayfa yükleniyor ...
Sayfa yükleniyor ...
Sayfa yükleniyor ...
Sayfa yükleniyor ...
Sayfa yükleniyor ...
Sayfa yükleniyor ...
Sayfa yükleniyor ...
Sayfa yükleniyor ...
Sayfa yükleniyor ...
Sayfa yükleniyor ...
Sayfa yükleniyor ...
Sayfa yükleniyor ...
Sayfa yükleniyor ...
Sayfa yükleniyor ...
Sayfa yükleniyor ...
-
 1
1
-
 2
2
-
 3
3
-
 4
4
-
 5
5
-
 6
6
-
 7
7
-
 8
8
-
 9
9
-
 10
10
-
 11
11
-
 12
12
-
 13
13
-
 14
14
-
 15
15
-
 16
16
-
 17
17
-
 18
18
-
 19
19
-
 20
20
-
 21
21
-
 22
22
-
 23
23
-
 24
24
-
 25
25
-
 26
26
-
 27
27
-
 28
28
-
 29
29
-
 30
30
-
 31
31
-
 32
32
-
 33
33
-
 34
34
-
 35
35
-
 36
36
-
 37
37
-
 38
38
-
 39
39
-
 40
40
-
 41
41
-
 42
42
-
 43
43
-
 44
44
-
 45
45
-
 46
46
-
 47
47
-
 48
48
-
 49
49
-
 50
50
-
 51
51
-
 52
52
-
 53
53
-
 54
54
-
 55
55
-
 56
56
-
 57
57
-
 58
58
-
 59
59
-
 60
60
-
 61
61
-
 62
62
-
 63
63
-
 64
64
-
 65
65
-
 66
66
-
 67
67
-
 68
68
-
 69
69
-
 70
70
-
 71
71
-
 72
72
-
 73
73
-
 74
74
-
 75
75
-
 76
76
-
 77
77
-
 78
78
-
 79
79
-
 80
80
-
 81
81
-
 82
82
-
 83
83
-
 84
84
-
 85
85
-
 86
86
-
 87
87
-
 88
88
-
 89
89
-
 90
90
-
 91
91
-
 92
92
-
 93
93
-
 94
94
-
 95
95
-
 96
96
-
 97
97
-
 98
98
-
 99
99
-
 100
100
-
 101
101
-
 102
102
-
 103
103
-
 104
104
-
 105
105
-
 106
106
-
 107
107
-
 108
108
-
 109
109
-
 110
110
-
 111
111
-
 112
112
-
 113
113
-
 114
114
-
 115
115
-
 116
116
-
 117
117
-
 118
118
-
 119
119
-
 120
120
-
 121
121
-
 122
122
-
 123
123
-
 124
124
-
 125
125
-
 126
126
-
 127
127
-
 128
128
-
 129
129
-
 130
130
-
 131
131
-
 132
132
-
 133
133
-
 134
134
-
 135
135
-
 136
136
-
 137
137
-
 138
138
-
 139
139
-
 140
140
-
 141
141
-
 142
142
-
 143
143
-
 144
144
-
 145
145
-
 146
146
-
 147
147
-
 148
148
-
 149
149
-
 150
150
-
 151
151
-
 152
152
-
 153
153
-
 154
154
-
 155
155
-
 156
156
-
 157
157
-
 158
158
-
 159
159
-
 160
160
-
 161
161
-
 162
162
-
 163
163
-
 164
164
-
 165
165
-
 166
166
-
 167
167
-
 168
168
-
 169
169
-
 170
170
-
 171
171
-
 172
172
-
 173
173
-
 174
174
-
 175
175
-
 176
176
-
 177
177
-
 178
178
-
 179
179
-
 180
180
-
 181
181
-
 182
182
-
 183
183
-
 184
184
-
 185
185
-
 186
186
-
 187
187
-
 188
188
-
 189
189
-
 190
190
-
 191
191
-
 192
192
-
 193
193
-
 194
194
-
 195
195
-
 196
196
-
 197
197
-
 198
198
-
 199
199
-
 200
200
-
 201
201
-
 202
202
-
 203
203
-
 204
204


Motorola TALKABOUT T92 H2O El kitabı
- Kategori
- Iki yönlü telsizler
- Tip
- El kitabı
Diğer dillerde
- español: Motorola TALKABOUT T92 H2O El manual del propietario
- français: Motorola TALKABOUT T92 H2O Le manuel du propriétaire
- italiano: Motorola TALKABOUT T92 H2O Manuale del proprietario
- svenska: Motorola TALKABOUT T92 H2O Bruksanvisning
- polski: Motorola TALKABOUT T92 H2O Instrukcja obsługi
- Deutsch: Motorola TALKABOUT T92 H2O Bedienungsanleitung
- português: Motorola TALKABOUT T92 H2O Manual do proprietário
- English: Motorola TALKABOUT T92 H2O Owner's manual
- dansk: Motorola TALKABOUT T92 H2O Brugervejledning
- русский: Motorola TALKABOUT T92 H2O Инструкция по применению
- suomi: Motorola TALKABOUT T92 H2O Omistajan opas
- Nederlands: Motorola TALKABOUT T92 H2O de handleiding
İlgili Makaleler
-
Motorola Talkabout T62 Blue/Black (2 штуки) Kullanım kılavuzu
-
Motorola Talkie Walkie Twin Pack T62 Bleu Kullanım kılavuzu
-
-
-
Motorola XTR446 Kullanım kılavuzu
-
Zebra T6 Walkie Talkie El kitabı
-
-
-
-
Motorola XT460 Kullanma talimatları