DeWalt DCD700 Kullanım kılavuzu
- Kategori
- Elektrikli aletler
- Tip
- Kullanım kılavuzu

DCD700

B
Copyright DeWALT
English (original instructions) 3
Türkçe (orijinal talimatlardan çevrilmiştir) 12

1
Fig. A
Fig. B
7
43
5
9
7
6
2
1
8
7
6
6

2
Fig. C
Fig. E
Fig. G
Fig. D
Fig. F
3
4
9

ENGLISH
3
WARNING: To reduce the risk of injury, read the
instructionmanual.
Definitions: Safety Guidelines
The definitions below describe the level of severity for each
signal word. Please read the manual and pay attention to
thesesymbols.
DANGER: Indicates an imminently hazardous
situation which, if not avoided, will result in death or
seriousinjury.
WARNING: Indicates a potentially hazardous situation
which, if not avoided, could result in death or
seriousinjury.
CAUTION: Indicates a potentially hazardous situation
which, if not avoided, may result in minor or
moderateinjury.
NOTICE: Indicates a practice not related to
personal injury which, if not avoided, may result in
propertydamage.
Denotes risk of electricshock.
Denotes risk offire.
EC-Declaration of Conformity
Machinery Directive
12V Cordless Adjustable Clutch Drill/Driver
DCD700
DeWALT declares that these products described under
Technical Data are in compliance with:
2006/42/EC, EN62841-1-2015, EN62841-2-1:2018.
These products also comply with Directive 2014/30/EU and
2011/65/EU. For more information, please contact DeWALT at
the following address or refer to the back of themanual.
The undersigned is responsible for compilation of the technical
file and makes this declaration on behalf ofDeWALT.
Markus Rompel
Vice-President Engineering, PTE-Europe
DeWALT, Richard-Klinger-Straße 11,
D-65510, Idstein, Germany
26.11.2019
The vibration and/or noise emission level given in this
information sheet has been measured in accordance with
a standardised test given in EN62841 and may be used to
compare one tool with another. It may be used for a preliminary
assessment ofexposure.
WARNING: The declared vibration and/or noise emission
level represents the main applications of the tool. However
if the tool is used for different applications, with different
accessories or poorly maintained, the vibration and/or
noise emission may differ. This may significantly increase
the exposure level over the total workingperiod.
An estimation of the level of exposure to vibration and/
or noise should also take into account the times when the
tool is switched off or when it is running but not actually
doing the job. This may significantly reduce the exposure
level over the total workingperiod.
Identify additional safety measures to protect the
operator from the effects of vibration and/or noise such
as: maintain the tool and the accessories, keep the
DCD700
Voltage
Peak V
DC
12
Rated V
DC
10.8
Type 2/3/4/5
Battery type Li-Ion
No-load speed:
1st gear
2nd gear
min
-1
min
-1
0–400
0–1500
Max torque (hard/soft) Nm 24/15
Power output W 180
Chuck capacity mm 10
Maximum drilling capacity:
Wood
Metal
mm
mm
20
10
Weight (without battery pack) kg 0.91
Noise values and/or vibration values (triax vector sum) according to EN62841
L
PA
(emission sound pressure level) dB(A) 65
L
WA
(sound power level) dB(A) 76
K (uncertainty for the given sound level) dB(A) 5
Vibration emission value a
h
= m/s
2
< 2.5
Uncertainty K = m/s
2
1.5
English (original instructions)
Congratulations!
You have chosen a DeWALT tool. Years of experience, thorough
product development and innovation make DeWALT one of the
most reliable partners for professional power toolusers.
Technical Data
12V CORDLESS ADJUSTABLE CLUTCH DRILL/DRIVER
DCD700
hands warm (relevant for vibration), organisation of
workpatterns.

4
ENGLISH
GENERAL POWER TOOL SAFETY WARNINGS
WARNING: Read all safety warnings, instructions,
illustrations and specifications provided with this
power tool. Failure to follow all instructions listed below
may result in electric shock, fire and/or serious injury.
SAVE ALL WARNINGS AND INSTRUCTIONS
FOR FUTURE REFERENCE.
The term “power tool” in the warnings refers to your mains-
operated (corded) power tool or battery-operated (cordless)
powertool.
1) Work Area Safety
a ) Keep work area clean and well lit. Cluttered or dark
areas inviteaccidents.
b ) Do not operate power tools in explosive
atmospheres, such as in the presence of flammable
liquids, gases or dust. Power tools create sparks which
may ignite the dust orfumes.
c ) Keep children and bystanders away while operating
a power tool. Distractions can cause you to losecontrol.
2) Electrical Safety
a ) Power tool plugs must match the outlet. Never
modify the plug in any way. Do not use any adapter
plugs with earthed (grounded) power tools.
Unmodified plugs and matching outlets will reduce risk of
electricshock.
b ) Avoid body contact with earthed or grounded
surfaces, such as pipes, radiators, ranges and
refrigerators. There is an increased risk of electric shock if
your body is earthed orgrounded.
c ) Do not expose power tools to rain or wet conditions.
Water entering a power tool will increase the risk of
electricshock.
d ) Do not abuse the cord. Never use the cord for
carrying, pulling or unplugging the power tool. Keep
cord away from heat, oil, sharp edges or moving
parts. Damaged or entangled cords increase the risk of
electricshock.
e ) When operating a power tool outdoors, use an
extension cord suitable for outdoor use. Use of a cord
suitable for outdoor use reduces the risk of electricshock.
f ) If operating a power tool in a damp location is
unavoidable, use a residual current device (RCD)
protected supply. Use of an RCD reduces the risk of
electricshock.
3) Personal Safety
a ) Stay alert, watch what you are doing and use
common sense when operating a power tool. Do not
use a power tool while you are tired or under the
influence of drugs, alcohol or medication. A moment
of inattention while operating power tools may result in
serious personalinjury.
b ) Use personal protective equipment. Always wear eye
protection. Protective equipment such as a dust mask,
non-skid safety shoes, hard hat or hearing protection used
for appropriate conditions will reduce personalinjuries.
c ) Prevent unintentional starting. Ensure the switch
is in the off-position before connecting to power
source and/or battery pack, picking up or carrying
the tool. Carrying power tools with your finger on the
switch or energising power tools that have the switch on
invitesaccidents.
d ) Remove any adjusting key or wrench before turning
the power tool on. A wrench or a key left attached
to a rotating part of the power tool may result in
personalinjury.
e ) Do not overreach. Keep proper footing and balance
at all times. This enables better control of the power tool
in unexpectedsituations.
f ) Dress properly. Do not wear loose clothing or
jewellery. Keep your hair and clothing away from
moving parts. Loose clothes, jewellery or long hair can be
caught in movingparts.
g ) If devices are provided for the connection of dust
extraction and collection facilities, ensure these are
connected and properly used. Use of dust collection
can reduce dust-relatedhazards.
h ) Do not let familiarity gained from frequent use of
tools allow you to become complacent and ignore
tool safety principles. A careless action can cause severe
injury within a fraction of asecond.
4) Power Tool Use and Care
a ) Do not force the power tool. Use the correct power
tool for your application. The correct power tool
will do the job better and safer at the rate for which it
wasdesigned.
b ) Do not use the power tool if the switch does not turn
it on and off. Any power tool that cannot be controlled
with the switch is dangerous and must berepaired.
c ) Disconnect the plug from the power source and/
or remove the battery pack, if detachable, from
the power tool before making any adjustments,
Batteries Chargers/Charge Times (Minutes)
Cat # V
DC
Ah
Weight
kg
DCB104 DCB107 DCB110 DCB112 DCB113 DCB115 DCB118 DCB132 DCB119
DCB122 12 2.0 0.22 30 90 90 60 50 30 X 30 60
DCB124 12 3.0 0.25 45 140 140 90 70 45 45 45 90
DCB125 12 1.3 0.20 22 60 60 40 30 22 X 22 40
DCB127 12 2.0 0.20 30 90 90 60 50 30 X 30 60
Batteries
Chargers/Charge Times (Minutes)
Cat #
DC
Weight
*Date code 201811475B or later
**Date code 201536 or later

5
ENGLISH
Residual Risks
In spite of the application of the relevant safety regulations
and the implementation of safety devices, certain residual risks
cannot be avoided. These are:
• Impairment ofhearing.
• Risk of personal injury due to flyingparticles.
• Risk of burns due to accessories becoming hot
duringoperation.
• Risk of personal injury due to prolongeduse.
SAVE THESE INSTRUCTIONS
Safety Instructions When Using Long
DrillBits
• Never operate at higher speed than the maximum
speed rating of the drill bit. At higher speeds, the bit is likely
to bend if allowed to rotate freely without contacting the
workpiece, resulting in personalinjury.
• Always start drilling at low speed and with the bit tip
in contact with the workpiece. At higher speeds, the bit is
likely to bend if allowed to rotate freely without contacting the
workpiece, resulting in personalinjury.
• Apply pressure only in direct line with the bit and do not
apply excessive pressure. Bits can bend causing breakage or
loss of control, resulting in personalinjury.
Chargers
DeWALT chargers require no adjustment and are designed to be
as easy as possible tooperate.
Electrical Safety
The electric motor has been designed for one voltage only.
Always check that the battery pack voltage corresponds to the
voltage on the rating plate. Also make sure that the voltage of
your charger corresponds to that of yourmains.
Additional Specific Safety Rules for Drill/
Drivers
• Wear ear protectors when impact drilling. Exposure to
noise can cause hearingloss.
• Use auxiliary handle(s), if supplied with the tool. Loss of
control can cause personalinjury.
• Hold power tool by insulated gripping surfaces when
performing an operation where the cutting accessory
may contact hidden wiring or its own cord. Cutting
accessory contacting a “live” wire may make exposed metal
parts of the power tool “live” and could give the operator an
electricshock.
changing accessories, or storing power tools. Such
preventive safety measures reduce the risk of starting the
power toolaccidentally.
d ) Store idle power tools out of the reach of children
and do not allow persons unfamiliar with the power
tool or these instructions to operate the power tool.
Power tools are dangerous in the hands of untrainedusers.
e ) Maintain power tools and accessories. Check for
misalignment or binding of moving parts, breakage
of parts and any other condition that may affect the
power tool’s operation. If damaged, have the power
tool repaired before use. Many accidents are caused by
poorly maintained powertools.
f ) Keep cutting tools sharp and clean. Properly
maintained cutting tools with sharp cutting edges are less
likely to bind and are easier tocontrol.
g ) Use the power tool, accessories and tool bits etc.
in accordance with these instructions, taking into
account the working conditions and the work to be
performed. Use of the power tool for operations different
from those intended could result in a hazardoussituation.
h ) Keep handles and grasping surfaces dry, clean and
free from oil and grease. Slippery handles and grasping
surfaces do not allow for safe handling and control of the
tool in unexpectedsituations.
5) Battery Tool Use and Care
a ) Recharge only with the charger specified by the
manufacturer. A charger that is suitable for one type
of battery pack may create a risk of fire when used with
another batterypack.
b ) Use power tools only with specifically designated
battery packs. Use of any other battery packs may create
a risk of injury andfire.
c ) When battery pack is not in use, keep it away from
other metal objects, like paper clips, coins, keys,
nails, screws or other small metal objects, that can
make a connection from one terminal to another.
Shorting the battery terminals together may cause burns
or afire.
d ) Under abusive conditions, liquid may be ejected
from the battery; avoid contact. If contact
accidentally occurs, flush with water. If liquid
contacts eyes, additionally seek medical help. Liquid
ejected from the battery may cause irritation orburns.
e ) Do not use a battery pack or tool that is damaged or
modified. Damaged or modified batteries may exhibit
unpredictable behaviour resulting in fire, explosion or risk
of injury.
f ) Do not expose a battery pack or tool to fire or
excessive temperature. Exposure to fire or temperature
above 130 °C may causeexplosion.
g ) Follow all charging instructions and do not charge
the battery pack or tool outside the temperature
range specified in the instructions. Charging
improperly or at temperatures outside the specified range
may damage the battery and increase the risk of fire.
6) Service
a ) Have your power tool serviced by a qualified repair
person using only identical replacement parts. This
will ensure that the safety of the power tool is maintained.
b ) Never service damaged battery packs. Service
of battery packs should only be performed by the
manufacturer or authorized service providers.

6
ENGLISH
• These chargers are not intended for any uses other than
charging DeWALT rechargeable batteries. Any other uses
may result in risk of fire, electric shock orelectrocution.
• Do not expose charger to rain orsnow.
• Pull by plug rather than cord when disconnecting
charger. This will reduce risk ofdamage to electric plug
andcord.
• Make sure that cord is located so that it will not be
stepped on, tripped over, or otherwise subjected to
damage orstress.
• Do not use an extension cord unless it is absolutely
necessary. Use of improper extension cord could result in risk
of fire,electric shock, orelectrocution.
• Do not place any object on top of charger or place
the charger on a soft surface that might block the
ventilation slots and result in excessive internal heat.
Place the charger in a position away from any heat source. The
charger is ventilated through slots in the top and the bottom
of thehousing.
• Do not operate charger with damaged cord or plug—
have them replacedimmediately.
• Do not operate charger if it has received a sharp blow,
been dropped, or otherwise damaged in any way. Take it
to an authorised servicecentre.
• Do not disassemble charger; take it to an authorised
service centre when service or repair is required. Incorrect
reassembly may result in a risk of electric shock, electrocution
orfire.
• In case of damaged power supply cord the supply cord must
be replaced immediately by the manufacturer, its service agent
or similar qualified person to prevent anyhazard.
• Disconnect the charger from the outlet before
attempting any cleaning. This will reduce the risk of
electric shock. Removing the battery pack will not reduce
thisrisk.
• NEVER attempt to connect two chargerstogether.
• The charger is designed to operate on standard
230V household electrical power. Do not attempt to
use it on any other voltage. This does not apply to the
vehicularcharger.
Charging a Battery (Fig. B)
1. Plug the charger into an appropriate outlet before inserting
battery pack.
2. Insert the battery pack
7
into the charger, making sure the
battery pack is fully seated in the charger. The red (charging)
light will blink repeatedly indicating that the charging
process has started.
3. The completion of charge will be indicated by the red
light remaining ON continuously. The battery pack is fully
charged and may be used at this time or left in the charger.
To remove the battery pack from the charger, push the
battery release button
6
on the battery pack.
NOTE: To ensure maximum performance and life of lithium-ion
battery packs, charge the battery pack fully before first use.
Your DeWALT charger is double insulated in
accordance with EN60335; therefore no earth wire
isrequired.
If the supply cord is damaged, it must be replaced by a
specially prepared cord available through the DeWALT
serviceorganisation.
Mains Plug Replacement
(U.K. & Ireland Only)
If a new mains plug needs to be fitted:
• Safely dispose of the oldplug.
• Connect the brown lead to the live terminal in theplug.
• Connect the blue lead to the neutralterminal.
WARNING: No connection is to be made to the
earthterminal.
Follow the fitting instructions supplied with good quality plugs.
Recommended fuse: 3A.
Using an Extension Cable
An extension cord should not be used unless absolutely
necessary. Use an approved extension cable suitable for
the power input of your charger (see Technical Data). The
minimum conductor size is 1mm
2
; the maximum length
is30m.
When using a cable reel, always unwind the cablecompletely.
Important Safety Instructions for All Battery
Chargers
SAVE THESE INSTRUCTIONS: This manual contains important
safety and operating instructions for compatible battery
chargers (refer to TechnicalData).
• Before using charger, read all instructions and cautionary
markings on charger, battery pack, and product using
batterypack.
WARNING: Shock hazard. Do not allow any liquid to get
inside charger. Electric shock mayresult.
WARNING: We recommend the use of a residual current
device with a residual current rating of 30mA orless.
CAUTION: Burn hazard. To reduce the risk of injury,
charge only DeWALT rechargeable batteries. Other types of
batteries may burst causing personal injury anddamage.
CAUTION: Children should be supervised to ensure that
they do not play with theappliance.
NOTICE: Under certain conditions, with the charger
plugged into the power supply, the exposed charging
contacts inside the charger can be shorted by foreign
material. Foreign materials of a conductive nature such
as, but not limited to, steel wool, aluminum foil or any
buildup of metallic particles should be kept away from
charger cavities. Always unplug the charger from the
power supply when there is no battery pack in the cavity.
Unplug charger before attempting to clean
• DO NOT attempt to charge the battery pack with any
chargers other than the ones in this manual. The charger
and battery pack are specifically designed to worktogether.

7
ENGLISH
Battery Packs
Important Safety Instructions for All Battery
Packs
When ordering replacement battery packs, be sure to include
catalogue number and voltage.
The battery pack is not fully charged out of the carton. Before
using the battery pack and charger, read the safety instructions
below. Then follow charging procedures outlined.
READ ALL INSTRUCTIONS
• Do not charge or use battery in explosive atmospheres,
such as in the presence of flammable liquids, gases or
dust. Inserting or removing the battery from the charger may
ignite the dust or fumes.
• Never force battery pack into charger. Do not modify
battery pack in any way to fit into a non-compatible
charger as battery pack may rupture causing serious
personal injury.
• Charge the battery packs only in DeWALT chargers.
• DO NOT splash or immerse in water or other liquids.
• Do not store or use the tool and battery pack in
locations where the temperature may reach or exceed
40 ˚C (104 ˚F) (such as outside sheds or metal buildings
in summer).
• Do not incinerate the battery pack even if it is severely
damaged or is completely worn out. The battery pack can
explode in a fire. Toxic fumes and materials are created when
lithium-ion battery packs are burned.
• If battery contents come into contact with the skin,
immediately wash area with mild soap and water. If
battery liquid gets into the eye, rinse water over the open eye
for 15 minutes or until irritation ceases. If medical attention
is needed, the battery electrolyte is composed of a mixture of
liquid organic carbonates and lithium salts.
• Contents of opened battery cells may cause respiratory
irritation. Provide fresh air. If symptoms persists, seek
medicalattention.
WARNING: Burn hazard. Battery liquid may be flammable
if exposed to spark or flame.
WARNING: Never attempt to open the battery pack for
any reason. If battery pack case is cracked or damaged,
do not insert into charger. Do not crush, drop or damage
battery pack. Do not use a battery pack or charger that
has received a sharp blow, been dropped, run over or
damaged in any way (i.e., pierced with a nail, hit with
a hammer, stepped on). Electric shock or electrocution
may result. Damaged battery packs should be returned to
service centre for recycling.
WARNING: Fire hazard. Do not store or carry the
battery pack so that metal objects can contact
exposed battery terminals. For example, do not place
the battery pack in aprons, pockets, tool boxes, product kit
boxes, drawers, etc., with loose nails, screws, keys, etc.
Charger Operation
Refer to the indicators below for the charge status of the
batterypack.
Charge Indicators
Charging
Fully Charged
Hot/Cold Pack Delay*
* The red light will continue to blink, but a yellow indicator light
will be illuminated during this operation. Once the battery pack
has reached an appropriate temperature, the yellow light will
turn off and the charger will resume the charging procedure.
The compatible charger(s) will not charge a faulty battery pack.
The charger will indicate faulty battery by refusing to light.
NOTE: This could also mean a problem with a charger.
If the charger indicates a problem, take the charger and battery
pack to be tested at an authorised service centre.
Hot/Cold Pack Delay
When the charger detects a battery pack that is too hot or too
cold, it automatically starts a Hot/Cold Pack Delay, suspending
charging until the battery pack has reached an appropriate
temperature. The charger then automatically switches to the
pack charging mode. This feature ensures maximum battery
pack life.
A cold battery pack will charge at a slower rate than a warm
battery pack. The battery pack will charge at that slower rate
throughout the entire charging cycle and will not return to
maximum charge rate even if the battery pack warms.
Electronic Protection System
XR Li-Ion tools are designed with an Electronic Protection
System that will protect the battery pack against overloading,
overheating or deep discharge.
The tool will automatically turn off if the Electronic Protection
System engages. If this occurs, place the lithium-ion battery
pack on the charger until it is fully charged.
Wall Mounting
These chargers are designed to be wall mountable or to sit
upright on a table or work surface. If wall mounting, locate the
charger within reach of an electrical outlet, and away from a
corner or other obstructions which may impede air flow. Use
the back of the charger as a template for the location of the
mounting screws on the wall. Mount the charger securely using
drywall screws (purchased separately) at least 25.4mm long
with a screw head diameter of 7–9mm, screwed into wood to
an optimal depth leaving approximately 5.5mm of the screw
exposed. Align the slots on the back of the charger with the
exposed screws and fully engage them in the slots.
Charger Cleaning Instructions
WARNING: Shock hazard. Disconnect the charger
from the AC outlet before cleaning. Dirt and grease
may be removed from the exterior of the charger using a
cloth or soft non-metallic brush. Do not use water or any
cleaning solutions. Never let any liquid get inside the tool;
never immerse any part of the tool into a liquid.

8
ENGLISH
Battery Type
The DCD700 operates on a 12 volt batterypack.
These battery packs may be used: DCB122, DCB124, DCB125,
DCB127. Refer to Technical Data for moreinformation.
Package Contents
The package contains:
1 Drill/driver
1 Charger
2 Batteries
1 Kitbox
1 Li-Ion battery pack (C1, D1, L1, M1, P1, S1, T1, X1, Y1 models)
2 Li-Ion battery packs (C2, D2, L2, M2, P2, S2, T2, X2, Y2 models)
3 Li-Ion battery packs (C3, D3, L3, M3, P3, S3, T3, X3, Y3 models)
1 Instruction manual
Labels on Charger and Battery Pack
In addition to the pictographs used in this manual, the labels
on the charger and the battery pack may show the following
pictographs:
Read instruction manual before use.
See Technical Data for charging time.
Do not probe with conductive objects.
Do not charge damaged battery packs.
Do not expose to water.
Have defective cords replaced immediately.
Charge only between 4 ˚C and 40 ˚C.
Only for indoor use.
Discard the battery pack with due care for the
environment.
Charge DeWALT battery packs only with designated
DeWALT chargers. Charging battery packs other
than the designated DeWALT batteries with a
DeWALT charger may make them burst or lead to
other dangerous situations.
Do not incinerate the battery pack.
CAUTION: When not in use, place tool on its side on
a stable surface where it will not cause a tripping
or falling hazard. Some tools with large battery packs
will stand upright on the battery pack but may be easily
knocked over.
Transportation
WARNING: Fire hazard. Transporting batteries can
possibly cause fire if the battery terminals inadvertently
come in contact with conductive materials. When
transporting batteries, make sure that the battery
terminals are protected and well insulated from
materials that could contact them and cause a short
circuit. NOTE: Lithium-ion batteries should not be put in
checkedbaggage.
DeWALT batteries comply with all applicable shipping
regulations as prescribed by industry and legal standards which
include UN Recommendations on the Transport of Dangerous
Goods; International Air Transport Association (IATA) Dangerous
Goods Regulations, International Maritime Dangerous Goods
(IMDG) Regulations, and the European Agreement Concerning
The International Carriage of Dangerous Goods by Road (ADR).
Lithium-ion cells and batteries have been tested to section 38.3
of the UN Recommendations on the Transport of Dangerous
Goods Manual of Tests and Criteria.
In most instances, shipping a DeWALT battery pack will be
excepted from being classified as a fully regulated Class 9
Hazardous Material. In general, only shipments containing a
lithium-ion battery with an energy rating greater than 100 Watt
Hours (Wh) will require being shipped as fully regulated Class 9.
All lithium-ion batteries have the Watt Hour rating marked on
the pack. Furthermore, due to regulation complexities, DeWALT
does not recommend air shipping lithium-ion battery packs
alone regardless of Watt Hour rating. Shipments of tools with
batteries (combo kits) can be air shipped as excepted if the Watt
Hour rating of the battery pack is no greater than 100 Whr.
Regardless of whether a shipment is considered excepted
or fully regulated, it is the shipper's responsibility to consult
the latest regulations for packaging, labeling/marking and
documentation requirements.
The information provided in this section of the manual is
provided in good faith and believed to be accurate at the time
the document was created. However, no warranty, expressed or
implied, is given. It is the buyer’s responsibility to ensure that its
activities comply with the applicable regulations.
Storage Recommendations
1. The best storage place is one that is cool and dry away
from direct sunlight and excess heat or cold. For optimum
battery performance and life, store battery packs at room
temperature when not in use.
2. For long storage, it is recommended to store a fully charged
battery pack in a cool, dry place out of the charger for
optimal results.
NOTE: Battery packs should not be stored completely depleted
of charge. The battery pack will need to be recharged before
use.

9
ENGLISH
Proper Hand Position (Fig. G)
WARNING: To reduce the risk of serious personal injury,
ALWAYS use proper hand position asshown.
WARNING: To reduce the risk of serious personal
injury, ALWAYS hold securely in anticipation of a
suddenreaction.
OPERATION
Instructions for Use
WARNING: Always observe the safety instructions and
applicableregulations.
WARNING: To reduce the risk of serious personal
injury, turn tool off and disconnect battery pack
before making any adjustments or removing/
installing attachments or accessories. An accidental
start-up can cause injury.
Inserting and Removing the Battery Pack
from the Tool (Fig. B)
NOTE: Make sure your battery pack
7
is fullycharged.
To Install the Battery Pack into the Tool Handle
1. Align the battery pack
7
with the rails inside the tool’s
handle (Fig. B).
2. Slide it into the handle until the battery pack is firmly seated
in the tool and ensure that you hear the lock snap intoplace.
To Remove the Battery Pack from the Tool
1. Press the release button
6
and firmly pull the battery pack
out of the toolhandle.
2. Insert battery pack into the charger as described in the
charger section of thismanual.
Fuel Gauge Battery Packs (Fig. B)
Some DeWALT battery packs include a fuel gauge which
consists of three green LED lights that indicate the level of
charge remaining in the batterypack.
To actuate the fuel gauge, press and hold the fuel gauge button.
A combination of the three green LED lights will illuminate
designating the level of charge left. When the level of charge
in the battery is below the usable limit, the fuel gauge will not
illuminate and the battery will need to berecharged.
NOTE: The fuel gauge is only an indication of the charge left on
the battery pack. It does not indicate tool functionality and is
subject to variation based on product components, temperature
and end-userapplication.
ASSEMBLY AND ADJUSTMENTS
WARNING: To reduce the risk of serious personal
injury, turn tool off and disconnect battery pack
before making any adjustments or removing/
installing attachments or accessories. An accidental
start-up can causeinjury.
WARNING:Use only DeWALT battery packs andchargers.
Description (Fig. A)
WARNING: Never modify the power tool or any part of it.
Damage or personal injury couldresult.
1
Variable speed trigger switch
2
Forward/reverse button
3
Torque adjustment collar
4
Gear shifter
5
Keyless chuck
6
Battery release button
7
Battery pack
8
Worklight
Intended Use
This drill/driver is designed for light fastening and
drillingapplications.
DO NOT use under wet conditions or in the presence of
flammable liquids orgases.
This drill/driver is a professional powertool.
DO NOT let children come into contact with the tool.
Supervision is required when inexperienced operators use
thistool.
• Young children and the infirm. This appliance is not
intended for use by young children or infirm persons
withoutsupervision.
• This product is not intended for use by persons (including
children) suffering from diminished physical, sensory or
mental abilities; lack of experience, knowledge or skills
Date Code Position
The date code, which also includes the year of manufacture, is
printed into thehousing.
Example:
2019 XX XX
Year of Manufacture
Markings on Tool
The following pictograms are shown on the tool:
Read instruction manual beforeuse.
Visible radiation. Do not stare intolight.
NOTE: Battery packs, chargers and kitboxes are not included
with N models. Battery packs and chargers are not included with
NT models. Bmodels include Bluetooth® batterypacks.
NOTE: The Bluetooth® word mark and logos are registered
trademarks owned by the Bluetooth®, SIG, Inc. and any use of
such marks by DeWALT is under license. Other trademarks and
trade names are those of their respectiveowners.
• Check for damage to the tool, parts or accessories which may
have occurred duringtransport.
• Take the time to thoroughly read and understand this manual
prior tooperation.
unless they are supervised by a person responsible for their
safety. Children should never be left alone with thisproduct.

10
ENGLISH
Proper hand position requires one hand on the main handle
9
.
Variable Speed Trigger Switch (Fig.A)
To turn the tool on, squeeze the trigger switch
1
. To turn
the tool off, release the trigger switch. Your tool is equipped
with a brake. The chuck will stop when the trigger switch is
fullyreleased.
The variable speed switch enables you to select the best speed
for a particular application. The further you squeeze the trigger,
the faster the tool will operate. For maximum tool life, use
variable speed only for starting holes or fasteners
NOTE: Continuous use in variable speed range is not
recommended. It may damage the switch and should
beavoided.
Forward/Reverse Control Button (Fig.A)
A forward/reverse control button
2
determines the direction of
the tool and also serves as a lock-offbutton.
To select forward rotation, release the trigger switch and
depress the forward/reverse control button on the right side of
thetool.
To select reverse, depress the forward/reverse control button on
the left side of the tool. The center position of the control button
locks the tool in the off position. When changing the position of
the control button, be sure the trigger isreleased.
NOTE: The first time the tool is run after changing the direction
of rotation, you may hear a click on start up. This is normal and
does not indicate aproblem.
Worklight (Fig.A)
There is a worklight
8
located under the torque adjustment
collar
3
. The worklight will be activated when the trigger switch
issqueezed.
NOTE: The worklight is for lighting the immediate work surface
and is not intended to be used as aflashlight.
Torque Adjustment Collar (Fig.A)
The torque adjustment collar
3
is clearly marked with numbers
and a drill bit symbol.The collar should be rotated until the
desired setting is located at the top of the tool. Locators are
provided in the collar to eliminate the guess work when
selecting fastening torque. The higher the number on the collar,
the higher the torque and the larger the fastener which can be
driven. To lock the clutch for drilling operations, move to the
drill bitposition.
NOTE: When using the drill/driver for drilling holes, be sure
that the torque adjusting collar is set so the figure of the drill is
aligned with the center line on the top of the tool. Failure to do
this will allow the clutch to slip while attempting todrill.
Dual Range Gearing (Fig.A,C)
The dual range feature of your driver/drill allows you to shift
gears for greaterversatility.
To select the low speed, high torque setting, turn the tool off
and permit to stop. Slide the gear shifter
4
forward (towards
the chuck). To select the high speed, low torque setting, turn
the tool off and permit to stop. Slide the gear shifter back (away
fromchuck).
NOTE: Do not change gears when the tool is running. If you are
having trouble changing gears, make sure that the dual range
gear shifter is either completely pushed forward or completely
pushedback.
Keyless Single Sleeve Chuck (Fig.D)
Your tool features a keyless chuck with one rotating sleeve for
one-handed operation of the chuck. To insert a drill bit or other
accessory, follow thesesteps.
1. Lock the trigger in the OFF position as previouslydescribed.
2. Grasp the black sleeve of the chuck with one hand
and use the other hand to secure the tool. Rotate the
sleeve counterclockwise far enough to accept the
desiredaccessory.
3. Insert the accessory about 19 mm into the chuck and
tighten securely by rotating the chuck sleeve clockwise with
one hand while holding the tool with the other. Your tool is
equipped with an automatic spindle lock mechanism. This
allows you to open and close the chuck with onehand.
To release the accessory, repeat step 2above.
WARNING: Do not attempt to tighten drill bits (or any
other accessory) by gripping the front part of the chuck
and turning the tool on. Damage to the chuck and
personal injury may result. Always lock off trigger switch
when changingacces sories.
Be sure to tighten chuck with one hand on the chuck sleeve and
one hand holding the tool for maximumtightness.
Chuck Removal (Fig.E)
Turn the adjustment collar to the “drill” position and gear shifter
to position 1 (low speed). Tighten the chuck around the shorter
end of a hex key (not supplied) of 6 mm or greater size. Using
a wooden mallet or similar object, strike the longer end in the
clockwise direction, as shown. This will loosen the screw inside
thechuck.
Open chuck jaws fully, insert screwdriver (or Torx tool if
required) into front of chuck between jaws to engage screw
head. Remove screw by turning clockwise (left-hand-thread).
Place hex key in chuck and tighten, as shown in FigureE. Using
a wooden mallet or similar object, strike key sharply in the
counterclockwise direction. This will loosen the chuck so that it
can be unscrewed byhand.
Chuck Installation (Fig.F)
Screw the chuck on by hand as far as it will go and insert
screw (left-hand thread). Tighten screw securely. Tighten the
chuck around the shorter end of a 6 mm or larger hex key (not
supplied) strike the longer end in the clockwise direction with
a wooden mallet, as shown. Tighten the screw once again by
turning in a counterclockwisedirection.
Drill Operation
WARNING: To reduce the risk of serious personal injury,
turn tool off and disconnect tool from power source

11
ENGLISH
MAINTENANCE
Your power tool has been designed to operate over a long
period of time with a minimum of maintenance. Continuous
Protecting the Environment
Separate collection. Products and batteries marked
with this symbol must not be disposed of with normal
householdwaste.
Products and batteries contain materials that can
be recovered or recycled reducing the demand for raw
materials. Please recycle electrical products and batteries
according to local provisions. Further information is available at
www.2helpU.com.
Rechargeable Battery Pack
This long life battery pack must be recharged when it fails
to produce sufficient power on jobs which were easily done
before. At the end of its technical life, discard it with due care for
our environment:
• Run the battery pack down completely, then remove it from
the tool.
• Li-Ion cells are recyclable. Take them to your dealer or a
local recycling station. The collected battery packs will be
recycled or disposed of properly.
Optional Accessories
WARNING: Since accessories, other than those offered
by DeWALT, have not been tested with this product, use
of such accessories with this tool could be hazardous.
To reduce the risk of injury, only DeWALT recommended
accessories should be used with thisproduct.
Consult your dealer for further information on the
appropriateaccessories.
Cleaning
WARNING: Blow dirt and dust out of the main housing
with dry air as often as dirt is seen collecting in and around
the air vents. Wear approved eye protection and approved
dust mask when performing thisprocedure.
WARNING: Never use solvents or other harsh chemicals
for cleaning the non-metallic parts of the tool. These
chemicals may weaken the materials used in these parts.
Use a cloth dampened only with water and mild soap.
Never let any liquid get inside the tool; never immerse any
part of the tool into aliquid.
Lubrication
Your power tool requires no additionallubrication.
before making any adjustments or removing/installing
attachments oraccessories.
WARNING: To reduce the risk of personal injury,
ALWAYS ensure workpiece is anchored or clamped firmly.
If drilling thin material, use a wood “back-up” block to
prevent damage to thematerial.
Turn the collar to the drill bit symbol for drilling. Select the
desired speed/torque range using the gear shifter to match the
speed and torque to the plannedoperation.
1. Use sharp drill bits only. For WOOD, use twist drill bits, spade
bits, or hole saws. For METAL, use high-speed steel (HHS)
twist drill bits or holesaws.
2. Always apply pressure in a straight line with the bit. Use
enough pressure to keep drill biting, but do not push hard
enough to stall the motor or deflect thebit.
3. Hold tool firmly with both hands to control the twisting
action of thedrill.
WARNING: The drill may stall if overloaded causing a
sudden twist. Always expect the stall. Grip the drill firmly
with both hands to control the twisting action and
avoidinjury.
4. IF DRILL STALLS, it is usually because it is being overloaded
or improperly used. RELEASE TRIGGER IMMEDIATELY,
remove drill bit from work, and determine cause of stalling.
DO NOT CLICK TRIGGER ON AND OFF IN AN ATTEMPT
TO START A STALLED DRILL — THIS CAN DAMAGE
THEDRILL.
5. To minimize stalling or breaking through the material,
reduce pressure on drill and ease the bit through the last
fractional part of thehole.
6. Keep the motor running when pulling the bit back out of a
drilled hole. This will help preventjamming.
7. With variable speed drills there is no need to center punch
the point to be drilled. Use a slow speed to start the hole
and accelerate by squeezing the trigger harder when the
hole is deep enough to drill without the bit skippingout.
Operation as a Screwdriver
Select the desired speed/torque range using the dual range
gear shifter on the top of tool to match the speed and torque to
the plannedoperation.
Insert the desired fastener accessory into the chuck as you
would any drill bit. Make a few practice runs in scrap or unseen
areas to determine the proper position of the clutchcollar.
MAXIMUM RECOMMENDED CAPACITIES
Low Range–1 High Range–2
Bits, Metal Drilling 6.35 mm 3.18 mm
Wood, Flat Boring 19.05 mm 12.7 mm
Hole Saws 19.05 mm 15.88 mm
satisfactory operation depends upon proper tool care and
regularcleaning.
WARNING:To reduce the risk of serious personal
injury, turn tool off and disconnect battery pack
before making any adjustments or removing/
installing attachments or accessories. An accidental
start-up can cause injury.
The charger and battery pack are notserviceable.

12
TÜRKÇE
UYARI: Yaralanma riskini azaltmak için, kullanım
kılavuzunuokuyun.
Tanımlar: Güvenlik Talimatları
Aşağıdaki tanımlar her işaret sözcüğü ciddiyet derecesini
gösterir. Lütfen kılavuzu okuyunuz ve bu simgelere dikkatediniz.
TEHLİKE: Engellenmemesi halinde ölüm veya ciddi
yaralanma ile sonuçlanabilecek çok yakın bir tehlikeli
durumugösterir.
UYARI: Engellenmemesi halinde ölüm veya ciddi
yaralanma ile sonuçlanabilecek potansiyel bir tehlikeli
durumugösterir.
DİKKAT: Engellenmemesi halinde önemsiz veya orta
dereceli yaralanma ile sonuçlanabilecek potansiyel bir
tehlikeli durumugösterir.
İKAZ: Engellenmemesi halinde maddi hasara
neden olabilecek, yaralanma ile ilişkisi olmayan
durumlarıgösterir.
Elektrik çarpması riskinibelirtir.
Yangın riskinibelirtir.
AT Uygunluk Beyanatı
Makıne Dırektıfı
12 V Şarjli Matkap/Tornavida
DCD700
DeWALT, Teknik Özellikleri bölümünde açıklanan bu ürünlerin
aşağıda belirtilen yönergelere uygun olduğunu beyan eder:
2006/42/AT, EN62841-1-2015, EN62841-2-1:2018.
Bu ürünler ayrıca 2014/30/EU ve 2011/65/EU Direktiflerine de
uygundur. Daha ayrıntılı bilgi için, lütfen aşağıdaki adresten
DeWALT ile temas kurun veya kılavuzun arka kapağınabakın.
Bu belge altında imzası bulunan yetkili, teknik dosyanın
derlenmesinden sorumludur ve bu beyanı DeWALT
adınavermiştir.
Markus Rompel
PTE-Avrupa, Mühendislik Birimi Genel Müdür Yardımcısı
DeWALT, Richard-Klinger-Straße 11,
D-65510, Idstein, Almanya
26.11.2019
Bu bilgi sayfasında verilen titreşim ve/veya gürültü emisyonu
düzeyi, EN62841’de belirtilen standart teste uygun olarak
ölçülmüştür ve aletleri birbiriyle karşılaştırmak için kullanılabilir.
Maruz kalmaya dönük bir ön değerlendirme olarak kullanılabilir.
UYARI: Beyan edilen titreşim ve/veya gürültü emisyon
düzeyi, aletin ana uygulamalarını yansıtır. Bununla
birlikte alet farklı uygulamalar için, farklı aksesuarla
veya yeterince bakım yapılmadan kullanıldığında,
titreşim ve/veya gürültü emisyonu değişebilir. Bu, toplam
çalışma süresindeki maruz kalma seviyesini önemli
ölçüdeartırabilir.
Titreşim ve/veya gürültü maruz kalma seviyesine ilişkin bir
tahminde bulunurken aletin kapalı kaldığı veya çalıştığı
ancak gerçekte işi yapmadığı zamanlar da dikkate
alınmalıdır. Bu, toplam çalışma süresindeki maruziyet
düzeyini önemli ölçüde azaltabilir.
Operatörü titreşim ve/veya gürültünün etkilerinden
korumak için aşağıdakiler gibi ilave güvenlik önlemleri
tanımlayın: aleti ve aksesuarları iyi koruyun, ellerinizi
sıcak tutun (titreşim için uygundur), çalışma sürelerini iyi
organize edin.
DCD700
Voltage
Zirve V
DC
12
Nominal V
DC
10,8
Tip 2/3/4/5
Akü tipi Li-Ion
Yüksüz hız:
1. vites
2. vites
dev/dak
dev/dak
0–400
0–1500
Maks. tork (sert/yumuşak) Nm 24/15
Çıkış gücü W 180
Mandren kapasitesi mm 10
Maksimum delme kapasitesi:
Ahşap
Metal
mm
mm
20
10
Ağırlık (akü hariç) kg 0,91
Bu standart uyarınca gürültü ve/veya titreşim değerleri (triaks vektör toplamı):
EN62841
L
PA
(ses basıncı düzeyi) dB(A) 65
L
WA
(akustik güç düzeyi) dB(A) 76
K (akustik gücü belirsizliği) dB(A) 5
Titreşim emisyon değeri a
h
= m/s
2
< 2,5
Belirsizlik K = m/s
2
1,5
Türkçe (orijinal talimatlardan çevrilmiştir)
Tebrikler!
Bir DeWALT aleti seçtiniz. Uzun süreli deneyim, sürekli ürün
geliştirme ve yenilik DeWALT markasının profesyonel elektrikli
alet kullanıcıları için en güvenilir ortaklardan birisi haline
gelmesinisağlamaktadır.
Teknik Özellikleri
12 V ŞARJLI MATKAP/TORNAVIDA
DCD700

13
TÜRKÇE
kullanın. Açık havada kullanıma uygun bir kablonun
kullanılması elektrik çarpması riskiniazaltır.
f ) Eğer bir elektrikli aletin nemli bir bölgede
çalıştırılması zorunluysa, bir artık akım aygıtı (RCD)
korumalı bir kaynak kullanın. Bir RCD kullanılması
elektrik şoku riskiniazaltır.
3) Kışısel Güvenlık
a ) Elektrikli bir aleti kullanırken her zaman dikkatli
olun, yaptığınız işe yoğunlaşın ve sağduyulu
davranın. Elektrikli bir aleti yorgunken veya ilaç ya
da alkolün etkisi altındayken kullanmayın. Elektrikli
aletleri kullanırken bir anlık dikkatsizlik ciddi kişisel
yaralanmaylasonuçlanabilir.
b ) Kişisel koruyucu ekipmanları mutlaka kullanın.
Daima koruyucu gözlük takın. Koşullara uygun toz
maskesi, kaymayan güvenlik ayakkabıları, baret veya
kulaklık gibi koruyucu donanımların kullanılması kişisel
yaralanmalarıazaltacaktır.
c ) İstem dışı çalıştırılmasını önleyin. Aleti güç
kaynağına ve/veya aküye bağlamadan, yerden
kaldırmadan veya taşımadan önce düğmenin kapalı
konumda olduğundan emin olun. Aleti, parmağınız
düğme üzerinde bulunacak şekilde taşımak veya açık
konumdaki elektrikli aletleri elektrik şebekesine bağlamak
kazaya davetiyeçıkartır.
d ) Elektrikli aleti açmadan önce tüm ayarlama
anahtarlarını çıkartın. Elektrikli aletin hareketli bir
parçasına takılı kalmış bir anahtar kişisel yaralanmaya
nedenolabilir.
e ) Ulaşmakta zorlandığınız yerlerde kullanmayın.
Daima sağlam ve dengeli basın. Bu, beklenmedik
durumlarda elektrikli aletin daha iyi kontrol edilmesine
olanaktanır.
f ) Uygun şekilde giyinin. Bol elbiseler giymeyin ve takı
takmayın. Saçınızı, elbiselerinizi ve eldivenlerinizi
hareketli parçalardan uzak tutun. Bol elbiseler ve
takılar veya uzun saç hareketli parçalaratakılabilir.
g ) Eğer kullandığınız üründe toz emme ve toplama
özellikleri olan ataşmanlar varsa bunların bağlı
olduğundan ve doğru şekilde kullanıldığından
emin olun. Bu ataşmanların kullanılması tozla ilgili
tehlikeleriazaltabilir.
h ) Aletlerin sık kullanımı sonucu oluşan aşinalığın
keyfi davranışta bulunmanıza ve aletle ilgili
güvenlik ilkeleri ihmal etmenize neden olmasına
ELEKTRIKLI EL ALETLERI İÇIN GENEL
GÜVENLIKTALIMATLARI
UYARI: Bu elektrikli aletle verilen tüm güvenlik
uyarılarını, talimatları, resimleri ve teknik özellikleri
okuyun. Aşağıda listelenen tüm talimatlara uyulmaması
elektrik çarpmasına, yangına ve/veya ciddi yaralanmalara
nedenolabilir.
BÜTÜN UYARI VE GÜVENLİKTALİMATLARINI
İLERİDE BAKMAK ÜZERESAKLAYIN
Uyarılarda yer alan «elektrikli alet» terimi şebeke elektriğiyle
(kablolu) veya akü/pille (şarjlı) çalışan elektrikli aletinizi
ifadeetmektedir.
1) Çalışma alanının Güvenlığı
a ) Çalışma alanını temiz ve aydınlık tutun. Karışık ve
karanlık alanlar kazaya davetiyeçıkartır.
b ) Elektrikli aletleri, yanıcı sıvılar, gazlar ve
tozların bulunduğu yerler gibi yanıcı ortamlarda
çalıştırmayın. Elektrikli aletler, toz veya dumanları
ateşleyebilecek kıvılcımlarçıkartır.
c ) Bir elektrikli aleti çalıştırırken çocuklardan ve
etraftaki kişilerden uzak tutun. Dikkatinizi dağıtıcı
şeyler kontrolü kaybetmenize nedenolabilir.
2) Elektrık Güvenlığı
a ) Elektrikli aletlerin fişleri prizlere uygun olmalıdır.
Fiş üzerinde kesinlikle hiçbir değişiklik yapmayın.
Topraklı elektrikli aletlerde hiçbir adaptör fişi
kullanmayın. Değiştirilmemiş fişler ve uygun prizler
elektrik çarpması riskiniazaltacaktır.
b ) Borular, radyatörler, ocaklar ve buzdolapları gibi
topraklanmamış yüzeylerle vücut temasından
kaçının. Vücudunuzun topraklanması halinde yüksek bir
elektrik çarpması riskivardır.
c ) Elektrikli aletleri yağmura maruz bırakmayın veya
ıslatmayın. Elektrikli alete su girmesi elektrik çarpması
riskiniarttıracaktır.
d ) Elektrik kablosunu uygun olmayan amaçlarla
kullanmayın. Elektrikli aleti kesinlikle kablosundan
tutarak taşımayın, çekmeyin veya prizden
çıkartmayın. Kabloyu sıcaktan, yağdan, keskin
kenarlardan veya hareketli parçalardan uzak
tutun. Hasarlı veya dolaşmış kablolar elektrik çarpması
riskiniarttırır.
e ) Elektrikli bir aleti açık havada çalıştırıyorsanız,
açık havada kullanıma uygun bir uzatma kablosu
Aküler
Şarj Aletleri/Şarj Süreleri (Dakika)
Kat. #
DC
Ağırlık
*Veri kodu 201811475B veya sonrası
**Veri kodu 201536 veya sonrası
Aküler Şarj Aletleri/Şarj Süreleri (Dakika)
Kat. # V
DC
Ah
Ağırlık
kg
DCB104 DCB107 DCB110 DCB112 DCB113 DCB115 DCB118 DCB132 DCB119
DCB122 12 2.0 0.22 30 90 90 60 50 30 X 30 60
DCB124 12 3.0 0.25 45 140 140 90 70 45 45 45 90
DCB125 12 1.3 0.20 22 60 60 40 30 22 X 22 40
DCB127 12 2.0 0.20 30 90 90 60 50 30 X 30 60

14
TÜRKÇE
Matkaplar çn Ek Güvenlk Uyarıları
• İş parçasını stabil bir yüzeye sabitlemek ve desteklemek
için kelepçe veya başka bir pratik yöntem kullanın. İş
parçasını el veya vücudunuzla tutmak dengesizdir ve kontrol
kaybına nedenolabilir.
• Aksesuarlar ve alet çalışma sırasında ısınır. Metal
malzeme delme gibi ısınmaya yol açan uygulamaları
gerçekleştiriyorsanız aksesuarları ve aletleri tutarken
eldivenkullanın.
• Havalandırma delikleri sıklıkla hareketli parçaların
üstünü örterler ve bunlardan kaçınılmalıdır. Bol elbiseler,
takılar veya uzun saç hareketli parçalaratakılabilir.
Matkap/Tornavidalar için Özel Ek Güvenlik
Talimatları
• Darbeli matkapla çalışırken kulaklık takın. Gürültüye
maruz kalınması, işitme kaybına yolaçabilir.
• Aletle birlikte verilmişse yardımcı tutma kollarını
kullanın. Kontrolü kaybetmeniz, yaralanmanıza
nedenolabilir.
• Kesme aksesuarının gizli kablolara veya kendi
kablosuna temas edebileceği yerlerde çalışma yaparken
elektrikli aleti yalıtımlı kavrama yüzeylerinden tutun.
Kesme aksesuarının “akım taşıyan” bir kabloya temas etmesi
durumunda metal kısımları da “akım taşır“ hale gelecek ve
operatörün çarpılmasına yolaçacaktır.
izin vermeyin. Dikkatsiz bir hareket bir anda ciddi
yaralanmalara nedenolabilir.
4) Elektrıklı Aletlerın Kullanımı
ve Bakımı
a ) Elektrikli aleti zorlamayın. Uygulamanız için
doğru elektrikli aleti kullanın. Doğru elektrikli alet,
belirlendiği kapasite ayarında kullanıldığında daha iyi ve
güvenliçalışacaktır.
b ) Düğme açmıyor ve kapatmıyorsa elektrikli aleti
kullanmayın. Düğmeyle kontrol edilemeyen tüm elektrikli
aletler tehlikelidir ve tamir edilmesigerekmektedir.
c ) Herhangi bir ayar, aksesuar değişimi veya elektrikli
aletlerin saklanması öncesinde fişi güç kaynağından
çekin ve/veya eğer demonte edilebilir tipteyse,
bataryayı aletten ayırın. Bu tür önleyici güvenlik
tedbirleri elektrikli aletin istem dışı olarak çalıştırılması
riskiniazaltacaktır.
d ) Elektrikli aleti, çocukların ulaşamayacağı yerlerde
saklayın ve elektrikli aleti tanımayan veya bu
talimatları bilmeyen kişilerin elektrikli aleti
kullanmasına izin vermeyin. Elektrikli aletler, eğitimsiz
kullanıcıların elindetehlikelidir.
e ) Elektrikli aletleri iyi durumda muhafaza edin.
Hareketli parçalardaki hizalama hatalarını ve
tutuklukları, parçalardaki kırılmalar ve elektrikli
aletin çalışmasını etkileyebilecek tüm diğer koşulları
kontrol edin. Hasarlı ise, elektrikli aleti kullanmadan
önce tamir ettirin. Kazaların çoğu, elektrikli aletlerin
bakımının yeterli şekilde yapılmamasındankaynaklanır.
f ) Kesim aletlerini keskin ve temiz tutun. Bakımı uygun
şekilde yapılmış keskin kesim uçlu kesim aletlerinin sıkışma
ihtimali daha düşüktür ve kontrol edilmesi dahakolaydır.
g ) Elektrikli aleti, aksesuarlarını ve aletin diğer
parçalarını kullanırken bu talimatlara mutlaka uyun
ve çalışma ortamının koşullarını ve yapılacak işin
ne olduğunu göz önünde bulundurun. Elektrikli aletin
öngörülen işlemler dışındaki işlemler için kullanılması
tehlikeli durumlara nedenolabilir.
h ) Tüm tutamakları ve tutma yerlerini kuru, temiz
ve üzerinde yağ ile gres bulunmayacak şekilde
muhafaza edin. Kaygan tutamaklar ve tutma yerleri,
beklenmedik durumlarda aletin güvenli bir şekilde
tutulması ve kontrol edilmesine izinvermez.
5) Şarjlı Aletlerın kullanımı ve bakımı
a ) Sadece üretici tarafından belirtilen şarj cihazı ile
şarj edin. Bir akü tipine uygun bir şarj cihazı başka
tipte bir aküyü şarj etmek için kullanıldığında yangın
riskiyaratabilir.
b ) Elektrikli aletleri yalnızca özel olarak tanımlanmış
akülerle kullanın. Başka akülerin kullanılması
yaralanma ve yangın riskine yolaçabilir.
c ) Akü kullanımda değilken, ataç, bozuk para, anahtar,
çivi, vida veya terminaller arasında kontağa neden
olabilecek diğer küçük metal nesnelerden uzak
tutulmalıdır. Akü terminallerinin birbirine kısa devre
yapılması yanıklara veya yangına nedenolabilir.
d ) Uygun olmayan koşullarda, akü sıvı sızıntısı
yapabilir; sıvıya temas etmekten kaçının. Kazara
temas etmeniz halinde suyla yıkayın. Sıvı,
gözlerinize temas ederse, ayrıca bir doktora
başvurun. Aküden sıvı sızması tahriş veya yanıklara
nedenolabilir.
e ) Hasarlı ya da modifiye edilmiş bir batarya veya aleti
kullanmayın. Hasarlı ya da modifiye edilmiş bataryalar
yangın, patlama veya yaralanma riskiyle sonuçlanan
beklenmedik durumlara nedenolabilir.
f ) Bir batarya veya aleti ateşe veya aşırı ısıya maruz
bırakmayın. 130 °C üzeri ısı veya ateşe maruz kalması
patlamaya nedenolabilir.
g ) Tüm şarj talimatlarına uyun ve talimatlarda
belirtilen sıcaklık aralığı dışında batarya veya aleti
şarj etmeyin. Doğru olmayan şekilde veya belirtilen
aralık dışındaki sıcaklıklarda şarj edilmesi bataryaya hasar
verebilir ve yangın riskiniartırabilir.
6) Servıs
a ) Elektrikli aletinizi, sadece orijinal yedek parçaların
kullanıldığı yetkili DeWALT servisine tamir
ettirin. Bu, elektrikli aletin güvenliğinin muhafaza
edilmesinisağlayacaktır.
b ) Hasar görmüş bataryalara asla serviste bulunmayın.
Bataryaların servisi sadece üretici veya yetkili servis
tarafındanyapılabilir.

15
TÜRKÇE
Diğer Tehlikeler
Emniyet tedbirlerini düzenleyen yönetmeliğin uygulanmasına
ve emniyet sağlayıcı aygıtların kullanılmasına rağmen, başka
belirli risklerden kaçınılamaz. Bunlar:
• Duymabozukluğu.
• Sıçrayan parçacıklardan kaynaklanan yaralanmariski.
• Çalışma sırasında ısınan aksesuarlardan kaynaklanan
yanıktehlikesi.
• Uzun süreli kullanımdan kaynaklanan yaralanmariski.
BU TALİMATLARI SAKLAYIN
arj Cihazları
DeWALT şarj cihazlarının ayara ihtiyacı yoktur ve olabildiğince
kolay çalıştırılmak üzeretasarlanmışlardır.
Elektrik Güvenliği
Elektrik motoru, sadece tek bir gerilim ile çalışacak şekilde
ayarlanmıştır. Her zaman akü voltajının aletin üretim etiketinde
belirlenmiş değerlere uyup uymadığını kontrol edin. Aynı
zamanda şarj cıhazınızın voltajının ana şebeke voltajınızla aynı
olduğundan eminolun.
DeWALT şarj cihazınız EN60335 standardına uygun
olarak çift yalıtımlıdır; bu nedenle, topraklama
kablosuna gerekyoktur.
Güç kablosu hasarlıysa, DeWALT yetkili servisinden temin
edilebilen özel olarak hazırlanmış bir kabloyladeğiştirilmelidir.
Uzatma Kablolarının Kullanımı
Kesinlikle gerekli olmadıkça bir uzatma kablosu
kullanılmamalıdır. Daima şarj cihazınızın elektrik girişine uygun
(Teknik Özellikleri bölümüne bakın), onaylı bir uzatma kablosu
kullanın. Minimum iletken boyutu 1mm
2
'dir; maksimum
uzunluk 30 m’dir.
Bir kablo makarası kullanırken, kabloyu daima sonuna kadaraçın.
Tüm Akü Şarj Cihazları İçin Önemli Güvenlik
Talimatları
BU TALİMATLARI SAKLAYIN: Bu kılavuz uyumlu şarj cihazları
hakkında önemli güvenlik ve çalıştırma talimatları içerir (Teknik
Özellikleri bölümünebakın).
• Şarj cihazını kullanmadan önce şarj cihazının, akünün ve
üründe kullanılan akünün üzerindeki talimatları ve uyarıcı
işaretleriokuyun.
UYARI: Elektrik çarpması tehlikesi. Şarj cihazının içine
sıvı kaçmasına izin vermeyin. Elektrik çarpmasına
nedenolabilir.
UYARI: Alet, 30mA akımı aşmayan akım kesici cihazla
beraber kullanılmaya tavsiyeedilir.
DİKKAT: Yanma tehlikesi. Yaralanma riskini azaltmak
için, yalnızca DeWALT şarj edilebilir akülerini şarj edin.
Diğer akü tipleri patlayarak yaralanmanıza veya hasar
meydana gelmesine yolaçabilir.
DİKKAT: Çocuklar, cihazla oynamalarını önlemek
amacıyla kontrol altındatutulmalıdır.
İKAZ: Belirli koşullar altında, şarj cihazı güç kaynağına
takılıyken, şarj içindeki açık şarj kontakları yabancı
maddeler tarafından kısa devre yapılabilir. Bunlarla
sınırlı olmamak kaydıyla iletken nitelikteki çelik yünü,
alüminyum folyo veya metal parçacık birikimi gibi yabancı
maddeler şarj cihazının yuvalarından uzak tutulmalıdır.
Yuvada akü yokken şarj cihazını daima güç kaynağından
çıkarın. Şarj cihazının fişini temizlemeden önceçıkarın.
• Aküyü bu kılavuzdaki şarj cihazlarından başka
cihazlarla şarj etmeye ÇALIŞMAYIN. Şarj cihazı ve akü
özellikle birlikte çalışacak şekildetasarlanmıştır.
• Bu şarj cihazları DeWALT şarj edilebilir akülerini şarj
etmekten başka kullanımlar için tasarlanmamıştır.
Başka kullanımlar yangın veya elektrik çarpmasına yolaçabilir.
• Şarj cihazını yağmura veya kara maruzbırakmayın.
• Şarj cihazını fişten çıkarırken kablodan değil fişten
tutarak çekin. Bu, elektrik fişine ve kablosuna hasar verilmesi
riskiniazaltır.
• Kablonun üzerine basılmayacak, ortalıkta
gezinmeyecek veya başka şekilde hasara ve gerginliğe
maruz kalmayacak şekilde yerleştirildiğinden
eminolun.
• Kesinlikle gerekli olmadıkça uzatma kablosu
kullanmayın. Yanlış uzatma kablosu kullanımı yangın veya
elektrik çarpmasına nedenolabilir.
• Şarj cihazının üzerine herhangi bir eşya koymayın
veya şarj cihazını havalandırma deliklerini kapatıp
aşırı iç sıcaklığa neden olabilecek yumuşak bir yüzeye
yerleştirmeyin. Şarj cihazını herhangi bir ısı kaynağından
uzaktaki bir yere koyun. Şarj cihazı muhafazanın üstündeki ve
altındaki delikler aracılığıylahavalandırılır.
• Şarj cihazını hasarlı kordon veya fişle çalıştırmayın—
bunları derhaldeğiştirin.
• Şarj cihazını sert bir darbe aldıysa, düştüyse veya
herhangi bir şekilde hasar gördüyse çalıştırmayın. Yetkili
bir servis merkezinegötürün.
• Şarj cihazını sökmeyin; servis veya onarım gerektiğinde
yetkili bir servis merkezine götürün. Yanlış yeniden takma
elektrik çarpmasına veya yangına yolaçabilir.
• Elektrik kablosu hasarlı ise, bir tehlike oluşmasını önlemek için
üretici ya da yetkili Servis Merkezi tarafındandeğiştirilmelidir.
• Herhangi bir temizlik işlemi yapmadan önce şarj
cihazının fişini prizden çekin. Bu, elektrik çarpması
riskini azaltır. Aküyü çıkarmak bu riskiazaltmaz.
• ASLA 2 şarj cihazını bir arada bağlamayaçalışmayın.
• Şarj cihazı standart 230 V ev elektrik gücüyle çalışmak
üzere tasarlanmıştır. Başka herhangi bir voltaj
ile kullanmayı denemeyin. Bu araba şarj cihazı için
geçerlideğildir.
Bir Bataryanın Şarj Edilmesi (Şek. [Fig.] B)
1. Bataryayı takmadan önce şarj cihazını uygun prizetakın.
2. Bataryayı
7
şarj cihazına takın, bataryanın şarj cihazına
tamamen oturduğundan emin olun. Devamlı yanıp sönen
kırmızı (şarj) ışık, şarj işleminin başladığınıgösterir.
3. Şarjın tamamlandığı, kırmızı ışığın sürekli yanmasıyla belirtilir.
Batarya tam olarak şarj edildikten sonra hemen kullanılabilir
veya şarj cihazından bırakılabilir. Bataryayı şarj cihazından

16
TÜRKÇE
Akü
Tüm Aküler İçin Önemli Güvenlik Talimatları
Yedek aküleri sipariş ederken, katalog numarasını ve voltajı
eklediğinizden eminolun.
Akü, kutudan şarjı dolu olarak çıkmaz. Aküyü ve şarj cihazını
kullanmadan önce, aşağıdaki güvenlik talimatlarını dikkatlice
okuyun. Daha sonra belirtilen şarj işlemleriniuygulayın.
TÜM TALİMATLARI OKUYUN
• Aküyü yanıcı sıvılar, gazlar ve tozların bulunduğu yerler
gibi yanıcı ortamlarda şarj etmeyin veya kullanmayın.
Aküyü şarj cihazına takmak veya cihazdan çıkarmak toz veya
dumanlarıtutuşturabilir.
• Aküyü şarj cihazının içine doğru zorlamayın.
Akü kırılarak ciddi kişisel yaralanmaya neden
olabileceğinden akünün üzerinde hiçbir şekilde
uyumsuz bir şarj cihazına uydurmak için
değişiklikyapmayın.
• Aküleri yalnızca DeWALT şarj cihazlarında şarjedin.
• Su veya diğer sıvıları sıçratmayın veya
bunlaraDALDIRMAYIN.
• Aleti ve aküyü sıcaklığın 40 °C’ye ulaştığı veya bu
sıcaklığı aştığı yerlerde (yazın dış barakalar veya metal
binalar gibi) depolamayın veyakullanmayın.
• Önemli ölçüde hasarlı veya tamamen eskimiş olsa bile
aküyü ateşe atmayın. Akü ateşe atılırsa patlayabilir. Lityum
iyon aküler yanınca zehirli buharlar ve materyaller açığaçıkar.
• Akü içeriği cildinizle temas ederse, etkilenen alanı
derhal yumuşak bir sabun ve suyla yıkayın. Akü sıvısı
gözlerinize bulaşırsa, gözünüzü açık tutarak 15 dakika
boyunca veya tahriş hissi geçene kadar suyla yıkayın. Tıbbi
yardım gerekirse, akü elektroliti sıvı organik karbonatlar ve
lityum tuzları karışımındanoluşmaktadır.
• Açılan akü hücrelerinin içeriği solunum yolunu tahriş
edebilir. Ortama temiz hava girmesini sağlayın. Belirtiler
geçmezse tıbbi yardımalın.
UYARI: Yanık tehlikesi. Akü sıvısı kıvılcıma veya ateşe
maruz kalırsa yanıcıolabilir.
UYARI: Aküyü hiçbir nedenle asla açmayın. Akünün
muhafazası çatlarsa veya hasar görürse, şarj cihazına
takmayın. Aküyü çarpmayın, düşürmeyin veya pakete
hasar vermeyin. Sert bir darbe almış, düşmüş, çiğnenmiş
veya herhangi bir şekilde hasar görmüş (örn. çiviyle
delinmiş, çekiçle vurulmuş veya üzerine basılmış) bir
aküyü veya şarj cihazını kullanmayın. Elektrik çarpmasına
yol açabilir. Hasarlı aküler geri dönüşüm için servis
merkezinegönderilmelidir.
çıkarmak için, bataryanın üzerindeki batarya bırakma
düğmesine
6
basın.
NOT: Lityum iyon bataryalardan maksimum performans almak
ve bataryaların kullanım ömrünü uzatmak için, ilk kullanım
öncesinde tam olarak şarjedin.
Şarj Cihazının Çalışması
Bataryanın şarj durumu için aşağıdaki göstergelerebakın.
Şarj ışıkları
şarj edilmesi
tamamen şarj oldu
sıcak/soğuk akü gecikmesi*
* Bu işlem esnasında kırmızı ışık yanıp sönmeye devam edecek,
fakat bir sarı ışık da yanacaktır. Akü uygun bir sıcaklığa
ulaştığında, sarı ışık kapanacak ve şarj aleti şarj işlemine
devamedecektir.
Uyumlu şarj cihazı arızalı bir aküyü şarj etmeyecektir. Şarj cihazı
lambası yanmayarak arızalı bir bataryayıgösterecektir.
NOT: Bu aynı zamanda şarj cihazının arızalı olduğu anlamına
dagelebilir.
Şarj cihazı bir sorun gösteriyorsa, şarj cihazını ve akü takımını test
edilmek üzere yetkili bir servis merkezinegönderin.
Sıcak/Soğuk Paket Gecikmesi
Şarj aleti çok sıcak veya çok soğuk bir batarya tespit ettiğinde,
otomatik olarak Sıcak/Soğuk Gecikmesini başlatarak batarya
uygun sıcaklığa gelene kadar şarjı durdurur. Şarj aleti sonrasında
otomatik olarak şarj moduna geçer. Bu özellik maksimum
batarya ömrünü garantieder.
Soğuk bir batarya sıcak bir bataryaya göre daha yavaş bir hızla
şarj olacaktır. Akü takımı tüm şarj döngüsü boyunca daha yavaş
bir hızda şarj olacaktır ve akü ısındığında bile maksimum şarj
oranına geridönmeyecektir.
Elektronik Koruma Sistemi
XR Li-Ion cihazları aşırı yük, aşırı ısınma veya tamamen
boşalmadan koruyacak bir Elektronik Koruma Sistemi ile
birliktetasarlanmıştır.
Elektronik Koruma Sistemi devreye girerse alet otomatik olarak
kapatılacaktır. Bu durum gerçekleşirse lityum iyon aküyü
tamamen şarj olana dek bir şarj cihazının üzerinekoyun.
Duvara Montaj
Bu şarj cihazları duvara monte edilebilir veya bir masa veya
çalışma tezgahı üzerinde yukarı doğru durabilir şekilde tasarlanır.
Duvara monte edilecekse şarj aletini bir elektrik prizinin
yakınında veya bir köşe veya hava akımını engelleyebilecek diğer
engellerden uzakta konumlandırın. Şarj cihazının arka tarafını
montaj vidalarının duvar üzerindeki yerini belirlemek amacıyla
şablon olarak kullanın. Şarj aletini (ayrıca satın alınan) en az
25,4mm uzunluğunda ve 7–9mm bir vida başı çapına sahip,
ahşap üzerine vidalandığında vida başının açıkta olan kısmı
yaklaşık 5,5mm optimal bir derinlik bırakacak şekilde vidalayarak
monte edin. Şarj cihazının arkasındaki yuvaları vidaların açıkta
olan kısımlarıyla hizalayın ve onları yuvalara tam olarakoturtun.
Şarj Cihazı Temizlik Talimatları
UYARI: Elektrik çarpması tehlikesi. Temizlik
öncesinde AC çıkışı bağlantısını kesin. Şarj cihazının
dış yüzeyindeki kir ve yağ bir bez parçası yada metal
olmayan bir fırça kullanılarak çıkarılabilir. Su veya temizlik
solüsyonları kullanmayın. Aletin içine herhangi bir sıvının
girmesine izin vermeyin; aletin herhangi bir parçasını bir
sıvı içinedaldırmayın.

17
TÜRKÇE
Akü tipi
DCD700 ve 12 volt akülerleçalışır.
Bu bataryalar kullanılmalıdır: DCB122, DCB124, DCB125, DCB127.
Daha fazla bilgi için Teknik Özellikleri bölümünebakın.
Saklama Önerileri
1. En iyi saklama ortamı serin ve kuru, doğrudan güneş ışığı
almayan, aşırı sıcak ve soğuk olmayan yerlerdir. En uygun
akü performansı ve ömrü için kullanımda değilken aküleri
oda sıcaklığındasaklayın.
2. Uzun süreli saklama için, en iyi sonuç için şarj cihazından
uzak serin, kuru bir yerde tamamen dolu bir akü saklamak
için tavsiyeedilir.
NOT: Aküler tamamen şarj boşalmış halinde saklanmamalıdır.
Akünün kullanılmadan önce yeniden şarj edilmesigerekir.
Şarj Cihazı ve Akü Üzerindeki Etiketler
Bu kılavuzda kullanılan sembollere ilave olarak, şarj cihazı ve akü
üzerinde bulunan etiketler aşağıdaki sembolleri belirtmektedir:
Aletle çalışmaya başlamadan önce bu
kılavuzuokuyun.
Şarj süresi için Teknik Özellikleri bölümünebakın.
İletken nesnelerle temasetmeyin.
Hasarlı aküleri şarjetmeyin.
Suya maruz bırakmayın.
Hasarlı kabloların hemen değiştirilmesinisağlayın.
Sadece 4 ˚C ve 40 ˚C arasında şarjedin.
Yalnızca kapalı alanda kullanımicindir.
Aküleri cevremize gerekli ozeni gostererekatın.
DeWALT aküler, yalnızca onlar için tasarlanmış
olan DeWALT şarj cihazlarında şarj edin. DeWALT
aküleri haricindeki akülerin DeWALT şarj cihazlarıyla
şarj edilmesi patlamalarına veya diğer tehlikeli
durumların ortaya çıkmasına sebepolabilir.
Aküyü ateşeatmayın.
UYARI: Yangın tehlikesi. Bataryayı metal nesnelerin
batarya terminallerine değmeyecekleri şekilde
saklayın veya taşıyın. Örneğin, bataryayı içerisinde
gevşek çiviler, vidalar, anahtarlar vb. bulunan kayışlı
taşıyıcı, cep, alet kutuları, ürün kiti kutuları, çekmece vb.
içerisinekoymayın.
DİKKAT: Aleti kullanmadığınız zaman, devrilme veya
düşme tehlikesine yol açmayacağı dengeli bir yüzeye
yan tarafının üzerine yerleştirin. Büyük akülere sahip
bazı aletler akünün üzerinde dik durabilir, ancak bunlar
kolayca devrilebilir
Nakliyat
UYARI: Yangın tehlikesi. Batarya nakliyatında,
batarya kutuplarının istemsiz şekilde iletken maddelerle
temas ederek yangına sebep vermesi ihtimali vardır.
Batarya nakliyatı yaparken, batarya kutuplarının iyi
korunduğundan ve kutuplarla temas edip kısa devreye
sebep olabilecek maddelerden iyi şekilde izole edildiğinden
eminolun.
NOT: Lityum-iyon piller kontrol edilmiş
bagajakonmamalıdır.
DeWALT bataryalar, Tehlikeli Maddelerin Nakliyesi Hakkında BM
Tavsiyeleri; Uluslararası Hava Taşımacılığı Birliği (IATA) Tehlikeli
Madde Düzenlemeleri, Uluslararası Deniz Taşımacılığı Tehlikeli
Madde (IMDG) Düzenlemeleri ve Uluslararası Karayoluyla
Tehlikeli madde Taşıma Konulu Avrupa Anlaşması içeriklerinde
belirtilen sektörel ve hukuki standartların tüm düzenlemeleriyle
uyumludur. Lityum-iyon bataryalar, Tehlikeli Madde Taşımacılığı
Kılavuzu Testleri ve Kriterleri Hakkındaki BM Tavsiyelerinin 38,3.
bölümüne kadar testedilmiştir.
Çoğu durumda bir DeWALT bataryanın nakliyesinin tam
olarak düzenlenmiş bir Sınıf 9 Tehlikeli Maddeler kapsamında
sınıflandırılması beklenir. Genelde sadece 100 Watt Saat (Wh)
üzeri bir enerji değerine sahip bir lityum iyon bataryayı içeren
taşıma işlemlerinin tam olarak düzenlenmiş bir Sınıf 9 Tehlikeli
Maddeler kapsamında sınıflandırılarak yapılması gerekmektedir.
Tüm lityum iyon bataryalarda ambalajın üzerinde Watt Saati
değeri mevcuttur. Buna ilave olarak, düzenlemedeki karışıklıklar
nedeniyle, DeWALT lityum iyon bataryaların Watt Saati değeri
göz önünde bulundurulmaksızın havayolu kargosuyla tek
başına taşınmasını önermez. Bataryası bulunan aletlerin (kombo
setler) havayoluyla nakliyesi ancak bataryanın sahip olduğu
Watt Saati değerinin 100 Watt Saatinden yüksek olmaması
şartıylayapılabilir.
Nakliyat kapsam dışında da kalsa, tamamen düzenlenmiş
de olsa, paketleme, etiketleme ve belgeleme
gereklilikleri hakkındaki son düzenlemeleri takip etmek
nakliyatçılarınsorumluluğudur.
Kılavuzun bu bölümünde bulunan bilgiler iyi niyetle
yazılmıştır ve kılavuzun hazırlandığı tarih itibarıyla doğru
olduğuna inanılmaktadır. Fakat, sözlü veya zımnen hiçbir
garanti verilmemektedir. Gerçekleştirdiği işlemlerin
geçerli düzenlemelerle uyumlu olduğundan emin olmak
alıcınınsorumluluğundadır.

18
TÜRKÇE
KULLANMA
Kullanma Talimatları
UYARI: Güvenlik talimatlarına ve geçerli yönetmeliklere
daimauyun.
UYARI: Ciddi yaralanma riskini azaltmak için
herhangi bir ayar yapmadan ya da parça veya
aksesuarları söküp takmadan önce aleti kapatın ve
aküyü ayırın. Aletin yanlışlıkla çalıştırılması yaralanmaya
nedenolabilir.
Tarih Kodu Konumu
İmalat yılını da içeren Tarih Kodu gövdeyebasılıdır.
Örnek:
2019 XX XX
İmalat Yılı
Alet Üzerindeki Etiketler
Alet üzerinde, aşağıdaki uyarı sembolleri bulunmaktadır:
Aletle çalışmaya başlamadan önce bu kılavuzuokuyun.
Görünür radyasyon. Işığabakmayın.
Alete Akü Takma Ve Çıkartma (ek. B)
NOT: Akünün
7
tamamen şarjlı olduğundan eminolun.
Aküyü Aletin Koluna Takma
1. Aküyü
7
kolun içindeki raylarla hizalayın (Şek. B).
2. Aküyü, yerine oturduğunu duyana kadar ve alette tamamen
oturana kadar kolun içinekaydırın.
Aküyü Aletten çıkarma
1. Serbest bırakma düğmesine
6
basın ve aküyü sıkıca çekerek
aletin kolundançıkarın.
2. Aküyü bu kılavuzun şarj cihazı kısmında açıklandığı gibi şarj
cihazınatakın.
Akü Şarj Sevİyesİ Göstergesı (Şek. B)
Bazı DeWALT aküler, aküde kalan şarj seviyesini gösteren üç yeşil
LED ışından oluşan bir şarj seviyesi göstergesiniiçerir.
Şarj seviyesi göstergesini çalıştırmak için gösterge düğmesine
basın ve basılı tutun . Üç yeşil LED ışığının bir kombinasyonu
kalan şarj seviyesini gösterecek şekilde yanacaktır. Aküdeki şarj
seviyesi kullanılabilir limitin altındayken, gösterge yanmaz ve
akünün şarj edilmesigerekir.
NOT: Bu gösterge sadece aküda kalan şarj seviyesini gösterir. Bu
alet işlevini göstermez; ürün parçaları, sıcaklık ve son kullanıcı
uygulamaya göre değişimetabidir.
MONTAJ VE AYARLAMALAR
UYARI: Ciddi yaralanma riskini azaltmak için
herhangi bir ayar yapmadan ya da parça veya
aksesuarları söküp takmadan önce aleti kapatın ve
aküyü ayırın. Aletin yanlışlıkla çalıştırılması yaralanmaya
nedenolabilir.
UYARI: Yalnızca DeWALT akü ve şarj cihazlarınıkullanın.
Açıklama (ek. A)
UYARI: Hiçbir zaman elektrikli aleti veya herhangi
bir parçasını değiştirmeyin. Hasarla veya
yaralanmaylasonuçlanabilir.
1
Değişken hız ayarlı tetik
2
İleri/geri düğmesi
3
Tork ayarlama bileziği
4
Vites mandalı
5
Anahtarsız mandren
6
Akü serbest bırakma düğmesi
7
Akü
8
Çalışma Işığı
Kullanim Amaci
Bu matkap/tornavida hafif hizmet tipi delme ve vidalama
uygulamaları içintasarlanmıştır.
Ambalaj İçeriği
Ambalaj, aşağıdaki parçaları içermektedir:
1 Şarjlı matkap/tornavida
1 Şarj cihazı
2 Li-Ion akü
1 Taşıma çantası
1 Li-İyon batarya (C1, D1, L1, M1, P1, S1, T1, X1, Y1 modelleri)
2 Li-İyon bataryalar (C2, D2, L2, M2, P2, S2, T2, X2, Y2 modelleri)
3 Li-İyon bataryalar (C3, D3, L3, M3, P3, S3, T3, X3, Y3 modelleri)
1 Kullanım kılavuzu
NOT: Bataryalar, şarj cihazları ve alet kutuları N modellerinde
bulunmaz. Bataryalar ve şarj cihazları NT modellerinde
bulunmaz. B modelleri Bluetooth® bataryalarıiçerir.
NOT: Bluetooth® kelimesi tescili ve logoları Bluetooth®, SIG,
Inc.'in tescilli markalarıdır ve bunların DeWALT tarafından
kullanımı lisanslıdır. Diğer ticari markalar ve ticari isimler ilgili
sahibineaittir.
• Alet, parçalar ve aksesuarlarda nakliye sırasında hasar oluşup
oluşmadığını kontroledin.
• Çalıştırmadan önce bu kılavuzu iyice okuyup anlamak için
zamanayırın.
Islak koşullarda veya yanıcı sıvı ya da gazların mevcut olduğu
ortamlardaKULLANMAYIN.
Bu matkap/tornavida profesyonel bir elektriklialettir.
Çocukların aleti ellemesine İZİN VERMEYİN. Bu alet deneyimsiz
kullanıcılar tarafından kullanılırken nezaretedilmelidir.
• Bu ürün fiziksel ve zihinsel kapasitesinin yanı sıra
algılama gücü azalmış olan veya yeterince deneyim ve
bilgisi bulunmayan kişiler (çocuklar dahil) tarafından
kullanılmak üzere üretilmemiştir. Bu tür kişiler ürünü
ancak güvenliklerinden sorumlu bir kişi tarafından cihazın
kullanımıyla ilgili talimatların verilmesi veya sürekli kontrol
altında tutulması durumunda kullanabilir. Çocuklar, bu ürün
ile kontrol altındatutulmalıdır.
Sayfa yükleniyor...
Sayfa yükleniyor...
Sayfa yükleniyor...
Sayfa yükleniyor...
Sayfa yükleniyor...
Sayfa yükleniyor...
Sayfa yükleniyor...
Sayfa yükleniyor...
-
 1
1
-
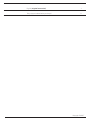 2
2
-
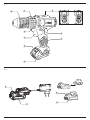 3
3
-
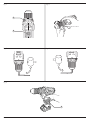 4
4
-
 5
5
-
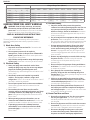 6
6
-
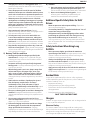 7
7
-
 8
8
-
 9
9
-
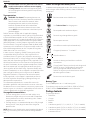 10
10
-
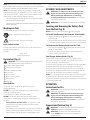 11
11
-
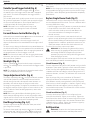 12
12
-
 13
13
-
 14
14
-
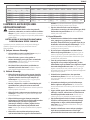 15
15
-
 16
16
-
 17
17
-
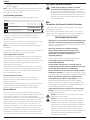 18
18
-
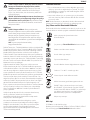 19
19
-
 20
20
-
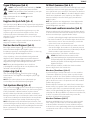 21
21
-
 22
22
-
 23
23
-
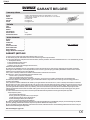 24
24
-
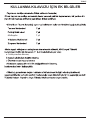 25
25
-
 26
26
-
 27
27
-
 28
28


DeWalt DCD700 Kullanım kılavuzu
- Kategori
- Elektrikli aletler
- Tip
- Kullanım kılavuzu
diğer dillerde
- English: DeWalt DCD700 User manual
İlgili makaleler
Diğer belgeler
-
Stanley SCH12S2K El kitabı
-
-
Black & Decker Sbh20 Kullanım kılavuzu
-
-
-
-
-
-
-