
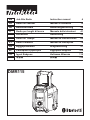
DMR115
EN Job Site Radio Instruction manual 4
FR Radio de chantier Manuel d’utilisation 15
DE Baustellenradio Bedienungsanleitung 28
IT Radio per luoghi di lavoro Manuale delle istruzioni 41
NL Bouwradio Handleiding 52
ES Radio de Trabajo Manual de instrucciones 65
PT Rádio a Bateria Manual de instruções 78
DA Byggepladsradio Brugsanvisning 91
EL Ραδιόφωνο εργοταξίου Εγχειριδιο οδηγιων 102
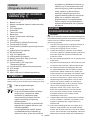
TR İşyeri Radyosu Kullanma Kilavuzu 115
ZHTW 收音機 說明書 126

2
1
3
5
6
4
1
16
17
12
13
15
2
14
22
20
19
18
21
23
78910
24
24
11
25

3
4
2
3
4
2
3

4 ENGLISH
ENGLISH
(Original instructions)
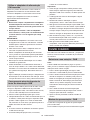
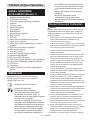
EXPLANATION OF
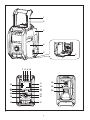
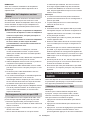
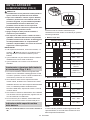
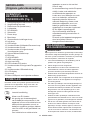
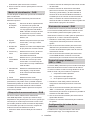
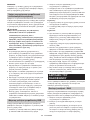
GENERAL VIEW (Fig. 1)
1. Handle/Built-in antenna(DAB/FM)
2. Battery compartment locker
3. Battery compartment cover (covering battery
cartridge)
4. Speaker
5. DC IN socket
6. Subwoofer
7. Power button
8. Band button
9. Advanced setting button
10. Info button
11. LED light
12. Preset 3/Play/Pause button
13. Preset 5 button
14. Preset 4/Next track/Fast-forward button
15. Volume/Tuning control/Select knob
16. EQ control button
17. AUX IN socket
18. USB power supply port
19. Auto tune button
20. EQ mode LED indicator
21. Preset 2/Previous track/Rewind button
22. Preset 1/Bluetooth pairing button
23. LCD display
24. Battery compartment
25. Micro USB port for software upgrade
SYMBOLS
The following show the symbols used for the equipment.
Be sure that you understand their meaning before use.
Read instruction manual.
Only for EU countries.
Due to the presence of hazardous
components in the equipment, waste
electrical and electronic equipment,
accumulators and batteries may have
a negative impact on the environment
and human health.
Do not dispose of electrical and
electronic appliances or batteries with
household waste!
In accordance with the European
Directive on waste electrical and
electronic equipment and on
accumulators and batteries and
waste accumulators and batteries,
as well as their adaptation to national
law, waste electrical equipment,
batteries and accumulators should be
stored separately and delivered to a
separate collection point for municipal
waste, operating in accordance with
the regulations on environmental
protection.
This is indicated by the symbol of the
crossed-out wheeled bin placed on the
equipment.
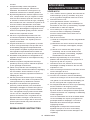
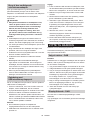
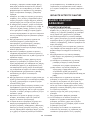
IMPORTANT SAFETY
INSTRUCTIONS
WARNING:
When using electric tools, basic safety precautions
should always be followed to reduce the risk of re,
electric shock, and personal injury, including the
following:
1. Read this instruction manual and the charger
instruction manual carefully before use.
2. Clean only with dry cloth.
3. Do not install near any heat sources such as
radiators, heat registers, stoves, or other apparatus
(including ampliers) that produce heat.
4. Only use attachments/accessories specied by the
manufacturer.
5. Unplug this apparatus during lighting storms or
when unused for long periods of time.
6. A battery operated radio with integral batteries or a
separate battery pack must be recharged only with
the specied charger for the battery. A charger that
may be suitable for one type of battery may create a
risk of re when used with another battery.
7. Use battery operated radio only with specically
designated battery packs. Use of any other batteries
may create a risk of re.
8. When battery pack is not in use, keep it away from
other metal objects like: paper clips, coins, keys,
nails, screws, or other small metal objects that can
make a connection from one terminal to another.
Shorting the battery terminals together may cause
sparks, burns, or a re.
9. Avoid body contact with grounded surfaces such
as pipes, radiators, ranges and refrigerators. There
is an increased risk of electric shock if your body is
grounded.
10. Under abusive conditions, liquid may be ejected
from the battery; avoid contact. If contact
accidentally occurs, ush with water. If liquid
contacts eyes, additionally seek medical help.
Liquid ejected from the battery may cause irritation
or burns.
11. Do not use a battery pack or tool that is damaged
or modied. Damaged or modied batteries may

5 ENGLISH
exhibit unpredictable behaviour resulting in re,
explosion or risk of injury.
12. Do not expose a battery pack or tool to re
or excessive temperature. Exposure to re or
temperature above 130 °C(266°F) may cause
explosion.
13. Follow all charging instructions and do not charge
the battery pack or tool outside the temperature
range specied in the instructions. Charging
improperly or at temperatures outside the specied
range may damage the battery and increase the risk
of re.
14. The MAINS plug is used as the disconnect device,
and it shall remain readily operable.
15. Do not use the product at a high volume for any
extended period. To avoid hearing damage, use the
product at moderate volume level.
16. (For products with LCD display only) LCD displays
include liquid which may cause irritation and
poisoning. If the liquid enters the eyes, mouth or
skin, rinse it with water and call a doctor.
17. Do not expose the product to rain or wet conditions.
Water entering the product will increase the risk of
electric shock.
18. This product is not intended for use by persons
(including children) with reduced physical, sensory
or mental capabilities, or lack of experience
and knowledge, unless they have been given
supervision or instruction concerning use of the
product by a person responsible for their safety.
Children should be supervised to ensure that they
do not play with the product. Store the product out
of the reach of children.
SAVE THESE INSTRUCTIONS
SPECIFIC SAFETY RULES
FOR BATTERY CARTRIDGE
1. Before using battery cartridge, read all instructions
and cautionary markings on (1) battery charger, (2)
battery, and (3) product using battery.
2. Do not disassemble battery cartridge.
3. If operating time has become excessively shorter,
stop operating immediately. It may result in a risk of
overheating, possible burns and even an explosion.
4. If electrolyte gets into your eyes, rinse them out with
clear water and seek medical attention right away. It
may result in loss of your eyesight.
5. Do not short the battery cartridge:
(1) Do not touch the terminals with any conductive
material.
(2) Avoid storing battery cartridge in a container
with other metal objects such as nails, coins,
etc.
(3) Do not expose battery cartridge to water or
rain. A battery short can cause a large current
ow, overheating, possible burns and even a
breakdown.
6. Do not store the tool and battery cartridge in
locations where the temperature may reach or
exceed 50°C (122°F).
7. Do not incinerate the battery cartridge even if it is
severely damaged or is completely worn out. The
battery cartridge can explode in a re.
8. Be careful not to drop or strike battery.
9. Do not use a damaged battery.
10. To avoid risk, the manual of replaceable the battery
should be read before use. And the max discharging
current of the battery should be greater than or
equal to 8A.
11. The contained lithium-ion-batteries are subject to
the Dangerous Goods Legislation requirements.
For commercial transports e.g. by third parties,
forwarding agents, special requirement on
packaging and labeling must be observed.
For preparation of the item being shipped,
consulting an expert for hazardous material is
required. Please also observe possibly more
detailed national regulations.
Tape or mask off open contacts and pack up the
battery in such a manner that it cannot move around
in the packaging.
12. When disposing the battery cartridge, remove
it from the tool and dispose of it in a safe place.
Follow your local regulations relating to disposal of
battery.
13. Use the batteries only with the products specied
by Makita. Installing the batteries to non-compliant
products may result in a re, excessive heat,
explosion, or leak of electrolyte.
If the tool is not used for a long period of time, the
battery must be removed from the tool.
CAUTION:
● Danger of explosion if battery is incorrectly
replaced.
● Replace only with the same or equivalent type.
● Only use genuine Makita batteries. Use of non-
genuine Makita batteries, or batteries that have
been altered, may result in the battery bursting
causing res, personal injury and damage. It will
also void the Makita warranty for the Makita tool
and charger.
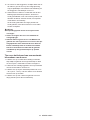
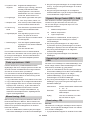
Tips for maintaining maximum battery
life
1. Charge the battery cartridge before completely
discharged. Always stop tool operation and charge

6 ENGLISH
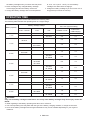
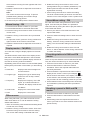
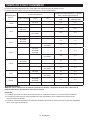
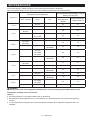
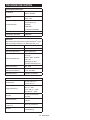
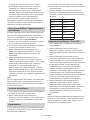
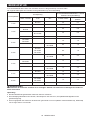
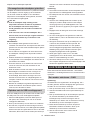
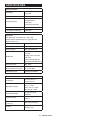
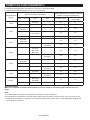
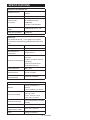
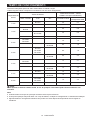
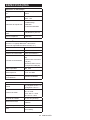
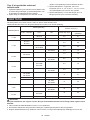
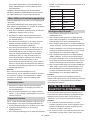
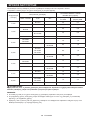
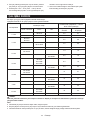
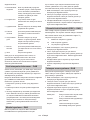
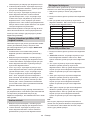
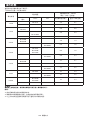
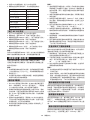
OPERATING TIME
The suitable battery packs for this radio listed as the following table.
The following table indicates the operating time on a single charge.
Battery capacity
Battery cartridge voltage AT SPEAKERS OUTPUT = 100mW
Unit: Hour (Approximately)
10.8V –12Vmax 14.4V 18V In Radio or AUX In Bluetooth +
USB Charging
1.3 Ah BL1415 3.5 0.7
BL1815 4.0 1.0
1.5 Ah
BL1015
BL1016 5.5 0.8
BL1415N
BL1415NA 4.5 0.9
BL1815N 5.0 1.2
2.0 Ah
BL1020B
BL1021B 7.0 1.0
BL1820
BL1820B 6.5 1.6
3.0 Ah
BL1430
BL1430B
BL1430A
8.0 1.6
BL1830
BL1830B 9.0 2.3
4.0 Ah
BL1040B
BL1041B 14 2.1
BL1440 12 2.5
BL1840
BL1840B 13 3.2
5.0Ah
BL1450 15 3.0
BL1850
BL1850B 16 4.2
6.0 Ah
BL1460B
BL1460A 16 3.3
BL1860B 20 5.0
WARNING:
Only use the battery cartridges listed above. Use of any other battery cartridges may cause injury and/or re.
NOTE:
● Table regarding to the battery operating time above is for reference.
● The actual operating time may differ with the type of the battery, charging condition, or usage environment.
● Some of the battery cartridges and chargers listed above may not be available depending on your region of
residence.
the battery cartridge when you notice less tool power.
2. Never recharge a fully charged battery cartridge.
Overcharging shortens the battery service life.
3. Charge the battery cartridge with room temperature
at 10°C - 40°C (50°F - 104°F). Let a hot battery
cartridge cool down before charging it.
4. Charge the battery cartridge if you do not use it for a
long period (more than six months).

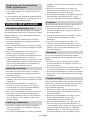
7 ENGLISH
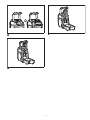
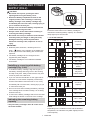
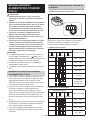
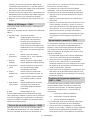
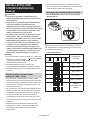
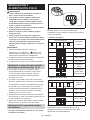
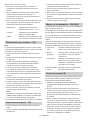
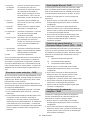
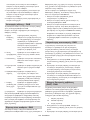
INSTALLATION AND POWER
SUPPLY (FIG.2)
CAUTION:
● Be careful not to pinch your ngers when
opening and closing the battery cover.
● Return the battery compartment locker to the
original position, after installing or removing
battery cartridge. If not, battery cartridge may
accidentally fall out of the radio, causing injury to
you or someone around you.
● Always close and lock the battery compartment
locker before moving the radio.
● Always switch off the radio before installing or
removing the battery cartridge.
● Be careful not to drop or strike the radio. Broken
shell may slash your nger or stab your body.
Damaged radio may exhibit unpredictable
behaviour resulting in re, explosion or risk of
injury.
IMPORTANT:
● Reduced power, distortion, “stuttering sound” or
when “ Battery Low” appears on the display are
all the signs that the main battery pack needs to be
replaced.
● The battery cartridge can’t be charged via the
supplied AC power adaptor.
● The battery cartridge is not included as standard
accessories.
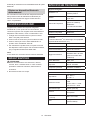
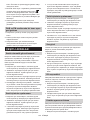
Installing or removing slide battery
cartridge (Fig. 3 & 4)
● To install the battery cartridge, align the tongue on
the battery cartridge with the groove in the housing
and slip it into place. Always insert it all the way until
it locks in place with a little click.
● If you can see the red indicator on the upper side of
the button, it is not locked completely. Install it fully
until the red indicator cannot be seen. If not, it may
accidentally fall out of the radio, causing injury to you
or someone around you.
● Do not use force when installing the battery cartridge.
If the cartridge does not slide in easily, it is not being
inserted correctly.
● To remove the battery cartridge, slide it from the radio
while sliding the button on the front of the cartridge.
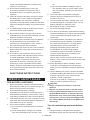
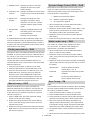
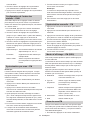
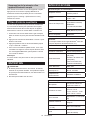
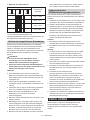
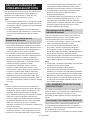
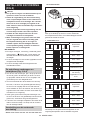
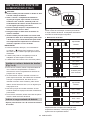
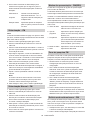
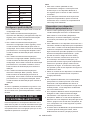
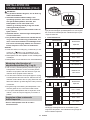
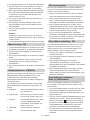
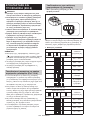
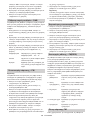
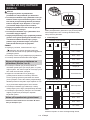
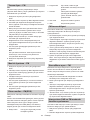
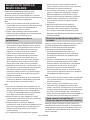
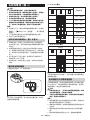
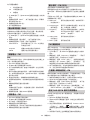
Indicating the remaining battery
capacity
* Only for battery cartridges with “B” at the end of
the model number.
2
1
1. Indicator lamps 2. Check button
Press the check button on the battery cartridge to
indicate the remaining battery capacity. The indicator
lamps light up for few seconds.
● 14.4V/18V batteries
Indicator or lamps
Remaining
Capacity
Lighted Off Blinking
75% ~ 100%
50% ~ 75%
25% ~ 50%
0% ~ 25%
Charge the
battery
The battery
may have
malfunctioned
● 10.8V-12V max batteries
Indicator or lamps
Remaining
Capacity
Lighted Off Blinking
75% ~ 100%
50% ~ 75%
25% ~ 50%
0% ~ 25%
NOTE:
Depending on the conditions of use and the ambient
temperature, the indication may differ slightly from the
actual capacity.

8 ENGLISH
Using supplied AC power adaptor
Remove the rubber protector and insert the adaptor
plug into the DC socket on the right hand side of the
radio. Plug the adaptor into a standard mains socket
outlet. Whenever the adaptor is used, the battery pack
is automatically disconnected.
CAUTION:
● Always disconnected the AC power adaptor
completely before moving the radio. If the AC
adaptor is not removed, it may cause an electric
shock.
● Never pull and/or drag the cord of the adaptor. If
not, the radio may accidentally fall down, causing
injury to you or someone around you.
IMPORTANT:
● The mains adaptor is used as the means of
connecting the radio to the mains supply. The mains
socket used for the radio must remain accessible
during normal use.
● In order to disconnect the radio, the mains adaptor
should be removed from the mains outlet completely.
● Use the AC power adaptor supplied with the product
or specied by Makita only.
● Do not hold the power supply cable and plug by your
mouth. Doing so might cause an electric shock.
● Do not touch the power plug with wet or greasy
hands.
● Damaged or entangled cords increase the risk
of electric shock. If the cord is damaged, have it
replaced by our authorized service center in order to
avoid a safety hazard. Do not use it before repair.
● After use, always store AC power adaptor out of the
reach of children. If Children play with the cord, they
may suffer injury.
Charging with USB power supply port
There is the USB port at the front side of the radio. You
can charge USB device trough the USB port.
1. Connect the USB device, such as a MP3, or CD
player, with USB cable available in the market.
2. Press the Power button to switch on your radio.
3. No matter if the radio is AC powered or battery
powered, the radio can charge the USB device when
the radio is switched on and in DAB/FM radio mode,
or BT mode, or AUX mode, which is appeared when
an external audio source is connected.
NOTE:
● The maximum volume of the output power speaker
will decrease when your USB is charging.
● The USB socket can provide max 5V/2.4A of
electrical current.
IMPORTANT:
● Before connecting USB device to the charger, always
backup your data of USB device. Otherwise your data
may lose by any possibility.
● The charger may not supply power to some USB
devices.
● When not using or after charging, remove the USB
cable and close the cover.
● Do not connect power source to USB port. Otherwise
there is risk of re. The USB port is only intended
for charging lower voltage device. Always place the
cover onto the USB port when not charging the lower
voltage device.
● Do not insert a nail, wire, etc. into USB power supply
port. Otherwise a circuit short may cause smoke and
re.
● Do not connect this USB socket with your PC
USB port, as it is highly possible that it may cause
breakdown of the units.
LISTENING TO THE RADIO
This radio has three tuning methods- Scan tuning,
Manual tuning and Memory presets recall.
Selecting a station – DAB
Note:
The DAB antenna is built into the handle. When
operating the radio, please straighten the handle
properly above the radio to get better reception.
1. Press the Power button to switch on your radio.
2. Select the DAB mode by pressing the Band button.
3. Press the Tuning Control knob to enter the list of the
stations. Or you can also press the Advanced setting
button and then rotate the Tuning Control knob to
select “Station List”. Press the Tuning Control knob to
enter the list of the stations.
4. Rotate the Tuning Control knob to scroll through the
list of available stations. Press the Tuning Control
knob to select the station.
5. Adjust the desired volume by rotating the Volume
knob.
Display modes – DAB
Your radio has a range of display options in the DAB
mode.
Press the Info button to cycle through the different
options.
a. Dynamic Label
Segment
Supplementary data services in text
form (up to 128 characters) running
alongside the DAB or DAB+ radio
programme. Displays scrolling
text messages such as artist/track
name, phone in number, etc.
b. Program type Displays the type of station being
listened to such as Pop, Classic,
News etc.

9 ENGLISH
c. Multiplex name Displays the name of the DAB
multiplex to which the current
station belongs.
d. Frequency and
channel
Displays the frequency and channel
number for the currently tuned DAB
station.
e. Signal error/
strength
Displays the signal error and
strength for the station being
listened to. A lower error number
indicates a better quality of radio
signal.
f. Bit rate/Audio
type
Displays the digital audio bit rate
and audio type for the currently
tuned DAB station.
g. Date Displays the current date.
If a DAB broadcast provides a slideshow image, this
may be viewed full-screen by pressing and holding the
Tuning Control knob. If the broadcast being received is
in stereo, then the stereo speaker symbol will be shown
at the bottom of the display.
Finding new stations – DAB
From time to time, new DAB radio stations may become
available. Or you may have moved to a different part of
the country. In this case you may need to activate your
radio to scan for new stations.
To allow the radio to nd the available stations, it is
recommended to carry out a full scan of the entire DAB
Band III frequencies.
1. Press the Power button to switch on your radio.
2. Press the Band button to select DAB radio mode.
3. Press the Auto tune button to initiate the scan. The
display will show “Scanning” and your radio will
perform a scan of the DAB Band III frequencies.
As new stations are found the station counter will
increase and stations will be added to the list. The
bar graph indicates the progress of the scan.
Manual tuning – DAB
Manual tuning allows you to tune your radio to a
particular DAB frequency in Band III. This function can
also be used to assist the positioning of the antenna
or the radio so as to optimize reception for a specic
channel or frequency.
1. When in DAB mode, press the Advanced setting
button to enter the menu setting.
2. Rotate the Tuning Control knob to select “Manual
Tune”. Press the Tuning Control knob to enter the
manual tuning mode.
3. Rotate the Tuning Control knob to select the desired
DAB channel. Press Tuning Control knob to conrm
the chosen frequency.
Dynamic Range Control (DRC) – DAB
DRC feature can make quieter sounds easier to hear
when your radio is used in a noisy environment by
reducing the dynamic range of the audio signal. There
are three levels of compression:
1 Maximum compression applied.
1/2 Medium compression applied.
0 No compression applied.
1. When in DAB mode, press the Advanced setting
button to enter the menu setting.
2. Rotate the Tuning Control knob to select “DRC”. Then
press the Tuning Control knob to enter the setting.
The display will show the current DRC value.
3. Rotate the Tuning Control knob to select desired
DRC setting.
4. Press the Tuning Control knob to conrm the setting.
Station order setup – DAB
Your radio has 3 station order settings from which
you can choose. The station order settings are
alphanumeric, ensemble and valid station.
1. When in DAB mode, press the Advanced setting
button to enter the menu setting.
2. Rotate the Tuning Control knob to select “Station
order”, then press the Tuning Control knob to enter
the setting.
3. Rotate the Tuning Control knob to select the following
options and press the Tuning Control knob to conrm
the setting.
Alphanumeric Sorts the station list alpha-
numerically 0...9 A...Z.
Ensemble Organizes the station list by DAB
multiplex.
Valid Shows only those stations for
which a signal can be found.
Scan Tuning – FM
Note:
The FM antenna is built into the handle. When operating
the radio, please straighten the handle properly above
the radio to get better reception.
1. Press the Power button to switch on your radio.
2. Press the Band button to select FM radio mode.
3. Press the Auto tune button and the radio will search
and stop automatically when it nds a radio station.
4. After a few seconds the display will update. The
display will show the frequency of the signal found.
If the signal is strong enough and there is RDS data
present then the radio will display the station name.
5. To nd other station, press the Auto tune button as
before.
6. When the end of the waveband is reached your radio

10 ENGLISH
will recommence tuning from the opposite end of the
waveband.
7. Rotate the Volume knob to adjust the sound level as
required.
Note:
The volume should not be too large. To prevent
possible hearing damage, do not listen at high
volume levels for long periods.
8. To switch off your radio press the Power button.
Manual tuning – FM
1. Press the Power button to switch on your radio.
2. Press the Band button to select FM radio mode.
3. Press the Tuning control knob to switch to the tuning
control mode.
4. Rotate the Tuning control knob to nd your desired
station.
5. To adjust the volume, press the Tuning control knob
again to switch to the volume control mode.
6. Rotate the Volume knob to adjust the sound level as
required.
Display modes – FM (RDS)
Your radio has a range of display options for FM radio
mode.
The RDS indicator at the bottom of the display shows
that there is some RDS data present in the broadcast
being received. The stereo speaker display shows that
the radio is receiving a stereo broadcast.
Repeatedly press the Info button to view the RDS (Radio
Data System) information of the station you are listening
to.
a. Radio text Displays radio text message such
as new items etc.
b. Program type Displays the type of station being
listened to such as Pop, Classic,
News, etc.
c. Frequency Displays the frequency of the FM
signal. (If no RDS information is
available, the display will be shown
“No Name”.
d. Audio mode Displays the current audio mode.
e. Date Displays the current date.
FM scan zone
When using FM mode, your radio can be set to scan
either local stations or to scan all stations including
distant radio stations.
1. When in FM mode, press the Advanced setting button
to enter the menu setting.
2. Rotate the Tuning control knob to select “Scan zone”.
Press the Tuning control knob to enter the setting.
The current audio setting is indicated with a tick.
3. Rotate the Tuning control knob to select “Local”
(Strong stations only) or “Distant” (All stations). The
distant option will allow the radio to nd weaker
signals when scanning.
4. Press Tuning control knob to conrm the setting.
The local or distant setting is stored in the radio and
remains in force until changed or until a system reset.
Stereo/Mono setting – FM
If the FM radio station being listened to has a weak
signal, some hiss may be audible. It is possible to
reduce this hiss by forcing the radio to play the station in
mono rather than stereo.
1. Ensure your radio is in FM mode and tune to the
required FM station.
2. Press the Advanced setting button to enter the menu
setting.
3. Rotate the Tuning control knob to select “Audio
Setting”. Press the Tuning control knob to enter the
setting. The current audio setting is indicated with a
tick.
4. Rotate the Tuning control knob to select “Forced
Mono” or “Stereo Allowed”. Press Tuning control knob
to conrm the setting.
Presetting stations in DAB and FM
modes
There are 5 preset stations each for DAB and FM radio.
They are used in the same way for each waveband.
1. Press the Power button to switch on your radio.
2. Press the Band button to select the desired
waveband. Tune to the required radio station as
previously described.
3. Press and hold the required Preset button until the
display shows “Preset 1 saved” (for example).
will be shown at the bottom of the display. The station
is then stored in the selected preset button. Repeat
this procedure for the remaining presets as you wish.
4. Preset stations which have already been stored may
be overwritten by following the above procedure if
required.
Recalling a preset in DAB and FM
modes
1. Press the Power button to switch on your radio.
2. Press the Band button to select DAB or FM radio
mode.
3. Momentarily press the required Preset button to
tune to your radio to one of the stations stored in the
preset memory.

11 ENGLISH
MISCELLANEOUS SETTINGS
Automatically updating the clock
You may specify that the radio sets its clock from DAB
or FM radio broadcasts. After a power failure, the radio
will then set its clock in the next time that you turn on
the radio in DAB or FM mode.
1. With your radio switched on, press the Advanced
setting button to access the menu for the current
mode.
2. Rotate the Tuning control knob to select “Time/Date”.
Press the Tuning control knob to enter the setting.
3. Rotate the Tuning control knob to select “Auto
Update”. Press the Tuning control knob to enter the
auto-update menu.
4. Rotate the Tuning control knob to choose an update
option from “from Any”, “from DAB” or “from FM” as
required. Press the Tuning control knob to conrm
your choice. The current setting will be marked with a
tick.
Setting the clock format
1. With your radio switched on, press the Advanced
setting button to access the menu for the current
mode.
2. Rotate the Tuning control knob to select “Time/Date”.
Press the Tuning control knob to enter the setting.
3. Rotate the Tuning control knob to select “Set 12/24
Hour”. Press the Tuning control knob to enter the
clock format setting. The current clock display format
is marked with a tick.
4. Rotate the Tuning control knob to select 12 or 24
hour format. Press the Tuning control knob to conrm
your setting. If the 12 hour clock format is chosen, the
radio will display a 12 hour clock with an AM or PM
indicator.
Setting the date format
1. With your radio switched on, press the Advanced
setting button to access the menu for the current
mode.
2. Rotate the Tuning control knob to select “Time/Date”.
Press the Tuning control knob to enter the setting.
3. Rotate the Tuning control knob to select “Set Date
Format”. Press the Tuning control knob to enter the
setting.
4. Rotate the Tuning control knob to select “DD-MM-
YYYY” or “MM-DD-YYYY” date format. Press the
Tuning control knob to conrm the setting.
Loudness
You can get compensation on lower and higher
frequency for your radio by adjusting the loudness
function.
1. With your radio switched on, press the Advanced
setting button to access the menu for the current
mode.
2. Rotate the Tuning control knob to select “Loudness”.
Press the Tuning control knob to enter the setting.
3. Rotate the Tuning control knob to select “On” to turn
on the loudness function. To turn off the loudness
function, select “Off”. Press the Tuning control knob
to conrm the setting.
Language options
There are eight language options available in the
radio: English, German, Italian, French, Dutch, Danish,
Norwegian and Polish.
1. With your radio switched on, press the Advanced
setting button to access the menu for the current
mode.
2. Rotate the Tuning control knob to select “Language”.
Press the Tuning control knob to enter the setting.
3. Rotate the Tuning control knob to choose your
desired language. Press the Tuning control knob to
conrm your setting.
Factory reset
If you wish to completely reset your radio to its initial
state this may be performed by following this procedure.
By performing a factory reset, all user entered settings
will be erased.
1. With your radio switched on, press the Advanced
setting button to access the menu for the current
mode.
2. Rotate the Tuning control knob to select “Factory
Reset”. Press the Tuning control knob to enter the
setting.
3. Rotate the Tuning control knob to select “Yes” or
“No”. If you do not wish to carry out a system reset,
select “No” and then press the Tuning control knob
to conrm the setting. With “Yes” selected, press the
Tuning control knob. A full reset will be performed.
The station list and presets will be erased. All settings
will be set to their default values.
In case of malfunction due to electrostatic discharge,
reset the product (reconnection of power source may be
required) to resume normal operation.
Micro USB port for software upgrade
Software updates for your radio may be available in the
future.
As software updates become available software and
information on how to update your radio can be found at
Makita website.
1. Using the micro USB cable (not supplied) to connect
the USB socket in the battery compartment and your
PC.

12 ENGLISH
2. With your radio switched on, press the Advanced
setting button to access the menu for the current
mode.
3. Rotate the Tuning control knob to select “Software
Update”. Press the Tuning control knob to enter the
setting.
4. Rotate the Tuning control knob to select “Yes” or “No”.
If you do not wish to carry out a software upgrade,
select “No” and press the Tuning control knob to
conrm the setting. With “Yes” selected, press the
Tuning control knob. The display will show “Waiting
for PC wizard”. Go to the website to download the
latest software. Follow the on-screen instructions
on your PC provided with the upgrade software to
complete the software upgrade.
Note:
Please use AC power adaptor as main power when
upgrading software. Do not switch off the power to the
radio until the update operation is complete and the
radio has restarted, otherwise the unit may become
permanently damaged.
Software version
1. With your radio switched on, press the Advanced
setting button to access the menu for the current
mode.
2. Rotate the Tuning control knob to select “Software
Version”. Press the Tuning control knob to display the
software version.
Equalizer function
There are 7 kinds of color LED indicators around the
Tuning control knob to indicate different EQ modes.
1. Press the Power button to switch on your radio.
2. Press the EQ control button to enter the EQ setting
menu.
3. Rotate the Tuning control knob to select your required
mode. Then press the Tuning control knob to conrm
the selection.
EQ mode LED indicator
Flat White
Jazz Blue
Rock Red
Classic Brown
Pop Pink
News Yellow
MY EQ Green
Set up My EQ prole
1. Press the EQ control button to enter the EQ setting
menu.
2. Rotate the Tuning control knob to select “MY EQ
Setup”. Then press the Tuning control knob to enter
the setting menu.
3. Rotate the Tuning control knob to select “Treble”
setting. Press the Tuning control knob to enter the
setting. Rotate the Tuning control knob to select your
required treble level. Press the Tuning control knob to
conrm the setting.
4. Rotate the Tuning control knob to select “Middle”
setting. Press the Tuning control knob to enter the
setting. Rotate the Tuning control knob to select your
required middle level. Press the Tuning control knob
to conrm the setting.
5. Rotate the Tuning control knob to select “Bass”
setting. Press the Tuning control knob to enter the
setting. Rotate the Tuning control knob to select your
required bass level. Press the Tuning control knob to
conrm the setting.
Note:
When using the equalizer to emphasize the bass and
listening at high volume levels, it may cause sound
cracking and distortion. In this case, adjust the radio
volume appropriately.
LISTENING TO MUSIC VIA
BLUETOOTH STREAMING
You need to pair your Bluetooth device with the radio
before you can auto-link to play/stream Bluetooth
music through the radio. Pairing creates a ‘bond’ so two
devices can recognize each other.
Note:
● To have the better sound quality, we recommend
setting the volume to more than two-thirds level on
your Bluetooth device and then adjust the volume on
the radio as required.
● The radio can memorize up to 8 sets of paired
device, when the memory exceed this amount, the
oldest pairing history will be over written.
Pairing your Bluetooth device for the
rst time
1. Press the Power button to turn on the radio. Press the
Band button to select Bluetooth mode. The display
will appear “BT Pair” and the Preset buttons (1-5)
ash white light to show the radio is discoverable.
2. Activate Bluetooth on your device according to the
device’s user manual to link to the radio. Locate the
Bluetooth device list and select the device named
“DMR115” (With some mobiles which are equipped
with earlier versions than BT2.1 Bluetooth device,
you may need to input the pass code “0000”).
3. Once connected, there will be a conrmation tone
sound. The Preset buttons (1-5) will remain in solid
white. You can simply select and play any music from

13 ENGLISH
your source device. Volume control can be adjusted
from your source device, or directly from the radio.
4. Use the controls on your Bluetooth-enabled device or
on the radio to play/pause and navigate tracks.
Note:
● If 2 Bluetooth devices, pairing for the rst time, both
search for the radio, it will show its availability on both
devices. However, if one device links with this unit
rst, then the other Bluetooth device won’t nd it on
the list.
● If your Bluetooth device is temporarily disconnected
to the radio, then you need to manually reconnect
your device again to the radio.
● If “DMR115” shows in your Bluetooth device list but
your device cannot connect with it, please delete the
item from your list and pair the device with the radio
again following the steps described previously.
● Optimum Bluetooth streaming range is roughly
10 meters (30 feet) (line of sight) to the radio but
distance up to 30 meters (100 feet) are possible.
● If Bluetooth connection is lost due to exceeding time
of separation, exceeding the optimum distance,
obstacles or otherwise, reconnecting your device with
the radio may be necessary.
● Physical obstacles, other wireless devices or
electromagnetic devices may affect the connection
quality.
● Bluetooth connectivity performance may vary
depending on the connected Bluetooth devices.
Please refer to the Bluetooth capabilities of your
device before connecting to the radio. All features
may not be supported on some paired Bluetooth
devices.
Playing audio les in Bluetooth mode
When you have successfully connected the radio with
the chosen Bluetooth device you can start to play your
music using the controls on your connected Bluetooth
device.
1. Once playing has started, adjust the volume to the
required setting using the Volume knob on the radio
or on your enabled Bluetooth device.
2. Use the controls on your Bluetooth source device to
play/pause and navigate tracks. Alternatively, control
the playback using Play/Pause, Next track, Previous
track buttons on your radio.
3. Press and hold the Fast-forward or Rewind button to
move through the current track. Release the button
when the desired point is reached.
Note:
● Some player applications or devices may not respond
to all of these controls.
● Some mobile phones may temporarily disconnect
from the radio when you make or receive calls. Some
devices may temporarily mute their Bluetooth audio
streaming when they receive text messages, emails
or for other reasons unrelated to audio streaming.
Such behaviour is a function of the connected device
and does not indicate a fault with the radio.
Playing a previously-paired Bluetooth
source device
If your Bluetooth device already paired with the radio
previously, the unit will memorize your Bluetooth device
and it attempts to reconnect with a device in memory
which is last connected. If the last connected device is
not available, the radio will be discoverable.
Disconnecting your Bluetooth device
Press and hold the Bluetooth pairing button for 2-3
seconds until “BT Pair” is shown on the display or turn
off Bluetooth on your Bluetooth device to disable the
connection.
You can also press the Band button to select any mode
other than Bluetooth mode to disable the connection.
Deleting Bluetooth paired device
memory
To clear the memory of all paired devices, press and
hold the Bluetooth pairing button more than 7 seconds
until “Clearing” shows on the display.
AUXILIARY INPUT SOCKET
A 3.5mm Auxiliary input socket is provided at the front
of your radio to permit an audio signal to be fed into the
unit from an external audio device such as a MP3 or CD
player.
1. Connect an external audio source (for example, MP3
or CD player) to the AUX IN socket.
2. Press the Power button to switch on your radio.
3. Repeatedly press and release the Band button until
“AUX IN” is displayed.
4. To have the better sound quality, we recommend
setting the volume to more than two-thirds level on
your audio device and then adjust the volume on the
radio as required.
Note:
Audio cord is not included as standard accessories.
MAINTENANCE
CAUTION:
● Never use gasoline, benzine, thinner, alcohol or the
like. Discoloration, deformation or cracks may result.
● Do not wash the radio with water.

14 ENGLISH
SPECIFICATIONS
Power requirements
AC power adaptor DC 12V 2.5A, center pin
positive
Battery Slide battery: 10.8V-18V
Frequency coverage
FM87.50-108MHz
(0.05MHz/step)
DAB/DAB+
174.928-239.200 MHz
DAB/DAB+ Channel block DAB (Band III) 5A-13F
Compatible standard DAB/DAB+
Bluetooth®
(The Bluetooth® word mark and logos are registered
trademarks owned by Bluetooth SIG, Inc.)
Bluetooth version 5.0 Certied
Bluetooth Proles A2DP/SCMS-T/AVRCP
Transmission Power Power Class2
Transmisson Range
Optimum:
Max.10 meters (33 feet)
Possible:
Max.30 meters (100 feet)
(varies according to usage
conditions)
Bluetooth Codec SBC, AAC
Maximum radio-frequency
power
BT EDR: 1.91dBm
BT LE: 0.21dBm
Operating Frequency 2402MHz~2480MHz
Circuit feature
Loudspeaker 2.5 inches 8 ohm x 2
4 inches 6 ohm x1
Output power
10.8V-12Vmax:
2W x 2 + 10W
14.4V: 3W x 2 + 15W
18V: 5W x 2 + 25W
Input terminal 3.5mm dia. (AUX IN)
Antenna system DAB/FM: Built-in antenna
Dimensions
(L x W x H) 268 x 164 x 295 mm
Weight 4.8 KG
(without battery)

15 FRANÇAIS
FRANÇAIS
(Instructions d’origine)
INTERPRETATION DE LA
VUE GENERALE (Fig. 1)
1. Poignée/Antenne intégrée(DAB/FM)
2. Loquet du compartiment de la batterie
3. Clapet du compartiment de la batterie
(recouvrant le bloc de batterie)
4. Haut-parleur
5. Prise DC IN
6. Caisson de basse
7. Bouton d’alimentation (Power)
8. Bouton Bande
9. Bouton Paramètres avancés
10. Bouton Info
11. Voyant LED
12. Bouton de présélection 3/Lecture/Pause
13. Bouton de présélection 5
14. Bouton de présélection 4/Piste suivante/
avance rapide
15. Bouton Volume/réglage de la syntonisation/
de sélection
16. Bouton de réglage de l’EQ (Egaliseur)
17. Prise AUX IN
18. Prise d’alimentation USB
19. Bouton Auto tune (syntonisation auto)
20. Voyant LED du mode EQ
21. Bouton de présélection 2/Piste précédente/
rembobinage
22. Bouton de présélection 1/couplage Bluetooth
23. Écran LCD
24. Compartiment de la batterie
25. Port micro-USB pour la mise à niveau du
logiciel
SYMBOLES
Les symboles utilisés pour l'équipement sont afchés
ci-dessous. Soyez sûr de tout comprendre avant toute
utilisation.
Lisez le manuel d’utilisation.
Pour les pays de l’Union européenne
uniquement.
En raison de la présence de
composants dangereux dans
l’équipement, les déchets
d’équipements électriques et
électroniques, les accumulateurs et
les batteries peuvent avoir un impact
négatif sur l’environnement et la santé
humaine.
Ne jetez pas les appareils électriques
et électroniques ou les batteries avec
les ordures ménagères !
Conformément à la directive
européenne relative aux déchets
d’équipements électriques et
électroniques et aux déchets
d’accumulateurs et de batteries, ainsi
qu’à son adaptation à la législation
nationale, les déchets d’équipements
électriques, les batteries et les
accumulateurs doivent être collectés
séparément et déposés dans
un point de collecte distinct pour
déchets urbains, conformément
aux réglementations en matière de
protection de l’environnement.
Cela est indiqué par le symbole de
la poubelle à roulettes barrée sur
l’équipement.
INSTRUCTIONS
IMPORTANTES DE
SECURITE
AVERTISSEMENT:
Lorsque vous utilisez des outils électriques, des
précautions de base devraient toujours être suivies
pour réduire le risque d'incendie, d'électrocution et de
blessures, notamment les précautions suivantes:
1. Lisez ce manuel d'utilisation attentivement ainsi que
le manuel d'utilisation du chargeur avant de l'utiliser.
2. Nettoyez avec un chiffon sec.
3. N’installez pas à proximité de sources de chaleur
telles que radiateurs, registre de chaleur, poêle ou
autres appareils (y compris les amplicateurs) qui
produisent de la chaleur.
4. N’utilisez que les extensions/accessoires spéciés
par le fabricant.
5. Débranchez cet appareil lors des orages ou lorsqu’il
est inutilisé pendant une longue période.
6. Les batteries utilisées pour les radios, qu’elles
soient intégrées ou séparées, doivent être
rechargées uniquement à l’aide du chargeur de
batterie spécié. Un chargeur qui convient à un type
de batterie peut créer un risque d’incendie s’il est
utilisé avec une autre batterie.
7. Les radios fonctionnant à l’aide de batteries
doivent être utilisées uniquement avec les batteries
désignées. L’utilisation d’autres batteries peut créer
un risque d’incendie.
8. Lorsque la batterie externe n’est pas utilisée,

16 FRANÇAIS
veuillez le tenir éloigner des autres objets
métalliques tels que: les trombones, les pièces de
monnaie, les clés, les clous, les vis ou les autres
petits objets métalliques qui peuvent établir une
connexion d'une borne à un autre. Court-circuiter les
bornes de la batterie peut provoquer des étincelles,
des brûlures ou un incendie.
9. Évitez tout contact corporel avec des surfaces
reliées à la terre telles que les tuyaux, les
radiateurs, les cuisinières et les réfrigérateurs. Il y a
un risque accru de choc électrique si votre corps est
relié à la terre.
10. Dans des conditions extrêmes, du liquide peut être
éjecté depuis la batterie; évitez tout contact avec le
liquide. En cas de contact accidentel, rincez avec de
l'eau. Si le liquide rentre en contact avec les yeux,
consultez un médecin. Le liquide éjecté depuis la
batterie peut causer des irritations ou des brûlures.
11. N'utilisez pas le regroupement de batteries
d'accumulateurs ou un outil qui a été endommagé
voire même modié. Les batteries endommagées
ou modiées peuvent présenter un comportement
imprévisible entraînant un incendie, une explosion
ou un risque de blessure.
12. N'exposez pas une batterie ou un outil au feu ou à
une température excessive. L'exposition au feu ou
à une température supérieure à130 °C(266°F) peut
provoquer une explosion.
13. Suivez toutes les instructions de charge et ne
chargez pas la batterie ou l'outil en dehors de la
plage de température spéciée dans les instructions.
La charge incorrecte ou à des températures en
dehors de la plage spéciée peut endommager la
batterie et augmenter le risque d'incendie.
14. Les prises SECTEUR sont utilisées
comme dispositif de déconnexion, et elles doivent
rester facilement accessibles.
15. N'utilisez pas le produit à un volume élevé durant
une période prolongée. Pour éviter les dommages
auditifs, utilisez-le produit à un niveau de volume
modéré.
16. (pour les produits avec afchage à cristaux liquides
seulement) les afchages à cristaux liquides
incluent le liquide qui peut causer de l'irritation et
un empoisonnement. Si le liquide pénètre dans les
yeux, la bouche ou la peau, rincez avec de l'eau et
appelez un médecin.
17. N'exposez pas le produit à la pluie ou à des
environnements humides. L'eau pénétrant dans le
produit augmente le risque de choc électrique.
18. Ce produit n'est pas destiné à être utilisé par des
personnes (y compris des enfants) ayant des
capacités physiques, sensorielles ou mentales
réduites, ou un manque d'expérience et de
connaissances, à moins qu'elles aient reçu une
supervision ou une formation concernant l'utilisation
du produit par une personne responsables pour
leur sécurité. Les enfants doivent être surveillés
pour s'assurer qu'ils ne jouent pas avec le produit.
Entreposez le produit hors de la portée des enfants.
ENREGISTRER SES
INSTRUCTIONS
REGLES SPECIFIQUES DE
SECURITE
POUR LA CARTOUCHE DE BATTERIE
1. Avant d'utiliser la cartouche de batterie, lire toutes
les instructions et les avertissements concernant
(1) le chargeur de batterie, (2) la batterie, et (3)
l’équipement utilisant la batterie.
2. Ne démontez pas la cartouche de batterie
3. Si le temps de fonctionnement devient
excessivement court, cessez immédiatement
l’utilisation. Il peut en résulter un risque de
surchauffe, de brûlures et même d’explosion.
4. Si l'électrolyte pénètre dans vos yeux, rincez-les à
l'eau claire et consultez un médecin immédiatement.
Cela peut entraîner une perte de la vue.
5. Ne court-circuitez pas la cartouche de la batterie:
(1) Ne touchez pas les bornes avec un matériau
conducteur.
(2) Évitez de ranger la cartouche de la batterie dans
un conteneur avec d’autres objets métalliques
tels que des clous, des pièces de monnaie, etc.
(3) N’exposez pas la cartouche de la batterie à l’eau
ou à la pluie. Un court-circuit de la batterie peut
provoquer un fort courant, une surchauffe, des
brûlures et même une panne.
6. Ne rangez pas l’outil ou la cartouche de la batterie
dans des endroits où la température peut atteindre
ou dépasser 50°C (122°F)
7. N’incinérez pas la cartouche de la batterie
même si elle est sérieusement endommagée ou
complètement usée. La cartouche de la batterie
peut exploser dans un feu.
8. Veillez ne pas laisser tomber ou heurter la batterie.
9. N’utilisez pas de batterie endommagée.
10. Pour éviter tout risque, le manuel de la batterie
de remplacement de la batterie doit être lu avant
utilisation. Le courant de décharge maximal de la
batterie doit être supérieur ou égal à 8A
11. Les batteries lithium-ion sont soumises aux
exigences de la législation sur les marchandises
dangereuses. Pour les transports commerciaux,

17 FRANÇAIS
par ex. par des tiers, des agents de livraison,
des exigences particulières en matière de
conditionnement et d’étiquetage doivent être
respectées.
Pour la préparation de l’article à expédier, il est
nécessaire de consulter un expert pour les matières
dangereuses. Veuillez également observer des
réglementations nationales éventuellement plus
détaillées.
Recouvrez par du scotch ou masquez les contacts
ouverts et emballez la batterie de telle manière
qu’elle ne puisse pas bouger dans l’emballage.
12. Lors de la mise au rebut de la cartouche de
batterie, retirez la batterie de l’appareil et éliminez la
cartouche vide dans un endroit sûr prévu à cet effet
selon les lois environnementales en vigueur. Suivez
les réglementations locales relatives à l’élimination
des batteries.
13. Utilisez les batteries uniquement avec les produits
spéciés par Makita. L’installation des batteries
dans des produits non conformes peut entraîner un
incendie, une chaleur excessive, une explosion ou
une fuite d’électrolyte.
Si l’appareil n’est pas utilisé pendant une longue
période, retirez la batterie.
MISE EN GARDE:
● Risque d'explosion si la batterie est
incorrectement remplacée.
● Remplacez uniquement avec le même type ou
équivalent.
● n'utilisez que des batteries Makita authentiques.
L'utilisation de batteries Makita non authentiques,
ou des batteries qui ont été modiées, peut
provoquer une explosion de la batterie
provoquant des incendies, des blessures et des
dégâts. Cela annulera également la garantie
Makita pour l'outil Makita et le chargeur.
Conseils pour maintenir la durée de vie
de la batterie au maximum
1. Chargez la cartouche de la batterie avant qu’elle
ne soit complètement déchargée. Arrêtez toujours
le fonctionnement de l’équipement et rechargez la
cartouche de la batterie lorsque vous remarquez que
la puissance de l’équipement est faible.
2. Rechargez jamais une cartouche de batterie qui est
déjà complètement chargée. La surcharge réduit la
durée de vie de la batterie.
3. Rechargez la cartouche de batterie à une
température ambiante de 10°C à 40°C (50°F -
104°F). Laissez la cartouche de batterie chaude se
refroidir avant de la charger.
4. Rechargez la cartouche de batterie si vous ne l’utilisez
pas pendant une longue période (plus de six mois).

18 FRANÇAIS
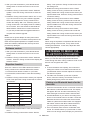
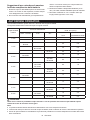
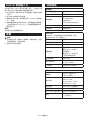
TEMPS DE FONCTIONNEMENT
Les blocs de batterie appropriés pour cette radio sont répertoriés dans le tableau suivant.
Le tableau suivant indique le temps de fonctionnement sur une seule charge.
Capacité de la
batterie
Tension de la batterie SORTIE DU HAUT-PARLEUR = 100 mW
Unité: Heures (Approximative)
10.8V –12Vmax 14.4V 18V En mode Radio ou
AUX
En mode Bluetooth
+ recharge USB
1.3 Ah BL1415 3.5 0.7
BL1815 4.0 1.0
1.5 Ah
BL1015
BL1016 5.5 0.8
BL1415N
BL1415NA 4.5 0.9
BL1815N 5.0 1.2
2.0 Ah
BL1020B
BL1021B 7.0 1.0
BL1820
BL1820B 6.5 1.6
3.0 Ah
BL1430
BL1430B
BL1430A
8.0 1.6
BL1830
BL1830B 9.0 2.3
4.0 Ah
BL1040B
BL1041B 14 2.1
BL1440 12 2.5
BL1840
BL1840B 13 3.2
5.0Ah
BL1450 15 3.0
BL1850
BL1850B 16 4.2
6.0 Ah
BL1460B
BL1460A 16 3.3
BL1860B 20 5.0
AVERTISSEMENT:
n'utilisez que les cartouches de batterie énumérées ci-dessus. L'utilisation de toute autre cartouche de
batterie peut causer des blessures et/ou des incendies.
Remarque:
● Le tableau concernant la durée de fonctionnement de la batterie ci-dessus est présenté comme référence.
● Le temps de fonctionnement réel peut différer du type de la batterie, de la condition de la charge ou de
l'environnement d'utilisation.
● Certaines cartouches de batterie et chargeurs de batterie énumérés ci-dessus peuvent ne pas être disponibles
selon votre région de résidence.

19 FRANÇAIS
INSTALLATION ET
ALIMENTATION FOURNIE
(FIG.2)
ATTENTION:
● Veuillez faire attention à ne pas vous pincer
les doigts en ouvrant ou fermant le clapet de la
batterie.
● Remettez le loquet du compartiment de la batterie
dans sa position initiale après l’ajout ou le retrait
de la batterie. À défaut, elle risque de tomber
accidentellement de la radio et de vous blesser
ou de blesser une personne située près de vous.
● Fermez et verrouillez le compartiment de la
batterie avant tout déplacement de la radio.
● Éteignez toujours la radio avant d’installer et de
retirer le bloc de batterie.
● Prenez garde de ne pas laisser tomber ou cogner
la radio. Le boîtier cassé pourrait vous entailler
un doigt ou provoquer de plus graves blessures.
La radio endommagée pourrait fonctionner de
manière imprévisible, provoquant des risques de
blessures, d’explosion ou d’incendie.
IMPORTANT:
● Une baisse de puissance, une distorsion sonore, un
son saccadé ou l’afchage de « Battery Low »
(Batterie faible) sur l'écran sont les signes que le bloc
de batterie principal a besoin d'être remplacé.
● La batterie ne peut être chargée via l’adaptateur
d’alimentation secteur fourni.
● La batterie n’est pas incluse dans les accessoires de
base.
Installation et retrait d’une batterie
coulissante (Fig. 3 & 4)
● Pour installer la batterie, alignez sa languette sur la
rainure qui se trouve à l’intérieur du logement, puis
faites glisser la batterie pour la mettre en place.
Insérez-la toujours bien à fond, jusqu’à ce qu’elle se
verrouille en émettant un léger déclic.
● Si vous voyez le voyant rouge sur la face supérieure
du bouton, la batterie n’est pas parfaitement
verrouillée. Installez-la à fond, jusqu’à ce que le
voyant rouge ne soit plus visible. À défaut, elle risque
de tomber accidentellement de la radio et de vous
blesser ou de blesser une personne située près de
vous.
● N’appliquez pas une force excessive lors de l’insertion
de la batterie. Si la batterie ne glisse pas aisément,
elle n’est pas insérée correctement.
● Pour retirer la batterie, faites-la glisser hors de la
radio tout en faisant glisser le bouton à l'avant de la
cartouche.
Indication de l’autonomie restante de
la batterie
* Uniquement pour les batteries dont le numéro de
modèle se termine par la lettre « B ».
2
1
1. Voyant des Lampes 2. Bouton de vérication
Appuyez sur le bouton de vérication pour indiquer
l’autonomie restante de la batterie. Les voyants
s’allument alors pendant quelques secondes.
● Batteries de 14,4V/18V
Voyant des lampes
Capacité restante
Allumés Eteintes Clignotant
75% ~ 100%
50% ~ 75%
25% ~ 50%
0% ~ 25%
Rechargez la
batterie
La batterie
semble mal
fonctionnée
● Batteries de 10,8V-12V max
Voyant des lampes
Capacité restante
Allumés Eteintes Clignotant
75% ~ 100%
50% ~ 75%
25% ~ 50%
0% ~ 25%

20 FRANÇAIS
REMARQUE:
Selon les conditions d'utilisation et la température
ambiante, le voyant peut différer légèrement de la
capacité réelle.
Utilisation de l'adaptateur secteur
fourni
Retirez la protection en caoutchouc et insérez la che
de l'adaptateur dans la prise CC située sur le côté
droit de la radio. Branchez l'adaptateur dans une prise
secteur standard. Chaque fois que l'adaptateur est
utilisé, la batterie est automatiquement déconnectée.
ATTENTION:
● Déconnectez toujours complètement l'adaptateur
secteur avant de déplacer la radio. Si l'adaptateur
secteur n'est pas retiré, cela peut provoquer un
risque d’électrocution.
● Ne jamais tirer et trainer le cordon de l'adaptateur.
Si vous le faites, la radio risque de tomber
accidentellement, vous blessant ou blessant les
gens situés autour de vous.
IMPORTANT:
● L'adaptateur secteur est utilisé pour connecter
la radio à l'alimentation secteur. La prise secteur
utilisée pour la radio doit rester accessible pendant
l'utilisation normale.
● Pour déconnecter la radio, débranchez complètement
l'adaptateur secteur de la prise de courant.
● Utilisez l'adaptateur secteur fourni avec le produit ou
uniquement celui spécié par MAKITA.
● Ne tenez pas le câble d'alimentation et ne le mettez
pas dans votre bouche. Cela peut provoquer un choc
électrique.
● Ne touchez pas le câble d'alimentation avec les
mains mouillées ou grasses.
● Les cordons endommagés ou emmêlés augmentent
le risque d’électrocution. Si le cordon est
endommagé, faites-le remplacer par notre centre de
service autorisé an d'éviter tout risque de sécurité.
Ne l'utilisez surtout pas avant la réparation.
● Après utilisation, rangez toujours l'adaptateur secteur
hors de la portée des enfants. Si les enfants jouent
avec le cordon d’alimentation, ils encourent des
risques de blessures.
Rechargement à partir du port USB
Le port USB se trouve sur la façade de la radio. Vous
pouvez charger l’appareil USB à partir du port USB.
1. Branchez l’appareil USB, par exemple un lecteur
MP3 ou un lecteur CD, à l’aide d’un câble USB vendu
dans le commerce.
2. Appuyez sur le bouton d’alimentation « Power » pour
allumer votre radio.
3. Que la radio soit branchée sur une prise secteur
ou alimentée par la batterie, elle sera en mesure
de charger l’appareil USB lorsqu’elle est allumée
en mode radio DAB/FM, en mode BT ou en mode
AUX, lesquels apparaissent lorsqu’une source audio
externe est raccordée.
Remarque:
● Le volume maximum du haut-parleur émettant la
puissance de sortie diminue lors du rechargement à
partir du port USB.
● La prise USB peut fournir un courant électrique
maximum de 2.4A ou 5 V.
IMPORTANT:
● Avant de brancher votre appareil USB au port USB,
sauvegardez toujours vos données enregistrées sur
l’appareil USB. Dans le cas contraire, vous risquez
de les perdre par accident.
● Il est possible que la radio ne puisse pas alimenter
certains appareils USB.
● Retirez le câble USB et fermez le couvercle lorsque
vous ne l’utilisez pas ou lorsque le chargement est
terminé.
● Ne branchez pas une source d’alimentation dans le
port USB. Il y a risque d’incendie. Le port USB est
destiné uniquement au rechargement d’appareils de
faible tension. Placez toujours le couvercle sur le port
USB lorsque vous ne rechargez pas d’appareils de
faible tension.
● N’insérez pas de clou, l, etc., dans le port USB. Vous
pourriez provoquer un court-circuit et déclencher un
incendie et la formation de fumée.
● Ne branchez pas cette prise USB dans le port USB
de votre PC, au risque de provoquer une panne des
appareils.
FONCTIONNEMENT DE LA
RADIO
Cette radio dispose de trois méthodes de syntonisation:
la syntonisation par balayage, la syntonisation manuelle
et le rappel des présélections en mémoire.
Sélection d’une station – DAB
Remarque:
L’antenne pour la bande DAB est intégrée dans
la poignée. Lorsque vous utilisez la radio, veuillez
redresser correctement la poignée au-dessus de la
radio pour obtenir une meilleure réception.
1. Appuyez sur le bouton d’alimentation pour allumer
votre radio.
2. Appuyez sur le bouton Bande pour sélectionner le
mode DAB.
3. Appuyez sur le bouton de réglage de la syntonisation
enfoncé pour afcher la liste des stations. Vous
pouvez également appuyer sur le bouton Paramètres
Sayfa yükleniyor...
Sayfa yükleniyor...
Sayfa yükleniyor...
Sayfa yükleniyor...
Sayfa yükleniyor...
Sayfa yükleniyor...
Sayfa yükleniyor...
Sayfa yükleniyor...
Sayfa yükleniyor...
Sayfa yükleniyor...
Sayfa yükleniyor...
Sayfa yükleniyor...
Sayfa yükleniyor...
Sayfa yükleniyor...
Sayfa yükleniyor...
Sayfa yükleniyor...
Sayfa yükleniyor...
Sayfa yükleniyor...
Sayfa yükleniyor...
Sayfa yükleniyor...
Sayfa yükleniyor...
Sayfa yükleniyor...
Sayfa yükleniyor...
Sayfa yükleniyor...
Sayfa yükleniyor...
Sayfa yükleniyor...
Sayfa yükleniyor...
Sayfa yükleniyor...
Sayfa yükleniyor...
Sayfa yükleniyor...
Sayfa yükleniyor...
Sayfa yükleniyor...
Sayfa yükleniyor...
Sayfa yükleniyor...
Sayfa yükleniyor...
Sayfa yükleniyor...
Sayfa yükleniyor...
Sayfa yükleniyor...
Sayfa yükleniyor...
Sayfa yükleniyor...
Sayfa yükleniyor...
Sayfa yükleniyor...
Sayfa yükleniyor...
Sayfa yükleniyor...
Sayfa yükleniyor...
Sayfa yükleniyor...
Sayfa yükleniyor...
Sayfa yükleniyor...
Sayfa yükleniyor...
Sayfa yükleniyor...
Sayfa yükleniyor...
Sayfa yükleniyor...
Sayfa yükleniyor...
Sayfa yükleniyor...
Sayfa yükleniyor...
Sayfa yükleniyor...
Sayfa yükleniyor...
Sayfa yükleniyor...
Sayfa yükleniyor...
Sayfa yükleniyor...
Sayfa yükleniyor...
Sayfa yükleniyor...
Sayfa yükleniyor...
Sayfa yükleniyor...
Sayfa yükleniyor...
Sayfa yükleniyor...
Sayfa yükleniyor...
Sayfa yükleniyor...
Sayfa yükleniyor...
Sayfa yükleniyor...
Sayfa yükleniyor...
Sayfa yükleniyor...
Sayfa yükleniyor...
Sayfa yükleniyor...
Sayfa yükleniyor...
Sayfa yükleniyor...
Sayfa yükleniyor...
Sayfa yükleniyor...
Sayfa yükleniyor...
Sayfa yükleniyor...
Sayfa yükleniyor...
Sayfa yükleniyor...
Sayfa yükleniyor...
Sayfa yükleniyor...
Sayfa yükleniyor...
Sayfa yükleniyor...
Sayfa yükleniyor...
Sayfa yükleniyor...
Sayfa yükleniyor...
Sayfa yükleniyor...
Sayfa yükleniyor...
Sayfa yükleniyor...
Sayfa yükleniyor...
Sayfa yükleniyor...
Sayfa yükleniyor...
Sayfa yükleniyor...
Sayfa yükleniyor...
Sayfa yükleniyor...
Sayfa yükleniyor...
Sayfa yükleniyor...
Sayfa yükleniyor...
Sayfa yükleniyor...
Sayfa yükleniyor...
Sayfa yükleniyor...
Sayfa yükleniyor...
Sayfa yükleniyor...
Sayfa yükleniyor...
Sayfa yükleniyor...
Sayfa yükleniyor...
Sayfa yükleniyor...
Sayfa yükleniyor...
Sayfa yükleniyor...
Sayfa yükleniyor...
Sayfa yükleniyor...
Sayfa yükleniyor...
-
 1
1
-
 2
2
-
 3
3
-
 4
4
-
 5
5
-
 6
6
-
 7
7
-
 8
8
-
 9
9
-
 10
10
-
 11
11
-
 12
12
-
 13
13
-
 14
14
-
 15
15
-
 16
16
-
 17
17
-
 18
18
-
 19
19
-
 20
20
-
 21
21
-
 22
22
-
 23
23
-
 24
24
-
 25
25
-
 26
26
-
 27
27
-
 28
28
-
 29
29
-
 30
30
-
 31
31
-
 32
32
-
 33
33
-
 34
34
-
 35
35
-
 36
36
-
 37
37
-
 38
38
-
 39
39
-
 40
40
-
 41
41
-
 42
42
-
 43
43
-
 44
44
-
 45
45
-
 46
46
-
 47
47
-
 48
48
-
 49
49
-
 50
50
-
 51
51
-
 52
52
-
 53
53
-
 54
54
-
 55
55
-
 56
56
-
 57
57
-
 58
58
-
 59
59
-
 60
60
-
 61
61
-
 62
62
-
 63
63
-
 64
64
-
 65
65
-
 66
66
-
 67
67
-
 68
68
-
 69
69
-
 70
70
-
 71
71
-
 72
72
-
 73
73
-
 74
74
-
 75
75
-
 76
76
-
 77
77
-
 78
78
-
 79
79
-
 80
80
-
 81
81
-
 82
82
-
 83
83
-
 84
84
-
 85
85
-
 86
86
-
 87
87
-
 88
88
-
 89
89
-
 90
90
-
 91
91
-
 92
92
-
 93
93
-
 94
94
-
 95
95
-
 96
96
-
 97
97
-
 98
98
-
 99
99
-
 100
100
-
 101
101
-
 102
102
-
 103
103
-
 104
104
-
 105
105
-
 106
106
-
 107
107
-
 108
108
-
 109
109
-
 110
110
-
 111
111
-
 112
112
-
 113
113
-
 114
114
-
 115
115
-
 116
116
-
 117
117
-
 118
118
-
 119
119
-
 120
120
-
 121
121
-
 122
122
-
 123
123
-
 124
124
-
 125
125
-
 126
126
-
 127
127
-
 128
128
-
 129
129
-
 130
130
-
 131
131
-
 132
132
-
 133
133
-
 134
134
-
 135
135


diğer dillerde
- español: Makita DMR115 Manual de usuario
- français: Makita DMR115 Manuel utilisateur
- italiano: Makita DMR115 Manuale utente
- Deutsch: Makita DMR115 Benutzerhandbuch
- português: Makita DMR115 Manual do usuário
- dansk: Makita DMR115 Brugermanual
- Nederlands: Makita DMR115 Handleiding