
JPM & Associés • marketing-design-communication • 09/2011
Ref. NC00145414
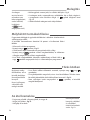
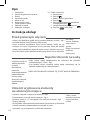
EN p. 2 - 11
CS p. 12 - 21
SK p. 22 - 31
HU p. 32 - 41
BG p. 42 - 51
SL p. 52 - 61
SR p. 62 - 71
HR p. 72 - 81
RO p. 82 - 91
RU p. 92 - 101
UK p. 102 - 111
PL p. 112 - 121
ET p. 122 - 131
LV p. 132 - 141
LT p. 142 - 151
TR p. 152 - 161

www.groupeseb.com
EN
CS
SK
HU
BG
SL
SR
HR
RO
RU
UK
PL
ET
LV
LT
TR
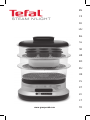
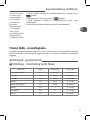
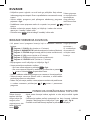
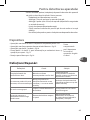
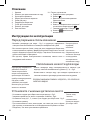
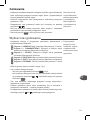
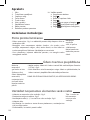
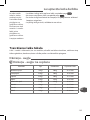
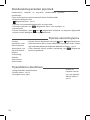
STEAM N'LIGHT


2
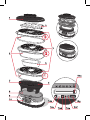
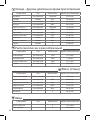
1 Lid
2 Steam baskets
3 Cooking trays
4 Cake mould
5 Rice bowl
6 Juice collector
7 Filling inlet
8 Water tank
9 Power supply base
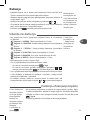
10 Controls
a Programme selector
b
Button
c Screen with cooking times
d
Button
e Frozen food button with indicator
f Keep food warm indicator
g Start/Stop button
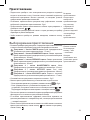
Description
Preparation
Before first use
• Clean the water tank with a non-abrasive sponge - fig.1 and the
exterior of the electronic base.
• Wash all detachable parts (bowls, rice bowl, juice collector, removable
trays, cover, cake mould) with warm water and washing up liquid.
Rinse and dry.
• You can wash all parts in the dishwasher except the electronic base.
Fill the water tank
• Pour cold water directly into the water tank up to the maximum level
(1.5 litre) - fig.2.
• Use fresh water with each use and check that the water tank is filled
to the maximum level.
ALWAYS ENSURE THERE IS WATER IN THE WATER TANK BEFORE
SWITCHING ON.
Fitting the detachable elements
• Place the juice collector on the water tank - fig.3.
• Clip the trays onto the bowls - fig.4.
• Place the bowl(s) 1, 2 and 3 on the juice collector - fig.5.
• Fit the lid.
• When you use the rice bowl and cake mould accessories, position
them directly on the trays in the bowl.
• Check that the bowls are correctly positioned.
Never use a
scourer, especially
on the heating
element. Never
immerse the
electronic base.
Never place any
seasoning or liquid
other than water in
the water tank.
Do not fill the
water tank by
placing it directly
under a tap; use a
container with a
spout.
Only 1 bowl can be
used directly on
the juice collector.

3
EN
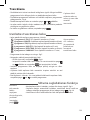
Cooking
• Plug in the appliance: you will hear a beep indicating that it is
connected to the mains. The colour of the chosen programme flashes.
The screen with suggested cooking time flashes.
• Place the programme selector below the symbol of your chosen
programme - fig.6.
• The suggested cooking time can be adjusted with buttons
and .
• If you take no further action, the screen will go off and the appliance
will switch to standby after 2 minutes.
• Press button to leave standby mode.
Choose the cooking time
• Your appliance offers 6 cooking programmes associated with 6 colour
indicators:
Programme 1/BLUE: Fish (pre-set 15 mins)
Programme 2/ORANGE:
Vegetables short cooking time (pre-set 20 mins)
Programme 3/GREEN:
Vegetables long cooking time (pre-set 30 mins)
Programme 4/PURPLE: Meat (pre-set 35 mins)
Programme 5/YELLOW: Rice/eggs (pre-set 40 mins)
Programme 6/RED: Cake (pre-set 17 mins)
• The programme colour lights up and flashes - fig.7.
• The default time setting flashes:
- If you are happy with the pre-set time, press - fig.8.
- If you wish to change the pre-set time, adjust with buttons and
and press
to confirm the selected time.
• The selected time and programme light are now set and cooking begins.
• During cooking, the remaining time counts down in minutes, and then
seconds during the last minute.
• Once cooking has begun, you can adjust the cooking time whenever
you wish using buttons
or
and changing the programme.
Keep warm function
• The sound indicator will beep twice at the end of the cooking time
- fig.9.
• The keep warm function comes on automatically at the end of the
cooking time and the programme colour flashes on and off. Button
will light up - fig.10.
• The elapsed keep warm time since cooking is displayed.
A long press
on the + or –
touchpad allows
you to increase
or decrease the
cooking time more
quickly.
Do not place your
hands above the
appliance when
in use, as steam is
emitted through
the holes in the lid.
While the keep
warm function is
in operation, no
other action is
possible, except
stop when
required
(by pressing
button
).

4
Cooking frozen products
It is possible to cook frozen vegetables and fruits without defrosting them.
The appliance automatically adds 10 minutes to the selected cooking
time.
• Select a cooking programme.
• Press button - fig.11.
• The time is automatically incremented for defrosting and flashes.
• Press to begin cooking; the time is set and cooking begins.
• Once cooking has begun, you can adjust the cooking time whenever
you wish using buttons
or
and changing the programme.
During the cooking time
• If you wish to change the cooking time, press buttons
or .
• If there is no more steam, the appliance needs more water. Add
water by pouring through the filling hole on the right hand side of
the appliance - fig.12.
• You will not need to press button
again, as the appliance will
restart automatically.
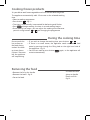
Removing the food
• Remove the lid by the handle.
• Remove the bowls - fig.13.
• Serve the food.
Do not touch the
hot surfaces or
the foods being
cooked. Use heat
resistant gloves.
If there is no water
left, the appliance
will stop heating.
Use heat resistant
gloves to handle
bowls and lids
-
fig.13
.

5
EN
To stop the steamer
• If you wish to stop your appliance during the cooking time, press
button .
• During the keep warm function, press button .
• When cooking stops, this is indicated by rapid flashing of the light
and the “programme selector” screen.
• Unplug the appliance to switch off completely.
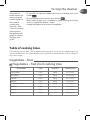
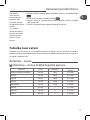
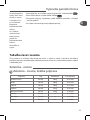
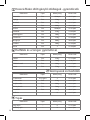
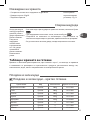
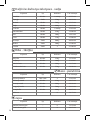
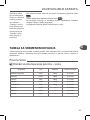
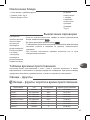
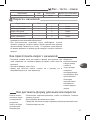
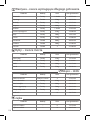
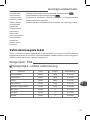
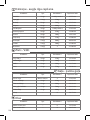
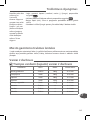
Table of cooking times
The cooking times for bowl 1 are an approximate guide only. Times can vary depending on the
size of the food items, the space between items, quantities, individual taste, and the voltage of
your mains supply.
Vegetables – fruit
Vegetables – fruit short cooking time
If you take no
further action, the
screen will go off
and the appliance
will switch to
standby after
2 minutes. After
1 hour on the keep
warm function,
the appliance will
switch to standby.
The lights will
go off.
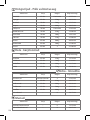
Preparation Type Quantity Cooking time
Sliced carrots
Fresh 300 g
22-27 mins
Mushrooms
Fresh
500 g
18-25 mins
Spinach
Fresh
300 g
12-17 mins
Peppers
Fresh
250 g
18-25 mins
Small white onions
Fresh
250 g
15-20 mins
Bananas
Fresh 4
12-17 mins
Peaches
Fresh 4
12-17 mins
Apples
Fresh 4
25-30 mins

6
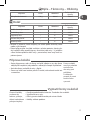
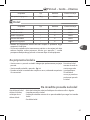
Preparation Type Quantity Cooking time
Fish fillets
Fresh 350 g
12-14 mins
Shellfish
Fresh 200 g
5-10 mins
Pollock steaks
Fresh 300 g
12-17 mins
Salmon
Fresh 550 g
20-30 mins
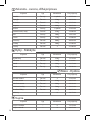
Vegetables – fruit long cooking time
Preparation Type Quantity Cooking time
Chicken legs
Whole fresh 4
35-45 mins
Chicken escalope
Fresh 450 g
20-25 mins
Turkey escalope
Fresh 400 g
20-26 mins
Lamb chops
Fresh 500 g
18-23 mins
Pork fillets
Fresh 600 g
40-45 mins
Sausages
-- 6
10-15 mins
Meat – Poultry
Fish – Shellfish
Preparation Type Quantity Cooking time
Soft-boiled eggs
-- 6
12-15 mins
Hard-boiled eggs
-- 6
20-25 mins
Eggs
Preparation Type Quantity Cooking time
Artichoke
Fresh 1 average sized
45-55 mins
Asparagus
Fresh 550 g
30-34 mins
Broccoli
Fresh
500 g
25-35 mins
Cabbage
Fresh
600 g
30-35 mins
Cauliflower
Fresh
1 average sized
35-45 mins
Green beans
Fresh
450 g
34-40 mins
Leeks
Fresh
500 g
34-41 mins
Garden peas
Fresh
350 g
35-40 mins
Potatoes
Fresh 600 g
40-46 mins
Courgettes
Fresh 500 g
25-30 mins
Pears
Fresh 4
25-30 mins

7
EN
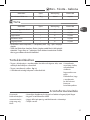
Preparation Type Quantity Cooking time
Summer fruit cake
-- 6
25 mins
Chocolate gateau
-- 6
23 mins
Yoghurt cake
-- 6
18 mins
Provencal cake
-- 6
18 mins
Carrot cake
-- 6
18 mins
Cakes
• You can prepare a range of cake recipes, including those from the recipe
book and your own personal recipes.
• To cook several dishes at once, begin by cooking the foods that require
the longest cooking time. Place them in bowl 1, and then gradually add
the other bowls with the foods that cook quicker.
Cake making
• Put the cake mixture into the cake mould, avoiding overfilling and
spillages with certain recipes.
• Place the cake mould in the bowl - fig.14.
• The cake pan cannot be put in the oven, the microwave or the freezer.
Removing the cake mould
• Use heatproof oven gloves.
• Remove the cover with the handle.
• Leave to cool for a few minutes before removing your cakes.
• Serve your cakes.
The cake pan must
be always put in
the bowl under
the lid.
You may have to
grease the mould
for certain cake
preparations.
If you wish to keep
your cakes in the
refrigerator, wait
until they have
cooled to room
temperature
before
refrigerating.
Preparation Type Quantity Cooking time
White long grain rice
150 g 300 ml
30 mins
Rice – Pasta – Cereals

8
Steaming Tips and Techniques
• Do not pack food too tightly in the steam baskets. Leave some space for
steam to circulate as much as possible.
• For best results, use pieces of food of approximately the same size (such
as potatoes, vegetables and chicken breasts) so that they cook at the
same time. The size and thickness of the food will alter the cooking time.
• Avoid lifting the lid to check on the cooking progress too often, as this
allows loss of steam and can lengthen the cooking time.
• If recipes require the use of cling film, always use the all purpose type
suitable for use in microwave ovens. Cling film is often used to prevent
condensation forming and spoiling delicates foods such as egg custards.
Avoid using foil as this tends to increase the steaming time.
• When choosing food for steaming, select suitable size food to fit the
steaming basket, especially if it is cooked whole such as fish.
• Subtle flavour can be given to steamed food with the addition of fresh
herbs, slices of lemon or orange, garlic and onion. These ingredients may
be added directly to the food.
• To give more flavour to poultry, meat and fish, use marinades,
combinations of herbs and wine or barbecue sauces or spices blends.
• The frozen vegetables and fruits can be steamed without being
defrosted. All shellfish, poultry and meat must be completely thawed
before steaming.
• For some recipes with a long cooking time, such as steamed sponge
pudding, you will need to top up with more cold water during steaming.
• Always use oven gloves when handling the baskets or steaming cups
during or after cooking.
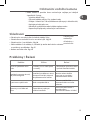
Maintenance and cleaning
Cleaning the steamer
• Unplug the steamer after use.
• Allow it to cool completely before cleaning.
• Check that the steamer has cooled completely before emptying the
juice collector and water tank.
• Wash all removable parts using warm water and washing up liquid,
rinse and dry.
• All parts except the power supply base are dishwasher safe.
Do not immerse
the electronic base
or rinse it under
the tap.
Do not use
abrasive cleaning
products.

9
EN
Descaling your appliance
• For best results, descale the steamer after every 8 uses. To do this:
- Remove the juice collector.
- Pour 1 litre of cold water into the water tank.
- Add 1 glass (about 150 ml) of white vinegar (available from
hardware stores).
- Leave it to descale overnight.
- Rinse out the inside of the water tank several times using warm water.
- Do not use other scale removing products.
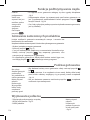
Storage
• Place the rice bowl upside down in the juice collector.
• Place the cake mould upside down on the rice bowl - fig.15.
• Place bowl 1 upside down on the base - fig.16.
• Stack bowl 2 and then bowl 3 upside down on the base - fig.17.
• Place the lid on top - fig.18.
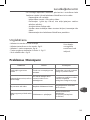
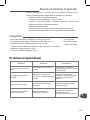
Troubleshooting
All parts can be
stored inside the
steamer.
Incident Cause Solution
There is steam escaping from
the sides of the appliance.
Bowls poorly interlocked
between each other.
Check that the bowls are placed
and fitted in the correct order.
Fit bowl 1 first, next fit bowl
2 and then bowl 3.
I plugged in my appliance but it
switched itself off.
You switched the appliance on
less than 2 minutes ago and it
has gone into standby mode.
Press the start/stop button once
to leave standby mode.
Water is coming out of the
base.
There might be a leak around
the heating element.
Take the appliance to an
approved Service Centre.
The foods don’t cook as quickly
as they used to.
Build-up of scale on the heating
element.
Descale the heating element
(see maintenance and cleaning
paragraph).

10
TEFAL/T-FAL * INTERNATIONAL LIMITED GUARANTEE
: www.tefal.com
This product is repairable by TEFAL/T-FAL*, during and after the guarantee period.
Accessories, consumables and end-user replaceable parts can be purchased, if locally
available, as described on the TEFAL/T-FAL internet site www.tefal.com
The Guarantee**
TEFAL/T-FAL guarantees this product against any manufacturing defect in materials or
workmanship during the guarantee period within those countries*** as stated in the attached
country list, starting from the initial date of purchase or delivery date. The international
manufacturer’s guarantee covers all costs related to restoring the proven defective product
so that it conforms to its original specications, through the repair or replacement of any
defective part and the necessary labour. At TEFAL/T-FAL’s choice, a replacement product may
be provided instead of repairing a defective product. TEFAL/T-FAL’s sole obligation and your
exclusive resolution under this guarantee are limited to such repair or replacement.
Conditions & Exclusions
TEFAL/T-FAL shall not be obliged to repair or replace any product which is not accompanied by
a valid proof of purchase. The product can be taken directly in person or must be adequately
packaged and returned, by recorded delivery (or equivalent method of postage), to a TEFAL/T-
FAL authorised service centre. Full address details for each country’s authorised service centres
are listed on TEFAL/T-FAL website (www.tefal.com) or by calling the appropriate consumer
Service centre set out in the attached country list. In order to oer the best possible after-sales
service and constantly improve customer satisfaction, TEFAL/T-FAL may send a satisfaction
survey to all customers who have had their product repaired or exchanged in a TEFAL/T-FAL
authorised service centre.
This guarantee applies only for products purchased and used for domestic purposes and will
not cover any damage which occurs as a result of misuse, negligence, failure to follow TEFAL/
T-FAL instructions, or a modication or unauthorised repair of the product, faulty packaging
by the owner or mishandling by any carrier. It also does not cover normal wear and tear,
maintenance or replacement of consumable parts, or the following:
– using the wrong type of water or consumable
– ingress of water, dust or insects into the product (excluding appliances with features
specically designed for insects)
– scaling (any de-scaling must be carried out according to the instructions for use)
– damage to any glass or porcelain ware in the product
– damages or poor results specically due to wrong voltage or frequency as stamped on the
product ID or specication
– mechanical damages, overloading
– damage as a result of lightning or power surges
– accidents including re, ood, etc
– professional or commercial use
Consumer Statutory Rights
This international TEFAL/T-FAL guarantee does not aect the Statutory Rights a consumer
may have or those rights that cannot be excluded or limited, nor rights against the retailer
from which the consumer purchased the product. This guarantee gives a consumer specic
legal rights, and the consumer may also have other legal rights which vary from State to State
or Country to Country. The consumer may assert any such rights at his sole discretion.

11
EN
***Where a product purchased in a listed country and then used in another listed country,
the international TEFAL/T-FAL guarantee duration is the one in the country of usage, even
if the product was purchased in a listed country with dierent guarantee duration. The
repair process may require a longer time if the product is not locally sold by TEFAL/T-FAL. If
the product is not repairable in the new country, the international TEFAL/T-FAL guarantee is
limited to a replacement by a similar or alternative product at similar cost, where possible.
*TEFAL household appliances appear under the T-FAL brand in some territories like America
and Japan. TEFAL/T-FAL are registered trademarks of Groupe SEB.
Please keep this document for your reference should you wish to make a claim under the
guarantee.
**For Australia only:
Our goods come with guarantees that cannot be excluded under the Australian Consumer
Law. You are entitled to a replacement or refund for a major failure and compensation for any
other reasonably foreseeable loss or damage. You are also entitled to have the goods repaired
or replaced if the goods fail to be of acceptable quality and the failure does not amount to a
major failure.
**For India only:
Your Tefal product is guaranteed for 2 years. The guarantee covers exclusively the repair of a
defective product, but at TEFAL’s choice, a replacement product may be provided instead of
repairing a defective product. It is mandatory that the consumer, to have his product repaired,
has to log a service request on the dedicated Smartphone application TEFAL SERVICE APP
or by calling TEFAL Consumer Care Center at 1860-200-1232, Opening hours Mon-Sat 09
AM to 06 PM. Products returned by Post will not be covered by the guarantee. As a proof
of purchase consumer needs to provide both this stamped guarantee card and cash memo.

12
Popis
Návod k použití
Před prvním použitím
• Na čištění zásobníku na vodu a na elektrickou základnu nepoužívejte
drsnou houbičku - fig.1.
• Umyjte všechny odnímatelné díly (varné mísy, mísu na vaření rýže,
sběrnou nádobu šťávy, odnímatelná dna, víko, formu na dezert)
vlažnou vodou a saponátem. Opláchněte a osušte.
• Všechny díly s výjimkou elektrické základny můžete mít v myčce na
nádobí.
Naplňte vodní nádobu
• Nalijte studenou vodu přímo do vodní nádoby po maximální úroveň
(1,5 litru) - fig.2.
• Při každém použití používejte čerstvou vodu a kontrolujte, zda je
vodní nádoba naplněna po maximální úroveň.
PŘED ZAPNUTÍM SPOTŘEBIČE SE UJISTĚTE, ŽE JE V ZÁSOBNÍKU VODA.
Umístěte snímatelné díly
• Umístěte sběrnou nádobu šťávy na zásobník - fig.3.
• Přichyťte odnímatelná dna k mísám - fig.4.
• Umístěte mísy 1, 2 a 3 na sběrnou nádobu šťávy - fig.5.
• Přiklopte víkem.
• Pokud používáte příslušenství mísu na rýži a formu na dezert,
umístěte je přímo na dno v míse.
• Zkontrolujte, zda jsou mísy správně umístěné.
Nepoužívejte
škrabku, a to
zejména na topné
těleso.
Elektrickou
základnu nikdy
neponořujte do
vody.
Do zásobníku na
vodu nalévejte
pouze vodu,
nedávejte žádné
koření nebo jiné
kapaliny.
Při plnění
zásobníku vodou
ho neumísťujte pod
tekoucí vodu, ale
použijte nádobu s
hubičkou.
Pouze mísa 1
může být použita
přímo na sběrnou
nádobu šťávy.
1 Víko
2 Parní koše
3 Odnímatelné varné dno
4 Forma na dezert
5 Mísa na vaření rýže
6 Sběrná nádoba šťávy
7 Plnící otvor
8 Vodní nádoba
9 Základna pro napájení elektrickým
proudem
10 Ovládací panel
a Volič programu
b Tlačítko
c Displej s časem tepelné úpravy
d Tlačítko
e Tlačítko na rozmrazování s
kontrolkou
f Kontrolka udržování teploty
g Tlačítko (start/stop)

13
CS
Vaření
• Zapojte spotřebič: Ozve se zvukový signál oznamující, že je spotřebič
pod napětím. Bliká barva zvoleného programu. Na displeji bliká
navržená doba tepelné úpravy.
• Nastavte volič programu pod piktogram zvoleného programu tepelné
úpravy - fig.6.
• Navrženou dobu tepelné úpravy lze změnit tlačítky
a .
• Nedojde-li k další aktivaci, displej zhasne a spotřebič po 2 minutách
přejde do pohotovostního režimu.
• Stiskem tlačítka se spotřebič navrátí z pohotovostního režimu.
Zvolte čas vaření
• Tento spotřebič má 6 programů tepelné úpravy, ke kterým je
přiřazeno 6 světelných barev:
Program 1/MODRÁ: Ryby (přednastaveno 15 min).
Program 2/ORANŽOVÁ: Zelenina krátká tepelná úprava
(přednastaveno 20 min)
Program 3/ZELENÁ: Zelenina dlouhá tepelná úprava
(přednastaveno 30 min)
Program 4/FIALOVÁ: Maso (přednastaveno 35 min)
Program 5/ŽLUTÁ: Rýže/vejce (přednastaveno 40 min)
Program 6/ČERVENÁ: Dezert (přednastaveno 17 min)
• Barva programu se rozsvítí a bliká - fig.7.
• Zobrazený implicitně nastavený čas bliká:
- Pokud vám čas vyhovuje, stiskněte - fig.8.
- Pokud vám přednastavený čas nevyhovuje, můžete ho změnit
tlačítky
a a stisknutím tento čas potvrdíte.
• Zvolený čas a světlo programu se ustálí a vaření se spustí.
• Zobrazený čas v průběhu vaření klesá po minutách a během poslední
minuty po sekundách.
• Během vaření můžete kdykoliv změnit dobu tepelné úpravy stisknutím
tlačítka
nebo a změnit program.
Dlouhé stisknutí
tlačítka + nebo
– umožňuje
prodloužit nebo
zkrátit čas vaření
rychleji.
Při tepelné úpravě
nedávejte nad
spotřebič ruce
kvůli páře, která
uniká z otvorů
víka.

14
Funkce udržování teploty
• Po uplynutí doby vaření zazní dva zvukové signály - fig.9.
• Udržování teploty se automaticky spustí po ukončení vaření a barva
programu se střídavě rozsvěcuje. Rozsvítí se tlačítko - fig.10.
• Zobrazuje se uplynulý čas udržování teploty od ukončení vaření.
Tepelná úprava mražených produktů
Můžete připravovat zmraženou zeleninu a ovoce bez potřeby rozmražení.
Spotřebič automaticky přidá 10 minut k nastavené době tepelné
úpravy.
• Zvolte požadovaný program.
• Stiskněte tlačítko - fig.11.
• Čas rozmražení je automaticky pričten a bliká.
• Stisknutím tlačítka spustíte vaření, čas přestane blikat a vaření
se spustí.
• Během vaření můžete kdykoliv změnit dobu tepelné úpravy stisknutím
tlačítka
nebo a změnit program.
Průběh vaření
• Chcete-li upravit dobu tepelné úpravy, stiskněte tlačítka
nebo .
• Pokud již nevzniká pára, znamená to, že ve spotřebiči chybí voda.
Dolijte vodu plnicím otvorem umístěným na pravé straně spotřebiče
- fig.12.
• Není nutné znovu stisknout tlačítko , spotřebič se sám znovu
spustí.
Vyjmutí potravin
• Odejměte víko za rukojeť.
• Sejměte mísy - fig.13.
• Servírujte potraviny.
Během vaření
se nedotýkejte
horkých částí
spotřebiče ani
potravin. Použijte
kuchyňské
rukavice.
Pokud dojde voda,
spotřebič přestane
hřát.
K manipulaci s
mísami a víkem
použijte kuchyňské
rukavice - fig.13.
Při udržování
teploty není možné
provést jinou
činnost, pokud
budete chtít,
můžete spotřebič
pouze vypnout
(stisknutím tlačítka
).

15
CS
Zastavení parního hrnce
• Chcete-li během tepelné úpravy spotřebič vypnout, stiskněte tlačítko
.
• Při udržování teploty stiskněte tlačítko .
• Vypnutí vaření je signalizováno rychlým blikáním světla a displeje
„volič programu“.
• Chcete-li spotřebič zcela vypnout, odpojte ho od sítě.
Tabulka časů vaření
Uvedené časy jsou pro mísu 1, jsou pouze orientační a mohou se lišit v závislosti na velikosti
potravin, prostoru mezi potravinami, množství potravin, podle individuální chuti a v závislosti
na napětí v elektrické síti.
Zelenina – ovoce
Zelenina – ovoce krátká tepelná úprava
Nedojde-li k
další aktivaci,
displej zhasne a
spotřebič po 2
minutách přejde
do pohotovostního
režimu.
Po 1 hodině
udržování teploty
zařízení přejde do
pohotovostního
režimu. Světlo
zhasne.
Příprava Druh Množství
Doba tepelné
úpravy
Mrkve nakrájené na kolečka
Čerstvé 300 g
22-27 min
Houby
Čerstvé
500 g
18-25 min
Špenát
Čerstvý
300 g
12-17 min
Papriky
Čerstvé
250 g
18-25 min
Bílé cibulky
Čerstvé
250 g
15-20 min
Banány
Čerstvé 4
12-17 min
Broskve
Čerstvé 4
12-17 min
Jablka
Čerstvé 4
25-30 min

16
Příprava Druh Množství
Doba tepelné
úpravy
Rybí filé
Čerstvý 350 g
12-14 min
Korýši
Čerstvý 200 g
5-10 min
Biftek
Čerstvý 300 g
12-17 min
Losos
Čerstvý 550 g
20-30 min
Zelenina – ovoce dlouhá tepelná úprava
Příprava Druh Množství
Doba tepelné
úpravy
Kuřecí stehna
Čerstvé, vcelku 4
35-45 min
Kuřecí řízek
Čerstvý 450 g
20-25 min
Krůtí řízek
Čerstvý 400 g
20-26 min
Jehněčí kotleta
Čerstvý 500 g
18-23 min
Vepřové plátky
Čerstvý 600 g
40-45 min
Klobásy
-- 6
10-15 min
Maso – drůbež
Ryby – korýši
Příprava Druh Množství
Doba tepelné
úpravy
Vejce na hniličku
-- 6
12-15 min
Vejce natvrdo
-- 6
20-25 min
Vejce
Příprava Druh Množství
Doba tepelné
úpravy
Artyčok
Čerstvý 1 průměrné velikosti
45-55 min
Chřest
Čerstvý 550 g
30-34 min
Brokolice
Čerstvé
500 g
25-35 min
Zelí
Čerstvé
600 g
30-35 min
Květák
Čerstvý
1 průměrné velikosti
35-45 min
Zelené fazolové lusky
Čerstvé
450 g
34-40 min
Pórky
Čerstvé
500 g
34-41 min
Hrášek
Čerstvý
350 g
35-40 min
Brambory
Čerstvé 600 g
40-46 min
Dýně
Čerstvé 500 g
25-30 min
Hrušky
Čerstvé 4
25-30 min

17
CS
Příprava Druh Množství
Doba tepelné
úpravy
Koláč s červeným ovocem
-- 6
25 min
Čokoládový dort
-- 6
23 min
Jogurtový dort
-- 6
18 min
Provensálský koláč
-- 6
18 min
Mrkvový koláč
-- 6
18 min
Koláč
• Můžete si připravit různé receptury na koláče podle kuchařky nebo
podle svých receptů.
• Pokud připravujete více jídel: začněte s vařením potravin, které vyža-
dují nejdelší dobu tepelné úpravy. Umístěte je do mísy 1. V průběhu
vaření můžete přidávat další mísy s potravinami, které mají kratší te-
pelnou úpravu.
Příprava koláčů
• Dejte připravenou směs do formy na koláč, dbejte na to, aby forma
nebyla příliš naplněná, aby nedošlo u některých receptů k přetečení.
• Umístěte formu na koláč do mísy - fig.14.
• Formu na koláč není možno použít v troubě, mikrovlnné troubě ani
v mrazničce.
Vyjmutí formy na koláč
• Použijte tepelně odolné rukavice. Zvedněte víko za držák.
• Vyjměte formu z mísy.
• Před vyjmutím koláče nechte pár minut chladit.
• Koláčky můžete podávat.
Forma na koláč
musí být pokaždé
umístěna na
dno mísy pod
pokličkou.
U některých
receptů je nutné
formu trochu
vymastit.
Chcete-li koláčky
uschovat do
lednice, vyčkejte,
dokud nedosáhnou
pokojové teploty.
Příprava Druh Množství
Doba tepelné
úpravy
Bílá rýže dlouhozrnná
150 g 300 ml
30 min
Rýže – Těstoviny – Obilniny
Sayfa yükleniyor ...
Sayfa yükleniyor ...
Sayfa yükleniyor ...
Sayfa yükleniyor ...
Sayfa yükleniyor ...
Sayfa yükleniyor ...
Sayfa yükleniyor ...
Sayfa yükleniyor ...
Sayfa yükleniyor ...
Sayfa yükleniyor ...
Sayfa yükleniyor ...
Sayfa yükleniyor ...
Sayfa yükleniyor ...
Sayfa yükleniyor ...
Sayfa yükleniyor ...
Sayfa yükleniyor ...
Sayfa yükleniyor ...
Sayfa yükleniyor ...
Sayfa yükleniyor ...
Sayfa yükleniyor ...
Sayfa yükleniyor ...
Sayfa yükleniyor ...
Sayfa yükleniyor ...
Sayfa yükleniyor ...
Sayfa yükleniyor ...
Sayfa yükleniyor ...
Sayfa yükleniyor ...
Sayfa yükleniyor ...
Sayfa yükleniyor ...
Sayfa yükleniyor ...
Sayfa yükleniyor ...
Sayfa yükleniyor ...
Sayfa yükleniyor ...
Sayfa yükleniyor ...
Sayfa yükleniyor ...
Sayfa yükleniyor ...
Sayfa yükleniyor ...
Sayfa yükleniyor ...
Sayfa yükleniyor ...
Sayfa yükleniyor ...
Sayfa yükleniyor ...
Sayfa yükleniyor ...
Sayfa yükleniyor ...
Sayfa yükleniyor ...
Sayfa yükleniyor ...
Sayfa yükleniyor ...
Sayfa yükleniyor ...
Sayfa yükleniyor ...
Sayfa yükleniyor ...
Sayfa yükleniyor ...
Sayfa yükleniyor ...
Sayfa yükleniyor ...
Sayfa yükleniyor ...
Sayfa yükleniyor ...
Sayfa yükleniyor ...
Sayfa yükleniyor ...
Sayfa yükleniyor ...
Sayfa yükleniyor ...
Sayfa yükleniyor ...
Sayfa yükleniyor ...
Sayfa yükleniyor ...
Sayfa yükleniyor ...
Sayfa yükleniyor ...
Sayfa yükleniyor ...
Sayfa yükleniyor ...
Sayfa yükleniyor ...
Sayfa yükleniyor ...
Sayfa yükleniyor ...
Sayfa yükleniyor ...
Sayfa yükleniyor ...
Sayfa yükleniyor ...
Sayfa yükleniyor ...
Sayfa yükleniyor ...
Sayfa yükleniyor ...
Sayfa yükleniyor ...
Sayfa yükleniyor ...
Sayfa yükleniyor ...
Sayfa yükleniyor ...
Sayfa yükleniyor ...
Sayfa yükleniyor ...
Sayfa yükleniyor ...
Sayfa yükleniyor ...
Sayfa yükleniyor ...
Sayfa yükleniyor ...
Sayfa yükleniyor ...
Sayfa yükleniyor ...
Sayfa yükleniyor ...
Sayfa yükleniyor ...
Sayfa yükleniyor ...
Sayfa yükleniyor ...
Sayfa yükleniyor ...
Sayfa yükleniyor ...
Sayfa yükleniyor ...
Sayfa yükleniyor ...
Sayfa yükleniyor ...
Sayfa yükleniyor ...
Sayfa yükleniyor ...
Sayfa yükleniyor ...
Sayfa yükleniyor ...
Sayfa yükleniyor ...
Sayfa yükleniyor ...
Sayfa yükleniyor ...
Sayfa yükleniyor ...
Sayfa yükleniyor ...
Sayfa yükleniyor ...
Sayfa yükleniyor ...
Sayfa yükleniyor ...
Sayfa yükleniyor ...
Sayfa yükleniyor ...
Sayfa yükleniyor ...
Sayfa yükleniyor ...
Sayfa yükleniyor ...
Sayfa yükleniyor ...
Sayfa yükleniyor ...
Sayfa yükleniyor ...
Sayfa yükleniyor ...
Sayfa yükleniyor ...
Sayfa yükleniyor ...
Sayfa yükleniyor ...
Sayfa yükleniyor ...
Sayfa yükleniyor ...
Sayfa yükleniyor ...
Sayfa yükleniyor ...
Sayfa yükleniyor ...
Sayfa yükleniyor ...
Sayfa yükleniyor ...
Sayfa yükleniyor ...
Sayfa yükleniyor ...
Sayfa yükleniyor ...
Sayfa yükleniyor ...
Sayfa yükleniyor ...
Sayfa yükleniyor ...
Sayfa yükleniyor ...
Sayfa yükleniyor ...
Sayfa yükleniyor ...
Sayfa yükleniyor ...
Sayfa yükleniyor ...
Sayfa yükleniyor ...
Sayfa yükleniyor ...
Sayfa yükleniyor ...
Sayfa yükleniyor ...
Sayfa yükleniyor ...
Sayfa yükleniyor ...
Sayfa yükleniyor ...
-
 1
1
-
 2
2
-
 3
3
-
 4
4
-
 5
5
-
 6
6
-
 7
7
-
 8
8
-
 9
9
-
 10
10
-
 11
11
-
 12
12
-
 13
13
-
 14
14
-
 15
15
-
 16
16
-
 17
17
-
 18
18
-
 19
19
-
 20
20
-
 21
21
-
 22
22
-
 23
23
-
 24
24
-
 25
25
-
 26
26
-
 27
27
-
 28
28
-
 29
29
-
 30
30
-
 31
31
-
 32
32
-
 33
33
-
 34
34
-
 35
35
-
 36
36
-
 37
37
-
 38
38
-
 39
39
-
 40
40
-
 41
41
-
 42
42
-
 43
43
-
 44
44
-
 45
45
-
 46
46
-
 47
47
-
 48
48
-
 49
49
-
 50
50
-
 51
51
-
 52
52
-
 53
53
-
 54
54
-
 55
55
-
 56
56
-
 57
57
-
 58
58
-
 59
59
-
 60
60
-
 61
61
-
 62
62
-
 63
63
-
 64
64
-
 65
65
-
 66
66
-
 67
67
-
 68
68
-
 69
69
-
 70
70
-
 71
71
-
 72
72
-
 73
73
-
 74
74
-
 75
75
-
 76
76
-
 77
77
-
 78
78
-
 79
79
-
 80
80
-
 81
81
-
 82
82
-
 83
83
-
 84
84
-
 85
85
-
 86
86
-
 87
87
-
 88
88
-
 89
89
-
 90
90
-
 91
91
-
 92
92
-
 93
93
-
 94
94
-
 95
95
-
 96
96
-
 97
97
-
 98
98
-
 99
99
-
 100
100
-
 101
101
-
 102
102
-
 103
103
-
 104
104
-
 105
105
-
 106
106
-
 107
107
-
 108
108
-
 109
109
-
 110
110
-
 111
111
-
 112
112
-
 113
113
-
 114
114
-
 115
115
-
 116
116
-
 117
117
-
 118
118
-
 119
119
-
 120
120
-
 121
121
-
 122
122
-
 123
123
-
 124
124
-
 125
125
-
 126
126
-
 127
127
-
 128
128
-
 129
129
-
 130
130
-
 131
131
-
 132
132
-
 133
133
-
 134
134
-
 135
135
-
 136
136
-
 137
137
-
 138
138
-
 139
139
-
 140
140
-
 141
141
-
 142
142
-
 143
143
-
 144
144
-
 145
145
-
 146
146
-
 147
147
-
 148
148
-
 149
149
-
 150
150
-
 151
151
-
 152
152
-
 153
153
-
 154
154
-
 155
155
-
 156
156
-
 157
157
-
 158
158
-
 159
159
-
 160
160
-
 161
161
-
 162
162
-
 163
163
-
 164
164


Tefal VC300831 Kullanım kılavuzu
- Tip
- Kullanım kılavuzu
- Bu kılavuz için de uygundur
Diğer dillerde
- eesti: Tefal VC300831 Kasutusjuhend
- slovenčina: Tefal VC300831 Používateľská príručka
- română: Tefal VC300831 Manual de utilizare
İlgili Makaleler
Diğer Belgeler
-
Philips HD9120 Kullanım kılavuzu
-
Kenwood CCL450SI El kitabı
-
Beaba Babycook Neo Eucalyptus El kitabı
-
Moulinex AMA351 El kitabı
-
-
Siemens HF24M564/03 Kullanım kılavuzu
-
 Russell Hobbs ib_22130 Kullanım kılavuzu
-
Electrolux EMS17216X Kullanım kılavuzu
-
-
Russell Hobbs 19773-56 Kullanım kılavuzu
