
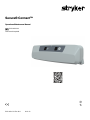
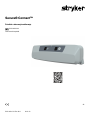
SSeeccuurree®® CCoonnnneecctt™™
OOppeerraattiioonnss//MMaaiinntteennaannccee MMaannuuaall
521200380100
Connected Hospital®
EN
RU
SL
TR
5212-009-211 Rev AA.1 2021-12


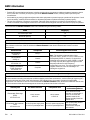
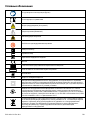
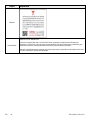
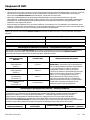
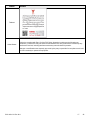
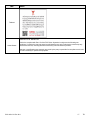
SSyymmbboollss
Refer to instruction manual/booklet
Consult instructions for use
General warning
Caution
Non-ionizing radiation
China RoHS with declarable substances
Catalogue number
Serial number
European medical device
CE mark
Authorized representative in the European Community
For US Patents see www.stryker.com/patents
Manufacturer
IIPPXX44 Protection from liquid splash
Class II electrical equipment: equipment in which protection against electric shock does not rely
on basic insulation only, but in which additional safety precautions such as double insulation or
reinforced insulation are provided, there being no provision for protective earthing or reliance
upon installation conditions.
87VL
Medical Equipment Classified by Underwriters Laboratories Inc. With Respect to Electric Shock,
Fire, and Mechanical Hazards Only in Accordance with ANSI/AAMI ES60601-1:2005/(R)2012
and A1:2012 C1:2009/(R)2012 and A2:2010/(R)2012, CAN/CSA-C22.2 No. 60601-1:14, IEC
60601-2-52:2009/A1:2015, CAN/CSA-C22.2 No. 60601-2-52:11 with Amendment 1:2017.
In accordance with European Directive 2012/19/EU on Waste Electrical and Electronic
Equipment (WEEE) as amended, this symbol indicates that the product should be collected
separately for recycling. Do not dispose of as unsorted municipal waste. Contact local distributor
for disposal information. Ensure infected equipment is decontaminated prior to recycling.
5212-009-211 Rev AA.1 EN


TTaabbllee ooff CCoonntteennttss
Warning/Caution/Note Definition ....................................................................................................................2
Summary of safety precautions ...............................................................................................................2
Introduction ..................................................................................................................................................3
Product description ................................................................................................................................3
Contraindications ...................................................................................................................................3
Expected service life...............................................................................................................................3
Disposal/recycle..............................................................................................................................3
Specifications ........................................................................................................................................3
Bluetooth radio specifications ...........................................................................................................4
Contact information ................................................................................................................................5
Serial number location .....................................................................................................................5
Installation....................................................................................................................................................6
Installing SSeeccuurree CCoonnnneecctt .....................................................................................................................6
Installation checklist......................................................................................................................................9
Operation...................................................................................................................................................10
SSeeccuurree CCoonnnneecctt indicators/functions....................................................................................................10
Configuring the SSeeccuurree CCoonnnneecctt..........................................................................................................11
Testing the SSeeccuurree CCoonnnneecctt................................................................................................................12
Preventive maintenance..............................................................................................................................13
Cleaning ....................................................................................................................................................14
Disinfecting ................................................................................................................................................15
Wireless notifications ..................................................................................................................................16
EMC information.........................................................................................................................................18
SSeeccuurree CCoonnnneecctt association form...............................................................................................................22
5212-009-211 Rev AA.1 1 EN

WWaarrnniinngg//CCaauuttiioonn//NNoottee DDeeffiinniittiioonn
The words WWAARRNNIINNGG,CCAAUUTTIIOONN, and NNOOTTEE carry special meanings and should be carefully reviewed.
WWAARRNNIINNGG
Alerts the reader about a situation which, if not avoided, could result in death or serious injury. It may also describe
potential serious adverse reactions and safety hazards.
CCAAUUTTIIOONN
Alerts the reader of a potentially hazardous situation which, if not avoided, may result in minor or moderate injury to the
user or patient or damage to the product or other property. This includes special care necessary for the safe and effective
use of the device and the care necessary to avoid damage to a device that may occur as a result of use or misuse.
NNoottee -- Provides special information to make maintenance easier or important instructions clearer.
SSuummmmaarryy ooff ssaaffeettyy pprreeccaauuttiioonnss
Always read and strictly follow the warnings and cautions listed on this page. Service only by qualified personnel.
WWAARRNNIINNGG
• Portable RF communications equipment, including peripherals such as antenna cables and external antennas, should
be no closer than 12 inches (30 cm) to any part of the SSeeccuurree CCoonnnneecctt locator, including cables specified by the
manufacturer.
• Avoid stacking or placing equipment adjacent with other equipment to prevent improper operation of the product. If such
use is necessary, carefully observe stacked or adjacent equipment to make sure that they operate properly.
• The use of accessories, transducers, and cables, other than those specified or provided by the manufacturer, could
result in increased electromagnetic emissions or decreased electromagnetic immunity and result in improper operation.
CCAAUUTTIIOONN
• Improper usage of the product can cause injury to the patient or operator. Operate the product only as described in this
manual.
• Do not modify the product or any components of the product. Modifying the product can cause unpredictable operation
resulting in injury to patient or operator. Modifying the product also voids its warranty.
• Always match the dip-switches on SB1 and SB2 to the connected product configuration to avoid the risk of head wall
damage.
• Always match the dip-switches of a product to the head wall configuration if a nurse call communication cable needs to
be connected to avoid the risk of head wall damage.
• Always match the dip-switches on SB1 and SB2 to the product configuration to avoid the risk of head wall damage.
• Do not clean, disinfect, service, or perform maintenance while the product is in use.
• Always unplug the power cord from the wall outlet when large spills occur near the circuit boards and cables. Clean up
the fluid, and inspect the product. Fluids can cause unpredictable operation and decreased functionality of any electrical
product. Do not return the product to service until dry and tested for safe operation.
• Always wipe down with clean water (or 70% isopropyl alcohol, if using VViirreexx® TB) and dry each product after
disinfecting. Some disinfectants are corrosive in nature and may cause damage to the product. If you do not rinse and
dry the product, you may leave a corrosive residue on the surface of the product. This corrosive residue could cause
premature degradation of critical components. Failure to follow these disinfecting instructions may void your warranty.
EN 2 5212-009-211 Rev AA.1

IInnttrroodduuccttiioonn
This manual assists you with the operation or maintenance of your Stryker product. Read this manual before operating or
maintaining this product. Set methods and procedures to educate and train your staff on the safe operation or maintenance
of this product.
CCAAUUTTIIOONN
• Improper usage of the product can cause injury to the patient or operator. Operate the product only as described in this
manual.
• Do not modify the product or any components of the product. Modifying the product can cause unpredictable operation
resulting in injury to patient or operator. Modifying the product also voids its warranty.
NNoottee
• This manual is a permanent part of the product and should remain with the product even if the product is sold.
• Stryker continually seeks advancements in product design and quality. This manual contains the most current product
information available at the time of printing. There may be minor discrepancies between your product and this manual. If
you have any questions, contact Stryker Customer Service or Technical Support at 1-800-327-0770.
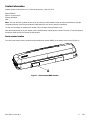
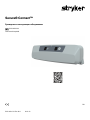
PPrroodduucctt ddeessccrriippttiioonn
The Stryker Model 521200380100 SSeeccuurree®CCoonnnneecctt™ is a cable-free nurse call solution. SSeeccuurree CCoonnnneecctt allows for
patient nurse communication via the nurse call button, room controls, and TV controls without the need for any cables or
wires.
CCoonnttrraaiinnddiiccaattiioonnss
None known.
EExxppeecctteedd sseerrvviiccee lliiffee
The SSeeccuurree CCoonnnneecctt has a 10 year expected service life under normal use conditions and with appropriate periodic
maintenance.
The battery has a two year expected service life under normal use conditions.
DDiissppoossaall//rreeccyyccllee
Always follow the current local recommendations and/or regulations governing environmental protection and the risks
associated with recycling or disposing of the equipment at the end of its useful life.
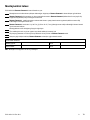
SSppeecciiffiiccaattiioonnss
Overall length, width, and depth 16.3 in. x 3.3 in. x 4.3 in. 41.1 cm x 8.4 cm x 10.9 cm
Weight 4 lb 1.8 kg
5212-009-211 Rev AA.1 3 EN

System voltage rating AC supply: 100-240 VAC, 50/60 Hz, 0.8A
SSeeccuurree CCoonnnneecctt: 18 VDC, 1.67A
Wireless connection
Uses infrared (IR) LED and Bluetooth based on Stryker
proprietary communication scheme
NNoottee -- Minimum signal strength of the SSeeccuurree CCoonnnneecctt must
be within 3dB of the connected product. Make sure the product
is within 5.5 ft (1.7 m) of the SSeeccuurree CCoonnnneecctt.
Stryker reserves the right to change specifications without notice.
Specifications listed are approximate and may vary slightly from product to product or by power supply fluctuations.
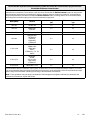
EEnnvviirroonnmmeennttaall ccoonnddiittiioonnss OOppeerraattiioonn SSttoorraaggee aanndd ttrraannssppoorrttaattiioonn
Ambient temperature
95 °F
(35 °C)
50 °F
(10 °C)
140 °F
(60 °C)
-40 °F
(-40 °C)
Relative humidity (non-condensing)
75%
30%
95%
10%
Atmospheric pressure
106 kPa
70 kPa
106 kPa
50 kPa
In accordance with the European REACH regulation and other environmental regulatory requirements, the components that
contain declarable substances are listed.
DDeessccrriippttiioonn NNuummbbeerr SSuubbssttaannccee ooff vveerryy hhiigghh ccoonncceerrnn
((SSVVHHCC)) cchheemmiiccaall nnaammee
Wallside room interface board 521200380950
Decamethylcyclopentasiloxane,
dodecamethylcyclohexasiloxane, lead,
octamethylcyclotetrasiloxane
BBlluueettooootthh rraaddiioo ssppeecciiffiiccaattiioonnss
IItteemm SSppeecciiffiiccaattiioonn -- CChhiippsseett WWTT3322ii ((SSiilliiccoonn LLaabbss)) UUnniitt
CChhaannnneell MMiinn MMaaxx
Operating frequencies 79 2.4 2.4835 GHz
Receiving bandwidth Not applicable 1 MHz
Maximum ERP Not applicable -24.148 dBW
EN 4 5212-009-211 Rev AA.1

CCoonnttaacctt iinnffoorrmmaattiioonn
Contact Stryker Customer Service or Technical Support at: 1-800-327-0770.
Stryker Medical
3800 E. Centre Avenue
Portage, MI 49002
USA
NNoottee -- The user and/or the patient should report any serious product-related incident to both the manufacturer and the
Competent authority of the European Member State where the user and/or patient is established.
To view your operations or maintenance manual online, see https://techweb.stryker.com/.
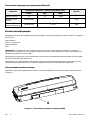
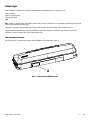
Have the serial number (A) of your Stryker product available when calling Stryker Customer Service or Technical Support.
Include the serial number in all written communication.
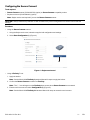
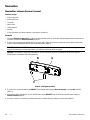
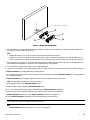
SSeerriiaall nnuummbbeerr llooccaattiioonn
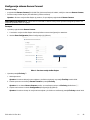
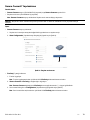
You can find the serial number (A) and bed bay identification number (BBID) on the bottom of the product (Figure 1).
A
FFiigguurree 11 –– SSeerriiaall nnuummbbeerr//BBBBIIDD llooccaattiioonn
5212-009-211 Rev AA.1 5 EN

IInnssttaallllaattiioonn
IInnssttaalllliinngg SSeeccuurree CCoonnnneecctt
TToooollss rreeqquuiirreedd::
• #2 Phillips screwdriver
• #1 Phillips screwdriver
• Straight pick
• Tape measure
• Level
• Pencil
• Tools required for hospital supplied fasteners
PPrroocceedduurree::
1. Record the SSeeccuurree CCoonnnneecctt BBID (
Serial number location
(page 5)) and room number/patient position on the
SSeeccuurree
CCoonnnneecctt association form
(page 22).
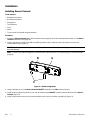
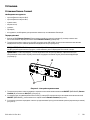
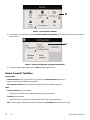
2. Using a straight pick, configure the SB1 and SB2 dip-switches (A) to match the nurse call system and nurse call
communication cable (Figure 2).
CCAAUUTTIIOONN -- Always match the dip-switches on SB1 and SB2 to the connected product configuration to avoid the risk of
head wall damage.
NNoottee -- To confirm dip-switch configuration, contact Stryker customer service or technical support (
Contact information
(page 5)).
AB
C
FFiigguurree 22 –– SSwwiittcchh ccoonnffiigguurraattiioonn
3. Using a straight pick, turn the SSeeccuurree CCoonnnneecctt OONN//OOFFFF switch (B) to the OONN position (Figure 2).
4. Install the two supplied IPX labels (C) over the dip-switch and the OONN//OOFFFF cutouts located on the back of the SSeeccuurree
CCoonnnneecctt (Figure 2).
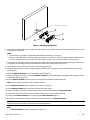
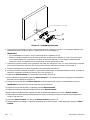
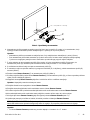
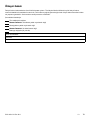
5. Using a tape measure and pencil, mark the intended center of the bed location (vertical line) (Figure 3).
EN 6 5212-009-211 Rev AA.1

1 in. - 5 in. (2.54 cm - 12.7 cm)
D
E
F
G
FFiigguurree 33 –– MMoouunnttiinngg ssppeecciiffiiccaattiioonnss
6. Center the mounting plate on the vertical line made in step 5 and mount the bottom of the mounting plate max 1 in. (2.54
cm) off the floor (Figure 3).
NNoottee
• Do not mount on a baseboard if the baseboard thickness exceeds 1 in. (2.54 cm).
• You may mount the bottom of the mounting plate up to 5 in. from the floor if you can always maintain a distance of at
least 5 in. between the head end of the bed and the wall. Consider use of a floor threshold or roller bumpers.
7. Using a level on the bottom of the mounting plate (D), make sure that the bottom of the mounting plate (D) is level when
you position the mounting plate (D) on the reference marks made in steps 5 and 6 (Figure 3).
8. Use a pencil to mark the three screw holes of the mounting plate (D).
9. Using the appropriate tool with the hospital supplied fasteners (E, not included), secure the mounting plate (D) to the
wall (Figure 3).
10.Attach the SSeeccuurree CCoonnnneecctt (F) to the mounting plate (D) (Figure 3).
11.Using a #2 Phillips screwdriver, secure the SSeeccuurree CCoonnnneecctt (F) to the mounting plate (D) with the two supplied screws
(700001126359) (G) (Figure 3).
12.Plug the SSeeccuurree CCoonnnneecctt power supply into a hospital grade protective earthed wall outlet.
NNoottee -- Position the power supply in an accessible location.
13.On the SSeeccuurree CCoonnnneecctt, plug in the female end of the power supply.
14.On the SSeeccuurree CCoonnnneecctt, plug in the nurse call communication cable.
15.Using a #1 Phillips screwdriver, secure the nurse call communication cable to the SSeeccuurree CCoonnnneecctt.
16.Connect and secure the nurse call communication cable to the nurse call system wall plug.
17.Configure the SSeeccuurree CCoonnnneecctt, see
Configuring the SSeeccuurree CCoonnnneecctt
(page 11).
18.Follow the procedure in the product manual to connect the product to the SSeeccuurree CCoonnnneecctt.
CCAAUUTTIIOONN -- Always match the dip-switches of a product to the head wall configuration if a nurse call communication
cable needs to be connected to avoid the risk of head wall damage.
NNoottee
• If a SSeeccuurree CCoonnnneecctt is moved, repeat steps 1 and 10-17.
5212-009-211 Rev AA.1 7 EN

• If a product is moved to another configured SSeeccuurree CCoonnnneecctt, no change needs to be made as the product will
connect automatically.
EN 8 5212-009-211 Rev AA.1

IInnssttaallllaattiioonn cchheecckklliisstt
Follow this checklist for the 521200380100 SSeeccuurree CCoonnnneecctt:
Confirm that you do not have any unused components after installation. Your SSeeccuurree CCoonnnneecctt does not ship with
any extra components
Check that the SSeeccuurree CCoonnnneecctt ID number and room number/location has been recorded on the
SSeeccuurree CCoonnnneecctt
association form
(page 22)
Use a tape measure to check that the SSeeccuurree CCoonnnneecctt is installed at the horizontal center of the wall behind the bed
location
Use a tape measure to check that the bottom of the SSeeccuurree CCoonnnneecctt is installed 1 in. - 5 in. (2.54 cm - 12.7 cm) from
the floor
Use a level to confirm that the mounting plate is level
All fasteners are tight with no signs of protruding or missing fasteners
Power supply is plugged into a hospital grade protective earthed wall outlet and to the SSeeccuurree CCoonnnneecctt
Nurse call communication cable is plugged into the SSeeccuurree CCoonnnneecctt and the nurse call system
Product ID number:
Installed by: Date:
Inspected by: Date:
NNoottee -- Maintain a copy of this record for at least 10 years.
5212-009-211 Rev AA.1 9 EN

OOppeerraattiioonn
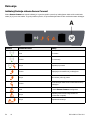
SSeeccuurree CCoonnnneecctt iinnddiiccaattoorrss//ffuunnccttiioonnss
The SSeeccuurree CCoonnnneecctt has indicator symbols and a nurse call cord out cancel button (A) that is located on top of the
product. This button cancels the alert if the nurse call communication cable is unplugged.
A
IInnddiiccaattoorr IInnddiiccaattoorr lliigghhtt SSttaattuuss
Solid Connected
Pulse Connecting
Flash Connection error
Pulse AC power unplugged
Flash Low battery
Pulse Nurse call communication cable unplugged
Solid The SSeeccuurree CCoonnnneecctt is not configured
Flash Error (reference product display for error detail)
Flash Battery error
EN 10 5212-009-211 Rev AA.1

CCoonnffiigguurriinngg tthhee SSeeccuurree CCoonnnneecctt
TToooollss rreeqquuiirreedd::
•SSeeccuurree CCoonnnneecctt scanner (521200380700) (option) or SSeeccuurree CCoonnnneecctt compatible product
• Stryker service tool (521205080001) (option)
NNoottee -- Stryker service tool required if you use the SSeeccuurree CCoonnnneecctt scanner.
CCAAUUTTIIOONN -- Always match the dip-switches on SB1 and SB2 to the product configuration to avoid the risk of head wall
damage.
PPrroocceedduurree::
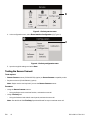
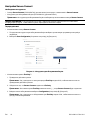
• Using the SSeeccuurree CCoonnnneecctt scanner:
1. Using the Stryker service tool, select the supplied soft configuration and settings.
2. Select SSaavvee CCoonnffiigguurraattiioonn (A) (Figure 4).
A
FFiigguurree 44 –– SSttrryykkeerr sseerrvviiccee ttooooll
• Using a PPrrooCCuuiittyy™ bed:
1. Apply the brakes.
NNoottee -- See the Model 3009 PPrrooCCuuiittyy Operations Manual for steps to apply the brakes.
2. Confirm the SSeeccuurree CCoonnnneecctt connection to PPrrooCCuuiittyy.
NNoottee -- The icon will appear on the PPrrooCCuuiittyy home screen when SSeeccuurree CCoonnnneecctt has connected.
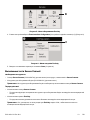
3. Enter the service menu and select CCoonnffiigguurraattiioonn (B) (Figure 5).
NNoottee -- See the Model 3009 PPrrooCCuuiittyy Maintenance Manual for steps to access the service menu.
5212-009-211 Rev AA.1 11 EN

B
FFiigguurree 55 –– PPrrooCCuuiittyy sseerrvviiccee mmeennuu
4. In the configuration menu, select RRoooomm IInntteerrffaaccee CCoonnffiigguurraattiioonn (C) (Figure 6).
C
FFiigguurree 66 –– PPrrooCCuuiittyy ccoonnffiigguurraattiioonn mmeennuu
5. Input the supplied settings and select SSaavvee.
TTeessttiinngg tthhee SSeeccuurree CCoonnnneecctt
TToooollss rreeqquuiirreedd::
•SSeeccuurree CCoonnnneecctt scanner (521200380700) (option) or SSeeccuurree CCoonnnneecctt compatible product
• Stryker service tool (521205080001) (option)
NNoottee -- Stryker service tool required if you use the SSeeccuurree CCoonnnneecctt scanner.
PPrroocceedduurree::
• Using the SSeeccuurree CCoonnnneecctt scanner:
∘ Using the Stryker service tool test function, activate the nurse call.
• Using a PPrrooCCuuiittyy bed:
∘ Using the footboard and siderail control panels, activate the nurse call.
NNoottee -- See the Model 3009 PPrrooCCuuiittyy Operations Manual for steps to activate nurse call.
EN 12 5212-009-211 Rev AA.1

PPrreevveennttiivvee mmaaiinntteennaannccee
Remove product from service before you perform the preventive maintenance inspection. Check all items listed during
annual preventive maintenance for all Stryker Medical products. You may need to perform preventive maintenance checks
more often based on your level of product usage. Service only by qualified personnel.
Inspect the following items:
All fasteners are secure
The SSeeccuurree CCoonnnneecctt casing is not cracked or damaged
Mounting plate not cracked or damaged
The SSeeccuurree CCoonnnneecctt front label is not damaged
Replace the battery (every two years)
Product serial number:
Completed by:
Date:
5212-009-211 Rev AA.1 13 EN

CClleeaanniinngg
CCAAUUTTIIOONN
• Do not clean, disinfect, service, or perform maintenance while the product is in use.
• Always unplug the power cord from the wall outlet when large spills occur near the circuit boards and cables. Clean up
the fluid, and inspect the product. Fluids can cause unpredictable operation and decreased functionality of any electrical
product. Do not return the product to service until dry and tested for safe operation.
Recommended cleaning method:
1. Using spray or pre-soaked wipes, hand wash all exposed surfaces of the product with a mild detergent.
2. Follow the cleaning solution manufacturer’s instructions for appropriate contact time and rinse requirements.
3. Dry the product before you return it to service.
NNoottee -- Avoid oversaturation. Do not allow the product to remain wet.
EN 14 5212-009-211 Rev AA.1

DDiissiinnffeeccttiinngg
CCAAUUTTIIOONN
• Do not clean, disinfect, service, or perform maintenance while the product is in use.
• Always unplug the power cord from the wall outlet when large spills occur near the circuit boards and cables. Clean up
the fluid, and inspect the product. Fluids can cause unpredictable operation and decreased functionality of any electrical
product. Do not return the product to service until dry and tested for safe operation.
• Always wipe down with clean water (or 70% isopropyl alcohol, if using VViirreexx® TB) and dry each product after
disinfecting. Some disinfectants are corrosive in nature and may cause damage to the product. If you do not rinse and
dry the product, you may leave a corrosive residue on the surface of the product. This corrosive residue could cause
premature degradation of critical components. Failure to follow these disinfecting instructions may void your warranty.
Recommended disinfectants for this product’s surfaces include:
• Quaternary (active ingredient - ammonium chloride)
• Phenolic (active ingredient - o-phenylphenol)
• Chlorinated bleach solution (10,000 ppm available chlorine, 941 mL of a 5.25% sodium hypochlorite solution per 4000
mL of water)
• Alcohol (active ingredient - 70% isopropyl alcohol)
• Accelerated hydrogen peroxide (5,000 ppm hydrogen peroxide)
Disinfection method:
1. Follow the disinfectant solution manufacturer’s dilution recommendations.
2. Using spray or pre-soaked wipes, apply the recommended disinfectant solution.
3. Hand wash all exposed surfaces of the product with the recommended disinfectant.
4. Dry the product before you return it to service.
NNoottee
• Avoid oversaturation. Do not allow the product to remain wet.
• Follow the manufacturer’s dilution recommendations for appropriate contact time and rinse requirements. Follow the
chemical manufacturer’s guidelines to disinfect.
5212-009-211 Rev AA.1 15 EN

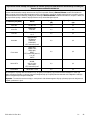
WWiirreelleessss nnoottiiffiiccaattiioonnss
For product equipped with wireless communication technology, these statements apply to the countries as indicated:
CCoouunnttrryy NNoottiiffiiccaattiioonn
Canada
Contains IC: 5123A-BGTWT32I
This device complies with Innovation, Science and Economic Development Canada’s license-
exempt RSSs. Operation is subject to the following two conditions: (1) this device may not cause
interference, and (2) this device must accept any interference, including interference that may cause
undesired operation of the device.
Le présent appareil est conforme aux CNR d'Industrie Canada applicables aux appareils radio
exempts de licence. L'exploitation est autorisée aux deux conditions suivantes : (1) l'appareil ne doit
pas produire de brouillage, et (2) l'utilisateur de l'appareil doit accepter tout brouillage radioélectrique
subi, même si le brouillage est susceptible d'en compromettre le fonctionnement.
Mexico
La operación de este equipo está sujeta a las siguientes dos condiciones: (1) es posible que este
equipo o dispositivo no cause interferencia perjudicial y (2) este equipo o dispositivo debe aceptar
cualquier interferencia, incluyendo la que pueda causar su operación no deseada.
Oman
Oman – TRA
D090024
TRA/TA-R/
11190/21
Singapore Complies with
IMDA standards
DA103640
South Africa
EN 16 5212-009-211 Rev AA.1
Sayfa yükleniyor...
Sayfa yükleniyor...
Sayfa yükleniyor...
Sayfa yükleniyor...
Sayfa yükleniyor...
Sayfa yükleniyor...
Sayfa yükleniyor...
Sayfa yükleniyor...
Sayfa yükleniyor...
Sayfa yükleniyor...
Sayfa yükleniyor...
Sayfa yükleniyor...
Sayfa yükleniyor...
Sayfa yükleniyor...
Sayfa yükleniyor...
Sayfa yükleniyor...
Sayfa yükleniyor...
Sayfa yükleniyor...
Sayfa yükleniyor...
Sayfa yükleniyor...
Sayfa yükleniyor...
Sayfa yükleniyor...
Sayfa yükleniyor...
Sayfa yükleniyor...
Sayfa yükleniyor...
Sayfa yükleniyor...
Sayfa yükleniyor...
Sayfa yükleniyor...
Sayfa yükleniyor...
Sayfa yükleniyor...
Sayfa yükleniyor...
Sayfa yükleniyor...
Sayfa yükleniyor...
Sayfa yükleniyor...
Sayfa yükleniyor...
Sayfa yükleniyor...
Sayfa yükleniyor...
Sayfa yükleniyor...
Sayfa yükleniyor...
Sayfa yükleniyor...
Sayfa yükleniyor...
Sayfa yükleniyor...
Sayfa yükleniyor...
Sayfa yükleniyor...
Sayfa yükleniyor...
Sayfa yükleniyor...
Sayfa yükleniyor...
Sayfa yükleniyor...
Sayfa yükleniyor...
Sayfa yükleniyor...
Sayfa yükleniyor...
Sayfa yükleniyor...
Sayfa yükleniyor...
Sayfa yükleniyor...
Sayfa yükleniyor...
Sayfa yükleniyor...
Sayfa yükleniyor...
Sayfa yükleniyor...
Sayfa yükleniyor...
Sayfa yükleniyor...
Sayfa yükleniyor...
Sayfa yükleniyor...
Sayfa yükleniyor...
Sayfa yükleniyor...
Sayfa yükleniyor...
Sayfa yükleniyor...
Sayfa yükleniyor...
Sayfa yükleniyor...
Sayfa yükleniyor...
Sayfa yükleniyor...
Sayfa yükleniyor...
Sayfa yükleniyor...
Sayfa yükleniyor...
Sayfa yükleniyor...
Sayfa yükleniyor...
Sayfa yükleniyor...
Sayfa yükleniyor...
Sayfa yükleniyor...
Sayfa yükleniyor...
Sayfa yükleniyor...
Sayfa yükleniyor...
Sayfa yükleniyor...
Sayfa yükleniyor...
Sayfa yükleniyor...
Sayfa yükleniyor...
Sayfa yükleniyor...
Sayfa yükleniyor...
Sayfa yükleniyor...
-
 1
1
-
 2
2
-
 3
3
-
 4
4
-
 5
5
-
 6
6
-
 7
7
-
 8
8
-
 9
9
-
 10
10
-
 11
11
-
 12
12
-
 13
13
-
 14
14
-
 15
15
-
 16
16
-
 17
17
-
 18
18
-
 19
19
-
 20
20
-
 21
21
-
 22
22
-
 23
23
-
 24
24
-
 25
25
-
 26
26
-
 27
27
-
 28
28
-
 29
29
-
 30
30
-
 31
31
-
 32
32
-
 33
33
-
 34
34
-
 35
35
-
 36
36
-
 37
37
-
 38
38
-
 39
39
-
 40
40
-
 41
41
-
 42
42
-
 43
43
-
 44
44
-
 45
45
-
 46
46
-
 47
47
-
 48
48
-
 49
49
-
 50
50
-
 51
51
-
 52
52
-
 53
53
-
 54
54
-
 55
55
-
 56
56
-
 57
57
-
 58
58
-
 59
59
-
 60
60
-
 61
61
-
 62
62
-
 63
63
-
 64
64
-
 65
65
-
 66
66
-
 67
67
-
 68
68
-
 69
69
-
 70
70
-
 71
71
-
 72
72
-
 73
73
-
 74
74
-
 75
75
-
 76
76
-
 77
77
-
 78
78
-
 79
79
-
 80
80
-
 81
81
-
 82
82
-
 83
83
-
 84
84
-
 85
85
-
 86
86
-
 87
87
-
 88
88
-
 89
89
-
 90
90
-
 91
91
-
 92
92
-
 93
93
-
 94
94
-
 95
95
-
 96
96
-
 97
97
-
 98
98
-
 99
99
-
 100
100
-
 101
101
-
 102
102
-
 103
103
-
 104
104
-
 105
105
-
 106
106
-
 107
107
-
 108
108


Diğer belgeler
-
 Nutricia Flocare Flocare Infinity Instructions For Use Manual
-
Bard PowerPICC SOLO 2 Patient Manual
-
Sennheiser SKM 5200-II Kullanma talimatları
-
BD Alaris™ GH Şiringa Pompası Kullanma talimatları
-
Motorola XT420 Kullanım kılavuzu
-
-
 Symmetry Surgical SW-5-12-R Kullanma talimatları
-
-
-

