Hoover HOE7173IN WF/E Kullanım kılavuzu
- Kategori
- Mikrodalgalar
- Tip
- Kullanım kılavuzu

USER INSTRUCTIONS
OVENS
MANUALE D’ISTRUZIONI
FORNO
KULLANIM KILAVUZU
FIRINLAR
INSTRUCCIONES DE USO
HORNOS EMPOTRABLES
BEDIENUNGSANLEITUNG
BACKOFEN
GB
IT
02
15
TR
PT
28
41
SL
54
• HOE7173IN
• HOT7174BI
• HOT7174WI
CANDY HOOVER GROUP S.R.L. • Via Comolli 16 • 20861 Brugherio (MB) - Italy

Safety Indications
GB 02
•Children must not play with the appliance. The appliance can be used
by those aged 8 or over and by those with limited physical, sensorial or
mental capacities, without experience or knowledge of the product,
only if supervised or provided with instruction as to the operation of the
appliance, in a safe way with awareness of the possible risks.
•Children under 8 must be kept at a safe distance from the appliance if
not continuously supervised.
•Cleaning and maintenance should not be carried out by unsupervised
children.
•The oven must be switched off before removing the removable parts
and, after cleaning, reassemble them according the instructions.
•Do not use rough or abrasive materials or sharp metal scrapers to
clean the oven door glasses, as they can scratch the surface and cause
the glass to shatter.
•Only use the meat probe recommended for this oven.
- Remove large or coarse food residues from the inside of the oven using
a damp sponge. Do not use detergents;
•WARNING: before initiating the automatic cleaning cycle:
• WARNING: the appliance and accessible parts become hot during use.
Be careful not to touch any hot parts.
- Clean the oven door;
- Do not place tea towels
• In ovens with meat probe it is necessary, before making the cleaning
cycle, close the hole with the nut provided. Always close the hole with
the nut when the meat probe is not used.
- Remove all accessories and the sliding rack kit (where present);
•WARNING: the accessible parts can become hot when the oven is in
use. Children must be kept at a safe distance.
•WARNING: ensure that the appliance is switched off before replacing
the bulb, to avoid the possibility of electric shocks.
• During cooking, moisture may condense inside the oven cavity or on
the glass of the door. This is a normal condition. To reduce this effect,
wait 10-15 minutes after turning on the power before putting food
inside the oven. In any case, the condensation disappears when the
oven reaches the cooking temperature.
• Cook the vegetables in a container with a lid instead of an open tray.
• Avoid leaving food inside the oven after cooking for more than 15/20
minutes.

GB 03
• Do not use a steam cleaner for cleaning operations.
• The type of power cable must be H05V2V2-F.
• During the pyrolytic cleaning process, surfaces can heat up more than
usual, children must therefore be kept at a safe distance.
• No additional operation/setting is required in order to operate the
appliance at the rated frequencies.
• The disconnection may be achieved by having the plug accessible or
by incorporating a switch in the fixed wiring in accordance with the
wiring rules.
• If the power cable is damaged, it must be substituted with a cable or
special bundle available from the manufacturer or by contacting the
customer service department.
• Connect a plug to the supply cable that is able to bear the voltage,
current and load indicated on the tag and having the earth contact. The
socket must be suitable for the load indicated on the tag and must be
having the earth contact connected and in operation. The earth
conductor is yellow-green in colour. This operation should be carried out
by a suitably qualified professional. In case of incompatibility between
the socket and the appliance plug, ask a qualified electrician to substitute
the socket with another suitable type. The plug and the socket must be
conformed to the current norms of the installation country. Connection
to the power source can also be made by placing an omnipolar breaker
between the appliance and the power source that can bear the
maximum connected load and that is in line with current legislation. The
yellow-green earth cable should not be interrupted by the breaker. The
socket or omnipolar breaker used for the connection should be easily
accessible when the appliance is installed.
• Any excess of spilled material should be removed before cleaning.
• When you place the shelf inside, make sure that the stop is directed
upwards and in the back of the cavity.
The shelf must be inserted completely into the cavity
• WARNING: Do not line the oven walls with aluminum foil or single-use
protection available from stores. Aluminum foil or any other protection,
in direct contact with the hot enamel, risk melting and deteriorating the
enamel of the insides.
• WARNING: Never remove the oven door seal.
• Failure to comply with the above can compromise the safety of the
appliance and invalidate the guarantee.
• The appliance must not be installed behind a decorative door in order
to avoid overheating.

Summary
General Instructions
5
1.1 Safety indications
1.2 Electrical safety
1.3 Recommendations
1.4 Installation
1.5 Waste management
1.6 Conformity declaration
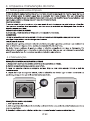
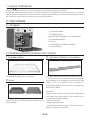
2.1 Overview
2.2 Accessories
2.3 First use
Product Description
7
3.1 Display description
3.2 Cooking modes
Use of the Oven
8
4.1 General notes on cleaning
4.2 Maintenance
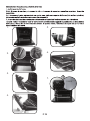
• Removal of the oven window
• Removal and cleaning of the side racks
• Removal and cleaning of the glass
door
Oven Cleaning and Maintenance
12
5.1 F.A.Q.
Troubleshooting
14
GB 04

GB 05
1. General Instructions
NOTE: the oven functions, properties and accessories cited in this manual will vary, depending on the
model you have purchased.
We thank you for choosing one of our products. For the
best results with your oven, you should read this
manual carefully and retain it for future reference.
Before installing the oven, take note of the serial
number so that you can give it to customer service staff
if any repairs are required. Having removed the oven
from its packaging, check that it has not been damaged
during transportation. If you have doubts, do not use
the oven and refer to a qualified technician for advice.
Keep all of the packaging material (plastic bags,
polystyrene, nails) out of the reach of children. When
the oven is switched on for the first time, strong
smelling smoke can develop, which is caused by the glue on the insulation panels surrounding the oven
heating for the first time. This is absolutely normal and, if it occurs, you should wait for the smoke to
dissipate before putting food in the oven. The manufacturer accepts no responsibility in cases where
the instructions contained in this document are not observed.
1.1 Safety Indications
- in general the use of adaptors, multiple sockets and extension cables is not recommended;
Only use the oven for its intended purpose, that is only for the cooking of foods; any other use, for
example as a heat source, is considered improper and therefore dangerous. The manufacturer cannot
be held responsible for any damage resulting from improper, incorrect or unreasonable usage.
The use of any electrical appliance implies the observance of some fundamental rules:
- do not touch the appliance with wet or damp hands or feet;
- in case of malfunction and/or poor operation, switch off the appliance and do not tamper with it.
- do not pull on the power cable to disconnect the plug from the socket;
1.2 Electrical Safety
ENSURE THAT AN ELECTRICIAN OR QUALIFIED TECHNICIAN MAKES THE ELECTRICAL CONNECTIONS.
The power supply to which the oven is connected must conform with the laws in force in the country of
installation. The manufacturer accepts no responsibility for any damage caused by the failure to observe
these instructions. The oven must be connected to an electrical supply with an earthed wall outlet or a
disconnector with multiple poles, depending on the laws in force in the country of installation. The
electrical supply should be protected with suitable fuses and the cables used must have a transverse
section that can ensure correct supply to the oven.
The oven is supplied with a power cable that should only be connected to an electrical supply with 220-
240 Vac 50 Hz power between the phases or between the phase and neutral. Before the oven is
connected to the electrical supply, it is important to check:
- power voltage indicated on the gauge;
- the setting of the disconnector.
CONNECTION
WARNING
Before connecting the oven to the power supply, ask a qualified electrician to check the continuity of the
power supply's earth terminal. The manufacturer accepts no responsibility for any accidents or other
problems caused by failure to connect the oven to the earth terminal or by an earth connection that has
defective continuity.
The grounding wire connected to the oven's earth terminal must be connected to the earth terminal of
the power supply.

GB 06
1.3 Recommendations
After each use of the oven, a minimum of cleaning will help keep the oven perfectly clean.
Do not line the oven walls with aluminium foil or single-use protection available from stores. Aluminium
foil or any other protection, in direct contact with the hot enamel, risks melting and deteriorating the
enamel of the insides. In order to prevent excessive dirtying of your oven and the resulting strong
smokey smells, we recommend not using the oven at very high temperature. It is better to extend the
cooking time and lower the temperature a little. In addition to the accessories supplied with the oven,
we advise you only use dishes and baking moulds resistant to very high temperatures.
1.4 Installation
The manufacturers have no obligation to carry this out. If the assistance of the manufacturer is required
to rectify faults arising from incorrect installation, this assistance is not covered by the guarantee. The
installation instructions for professionally qualified personnel must be followed. Incorrect installation
may cause harm or injury to people, animals or belongings. The manufacturer cannot be held
responsible for such harm or injury.
The oven can be located high in a column or under a worktop. Before fixing, you must ensure good
ventilation in the oven space to allow proper circulation of the fresh air required for cooling and
protecting the internal parts. Make the openings specified on last page according to the type of fitting.
NOTE: as the oven could require maintenance work, it is advisable to keep another wall socket available
so that the oven can be connected to this if it is removed from the space in which it is installed. The
power cable must only be substituted by technical service staff or by technicians with equivalent
qualifications.
1.5 Waste management and environmental protection
- the WEEE should not be treated as domestic waste;
- the WEEE should be taken to dedicated collection areas managed by the town council or a registered
company.
SAVING AND RESPECTING THE ENVIRONMENT
This appliance is labelled in accordance with European Directive 2012/19/EU regarding
electric and electronic appliances (WEEE). The WEEE contain both polluting substances
(that can have a negative effect on the environment) and base elements (that can be
reused). It is important that the WEEE undergo specific treatments to correctly remove and
dispose of the pollutants and recover all the materials. Individuals can play an important
role in ensuring that the WEEE do not become an environmental problem; it is essential to
follow a few basic rules:
In many countries, domestic collections may be available for large WEEEs. When you buy a new
appliance, the old one can be returned to the vendor who must accept it free of charge as a one-off, as
long as the appliance is of an equivalent type and has the same functions as the purchased appliance.
Where possible, avoid pre-heating the oven and always try to fill it. Open the oven door as infrequently
as possible, because heat from the cavity disperses every time it is opened. For a significant energy
saving, switch off the oven between 5 and 10 minutes before the planned end of the cooking time, and
use the residual heat that the oven continues to generate. Keep the seals clean and in order, to avoid any
heat dispersal outside of the cavity. If you have an electric contract with an hourly tariff, the "delayed
cooking" programme makes energy saving more simple, moving the cooking process to start at the
reduced tariff time slot.
1.6 Declaration of compliance
By placing the mark on this product, we are confirming compliance to all relevant European safety,
health and environmental requirements which are applicable in legislation for this product.

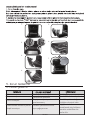
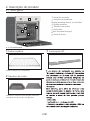
1
2
3
5
4
6
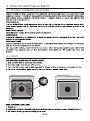
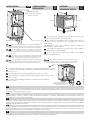
2. Product Description
2.1 Overview
2.2 Accessories (According to model)
Metal grill
1
Drip pan
2
Holds baking trays and plates.
Collects the residues that drip during the cooking
of foods on the grills.
GB 07
1. Control panel
2. Shelf positions
(lateral wire grid if included)
3. Metal grill
4. Drip pan
5. Fan (behind the steel plate)
6. Oven door
Led vision
3

GB 08
2.3 First Use
3. Use of the Oven
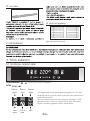
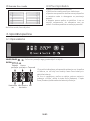
3.1 Display description
Cooking
duration
Cooking
end
Timer
Clock
set
Child
lock
WiFi
ON / OFF
EXTRA
The oven is switched on and off with this button.
If the oven is switched off, the display shows the clock. When
the oven is inactive, all the functions are available except the
cooking duration and end of cooking.
If the clock is not set, the oven does not work: the display
flashes, showing "12:00" and the only functioning key is
Extra. From the Extra key, the following functions can be set:
Lateral wire grids
4
Lateral wire grid if included.

GB 09
When the cooking time has
f i n i s h e d , t h e o v e n
automatically switches off
and the alarm sounds for a
few seconds.
•If delayed cooking is set, the
oven switches off and the
display shows the current time
while the cooking programme,
cooking duration and end of
cooking icons are illuminated.
•If a cooking programme is set,
by pressing the “<” and “>” keys
you can see and modify the
temperature set: at the first t o
u c h , t h e o p e r a t i n g
temperature is shown while
another touch will allow you to
modify said temperature.
•This function is also used for
cooking that can be scheduled
in advance.
•If a cooking programme is set,
it will be lost if the "F" key is
pressed.
not switch the oven off).
•This function activates an
alarm that sounds for a few
seconds when the set time
expires (this function does
You can select a time
between 00:00 and 23:59.
• The t imer f un ct ions
regardless of whether the
oven is switched on.
•The alarm functions
regardless of whether the
oven is switched on.
•Switched on for the first
time, the display
illuminates and sh
ows
"12:00".
•To modify the time, press
enough times to
illuminate the icon and use
the “<” and “>” keys to set
the time, confirming it by
•It allows you to set the
time that appears on the
display.
•This function is useful
when there are children in
the house.
•Press the key
enough times to illuminate
the icon and then either
the “<” or “>” key to
activate this function: the
•Press the key
enough times to illuminate
the icon and then either
the “<” or “>” key to
deactivate this function:
•If the function is active
only the "Extra" button, to
deactivate the function,
and "On/Off" button can
be used.

GB 10
- Off: Wi-Fi is off; the oven is not controllable via the app.
- Icon blinks 1 second on an 1 second off: the oven is accessible to your Wi-Fi network and ready to be enrolled.
If the enrolment has not been successful, the Wi-Fi icon will switch off after 5 minutes.
- Read: the oven sends its status to the app but it cannot be controlled remotely. The oven must be enrolled
before this is possible.
Wi-Fi icon
- Icon not lit: Wi-Fi is off.
When the oven is connected to Wi-Fi, the default cooking time duration is 5 hours, but this can be modified by
the user.
- The icon blinks 1 second on and 3 seconds off: the oven is in read only mode.
- On: Wi-fi is on and the oven is only controllable via the app. It means that it is not possible to select cooking
functions, recipes and temperature from the display. Only the Wi-Fi menu is available by pressing "Extra". You
can switch the oven off using the On/Off button, but you cannot switch it back on again via the display, it can
only be switched on via the app.
If Wi-Fi is not configured it is only possible to choose between off and reset.
- Reset: This setting should be used to enrol the oven the first time it connects to your Wi-Fi network and to
reset the current Wi-Fi connection to allow a new enrolment. Once selected, the appliance gives you 5
minutes to complete the enrolment process. During this process the cooking functions, recipes and
temperature setting are not accessible from the display. Only the Wi-Fi menu is available by pressing "Extra".
You can switch the oven off using the On/Off button, but you cannot switch it back on again via the display, it
can only be switched on via the app. To exit the enrolment/reset procedure via the display, press "Extra" and
then use "< >" buttons to select "Off". After five minutes, the appliance will exit the enrolment/reset
procedure automatically.
To enroll the appliance for Wi-Fi, press "Extra" on the display until the Wi-Fi icon lights, then select "Reset" by
pressing "< >". The procedure on the app should then be followed. Once selected, the appliance gives you 5
minutes to complete the enrolment process.
- The icon blinks 3 seconds on and 1 second off: the oven is trying to connect to your Wi-Fi router.
- Icon is permanently lit: the oven is connected to your Wi-Fi router.
Pressing "Extra" on the timer display allows you to select the Wi-
Fi menu. In the Wi-Fi menu if you press the "< >" buttons you can select:
Wi-Fi Enrolment:
WiFi (depends on the oven model)
Grill
Oven box
Turnspit
Circular
heating element
Bottom heating element
Fan
Defost
Pyro
LANGUAGE SETTING The language can be set when
the oven is switched off by pressing the Extra and Select
buttons simultaneously and for 3". The current language is
shown on the display and can be changed by pressing the
“<” or “>” keys, confirming it by pressing SELECT. Available
languages are: Italian, English, French and German.
SELECT Any selection must be confirmed. If not
confirmed within 15 seconds, the selection is cancelled.
By changing menu, any unconfirmed selection is lost.
“HOT” ICON When a cooking programme finishes or when the oven switches off, if the oven is still
hot, the display shows the current time alternating with the message “HOT” at 3 intervals.

GB 11
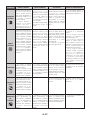
T °C
default
180
220
210
210
40
T °C
range
40 ÷ 40
50 ÷ 240
50 ÷ 280
50 ÷ 230
50 ÷ 240
Function
Dial
Function (Depends on the oven model)
LAMP: Turns on the oven light.
Allow about ten minutes extra when cooking foods at the same time.
FAN COOKING: We recommend you use this method for poultry, pastries, fish
and vegetables. Heat penetrates into the food better and both the cooking and
preheating times are reduced. You can cook different foods at the same time
with or without the same preparation in one or more positions. This cooking
method gives even heat distribution and the smells are not mixed.
CONVENTIONAL COOKING: Both top and bottom heating elements are used.
Preheat the oven for about ten minutes. This method is ideal for all traditional
roasting and baking. For seizing red meats, roast beef, leg of lamb, game, bread,
foil wrapped food (papillotes), flaky pastry. Place the food and its dish on a shelf
in mid position.
DEFROST: When the dial is set to this position. The fan circulates air at room
temperature around the frozen food so that it defrosts in a few minutes without
the protein content of the food being changed or altered.
*Tested in accordance with the CENELEC EN 60350-1 used for definition of energy class.
3.2 Cooking Modes
It prevents food from drying and encourages rising in cakes, bread dough and
other bottom-cooked food.
FAN + LOWER ELEMENT: The bottom heating element is used with the fan
circulating the air inside the oven. This method is ideal for juicy fruit flans, tarts,
quiches and pâté.
Place the shelf in the bottom position.
L3
L1 ÷ L5
The top heating element is used alone and you can adjust the temperature. Five
minutes preheating is required to get the elements red-hot. Success is
guaranteed for grills, kebabs and gratin dishes. White meats should be put at a
distance from the grill; the cooking time is longer, but the meat will be tastier.
You can put red meats and fish fillets on the shelf with the drip tray underneath.
The oven has two grill positions:
Grill: 2140 W Barbecue: 3340 W
GRILL: Use the grill with the door closed.
200 150 ÷ 220
FAN ASSISTED GRILL : Use the turbo-grill with the door closed.
The top heating element is used with the fan circulating the air inside the oven.
Preheating is necessary for red meats but not for white meats. Ideal for cooking
thick food items, whole pieces such as roast pork, poultry, etc. Place the food to
be grilled directly on the shelf centrally, at the middle level. Slide the drip tray
under the shelf to collect the juices. Make sure that the food is not too close to
the grill. Turn the food over halfway through cooking.
BOTTOM: Using the lower element. Ideal for cooking all pastry based dishes.
Use this for flans, quiches, tarts, pate and any cooking that needs more heat
from below.
210 50 ÷ 230
*
*

GB 12
4. Oven cleaning and maintenance
4.1 General notes on cleaning
4.2 Maintenance
A

LOW-E
1
2
3
1.
2.
3.
4.
5.
6.
7.
GB 13

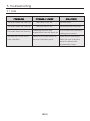
5. Troubleshooting
5.1 FAQ
The oven does not heat up
The clock is not set Set the clock
The child lock is on
A cooking function and
temperature has not been set
Deactivate the child lock
Ensure that the necessary
settings are correct
The oven does not heat up
The oven does not heat up
GB 14
Steam and condensation on
the user interface panel
Clean with a microfiber
cloth the user interface
panel to remove the
condensation layer
No reaction of the touch
user interface

IT 15
Indicazioni di Sicurezza
• Evitare di lasciare il cibo all'interno del forno dopo la cottura per un
periodo superiore a 15/20 minuti.
• La pulizia e la manutenzione non dovrebbero essere fatte da bambini
senza supervisione
• ATTENZIONE: Le parti accessibili possono diventare molto calde
durante l’uso. I bambini dovrebbero essere tenuti a distanza.
• Durante la cottura l'umidità può condensarsi all'interno della cavità o
sul vetro della porta. È normale. Per ridurre questo effetto, attendere
10-15 minuti dopo l'accensione prima di mettere il cibo all'interno del
forno. In ogni caso, la condensa scompare quando il forno raggiunge la
temperatura di cottura.
• Non usare per la pulizia materiali ruvidi abrasivi o raschietti metallici
affilati per pulire le porte di vetro del forno dato che possono graffiare la
superficie e causare la frantumazione del vetro.
• Durante l’uso l’apparecchio diventa molto caldo. Si dovrebbe fare
attenzione a non toccare gli elementi riscaldanti all’interno del forno.
• Spegnere il forno prima di rimuovere lo schermo di protezione e, dopo
la pulizia, rimontarlo secondo le istruzioni.
• L'apparecchio può essere usato da bambini dagli 8 anni in su e
persone con ridotte capacità fisiche, sensoriali o mentali o senza
esperienza e conoscenza del prodotto se supervisionate o dando loro
istruzioni riguardo al funzionamento dell'apparecchio in maniera sicura
e coscente del rischio possibile.
• Cuocere le verdure in un contenitore con un coperchio invece di un
vassoio aperto.
• ATTENZIONE: l'apparecchio e le parti accessibili diventano calde
durante l'uso. Prestare attenzione a non toccare le parti calde.
• ATTENZIONE: le parti accessibili possono diventare molto calde quando
si utilizza il forno. I bambini devono essere tenuti a distanza di sicurezza.
• I bambini non dovrebbero giocare con l'apparecchio.
• Usare solo la sonda termica raccomandata per questo forno.
• Collegare al cavo di alimentazione una spina dimensionata per la
tensione, la corrente e la potenza indicate nella targhetta e dotata del
Contatto di terra. La presa deve essere dimensionata per la potenza
• Non utilizzare un pulitore a vapore.
Indicata sulla targhetta e deve avere il contatto di terra collegato e

IT 16
• Qualsiasi materiale fuoriuscito in eccesso deve essere tolto prima
della pulizia.
• Se il cavo di alimentazione si danneggia, deve essere sostituito con un
cavo o uno speciale fascio di cavi disponibile presso il produttore o
contattando il reparto assistenza al cliente.
Funzionante. Il conduttore di terra è giallo-verde. Questa operazione
deve essere eseguita solo da un tecnico adeguatamente addestrato. In
caso di incompatibilità tra presa e spina dell'elettrodomestico, richiedere
ad un tecnico specializzato di sostituire la presa con un'altra di tipo
compatibile. La spina e la presa devono essere conformi alle normative
attuali del paese di installazione. Il collegamento alla rete di
alimentazione può essere effettuato anche collocando un interruttore
automatico onnipolare tra l'elettrodomestico e la rete di alimentazione,
in grado di supportare il carico massimo collegato, in linea con la
legislazione corrente. Il cavo di terra giallo-verde non deve essere
interrotto dall'interruttore automatico. La presa o l'interruttore
automatico onnipolare utilizzati per il collegamento devono essere
facilmente accessibili al momento del montaggio dell'elettrodomestico.
• Durante il processo di pulizia pirolitico, le superfici possono surriscaldarsi
più del normale: mantenere sempre i bambini a distanza di sicurezza;
•L’elettrodomestico non deve essere installato dietro a una porta a
scopo ornamentale per evitarne il surriscaldamento.
• AVVERTENZA: Non coprire le pareti del forno con fogli di alluminio o
protezioni monouso disponibili in commercio. I fogli di alluminio o le
altre protezioni, se a diretto contatto con lo smalto caldo, rischiano di
fondersi e di danneggiare lo smalto interno stesso.
• Il funzionamento dell'elettrodomestico alle frequenze nominali non
richiede alcuna operazione o impostazione.
Lo scaffale deve essere inserito completamente nella guida
• La disconnessione può essere eseguita con la spina accessibile o
aggiungendo un interruttore sul cablaggio fisso, nel rispetto delle
normative relative ai cablaggi.
• Il cavo di alimentazione deve essere di tipo H05V2V2-F.
• AVVERTENZA: Non togliere mai la guarnizione della porta del forno.
• Quando si posiziona uno scaffale all’interno, accertarsi che il blocco
sia rivolto verso l’alto e nella parte posteriore della guida.
• Il mancato rispetto di quanto indicato sopra può compromettere la
sicurezza dell'elettrodomestico e rendere nulla la garanzia.

Sommario
Avvertenze Generali
18
1.1 Suggerimenti sulla sicurezza
1.2 Sicurezza elettrica
1.3 Raccomandazioni
1.4 Installazione
1.5 Gestione dei rifiuti
1.6 Dichiarazione di conformità
2.1 Panoramica
2.2 Accessori
2.3 Primo utilizzo
Descrizione del Prodotto
20
3.1 Descrizione del display
3.2 Modalità di cottura
Utilizzo del Forno
21
4.1.Note generiche di pulizia
4.2 Manutenzione
• Rimozione e pulizia delle griglie
• Rimozione dello sportello del forno
• Rimozione e pulizia della porta in
vetro
Pulizia e Manutenzione del Forno
25
5.1 F.A.Q.
Risoluzione dei problemi
27
IT 17
Garanzie
27

1. Avvertenze Generali
1.1 Suggerimenti sulla Sicurezza
- Non toccare l’apparecchio con mani o piedi bagnati o umidi;
- Non tirare il cavo di alimentazione per staccare la spina della presa di corrente;
Utilizzare il forno solo per lo scopo per cui è stato progettato, ossia solo per la cottura di alimenti;
qualsiasi altro utilizzo, ad esempio come fonte di riscaldamento, è considerato improprio e quindi
pericoloso. Il costruttore non può essere considerato responsabile per eventuali danni derivanti da usi
impropri, erronei ed irragionevoli.
- In generale è sconsigliabile l’uso di adattatori, prese multiple e prolunghe;
L’uso di un qualsiasi apparecchio elettrico comporta l’osservanza di alcune regole fondamentali:
- In caso di guasto e/o cattivo funzionamento dell’apparecchio, spegnerlo e non manometterlo.
1.2 Sicurezza Elettrica
IT 18

1.3 Raccomandazioni
Dopo l’uso sono sufficienti alcune semplici operazioni di pulizia per mantenere il forno perfettamente
pulito. Non rivestire le pareti del forno con fogli d’alluminio da cucina o fogli monouso commerciali,
perché potrebbero fondersi a contatto con le superfici in smalto caldo e danneggiare le superfici in
smalto all’interno del forno. Per evitare di sporcare eccessivamente il forno e prevenire la diffusione di
fumo maleodorante, è consigliabile non utilizzare il forno a temperature molto alte. E’ generalmente
preferibile imposta- re un tempo di cottura più lungo e utilizzare una temperatura più bassa. Oltre agli
accessori forniti con il forno, è consigliabile utilizzare piatti e teglie resistenti alle alte temperature.
1.4 Installazione
Il produttore non è obbligato ad occuparsi dell’installazione. Gli eventuali interventi di assistenza,
necessari per correggere problemi dovuti ad un’errata installazione, non sono coperti da garanzia.
L’installazione deve essere effettuata da un tecnico qualificato e in conformità con queste istruzio- ni.
Un’installazione impropria potrebbe causare infortuni alle persone, agli animali domestici o danni alle
attrezzature. Il produttore declina ogni responsabilità per eventuali lesioni o danni dovuti ad un’errata
installazione.
Il forno può essere installato sopra una colonna o sotto a un piano di lavoro. Prima di fissare in posizione
il forno, verificare che lo spazio attorno allo stesso sia sufficiente a garantire la circolazione del flusso di
aria fresco necessario a garantire il raffreddamento del forno e la sicurezza dei componenti interni.
Realizzare le aperture indicate nell’ultima pagina del manuale, a seconda del tipo di installazione.
1.5 Gestione dei rifiuti e rispetto dell’ambiente
IT 19

1.6 Dichiarazione di conformità
2. Descrizione del Prodotto
2.1 Panoramica
1. Pannello di controllo
2. Posizioni ripiani (castelletto se previsto)
3. Griglia metallica
4. Leccarda
5. Ventola (dietro alla piastra di acciaio)
6. Porta forno
2.2 Accessori
Leccarda
2
Raccoglie i residui di cibo che gocciolano durante
la cottura.
Griglia metallica
1
Sostiene teglie e piatti.
3
Led vision
1
2
3
5
4
6
IT 20
Sayfa yükleniyor...
Sayfa yükleniyor...
Sayfa yükleniyor...
Sayfa yükleniyor...
Sayfa yükleniyor...
Sayfa yükleniyor...
Sayfa yükleniyor...
Sayfa yükleniyor...
Sayfa yükleniyor...
Sayfa yükleniyor...
Sayfa yükleniyor...
Sayfa yükleniyor...
Sayfa yükleniyor...
Sayfa yükleniyor...
Sayfa yükleniyor...
Sayfa yükleniyor...
Sayfa yükleniyor...
Sayfa yükleniyor...
Sayfa yükleniyor...
Sayfa yükleniyor...
Sayfa yükleniyor...
Sayfa yükleniyor...
Sayfa yükleniyor...
Sayfa yükleniyor...
Sayfa yükleniyor...
Sayfa yükleniyor...
Sayfa yükleniyor...
Sayfa yükleniyor...
Sayfa yükleniyor...
Sayfa yükleniyor...
Sayfa yükleniyor...
Sayfa yükleniyor...
Sayfa yükleniyor...
Sayfa yükleniyor...
Sayfa yükleniyor...
Sayfa yükleniyor...
Sayfa yükleniyor...
Sayfa yükleniyor...
Sayfa yükleniyor...
Sayfa yükleniyor...
Sayfa yükleniyor...
Sayfa yükleniyor...
Sayfa yükleniyor...
Sayfa yükleniyor...
Sayfa yükleniyor...
Sayfa yükleniyor...
Sayfa yükleniyor...
Sayfa yükleniyor...
-
 1
1
-
 2
2
-
 3
3
-
 4
4
-
 5
5
-
 6
6
-
 7
7
-
 8
8
-
 9
9
-
 10
10
-
 11
11
-
 12
12
-
 13
13
-
 14
14
-
 15
15
-
 16
16
-
 17
17
-
 18
18
-
 19
19
-
 20
20
-
 21
21
-
 22
22
-
 23
23
-
 24
24
-
 25
25
-
 26
26
-
 27
27
-
 28
28
-
 29
29
-
 30
30
-
 31
31
-
 32
32
-
 33
33
-
 34
34
-
 35
35
-
 36
36
-
 37
37
-
 38
38
-
 39
39
-
 40
40
-
 41
41
-
 42
42
-
 43
43
-
 44
44
-
 45
45
-
 46
46
-
 47
47
-
 48
48
-
 49
49
-
 50
50
-
 51
51
-
 52
52
-
 53
53
-
 54
54
-
 55
55
-
 56
56
-
 57
57
-
 58
58
-
 59
59
-
 60
60
-
 61
61
-
 62
62
-
 63
63
-
 64
64
-
 65
65
-
 66
66
-
 67
67
-
 68
68


Hoover HOE7173IN WF/E Kullanım kılavuzu
- Kategori
- Mikrodalgalar
- Tip
- Kullanım kılavuzu
diğer dillerde
- italiano: Hoover HOE7173IN WF/E Manuale utente
- português: Hoover HOE7173IN WF/E Manual do usuário
- English: Hoover HOE7173IN WF/E User manual
İlgili makaleler
-
Hoover HOZ3150IN/E Kullanım kılavuzu
-
-
-
-
-
-
-
-
-