
Picadora eléctrica de carne
Electric meat grinder
Hachoir à viande électrique
Máquina de moer carne
Elektrischer Fleischwolf
Tritacarne elettrico
Elektrische vleesmolen
Hlektrikó mhcánhma poltopoíhshv kréatov
Электрическая мясорубка
Elektromos húsdaráló
Elektrikli kñyma makinasñ
Thor
Cód. 30485
MODO DE EMPLEO
OPERATING INSTRUCTIONS
MODE D’EMPLOI
MODO DE EMPRÊGO
GEBRAUCHSANLEITUNG
ISTRUZIONI
GEBRUIKSAANWIJZING
TROPOS CRHSHS
HASZNÁLATI UTASÍTÁS
KULLANMA WEKLI
�
GB
E
F
P
D
I
NL
GR
RU
AR
HU
TR
�
�

2
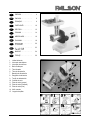
1 Bloc moteur
2 Interrupteur marche/arrêt
3 Interrupteur de recul
4 Bouton de blocage
5 Tube hacheur
6 Tube d’alimentation
7 Plateau d’alimentation
8 Poussoir
9 Vis d’alimentation
10 Couteau
11 Grille à hacher (épais)
12 Grille à hacher (moyen)
13 Grille à hacher (fin)
14 Bague vissée
15 Jeu d’embouts
1 Unidade do motor
2 Botão «Ligado»/
«Desligado»
3 Botão de retrocesso
4 Botão de bloqueio
5 Tubo triturador
6 Tubo de alimentação
7 Bandeja de alimentação
8 Empurrador de alimentos
9 Haste espiral de
alimentação
10 Lâmina de corte
11 Disco de corte (grosso)
12 Disco de corte (médio)
13 Disco de corte (fino)
14 Anel roscado
15 Jogo de adaptadores
1 Motorgehäuse
2 Ein-/Ausschalter
3 Rücklauftaste
4 Sperrknopf
5 Schneckenrohr
6 Einfüllrohr
7 Einfüllschale
8 Stopfer
9 Schnecke
10 Kreuzmesser
11 Lochscheibe (grob)
12 Lochscheibe (mittel)
13 Lochscheibe (fein)
14 Vorsatz
15 Fülltrichter-Set
1 Motoreenheid
2 Aan/uitschakelaar
3 Terugdraaischakelaar
4 Blokkeerknop
5 Maalbuis
6 Toevoerbuis
7 Toevoerschaal
8 Duwstaaf
9 Toevoerschroef
10 Mes
11 Snijschijf (grof)
12 Snijschijf (medium)
13 Snijschijf (fijn)
14 Ring met schroefdraad
15 Set mondstukken
1. Блок электромотора
2. Переключатель Работа/
Остановка»
3. Переключатель возврата
4. Блокирующая кнопка
5. Трубка-дробилка
6. Трубка подачи
7. Поддон подачи
8. Толкатель продукта
9. Подающий червяк
10. Режущий нож
11. Режущая пластина
(толстая)
12. Режущая платина (средняя)
13. Режущая пластина (тонкая)
14. Резьбовое кольцо.
15. Комплект насадок
1 Készülékház
2 Bekapcsolás/kikapcsolás
gomb
3 Hátrafele gomb
4 Leállítás gomb
5 Daráló cső
6 Betöltő cső
7 Adagolótálca
8 Nyomórúd
9 Töltő csonk
10 Vágókés
11 Darálótárcsa (durva)
12 Darálótárcsa (közepes)
13 Darálótárcsa (finom)
14 Menetes gyűrű
15 Daráló fejek
1 Monáda tou kinhtñra
2 Diakópthv thv qéshv se
leitourgía /paúsh
3 Diakópthv opisqocýrhshv
4 Koumpí mplokarísmatov
5 Swlñnav poltopoíhshv
6 Swlñnav trofodóthshv
7 Dískov trofodóthshv
8 Wqhtñv twn trofýn
9 Bída trofodóthshv
10 Macaíri kopñv
11 Pláka kopñv (contrñ)
12 Pláka kopñv (mesaía)
13 Pláka kopñv (leptñ)
14 Bidwtó daktulídi
15 Set stomíwn
�
�
��
��
�
�
��
��
��
��
�
�
�
�
�
�
�
�
1 Unità del motore
2 Interruttore accensione/
spegnimento
3 Interruttore di retrocesso
4 Pulsante di bloccaggio
5 Tubo di triturazione
6 Tubo di alimentazione
7 Vassoio di alimentazione
8 Pestello alimenti
9 Vite di alimentazione
10 Lama di taglio
11 Piastra da taglio (grossa)
12 Piastra da taglio (media)
13 Piastra da taglio (sottile)
14 Anello filettato
15 Set di effusori
1 Motor unit
2 On/off switch
3 Reverse switch
4 Locking knob
5 Mincing tube
6 Feeding tube
7 Feeding hopper
8 Food pusher
9 Feeding screw
10 Cutting blade
11 Mesh plate (coarse)
12 Mesh plate (medium)
13 Mesh plate (fine)
14 Threaded ring
15 Assortment of nozzles
1 Motor
2 Açñk/kapalñ düxmesi
3 Geri dönüw düxmesi
4 Bloke etme düxmesi
5 Kñyma tüpü
6 Besin maddesi giriw tüpü
7 Besin maddesi giriw tepsisi
8 Besinleri itici mekanizma
9 Kñyma tüpünün içindeki vida
10 Kesim bñçaxñ
11 Kesim plakasñ(kalñn)
12 Kesim plakasñ(orta kalñnlñkta)
13 Kesim plakasñ(ince)
14 Burmalñ halka
15 Kñyñlmñw besin maddesinin
çñktñxñ axñzlardan oluwan set

3
1 Unidad del motor
2 Interruptor marcha/paro
3 Interruptor de retroceso
4 Botón de bloqueo
5 Tubo triturador
6 Tubo de alimentación
7 Bandeja de alimentación
8 Empujador de alimentos
9 Tornillo de alimentación
10 Cuchilla de corte
11 Placa de corte (gruesa)
12 Placa de corte (mediana)
13 Placa de corte (fina)
14 Anillo roscado
15 Juego de boquillas
ESPAÑOL . . . . . . . . . . . . . . 4
ENGLISH . . . . . . . . . . . . . . . 6
FRANÇAIS . . . . . . . . . . . . . 8
PORTUGUÊS . . . . . . . . . . . 10
DEUTSCH . . . . . . . . . . . . . . 12
ITALIANO . . . . . . . . . . . . . . 14
NEDERLANDS . . . . . . . . . . 16
ELLHNIKA . . . . . . . . . . . . . 18
. . . . . . . . . . . . 20
. . . . . . . . . . 23
MAGYAR . . . . . . . . . . . . . . . 24
TÜRKÇE . . . . . . . . . . . . . . . 26
GB
E
F
P
D
I
NL
GR
RU
AR
HU
TR
1
2
3
4
5
6
7
8
9
10
11
12
13
14
15

4
E
5
Nuestros productos están desarrollados para alcanzar los mas altos estándares de calidad, funcionalidad y diseño. Esperamos
que disfrute de su nueva picadora eléctrica de carne Thor de PALSON.
PROTECCIONES IMPORTANTES DE SEGURIDAD
Cuando se utilizan aparatos eléctricos, han de seguirse siempre unas precauciones de seguridad básicas, incluyendo las
siguientes:
- Leer todas las instrucciones antes de su utilización.
- Con el fin de protegerse contra el riesgo de sacudidas eléctricas, no introducir la unidad, el cable o el enchufe en agua u
otros líquidos.
- Es necesaria una estrecha supervisión cuando cualquier aparato es utilizado por o cerca de los niños.
- Desenchufarlo de la toma de corriente cuando no se utilice, antes de montar o desmontar piezas, y antes de la limpieza.
- Evitar el contacto con las partes móviles. Nunca empujar los alimentos con la mano. Utilizar siempre un empujador de
alimentos.
- No hacer funcionar ningún aparato con el cable o el enchufe dañado, o después de un mal funcionamiento del mismo, o
cuando haya caído o tenga algún daño. Llevar el aparato al centro de servicio técnico autorizado más cercano, para su
examen, reparación o ajuste mecánico o eléctrico.
- Este equipo se suministra sin más accesorios que los suministrados.
- La utilización de accesorios no recomendados ni vendidos por el fabricante del aparato puede ser causa de incendio, de
sacudidas eléctricas o de lesiones.
- No utilizarlo al aire libre.
- No dejar que el cable cuelgue del borde de una mesa o mostrador, o que entre en contacto con superficies calientes.
- Para evitar los riesgos de lesiones por corte, no utilizar los dedos para quitar la comida del disco de corte mientras el
aparato está en funcionamiento.
- Este aparato está pensado sólo para uso doméstico. Cualquier servicio distinto de la limpieza y el mantenimiento por parte
del usuario ha de ser efectuado por un representante del servicio técnico autorizado.
- No sumergir la unidad en el agua.
- Con el fin de reducir los riesgos de incendio o de sacudidas eléctricas, no desmontar la base. En su interior no hay piezas
que el usuario deba mantener. Las reparaciones solamente deben ser efectuadas por el personal de servicio técnico
autorizado.
- Con el fin de evitar daños, no intentar picar huesos, cáscaras de nueces u otros elementos duros.
- Este producto no está permitido para uso infantil u otras personas sin asistencia o supervisión si su estado físico, sensorial
o mental le limita de usarlo con seguridad. Los niños deberían ser supervisados para asegurar que no juegan con dicho
producto.
- Si el cable de corriente está dañado deberá ser sustituido por el fabricante o su servicio técnico autorizado o por un técnico
cualificado, con tal de evitar un peligro.
MONTAJE
1 Introducir el tornillo de alimentación en el tubo triturador con el extremo largo del eje en primer lugar.
2 Posicionar la cuchilla de corte en el tornillo de alimentación con los lados cortantes planos de cara al montador.
3 Posicionar la placa de corte deseada en el tornillo de alimentación contra los lados planos de la cuchilla de corte.
Asegurarse de que las muescas de la placa de corte encajan en las ranuras del tubo triturador.
4 Fijar firmemente la arandela roscada al extremo del tubo triturador.
5 Introducir el cabezal del triturador en la abertura de la unidad del motor. Girarlo poco a poco y empujarlo hasta que
encaje firmemente. Nota: Puede ser necesario aflojar el botón de bloqueo para permitir que el cabezal del triturador se
introduzca completamente.
6 Fijar el cabezal del triturador girando el botón de bloqueo hasta que quede apretado.
7 Colocar la bandeja de alimentación en el tubo de alimentación.
8 Utilizar el empujador de alimentos, para empujar la comida suavemente, una pieza cada vez, dentro del tubo. No forzar los
alimentos en su interior.

4
E
5
MODO DE EMPLEO
- Colocar el aparato montado sobre una superficie de trabajo estable, de modo que los respiraderos de aire de la base y de
la parte posterior no queden bloqueados.
- Asegurarse de que el interruptor de marcha/paro, está en la posición de paro. Introducir el enchufe en la toma de
corriente.
- Colocar una cubeta ancha y poco profunda, o un plato debajo del tubo triturador para recoger los alimentos triturados.
- Poner el aparato en marcha. El triturador ha de estar SIEMPRE en marcha antes de añadir alimentos.
NOTA: Si el motor baja su velocidad o se para, puede ser debido a alimentos atascados. En este caso, parar inmediatamente
el triturador. Pulsar el interruptor de retroceso para empujar la comida en el sentido contrario. Soltar el interruptor de retroceso
y poner el triturador en marcha otra vez. Si este está todavía atascado, será necesario pararlo, desenchufarlo, desmontar el
cabezal y limpiar las piezas internas.
CONSEJOS PARA LA PLACA DE CORTE
Estos son los usos recomendados para cada una de las placas de corte. Experimentar para escoger la placa que encaje mejor
con los gustos propios o recetas.
PLACA DE CORTE GRUESA para triturar carne utilizada con chile o verduras.
PLACA DE CORTE MEDIANA para triturar carne utilizada con sopas o condimentos.
PLACA DE CORTE FINA para salsas, patés, comida de niños, hamburguesas.
DESPUÉS DE LA UTILIZACIÓN
- Triturando trozos de pan seco, se ayuda a eliminar restos de alimentos que queden en el triturador después de ser
utilizado.
- Parar el aparato y desenchufarlo de la toma de corriente de la pared.
- Desmontar y limpiar todas las piezas después de cada utilización.
COMO LIMPIARLO
- Siempre desenchufar el aparato de la toma de corriente cuando no se utilice, antes de montar o desmontar piezas o antes
de la limpieza.
- Nunca sumergir la unidad del motor en agua u otros líquidos.
- Lavar todas las piezas, excepto la unidad del motor, en agua caliente jabonosa, teniendo cuidado al manejar las cuchillas
afiladas.
- Aclarar estas piezas con agua caliente limpia y secarlas. NO lavar estas piezas en un lavaplatos.
- Limpiar la unidad del motor con un trapo húmedo. No utilizar productos de limpieza ásperos o abrasivos.
- Las cuchillas y las placas de corte deben ser recubiertas con aceite de cocinar después del lavado, con el fin de
mantenerlas lubricadas y protegidas del óxido.
SUGERENCIAS ÚTILES:
- Cortar los alimentos en tiras o cubos ligeramente más pequeños que el orificio del tubo de alimentación.
- Asegurarse de que los alimentos no tienen huesos, tendones resistentes, cáscaras de nueces, etc. antes de proceder a su
molido.
- La carne o el pescado crudo ha de estar bien frío (no congelado) antes del triturado, con el fin de reducir las pérdidas de
jugos.
- La carne fresca triturada ha de estar refrigerada y ser cocinada en 24 horas.
- Durante un triturado prolongado, pueden producirse grasas en el interior del tubo del triturador, reduciendo la eficiencia del
molido y forzando el motor. Si esto sucede, parar el triturador, lavar las piezas con agua caliente y montarlas de nuevo.
Siempre que sea posible alternar pan con los alimentos. Esto ayuda a mantener el tornillo de alimentación limpio.
Gracias por demostrarnos su confianza al elegir uno de nuestros productos.

6
7
Our products are developed to meet the highest quality, performance and design standards. We hope you enjoy your
new PALSON Thor electric meat mincer.
IMPORTANT SAFETY PRECAUTIONS
When using electrical appliances, certain basic safety precautions must be followed, including the following:
- Read all of the instructions before using.
- To prevent electric shocks, do not immerse the unit, the power cord or the plug in water or other liquids.
- Any appliance should be watched carefully when it is used by or near children.
- Unplug from the mains socket when it is not being used, before assembling or disassembling parts, and before
cleaning.
- Avoid contact with moving parts. Never push the food with your hand. Always use a food pusher.
- Never use any appliance with a damaged power cord or plug, or after a malfunction, or when it has been dropped
or damaged. Take the appliance to your nearest authorised technical service centre for inspection, repair or
mechanical or electrical adjustment.
- This appliance should only be used with the attachments supplied.
- Using attachments not recommended or sold by the appliance’s manufacturer may cause a fire, electric shock or
injury.
- Do not use outdoors.
- Do not allow the power cord to hang over the edge of a table or counter or touch hot surfaces.
- To prevent any risk of cuts, do not use your fingers to remove food from the cutting disc while the appliance is
operating.
- This appliance is designed for domestic use only. Any servicing other than cleaning and maintenance by the user
must be carried out by an authorised technical service representative.
- Do not immerse the unit in water.
- In order to reduce the risk of fire or electric shock, do not disassemble the base. There are no user-repairable parts
inside it. Repairs must be carried out solely by authorised technical service personnel.
- In order to prevent damage, do not try to mince bones, nutshells or other hard items.
- This product must not be used by children or by other people without assistance or supervision if their physical,
sensory or mental condition limits safe use of the appliance. Children must be watched to make sure that they do
not play with the appliance.
- If the power cord is damaged, it must be replaced by the manufacturer or its authorised technical service centre or
by a qualified technician in order to avoid hazards.
ASSEMBLY
1 Insert the feeding screw in the mincing tube with the long end of the shaft first.
2 Position the cutting blade on the feeding screw with the flat cutting surfaces facing you.
3 Place the required mesh plate on the feeding screw against the flat surfaces of the cutting blade.
Make sure that the mesh plate notches fit in the mincing tube grooves.
4 Fasten tightly the threaded ring to the end of the mincing tube.
5 Insert the mincer head in the opening of the motor unit. Turn slowly and push until it fits firmly in position. Note: It
may be necessary to loosen the locking knob to enable full insertion of the mincer head.
6 Fasten the mincer head by turning the locking knob until it is tight.
7 Place the feeding hopper on the feeding tube.
8 Use the food pusher to gently push the food, one piece at a time, into the tube. Do not force food into it.
DIRECTIONS FOR USE
- Place the assembled appliance on a stable work surface, so that the ventilation holes on the base and rear of the
appliance are not blocked.
- Make sure that the on/off switch is in the “off” position. Insert the plug in the mains socket.
GB

6
7
- Place a wide, shallow tray or dish underneath the mincing tube to collect the minced food.
- Turn the appliance on. The mincer must ALWAYS be working before inserting food.
NOTE: If the motor loses speed or stops, it may be due to stuck food. In this case, immediately stop the mincer. Press
the reverse switch to push the food in the opposite direction. Release the reverse switch and start the mincer again. If
it is still stuck, stop the mincer, unplug it, disassemble the head and clean the inside parts.
TIPS FOR THE MESH PLATE
The recommended uses for each of the mesh plates are the following. Experiment to find the plate that best matches
your taste or recipes.
COARSE MESH PLATE for mincing meat used with chilli or vegetables.
MEDIUM MESH PLATE for mincing meat used with soups or seasoning.
FINE MESH PLATE for sauces, pâtés, baby food, hamburgers.
AFTER USING
- Mincing pieces of dry bread will help remove any food remaining in the mincer after use.
- Stop the appliance and unplug from the mains socket.
- Disassemble and clean all the parts each time after use.
CLEANING
- Always unplug the appliance from the mains socket when it is not in use, before assembling or disassembling parts,
or before cleaning.
- Never immerse the motor unit in water or other liquids.
- Wash all the parts, except the motor unit, in hot soapy water, taking care when handling the sharp blades.
- Rinse these parts with hot, clear water and dry. Do NOT wash these parts in the dishwasher.
- Clean the motor unit with a damp cloth. Do not use rough or abrasive cleaning products.
- The blades and mesh plates must be smeared with cooking oil after washing in order to keep them lubricated and
rust-free.
HANDY TIPS:
- Cut the food into strips or dices that are slightly smaller than the opening of the feeding tube.
- Make sure that the food contains no bones, gristle, nutshells, etc. before mincing.
- Raw meat or fish must be cold (not frozen) before mincing in order to reduce losses of juice.
- Freshly minced meat should be kept in the refrigerator and cooked within 24 hours.
- When mincing for long periods, fat may accumulate inside the mincing tube, reducing mincing efficiency and
overloading the motor. If this happens, stop the mincer, wash the parts in hot water and reassemble. Whenever
possible, mince pieces of dry bread in between meat mincings. This helps keep the feeding screw clean.
Thank you for choosing one of our products.

8
9
Nos produits sont développés pour répondre aux standards de qualité, de fonctionnalité et de design les plus élevés.
Nous espérons que vous profiterez de votre nouvel hachoir à viande électrique de PALSON.
PROTECTIONS DE SÉCURITÉ IMPORTANTES
Lorsque vous utilisez des appareils électriques, vous devez toujours respecter certaines précautions de sécurité de
base, dont les suivantes:
- Lisez toutes les instructions avant de les utiliser.
- Afin de vous protéger contre tout risque de décharge électrique, n’introduisez pas l’appareil, le câble ou la fiche
dans l’eau ou dans tout autre liquide.
- Une surveillance étroite est indispensable lorsqu’un appareil est utilisé par ou à proximité d’enfants.
- Débranchez l’appareil de la prise de courant lorsque vous ne l’utilisez pas, avant de monter ou de démonter des
pièces et avant de le nettoyer.
- Evitez de toucher les parties mobiles. N’enfoncez jamais les aliments avec les doigts. Utilisez toujours le
poussoir.
- Ne faites jamais fonctionner un appareil si le câble ou la fiche sont endommagés, s’il est tombé ou s’il est
endommagé. Remettez l’appareil au centre de service technique agréé le plus proche pour examen, réparation ou
réglage mécanique ou électrique.
- Cet appareil est livré sans accessoires autres que ceux qui l’accompagnent.
- L’utilisation d’accessoires non recommandés ou vendus par le fabricant de l’appareil peut provoquer un incendie,
une décharge électrique ou des blessures.
- N’utilisez pas l’appareil à l’air libre.
- Ne laissez pas pendre le cordon sur le bord d’une table ou d’un plan de travail, ou entrer en contact avec des surfaces
chaudes.
- Pour éviter tout risque de blessure par coupe, n’utilisez pas les doigts pour retirer les aliments de la grille à hacher
alors que l’appareil est en marche.
- Cet appareil a été conçu exclusivement pour un usage domestique. Toute intervention autre que le nettoyage ou
l’entretien réalisé par l’utilisateur doit être effectuée par un représentant du service technique agréé.
- Ne plongez jamais l’appareil dans l’eau.
- Afin de réduire les risques d’incendie ou de décharge électrique, ne démontez jamais la base. L’intérieur ne
comprend aucune pièce devant être entretenue par l’utilisateur. Les réparations ne doivent être effectuées que
par le personnel du service technique agréé.
- Afin d’éviter des dommages, n’essayez pas de hacher des os, des coquilles de noix ou autres éléments durs.
- Ce produit ne peut pas être utilisé par des enfants ou d’autres personnes sans aide ou sans surveillance si leur état
physique, sensoriel ou mental ne leur permet de l’utiliser en toute sécurité. Les enfants devraient être surveillés
pour s’assurer qu’ils ne jouent pas avec ce produit.
- Si le cordon d’alimentation est endommagé, il devra être remplacé par le fabricant, par son service technique agréé
ou par un technicien qualifié, afin d’éviter tout danger.
MONTAGE
1 Introduisez l’extrémité longue de l’axe de la vis d’alimentation dans le tube hacheur.
2 Mettez en place le couteau dans la vis d’alimentation avec les côtés coupants plats face à vous.
3 Mettez en place la grille à hacher voulue dans la vis d’alimentation, contre les côtés plats du couteau.
Assurez-vous que les encoches de la grille à hacher s’emboîtent bien dans les rainures du tube hacheur.
4 Fixez fermement la bague vissée à l’extrémité du tube hacheur.
5 Introduisez la tête de l’ensemble hacheur dans l’ouverture du bloc moteur. Faites-la tourner petit à petit en la
poussant jusqu’à ce qu’elle s’emboîte fermement. Note: il peut s’avérer nécessaire de desserrer le bouton de
blocage pour pouvoir introduire complètement la tête de l’ensemble hacheur.
6 Fixez la tête de l’ensemble hacheur en faisant tourner le bouton de blocage jusqu’à ce qu’il soit serré.
7 Placez le plateau d’alimentation dans le tube d’alimentation.
8 Utilisez le poussoir pour enfoncer doucement les aliments dans le tube, une pièce à la fois. Ne forcez pas les
aliments à l’intérieur.
F

8
9
MODE D’EMPLOI
- Déposez l’appareil monté sur une surface de travail stable, de manière à ce que les sorties d’air de la base et de
la partie postérieure ne soient pas obstruées.
- Assurez-vous que l’interrupteur de marche/arrêt est bien sur la position d’arrêt. Introduisez la fiche dans la prise
de courant.
- Placez un récipient large et peu profond ou une assiette en-dessous du tube hacheur pour recueillir les aliments
hachés.
- Mettez l’appareil en marche. Le hachoir doit TOUJOURS être en marche avant d’ajouter les aliments.
NOTE: Si la vitesse du moteur diminue ou si le moteur s’arrête, cela peut être dû à des aliments bloqués. Dans ce cas,
arrêtez immédiatement le hachoir. Appuyez sur l’interrupteur de recul pour pousser les aliments dans le sens contraire.
Relâchez l’interrupteur de recul et remettez le hachoir en marche. Si celui-ci est toujours bouché, vous devrez l’arrêter,
le débrancher, démonter la tête et nettoyer les pièces internes.
CONSEILS POUR LA GRILLE A HACHER
Voici les utilisations recommandés pour chacune des grilles à hacher. Faites des essais pour choisir la grille qui
correspond le mieux à vos goûts ou à vos recettes.
GRILLE A HACHER EPAIS pour hacher la viande utilisée dans le chili con carne ou dans les légumes.
GRILLE A HACHER MOYEN pour hacher la viande utilisée dans les soupes ou avec des condiments.
GRILLE A HACHER FIN pour les sauces, pâtés, bouillies pour enfants, hamburgers.
APRES L’AVOIR UTILISE
- Triturer des morceaux de pain sec vous aidera à éliminer les restes d’aliments qui se trouveraient
dans le hachoir après son utilisation.
- Arrêtez l’appareil et débranchez la fiche de la prise de courant.
- Démontez et n
ettoyez toutes les pièces après chaque utilisation.
COMMENT LE NETTOYER
- Débranchez toujours la fiche de la prise de courant lorsque vous n’utilisez pas le hachoir, avant de monter ou
démonter des pièces ou de le nettoyer.
- Ne plongez jamais le bloc moteur dans l’eau ou dans tout autre liquide.
- Lavez toutes les pièces, sauf le bloc moteur, avec de l’eau chaude savonneuse, en manipulant avec précaution les
couteaux affilés.
- Rincez les pièces dans de l’eau chaude propre et séchez-les. NE lavez PAS ces pièces dans le lave-vaisselle.
- Nettoyez le bloc moteur avec un linge humide. N’utilisez pas de produits de nettoyage rugueux ou abrasifs.
- Recouvrez d’huile de cuisine les couteaux et les grilles de coupe après les avoir lavés, afin qu’ils soient lubrifiés
et protégés contre la rouille.
SUGGESTIONS UTILES:
- Coupez les aliments en languettes ou en cubes légèrement plus petits que l’orifice du tube d’alimentation.
- Assurez-vous que les aliments ne contiennent pas des os, tendons résistants, coquilles de noix, etc. avant de les
hacher.
- La viande et le poisson cru doivent être bien froids (non congelés) avant de les hacher, afin de réduire la perte de
sucs.
- La viande fraîche hachée doit être réfrigérée et cuisinée dans les 24 heures.
- Si vous hachez de la viande pendant un certain temps, des graisses peuvent se déposer à l’intérieur du hachoir,
réduisant ainsi l’efficacité du hachage et forçant le moteur. Si cela se produit, arrêtez le hachoir, lavez les pièces
avec de l’eau chaude et remontez le hachoir. Essayez autant que possible d’alterner pain et aliments. Cela
permettra que la vis d’alimentation reste propre.
Merci de nous démontrer votre confiance en choisissant l’un de nos produits.

10
11
Os nossos produtos estão desenvolvidos para atingir os mais altos padrões de qualidade, funcionalidade e design.
Esperamos que desfrute da sua nova máquina de moer carne Thor da PALSON.
RECOMENDAÇÕES IMPORTANTES DE SEGURANÇA
Ao utilizar aparelhos eléctricos, é necessário tomar sempre algumas precauções de segurança, incluindo as
seguintes:
- Para garantir um funcionamento correcto, queira, por favor, ler atentamente estas instruções.
- Para evitar descargas eléctricas, jamais submirja o aparelho em água ou outros líquidos.
- É necessária uma estrita vigilância quando qualquer aparelho eléctrico é utilizado por ou perto de crianças.
- Desligue o aparelho da tomada de corrente quando não for utilizar, antes de montar ou desmontar peças, e antes
de limpar.
- Evite o contacto com as partes móveis. Jamais empurre os alimentos com a mão. Utilize sempre o empurrador de
alimentos.
- Não utilize o aparelho se o cabo estiver deteriorado/danificado ou se a máquina de moer sofreu uma queda ou
está danificada. Para evitar riscos de possíveis descargas eléctricas, não desmonte o aparelho. Leve o aparelho
para um serviço de assistência técnica qualificado para a sua revisão/reparação. Uma montagem incorrecta pode
causar de descargas eléctricas durante o uso.
- O fornecimento deste aparelho apenas inclui os acessórios que se indicam.
- A utilização de acessórios não recomendados nem vendidos pelo fabricante do aparelho pode ser causa de
incêndio, descargas eléctricas ou lesões.
- Não utilize o aparelho ao ar livre.
- Não deixe que o cabo se dependure de uma mesa ou mostrador ou que entre em contacto com superfícies
quentes.
- Para evitar riscos de lesões por corte, não utilize os dedos para remover restos de alimento do disco de corte
enquanto o aparelho estiver em funcionamento.
- O aparelho é exclusivamente para uso doméstico. Qualquer serviço, que não seja a limpeza e a manutenção por
parte do utente, deverá ser realizado pelo pessoal do serviço técnico autorizado.
- JAMAIS submirja o aparelho em água.
- Para reduzir os riscos de incêndio ou descargas eléctricas, não tente desmontar a base. No interior do aparelho
não existem peças que o utente deva manter ou saiba reparar. As reparações apenas devem ser efectuadas pelo
pessoal do serviço técnico autorizado.
- Para evitar danos, não tente moer ossos, cascas de nozes ou outros elementos duros.
- Este produto não está desenhado para uso infantil ou outras pessoas sem assistência ou supervisão se o estado
físico, sensorial ou mental das mesmas limitara a sua capacidade de utilizar o aparelho com segurança. Deve-se
vigiar as crianças para impedir que fiquem a brincar com o aparelho.
- Se o cabo de alimentação estiver danificado, deverá ser substituído pelo fabricante ou o seu serviço técnico
autorizado ou por um técnico qualificado, com o fim de evitar possíveis perigos.
MONTAGEM
1 Introduza a haste espiral de alimentação no tubo triturador, inserindo, em primeiro lugar, o lado cilíndrico da
haste.
2 Posicione a lâmina de corte na haste espiral de alimentação com os lados cortantes planos voltados para si.
3 Posicione o disco de corte pretendido na haste espiral de alimentação e contra os lados planos da lâmina de
corte.
Assegure-se de que os entalhes do disco de corte se encaixam nas ranhuras do tubo triturador.
4 Fixe firmemente o anel roscado no extremo do tubo triturador.
5 Introduza o cabeçote do triturador na abertura da unidade do motor. Gire-o pouco a pouco e empurre-o até que
ambos se encaixem firmemente. Nota: Pode ser necessário afrouxar o botão de bloqueio para permitir que o
cabeçote do triturador se introduza totalmente.
6 Fixe o cabeçote do triturador girando o botão de bloqueio até que fique bem apertado.
7 Coloque a bandeja de alimentação no tubo de alimentação.
8 Utilize o empurrador de alimentos, para empurra os alimentos delicadamente, uma peça de cada vez, dentro do
tubo. Não force os alimentos para o interior.
P

10
11
MODO DE USAR
- Coloque o aparelho montado sobre uma plataforma de trabalho estável de forma que as entradas de ar da base
e da parte traseira não fiquem bloqueadas.
- Assegure-se de que o botão «Ligado»/«Desligado» está na posição OFF. Introduza a ficha do cabo na tomada de
corrente.
- Colocar um recipiente comprido e pouco fundo ou um prato debaixo do tubo triturador para recolher os alimentos
triturados.
- Colocar o aparelho em funcionamento. O triturador deve estar SEMPRE em funcionamento antes de se introduzir
alimentos.
NOTA: Uma diminuição da velocidade ou paragem súbita do motor, podem estar causadas por uma obstrução de
alimentos. Neste caso, pare imediatamente o triturador. Prima o botão de retrocesso para empurrar os alimentos para
o sentido contrário. Solte o botão de retrocesso e coloque o triturador em funcionamento outra vez. Se, ainda assim,
continuar obstruído, será necessário desligar o aparelho, desmontar o cabeçote e limpar as peças internas.
SUGESTÕES SOBRE OS DISCOS DE CORTE
Os diferentes discos foram desenhados para usos semelhantes aos que se indicam abaixo. Experimente com eles!
Assim poderá escolher o disco que melhor se encaixe com as suas receitas ou gostos pessoais.
DISCO DE CORTE GROSSO para triturar carnes utilizadas para preparar guisados ou triturar hortaliças.
DISCO DE CORTE MÉDIO para triturar carnes utilizadas para preparar com sopas ou triturar condimentos.
DISCO DE CORTE FINO para molhos, patés, alimentação infantil, hambúrgueres.
DEPOIS DA UTILIZAÇÃO
- Depois do uso, pode-se triturar troços de pão seco para ajudar a eliminar os restos de alimentos do triturador.
- Desligue o aparelho e retire a ficha da tomada de corrente.
- Desmonte e limpe todas as peças depois de cada uso.
COMO LIMPAR
- Desligue sempre a máquina de moer quando não for utilizar o aparelho, antes de montar ou desmontar peças ou
antes de limpar.
- Jamais submirja a unidade do motor em água ou em outros líquidos.
- Lave todas as peças, excepto a unidade do motor, em água quente com sabão, tendo cuidado ao manusear as
lâminas de corte.
- Enxagúe as peças com água quente e seque-as. NÃO se pode lave estas peças na máquina de lavar louça.
- Limpe a unidade do motor com um pano húmido. Não utilize produtos de limpeza abrasivos ou esfregões.
- As lâminas de corte e os discos de corte devem ser untados com um pouco de óleo de cozinha depois de cada
lavagem, com o fim de que se mantenham lubrificados e protegidos do óxido.
SUGESTÕES ÚTEIS:
- Corte os alimentos em tiras ou cubos ligeiramente mais pequenos que o orifício do tubo de alimentação.
- Comprove que os alimentos não têm ossos, tendões resistentes, cascas de nozes, etc. antes de começar a
moer.
- A carne ou os peixes cru devem estar bem frios (mas não congelados) antes de serem triturados, para assim,
reduzir a perda de nutrientes e sucos.
- Depois de triturada, a carne fresca deve permanecer no frigorífico e ser cozida em 24 horas.
- Durante operações de trituração prolongadas, podem-se introduzir gorduras no interior do tubo do triturador, com
o qual se reduz a eficiência da moagem e forçando o motor. Neste caso, desligue o triturador, lave as peças com
água quente e monte-as de novo. Sempre que possível, após o uso, deve-se triturar troços de pão seco para
ajudar a eliminar os restos de alimentos do triturador.
Obrigado por depositar a sua confiança em nós escolhendo um dos nossos produtos.

12
13
Unsere Produkte sind auf höchste Ansprüche hinsichtlich Qualität, Funktionsfähigkeit und Design ausgelegt. Wir
hoffen, dass Sie sich mit Ihrem neuen Fleischwolf Thor von PALSON wohl fühlen.
WICHTIGE SICHERHEITSMAßNAHMEN
Beim Benutzen von Elektrogeräten müssen stets die grundsätzlichen Sicherheitsvorschriften beachtet werden,
einschließlich Folgende:
- Lesen Sie die Gebrauchsanweisungen vor der Benutzung des Gerätes sorgfältig durch.
- Zur Vermeidung von elektrischen Schlägen tauchen Sie das Gerät, das Kabel und den Stecker nicht in Wasser
oder sonstige Flüssigkeiten.
- Bei der Benutzung elektrischer Geräte von oder in der Nähe von Kindern ist größte Aufmerksamkeit geboten.
- Nehmen Sie den Stecker aus der Steckdose, wenn das Gerät nicht benutzt wird, vor dem Auseinandernehmen
oder Zusammenbauen der Teile und vor der Reinigung.
- Vermeiden Sie den Kontakt mit beweglichen Teilen. Stopfen Sie Lebensmittel niemals mit der Hand. Verwenden
Sie dafür stets einen Stopfer.
- Schalten Sie keine Geräte mit beschädigtem Kabel oder Stecker ein, nach einer Störung, wenn das Gerät
heruntergefallen oder beschädigt ist. Bringen Sie den Apparat zum nächst gelegenen autorisierten Kundendienst,
damit es überprüft, repariert, sowie mechanisch und elektrisch eingestellt werden kann.
- Dieses Gerät enthält nur die gelieferten Zubehörteile.
- Die Verwendung von nicht vom Hersteller empfohlenen und verkauften Zubehörteilen kann zu Bränden,
elektrischen Schlägen oder Verletzungen führen.
- Nicht im Freien verwenden.
- Das Kabel sollte nicht von Tischrand oder Theke hängen oder heiße Flächen berühren.
- Zur Vermeidung von Schnittverletzungen entfernen Sie die Essensreste nicht mit den Fingern vom Kreuzmesser,
solange das Gerät eingeschaltet ist.
- Dieses Gerät ist nur für den Hausgebrauch geeignet. Außer Reinigung und Wartung sind weitere Dienste am Gerät
von einem autorisierten Kundendienst auszuführen.
- Tauchen Sie das Gerät nicht in Wasser.
- Bauen Sie nicht den Gerätesockel ab, um die Gefahr von Brand und elektrischen Schlägen zu mindern. Im
Innern befinden sich keine zu wartenden Teile. Reparaturen sind nur von einem autorisierten Kundendienst
auszuführen.
- Versuchen Sie nicht, Knochen, Nüsse oder sonstige harte Elemente im Gerät zu zerkleinern, damit es nicht
beschädigt wird.
- Dieses Produkt darf nicht von Kindern benutzt werden oder von sonstigen Personen, bei denen aufgrund der
körperlichen, sensorischen oder geistigen Verfassung ein sicherer Gebrauch ohne Hilfe oder Beaufsichtigung
einschränkt ist. Kinder sind zu beaufsichtigen, um sicherzustellen, dass sie das Produkt nicht zum Spielen
benutzen.
- Ein beschädigtes Stromkabel ist vom Hersteller oder seinem autorisierten Kundendienst zu ersetzen oder durch
einen ausgebildeten Techniker, um Gefahren zu verhindern.
ZUSAMMENBAU
1 Führen Sie die Schnecke mit dem langen Ende ins Schneckenrohr ein.
2 Legen Sie das Messer mit den Schneidseiten flach in Richtung des Betrachters auf die Schnecke.
3 Setzen Sie die gewünschte Lochscheibe gegen die flachen Seiten des Messers auf die Schnecke.
Vergewissern Sie sich dabei, dass die Kerben der Lochscheibe in die Schlitze des Schneckenrohres einrasten.
4 Schrauben Sie den Vorsatz fest an das Rohrende an.
5 Stecken Sie das Zerkleinerungsteil in die Öffnung der Motoreinheit. Drehen und drücken Sie es vorsichtig, bis es fest
sitzt. Hinweis: Eventuell ist der Sperrknopf etwas zu lösen, damit das Zerkleinerungsteil vollständig eingeführt werden
kann.
6 Drehen Sie den Sperrknopf, bis das Zerkleinerungsteil fest sitzt.
7 Setzen Sie die Einfüllschale auf das Rohr.
8 Drücken Sie immer nur ein Speisestück vorsichtig mit dem Stopfer in das Rohr. Die Nahrungsmittel sollen nicht
übermäßig in der Maschine gedrückt werden.
D

12
13
GEBRAUCHSANWEISUNG
- Stellen Sie den zusammengebauten Apparat so auf eine stabile Arbeitsfläche, dass die Lüftungslöcher hinten am
Gerät und am Sockel nicht blockiert werden.
- Vergewissern Sie sich, dass sich der Ein-/Ausschalter in Stopposition befindet. Stecken Sie den Stecker in die
Steckdose.
- Stellen Sie eine weite, flache Schüssel oder einen Teller zur Aufnahme der zerkleinerten Speisen unter das
Rohr.
- Schalten Sie das Gerät ein. Der Fleischwolf muss vor dem Einfüllen IMMER eingeschaltet sein.
HINWEIS: Wenn die Motorgeschwindigkeit absinkt oder der Motor stoppt, wird das Gerät möglicherweise von Speisen
verstopft. Schalten Sie das Gerät sofort aus. Drücken Sie die Rücklauftaste, um die Speisen in die entgegengesetzte
Richtung zu drücken. Lösen Sie die Rücklauftaste und schalten Sie das Gerät erneut ein. Ist der Apparat immer noch
verstopft, muss er ausgeschaltet werden, der Stecker abgezogen, das Zerkleinerungsteil ausgebaut und die inneren
Teile gereinigt werden.
EMPFEHLUNGEN FÜR DIE LOCHSCHEIBEN
Wir empfehlen die einzelnen Lochscheiben für die folgenden Verwendungszwecke. Probieren Sie aus, welche Scheibe
am besten zu den verschiedenen Geschmacksrichtungen und Rezepten passt.
GROBE LOCHSCHEIBE für Hackfleisch mit Chili oder Gemüse.
MITTLERE LOCHSCHEIBE für Hackfleisch in Suppen oder mit Gewürzen.
FEINE LOCHSCHEIBE für Soßen, Pasteten, Kindergerichte, Hamburger.
NACH DEM GEBRAUCH
- Das Zerkleinern von trockenem Brot im Fleischwolf hilft bei der Entfernung von festsitzenden Essenresten.
- Schalten Sie das Gerät aus und ziehen den Stecker aus der Steckdose.
- Nehmen Sie es nach jeder Benutzung auseinander und reinigen alle Teile.
REINIGUNG
- Nehmen Sie den Stecker aus der Steckdose, wenn das Gerät nicht benutzt wird, vor dem Auseinandernehmen
oder Zusammenbauen der Teile und vor der Reinigung.
- Tauchen Sie das Motorgehäuse auf keinen Fall in Wasser oder andere Flüssigkeiten.
- Reinigen Sie alle Teile außer des Motorgehäuses in warmem Spülwasser und gehen Sie vorsichtig mit den
scharfen Messern um.
- Spülen Sie die Teile mit sauberem, warmem Wasser und trocknen sie ab. Diese Teile NICHT in der Spülmaschine
reinigen.
- Reinigen Sie das Motorgehäuse mit einem feuchten Tuch. Benutzen Sie keine Scheuermittel oder
Scheuerlappen.
- Messer und Lochscheiben sollten nach der Reinigung mit Speiseöl eingeölt werden, damit sie nicht verrosten.
NÜTZLICHE EMPFEHLUNGEN:
- Schneiden Sie die Lebensmittel in Streifen oder Würfel, die etwas kleiner sind als das Einfüllrohr.
- Vergewissern Sie sich vor dem Zerkleinern, dass keine Knochen, harte Sehnen, Nussschalen, usw. vorhanden
sind.
- Rohes Fleisch oder Fisch sollte sehr kalt (nicht gefroren) verarbeitet werden, damit wenig Saft verloren geht.
- Frisches Hackfleisch ist kühl zu lagern und innerhalb von 24 Stunden zu verbrauchen.
- Bei längerem Zerkleinern können sich im Rohr Fette bilden, die den Vorgang verschlechtern und den Motor
überbeanspruchen. In diesem Fall schalten Sie den Fleischwolf aus, reinigen die Teile mit warmem Wasser und
bauen sie erneut ein. Wenn möglich, verwenden Sie abwechselnd Brot und andere Lebensmittel. Dadurch wird die
Schnecke sauber gehalten.
Vielen Dank, dass Sie eines unserer Produkte ausgewählt haben.

14
15
I nostri prodotti sono stati sviluppati per raggiungere i più elevati standard qualitativi, funzionalità e design. Ci auguriamo
che possiate usufruire appieno del vostro nuovo tritacarne elettrico Thor di PALSON.
IMPORTANTI MISURE DI SICUREZZA
Quando si utilizzano apparecchi elettrici, si devono seguire sempre delle precauzioni di sicurezza basilari, ivi comprese
le seguenti:
- Leggere interamente le istruzioni prima dell’uso.
- Per evitare il rischio di scariche elettriche, non introdurre l’apparecchio, il cavo oppure la spina nell’acqua o in altri
liquidi.
- È necessario stare molto attenti qualora gli apparecchi elettrici siano utilizzati da bambini o in presenza di essi.
- Staccare dalla presa di corrente quando non si utilizza, prima di montare o smontare i pezzi e prima della pulizia.
- Evitare il contatto con le parti mobili. Non spingere mai gli alimenti con la mano. Utilizzare sempre un pestello per
alimenti.
- Non far funzionare alcun apparecchio con il cavo oppure la spina danneggiata, dopo un cattivo funzionamento
dello stesso, quando è caduto o è danneggiato. Portare l’apparecchio al centro di servizio tecnico autorizzato più
vicino, perché venga esaminato, riparato o per qualche riparazione meccanica o elettrica.
- Questo apparecchio si fornisce senza altri accessori oltre a quelli forniti.
- L’uso di accessori non raccomandati o venduti dal fabbricante dell’apparecchio può causare incendi, scariche
elettriche o lesioni.
- Non utilizzarlo all’aria aperta.
- Non lasciare che il cavo sporga dal bordo di un tavolo o di un banco o che entri a contatto con superfici calde.
- Per evitare i rischi di lesioni in seguito a tagli, non rimuovere il cibo dal disco da taglio con le dita quando
l’apparecchio è in funzione.
- Questo apparecchio è stato ideato solo per uso domestico. Qualunque servizio al di là della pulizia e della
manutenzione, a carico dell’utente, deve essere realizzato da un tecnico del servizio tecnico autorizzato.
- Non immergere l’apparecchio nell’acqua.
- Per ridurre i rischi di incendio o di scariche elettriche, non smontare la base.
All’ interno non vi sono pezzi di cui l’utente non deve realizzare la manutenzione. Le riparazioni debbono essere
realizzate solamente dal personale del servizio tecnico autorizzato.
- Per evitare danni, non cercare di tritare ossi, gusci di noci o altri elementi duri.
- Non si consente l’uso di questo prodotto a bambini o ad altre persone senza assistenza o controllo qualora il loro
stato fisico, sensoriale o mentale non ne consentano l’uso sicuro. I bambini dovrebbero essere controllati per
assicurarsi che non giochino con detto prodotto.
- Se il cavo di corrente è danneggiato dovrà essere sostituito dal fabbricante o dal servizio tecnico autorizzato o da
un tecnico qualificato, in maniera tale da evitare eventuali pericoli.
MONTAGGIO
1 Introdurre la vite di alimentazione nel tubo tritacarne con l’estremità lunga dell’asse davanti.
2 Posizionare la lama da taglio nella vite di alimentazione con i lati taglienti piatti frontalmente rispetto al
montatore.
3 Posizionare la piastra da taglio desiderata nella vite di alimentazione di fronte ai lati piatti della lama da taglio.
Accertarsi che le scanalature della piastra da taglio coincidano con le fessure del tubo di triturazione.
4 Avvitare saldamente la rondella filettata all’estremità del tubo tritacarne.
5 Introdurre la testata del tritacarne nell’apertura dell’unità del motore. Girarlo delicatamente e spingerlo fino ad
incassare saldamente. Nota: Potrebbe essere necessario allentare il pulsante di bloccaggio per consentire
completamente l’introduzione della testata del tritacarne.
6 Fissare la testata del tritacarne girando il pulsante di bloccaggio fino a stringerla saldamente.
7 Collocare il vassoio di alimentazione nel tubo di alimentazione.
8 Utilizzare il pestello per alimenti, per spingere il cibo delicatamente, un pezzo alla volta, all’interno del tubo. Non
forzare gli alimenti all’interno.
I

14
15
MODALITÀ D’USO
- Collocare l’apparecchio montato al di sopra di una superficie di lavoro stabile, in maniera tale che gli sfiati dell’aria
della base e della parte posteriore non vengano ostruiti.
- Accertarsi che l’interruttore di accensione/spegnimento, si trovi nella posizione di spegnimento. Inserire la spina
nella presa di corrente.
- Collocare una vaschetta ampia e non eccessivamente fonda, o un piatto al di sotto del tubo di triturazione per
depositarvi gli alimenti tritati.
- Mettere in funzione l’apparecchio. Il tritacarne deve essere sempre in funzione prima di aggiungere gli alimenti.
NOTA: Se la velocità del motore diminuisce o se si arresta, la causa potrebbe essere l’ostruzione provocata dagli
alimenti. In questo caso, arrestare immediatamente il tritacarne. Premere l’interruttore di retrocesso per spingere il cibo
in senso contrario. Lasciare andare l’interruttore di retrocesso e mettere in funzione nuovamente il tritacarne. Se questo
è ancora intasato, sarà necessario arrestarlo, scollegarlo, smontare la testata e pulire i pezzi interni.
CONSIGLI PER LA PIASTRA DA TAGLIO
Questi sono gli usi consigliati per ciascuna delle piastre da taglio. Per scegliere la piastra che meglio si adatta ai propri
gusti o ricette, si consiglia di provarle.
PIASTRA DA TAGLIO GROSSA per tritare carne utilizzato con chile o verdure.
PIASTRA DA TAGLIO MEDIA per tritare carne utilizzata con minestre o condimento.
PIASTRA DA TAGLIO SOTTILE per salse, paté, pappe per bambini, hamburger.
DOPO L’USO
- Tritando pezzi di pane secco, si eliminano residui di alimenti che rimangono nel tritacarne dopo l’uso.
- Arrestare l’apparecchio e scollegarlo dalla presa di corrente.
- Smontare e pulire interamente i pezzi ogni volta che viene utilizzato.
COME PULIRLO
- Staccare sempre l’apparecchio dalla presa di corrente quando non si utilizza, prima di montare o smontare pezzi
o prima della pulizia.
- Non immergere mai l’apparecchio del motore nell’acqua o altri liquidi.
- Lavare tutti i pezzi, tranne l’apparecchio del motore, nell’acqua calda insaponata, facendo attenzione nel
manipolare le lame affilate.
- Sciacquare questi pezzi con acqua calda pulita ed asciugarli. NON lavare questi pezzi nella lavastoviglie.
- Pulire l’apparecchio del motore con un panno umido. Non utilizzare prodotti di pulizia ruvidi o abrasivi.
- Le lame e le piastre da taglio debbono essere ricoperte d’olio alimentare dopo il lavaggio, per lubrificarle e
proteggerle dall’ossidazione.
CONSIGLI UTILI:
- Tagliare gli alimenti in strisce o dadi leggermente più piccoli del foro del tubo di alimentazione.
- Accertarsi che gli alimenti non abbiano ossi, tendini resistenti, gusci di noci, ecc. prima di macinarla.
- La carne o il pesce crudo deve essere molto freddo (non congelato) prima di essere macinato per ridurre le perdite
di liquidi.
- La carne fresca tritata deve essere raffreddata ed essere cotta entro 24 ore.
- Durante una triturazione prolungata, si possono produrre grassi all’interno del tubo di triturazione, riducendo
l’efficienza della macinazione e forzando il motore. Se ciò succede, arrestare il tritacarne, lavare i pezzi con acqua
calda e montarli di nuovo. Se è possibile alternare il pane con gli alimenti. Ciò aiuta a mantenere pulita la vite di
alimentazione.
Vi ringraziamo per la fiducia accordataci scegliendo uno dei nostri prodotti.

16
17
Onze producten zijn ontworpen om aan de hoogste vereisten met betrekking tot kwaliteit, functionaliteit en design te
voldoen. Wij hopen dat u veel plezier beleeft aan uw nieuwe elektrische vleesmolen Thor van PALSON.
BELANGRIJKE VEILIGHEIDSMAATREGELEN
Bij het gebruik van elektrische apparaten dienen altijd een aantal elementaire veiligheidsmaatregelen in acht te worden
genomen, waaronder de volgende:
- Lees voor het gebruik alle aanwijzingen.
- Om het gevaar van elektrische schokken te voorkomen mogen de eenheid, het snoer of de stekker niet worden
ondergedompeld in water of andere vloeistoffen.
- Het is nodig om strikt toezicht te houden als apparaten door kinderen worden gebruikt of als zij in de buurt zijn.
- rek de stekker uit het stopcontact als het apparaat niet gebruikt wordt, alvorens onderdelen te monteren of te
demonteren, en alvorens het apparaat schoon te maken.
- Raak de beweegbare onderdelen niet aan. Druk de vleeswaren nooit met de hand aan. Gebruik daarvoor een
duwstaaf.
- Gebruik geen apparaten waarvan het snoer of de stekker beschadigd zijn, noch apparaten die niet goed werken,
gevallen of beschadigd zijn. Breng het apparaat voor controle of reparatie naar de dichtstbijzijnde erkende
technische dienst.
- Dit apparaat wordt slechts geleverd met de bijgeleverde accessoires.
- Het gebruik van accessoires die niet door de fabrikant van het apparaat worden aanbevolen noch worden verkocht,
kan brand, elektrische schokken of letsel veroorzaken.
- Gebruik het apparaat niet in de open lucht.
- Zorg ervoor dat het snoer niet over de rand van de tafel hangt of in contact komt met warme oppervlaktes.
- Om het risico op snijwonden te voorkomen, dient u de vleeswaren niet met de handen van de schijf te verwijderen
zolang het apparaat aan staat.
- Dit apparaat is uitsluitend bedoeld voor huishoudelijk gebruik. Alle handelingen aan het apparaat, behalve reiniging
en onderhoud, moeten worden uitgevoerd door een vertegenwoordiger van de erkende technische dienst.
- Dompel de eenheid niet onder in water.
- Om het risico op brand of elektrische schokken te voorkomen, mag het voetstuk niet worden gedemonteerd.
Daarbinnen bevinden zich geen onderdelen waarvoor onderhoud door de gebruiker vereist is. Reparaties mogen
alleen door personeel van de erkende technische dienst worden uitgevoerd.
- Om schade te voorkomen mogen geen botten, notendoppen of andere harde voorwerpen worden gemalen.
- Dit product is niet geschikt om zonder toezicht te worden gebruikt door kinderen of andere personen die vanwege
hun lichamelijke, zintuiglijke of geestelijke gesteldheid niet in staat zijn om het op veilige wijze te gebruiken. Er moet
altijd goed op de kinderen worden gelet om te voorkomen dat zij met het product gaan spelen.
- Indien het snoer beschadigd is dient het, om gevaar te voorkomen, te worden vervangen door de fabrikant of door
een erkende technische dienst of vakman.
MONTAGE
1 Plaats de toevoerschroef in de maalbuis, het lange uiteinde van de schroef eerst.
2 Plaats het mes in de toevoerschroef met de scherpe kant naar u toewijzend.
3 Plaats de gewenste snijschijf in de toevoerschroef tegen de stompe kant van het mes.
Zorg ervoor dat de inkepingen van de snijschijf in de groeven van de maalbuis passen.
4 Draai de sluitring aan het uiteinde van de maalbuis goed aan.
5 Plaats de kop van de maalmolen in de opening van de motoreenheid. Draai het langzaam totdat hij goed vast zit.
N.B.: Het kan nodig zijn om de blokkeerknop enigszins los te draaien, zodat de kop van de maalmolen er helemaal
in past.
6 Plaats de kop van de maalmolen door de blokkeerknop helemaal aan te draaien.
7 Plaats de toevoerschaal in de maalbuis.
8 Gebruik de duwstaaf, om de vleeswaren voorzichtig aan te drukken, één stuk per keer, binnen in de buis. Oefen
geen kracht uit op de etenswaren die zich daarbinnen bevinden.
NL

16
17
GEBRUIKSAANWIJZING
- Zet het apparaat, als het gemonteerd is, op een stabiel werkoppervlak, zodat de luchtopeningen van het voetstuk
en de achterkant niet geblokkeerd raken.
- Controleer of de aan/uitschakelaar op de stand uit staat. Steek de stekker in het stopcontact.
- Zet een brede en lage bak of een bord onder de maalbuis om de gemalen etenswaren op te vangen.
- Zet het apparaat aan. De maalmolen moet ALTIJD aan staan alvorens etenswaren toe te voegen.
N.B.: Indien de snelheid van de motor afneemt of de motor uitgaat, kan het zijn dat er etenswaren in vastzitten. Zet in
dat geval de vleesmolen onmiddellijk uit. Druk op de terugdraaischakelaar om het voedsel in tegengestelde richting te
duwen. Laat de terugdraaischakelaar los en zet de vleesmolen weer aan. Is het apparaat dan nog steeds verstopt, dan
moet het worden uitgezet, de stekker uit het stopcontact worden gehaald, de kop worden gedemonteerd en de interne
onderdelen worden schoongemaakt.
ADVIEZEN VOOR DE SNIJSCHIJF
Dit zijn de gebruiksadviezen voor de afzonderlijke snijschijven. U kunt ermee experimenteren en zo om de schijf te
kiezen die het beste voldoet aan uw eigen smaak of de recepten.
GROVE SNIJSCHIJF voor het maken van vlees dat gebruikt wordt met chilipeper of groente.
MEDIUM SNIJSCHIJF voor het malen van vlees dat gebruikt wordt voor soep of kruiderijen.
FIJNE SNIJSCHIJF voor sauzen, patés, maaltijden voor kinderen, hamburgers.
NA GEBRUIK
- Door droog brood te malen kunnen etensresten die mogelijk na het malen in de maalmolen zijn achtergebleven
worden verwijderd.
- Zet het apparaat uit en trek de stekker uit het stopcontact.
- Demonteer na elk gebruik alle onderdelen en maak ze schoon.
SCHOONMAKEN
- Trek altijd de stekker uit het stopcontact als het apparaat niet gebruikt wordt, alvorens onderdelen te monteren of
te demonteren en alvorens het apparaat schoon te maken.
- Dompel de motoreenheid nooit onder in water of andere vloeistoffen.
- Maak alle onderdelen, behalve de motoreenheid, in warm zeepsop schoon. Wees daarbij voorzichtig met de
scherpe messen.
- Spoel deze onderdelen met schoon, warm water af en droog ze. Was deze onderdelen NIET in de vaatwasser.
- Maak de motoreenheid met een vochtige doek schoon. Gebruik geen ruwe middelen of schuurmiddelen.
- De messen de snijschijven moeten na het afwassen met keukenolie worden ingevet. Zo blijven ze gesmeerd en
beschermd tegen roest.
NUTTIGE ADVIEZEN:
- Snijd de vleeswaren in reepjes of blokjes die iets kleiner zijn dan de opening van de toevoerbuis.
- Zorg ervoor dat de etenswaren geen botten, taaie pezen, notendoppen etc. bevatten, alvorens ze te malen.
- Rauw vlees of rauwe vis moet goed koud zijn (niet bevroren) om te worden gemaald, om het verlies van sappen te
voorkomen.
- Vers gemalen vlees moet worden gekoeld en binnen 24 uur worden gebruikt.
- Bij langdurig malen kan er zich vet in de binnenkant van de toevoerbuis ophopen, waardoor het malen niet meer
efficiënt verloopt en de motor wordt geforceerd. Doet deze omstandigheid zich voor, zet de maalmolen dan uit,
maak de onderdelen met warm water schoon en monteer ze vervolgens weer. Wissel zo mogelijk steeds brood en
vleeswaren met elkaar af. Dit helpt om de toevoerschroef schoon te houden.
Wij danken u voor uw vertrouwen in ons en voor het kiezen van een van onze producten.

18
19
Ta diká mav proiónta eínai kataskeuasména gia na antapokrínontai sta pléon uyhlá stántar tóso se poióthta
óso kai se leitourgikóthta kai scediasmó. Elpízoume na apolaúsete to kainoúrio sav hlektrikó mhcánhma
poltopoíhshv kréatov Thor thv PALSON.
SHMANTIKÉV PROFULÁXEIV ASFALEÍAV
Otan crhsimopoioúntai mikrév hlektrikév suskeuév, qa prépei na lambánontai kápoiev basikév profuláxeiv
asfaleíav, anámesa sta opoíev sumperilambánontai kai oi akólouqev:
- Diabáste prosektiká ólev tiv odhgíev crñshv prin procwrñsete sthn crhsimopoíhsñ tou.
- Me apýtero skopó na prostateúeste apo ton kínduno próklhshv hlektroplhxíav.mhn buqízete thn monáda to
kalýdio ñ ton reumatolñpth mésa sto neró ñ opoιoudñpote állou túpou ugrá.
- Eínai aparaíthth mía sunecñv epíbleyh ótan opoiadñpote hlektrikñ suskeuñ eíte crhsimopoieítai eíte
brísketai kontá se cýrouv me mikrá paidiá.
- Na to aposundéete apo thn kúria príza parocñv hlektrikoú reúmatov ótan den crhsimopoieítai, ñ prin apo
thn sunarmológhsh ñ thn aposunarmológhsh kommatiýn kai prin apo to kaqárisma.
- Na apofeúgete thn epafñ me ta kinhtá mérh. Poté mhn wqñsete tiv trofév me to céri. Na crhsimopoieíte pánta
gia autó énan wqhtñ twn trofýn.
- Mhn procwrñsete sthn crhsimopoíhsh kammíav suskeuñv me to kalýdio ñ ton reumatolñpth fqarméno, ñ
metá apo mía elattwmatikñ leitourgía tou idíou, ñ ótan écei pései, ñ écei uposteí me opoiondñpote trópo fqorá.
Na páte thn suskeuñ sto plhsiéstero exousiodothméno tecnikó grafeío exuphréthshv,gia thn exétash thv
suskeuñv, thn episkeuñ thv ñ hlektrikñ ñ mhcanikñ rúqmish.
- Autñ h monáda parécetai cwrív epipléon exartñmata ektóv apo ta corhgoúmena me thn suskeuñ.
- H crhsimopoíhsh exarthmátwn pou den parécontai oúte pwloúntai apo ton kataskeuastñ, mporeí na
prokalésoun fwtiév, hlektroplhxíev ñ proswpiká atucñmata.
- Mhn to crhsimopoieíte se upaíqriouv cýrouv.
- Mhn afñnete to kalýdio na krémetai apo thn ákrh enóv trapezioú ñ bitrínav oúte na ércetai se epafñ me
qermainómenev epifáneiev.
- Gia na apofeúgete touv kindúnouv atuchmátwn kopñv, mhn crhsimopoieíte ta dáktulá sav gia na afaireíte to
faghtó apo ton dísko kopñv kai ený h suskeuñ brísketai se leitourgía.
- Autñ h suskeuñ proorízetai apokleistiká kai móno gia oikiakñ crñsh. Opoiadñpote állh diergasía apo
pleuráv crñsth sthn suskeuñ ektóv apo to kaqárisma kai thn suntñrhsh qa prépei na pragmatopoieítai apo
énan tecnikó tou exousiodothménou tecnikoú grafeíou exuphréthshv.
- Mhn buqízete thn monáda mésa sto neró.
- Me apýtero skopó na meiýnontai sto elácisto oi kíndunoi próklhshv fwtiáv ñ hlekroplhxíav mhn
aposunarmologeíte thn básh.Sto eswterikó thv den upárcoun kommátia pou o crñsthv prépei na diathreí. Oi
episkeuév qa prépei na pragmatopoioúntai móno apo to proswpikó enóv exousiodothménou tecnikoú grafeíou
exuphréthshv.
- Me apýtero skopó na apofeúgontai fqorév, mhn prospaqñsete na alésete kókkala, tsóflia karudiýn kai
álla sklhrá sustatiká.
- Autó to proión den epitrépetai giá paidikñ crñsh ñ apó álla átoma, cwrív parakoloúqhsh kai epíbleyh,
ótan h fusikñ, aisqhthriakñ ñ yucikñ touv katástash ta empodízei na to crhsimopoioún me asfáleia.Ta paidiá
qa prépei na epithroúntai étsi ýste na eíste sígouroi pwv den paízoun me to proanaferqén proión.
- Eán to kalýdio trofodosíav tou hlektrikoú reúmatov écei fqareí, qa prépei na antikatastaqeí to
suntomýtero dunatón apo ton kataskeuastñ ñ apo éna exousiodothméno tecnikó grafeío exuphréthshv ñ apo
énan exeidikeuméno tecnikó, me apýtero skopó thn apofugñ opoioudñpote kindúnou.
SUNARMOLOGHSH
1 Eiságete thn bída trofodóthshv ston poltopoihtñ swlñna me to makrú ákro tou áxona se prýth qésh.
2 Topoqeteíste to macaíri kopñv sthn bída trofodóthshv me tiv epípedev kofterév pleurév prov ton
sunarmologhtñ.
3 Topoqeteíste thn epiqumhtñ pláka kopñv sthn bída trofodóthshv apénanti apó tiv epípedev pleurév tou
macairioú kopñv. Na eíste sígouroi pwv oi egkopév thv plákav kopñv prosarmózontai sta anoígmata tou
poltopoihtñ swlñna.
4 Stereýste dunatá to bidwtó paximádi sto ákro tou poltopoihtñ swlñna.
5 Eiságete thn kefalñ tou poltopoihtñ sto ánoigma thv monádav tou kinhtñra.Thn gurízete sigá sigá kai tautógcrona
thn prowqeíte mécriv ótou prosarmosteí staqerá. Shmeíwsh: Mporeí na eínai anagkaío na xebidýsete to koumpí
mplokarísmatov étsi ýste na epitréyete sthn kefalñ poltopoíhshv na mpeí olóklhrh mésa.
6 Stereýste thn kefalñ tou poltopoihtñ gurízontav to koumpí mplokarísmatov mécriv ótou meínei
egklwbisméno.
7 Topoqeteíste ton dísko trofodóthshv mésa ston swlñna trofodóthshv.
8 Crhsimopoieíste ton wqhtñ twn trofýn gia na prowqñsete thn trofñ elafrá, éna kommáti káqe forá, mésa
ston swlñna. Mhn piézete tiv trofév sto eswterikó tou.
GR

18
19
TROPOS CRHSIMOPOIHSHS
- Topoqeteíste thn sunarmologhménh suskeuñ epánw se mía staqerñ epifáneia ergasíav, étsi.ýste toso oi
exaeristñrev aéra thv báshv óso kai thv písw pleuráv na mh ménoun mplokarisménoi.
- Na eíste sígouroi pwv o diakópthv thv qéshv se leitourgía/paúsh brísketai sthn qésh paúshv. Eiságete ton
reumatolñpth se mía príza parocñv reúmatov tou diktúou.
- Topoqeteíste éna platú kai lígo baqú koubadáki,ñ éna piáto kátw apo ton poltopoihtñ swlñna gia na
paralábei tiv poltopoihménev trofév.
- Qétete thn suskeuñ se leitourgía. O poltopoihtñv prépei na eínai PANTA se leitourgía prin bálete tiv
trofév.
SHMEIWSH: Eán o kinhtñrav meiýnei thn tacúthtá tou ñ paúei entelýv, mporeí na ofeíletai se fragménev trofév.
Se autñ thn períptwsh, apenergopoieíste améswv ton poltopoihtñ. Patñste ton diakópth opisqocýrhshv gia
na sprýxete thn trofñ prov thn antíqeth kateúqunsh. Eleuqerýnete ton diakópth opisqocýrhshv kai qétete
ton poltopoihtñ se leitourgía mía akóma forá. Eán autóv paraménei akóma fragménov qa eínai anagkaío na ton
stamatñsete, aposundéontáv ton apo thn príza kai afoú aposunarmologñsete thn kefalñ na kaqarísete ta
eswteriká kommátia.
SUMBOULES GIA THN PLAKA KOPHS
Áutév eínai oi sunistoúmenev crñseiv giá káqe mía apo tiv treív plákev kopñv. Dokimáste gia na dialéxete Thn pláka
pou perissótero tairiázei sta proswpiká ´sav goústa kai suntagév.
CONTRH PLAKA KOPHS gia na poltopoieíte kréav pou prókeitai na crhsimopoiñsete me chile ñ cortariká.
MESAIA PLAKA KOPHS gia na poltopoieíte kréav pou prókeitai na crhsimopoiñsete se soúpev ñ san
karúkeuma.
LEPTH PLAKA KOPHS gia sáltsev, pouré,faghtó gia paidiá, mpiftékia.
META APO THN CRHSIMOPOIHSH TOU
- Poltopoiýntav kommátia apo xeró ywmí bohqáte sthn na afairoúntai ta katáloipa twn trofýn pou ménoun
ston poltopoihtñ metá thn crhsimopoíhsñ tou.
- Paúete thn leitourgía thv suskeuñv kai to aposundéete apo thn príza parocñv hlektrikoú reúmatov tou
toícou.
- Aposunarmologeíte kai kaqarízete óla ta kommátia thv suskeuñv metá apo káqe crhsimopoíhsh.
PWS NA TO KAQARISETE
- Na aposundéete thn suskeuñ apo thn kúria príza parocñv reúmatov ótan den crhsimopoieítai, prin apo thn
sunarmológhsh ñ thn aposunarmológhsh kommatiýn kai prin to kaqárisma.
- Poté mhn buqízete ton kinhtñra mésa sto neró ñ opoιoudñpote állou túpou ugrá.
- Na plénete óla ta tmñmata ektóv apo autó tou kinhtñra, me zestó sapounisméno neró, frontízontav na eíste
idiaítera prosektikoí ótan piánete ta akonisména macaíria.
- Xeplénete autá ta kommátia me zestó kaqaró neró kai ta stegnýnete. MHN plénete autá ta kommátia se éna
pluntñrio piátwn.
- Na kaqarízete thn monáda tou kinhtñra me éna ugró paní. Mhn crhsimopoieíte diabrwtiká kai sklhrá proiónta
kaqarismoú.
- Ta macaíria kai oi plákev kopñv qa prépei na aleífontai me ládi mageirématov metá apo to plúsimo, me
apýtero skopó na diathroúntai lipará kai na prostateúontai apo thn oxeídwsh.
CRHSIMES PROTASEIS:
- Na kóbete tiv trofév se lwrídev h kúbouv lígo pió mikroúv apo thn opñ tou swlñna trofodóthshv.
- Na eíste sígouroi pwv oi trofév den periécoun kókkala, anqektikoúv ´ténontev tsóflia karudiýn klp.prin
procwrñsete sthn álesñ touv.
- To kréav ñ to wmó yári qa prépei na eínai arketá krúa (óci ómwv kateyugména) prin thn poltopoíhsh, me
apýtero skopó na meiýnontai oi apýleiev twn cumýn.
- To frésko poltopoihméno kréav prépei na ménei sto yugeío kai na mageireúetai se 24 ýrev.
- Katá thn diárkeia míav paratetaménhv poltopoíhshv, mporeí na dhmiourghqoún lipará sto eswterikó tou
swlñna tou poltopoihtñ, meiýnontav étsi aisqhtá thn apotelesmatikóthta thv poltopoíhshv kai piézontav
ton kinhtñra. Eán autó sumbeí na paúsete ton poltopoihtñ, na plúnete ta kommátia me zestó neró kai na ta
sunarmologñsete xaná. Pánta ótan eínai efiktó na enallássete to ywmí me tiv trofév. Autó bohqá sto na
diathreítai o swlñnav trofodóthshv kaqaróv.
Eucaristoúme gia thn empistosúnh pou mav deícnete dialégontav éna apo ta diká mav proiónta.

20
E
21
Проектируя наши изделия, мы стремимся к тому, чтобы их качество, дизайн и функциональность отвечали
стандартам наивысшего уровня. Надеемся, что Вам понравится новая электрическая мясорубка Thor фирмы
PALSON.
НЕОБХОДИМЫЕ МЕРЫ БЕЗОПАСНОСТИ
При пользовании электрическими приборами следует соблюдать основные меры безопасности, включая
следующие положения:
- Перед использованием прибора прочитать данные инструкции.
- Во избежание электрошока не погружать прибор, его электрошнур или вилку в воду и другие жидкости.
- Необходимо внимательно наблюдать, если электроприбор используется детьми или рядом с ними.
- Всегда отключать прибор от сети, если он не используется, если требуется снять или установить детали,
а также произвести его мойку.
- Избегать прикосновения с движущимися частями. Никогда не проталкивать продукты рукой. Всегда
использовать для этого приданный толкатель.
- Электроприбор нельзя использовать, если поврежден электрошнур, если прибор упал или имеет
повреждения. Отнести прибор в специализированную техническую службу для осмотра и ремонта или
для выполнения механических или электрических регулировок.
- Прибор поставляется без дополнительный принадлежностей, кроме уже приданных.
- Применение принадлежностей, не рекомендованных или не поставляемых изготовителем, может
привести к возгоранию, электрошоку или травмам.
- Следить, чтобы электрошнур не свешивался со стола или прилавка, и не касался нагретых
поверхностей.
- Во избежание порезов не снимать продукт с режущего диска во время работы прибора.
- Прибор предназначен только для бытовых целей. Любая работа с прибором, кроме мойки и обслуживания,
выполняемых пользователем, должна осуществляться представителем специализированной технической
службы.
- Не погружать прибор в воду.
- С целью уменьшить риск возгорания или электрошока, не разбирать основание. Внутри нет
деталей, которые пользователь должен обслуживать. Ремонт может выполнять только персонал
специализированной технической службы.
- Во избежание несчастного случая не пытаться дробить кости, скорлупу орехов и другие твердые
предметы.
- Запрещается включать прибор детям и другим лицам без помощи или наблюдения, если их физическое
или умственное состояние не позволяет им безопасно пользоваться прибором. Не оставлять детей
без присмотра, чтобы они не могли играть с прибором.- Если электрошнур поврежден, во избежание
опасности он должен быть заменен изготовителем или специализированной технической службой, или
квалифицированным специалистом.
СБОРКА
1. Сначала ввести подающий червяк в трубку-дробилку длинным концом.
2. Вставить режущий нож в подающий червяк плоскими режущими кромками в сторону сборщика.
3. Вставить нужную режущую пластину в подающий червяк напротив плоских кромок режущего ножа.
Убедиться, что выемки режущей пластины вошли в пазы трубки-дробилки.
4. Плотно затянуть резьбовое кольцо на конце трубки-дробилки.
5. Ввести головку дробилки в отверстие блока электромотора. Слегка поворачивая, протолкнуть головку до
упора и плотного соединения. Примечание: Возможно, придется ослабить блокирующую кнопку для того,
чтобы головка дробилки полностью вошла.
6. Закрепить головку дробилки, повернув блокирующую кнопку до полного зажатия.
7. Вставить подающий поддон в подающую трубку.
8. Воспользоваться толкателем продукта для постепенной подачи продукта, кусок за куском, внутрь трубки.
Не применять усилий для проталкивания продукта внутрь трубки.
Sayfa yükleniyor...
Sayfa yükleniyor...
Sayfa yükleniyor...
Sayfa yükleniyor...
Sayfa yükleniyor...
Sayfa yükleniyor...
Sayfa yükleniyor...
Sayfa yükleniyor...
-
 1
1
-
 2
2
-
 3
3
-
 4
4
-
 5
5
-
 6
6
-
 7
7
-
 8
8
-
 9
9
-
 10
10
-
 11
11
-
 12
12
-
 13
13
-
 14
14
-
 15
15
-
 16
16
-
 17
17
-
 18
18
-
 19
19
-
 20
20
-
 21
21
-
 22
22
-
 23
23
-
 24
24
-
 25
25
-
 26
26
-
 27
27
-
 28
28


Palson THOR El kitabı
- Tip
- El kitabı
- Bu kılavuz aynı zamanda aşağıdakiler için de uygundur:
diğer dillerde
- slovenčina: Palson THOR Návod na obsluhu
- español: Palson THOR El manual del propietario
- français: Palson THOR Le manuel du propriétaire
- italiano: Palson THOR Manuale del proprietario
- Deutsch: Palson THOR Bedienungsanleitung
- português: Palson THOR Manual do proprietário
- English: Palson THOR Owner's manual
- русский: Palson THOR Инструкция по применению
- Nederlands: Palson THOR de handleiding
İlgili makaleler
Diğer belgeler
-
Tefal FP413DAD Kullanım kılavuzu
-
Kenwood MG700 Kullanım kılavuzu
-
Kenwood AX950 Kullanım kılavuzu
-
Kenwood MG474 El kitabı
-
Kenwood MG510 Kullanım kılavuzu
-
Kenwood MG516 El kitabı
-
Moulinex DKA141 El kitabı
-
Kenwood KAX950ME Kullanım kılavuzu
-
Braun Multiquick 5 G 1500 Kullanım kılavuzu
-