

1

2
3

4
5
6
7

8
9
10
11

12
13
14
15

16

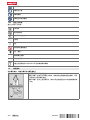
DD 150-U
en Original operating instructions . . . . . . . . . . . . . . . . . . . . . . . . . . . . . . . . . . . . . . . 1
it Istruzioni originali . . . . . . . . . . . . . . . . . . . . . . . . . . . . . . . . . . . . . . . . . . . . . . 29
sl Originalna navodila za uporabo . . . . . . . . . . . . . . . . . . . . . . . . . . . . . . . . . . . . . 59
hr Originalne upute za uporabu . . . . . . . . . . . . . . . . . . . . . . . . . . . . . . . . . . . . . . . 86
sr Originalno uputstvo za upotrebu . . . . . . . . . . . . . . . . . . . . . . . . . . . . . . . . . . . . 114
ru Перевод оригинального руководства по эксплуатации . . . . . . . . . . . . . . . . . . . . 142
uk Оригінальна інструкція з експлуатації . . . . . . . . . . . . . . . . . . . . . . . . . . . . . . . . 173
kk Түпнұсқа пайдалану бойынша нұсқаулық . . . . . . . . . . . . . . . . . . . . . . . . . . . . . 204
bg Оригинално Ръководство за експлоатация . . . . . . . . . . . . . . . . . . . . . . . . . . . . 234
ro Manual de utilizare original . . . . . . . . . . . . . . . . . . . . . . . . . . . . . . . . . . . . . . . . 265
el Μετάφραση οδηγιών χρήσης από το πρωτότυπο . . . . . . . . . . . . . . . . . . . . . . . . . 295
tr Orijinal kullanım kılavuzu . . . . . . . . . . . . . . . . . . . . . . . . . . . . . . . . . . . . . . . . . 325
ar ﺩﻟﻴﻞﺍﻻﺳﺘﻌﻤﺎﻝﺍﻷﺻﻠﻲ . . . . . . . . . . . . . . . . . . . . . . . . . . . . . . . . . . . . . . . . . . 354
ja オリジナル取扱説明書 . . . . . . . . . . . . . . . . . . . . . . . . . . . . . . . . . . . . . . . . . . . . 383
ko 오리지널 사용 설명서 . . . . . . . . . . . . . . . . . . . . . . . . . . . . . . . . . . . . . . . . . . . . . 410
zh 原始操作說明 . . . . . . . . . . . . . . . . . . . . . . . . . . . . . . . . . . . . . . . . . . . . . . . . . . 437
cn 原版操作说明 . . . . . . . . . . . . . . . . . . . . . . . . . . . . . . . . . . . . . . . . . . . . . . . . . . 461

*2204402*
2204402 English 1
Original operating instructions
1 Information about the documentation
1.1 About this documentation
• Read this documentation before initial operation or use. This is a prerequisite for safe, trouble-free
handling and use of the product.
• Observe the safety instructions and warnings in this documentation and on the product.
• Always keep the operating instructions with the product and make sure that the operating instructions
are with the product when it is given to other persons.
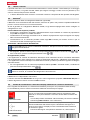
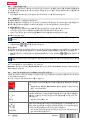
1.2 Explanation of symbols used
1.2.1 Warnings
Warnings alert persons to hazards that occur when handling or using the product. The following signal words
are used:
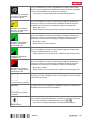
DANGER
DANGER !
▶ Draws attention to imminent danger that will lead to serious personal injury or fatality.
WARNING
WARNING !
▶ Draws attention to a potential threat of danger that can lead to serious injury or fatality.
CAUTION
CAUTION !
▶ Draws attention to a potentially dangerous situation that could lead to slight personal injury or damage
to the equipment or other property.
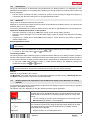
1.2.2 Symbols in the documentation
The following symbols are used in this document:
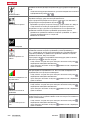
Read the operating instructions before use.
Instructions for use and other useful information
Dealing with recyclable materials
Do not dispose of electric equipment and batteries as household waste
1.2.3 Symbols in the illustrations
The following symbols are used in illustrations:
These numbers refer to the corresponding illustrations found at the beginning of these operating
instructions
The numbering reflects the sequence of operations shown in the illustrations and may deviate
from the steps described in the text
Item reference numbers are used in the overview illustrations and refer to the numbers used in
the product overview section
This symbol is intended to draw special attention to certain points when handling the product.

2 English 2204402
*2204402*
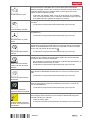
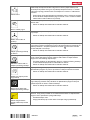
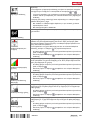
1.3 Product-dependent symbols
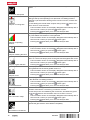
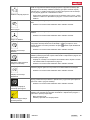
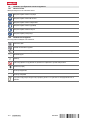
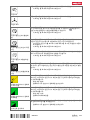
1.3.1 "Must do" symbols
The following "must do" symbols are used:
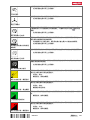
Wear eye protection
Wear a hard hat
Wear ear protection
Wear protective gloves
Wear protective footwear
Wear light respiratory protection
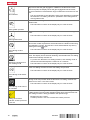
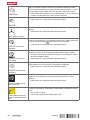
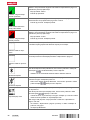
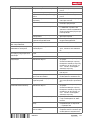
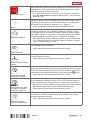
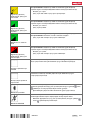
1.3.2 Symbols on the product
The following symbols are used on the product:
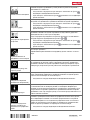
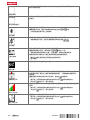
Analysis data
Hole-starting mode
Rated speed under no load
Alternating current
Diameter
Do not transport by crane
Bluetooth (optional)
Locking mechanism opened
Locking mechanism closed
The product supports wireless data transmission compatible with iOS and Android platforms.

*2204402*
2204402 English 3
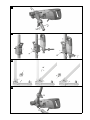
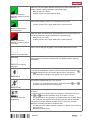
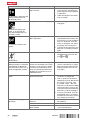
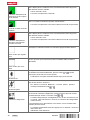
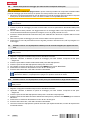
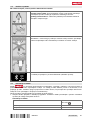
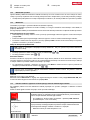
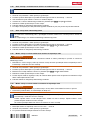
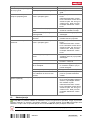
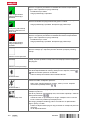
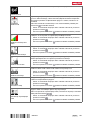
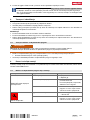
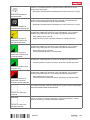
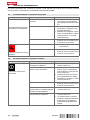
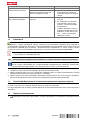
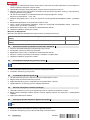
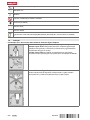
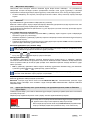
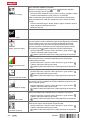
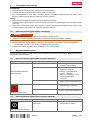
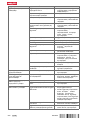
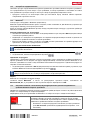
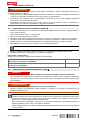
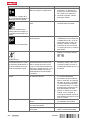
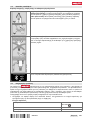
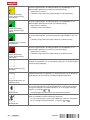
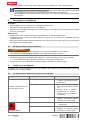
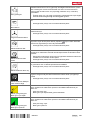
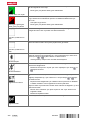
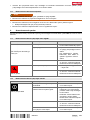
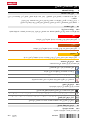
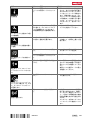
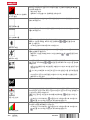
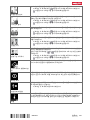
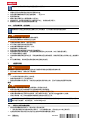
1.4 Information notices
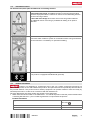
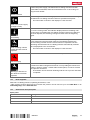
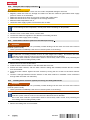
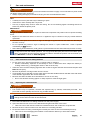
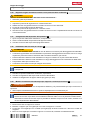
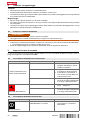
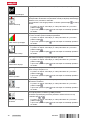
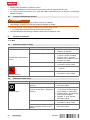
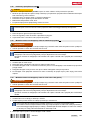
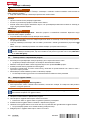
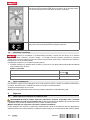
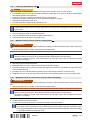
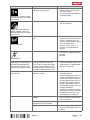
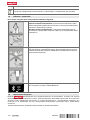
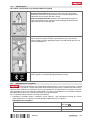
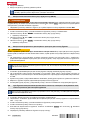
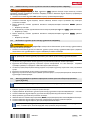
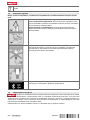
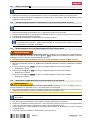
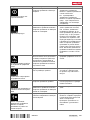
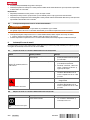
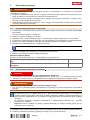
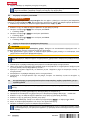
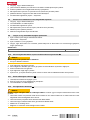
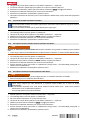
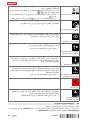
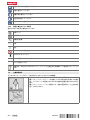
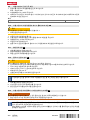
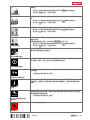
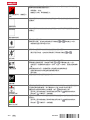
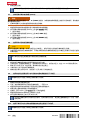
On the drill stand, base plate and diamond core drilling machine
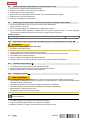
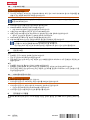
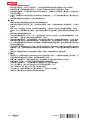
On the drill stand and on the vacuum base plate
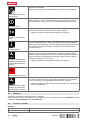
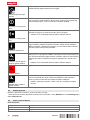
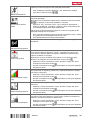
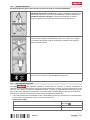
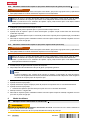
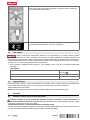
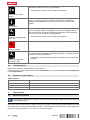
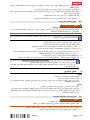
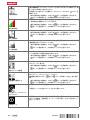
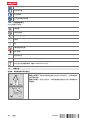
Upper half of the image: An additional means of securing the drill stand
must be employed when the machine is used for horizontal drilling with the
vacuum securing method.
Lower half of the image: Use of the vacuum securing method without
an additional means of securing is prohibited for drilling in an upward
direction.
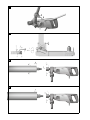
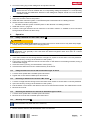
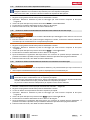
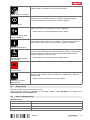
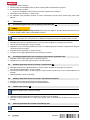
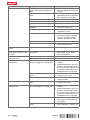
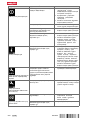
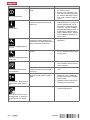
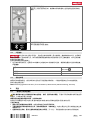
On the diamond core drilling machine
Use of the water collection system in combination with a wet-type industrial
vacuum extractor is mandatory for upward wet drilling.
On the diamond core drilling machine
This product is equipped with Bluetooth (optional).
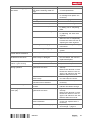
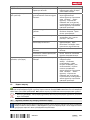
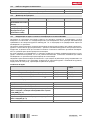
1.5 Product information
products are designed for professional users and only trained, authorized personnel are
permitted to operate, service and maintain the products. This personnel must be specifically informed about
the possible hazards. The product and its ancillary equipment can present hazards if used incorrectly by
untrained personnel or if used not in accordance with the intended use.
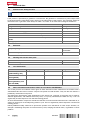
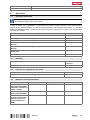
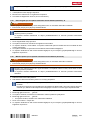
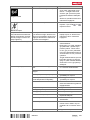
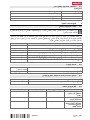
The type designation and serial number are printed on the rating plate.
▶ Write down the serial number in the table below. You will be required to state the product details when
contacting Hilti Service or your local Hilti organization to inquire about the product.
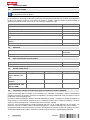
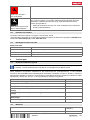
Product information
Type: DD 150-U
DD 150-U
Generation: 03
Serial no.:

4 English 2204402
*2204402*
1.6 Declaration of conformity
We declare, on our sole responsibility, that the product described here complies with the applicable directives
and standards. A copy of the declaration of conformity can be found at the end of this documentation.
The technical documentation is filed here:
Hilti Entwicklungsgesellschaft mbH | Tool Certification | Hiltistrasse 6 | 86916 Kaufering, Germany
2 Safety
2.1 General power tool safety warnings
WARNING Read all safety warnings, instructions, illustrations and specifications provided with this
power tool. Failure to follow all instructions listed below may result in electric shock, fire and/or serious injury.
Save all warnings and instructions for future reference.
The term "power tool" in the warnings refers to your mains-operated (corded) power tool or battery-operated
(cordless) power tool.
Work area safety
▶ Keep work area clean and well lit. Cluttered or dark areas invite accidents.
▶ Do not operate power tools in explosive atmospheres, such as in the presence of flammable
liquids, gases or dust. Power tools create sparks which may ignite the dust or fumes.
▶ Keep children and bystanders away while operating a power tool. Distractions can cause you to lose
control.
Electrical safety
▶ Power tool plugs must match the outlet. Never modify the plug in any way. Do not use any adapter
plugs with earthed (grounded) power tools. Unmodified plugs and matching outlets will reduce risk of
electric shock.
▶ Avoid body contact with earthed or grounded surfaces, such as pipes, radiators, ranges and
refrigerators. There is an increased risk of electric shock if your body is earthed or grounded.
▶ Do not expose power tools to rain or wet conditions. Water entering a power tool will increase the
risk of electric shock.
▶ Do not abuse the cord. Never use the cord for carrying, pulling or unplugging the power tool. Keep
cord away from heat, oil, sharp edges or moving parts. Damaged or entangled cords increase the
risk of electric shock.
▶ When operating a power tool outdoors, use an extension cord suitable for outdoor use. Use of a
cord suitable for outdoor use reduces the risk of electric shock.
▶ If operating a power tool in a damp location is unavoidable, use a residual current device (RCD)
protected supply. Use of an RCD reduces the risk of electric shock.
Personal safety
▶ Stay alert, watch what you are doing and use common sense when operating a power tool. Do
not use a power tool while you are tired or under the influence of drugs, alcohol or medication. A
moment of inattention while operating power tools may result in serious personal injury.
▶ Use personal protective equipment. Always wear eye protection. Protective equipment such as a
dust mask, non-skid safety shoes, hard hat or hearing protection used for appropriate conditions will
reduce personal injuries.
▶ Prevent unintentional starting. Ensure the switch is in the off-position before connecting to power
source and/or battery pack, picking up or carrying the tool. Carrying power tools with your finger on
the switch or energising power tools that have the switch on invites accidents.
▶ Remove any adjusting key or wrench before turning the power tool on. A wrench or a key left
attached to a rotating part of the power tool may result in personal injury.
▶ Do not overreach. Keep proper footing and balance at all times. This enables better control of the
power tool in unexpected situations.
▶ Dress properly. Do not wear loose clothing or jewellery. Keep your hair, clothing and gloves away
from moving parts. Loose clothes, jewellery or long hair can be caught in moving parts.
▶ If devices are provided for the connection of dust extraction and collection facilities, ensure these
are connected and properly used. Use of dust collection can reduce dust-related hazards.
▶ Do not let familiarity gained from frequent use of tools allow you to become complacent and ignore
tool safety principles. A careless action can cause severe injury within a fraction of a second.

*2204402*
2204402 English 5
Power tool use and care
▶ Do not force the power tool. Use the correct power tool for your application. The correct power tool
will do the job better and safer at the rate for which it was designed.
▶ Do not use the power tool if the switch does not turn it on and off. Any power tool that cannot be
controlled with the switch is dangerous and must be repaired.
▶ Disconnect the plug from the power source and/or remove the battery pack, if detachable, from
the power tool before making any adjustments, changing accessories, or storing power tools.
Such preventive safety measures reduce the risk of starting the power tool accidentally.
▶ Store idle power tools out of the reach of children and do not allow persons unfamiliar with the
power tool or these instructions to operate the power tool. Power tools are dangerous in the hands
of untrained users.
▶ Maintain power tools and accessories. Check for misalignment or binding of moving parts,
breakage of parts and any other condition that may affect the power tool’s operation. If damaged,
have the power tool repaired before use. Many accidents are caused by poorly maintained power
tools.
▶ Keep cutting tools sharp and clean. Properly maintained cutting tools with sharp cutting edges are
less likely to bind and are easier to control.
▶ Use the power tool, accessories and tool bits etc. in accordance with these instructions, taking
into account the working conditions and the work to be performed. Use of the power tool for
operations different from those intended could result in a hazardous situation.
▶ Keep handles and grasping surfaces dry, clean and free from oil and grease. Slippery handles and
grasping surfaces do not allow for safe handling and control of the tool in unexpected situations.
Service
▶ Have your power tool serviced by a qualified repair person using only identical replacement parts.
This will ensure that the safety of the power tool is maintained.
2.2 Drill safety warnings
Safety instructions for all operations
▶ Use the auxiliary handle(s). Loss of control can cause personal injury.
▶ Brace the tool properly before use. This tool produces a high output torque and without properly
bracing the tool during operation, loss of control may occur resulting in personal injury.
▶ Hold the power tool by insulated gripping surfaces, when performing an operation where the
cutting accessory may contact hidden wiring or its own cord. Cutting accessory contacting a "live"
wire may make exposed metal parts of the power tool "live" and could give the operator an electric
shock.
Safety instructions for all operations
▶ Use the auxiliary handle(s). Loss of control can cause personal injury.
▶ Hold the power tool by insulated gripping surfaces, when performing an operation where the
cutting accessory may contact hidden wiring or its own cord. Cutting accessory contacting a "live"
wire may make exposed metal parts of the power tool "live" and could give the operator an electric
shock.
Safety instructions when using long drill bits
▶ Never operate at higher speed than the maximum speed rating of the drill bit. At higher speeds,
the bit is likely to bend if allowed to rotate freely without contacting the workpiece, resulting in personal
injury.
▶ Always start drilling at low speed and with the bit tip in contact with the workpiece. At higher
speeds, the bit is likely to bend if allowed to rotate freely without contacting the workpiece, resulting in
personal injury.
▶ Apply pressure only in direct line with the bit and do not apply excessive pressure. Bits can bend
causing breakage or loss of control, resulting in personal injury.
2.3 Diamond drill safety warnings
▶ When performing drilling that requires the use of water, route the water away from the operator’s
work area or use a liquid collection device. Such precautionary measures keep the operator’s work
area dry and reduce the risk of electrical shock.
▶ Operate power tool by insulated grasping surfaces, when performing an operation where the
cutting accessory may contact hidden wiring or its own cord. Cutting accessory contacting a “live”

6 English 2204402
*2204402*
wire may make exposed metal parts of the power tool “live” and could give the operator an electric
shock.
▶ Wear hearing protection when diamond drilling. Exposure to noise can cause hearing loss.
▶ When the bit is jammed, stop applying downward pressure and turn off the tool. Investigate and
take corrective actions to eliminate the cause of the bit jamming.
▶ When restarting a diamond drill in the workpiece check that the bit rotates freely before starting. If
the bit is jammed, it may not start, may overload the tool, or may cause the diamond drill to release from
the workpiece.
▶ When securing the drill stand with anchors and fasteners to the workpiece, ensure that the
anchoring used is capable of holding and restraining the machine during use. If the workpiece is
weak or porous, the anchor may pull out causing the drill stand to release from the workpiece.
▶
When securing the drill stand with a vacuum pad to the workpiece, install the pad on a smooth,
clean, non-porous surface. Do not secure to laminated surfaces such as tiles and composite
coating. If the workpiece is not smooth, flat or well affixed, the pad may pull away from the workpiece.
▶ Ensure there is sufficient vacuum before and during drilling. If the vacuum is insufficient, the pad
may release from the workpiece.
▶ Never perform drilling with the machine secured by the vacuum pad only, except when drilling
downwards. If the vacuum is lost, the pad will release from the workpiece.
▶ When drilling through walls or ceilings, ensure to protect persons and the work area on the other
side. The bit may extend through the hole or the core may fall out on the other side.
▶ When drilling overhead, always use the liquid collection device specified in the instructions. Do
not allow water to flow into the tool. Water entering the power tool will increase the risk of electric
shock.
2.4 Additional safety precautions
Personal safety
▶ Do not tamper with or attempt to make alterations to the product.
▶ The product is not intended for use by debilitated persons who have received no special training.
▶ Check that the side handle is fitted correctly and tightened securely. Always hold the tool with both
hands on the grips provided. In accordance with the applications for which it is designed, the product
produces a high torque. Grip the side handle as far to the outside as possible.
▶ Never use continuous running lock in handheld operation!
▶ Always support the power tool firmly in preparation for use. This power tool produces high torque. If the
power tool is not securely supported at all times during operation loss of control can result and lead to
injuries.
▶ Do not touch rotating parts. Switch the product on only after it is in position at the workpiece. Touching
rotating parts, especially rotating accessory tools, can result in injury.
▶ Avoid skin contact with drilling slurry.
▶ Dust from materials such as lead-based paint, certain types of wood and concrete/masonry/stone
containing quartz, minerals or metal can be harmful to health. Contact with or inhalation of the dust can
cause allergic reactions and/or respiratory or other diseases among operators or bystanders. Certain
kinds of dust such as oakwood and beechwood dust are classified as carcinogenic, especially in
conjunction with additives for wood conditioning (chromate, wood preservative). Only specialists are
permitted to handle material containing asbestos. Use a dust removal system that is as effective
as possible. To achieve a high level of dust collection, use a suitable vacuum extractor of the type
recommended by Hilti for wood dust and/or mineral dust and which is designed for use with this power
tool. Make sure that the workplace is well ventilated. It is advisable to wear a respirator appropriate
for the type of dust generated. Comply with national regulations applicable to the materials you will be
working with.
▶ The diamond core drilling machine and the diamond core bit are heavy. There is a risk of crushing parts
of the body. The user and any other persons in the vicinity must wear of the product while the power
tool is suitable eye protection, a hard hat, ear protection, protective gloves and safety footwear while the
machine is in use.
▶ Improve the blood circulation in your fingers by relaxing your hands and exercising your fingers during
breaks between working.
▶ If work involves break-through, always secure the area on the side opposite where the work is carried
out. Pieces of debris could drop out and/or fall down and injure other persons.
▶ Wear eye protection, protective gloves and, if you are not using a dust removal system, wear light
respiratory protection. Flying fragments present a risk of injury to the body and eyes.

*2204402*
2204402 English 7
Power tool use and care
▶ Make sure that the product is correctly and securely mounted on the drill stand.
▶ Always make sure that an end stop is installed on the drill stand as otherwise the safety-relevant end-stop
function is not implemented.
▶ Make sure that the accessory tools used have a mounting system suitable for use with the to the product
and they are secured in the chuck correctly.
▶ The supply cord, the extension cord and the suction hose away to the rear of the product always. This
helps to avoid tripping over the cord or hose while working.
▶ Do not use damaged supply cord or hoses.
▶ Set up the mount on a firm, smooth and horizontal surface. It will not be possible to guide the power tool
smoothly and safely if the mount can slip or wobble.
▶ Check the nature of the surface. Rough surfaces may reduce holding power. Coatings or composite
materials may pull away from the surface while you are working.
▶ Do not overload the device and do not use it as a substitute for a ladder or platform. Overloading the
device or standing on it may shift its center of gravity to a higher position, causing it to tip over.
▶ When taking a break, lay the diamond core drilling machine down on a suitable surface where it will be
safe. Wait until the diamond core drilling machine has come to a complete stop before you lay it down.
▶ Disconnect the diamond core drilling machine from the electric supply before removing the core or tools.
Electrical safety
▶ Avoid using extension cords with multiple power outlets and the simultaneous use of several products.
▶ The product may be operated only when connected to an adequately rated electric supply equipped with
an earth (ground) conductor.
▶ Before beginning work, check the working area (e.g. using a metal detector) to ensure that no concealed
electric cables or gas and water pipes are present. External metal parts of the product can become live,
for example, when an electric cable is damaged accidentally. This constitutes a serious risk of electric
shock.
▶ Make sure that the supply cord cannot be damaged as the carriage advances.
▶ Never operate the product without the supplied PRCD (for products without PRCD: Never operate the
machine without an isolating transformer). Test the PRCD each time before use.
▶ Check the machine’s supply cord at regular intervals and have it replaced by a qualified specialist if
found to be damaged. If the machine’s supply cord is damaged it must be replaced with a specially
prepared and approved supply cord available from Hilti Customer Service. Check extension cords at
regular intervals and replace them if found to be damaged. Do not touch the supply cord or extension
cord if it is damaged while working. Disconnect the supply cord plug from the power outlet. Damaged
supply cords or extension cords present a risk of electric shock.
▶ Never operate the product when it is dirty or wet. Dust (especially dust from conductive materials) or
dampness adhering to the surface of the machine may, under unfavorable conditions, lead to electric
shock. Dirty or dusty machines should thus be checked by Hilti Service at regular intervals, especially if
used frequently for working on conductive materials.
▶ Tip the diamond core drilling machine in order to empty a filled core bit. Make sure that the water does
not get onto the diamond core drilling machine.
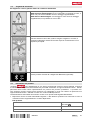
Workplace
▶ Approval must be obtained from the site engineer or architect prior to beginning drilling work. Drilling
work on buildings and other structures may influence the static equilibrium of the structure, especially
when steel reinforcing bars or load-bearing components are cut through.
▶ If the drill stand is not properly fastened, always move the diamond core drilling machine mounted on
the drill stand all the way down in order to prevent the stand from falling over.
▶ Keep the supply cord, extension cord, water hose and vacuum hose away from rotating parts of the
machine.
▶ Use of the water collection system in conjunction with a wet-type industrial vacuum extractor is a
mandatory requirement for wet drilling overhead.
▶ Use of the vacuum securing method without an additional means of fastening is prohibited for drilling in
an upward direction.
▶ For horizontal drilling, the drill stand may not be used without being additionally secured.
▶ In the hand-guided mode, always hold the diamond core drilling machine securely with one hand on the
on/off switch.
▶ Do not switch on the diamond core drilling machine until it is in the desired position.

8 English 2204402
*2204402*
3 Description
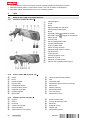
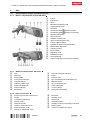
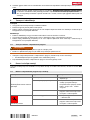
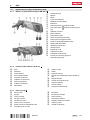
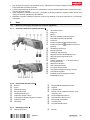
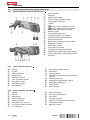
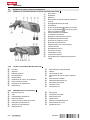
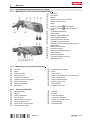
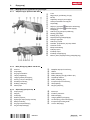
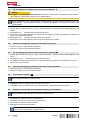
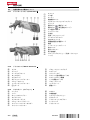
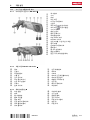
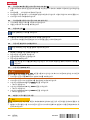
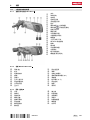
3.1 Parts of the tool and operating controls
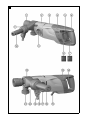
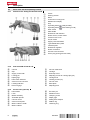
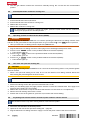
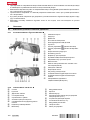
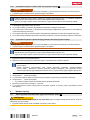
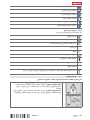
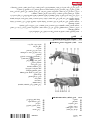
3.1.1 Diamond core drilling machine DD 150-U 1
@
Chuck
;
Gearing section
=
Motor
%
Continuous-running lock
&
Multifunction display
(
Grip
)
Operating button (analysis data)
+
Operating button (hole-starting mode)
§
Gear switch
/
Side handle
:
Water flow rate indicator
∙
Water swivel / suction head
$
Carbon-brush cover
£
On/off switch
|
Supply cord with PRCD
¡
Type identification plate
Q
Interface plate
W
Water flow regulator
E
Water connection
R
Suction hose connector
T
Screw plug (rinsing/suction head)
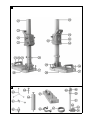
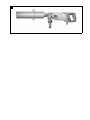
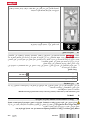
3.1.2 Drill stand DD-ST 150-U CTL 2
Z
Column
U
Grip
I
Supply cord holder
O
Locking pin
P
Depth gage
Ü
Hole center indicator
[
Vacuum hose connector
]
Leveling indicator
Æ
Pressure gage
º
Vacuum relief valve
~
Carriage
A
End stop screw
S
Adjusting screws for carriage play (2x)
D
Carriage lock
F
Leveling screws (4x)
G
Vacuum seal
H
Base plate
J
Adjusting lever
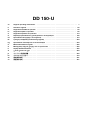
3.1.3 Accessories (optional) 3
K
Hand wheel
L
Lever
Ö
Wheel assembly
Ä
Threaded spindle
†
Column swivel
Œ
Vacuum base plate
Å
Water collector holder
ª
Water collector
¶
Eccentric pin
Y
Machine mount
X
Clamping screw
C
Depth gage
V
Drilling bush adapter
B
Rubber ring
N
Centering ring

*2204402*
2204402 English 9
3.2 Intended use
The product described is an electrically powered diamond core drilling machine. It is designed for hand-
guided wet and dry drilling, for wet drilling with a drilling rig as through-holes and I or blind holes in (reinforced)
mineral substrates.
• The tool may be operated only when connected to a power source providing a voltage and frequency in
compliance with the information given on the type identification plate.
3.3 Bluetooth
®
This product is equipped with Bluetooth (optional).
Bluetooth is a wireless data transfer system by which the two Bluetooth-enabled products can communicate
with each other over a short distance.
To ensure a stable Bluetooth connection there must be a clear line of sight between the connected devices.
Application of Bluetooth functions on this product:
• Automatic switching on and off of a Hilti water supply system during drilling operation.
• Displaying service messages of a connected water supply system on display of the diamond core drilling
machine.
• Connection to a mobile device via the Hilti Connect App for service functions and transfer of product-
related analysis data.
Switching Bluetooth on/off
Hilti products are delivered with Bluetooth turned off. On first start up, Bluetooth is switched on
automatically.
•
To switch off, press and hold down the buttons and simultaneously for at least 10 seconds.
•
To switch on, press the buttons and simultaneously.
Connecting products
The pairing with the water treatment system is sustained until the diamond core drilling machine is paired to
anotherwater treatmentsystem, or Bluetooth is switchedoff. Pairing is also sustained even when the products
are switched off and then on again; paired products always automatically re-establish their paired connection.
• To pair with a Hilti water treatment system or mobile terminal device, with Bluetooth switched on
simultaneously press the and buttons.
The time frame for the connection to a different diamond core drilling machine is approximately 2
minutes. When the 2 minutes have expired, the connection process will be canceled.
License
Bluetooth is not available in all countries.
The Bluetooth
®
word mark and the logo are registered trademarks and the property of Bluetooth SIG, Inc.
and Hilti has been granted a license to use these trademarks.
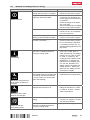
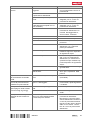
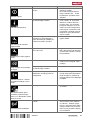
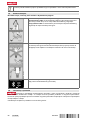
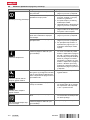
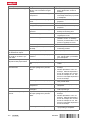
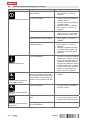
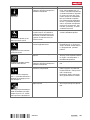
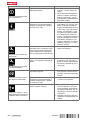
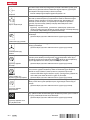
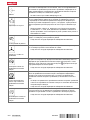
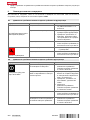
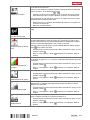
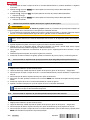
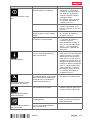
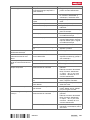
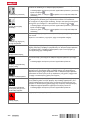
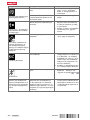
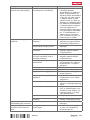
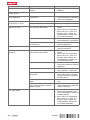
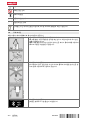
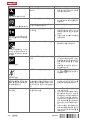
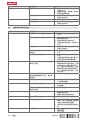
3.4 Display symbols and explanation of the multifunction display on the diamond core drilling
machine
For the following information to be displayed, the diamond core drilling machine must be ready for operation
(plugged in and PRCD switched on).
The displays may vary depending on the gear selection and the type of application.
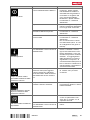
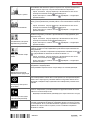
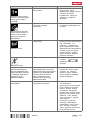
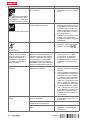
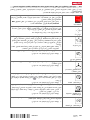
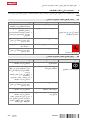
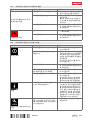
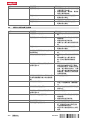
Starting screen
The start screen is displayed when the diamond core drilling machine is
supplied with power. The Bluetooth status, the personalized name and the
serial number of the diamond core drilling machine are shown on the start
screen.
• You can change the product name that appears on the screen in the
Hilti Connect app (default: 'Your name here').
Spirit level
The diamond core drilling machine is not switched on. The display helps
you to level the system and to align the drill stand when drilling at an angle.
The display shows the alignment of the diamond core drilling machine
symbolically and in degrees.
• Angular accuracy at room temperature: ±2°

10 English 2204402
*2204402*
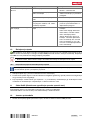
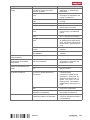
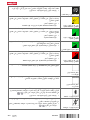
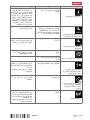
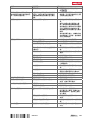
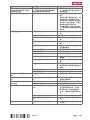
Gear indicator
The diamond core drilling machine is running under no load. The display
helps ensure that the gear engaged is suitable for the diamond core bit
used. At top left, the display shows the gear engaged and in the center,
the recommended core bit diameter range in millimeters and inches for this
gear.
• The recommended core bit diameter range varies depending on whether
the diamond core drilling machine is operated in the hand-guided or
stand-guided mode.
Hand-guided operation
The continuous-running lock is deactivated. The device is in the hand-
guided mode.
• This information is shown in the display only for a few seconds.
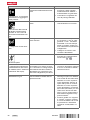
Stand-guided mode
The continuous-running lock is activated. The device is in the stand-guided
mode.
• This information is shown in the display only for a few seconds.
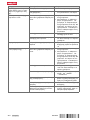
Hole-starting mode is
active
The diamond core drilling machine is switched off or running under no load.
This function makes it possible to start holes with low vibration when using
large-diameter core bits. This function can be deactivated at any time by
pressing the button again.
• This information is shown in the display only for a few seconds.
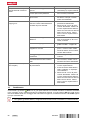
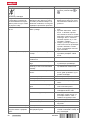
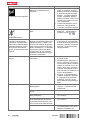
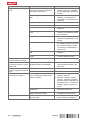
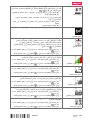
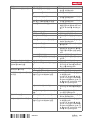
Remaining running time in
hole-starting mode
The diamond core drilling machine is drilling and the hole-starting mode is
active. The display shows the time remaining until the diamond core drilling
machine automatically switches off.
• To protect the diamond core drilling machine, hole-starting mode is
switched off automatically after a maximum of 2 minutes.
This information is shown in the display only for a few seconds.
Hole-starting mode deacti-
vated
Hole-starting mode has been deactivated. Speed and power of the dia-
mond core drilling machine increase and drilling can proceed
• This information is shown in the display only for a few seconds.
Hole-starting mode cannot
be activated
The diamond core drilling machine is drilling. The button for activating hole-
starting mode was pressed while the diamond core drilling machine was
under load or was in cool-down mode.
• This information is shown in the display only for a few seconds.
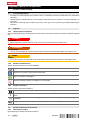
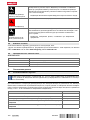
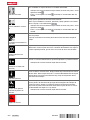
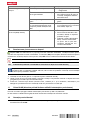
Drilling performance
indicator: Contact pressure
is too low
The diamond core drilling machine is drilling and the hole-starting mode
is not activated. The information displayed helps ensure that the diamond
core drilling machine is being operated in the optimal range.
• Background color: Yellow.
Contact pressure is too low. Increase the contact pressure.

*2204402*
2204402 English 11
Drilling performance
indicator: Optimum contact
pressure
The diamond core drilling machine is drilling and the hole-starting mode is
not active. The information displayed helps ensure that the diamond core
drilling machine is being operated in the optimal range.
• Background color: Green.
Contact pressure is at the optimum level.
Rated current limit has
been exceeded
The diamond core drilling machine is drilling and the hole-starting mode is
not activated. Rated current has exceeded the limit of 20 A.
• Contact pressure is too high. Reduce the contact pressure.
Drilling performance
indicator: Contact pressure
is too high
The diamond core drilling machine is drilling and the hole-starting mode
is not activated. The information displayed helps ensure that the diamond
core drilling machine is being operated in the optimal range.
• Background color: Red.
Contact pressure is too high. Reduce the contact pressure.
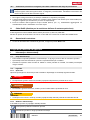
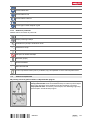
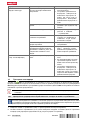
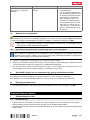
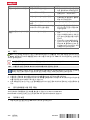
Status bar for information
The status bar displays various information regarding the machine’s current
status, such as the gear engaged or the activated hole-starting mode.
Status bar for warning
messages
The status bar displays various warnings regarding the tool's current
status which do not result in the diamond core drilling machine stopping
immediately.
Bluetooth ON
Bluetooth is activated in the basic setting.
To switch off the Bluetooth function, press and hold down the buttons
and simultaneously for 10 seconds with the motor switched off.
• This information is shown in the display only for a few seconds.
Bluetooth OFF
Bluetooth is deactivated. The diamond core drilling machine cannot be
connected to additional device or accessories.
•
To switch on the Bluetooth function, press the buttons and
simultaneously with the motor switched off.
Connection has been
established
The diamond core drilling machine is ready to connect to another device or
accessory.
To start the process of establishing the connection, simultaneously press
the and buttons and hold them down for at least 1 second.
• The time frame for the connection to another device is 2 minutes. When
the 2 minutes have expired, the connection process will be canceled.
The paired connection between another device or accessory and the
diamond core drilling machine is sustained until:
• The diamond core drilling machine is paired to a device or accessory of
the same type.
• Bluetooth is switched off.

12 English 2204402
*2204402*
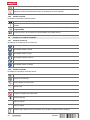
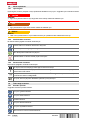
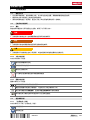
Connection interrupted
An existing Bluetooth connected to a device or accessory has been inter-
rupted.
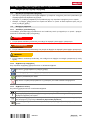
Analysis of running time
The display shows drilling time (diamond core drilling machine actually
drilling) at the top and operating hours (diamond core drilling machine
switched on) at the bottom. Both figures are shown in hours, minutes and
seconds.
To reset drilling time and all other analysis data, press the button and
hold it down for a few seconds.
• The information shown on the display disappears automatically after a
few seconds or when you press the button again.
•
Pressing the again takes you to the next analysis data.
Analysis of operating
behavior
This display shows contact pressure during drilling time as a percentage
(%). This enables user behavior to be optimized.
• The information shown on the display disappears automatically after a
few seconds or when you press the button again.
•
Pressing the again takes you to the next analysis data.
Analysis of drilling direction
This display shows an evaluation of the drilling directions in %.
• The information shown on the display disappears automatically after a
few seconds or when you press the button again.
•
Pressing the again takes you to the next analysis data.
Analysis of gear selection
This display shows an evaluation of the duration of use of the respective
gear in %. The arrow always points to the gear with the highest rate of use.
• The information shown on the display disappears automatically after a
few seconds or when you press the button again.
•
Pressing the again takes you to the next analysis data.
Analysis of use
This display shows the use of the diamond core drilling machine in the
hand-guided and in the stand-guided mode in %.
• The information shown on the display disappears automatically after a
few seconds or when you press the button again.
•
Pressing the again takes you to the next analysis data.
Connected devices
This display provides an overview of all devices and accessories connected
to the diamond core drilling machine.
• The information shown on the display disappears automatically after a
few seconds or when you press the button again.
•
Pressing the again takes you to the next analysis data.
Start connection setup
Start connection setup process at the diamond core drilling machine first
and then at the device or accessory you want to connect.
To start the process of establishing the connection, simultaneously press
the and buttons and hold them down for at least 1 second.
• The information shown on the display disappears automatically after a
few seconds or when you press the button again.
•
Pressing the again takes you to the next analysis data.
Gear selector not latched
The gear selector is in an intermediate position or is not correctly latched.
Operate the gear selector until it latches completely.
Sayfa yükleniyor ...
Sayfa yükleniyor ...
Sayfa yükleniyor ...
Sayfa yükleniyor ...
Sayfa yükleniyor ...
Sayfa yükleniyor ...
Sayfa yükleniyor ...
Sayfa yükleniyor ...
Sayfa yükleniyor ...
Sayfa yükleniyor ...
Sayfa yükleniyor ...
Sayfa yükleniyor ...
Sayfa yükleniyor ...
Sayfa yükleniyor ...
Sayfa yükleniyor ...
Sayfa yükleniyor ...
Sayfa yükleniyor ...
Sayfa yükleniyor ...
Sayfa yükleniyor ...
Sayfa yükleniyor ...
Sayfa yükleniyor ...
Sayfa yükleniyor ...
Sayfa yükleniyor ...
Sayfa yükleniyor ...
Sayfa yükleniyor ...
Sayfa yükleniyor ...
Sayfa yükleniyor ...
Sayfa yükleniyor ...
Sayfa yükleniyor ...
Sayfa yükleniyor ...
Sayfa yükleniyor ...
Sayfa yükleniyor ...
Sayfa yükleniyor ...
Sayfa yükleniyor ...
Sayfa yükleniyor ...
Sayfa yükleniyor ...
Sayfa yükleniyor ...
Sayfa yükleniyor ...
Sayfa yükleniyor ...
Sayfa yükleniyor ...
Sayfa yükleniyor ...
Sayfa yükleniyor ...
Sayfa yükleniyor ...
Sayfa yükleniyor ...
Sayfa yükleniyor ...
Sayfa yükleniyor ...
Sayfa yükleniyor ...
Sayfa yükleniyor ...
Sayfa yükleniyor ...
Sayfa yükleniyor ...
Sayfa yükleniyor ...
Sayfa yükleniyor ...
Sayfa yükleniyor ...
Sayfa yükleniyor ...
Sayfa yükleniyor ...
Sayfa yükleniyor ...
Sayfa yükleniyor ...
Sayfa yükleniyor ...
Sayfa yükleniyor ...
Sayfa yükleniyor ...
Sayfa yükleniyor ...
Sayfa yükleniyor ...
Sayfa yükleniyor ...
Sayfa yükleniyor ...
Sayfa yükleniyor ...
Sayfa yükleniyor ...
Sayfa yükleniyor ...
Sayfa yükleniyor ...
Sayfa yükleniyor ...
Sayfa yükleniyor ...
Sayfa yükleniyor ...
Sayfa yükleniyor ...
Sayfa yükleniyor ...
Sayfa yükleniyor ...
Sayfa yükleniyor ...
Sayfa yükleniyor ...
Sayfa yükleniyor ...
Sayfa yükleniyor ...
Sayfa yükleniyor ...
Sayfa yükleniyor ...
Sayfa yükleniyor ...
Sayfa yükleniyor ...
Sayfa yükleniyor ...
Sayfa yükleniyor ...
Sayfa yükleniyor ...
Sayfa yükleniyor ...
Sayfa yükleniyor ...
Sayfa yükleniyor ...
Sayfa yükleniyor ...
Sayfa yükleniyor ...
Sayfa yükleniyor ...
Sayfa yükleniyor ...
Sayfa yükleniyor ...
Sayfa yükleniyor ...
Sayfa yükleniyor ...
Sayfa yükleniyor ...
Sayfa yükleniyor ...
Sayfa yükleniyor ...
Sayfa yükleniyor ...
Sayfa yükleniyor ...
Sayfa yükleniyor ...
Sayfa yükleniyor ...
Sayfa yükleniyor ...
Sayfa yükleniyor ...
Sayfa yükleniyor ...
Sayfa yükleniyor ...
Sayfa yükleniyor ...
Sayfa yükleniyor ...
Sayfa yükleniyor ...
Sayfa yükleniyor ...
Sayfa yükleniyor ...
Sayfa yükleniyor ...
Sayfa yükleniyor ...
Sayfa yükleniyor ...
Sayfa yükleniyor ...
Sayfa yükleniyor ...
Sayfa yükleniyor ...
Sayfa yükleniyor ...
Sayfa yükleniyor ...
Sayfa yükleniyor ...
Sayfa yükleniyor ...
Sayfa yükleniyor ...
Sayfa yükleniyor ...
Sayfa yükleniyor ...
Sayfa yükleniyor ...
Sayfa yükleniyor ...
Sayfa yükleniyor ...
Sayfa yükleniyor ...
Sayfa yükleniyor ...
Sayfa yükleniyor ...
Sayfa yükleniyor ...
Sayfa yükleniyor ...
Sayfa yükleniyor ...
Sayfa yükleniyor ...
Sayfa yükleniyor ...
Sayfa yükleniyor ...
Sayfa yükleniyor ...
Sayfa yükleniyor ...
Sayfa yükleniyor ...
Sayfa yükleniyor ...
Sayfa yükleniyor ...
Sayfa yükleniyor ...
Sayfa yükleniyor ...
Sayfa yükleniyor ...
Sayfa yükleniyor ...
Sayfa yükleniyor ...
Sayfa yükleniyor ...
Sayfa yükleniyor ...
Sayfa yükleniyor ...
Sayfa yükleniyor ...
Sayfa yükleniyor ...
Sayfa yükleniyor ...
Sayfa yükleniyor ...
Sayfa yükleniyor ...
Sayfa yükleniyor ...
Sayfa yükleniyor ...
Sayfa yükleniyor ...
Sayfa yükleniyor ...
Sayfa yükleniyor ...
Sayfa yükleniyor ...
Sayfa yükleniyor ...
Sayfa yükleniyor ...
Sayfa yükleniyor ...
Sayfa yükleniyor ...
Sayfa yükleniyor ...
Sayfa yükleniyor ...
Sayfa yükleniyor ...
Sayfa yükleniyor ...
Sayfa yükleniyor ...
Sayfa yükleniyor ...
Sayfa yükleniyor ...
Sayfa yükleniyor ...
Sayfa yükleniyor ...
Sayfa yükleniyor ...
Sayfa yükleniyor ...
Sayfa yükleniyor ...
Sayfa yükleniyor ...
Sayfa yükleniyor ...
Sayfa yükleniyor ...
Sayfa yükleniyor ...
Sayfa yükleniyor ...
Sayfa yükleniyor ...
Sayfa yükleniyor ...
Sayfa yükleniyor ...
Sayfa yükleniyor ...
Sayfa yükleniyor ...
Sayfa yükleniyor ...
Sayfa yükleniyor ...
Sayfa yükleniyor ...
Sayfa yükleniyor ...
Sayfa yükleniyor ...
Sayfa yükleniyor ...
Sayfa yükleniyor ...
Sayfa yükleniyor ...
Sayfa yükleniyor ...
Sayfa yükleniyor ...
Sayfa yükleniyor ...
Sayfa yükleniyor ...
Sayfa yükleniyor ...
Sayfa yükleniyor ...
Sayfa yükleniyor ...
Sayfa yükleniyor ...
Sayfa yükleniyor ...
Sayfa yükleniyor ...
Sayfa yükleniyor ...
Sayfa yükleniyor ...
Sayfa yükleniyor ...
Sayfa yükleniyor ...
Sayfa yükleniyor ...
Sayfa yükleniyor ...
Sayfa yükleniyor ...
Sayfa yükleniyor ...
Sayfa yükleniyor ...
Sayfa yükleniyor ...
Sayfa yükleniyor ...
Sayfa yükleniyor ...
Sayfa yükleniyor ...
Sayfa yükleniyor ...
Sayfa yükleniyor ...
Sayfa yükleniyor ...
Sayfa yükleniyor ...
Sayfa yükleniyor ...
Sayfa yükleniyor ...
Sayfa yükleniyor ...
Sayfa yükleniyor ...
Sayfa yükleniyor ...
Sayfa yükleniyor ...
Sayfa yükleniyor ...
Sayfa yükleniyor ...
Sayfa yükleniyor ...
Sayfa yükleniyor ...
Sayfa yükleniyor ...
Sayfa yükleniyor ...
Sayfa yükleniyor ...
Sayfa yükleniyor ...
Sayfa yükleniyor ...
Sayfa yükleniyor ...
Sayfa yükleniyor ...
Sayfa yükleniyor ...
Sayfa yükleniyor ...
Sayfa yükleniyor ...
Sayfa yükleniyor ...
Sayfa yükleniyor ...
Sayfa yükleniyor ...
Sayfa yükleniyor ...
Sayfa yükleniyor ...
Sayfa yükleniyor ...
Sayfa yükleniyor ...
Sayfa yükleniyor ...
Sayfa yükleniyor ...
Sayfa yükleniyor ...
Sayfa yükleniyor ...
Sayfa yükleniyor ...
Sayfa yükleniyor ...
Sayfa yükleniyor ...
Sayfa yükleniyor ...
Sayfa yükleniyor ...
Sayfa yükleniyor ...
Sayfa yükleniyor ...
Sayfa yükleniyor ...
Sayfa yükleniyor ...
Sayfa yükleniyor ...
Sayfa yükleniyor ...
Sayfa yükleniyor ...
Sayfa yükleniyor ...
Sayfa yükleniyor ...
Sayfa yükleniyor ...
Sayfa yükleniyor ...
Sayfa yükleniyor ...
Sayfa yükleniyor ...
Sayfa yükleniyor ...
Sayfa yükleniyor ...
Sayfa yükleniyor ...
Sayfa yükleniyor ...
Sayfa yükleniyor ...
Sayfa yükleniyor ...
Sayfa yükleniyor ...
Sayfa yükleniyor ...
Sayfa yükleniyor ...
Sayfa yükleniyor ...
Sayfa yükleniyor ...
Sayfa yükleniyor ...
Sayfa yükleniyor ...
Sayfa yükleniyor ...
Sayfa yükleniyor ...
Sayfa yükleniyor ...
Sayfa yükleniyor ...
Sayfa yükleniyor ...
Sayfa yükleniyor ...
Sayfa yükleniyor ...
Sayfa yükleniyor ...
Sayfa yükleniyor ...
Sayfa yükleniyor ...
Sayfa yükleniyor ...
Sayfa yükleniyor ...
Sayfa yükleniyor ...
Sayfa yükleniyor ...
Sayfa yükleniyor ...
Sayfa yükleniyor ...
Sayfa yükleniyor ...
Sayfa yükleniyor ...
Sayfa yükleniyor ...
Sayfa yükleniyor ...
Sayfa yükleniyor ...
Sayfa yükleniyor ...
Sayfa yükleniyor ...
Sayfa yükleniyor ...
Sayfa yükleniyor ...
Sayfa yükleniyor ...
Sayfa yükleniyor ...
Sayfa yükleniyor ...
Sayfa yükleniyor ...
Sayfa yükleniyor ...
Sayfa yükleniyor ...
Sayfa yükleniyor ...
Sayfa yükleniyor ...
Sayfa yükleniyor ...
Sayfa yükleniyor ...
Sayfa yükleniyor ...
Sayfa yükleniyor ...
Sayfa yükleniyor ...
Sayfa yükleniyor ...
Sayfa yükleniyor ...
Sayfa yükleniyor ...
Sayfa yükleniyor ...
Sayfa yükleniyor ...
Sayfa yükleniyor ...
Sayfa yükleniyor ...
Sayfa yükleniyor ...
Sayfa yükleniyor ...
Sayfa yükleniyor ...
Sayfa yükleniyor ...
Sayfa yükleniyor ...
Sayfa yükleniyor ...
Sayfa yükleniyor ...
Sayfa yükleniyor ...
Sayfa yükleniyor ...
Sayfa yükleniyor ...
Sayfa yükleniyor ...
Sayfa yükleniyor ...
Sayfa yükleniyor ...
Sayfa yükleniyor ...
Sayfa yükleniyor ...
Sayfa yükleniyor ...
Sayfa yükleniyor ...
Sayfa yükleniyor ...
Sayfa yükleniyor ...
Sayfa yükleniyor ...
Sayfa yükleniyor ...
Sayfa yükleniyor ...
Sayfa yükleniyor ...
Sayfa yükleniyor ...
Sayfa yükleniyor ...
Sayfa yükleniyor ...
Sayfa yükleniyor ...
Sayfa yükleniyor ...
Sayfa yükleniyor ...
Sayfa yükleniyor ...
Sayfa yükleniyor ...
Sayfa yükleniyor ...
Sayfa yükleniyor ...
Sayfa yükleniyor ...
Sayfa yükleniyor ...
Sayfa yükleniyor ...
Sayfa yükleniyor ...
Sayfa yükleniyor ...
Sayfa yükleniyor ...
Sayfa yükleniyor ...
Sayfa yükleniyor ...
Sayfa yükleniyor ...
Sayfa yükleniyor ...
Sayfa yükleniyor ...
Sayfa yükleniyor ...
Sayfa yükleniyor ...
Sayfa yükleniyor ...
Sayfa yükleniyor ...
Sayfa yükleniyor ...
Sayfa yükleniyor ...
Sayfa yükleniyor ...
Sayfa yükleniyor ...
Sayfa yükleniyor ...
Sayfa yükleniyor ...
Sayfa yükleniyor ...
Sayfa yükleniyor ...
Sayfa yükleniyor ...
Sayfa yükleniyor ...
Sayfa yükleniyor ...
Sayfa yükleniyor ...
Sayfa yükleniyor ...
Sayfa yükleniyor ...
Sayfa yükleniyor ...
Sayfa yükleniyor ...
Sayfa yükleniyor ...
Sayfa yükleniyor ...
Sayfa yükleniyor ...
Sayfa yükleniyor ...
Sayfa yükleniyor ...
Sayfa yükleniyor ...
Sayfa yükleniyor ...
Sayfa yükleniyor ...
Sayfa yükleniyor ...
Sayfa yükleniyor ...
Sayfa yükleniyor ...
Sayfa yükleniyor ...
Sayfa yükleniyor ...
Sayfa yükleniyor ...
Sayfa yükleniyor ...
Sayfa yükleniyor ...
Sayfa yükleniyor ...
Sayfa yükleniyor ...
Sayfa yükleniyor ...
Sayfa yükleniyor ...
Sayfa yükleniyor ...
Sayfa yükleniyor ...
Sayfa yükleniyor ...
Sayfa yükleniyor ...
Sayfa yükleniyor ...
Sayfa yükleniyor ...
Sayfa yükleniyor ...
Sayfa yükleniyor ...
Sayfa yükleniyor ...
Sayfa yükleniyor ...
Sayfa yükleniyor ...
Sayfa yükleniyor ...
Sayfa yükleniyor ...
Sayfa yükleniyor ...
Sayfa yükleniyor ...
Sayfa yükleniyor ...
Sayfa yükleniyor ...
Sayfa yükleniyor ...
Sayfa yükleniyor ...
Sayfa yükleniyor ...
Sayfa yükleniyor ...
Sayfa yükleniyor ...
Sayfa yükleniyor ...
Sayfa yükleniyor ...
Sayfa yükleniyor ...
Sayfa yükleniyor ...
Sayfa yükleniyor ...
Sayfa yükleniyor ...
Sayfa yükleniyor ...
Sayfa yükleniyor ...
Sayfa yükleniyor ...
Sayfa yükleniyor ...
Sayfa yükleniyor ...
Sayfa yükleniyor ...
Sayfa yükleniyor ...
Sayfa yükleniyor ...
Sayfa yükleniyor ...
Sayfa yükleniyor ...
Sayfa yükleniyor ...
Sayfa yükleniyor ...
Sayfa yükleniyor ...
Sayfa yükleniyor ...
Sayfa yükleniyor ...
Sayfa yükleniyor ...
Sayfa yükleniyor ...
Sayfa yükleniyor ...
Sayfa yükleniyor ...
Sayfa yükleniyor ...
Sayfa yükleniyor ...
Sayfa yükleniyor ...
Sayfa yükleniyor ...
Sayfa yükleniyor ...
Sayfa yükleniyor ...
Sayfa yükleniyor ...
Sayfa yükleniyor ...
Sayfa yükleniyor ...
Sayfa yükleniyor ...
Sayfa yükleniyor ...
Sayfa yükleniyor ...
Sayfa yükleniyor ...
Sayfa yükleniyor ...
Sayfa yükleniyor ...
Sayfa yükleniyor ...
Sayfa yükleniyor ...
-
 1
1
-
 2
2
-
 3
3
-
 4
4
-
 5
5
-
 6
6
-
 7
7
-
 8
8
-
 9
9
-
 10
10
-
 11
11
-
 12
12
-
 13
13
-
 14
14
-
 15
15
-
 16
16
-
 17
17
-
 18
18
-
 19
19
-
 20
20
-
 21
21
-
 22
22
-
 23
23
-
 24
24
-
 25
25
-
 26
26
-
 27
27
-
 28
28
-
 29
29
-
 30
30
-
 31
31
-
 32
32
-
 33
33
-
 34
34
-
 35
35
-
 36
36
-
 37
37
-
 38
38
-
 39
39
-
 40
40
-
 41
41
-
 42
42
-
 43
43
-
 44
44
-
 45
45
-
 46
46
-
 47
47
-
 48
48
-
 49
49
-
 50
50
-
 51
51
-
 52
52
-
 53
53
-
 54
54
-
 55
55
-
 56
56
-
 57
57
-
 58
58
-
 59
59
-
 60
60
-
 61
61
-
 62
62
-
 63
63
-
 64
64
-
 65
65
-
 66
66
-
 67
67
-
 68
68
-
 69
69
-
 70
70
-
 71
71
-
 72
72
-
 73
73
-
 74
74
-
 75
75
-
 76
76
-
 77
77
-
 78
78
-
 79
79
-
 80
80
-
 81
81
-
 82
82
-
 83
83
-
 84
84
-
 85
85
-
 86
86
-
 87
87
-
 88
88
-
 89
89
-
 90
90
-
 91
91
-
 92
92
-
 93
93
-
 94
94
-
 95
95
-
 96
96
-
 97
97
-
 98
98
-
 99
99
-
 100
100
-
 101
101
-
 102
102
-
 103
103
-
 104
104
-
 105
105
-
 106
106
-
 107
107
-
 108
108
-
 109
109
-
 110
110
-
 111
111
-
 112
112
-
 113
113
-
 114
114
-
 115
115
-
 116
116
-
 117
117
-
 118
118
-
 119
119
-
 120
120
-
 121
121
-
 122
122
-
 123
123
-
 124
124
-
 125
125
-
 126
126
-
 127
127
-
 128
128
-
 129
129
-
 130
130
-
 131
131
-
 132
132
-
 133
133
-
 134
134
-
 135
135
-
 136
136
-
 137
137
-
 138
138
-
 139
139
-
 140
140
-
 141
141
-
 142
142
-
 143
143
-
 144
144
-
 145
145
-
 146
146
-
 147
147
-
 148
148
-
 149
149
-
 150
150
-
 151
151
-
 152
152
-
 153
153
-
 154
154
-
 155
155
-
 156
156
-
 157
157
-
 158
158
-
 159
159
-
 160
160
-
 161
161
-
 162
162
-
 163
163
-
 164
164
-
 165
165
-
 166
166
-
 167
167
-
 168
168
-
 169
169
-
 170
170
-
 171
171
-
 172
172
-
 173
173
-
 174
174
-
 175
175
-
 176
176
-
 177
177
-
 178
178
-
 179
179
-
 180
180
-
 181
181
-
 182
182
-
 183
183
-
 184
184
-
 185
185
-
 186
186
-
 187
187
-
 188
188
-
 189
189
-
 190
190
-
 191
191
-
 192
192
-
 193
193
-
 194
194
-
 195
195
-
 196
196
-
 197
197
-
 198
198
-
 199
199
-
 200
200
-
 201
201
-
 202
202
-
 203
203
-
 204
204
-
 205
205
-
 206
206
-
 207
207
-
 208
208
-
 209
209
-
 210
210
-
 211
211
-
 212
212
-
 213
213
-
 214
214
-
 215
215
-
 216
216
-
 217
217
-
 218
218
-
 219
219
-
 220
220
-
 221
221
-
 222
222
-
 223
223
-
 224
224
-
 225
225
-
 226
226
-
 227
227
-
 228
228
-
 229
229
-
 230
230
-
 231
231
-
 232
232
-
 233
233
-
 234
234
-
 235
235
-
 236
236
-
 237
237
-
 238
238
-
 239
239
-
 240
240
-
 241
241
-
 242
242
-
 243
243
-
 244
244
-
 245
245
-
 246
246
-
 247
247
-
 248
248
-
 249
249
-
 250
250
-
 251
251
-
 252
252
-
 253
253
-
 254
254
-
 255
255
-
 256
256
-
 257
257
-
 258
258
-
 259
259
-
 260
260
-
 261
261
-
 262
262
-
 263
263
-
 264
264
-
 265
265
-
 266
266
-
 267
267
-
 268
268
-
 269
269
-
 270
270
-
 271
271
-
 272
272
-
 273
273
-
 274
274
-
 275
275
-
 276
276
-
 277
277
-
 278
278
-
 279
279
-
 280
280
-
 281
281
-
 282
282
-
 283
283
-
 284
284
-
 285
285
-
 286
286
-
 287
287
-
 288
288
-
 289
289
-
 290
290
-
 291
291
-
 292
292
-
 293
293
-
 294
294
-
 295
295
-
 296
296
-
 297
297
-
 298
298
-
 299
299
-
 300
300
-
 301
301
-
 302
302
-
 303
303
-
 304
304
-
 305
305
-
 306
306
-
 307
307
-
 308
308
-
 309
309
-
 310
310
-
 311
311
-
 312
312
-
 313
313
-
 314
314
-
 315
315
-
 316
316
-
 317
317
-
 318
318
-
 319
319
-
 320
320
-
 321
321
-
 322
322
-
 323
323
-
 324
324
-
 325
325
-
 326
326
-
 327
327
-
 328
328
-
 329
329
-
 330
330
-
 331
331
-
 332
332
-
 333
333
-
 334
334
-
 335
335
-
 336
336
-
 337
337
-
 338
338
-
 339
339
-
 340
340
-
 341
341
-
 342
342
-
 343
343
-
 344
344
-
 345
345
-
 346
346
-
 347
347
-
 348
348
-
 349
349
-
 350
350
-
 351
351
-
 352
352
-
 353
353
-
 354
354
-
 355
355
-
 356
356
-
 357
357
-
 358
358
-
 359
359
-
 360
360
-
 361
361
-
 362
362
-
 363
363
-
 364
364
-
 365
365
-
 366
366
-
 367
367
-
 368
368
-
 369
369
-
 370
370
-
 371
371
-
 372
372
-
 373
373
-
 374
374
-
 375
375
-
 376
376
-
 377
377
-
 378
378
-
 379
379
-
 380
380
-
 381
381
-
 382
382
-
 383
383
-
 384
384
-
 385
385
-
 386
386
-
 387
387
-
 388
388
-
 389
389
-
 390
390
-
 391
391
-
 392
392
-
 393
393
-
 394
394
-
 395
395
-
 396
396
-
 397
397
-
 398
398
-
 399
399
-
 400
400
-
 401
401
-
 402
402
-
 403
403
-
 404
404
-
 405
405
-
 406
406
-
 407
407
-
 408
408
-
 409
409
-
 410
410
-
 411
411
-
 412
412
-
 413
413
-
 414
414
-
 415
415
-
 416
416
-
 417
417
-
 418
418
-
 419
419
-
 420
420
-
 421
421
-
 422
422
-
 423
423
-
 424
424
-
 425
425
-
 426
426
-
 427
427
-
 428
428
-
 429
429
-
 430
430
-
 431
431
-
 432
432
-
 433
433
-
 434
434
-
 435
435
-
 436
436
-
 437
437
-
 438
438
-
 439
439
-
 440
440
-
 441
441
-
 442
442
-
 443
443
-
 444
444
-
 445
445
-
 446
446
-
 447
447
-
 448
448
-
 449
449
-
 450
450
-
 451
451
-
 452
452
-
 453
453
-
 454
454
-
 455
455
-
 456
456
-
 457
457
-
 458
458
-
 459
459
-
 460
460
-
 461
461
-
 462
462
-
 463
463
-
 464
464
-
 465
465
-
 466
466
-
 467
467
-
 468
468
-
 469
469
-
 470
470
-
 471
471
-
 472
472
-
 473
473
-
 474
474
-
 475
475
-
 476
476
-
 477
477
-
 478
478
-
 479
479
-
 480
480
-
 481
481
-
 482
482
-
 483
483
-
 484
484
-
 485
485
-
 486
486
-
 487
487
-
 488
488
-
 489
489
-
 490
490
-
 491
491
-
 492
492
-
 493
493
-
 494
494
-
 495
495
-
 496
496


Diğer dillerde
İlgili Makaleler
-
Hilti 2048397 Kullanım kılavuzu
-
Hilti DD 120 Kullanma talimatları
-
-
-
Hilti DD-WMS 100 Kullanma talimatları
-
Hilti DD 500-CA Kullanma talimatları
-
-
Hilti DD AF-CA Kullanma talimatları
-