Electrolux EHF6240XOK Kullanım kılavuzu
- Kategori
- Ocaklar
- Tip
- Kullanım kılavuzu

EHF6240XOK
................................................ .............................................
EN HOB USER MANUAL 2
KK ПІСІРУ АЛАҢЫ ҚОЛДАНУ ТУРАЛЫ
НҰСҚАУЛАРЫ
13
TR OCAK KULLANMA KILAVUZU 24

CONTENTS
1. SAFETY INFORMATION . . . . . . . . . . . . . . . . . . . . . . . . . . . . . . . . . . . . . . . . . . . . . . . . . . . 3
2. SAFETY INSTRUCTIONS . . . . . . . . . . . . . . . . . . . . . . . . . . . . . . . . . . . . . . . . . . . . . . . . . . 4
3. PRODUCT DESCRIPTION . . . . . . . . . . . . . . . . . . . . . . . . . . . . . . . . . . . . . . . . . . . . . . . . . 6
4. DAILY USE . . . . . . . . . . . . . . . . . . . . . . . . . . . . . . . . . . . . . . . . . . . . . . . . . . . . . . . . . . . . . 7
5. HELPFUL HINTS AND TIPS . . . . . . . . . . . . . . . . . . . . . . . . . . . . . . . . . . . . . . . . . . . . . . . . 8
6. CARE AND CLEANING . . . . . . . . . . . . . . . . . . . . . . . . . . . . . . . . . . . . . . . . . . . . . . . . . . . . 9
7. TROUBLESHOOTING . . . . . . . . . . . . . . . . . . . . . . . . . . . . . . . . . . . . . . . . . . . . . . . . . . . . . 9
8.
INSTALLATION . . . . . . . . . . . . . . . . . . . . . . . . . . . . . . . . . . . . . . . . . . . . . . . . . . . . . . . . . 10
9. TECHNICAL INFORMATION . . . . . . . . . . . . . . . . . . . . . . . . . . . . . . . . . . . . . . . . . . . . . . . 12
WE’RE THINKING OF YOU
Thank you for purchasing an Electrolux appliance. You’ve chosen a product that brings with it
decades of professional experience and innovation. Ingenious and stylish, it has been designed
with you in mind. So whenever you use it, you can be safe in the knowledge that you’ll get great
results every time.
Welcome to Electrolux.
Visit our website for:
Get usage advice, brochures, trouble shooter, service information:
www.electrolux.com
Register your product for better service:
www.electrolux.com/productregistration
Buy Accessories, Consumables and Original spare parts for your appliance:
www.electrolux.com/shop
CUSTOMER CARE AND SERVICE
We recommend the use of original spare parts.
When contacting Service, ensure that you have the following data available.
The information can be found on the rating plate. Model, PNC, Serial Number.
Warning / Caution-Safety information
General information and tips
Environmental information
Subject to change without notice.
2
www.electrolux.com

1. SAFETY INFORMATION
Before the installation and use of the appliance, carefully
read the supplied instructions. The manufacturer is not
responsible if an incorrect installation and use causes in-
juries and damages. Always keep the instructions with
the appliance for future reference.
1.1 Children and vulnerable people safety
WARNING!
Risk of suffocation, injury or permanent disability.
• This appliance can be used by children aged from 8
years and above and persons with reduced physical,
sensory or mental capabilities or lack of experience and
knowledge if they are supervised by an adult or a per-
son who is responsible for their safety.
• Do not let children play with the appliance.
• Keep all packaging away from children.
• Keep children and pets away from the appliance when
it operates or when it cools down. Accessible parts are
hot.
• If the appliance has a child safety device, we recom-
mend that you activate it.
• Cleaning and user maintenance shall not be made by
children without supervision.
1.2 General Safety
• The appliance and its accessible parts become hot
during use. Do not touch the heating elements.
• Do not operate the appliance by means of an external
timer or separate remote-control system.
• Unattended cooking on a hob with fat or oil can be
dangerous and may result in fire.
ENGLISH 3

• Never try to extinguish a fire with water, but switch off
the appliance and then cover flame e.g. with a lid or a
fire blanket.
• Do not store items on the cooking surfaces.
• Do not use a steam cleaner to clean the appliance.
• Metallic objects such as knives, forks, spoons and lids
should not be placed on the hob surface since they
can get hot.
• If the glass ceramic surface is cracked, switch off the
appliance to avoid the possibility of electric shock.
2.
SAFETY INSTRUCTIONS
2.1 Installation
WARNING!
Only a qualified person must in-
stall this appliance.
• Remove all the packaging.
• Do not install or use a damaged appli-
ance.
• Obey the installation instruction sup-
plied with the appliance.
• Keep the minimum distance from the
other appliances and units.
• Always be careful when you move the
appliance because it is heavy. Always
wear safety gloves.
• Seal the cut surfaces with a sealant to
prevent moisture to cause swelling.
• Protect the bottom of the appliance
from steam and moisture.
• Do not install the appliance adjacent to
a door or under a window. This pre-
vents hot cookware to fall from the ap-
pliance when the door or the window is
opened.
• If the appliance is installed above draw-
ers make sure that the space, between
the bottom of the appliance and the up-
per drawer, is sufficient for air circula-
tion.
• The bottom of the appliance can get
hot. Make sure to install a non-com-
bustile separation panel under the ap-
pliance to prevent access to the bot-
tom.
Electrical connection
WARNING!
Risk of fire and electrical shock.
• All electrical connections must be made
by a qualified electrician.
• The appliance must be earthed.
• Before carrying out any operation make
sure that the appliance is disconnected
from the power supply.
• Use the correct electricity mains cable.
• Do not let the electricity mains cable
tangle.
• Make sure the mains cable or plug (if
applicable) does not touch the hot ap-
pliance or hot cookware, when you
connect the appliance to the near sock-
ets
• Make sure the appliance is installed
correctly. Loose and incorrect electricity
mains cable or plug (if applicable) can
make the terminal become too hot.
• Make sure that a shock protection is in-
stalled.
• Use the strain relief clamp on cable.
• Make sure not to cause damage to the
mains plug (if applicable) or to the
mains cable. Contact the Service or an
4
www.electrolux.com

electrician to change a damaged mains
cable.
• The electrical installation must have an
isolation device which lets you discon-
nect the appliance from the mains at all
poles. The isolation device must have a
contact opening width of minimum 3
mm.
• Use only correct isolation devices: line
protecting cut-outs, fuses (screw type
fuses removed from the holder), earth
leakage trips and contactors.
2.2 Use
WARNING!
Risk of injury, burns or electric
shock.
• Remove all the packaging, labelling and
protective film (if applicable) before first
use.
• Use this appliance in a household envi-
ronment.
• Do not change the specification of this
appliance.
• Do not let the appliance stay unatten-
ded during operation.
• Do not operate the appliance with wet
hands or when it has contact with wa-
ter.
• Do not put cutlery or saucepan lids on
the cooking zones. They become hot.
• Set the cooking zone to “off” after use.
• Do not use the appliance as a work
surface or as a storage surface.
• If the surface of the appliance is
cracked, disconnect immediately the
appliance from the power supply. This
to prevent an electrical shock.
• When you place food into hot oil, it may
splash.
WARNING!
Risk of fire or explosion.
• Fats and oil when heated can release
flammable vapours. Keep flames or
heated objects away from fats and oils
when you cook with them.
• The vapours that very hot oil releases
can cause spontaneous combustion.
• Used oil, that can contain food rem-
nants, can cause fire at a lower temper-
ature than oil used for the first time.
• Do not put flammable products or items
that are wet with flammable products
in, near or on the appliance.
WARNING!
Risk of damage to the appliance.
• Do not keep hot cookware on the con-
trol panel.
• Do not let cookware to boil dry.
• Be careful not to let objects or cook-
ware fall on the appliance. The surface
can be damaged.
• Do not activate the cooking zones with
empty cookware or without cookware.
• Do not put aluminium foil on the appli-
ance.
• Cookware made of cast iron, aluminium
or with a damaged bottom can cause
scratches on the glass or glass ceram-
ic. Always lift these objects up when
you have to move them on the cooking
surface.
2.3 Care and Cleaning
WARNING!
Risk of damage to the appliance.
• Clean regularly the appliance to prevent
the deterioration of the surface material.
• Do not use water spray and steam to
clean the appliance.
• Clean the appliance with a moist soft
cloth. Only use neutral detergents. Do
not use abrasive products, abrasive
cleaning pads, solvents or metal ob-
jects.
2.4 Disposal
WARNING!
Risk of injury or suffocation.
• Contact your municipal authority for in-
formation on how to discard the appli-
ance correctly.
• Disconnect the appliance from the
mains supply.
• Cut off the mains cable and discard it.
ENGLISH 5

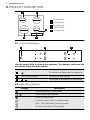
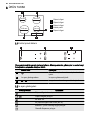
3. PRODUCT DESCRIPTION
45
1 2
3
210 mm
180 mm
145 mm
145 mm
1
Cooking zone
2
Cooking zone
3
Cooking zone
4
Control panel
5
Cooking zone
3.1 Control panel layout
1 2 3
Use the sensor fields to operate the appliance. The displays, indicators and
sounds tell which functions operate.
sensor field function
1
To activate and deactivate the appliance.
2
Heat setting display To show the heat setting.
3
/
To increase or decrease the heat setting.
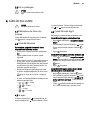
3.2 Heat setting displays
Display Description
The cooking zone is deactivated.
-
The cooking zone operates.
There is a malfunction.
A cooking zone is still hot (residual heat).
Lock / The Child Safety Device operates.
The Automatic Switch Off operates.
6
www.electrolux.com

3.3 Residual heat indicator
WARNING!
The risk of burns from residual
heat!
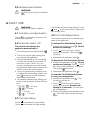
4. DAILY USE
WARNING!
Refer to the Safety chapters.
4.1 Activation and deactivation
Touch for 1 second to activate or de-
activate the appliance.
4.2 Automatic Switch Off
The function deactivates the
appliance automatically if:
•
All cooking zones are deactivated (
).
• You do not set the heat setting after
you activate the appliance.
• You spill something or put something
on the control panel for more than 10
seconds, (a pan, a cloth, etc.). An
acoustic signal sound some time and
the appliance deactivates. Remove the
object or clean the control panel.
• You do not deactivate a cooking zone
or change the heat setting. After some
time
comes on and the appliance
deactivates. See below.
• The relation between heat setting and
times of the Automatic Switch Off func-
tion:
•
, - — 6 hours
•
- — 5 hours
•
— 4 hours
•
- — 1.5 hours
4.3 The heat setting
Touch to increase the heat setting.
Touch
to decrease the heat setting.
The display shows the heat setting. Touch
and at the same time to deactivate
the cooking zone.
4.4 The Child Safety Device
This function prevents an accidental oper-
ation of the appliance.
To activate The Child Safety Device
•
Activate the appliance with
. Do not
set the heat settings.
•
Touch
of the two front cooking
zones for 4 seconds. The symbol
comes on.
•
Deactivate the appliance with
.
To deactivate The Child Safety Device
•
Activate the appliance with
. Do not
set the heat settings. Touch
of the
two front cooking zones for 4 seconds.
The symbol
comes on.
•
Deactivate the appliance with
.
To override The Child Safety Device
for only one cooking time
•
Activate the appliance with
. The
symbol
comes on.
•
Touch of the two front cooking
zones for 4 seconds. Set the heat
setting in 10 seconds. You can oper-
ate the appliance.
• When you deactivate the appliance with
, The Child Safety Device operates
again.
ENGLISH 7

5. HELPFUL HINTS AND TIPS
5.1 Cookware
Information about the cookware
• The bottom of the cookware must be
as thick and flat as possible.
• Cookware made of enamelled steel and
with aluminium or copper bottoms can
cause the colour change on the glass-
ceramic surface.
5.2 Energy saving
How to save energy
• If it is possible, always put the lids on
the cookware.
• Put cookware on a cooking zone be-
fore you start it.
• Stop the cooking zones before the end
of the cooking time to use residual
heat.
• The bottom of pans and cooking zones
must have the same dimension.
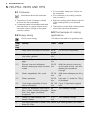
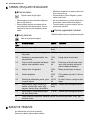
5.3 The Examples of cooking
applications
The data in the table is for guidance only.
Heat
set-
ting
Use to: Time Hints
1 Keep warm the food you cooked as re-
quired
Put a lid on a cookware
1-2 Hollandaise sauce, melt: butter,
chocolate, gelatine
5-25
min
Mix from time to time
1-2 Solidify: fluffy omelettes, baked
eggs
10-40
min
Cook with a lid on
2-3 Simmer rice and milkbased
dishes, heating up ready-cooked
meals
25-50
min
Add the minimum twice as
much liquid as rice, mix milk
dishes part procedure
through
3-4 Steam vegetables, fish, meat 20-45
min
Add some tablespoons of liq-
uid
4-5 Steam potatoes 20-60
min
Use max. ¼ l water for 750 g
of potatoes
4-5 Cook larger quantities of food,
stews and soups
60-150
min
Up to 3 l liquid plus ingredi-
ents
6-7 Gentle fry: escalope, veal cordon
bleu, cutlets, rissoles, sausages,
liver, roux, eggs, pancakes,
doughnuts
as
neces-
sary
Turn halfway through
7-8 Heavy fry, hash browns, loin
steaks, steaks
5-15
min
Turn halfway through
9 Boil large quantities of water, cook pasta, sear meat (goulash, pot roast),
deep-fry chips
8
www.electrolux.com

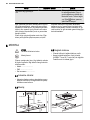
6. CARE AND CLEANING
Clean the appliance after each use.
Always use cookware with clean bottom.
Scratches or dark stains on the
glass-ceramic cause no effect on
how the appliance operates.
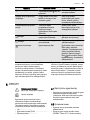
To remove the dirt:
1.
– Remove immediately: melted
plastic, plastic foil, and food with
sugar. If not, the dirt can cause
damage to the appliance. Use a
special scraper for the glass . Put
the scraper on the glass surface at
an acute angle and move the blade
on the surface .
–
Remove after the appliance is
sufficiently cool: limescale rings ,
water rings, fat stains, shiny metal-
lic discolorations. Use a special
cleaning agent for glass ceramic or
stainless steel.
2.
Clean the appliance with a moist cloth
and some detergent.
3.
At the end rub the appliance dry
with a clean cloth.
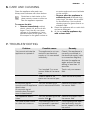
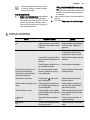
7. TROUBLESHOOTING
Problem Possible cause Remedy
You cannot activate the
appliance or operate it.
The appliance is not con-
nected to an electrical
supply or it is connected
incorrectly.
Check if the appliance is
correctly connected to
the electrical supply (refer
to connection diagram).
Activate the appliance
again and set the heat
setting in less than 10
seconds.
You touched 2 or more
sensor fields at the same
time.
Touch only one sensor
field.
There is water or fat
stains on the control pan-
el.
Clean the control panel.
An acoustic signal
sounds and the appliance
deactivates.
An acoustic signal
sounds when the appli-
ance is deactivated.
You put something on
one or more sensor fields.
Remove the object from
the sensor fields.
The appliance deacti-
vates.
You put something on the
sensor field
.
Remove the object from
the sensor field.
The residual heat indica-
tor does not come on.
The cooking zone is not
hot because it operated
only for a short time.
If the cooking zone oper-
ated sufficiently long to
be hot, speak to the serv-
ice centre.
ENGLISH 9

Problem Possible cause Remedy
The sensor fields become
hot.
The cookware is too large
or you put it too near to
the controls.
Put large cookware on
the rear cooking zones if
necessary.
comes on.
The Automatic Switch Off
operates.
Deactivate the appliance
and activate it again.
comes on.
The Child Safety Device
function operates.
Refer to the chapter “Dai-
ly Use”.
and a number come
on.
There is an error in the
appliance.
Disconnect the appliance
from the electrical supply
for some time. Discon-
nect the fuse from the
electrical system of the
house. Connect it again.
If
comes on again,
speak to the service cen-
tre.
If you tried the above solutions and can-
not repair the problem, speak to your
dealer or the customer service. Give the
data from the rating plate, three digit letter
code for the glass ceramic (it is in the cor-
ner of the glass surface) and an error
message that comes on.
Make sure, you operated the appliance
correctly. If not the servicing by a custom-
er service technician or dealer will not be
free of charge, also during the warranty
period. The instructions about the cus-
tomer service and conditions of guarantee
are in the guarantee booklet.
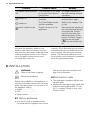
8. INSTALLATION
WARNING!
Refer to the Safety chapters.
Before the installation
Before the installation of the appliance, re-
cord the information below from the rating
plate. The rating plate is on the bottom of
the appliance casing.
• Model ...........................
• PNC .............................
• Serial number ....................
8.1 Built-in appliances
• Only use the built-in appliances after
you assemble the appliance into correct
built-in units and work surfaces that
align to the standards.
8.2 Connection cable
• The appliance is supplied with the con-
nection cable.
• Replace the damaged mains cable with
a special cable (type H05BB-F Tmax
90°C; or higher). Speak to your local
Service Centre.
10
www.electrolux.com

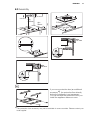
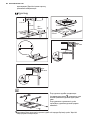
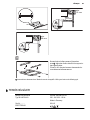
8.3 Assembly
min.
50mm
min.
500mm
R 5mm
min.
55mm
490
+1
mm
560
+1
mm
min.
12 mm
min.
20 mm
min.
28 mm
If you use a protection box (an additional
accessory
1)
), the protective floor directly
below the appliance is not necessary.
You can not use the protection box if you
install the appliance above an oven.
1)
The protection box accessory may not be available in some countries. Please contact your
local supplier.
ENGLISH 11

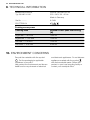
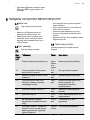
9. TECHNICAL INFORMATION
Modell EHF6240XOK Prod.Nr. 949 596 032 03
Typ 58 HAD 54 AO 220 - 240 V 50 - 60 Hz
Made in Germany
Ser.Nr. .......... 6.5 kW
ELECTROLUX
Cooking zones power
Cooking zone Nominal Power (Max heat setting)
[W]
Right rear —180 mm 1800 W
Right front — 145 mm 1200 W
Left rear — 145 mm 1200 W
Left front — 210 mm 2300 W
10. ENVIRONMENT CONCERNS
Recycle the materials with the symbol
. Put the packaging in applicable
containers to recycle it.
Help protect the environment and human
health and to recycle waste of electrical
and electronic appliances. Do not dispose
appliances marked with the symbol
with the household waste. Return the
product to your local recycling facility or
contact your municipal office.
12
www.electrolux.com

МАЗМҰНЫ
1. САҚТЫҚ ШАРАЛАРЫ . . . . . . . . . . . . . . . . . . . . . . . . . . . . . . . . . . . . . . . . . . . . . . . . . . . . . . . . . . . . . . . . . 14
2. ҚАУІПСІЗДІК НҰСҚАУЛАРЫ . . . . . . . . . . . . . . . . . . . . . . . . . . . . . . . . . . . . . . . . . . . . . . . . . . . . . . . . . . . 15
3. БҰЙЫМ СИПАТТАМАСЫ . . . . . . . . . . . . . . . . . . . . . . . . . . . . . . . . . . . . . . . . . . . . . . . . . . . . . . . . . . . . . . 17
4. ӘРКҮНДІК ҚОЛДАНУ . . . . . . . . . . . . . . . . . . . . . . . . . . . . . . . . . . . . . . . . . . . . . . . . . . . . . . . . . . . . . . . . . 18
5. ПАЙДАЛЫ НҰСҚАУЛАР МЕНЕН КЕҢЕСТЕР . . . . . . . . . . . . . . . . . . . . . . . . . . . . . . . . . . . . . . . . . . . . . . 19
6. КҮТУ МЕНЕН ТАЗАЛАУ . . . . . . . . . . . . . . . . . . . . . . . . . . . . . . . . . . . . . . . . . . . . . . . . . . . . . . . . . . . . . . . 20
7. АҚАУЛЫҚТЫ ТҮЗЕТУ . . . . . . . . . . . . . . . . . . . . . . . . . . . . . . . . . . . . . . . . . . . . . . . . . . . . . . . . . . . . . . . . . 20
8. ОРНАТУ . . . . . . . . . . . . . . . . . . . . . . . . . . . . . . . . . . . . . . . . . . . . . . . . . . . . . . . . . . . . . . . . . . . . . . . . . . . . 21
9. ТЕХНИКАЛЫҚ АҚПАРАТ . . . . . . . . . . . . . . . . . . . . . . . . . . . . . . . . . . . . . . . . . . . . . . . . . . . . . . . . . . . . . . 23
СІЗ ОЙЫМЫЗДА БОЛДЫҢЫЗ
Electrolux құрылғысын сатып алғаныңызға рахмет. Сіз ондаған жылдар бойғы кәсіби тәжірибе мен
инновацияға сүйеніп жасалған құрылғыны таңдадыңыз. Тапқырлықтың туындысы болған, көз тартарлық
бұл құрылғыны жасау барысында сіз ойымызда болдыңыз. Сондықтан, қолданған сайын тамаша нәтижеге
қол жеткізе алатыныңызға сенімді болыңыз.
Electrolux әлеміне қош келдіңіз.
Біздің веб-сайтқа барып келесіні қараңыз:
Қолдануға қатысты кеңестер, кітапшалар, ақаулықты түзету, қызмет көрсету туралы ақпарат:
www.electrolux.com
Сізге барынша жақсы қызмет көрсету үшін өніміңізді мына жерге тіркеңіз:
www.electrolux.com/productregistration
Құрылғыңызға қажетті керек-жарақтарды, шығынды материалдарды және фирмалық қосалқы
бөлшектерді сатып алу үшін:
www.electrolux.com/shop
ТҰТЫНУШЫҒА КӨМЕК, ҚЫЗМЕТ КӨРСЕТУ
Фирмалық заттарды қолдануды ұсынамыз.
Қызмет көрсету орталығына хабарласқанда келесі деректердің дайын болуын қамтамасыз етіңіз.
Деректерді техникалық ақпарат тақтайшасынан табуға болады. Үлгісі, Өнім нөмірі, Сериялық нөмірі
Ескерту / Абайлаңыз - Қауіпсіздік туралы маңызды мағлұмат.
Жалпы мағлұматтар менен кеңестер
Қорғаған ортаға зиян келдірмей пайдалану туралы нұсқаулар
Өндіруші ескертусіз өзгеріс енгізу құқығына ие.
ҚАЗАҚ 13

1. САҚТЫҚ ШАРАЛАРЫ
Құрылғыны орнатып іске қолданар алдында бірге жеткізілген
нұсқауларды мұқият оқып шығыңыз. Құрылғыны дұрыс
орнатпау мен дұрыс пайдаланбау нәтижесінде адам жарақат
алса және ақаулық орын алса өндіруші жауапты емес.
Нұсқаулықты келешекте қарап жүру үшін үнемі сақтап қойыңыз.
1.1 Балалар мен дәрменсіз адамдардың қауіпсіздігі
Назарыңызда болсын!
Тұншығып қалу, жарақат алуы немесе мүгедек болып
қалу қаупі бар.
• Бұл құрылғыны 8 жасқа толған және одан асқан балалар
және кемтар, сезім немесе ой-қабілетіне нұқсан келген
адамдар немесе тәжірибесі немесе білімі аз адамдар, өз
қауіпсіздіктерін қамтамасыз ететін адамның бақылауында
болса пайдалана алады.
• Балаларға құрылғымен ойнауға рұқсат бермеңіз.
• Орам материалдарының барлығын балалардан алыс
ұстаңыз.
• Құрылғы жұмыс істеп тұрғанда немесе ол суып тұрғанда,
балалар мен үй жануарларын оған жақындатпаңыз.
Қолжетімді бөлшектері ыстық болады.
• Егер құрылғы бала қауіпсіздігінің құралымен жабдықталса,
оны іске қосуды ұсынаыз.
• Балалар тазалау және күтім көрсету жұмыстарын басқаның
бақылауынсыз орындамауға тиіс.
1.2 Қауіпсіздік туралы жалпы ақпарат
• Құрылғы мен оның қол жететін жердегі бөлшектері қолдану
барысында ысып тұрады. Қыздырғыш элементтерін
ұстамаңыз.
• Құрылғыны сыртқы таймермен немесе бөлек қашықтан
басқару жүйесімен басқармаңыз.
• Май немесе өсімдік майы қосылған тағамды пештің үстіне
қараусыз қалдыру қауіпті және өрт шығуы мүмкін.
14
www.electrolux.com

• Өртті ешқашан сумен сөндіруге әрекет жасамаңыз, бұндай
жағдайда құрылғыны сөндіріп, содан кейін жалынды қақпақ
немесе өрт басқыш көрпе тәрізді затпен жабыңыз.
• Пісіру алаңына зат сақтамаңыз.
• Құрылғыны бумен тазалайтын құралмен тазаламаңыз.
• Пышақ, шанышқы, қасық және қақпақ тәрізді темір заттарды
пештің үстіне қоймаңыз, себебі ысып кетеді.
• Егер шыны керамика бетке сызат түссе, электр қатері пайда
болмас үшін құрылғыны сөндіріңіз.
2.
ҚАУІПСІЗДІК НҰСҚАУЛАРЫ
2.1 Орнату
Назарыңызда болсын!
Бұл құрылғыны тек білікті маман ғана
орнатуға тиіс.
• Орам материалдарының барлығын
алыңыз.
• Бүлінген құрылғыны орнатпаңыз немесе
іске қоспаңыз.
• Құрылғымен бірге берілген орнату
бойынша нұсқауларды орындаңыз.
• Осы құрылғы мен басқа құрылғылардың,
заттардың арасындағы ең аз қашықтықты
сақтаңыз.
• Құрылғыны жылжытқан кезде үнемі абай
болыңыз, себебі салмағы ауыр. Әрқашан
қорғаныс қолғабын киіңіз.
• Кесілген беттерге ылғал кіріп үлкейтіп
жібермес үшін тығыздағышпен бітеңіз.
• Құрылғының астыңғы жағын бу мен
ылғалдан қорғаңыз.
• Құрылғыны есікке жақын жерге терезенің
астына қоймаңыз. Бұл есік немесе терезе
ашылған кезде ыстық ыдыс құрылғыдан
құлап кетпеу үшін қажет.
• Егер құрылғыны тартпалардың үстіне
орнатсаңыз, құрылғының астыңғы жағы
мен үстіңгі тартпаның арасында ауа
ауысып тұруға жеткілікті орын қалуын
қамтамасыз етіңіз.
• Құрылғының астыңғы жағы ысып кетеді.
Құрылғының астыңғы жағын қол жетпейтін
етіп бітеу үшін тұтанбайтын оқшаулағыш
панель орнатыңыз.
Электртоғына қосу
Назарыңызда болсын!
Өрт шығу және электр қатеріне
ұшырау қаупі бар.
• Электртоғына қосу жұмыстарының
барлығын білікті электрші ғана іске асыруға
тиіс.
• Құрылғыны міндетті түрде жерге тұйықтау
қажет.
• Қандай да бір жұмысты іске асырмай
тұрып, құрылғының электр желісінен
ажыратылғанына көз жеткізіңіз.
• Дұрыс электр сымын пайдаланыңыз.
• Электр сымдарының оратылуына жол
бермеңіз.
• Құрылғыны жақын тұрған розеткаға
жалғаған кезде электр сымы немесе ашасы
(бар болса) ыстық құрылғыға немесе ыстық
ыдысқа тиіп кетпес үшін абай болыңыз
• Құрылғының дұрыс орнатылғаныа көз
жеткізіңіз. Босап қалған және дұрыс
жалғанбаған электр сымы немесе ашасы
(бар болса) ағытпаны өте ысытып жіберуі
мүмкін.
• Электр қатерінен сақтандыру құралының
орнатылғанына көз жеткізіңіз.
• Сымға деформацияға қарсы қапсырманы
пайдаланыңыз.
• Құрылғының сымына немесе ашасына (бар
болса) зақым келтірмеу үшін абай
ҚАЗАҚ 15

болыңыз. Зақым келген электр сымын
ауыстырту үшін қызмет көрсету
орталығына немесе электршіге
хабарласыңыз.
• Электр жүйесі құрылғыны кез келген
полюсте ажыратуға мүмкіндік беретін
оқшаулағыш құралмен жабықталуға тиіс.
Оқшаулағыш құралдың контакт ара
қашықтығы кем дегенде 3 мм болуға тиіс.
• Дұрыс оқшаулағыш құралдарды ғана
қолданыңыз. желіні қорғайтын
ажыратқыштар, сақтандырғыштар
(ұстатқыштан алынған бұрандалы
сақтандырғыштар), жерге тұйықталудан
қорғау тетіктері мен тұйықтағыштар.
2.2 Қолданылуы
Назарыңызда болсын!
Жарақат алу, күйіп қалу немесе
электр тоғының қатеріне ұшырау
қаупі бар.
• Ең алғаш пайдалану алдында барлық орам
материалын, жапсырмасын және қорғау
таспасын (бар болса) алыңыз.
• Бұл тұрмыста қолдануға арналған құрылғы.
• Бұл құрылғының техникалық сипаттамасын
өзгертпеңіз.
• Жұмыс істеп тұрған құрылғыны назардан
тыс қалдырмаңыз.
• Құрылғыны су қолмен іске қоспаңыз немесе
суға тиіп тұрған құрылғыны
пайдаланбаңыз.
• Пісіру алаңдарына ас құралдарын немесе
кәстрөлдердің қақпақтарын қоймаңыз.
Қызып кетуі мүмкін.
• Пісіру алаңын пайдаланып болғаннан кейін
"off" (сөндіру) қалпына қойыңыз.
• Құрылғыны жұмыс орны немесе зат
сақтайтын орын ретінде қолданбаңыз.
• Құрылғының бетіне сызат түссе, дереу тоқ
көзінен ағытыңыз. Бұл әрекет электр
қатеріне ұшырап қалуға жол бермейді.
• Тағамды ыстық майға салғанда, май
шашырауы мүмкін.
Назарыңызда болсын!
Өрт немесе жарылыс шығу қаупі бар.
• Тоңмайларды немесе майды қыздырған
кезде тұтанғыш бу пайда болады. Тоңмайға
немесе майға тамақ пісірген кезде қызған
заттарды немесе оттың жалынын алыс
ұстаңыз.
• Қатты қызған майдан бөлініп шығатын бу,
кенет жарылыстың орын алуына себеп
болады.
• Құрамында тағам қалдықтары бар
қолданылған май, бірінші рет қолданылып
отырған майға қарағанда, төмен
температурада өрт пайда болуға әкелуі
мүмкін.
• Тұтанғыш заттарды немесе ішіне тұтанғыш
зат салынған дымқыл заттарды
құрылғының ішіне, қасына немесе үстіне
қоймаңыз.
Назарыңызда болсын!
Құрылғыны бүлдіріп алуыңыз мүмкін.
• Басқару панеліне ыстық ыдыс қоймаңыз.
• Ыдысты ішіндегісі сарқылғанша
қайнатпаңыз.
• Құрылғының үстіне зат немесе ыдыс құлап
кетуге жол бермеңіз. Құрылғының бетіне
зақым келуі мүмкін.
• Пісіру алаңдарын бос ыдыс қойып немесе
ешбір ыдыс қоймай іске қоспаңыз.
• Құрылғының үстіне алюминий жұқалтыр
қоймаңыз.
• Құйылған шойыннан, алюминийден
жасалған немесе астына нұқсан келген
ыдыстар, шыны немесе шыны керамика
бетке сызат түсіреді. Бұндай заттарды
құрылғының бетінде үнемі көтеріп жылжыту
керек.
2.3 Күту менен тазалау
Назарыңызда болсын!
Құрылғыны бүлдіріп алуыңыз мүмкін.
• Құрылғының қаптамасының сапасы түспес
үшін мезгіл-мезгіл тазалаңыз.
• Құрылғыны тазалау үшін сулы спрейді және
буды қолданбаңыз.
• Құрылғыны дымқыл, жұмсақ шүберекпен
тазалаңыз. Тек бейтарап тазартқыш
заттарды қолданыңыз. Жеміргіш заттарды,
түрпілі жөкені, еріткіштерді немесе темір
заттарды пайдаланбаңыз.
2.4 Құрылғыны тастау
Назарыңызда болсын!
Жарақат алу немесе тұншығып қалу
қаупі бар.
16
www.electrolux.com

• Құрылғыны қоқысқа дұрыс тастауға
қатысты ақпаратты жергілікті әкімшілік
мекемеге хабарласып алыңыз.
• Құрылғыны тоқтан ажыратыңыз.
• Қуат сымын кесіп алыңыз да, қоқысқа
тастаңыз.
3. БҰЙЫМ СИПАТТАМАСЫ
45
1 2
3
210 mm
180 mm
145 mm
145 mm
1
Пісіру алаңы
2
Пісіру алаңы
3
Пісіру алаңы
4
Басқару панелі
5
Пісіру алаңы
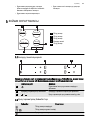
3.1 Басқару панелінің көрінісі
1 2 3
Құрылғыны іске қосу үшін сенсорлық өрістерді пайдаланыңыз. Бейнебеттер, индикаторлар
мен дыбыстық сигналдар қай функциялардың жұмыс жасайтынын көрсетеді.
сенсорлық өріс функция
1
Құрылғыны іске қосуға және сөндіруге
арналған.
2
Қыздыру параметрінің бейнебеті Қыздыру параметін көрсетуге арналған.
3
/
Қызу параметрін қосу немесе азайту үшін.
3.2 Қызу параметрінің бейнебеттері
Бейнебет Сипаттама
Пісіру алаңы сөндірулі.
-
Пісіру алаңы жұмыс істейді.
Ақаулық орын алды.
ҚАЗАҚ 17

Бейнебет Сипаттама
Пісіру алаңы әлі ыстық (қалдық қызу).
Қауіпсіздік құралы/Бала қауіпсіздігі функциясы жұмыс істейді.
Автоматты түрде ажыратқыш қосылады.
3.3 Қалдық қызу индикаторы
Назарыңызда болсын!
Суымаған пешке күйіп қалу қаупі
бар!
4. ӘРКҮНДІК ҚОЛДАНУ
Назарыңызда болсын!
Қауіпсіздік тарауларын қараңыз.
4.1 Қосу және сөндіру
Құрылғыны қосу немесе сөндіру үшін
белгісін 1 секунд басыңыз.
4.2 Автоматты түрде сөндіру
Функция құрылғыны төмендегі жағдайларда
автоматты түрде тоқтатады:
•
Пісіру алаңдарының барлығы өшсе (
).
• Құрылғыны іске қосқан соң қызу параметрін
орнатпасаңыз.
• Басқару панеліне бір нәрсе төгіліп қалса
немесе ол 10 секундтан артық (ыдыс, киім
т.с.с.) жабық қалса. Дыбыстық сигнал біраз
уақыт естіліп тұрады да, құрылғы сөнеді.
Заттарды алыңыз немесе басқару панелін
тазалаңыз.
• Пісіру алаңын тоқтатпасаңыз немесе қызу
параметрін өзгертпесеңіз. Шамалы
уақыттан кейін
жанады да, құрылғы
жұмысын тоқтатады. Келесі ақпаратты
қараңыз.
• Қызу параметрі мен Автоматты түрде
сөндіру функциясы уақыттарының ара
қатынасы:
•
, - — 6 сағат
•
- — 5 сағат
•
— 4 сағат
•
- — 1.5 сағат
4.3 Қызу параметрі
Қызу параметрі мәнін көбейту үшін
белгісін түртіңіз. Қызу параметрі мәнін азайту
үшін
белгісін түртіңіз. Бейнебетте қыздыру
параметрі көрсетіледі. Пісіру алаңын сөндіру
үшін
және белгісін бір уақытта
басыңыз.
4.4 Бала қауіпсіздігінің құралы
Бұл функция құрылғы кездейсоқ қосылып
кетуге жол бермейді.
Бала қауіпсіздігінің құралын қосу
•
Құрылғыны
көмегімен іске қосыңыз.
Қызу параметрлерін орнатпаңыз.
•
Алдыңғы пісіру алаңдарының
түймешігін 4 секунд басып тұрыңыз.
белгісі жанады.
•
Құрылғыны
арқылы сөндіріңіз.
Бала қауіпсіздігінің құралын ажырату
•
Құрылғыны
көмегімен іске қосыңыз.
Қызу параметрлерін орнатпаңыз. Алдыңғы
пісіру алаңдарының
түймешігін 4 секунд
басып тұрыңыз.
белгісі жанады.
•
Құрылғыны арқылы сөндіріңіз.
Бала қауіпсіздігінің құралын бір пісіру уақыты
үшін ғана ажыратып қою
•
Құрылғыны
арқылы іске қосыңыз.
белгісі жанады.
•
Алдыңғы пісіру алаңдарының
түймешігін 4 секунд басып тұрыңыз. Қызу
параметрін 10 секунд ішінде орнатыңыз.
Құрылғыны іске қосуыңызға болады.
18
www.electrolux.com

•
Құрылғыны
арқылы сөндірген кезде,
Бала қауіпсіздігінің құралы қайта іске
қосылады.
5. ПАЙДАЛЫ НҰСҚАУЛАР МЕНЕН КЕҢЕСТЕР
5.1 Ыдыс-аяқ
Ыдыс-аяққа қатысты ақпарат
• Ыдыстың түбі барынша қалың әрі
мүмкіндігінше жайпақ болуға тиіс.
• Эмальмен қапталған темірден және
алюминий немесе мыстан жасалған
ыдыстар шыны керамика беттің түсін
өзгертуі мүмкін.
5.2 Қуат үнемдеу
Қуатты үнемдеу жолдары
• Егер мүмкіндік болса, ыдысқа әрқашан
қақпақ жабыңыз.
• Пісіру алаңын ыдысты үстіне қойғаннан
кейін ғана іске қосыңыз.
• Қалған жылуды пайдалану үшін пісіру
алаңын пісіру уақыты аяқталмай тұрып
өшіріңіз.
• Ыдыстың түбі мен пісіру алаңының көлемі
бірдей болуға тиіс.
5.3 Тағам пісіру үлгілері
Кестедегі деректер тек бағдар ретінде
беріледі.
Қызу
парам
етрі
Пайдалану: Уақыт Ақыл-кеңес
1 Піскен тағамды жылы күйде ұстау (қажет
болған
ына
қарай)
Ыдыстың қақпағын жабыңыз
1-2 Голланд тұздығы, балқытылған:
май, шоколад, желатин
5-25
мин
Ара-тұра араластырыңыз
1-2 Қойылту: шайқалған омлет, піскен
жұмыртқа
10-40
мин
Қақпағын жауып пісіру керек
2-3 Суға піскен күріш және сүтке
пісірілген тағамдар, аспаздық
тағамдарды жылыту
25-50
мин
Күріштен кем дегенде екі есе
артық су қйыңыз, сүт
тағамдарын арасында
араластырыңыз
3-4 Буға піскен көкөніс, балық, ет 20-45
мин
Бірнеше ас қасық сұйықтық
қосыңыз
4-5 Буға піскен картоп 20-60
мин
750 гр. картопқа ең көбі ¼ л су
пайдаланыңыз
4-5 Көп мөлшердегі тағамдар,
бұқтырылған тағамдар мен көже
пісіру
60-150
мин
3 литрге дейін су және
құраластар
6-7 Сәл қуыру: эскалоп, "кордон блё"
бұзау еті, котлет, шұжық, бауыр,
майға қуырылған ұн, жұмыртқа,
құймақ, бауырсақ,
қажетін
е орай
Орта тұсында аударыңыз
ҚАЗАҚ 19

Қызу
парам
етрі
Пайдалану: Уақыт Ақыл-кеңес
7-8 Қатты қуыру, қуырылған картоп, қоң
ет, бифштекстер
5-15
мин
Орта тұсында аударыңыз
9 Көп мөлшердегі суды қайнату, макарон пісіру, етті қызартып қуыру (гуляш,
бұқтырып пісіру), фри
6. КҮТУ МЕНЕН ТАЗАЛАУ
Құрылғыны әр пайдаланғаннан кейін тазалап
отырыңыз.
Ыдысты қолданғанда табаны әрқашан таза
болсын.
Шыны керамикаға түскен сызаттар
немесе қошқыл дақтар құрылғының
жұмысына ешқандай әсер етпейді.
Қоқысты тазалау үшін:
1.
– Дереу тазалаңыз: балқыған
пластмасса, пластик фольга және қант
қосылған тағам. Дереу тазаламасаңыз,
құрылғыны бүлдіріп алуыңыз мүмкін.
Шыныға арналған арнайы қырғышты
қолданыңыз. Қырғышты шыны бетке
сүйір бұрыш жасап қойып, жылжыту
арқылы тазалаңыз.
– Құрылғы жеткілікті түрде суыған кезде
алыңыз:әк дақтары, су дақтары, май
дақтары, металдың жылтыраған
дақтары. Шыны керамикаға немесе
тоттанбайтын болатқа арналған
арнайы тазартқыш құралдарды
қолданыңыз.
2.
Құрылғыны дымқыл шүберекпен, шамалы
жуғыш зат қосып тазалаңыз.
3.
Соңында, құрылғыны таза шүберекпен
әбден құрғатыңыз.
7. АҚАУЛЫҚТЫ ТҮЗЕТУ
Ақаулық Ықтимал себебі Шешімі
Құрылғыны қосып немесе
пайдалана алмайсыз.
Құрылғы электр тоғына
қосылған жоқ немесе теріс
қосылған.
Құрылғының электр тоғына
дұрыс қосылғанына көз
жеткізіңіз (қосылым
сызбасын қараңыз).
Құрылғыны қайта іске
қосыңыз да, қызу
параметрін 10 секундтан аз
уақыт ішінде орнатңыз.
Бір уақытта 2 немесе одан
да көп сенсорлық өрістерді
басып қойғансыз.
Бір ғана сенсорлық өрісті
басыңыз.
Басқару панеліне су немесе
май шашыраған.
Басқару панелін тазалаңыз.
Дыбыстық сигнал естіліп,
құрылғы сөнеді.
Құрылғы сөнген кезде
дыбыстық сигнал естіледі.
Бір немесе бірнеше
сенсорлық өріске зат
қойылған.
Сенсорлық өрістердегі
затты алыңыз.
20
www.electrolux.com
Sayfa yükleniyor...
Sayfa yükleniyor...
Sayfa yükleniyor...
Sayfa yükleniyor...
Sayfa yükleniyor...
Sayfa yükleniyor...
Sayfa yükleniyor...
Sayfa yükleniyor...
Sayfa yükleniyor...
Sayfa yükleniyor...
Sayfa yükleniyor...
Sayfa yükleniyor...
Sayfa yükleniyor...
Sayfa yükleniyor...
Sayfa yükleniyor...
Sayfa yükleniyor...
-
 1
1
-
 2
2
-
 3
3
-
 4
4
-
 5
5
-
 6
6
-
 7
7
-
 8
8
-
 9
9
-
 10
10
-
 11
11
-
 12
12
-
 13
13
-
 14
14
-
 15
15
-
 16
16
-
 17
17
-
 18
18
-
 19
19
-
 20
20
-
 21
21
-
 22
22
-
 23
23
-
 24
24
-
 25
25
-
 26
26
-
 27
27
-
 28
28
-
 29
29
-
 30
30
-
 31
31
-
 32
32
-
 33
33
-
 34
34
-
 35
35
-
 36
36


Electrolux EHF6240XOK Kullanım kılavuzu
- Kategori
- Ocaklar
- Tip
- Kullanım kılavuzu
diğer dillerde
- English: Electrolux EHF6240XOK User manual
İlgili makaleler
-
Electrolux EHS60140X Kullanım kılavuzu
-
Electrolux EHF3920BOK Kullanım kılavuzu
-
Electrolux EUF2042AOW Kullanım kılavuzu
-
-
Electrolux EOB3450AAX Kullanım kılavuzu
-
-
Electrolux EHF6140FOK Kullanım kılavuzu
-
-
Electrolux EHH6340FOK Kullanım kılavuzu
-