WMF Schnellkochtopf Perfect Safety instructions & instructions for use
- Tip
- Safety instructions & instructions for use

WMF Group GmbH
Eberhardstraße 35
73312 Geislingen/Steige
Germany
Perfect PerfectPerfect Perfect
Käufer Purchaser
Name Name
Straße Street
Land State PLZ Postal code Ort Town
WMF Fachgeschäft WMF Retailer
Verkaufsdatum Date of sale
Stempel WMF Fachgeschäft WMF retailer’s stamp
Perfect
DE Garantieabschnitt
GB Guarantee voucher
ES Cupón de garantía
BG Гаранционна карта
DK Garantibevis
FI Takuukortti
FR Bon de garantie
GR Αποκοччα εγγυηοηζ
IT Tagliando di garanzia
NL Garantiebewijs
NO Garantibevis
PL Dowód gwarancji
PT Cupão de garantia
RU Гарантийный талон
SE Garantisedel
SK Záručný ústrižok
SI Grancijski list
CZ Záruční list
TR Garanti kuponunum
HU Garanciaszelvény
HR Garancijski obrazac
Perfect
WMF Group GmbH
Eberhardstrasse 35
73312 Geislingen/Steige
Germany
wmf.com
Perfect
Betriebsanleitung | User Manual
Perfect
Design Jo. Laubner

07 8940 6000
(3,0/4,5/6,5/8,5 l)
07 9278 6000 (2,5 l)
07 8941 6000
(3,0/4,5/6,5/8,5 l)
07 8943 6000
(4,5/6,5/8,5 l)
07 9279 6100 (2,5 l)
07 8944 6100
(3,0/4,5/6,5/8,5 l)
60 9310 9502 60 6852 9990 (2,5 l)
60 6856 9990 (3,0/4,5/6,5/8,5 l)
Perfect
DE Zubehör- und Ersatzteile
GB Accesories and spare parts
ES Accessorios y piezas de recambio
BG Aксесоари и резервни
DK Tilbehør og reservedele
FI Lisätarvikkeet ja varaosat
FR Accessoires et pièces de rechange
GR Eεαρτηματα & σκευη
IT Accessori e parti di ricambio
NL Toeheoren en onderdelen
NO Tilbehør og reservedeler
PL Akcesoria i części zamienne
PT Equipamento e peças sobresselentes
RU Nринадлежности и запасные уасти
SE Tillbehör och reservdelar
SK Príslušenstvo a náhradné diely
SI Pribor in nadomestni deli
CZ Příslušenství a náhradní díly
TR Ek ve yedek parçalar
HU Tartozékok és pótalkatrészek
HR Pribor i rezervni dijelovi
Perfect
DE Bedienungsanleitung
GB Operating instructions
ES Instrucciones de manejo
BG Инструкция За Употреба
DK Betjeningsvejledning
FI Kauppiaan Leima
FR Notice d’utilisation
GR Οδηγίες χρήσης
IT Istruzioni per l’uso
NL Gebruiksaanwijzing
NO Bruksanvisning
PL Instrukcja obsługi
PT Instruções de utilização
RU Руководстве по эксплуатации
SE Bruksanvisning
SK Návod na používanie
SI Navodilo za uporabo
CZ Návod k obsluze
TR Kullanma talimati
HU Használati utasítás
HR Upute za uporabu
CB D
HGE F
JI
M N O P
K
A
2 1 39 5
L
10 7
13 4128 11 6
Perfect
08 9260 6030

3
DEGBESBGDKFIFRGRITNLNOPLPTRUSESKSICZTRHUHR
Bedienungsanleitung
DE
Inhalt
1. Sicherheitshinweise
2. Bedienung des Schnelltopfs
3. Hinweise zur Bedienung
4. Garen mit dem Schnelltopf
5. Drei Methoden zum Druckabbau
6. Pflege des Schnelltopfs
Reinigung, Aufbewahrung, Wartung
7. Vielseitige Verwendung
8. Garantieerklärung
9. Haftungsausschluss
10. Beseitigen von Störungen
11. Garzeitentabelle
Zubehör- und Ersatzteile
siehe Umschlagseiten
1. Sicherheitshinweise
1. Lesen Sie bitte die Bedienungsanleitung
und alle Anweisungen vollständig durch,
bevor Sie mit dem WMF Schnelltopf
arbeiten. Eine unsachgemäße Benutzung
kann zu Schäden führen.
2. Überlassen Sie den Schnelltopf niemandem,
der sich nicht zuvor mit der Bedienungsan-
leitung vertraut gemacht hat.
3. Halten Sie Kinder vom Schnelltopf fern,
wenn er benutzt wird.
4. Benutzen Sie den Schnelltopf niemals im
Backofen. Griffe, Ventile und Sicherheits-
einrichtungen werden durch die hohen
Temperaturen beschädigt. Der Schnelltopf
darf nur für den Zweck eingesetzt werden,
für den er vorgesehen ist, das Kochen von
Lebensmitteln.
5. Bewegen Sie den Schnelltopf sehr vorsich-
tig, wenn dieser unter Druck steht. Berühren
Sie keine heißen Oberflächen. Verwenden
Sie die Griffe und Knöpfe. Wenn notwendig,
benutzen Sie Handschuhe.
6. Setzen Sie den Schnelltopf nur für Zwecke
ein, für die er vorgesehen ist.
7. Dieses Gerät kocht mit Hilfe von Druck.
Eine unzweckmäßige Benutzung kann zu
Verbrennungen führen. Achten Sie darauf,
dass das Gerät vor dem Erhitzen richtig
verschlossen wurde. Informationen hierzu
finden Sie in der Bedienungsanleitung.
8. Öffnen Sie den Schnelltopf niemals gewalt-
sam. Vergewissern Sie sich vor dem Öffnen,
dass der Innendruck vollständig abgebaut
ist, indem das Kochsignal vollständig im
Griff versunken ist. Bitte beachten Sie, dass
Sie das Kochsignal nicht berühren dürfen.
9. Erhitzen Sie den Schnelltopf niemals,
ohne vorher Wasser eingefüllt zu haben,
dies würde ihn ernstlich beschädigen.
Minimum: 1/4 l Wasser.

5 4
DEGBESBGDKFIFRGRITNLNOPLPTRUSESKSICZTRHUHR
2. Bedienung des Schnelltopfs
Vor dem ersten Gebrauch
2.1. Topf öffnen
Kochschieber (7) beidseitig zum Griffende
schieben. Markierungen auf Kochschieber (7)
müssen auf AUF/OPEN stehen (A).
Deckelgriff (5) nach rechts schwenken, bis
sich die Markierungen auf dem Deckel und
am Topfstielgriff (6) gegenüberstehen (B). De-
ckel abheben.
2.2. Topf reinigen
Vor dem ersten Gebrauch sollten Sie Aufkleber
entfernen und alle Teile Ihres Schnelltopfs
abwaschen (siehe Abschnitt »Reinigung«).
Deckel umdrehen und Deckelgriff (5) vom
Deckel abnehmen. Dazu orangefarbenen
Schieber (4) auf der Unterseite des Deckel-
griffes (5) in Pfeilrichtung zum Griffende
ziehen (C), Griff abklappen und aushängen (D).
Dichtungsring (10) aus dem Deckel entfernen
(O).
2.3. Topf schließen
Griff in den Deckel einhängen und den oran-
gefarbenen Schieber (4) über den Deckelrand
hörbar einrasten lassen (E). Dichtungsring (10)
so in den Deckelrand einlegen, dass er unter
dem nach innen gebogenen Rand des Deckels
liegt (G). Deckel aufsetzen (siehe Markierungen
auf Deckel und Topfgriff) und Deckelgriff nach
links bis zum Anschlag drehen (B).
Kochschieber (7) exakt auf Position ZU/LOCKED
schieben.
Der Topf darf nicht fehlerhaft zusammenge-
baut werden. Der Zusammenbau darf nur in
der vorgesehenen Weise erfolgen.
3. Hinweise zur Bedienung
3.1. Prüfung der Sicherheitseinrichtungen
vor jedem Gebrauch
Vergewissern Sie sich, dass Dichtungsring
(10) und Deckelrand sauber sind. Kontrollieren
Sie, ob die Kugel sichtbar auf der Deckel-
unterseite im Sicherheitsventil (9) sitzt (G).
Sollte sich die Kugel in der oberen Kammer
des Sicherheitsventils/der Ankochautomatik
(9) befinden, nehmen Sie den Griff (5) ab
und drücken Sie die Kugel mit dem Finger
in die untere Kammer (F).
Nehmen Sie den Griff ab und testen Sie das
Hauptventil (3) mit Fingerdruck auf Beweg-
lichkeit (H).
Prüfen Sie die Kochsignaldichtung (2) auf
Sitz und Beschädigungen.
Bitte beachten Sie: Kochsignaldichtung nicht
durchdrücken, weil dadurch die Restdruck-
sicherung beschädigt werden könnte und
dann die Funktion Ihres Schnelltopfs nicht
mehr gewährleistet ist (P).
Griff in den Deckel einhängen (E). Deckel
auf den Topf setzen und verschließen (B).
3.2. Flüssigkeitsmengen
Zur Dampferzeugung ist mindestens 1/4 l
Flüssigkeit erforderlich, unabhängig davon,
ob Sie mit oder ohne Einsätze (12) garen.
Der Schnelltopf darf maximal zu 2/3 gefüllt
werden, um die Funktion nicht zu beein-
trächtigen (M). Bei schäumenden und stark
quellenden Speisen (z.B. Fleischbrühe, Hülsen-
früchte, Innereien, Kompott) darf der Topf nur
zur Hälfte gefüllt werden. Weitere Hinweise
siehe Absatz »Vollwertkost zubereiten«.
Wollen Sie vor dem Garen Ihre Lebensmittel
anbraten (z.B. Zwiebeln, Fleischstü̈cke o.ä.),
können Sie den WMF Schnelltopf wie einen
herkömmlichen Topf benutzen.
Zum Fertiggaren sollten Sie, bevor Sie den
Schnelltopf verschließen, den Bratensatz
lösen und die erforderliche Flüssigkeitsmenge
(mindestens 1/4 l) zufügen.
Wichtiger Hinweis: Achten Sie darauf,
dass die Flüssigkeit nie ganz verdampft.
Es kann zum Anbrennen des Kochguts und
zum Schaden des Topfes durch schmelzende
Kunststoffteile oder zu Beschädigung der
Kochstelle durch Schmelzen des Aluminiums
im Boden kommen. Sollte dieser Fall ein-
treten, die Wärmequelle ausschalten und
den Topf nicht bewegen, bis er vollständig
abgekühlt ist.
10. Befüllen Sie den Schnelltopf niemals mit
mehr als 2/3 seines Fassungsvermögens.
Wenn Sie Nahrungsmittel kochen, die sich
während des Garens ausdehnen, wie z.B.
Reis oder getrocknetes Gemüse, dann fül-
len Sie den Schnelltopf höchstens bis zur
Hälfte seines Fassungsvermögens und hal-
ten Sie sich dabei an die ergänzenden
Anweisungen, die eventuell hierzu vom
Hersteller Ihres Schnelltopfs stammen.
11. Sie sollten den Schnelltopf niemals ohne
Aufsicht lassen. Regulieren Sie die Ener-
giezufuhr so, dass das Kochsignal nicht
über den entsprechenden orangefarbenen
Kochring steigt. Wird die Energiezufuhr
nicht verringert, entweicht durch das Ven-
til Dampf. Die Garzeiten verändern sich
und der Flüssigkeitsverlust kann zu Funkti-
onsstörungen führen.
12. Verwenden Sie nur solche Wärmequellen,
die in der Bedienungsanleitung aufgeführt
sind.
13. Wenn Sie Fleisch mit Haut gekocht haben
(zum Beispiel Ochsenzunge), die unter
Druckeinfluss anschwellen kann, dann
stechen Sie nicht in das Fleisch, solange
die Haut geschwollen ist, Sie könnten sich
Verbrennungen zuziehen.
14. Rütteln Sie den Schnelltopf grund-
sätzlich vor jedem Öffnen, damit keine
Dampfblasen aufspritzen und Sie sich
nicht verbrühen. Besonders wichtig ist
dies beim Schnellabdampfen oder unter
fließendem Wasser.
15. Halten Sie beim Schnellabdampfen oder
unter fließendem Wasser immer die Hände,
Kopf und Körper aus dem Gefahrenbereich.
Sie könnten sich am austretenden Dampf
verletzen.
16. Überprüfen Sie vor jeder Benutzung die
Funktionsfähigkeit der Sicherheitseinrich-
tungen, Ventile und Dichtungen.
Nur so kann eine sichere Funktionsweise
gewährleistet werden. Informationen hier-
zu finden Sie in der Bedienungsanleitung.
17. Verwenden Sie den Schnelltopf nicht,
um Nahrungsmittel unter Druck mit Öl
zu frittieren. Eine missbräuchliche Verwen-
dung des Schnelltopfes kann zu Verlet-
zungen führen.
18. Nehmen Sie an den Sicherheitssystemen
keinerlei Eingriffe mit Ausnahme der
Wartungsmaßnahmen vor, die in der
Bedienungsanleitung aufgeführt werden.
19. Tauschen Sie Verschleißteile (siehe Garan-
tieerklärung) regelmäßig aus. Teile, die
erkennbare Verfärbungen, Risse oder
sonstige Beschädigungen aufweisen oder
nicht korrekt sitzen, müssen gegen WMF
Originalersatzteile ausgetauscht werden.
20. Verwenden Sie nur WMF Originalersatz-
teile. Benutzen Sie insbesondere nur Töpfe
und Deckel des gleichen Modells.
21. Benutzen Sie den Schnelltopf nicht, wenn
dieser oder Teile davon beschädigt oder
deformiert sind, bzw. wenn deren Funktion
nicht der Beschreibung der Bedienungs-
anleitung entspricht. Wenden Sie sich in
diesem Fall an das nächste WMF Fachge-
schäft oder die Kundendienstabteilung
der WMF Group GmbH.
Bewahren Sie diese Bedienungsanleitung
bitte sorgfältig auf.

7 6
DEGBESBGDKFIFRGRITNLNOPLPTRUSESKSICZTRHUHR
Die Restdrucksicherung gewährleistet, dass
sich der Topf nur öffnen lässt, wenn der Druck
vollkommen abgebaut ist, d.h. auch der gelbe
Druckring darf nicht mehr sichtbar sein.
Bleibt der gelbe Ring sichtbar (K), hat die
Restdrucksicherung angesprochen. Um diese
zu lösen, schieben Sie den Kochschieber (7)
kurz in die Position ZU/LOCKED.
Tritt kein Dampf mehr aus, Topf kurz rüt-
teln. Dadurch lösen sich eventuell vor–
handene Dampfblasen aus dem Kochgut,
die sich besonders bei flüssigen und breiigen
Speisen bilden und bei abgenommenem Deckel
herausspritzen können. Jetzt Deckelgriff wie
beschrieben nach rechts drehen und Topf
öffnen.
4.6. Hinweis für Induktionsherde
Der TransTherm®-Allherdboden (11) ist für
alle Herdarten geeignet, auch für Induktion.
Bei Induktionsherden kann bei hohen Koch-
stufen ein Summgeräusch entstehen.
Dieses Geräusch ist technisch bedingt und
kein Anzeichen für einen Defekt an Ihrem
Herd oder Schnelltopf.
Topfgröße und Kochfeldgröße müssen über-
einstimmen, da sonst besonders bei kleinen
Durchmessern die Möglichkeit besteht, dass
das Kochfeld (Magnetfeld) auf den Topfboden
nicht anspricht.
5. Drei Methoden zum Druckabbau
Wichtige Hinweise:
Haben Sie schäumende oder quellende
Speisen (z. B. Hülsenfrüchte, Fleischbrühe,
Getreide) gegart, sollten Sie den Topf nicht
nach Methode 2 oder 3 drucklos machen.
Pellkartoffeln platzen, wenn Sie nach
Methode 2 oder 3 abgedampft werden.
Halten Sie beim Schnellabdampfen über
den Kochschieber oder unter fließendem
Wasser immer die Hände, Kopf und Körper
aus dem Gefahrenbereich. Sie könnten sich
am austretenden Dampf verletzen.
Methode 1
Topf von der Heizquelle nehmen. Nach kurzer
Zeit senkt sich das Kochsignal (1). Wenn es
ganz im Griff verschwunden ist (I), schieben
Sie den Kochschieber langsam auf AUF/OPEN
(A). Dabei entweicht unter dem Deckelgriff der
noch vorhandene restliche Dampf. Tritt kein
Dampf mehr aus, Topf kurz rütteln, damit
sich in der Speise gebildete Dampfblasen auf-
lösen können.
Methode 2
Bei Speisen mit kurzen Garzeiten (z. B. Gemüse)
schieben Sie den Kochschieber (7) langsam
stufenweise in Richtung AUF/OPEN (A), bis
unter dem Deckelgriff Dampf entweicht.
Wenn Sie den Kochschieber ganz auf AUF/
OPEN gestellt haben, kein Dampf mehr austritt
und das Kochsignal sich ganz abgesenkt hat (I),
Topf rütteln und öffnen.
Methode 3
Wenn Sie der austretende Dampf stört, stellen
Sie den Topf einfach in die Spüle und lassen
kaltes Wasser über den Deckel laufen (L), bis
das Kochsignal (1) ganz im Deckelgriff ver-
schwunden ist (I). Topf kurz rütteln und öffnen.
Achtung! Garen Sie nie ohne ausreichend
Flüssigkeit und achten Sie darauf, dass die
Flüssigkeit des Kochguts niemals vollständig
verdampft. Bei Nichtbeachtung kann es zum
Anbrennen des Kochguts, zu Beschädigung
des Topfes und der Kunststoffgriffe kommen.
4. Garen mit dem Schnelltopf
4.1. Allgemeines
Im Schnelltopf garen die Speisen unter Druck,
d.h. mit Temperaturen über 100 °C. Dadurch
verkürzen sich die Garzeiten bis zu 70 %,
eine deutliche Energieeinsparung. Durch das
kurze Garen im Dampf bleiben Aroma, Ge-
schmack und Vitamine weitgehend erhalten.
4.2. Garen mit Einsätzen
Je nach Größe des Schnelltopfs können Sie
mit Einsätzen (12) und Steg (13) garen.
Einsatz und Steg erhalten Sie als Zubehör im
Fachhandel (siehe »Zubehör und Ersatzteile«
im Umschlag).
4.3. Aufheizen
Verschlossenen, gefüllten Topf auf Heizquelle
setzen und auf höchste Energiezufuhr ein-
stellen. Über die Ankochautomatik (9),
die zugleich Sicherheitsventil ist, entweicht in
der Ankochphase so lange Luft, bis das Ventil
hörbar schließt und sich Druck aufbauen kann.
Das Kochsignal (1) steigt an, der gelbe Druck-
ring und die beiden orangefarbenen Kochringe
werden sichtbar (J).
Verringern Sie die Energiezufuhr rechtzeitig
und ausreichend, so dass der im Rezept
empfohlene orangefarbene Kochring gerade
noch sichtbar bleibt.
4.4. Garzeiten
Die Garzeit beginnt erst dann, wenn der im
Rezept empfohlene Kochring ganz sichtbar ist.
Achten Sie darauf, dass die Ringposition stabil
bleibt. Regulieren Sie die Energiezufuhr
entsprechend. Sinkt das Kochsignal (1) unter
den gewünschten orangefarbenen Kochring,
müssen Sie die Heizquelle wieder höher stellen.
Die Garzeit verlängert sich dadurch etwas.
Steigt das Kochsignal (1) über den zweiten
orangefarbenen Kochring hinaus, entsteht zu
hoher Dampfdruck, der über das Hauptventil
(3) am Deckelgriff hörbar entweicht.
Den Topf von der Kochstelle nehmen, warten
bis sich das Kochsignal auf den zweiten oran-
gefarbenen Kochring gesenkt hat und Energie-
zufuhr zurückschalten.
Die kurzen Garzeiten sind beim Schnellkochen
deshalb möglich, weil durch den Dampfdruck
im Topf höhere Temperaturen herrschen:
Erster Ring, ca. 110°C
für empfindliche Speisen wie Fisch
oder Kompott.
(45 kPa Betriebsdruck, 130 kPa Regeldruck)
Zweiter Ring, ca. 119 °C
für alle übrigen Speisen.
(95 kPa Betriebsdruck, 130 kPa Regeldruck)
Energiebewusste schalten die Heizquelle bereits
vor Beendigung der Garzeit aus, da die im Topf
gespeicherte Wärme ausreicht, den Garprozess
zu beenden. Garzeiten können bei demselben
Gargut unterschiedlich sein, da Menge, Form
und Beschaffenheit des Lebensmittels variieren.
4.5. Öffnen des Topfes
Nach Ablauf der Garzeit Schnelltopf von der
Heizquelle nehmen. Grundsätzlich darf der
Deckel nur geöffnet und vom Topf genommen
werden, wenn der Topf drucklos ist, d.h. das
Kochsignal (1) muss vollkommen im Griff
verschwunden sein (I).

9 8
DEGBESBGDKFIFRGRITNLNOPLPTRUSESKSICZTRHUHR
ungelochten Einsatz setzen und bei Bedarf zu-
ckern. Beim 2. orangefarbenen Kochring garen.
Je nach Obstsorte liegt die Zeit
zwischen 10-20 Minuten. Topf unter flie-
ßendem Wasser drucklos machen (Methode 3).
Vor dem Öffnen kurz rütteln.
7.5. Sterilisieren
Babyflaschen, Einmachgläser etc. können
schnell sterilisiert werden. Teile mit der
Öffnung nach unten in den gelochten Einsatz
stellen, 1/4 l Wasser zugeben und 20 min
beim 2. orangefarbenen Kochring sterilisieren.
Langsam abkühlen lassen (Methode 1).
7.6. Garen mit Einsätzen
Je nach Größe des Schnelltopfs können Sie
mit Einsätzen und Steg garen. Einsatz und
Steg erhalten Sie als Zubehör im Fachhandel.
Sie können im Schnelltopf auch mehrere
Gerichte gleichzeitig zubereiten. Die einzelnen
Beilagen werden durch Einsätze getrennt.
Das Gericht mit der längsten Garzeit wird
zuerst ohne Einsatz in den Topf gefüllt.
Beispiele
Braten (20 min) – Topfboden
Kartoffeln (8 min) – gelochter Einsatz
Gemüse (8 min) – ungelochter Einsatz
Den Braten zunächst 12 min garen. Dann den
Topf nach Anleitung öffnen. Kartoffeln im
gelochten Einsatz auf den Steg stellen, Gemüse
im ungelochten Einsatz einsetzen, Topf schlie-
ßen und weitere 8 min garen. Unterscheiden
sich die Garzeiten nicht wesentlich, können
alle Einsätze gleichzeitig in den Topf gegeben
werden. Durch das Öffnen zwischendurch ent-
weicht Dampf, geben Sie deshalb etwas mehr
als die erforderliche Flüssigkeit in den Topf.
8. Garantieerklärung
Während der Garantiezeit garantieren wir die
einwandfreie Funktion des Produkts und seiner
sämtlichen Teile. Die Garantiezeit beträgt 3
Jahre und beginnt mit dem Datum des Erwerbs
des Produktes vom WMF Fachhändler, zu
dokumentieren durch einen vom Verkäufer
vollständig ausgefüllten Garantieabschnitt.
Kommt es während der Garantiezeit zu Män-
geln am Produkt, so werden wir den Mangel
kostenlos durch Austausch der mangelhaften
Teile gegen einwandfreie beseitigen.
Mangelhafte Teile können nur durch den
WMF Fachhändler oder die Kundendienst-
abteilung der WMF Group GmbH in Geislingen
ersetzt werden. Der Garantieanspruch erstreckt
sich ausschließlich auf diesen Anspruch. Wei-
tergehende Ansprüche aus der Garantie sind
ausgeschlossen.
Zur Geltendmachung des Garantieanspruchs
ist der Garantieabschnitt vorzulegen.
Er ist dem Käufer gleichzeitig mit dem WMF
Schnelltopf auszuhändigen. Der Garantiean-
spruch besteht nur bei Vorlage des vollständig
ausgefüllten Abschnitts.
Selbstverständlich werden durch diese
Garantieerklärung Ihre gesetzlichen Gewähr-
leistungsrechte nicht eingeschränkt.
Innerhalb der Gewährleistungsfrist stehen
Ihnen die gesetzlichen Gewährleistungsrechte
auf Nacherfüllung, Minderung, Rücktritt und
Schadensersatz im gesetzlichen Umfang zu.
Von der Garantiepflicht ausgeschlossen sind:
– Kochsignaldichtung
– Sicherheitsventil
– Dichtungsring
Diese Teile unterliegen einem natürlichen
Verschleiß. 10 Jahre Liefergarantie auf
Ersatzteile.
6. Pflege des Schnelltopfs
6.1. Reinigung
Reinigen Sie den Schnelltopf nach jeder
Benutzung.
Deckelgriff abklipsen und von beiden Seiten
unter fließendem Wasser abwaschen (D)(N).
Dichtungsring (10) aus dem Deckel lösen (O)
und von Hand spülen.
Topf, Deckel und Einsätze können in der Spül-
maschine gereinigt werden. Rückstände nicht
abkratzen, sondern einweichen.
Bei Kalkansatz mit Essigwasser auskochen.
Topfboden ebenfalls regelmäßig reinigen.
6.2. Aufbewahrung
Legen Sie den Deckel nach der Reinigung um-
gekehrt auf den Topf. Dichtungsring (10) nach
der Reinigung separat aufbewahren, um ihn zu
schonen.
6.3. Wartung
Der Schnelltopf ist ein technischer Gebrauchs-
gegenstand, dessen Einzelteile einem Ver-
schleiß unterliegen können. Sie sollten deshalb
nach längerem Gebrauch alle Einzelteile
entsprechend der »Ersatzteilliste« überprüfen.
Bei offensichtlichen Veränderungen müssen
die betreffenden Teile ersetzt werden.
Verwenden Sie nur Originalersatzteile des
Herstellers.
Hinweis: Bei beschädigtem Deckelgriff (5)
ist eine werkseitige Reparatur notwendig.
7. Vielseitige Verwendung
Die Vorteile des Schnellkochens gelten nicht
nur für herkömmliche Zubereitungsarten:
7.1. Tiefkühlkost zubereiten
Tiefkühlkost kann direkt aus dem Gefrierge-
rät in den Topf gegeben werden. Das Fleisch
zum Anbraten etwas Antauen. Gemüse direkt
aus der Verpackung in den Einsatz geben. Die
Ankochzeiten verlängern sich, die Garzeiten
bleiben gleich.
7.2. Vollwertkost zubereiten
Für Vollwertkost werden häufig Getreide und
Hülsenfrüchte verarbeitet. Bei der Zubereitung
im Schnelltopf müssen Getreide und Hülsen-
früchte nicht mehr unbedingt eingeweicht
werden. Die Garzeiten verlängern sich dann
um ca. die Hälfte der Zeit. Geben Sie 1/4 l
Mindestflüssigkeit in den Topf und zusätzlich
auf 1 Teil Getreide/Hülsenfrüchte mind. 2 Teile
Flüssigkeit.
Restwärme der Kochstelle kann gut zum Nach-
quellen genutzt werden. Achten Sie darauf,
dass bei schäumenden oder quellenden Speisen
(Getreide, Hülsenfrüchte) der Topf nur zur
Hälfte gefüllt werden darf.
7.3. Einkochen
Gläser mit 1l Inhalt werden im 6,5 l und 8,5 l
Schnelltopf, kleinere Gläser im 4,5 l Schnell-
topf eingekocht. Vorbereiten der Lebensmittel
wie üblich. 1/4 l Wasser in den Topf füllen.
Einweckgläser in den gelochten Einsatz setzen.
Gemüse/Fleisch beim 2. orangefarbenen
Kochring ca. 20 min garen
Steinobst beim 1. orangefarbenen Kochring
ca. 5 min garen
Kernobst beim 1. orangefarbenen Kochring
ca. 10 min garen
Zum Abdampfen Topf langsam abkühlen lassen
(Methode 1) – nicht über den Kochschieber
oder unter fließendem Wasser drucklos
machen, weil sich sonst der Saft aus den
Gläsern drückt.
7.4. Entsaften
Im Schnelltopf können Sie kleine Mengen Obst
zu Saft verarbeiten. 1/4 l Wasser in den Topf
geben, Früchte im gelochten Einsatz auf den

11 10
DEGBESBGDKFIFRGRITNLNOPLPTRUSESKSICZTRHUHR
9. Haftungsausschluss
Es wird keine Garantie übernommen für
Beschädigungen, die aus folgenden Gründen
entstanden sind:
Ungeeignete und unsachgemäße Verwendung,
fehlerhafte oder nachlässige Behandlung,
nicht sachgemäß durchgeführte Reparaturen,
den Einbau von nicht der Originalausführung
entsprechenden Ersatzteilen, chemische oder
physikalische Einflüsse auf Topfoberflächen,
Nichtbefolgen dieser Bedienungsanleitung
Name und Anschrift des Garantiegebers:
WMF Group GmbH
Eberhardstraße 35
73312 Geislingen/Steige
Germany
wmf.com
Der Garantieanspruch ist entweder direkt beim
Garantiegeber oder bei einem autorisierten
WMF Fachhändler geltend zu machen.
Ursache
Durchmesser der Kochstelle ungeeignet.
Energiestufe ungeeignet.
Deckel ist nicht richtig aufgesetzt.
Kugel in Sicherheitsventil/Ankoch-
automatik (9) sitzt nicht richtig.
Flüssigkeit fehlt (mind.1/4 l).
Dichtungsring (10) und/oder Topfrand
sind nicht sauber.
Kochschieber (7) steht nicht auf ZU/LOCKED.
Dichtungsring (10) beschädigt oder hart
(durch Verschleiß).
Kugel sitzt nicht richtig im Ventil. Kugel
wurde in die obere Kammer gedrückt.
Bei Störungen grundsätzlich den
Schnelltopf von der Kochstelle nehmen.
Niemals mit Gewalt öffnen.
Beseitigung
Kochstelle wählen, die zum
Topfdurchmesser passt.
Auf höchste Energiestufe stellen.
Topf vollkommen drucklos machen, öffnen.
Dichtungsring (10) auf richtigen Sitz prüfen
und Topf erneut verschließen.
Topf vollkommen drucklos machen, öffnen,
Griff abnehmen, Sicherheitsventil (9) über-
prüfen, Sitz der Metallkugel im Deckel
prüfen und Topf erneut verschließen (F)(G).
Topf vollkommen drucklos machen, Deckel
öffnen. Flüssigkeit einfüllen und Topf erneut
verschließen.
Topf vollkommen drucklos machen, Deckel
öffnen. Dichtungsring (10) und Topfrand
reinigen und Topf erneut verschließen.
Kochschieber (7) auf ZU/LOCKED stellen.
Dichtungsring (10) durch einen original
WMF Dichtungsring erneuern.
Topf vollkommen drucklos machen, Deckel
öffnen. Kugel in die untere Kammer drücken
(F)(G), Hauptventil (3) auf Beweglichkeit prü-
fen und Topf erneut verschließen.
10. Beseitigen von Störungen
Störungen am Schnelltopf
Zu lange Ankochzeit oder das
Kochsignal (1) steigt nicht.
Dampf tritt am Deckel aus.
Aus Sicherheitsventil/Ankochautomatik
(9) tritt ständig Dampf aus (gilt nicht
für die Ankochphase).

13 12
DEGBESBGDKFIFRGRITNLNOPLPTRUSESKSICZTRHUHR
Schwein und Kalb
Beim 2. Ring garen und
die Mindestfüllmenge von
1/4 l Flüssigkeit beachten.
Es wird kein spezieller
Einsatz benötigt.
Rind
Beim 2. Ring garen und
die Mindestfüllmenge von
1/4 l Flüssigkeit beachten.
Bei Rinderzunge wird ein
gelochter Einsatz benötigt.
Geflügel
Beim 2. Ring garen und
die Mindestfüllmenge von
1/4 l Flüssigkeit beachten.
Bei dem Suppenhuhn
wird ein gelochter Ein satz
be nö tigt.
Wild
Beim 2. Ring garen und
die Mindestfüllmenge von
1/4 l Flüssigkeit beachten.
Es wird kein spezieller
Einsatz benötigt.
Lamm
Beim 2. Ring garen und
die Mindestfüllmenge von
1/4 l Flüssigkeit beachten.
Fisch
Beim 1. Ring garen und
die Mindestfüllmenge von
1/4 l Flüssigkeit beachten.
Bei Ragout und Gulasch
ist kein Einsatz erforder-
lich, ansonsten den
ungelochten benutzen.
Minuten
Geschnetzeltes Schwein 5 - 7
Gulasch Schwein 10 - 15
Schweinebraten 20 - 25 Garzeit abhängig von Größe und Form
Geschnetzeltes Kalb 5 - 7
Gulasch Kalb 10 - 15
Kalbshaxe am Stück 25 - 30
Kalbszunge 15 -20 Mit Wasser bedecken
Kalbsbraten 20 - 25 Garzeit abhängig von Größe und Form
Hackbraten 10 - 15
Sauerbraten 30 - 35
Rinderzunge 45 - 60
Geschnetzeltes 6 - 8
Gulasch 15 - 20
Rouladen 15 - 20
Rinderbraten 35 - 45 Garzeit abhängig von Größe und Form
Suppenhuhn 20 - 25 max. 1/2 Füllmenge
Hühnerteile 6 - 8
Putenkeule 25 - 30 Abhängig von Dicke der Keulen
Putenragout 6 - 10 Truthahn ist identisch
Putenschnitzel 2 - 3
Hasenbraten 15 -20
Hasenrücken 10 - 12
Hirschbraten 25 - 30
Hirschgulasch 15 - 20
Lammragout 20 - 25 Hammel hat längere Garzeiten
Lammbraten 25 - 30 Garzeit abhängig von Größe und Form
Fischfilets 2 - 3 Im eigenen Saft gedünstet
Ganze Fische 3 - 4 Im eigenen Saft gedünstet
Ragout oder Gulasch 3 - 4
11. Garzeitentabelle
Suppen
Beim 2. Ring garen und
die Füllmenge von min.
1/4 l bis max. 1/2 vom
Topfinhalt beachten.
Es wird kein spezieller
Einsatz benötigt.
Gemüse
Beim 1. Ring garen und
die Füllmenge von min.
1/4 l Flüssigkeit beachten.
Bei Sauerkraut und Rote
Bete wird kein Ein satz
benötigt. Bei allen anderen
Ge richten wird der
gelochte Ein satz benötigt.
Ab den Bohnen erhöht sich
die Garzeitentemperatur
(2. Ring).
Hülsenfrüchte
Getreide
Beim 2. Ring garen und
die Mindestfüllmenge von
1/4 l bis max. 1/2 vom
Topfinhalt beachten. Auf
1 Teil Getreide kommen
2 Teile Wasser. Nicht ein-
geweichtes Getreide muss
20 - 30 min. länger garen.
Milchreis beim 1. Ring
zubereiten.
Obst
Beim 1. Ring garen und
die Mindestfüllmenge von
1/4 l Flüssigkeit beachten.
Tipps und Tricks
zum Garen
Minuten
Erbsen-, Linsensuppe 12 - 15 Eingeweichte Hülsenfrüchte
Fleischbrühe 25 - 30 Für alle Fleischarten gültig
Gemüsesuppe 5 - 8
Gulaschsuppe 10 - 15
Hühnersuppe 20 - 25 Garzeit abhängig von der Größe
Kartoffelsuppe 5 - 6
Ochsenschwanzsuppe 35
Auberginen, Gurken und Im Dampf gegartes Gemüse
Tomaten 2 - 3 wird nicht so schnell ausgelaugt
Blumenkohl, Paprika, Porree 3 - 5
Erbsen, Sellerie, Kohlrabi 4 - 6
Fenchel, Karotten, Wirsing 5 - 8
Bohnen, Grünkohl, Rotkohl 7 - 10
Sauerkraut 10 - 15
Rote Bete 15 - 25
Salzkartoffeln 6 - 8 Pellkartoffeln platzen auf, wenn
Kartoffeln in der Schale 6 - 10 sie schnell abgedampft werden
Erbsen, Bohnen, Linsen 10 - 15 Dicke Bohnen 10 min länger garen
Buchweizen, Hirse 7 - 10 Garzeit für eingeweichtes Getreide
Mais, Reis, Grünkern 6 - 15 Garzeit für eingeweichtes Getreide
Milchreis 20 - 25 beim 1. Ring
Langkornreis 6 - 8
Vollkornreis 12 - 15
Weizen, Roggen 10 - 15 Garzeit für eingeweichtes Getreide
Kirschen, Pflaumen 2 - 5 Gelochter Einsatz wird empfohlen
Äpfel, Birnen 2 - 5 Gelochter Einsatz wird empfohlen
Garzeit beginnt, sobald vorgeschriebener Ring am Kochsignal sichtbar wird
Angegebene Garzeiten sind Richtwerte
Lieber kürzere Garzeiten wählen, es kann jederzeit nachgegart werden
Bei den angegebenen Garzeiten für Gemüse erhalten Sie bissfeste Speisen
Die Gartemperatur beträgt beim 1. Ring 110 °C und beim 2. Ring 119 °C
Rezepte finden Sie unter www.wmf.com

15
DEGBESBGDKFIFRGRITNLNOPLPTRUSESKSICZTRHUHR
Operating instructions
GB
Contents
1. Safety Notes
2. How to use the pressure cooker
3. Notes on operation
4. Cooking using your pressure cooker
5. Four methods for pressure reduction
6. Care and maintenance of the
pressure cooker
Cleaning, storage, maintenance
7. Versatile use
8. Guarantee statement
9. Preclusion of liability
10. Troubleshooting
11. Table of cooking times
Accessories and spare parts
See cover
1. Safety Notes
1. Please carefully read the operating manual
and all the instructions before using the
WMF pressure cooker. Improper use may
result in damage.
2. Do not allow anyone to use the pressure
cooker unless they have first read the
operating manual.
3. Keep children away from the pressure cooker
while it is in use.
4. Never use your pressure cooker in the oven.
The high oven temperatures could damage
handles, valves and safety devices. Never use
the pressure cooker in the oven. The high
temperatures can damage the handle, valves
and safety mechanisms. The pressure cooker
should only be used for its intended purpose,
which is cooking food.
5. Move the pressure cooker very carefully
while it is pressurised. Do not touch hot
surfaces. Use the handles and buttons
provided. Use gloves if necessary.
6. Only use the pressure cooker for the purpose
intended.
7. This appliance cooks with the aid of
pressure. Improper use may result in burns.
Take care to ensure that the appliance is
properly closed before heating it up. You will
find information on this in the operating
manual.
8. Never use force to open the pressure cooker.
Before opening it, make sure that the
internal pressure has completely reduced
by checking that the boil indicator has
descended fully into the handle. Please note
that you must not touch the boil indicator.
9. Never heat the pressure cooker without
any water inside; this would cause serious
damage to the pressure cooker.
Minimum: 1/4l water.

17
DEGBESBGDKFIFRGRITNLNOPLPTRUSESKSICZTRHUHR
2. How to use the pressure cooker
Before first use
2.1. Open the pot
Move the sliding indicator (7) to the end of
the handle, using both ends. The indicators on
the sliding indicator (7) must be set to AUF/
OPEN (A).
Pivot the lid handle (5) to the right until the
markings on the lid and the pot handle (6) are
facing one another (B). Lift off the lid.
2.2. Cleaning the pot
Before first use, you should remove the labels
and wash all parts of your pressure cooker
(see section on “Cleaning“).
Turn the lid over and detach the lid handle (5)
from the lid. For this purpose, pull the orange
slide (4) on the underside of the lid handle (5)
towards the end of the handle as indicated
by the arrow (C), fold down handle, and then
detach (D). Remove the sealing ring (10) from
the lid (O).
2.3. Closing the pot
Insert the handle into the lid and move the
orange slide (4) across the lid rim until it au-
dibly engages (E). Insert the sealing ring (10)
into the rim of the lid such that it is located
underneath the inwardly bent rim of the lid
(G).
Replace lid (see marking on lid and pot handle)
and turn lid handle to the left until the stop
position has been reached (B). Move the sliding
indicator (7) exactly to the position
ZU/LOCKED.
The pot must not be assembled incorrectly. The
pot may only be assembled in the intended
manner.
3. Notes on operation
3.1. Checking the safety devices
before each use
Ensure that the sealing ring (10) and lid rim
are clean. Check that the ball is sitting visibly
in the safety valve (9) on the underside of the
lid (G).
If the ball should be located in the upper
chamber of the safety valve / the automatic
cooking system (9), remove the handle (5) and
use your finger to press the ball into the lower
chamber (F).
Remove the handle and check the main valve (3)
for moveability by pressing with your
finger (H).
Inspect the cooking indicator seal (2) visually
to check for fit and damage.
Please note: Do not press down on the coo-
king indicator seal, since this could result in
damage to the residual pressure lock, and the
functionality of your pressure cooker could no
longer be guaranteed (P).
Insert the handle in the lid (E). Place the lid on
the pot and close it (B).
3.2. Liquid volumes
At least 1/4 l of liquid is required to generate
steam, regardless of whether you are cooking
with or without inserts (12).
To ensure that your pressure cooker’s func-
tionality is not impaired, do not fill it to more
than 2/3 of its capacity (M). When cooking
foodstuffs which foam or expand heavily (e.g.
stock, pulses, innards, compotes), only fill the
pot to half its capacity. See the section on
‘Preparing wholefood’ for further information.
If you want to brown your food before
cooking (e.g. onions, meat pieces etc.), you
can use your WMF pressure cooker as a
conventional pot. In order to complete the
cooking, deglaze the cooker and add the
requisite amount of liquid (at least 1/4 l)
before closing the pressure cooker.
16
Important note:
Take care to ensure that the liquid never
fully evaporates. This could result in food
burning onto the pot and the pot being
damaged by melting plastic parts. The hob
could also be damaged by the aluminium in
the base melting. If this should occur then
switch off the heat source and do not move
the pot until it has cooled down completely.
10. Never fill the pressure cooker to more
than 2/3 of its capacity. If using foodstuffs
which expand during the cooking process,
such as rice or dried vegetables, fill the
pressure cooker to a maximum of half its
capacity and observe any instructions de-
tailed in the operating manual with regards
to this.
11. Never leave your pressure cooker
unattended. Regulate the heat to ensure
that the cooking indicator does not rise
above the corresponding orange ring. If the
heat is not turned down, steam will escape
through the valve. Cooking times may
change and the loss of liquid may result in
function faults.
12. Only use the heat sources listed in the
operating manual.
13. If you have cooked meat with the skin
attached (such as ox-tongue), which may
expand under the influence of pressure,
take care not to pierce the meat while the
skin remains expanded. This could result in
burns.
14. In principle, always shake the pressure
cooker before opening it to avoid pockets
of steam spitting out; this could result
in scalding. This is particularly important
when releasing steam quickly or
depressurising the pressure cooker under
running water.
15. When releasing steam quickly or depres-
surising under running water, always keep
your hands, head and body away from the
danger area. You could otherwise be inju
red by escaping steam.
16. Before each use of your pressure cooker,
check that the safety devices, valves
and seals are working properly. Only
then can the safe functioning of your
pressure cooker be guaranteed. You will
find information on this in the operating
manual.
17. Do not use your pressure cooker to fry
food in oil under pressure. Do not use the
pressure cooker to fry food in oil under
pressure. Improper use of the pressure
cooker may result in injury.
18. Never interfere with the safety systems,
except when carrying out the maintenance
work specified in the operating manual.
19. Replace the wear parts (see warranty
statement) at regular intervals. Parts
showing apparent discolouration, cracks
or other damage, or which no longer sit
correctly, must be replaced with original
WMF spare parts.
20. Only use original WMF spare parts.
In particular, always use pots and lids of
the same model.
21. Do not use the pressure cooker if it or
parts of it are damaged or deformed, or if
their function does not correspond with the
description in the operating instructions. In
this case contact your nearest WMF dealer
or the customer services department at WMF
Group GmbH.
Please keep this operating manual in a safe
place.

19
DEGBESBGDKFIFRGRITNLNOPLPTRUSESKSICZTRHUHR
The residual pressure lock ensures that the pot
can only be opened once fully depressurised,
i.e. once even the yellow pressure ring is no
longer visible.
If the yellow ring is still visible (K), this means
that the residual pressure lock has reacted. To re-
lease it, shortly move the sliding indicator (7) to
the ZU/LOCKED position.
When all the steam has escaped, briefly
shake the pot.
This will release any pockets of steam from the
food. Such bubbles may form especially when
cooking liquid or viscous foods, and they can
spit out when removing the lid. Now turn the
lid handle to the right as described, and open
the pot.
4.6. Information on induction hobs
The TransTherm® universal base (11) is suitable
for all hob types, also for induction.
In the case of induction hobs, a humming noise
may develop if on a high heat setting.
This noise has technical causes and does not
indicate that either your hob or your pressure
cooker is defective.
The pot size must correspond to the size of the
cooking zone. Otherwise – especially in the case
of small diameters – the cooking zone (magne-
tic zone) may not respond to the pot base.
5. Three methods for pressure
reduction
Important note:
If you have cooked foaming or expanding
foods (e.g. pulses, stock, grains), you should
not depressurise the pot using methods 2 or 3.
Jacket potatoes will burst if you let steam out
of the pressure cooker using method 2 or 3.
When quickly releasing steam using the sli-
ding indicator, or under running water, always
keep your hands, head and body away from
the danger area. You could otherwise be in-
jured by escaping steam.
Method 1
Remove the pot from the heat source. After a
short time, the cooking indicator (1) will fall.
Once it has fully disappeared into the handle (I),
slowly move the sliding indicator to AUF/OPEN (A).
During this procedure, any remaining residual
steam will escape from under the lid handle.
When no more steam escapes, shake the
pot briefly so that any pockets of steam which
have formed in the food can be released.
Method 2
In the case of foods with short cooking times
(e.g. vegetables), slowly and gradually move
the sliding indicator (7) in the direction of
AUF/OPEN (A) until steam escapes underneath
the lid handle.
Once the sliding indicator is fully at the AUF/
OPEN position, steam is no longer escaping
and the cooking indicator has fully dropped (I),
shake the pot and then open it.
Method 3
If you are worried by the escaping steam,
simply place the pot in the sink and run cold
water over the lid (L), until the cooking indicator
(1) has fully disappeared into the lid handle (I).
Briefly shake the pot and then open it.
18
Caution! Never cook without sufficient liquid
and take care to ensure that the cooking li-
quid never evaporates fully. Failure to observe
the above may result in food getting burned,
or in damage to the pot or its plastic handles.
4. Cooking using your
pressure cooker
4.1. General
Your pressure cooker cooks food under pres-
sure, i.e. at a temperature above 100 °C. This
reduces cooking times by up to 70 %, a signi-
ficant energy saving. Due to the short cooking
time in steam the food‘s flavour, taste and
vitamins are largely preserved.
4.2. Cooking with inserts
Depending on the size of your pressure cooker,
you can cook with inserts (12) or a trivet (13).
Inserts and trivets are available as accessories
from your specialist dealer (see “Accessories
and Spare Parts” inside the cover).
4.3. Heating
Place closed, filled pot onto a source of heat
and set to maximum heat. Via the automatic
heating system (9), which is simultaneously
a safety valve, air escapes during this heating
phase until the valve closes audibly and pres-
sure can build up.
The cooking indicator (1) rises, the yellow
pressure ring and the two orange cooking rings
become visible (J).
Reduce the heat in good time and sufficiently,
so that the orange cooking ring recommended
in the recipe remains just visible.
4.4. Cooking times
The cooking time only starts once the ring re-
commended in the recipe is fully visible. Take
care to ensure that the ring position remains
stable. Regulate the heat accordingly. If the
cooking indicator (1) falls below the required
orange ring, you will have to turn up the heat
a little.
This will slightly prolong the cooking time.
If the cooking indicator (1) rises above the
second orange ring, excess pressure will result.
This pressure will escape audibly via the main
valve (3) on the lid handle.
Remove the pot from the hob, wait until the
cooking indicator has fallen to the second
orange ring, and turn the heat back on.
Pressure cooking facilitates shorter cooking
times because the steam pressure in the pot
results in higher temperatures.
First ring, approx. 110 °C for delicate foods
such as fish or compote.
(operating pressure 45 kPa, regulating
pressure 130 kPa)
Second ring, approx. 119 °C for all other foods.
(operating pressure 95 kPa, regulating
pressure 130 kPa)
Energy-conscious users will want to turn off
the heat even before the end of the cooking
time, since the heat stored in the pot will
suffice to finish the cooking process. Cooking
times may differ for same foodstuffs depending
on quantity, form, and composition of the food.
4.5. Opening the pot
At the end of the cooking time remove the
pressure cooker from the hob. On principle,
the lid should only be opened and removed
from the pot once the pot is depressurised.
This means that the cooking indicator (1) must
have fully disappeared into the handle (I).

21
DEGBESBGDKFIFRGRITNLNOPLPTRUSESKSICZTRHUHR
in the perforated insert on top of the un-
perforated insert; add sugar to taste. Cook
using the second orange ring. The cooking time
will be between 10 and 20minutes, depending
on the type of fruit.
Depressurise the pot under running water
(method 3). Shake briefly before opening.
7.5. Sterilising
Baby bottles, preserving jars etc. can be quickly
sterilised.
Place them in the perforated insert with the
opening facing downwards. Add 1/4 l water
and sterilise for 20 minutes using the second
orange ring. Allow to cool down slowly (method 1).
7.6. Cooking with inserts
Depending on the size of your pressure cooker,
you can cook with inserts or a trivet. Inserts
and trivets are available as accessories from
your WMF dealer.
You can also cook several foods simultaneously
in your pressure cooker. The inserts are used to
separate the individual foods. First, place the
food requiring the longest cooking time in the
pot (withoutinsert).
Examples
Roasts (20 min) – pot base
Potatoes (8 min) – perforated insert
Vegetables (8 min) – unperforated insert
First cook the roast for around 12 minutes.
Then open the pot according to the instruc-
tions. Place the potatoes in the perforated
insert on the trivet, place the vegetables in
the unperforated insert, close the pot and
cook for a further 8 minutes.
If there is no major difference in cooking
times, all inserts can be placed in the pot at
the same time.
Opening the pot during use allows steam
to escape. Therefore, add a little more liquid
to the pot than required.
8. Guarantee statement
We guarantee the perfect operation of the
product and all its parts during the warranty
period. The 3-year warranty period begins on
the date that the product is purchased from
the WMF specialist dealer, which must be do-
cumented by means of a guarantee voucher
completed by the vendor.
If product defects arise during the warranty
period, we will replace the defective parts for
parts in full working order free of charge.
Faulty parts can only be replaced by the
WMF specialist dealer or the customer ser-
vice department of the WMF Group GmbH in
Geislingen. The warranty only extends to this
claim. Additional claims from the warranty are
excluded.
The guarantee voucher is to be presented to
claim the warranty.
It must be given to the customer together with
the WMF pressure cooker. The customer must
then present the completed voucher for any
warranty claims.
Naturally, your legal warranty entitlements are
not limited by this guarantee declaration.
During the warranty period, you are entitled to
the legal warranty rights for subsequent fulfil-
ment, withdrawal, reduction and compensation
to the extent permitted by law.
The following are excluded from the warranty
obligation:
– Cooking indicator seal
– Safety valve
– Sealing ring
These parts are subject to normal wear and
tear. 10 year supply guarantee for spare parts.
20
6. Care and maintenance of the
pressure cooker
6.1. Cleaning
The pressure cooker should be cleaned after
every use.
Unclip the lid handle and rinse off from both
sides under running water (D) (N).
Remove the sealing ring (10) from the lid (O)
and rinse by hand.
The pot, lid and inserts can be washed in
the dishwasher. Food residues should not be
scraped off but soaked in water.
Scald with a vinegar and water solution to
remove lime deposits.
The base of the pot should also be cleaned
regularly.
6.2. Storage
Place the lid upside down on the pot after
cleaning. After cleaning, store the sealing ring
(10) separately to protect it.
6.3. Maintenance
Your pressure cooker is a technical appliance
and its individual parts may be subject to
wear-and-tear. Therefore, after prolonged use,
you should check all the individual parts in
accordance with the spare parts list.
If any changes are apparent, the parts in
question must be replaced.
Only use original spare parts produced by the
manufacturer.
Note: Any damage to the lid handle (5) will
require a factory repair.
7. Versatile use
The advantages of pressure cooking do not only
apply to standard methods of food preparation:
7.1. Cooking frozen food
Frozen food can be placed in the pot directly
from the freezer. Meat must be defrosted
slightly before browning. Vegetables can be
placed in the insert straight from the packet.
While the heating-up times will be prolonged,
cooking times will remain the same.
7.2. Cooking wholefood
Wholefood often involves grains and pulses.
Grains and pulses need not necessarily be soa-
ked before cooking them in a pressure cooker.
If they are not soaked, cooking times will be
prolonged by about 50 %.
As well as the minimum liquid volume of 1/4 l,
at least 2 parts liquid must be added to 1 part
grain/pulses. The residual heat from the hob
can be used for final swelling. Remember that,
when cooking foaming or expanding foods
(grains, pulses), the pot can only be filled to
half its capacity.
7.3. Making preserves
1 l preserving jars should be cooked in a 6.5 l or
8.5 l pressure cooker, while smaller jars should
be cooked in a 4.5 l pressure cooker. Prepare the
food to be bottled as normal. Pour 1/4 l water
into the pot. Place the preserving jars into the
perforated insert.
Cook vegetables / meat on the second orange
indicator for approximately 20 minutes.
Cook stoned fruit on the first orange indicator
for approximately 5to10 minutes.
For releasing steam allow the pot to cool down
slowly (method 1) – do not depressurize by
means of the sliding indicator or under run-
ning water, as otherwise the juice will be spill
out of the jars.
7.4. Juicing
You can use your pressure cooker to juice small
quantities of fruit.
Pour 1/4 l water into the pot. Place the fruit

23
DEGBESBGDKFIFRGRITNLNOPLPTRUSESKSICZTRHUHR
Cause
Diameter of the hob is unsuitable.
Inappropriate heat level.
Lid incorrectly positioned.
The ball in the safety valve (9) is not
positioned correctly.
Not enough liquid (at least 1/4 l).
Sealing ring (10) and/or pot edge are not clean.
The sliding indicator (7) is not in position ZU/LOCKED.
Sealing ring (10) is damaged or hard
(due to wear).
The ball does not sit correctly in the valve.
The ball was forced into the upper chamber.
If there is a problem, always remove
the pressure cooker from the hob.
Never use force to open!
Rectification
Select hob which is suitable for the
pot diameter.
Set to the highest heat level.
Fully depressurise the pot, open the lid. Check
that the sealing ring (10) is positioned properly
and close the pot again.
Fully depressurize the pot, open, remove handle,
check the safety valve (9), check that the metal
ball is positioned properly in the lid (F) and (G)
close the pot again.
Fully depressurise the pot, open the lid.
Add liquid and close the pot again.
Fully depressurise the pot, open the lid. Clean
sealing ring (10) and pot edge and close the pot
again.
Move the sliding indicator (7) to position ZU/LOCKED.
Correct the seating of the seals or replace with
original WMF spare parts.
Fully depressurise the pot, open the lid and
remove the handle. Force the ball into the
lower chamber (F). Check the main valve (3)
for moveability (G) and close the pot again.
22
9. Preclusion of liability
No guarantee is assumed for damage caused
by the following:
– Inappropriate and improper use
– Incorrect or careless handling
– Improperly implemented repairs
– The fitting of spare parts which do not
correspond to the original design
– Chemical or physical effects on the pot
surfaces
– Non-compliance with these operating
instructions
Name and address of the warranty provider
WMF Group GmbH
Eberhardstraße 35
73312 Geislingen/Steige
Germany
wmf.com
The guarantee claim must be filed either
directly with the guarantee provider or with
an authorised WMF dealer.
10. Troubleshooting
Pressure cooker problems
Excessive heating-up period or the cooking
indicator (1) does not rise.
Steam escapes from the lid.
Steam emerges continuously from the
safety valve (9) (does not apply to the
heating-up phase).

25
DEGBESBGDKFIFRGRITNLNOPLPTRUSESKSICZTRHUHR
Soups
Cooking temperature is at
2nd ring. Make sure there
is at least 1/4 l to a ma-
ximum of 1/2 capacity of
cooker. Special insert not
required.
Vegetables
Cooking temperature is at
1
st
ring. Make sure there
is at least 1/4 l of liquid.
For sauerkraut and bee-
troot, no insert required.
For other dishes the per-
forated insert is required.
From the beans onwards
the cooking temperature
increases (2nd ring).
Pulses, Cereals
Cooking temperature is at
2nd ring. Make sure there
is at least 1/4l to a ma-
ximum of 1/2 capacity
of cooker. Using 2 parts
water to 1 part cereal.
Cereal not soaked in ad-
vanced needs 20 – 30 min.
longer.
Fruit
Cooking temperature is at
1
st
ring. Make sure there is
at least 1/4 l of liquid.
Cooking tipps
and tricks
Minutes
Peas, lentils 12 - 15 Soaked pulses
Beef broth 25 - 30 Correct for all meats
Vegetable soup 5 - 8
Goulash soup 10 - 15
Chicken soup 20 -25 Cooking time dependent on size
Oxtail soup 35
Potato soup 5 - 6
Aubergines, cucumbers, 2 - 3 Steamed vegetables keep their colour
tomatoes better
Cauliflower, peppers, leek 3 - 5
Peas, celeriac, kohlrabi 4 - 6
Fennel, carrots, 5 - 8
Savoy cabbage
Beans, curly kale, 7 - 10
red cabbage
Sauerkraut 10 - 15
Beetroot 15 - 25
Potatoes 6 - 8
Potatoes, cooked 6 - 10 Potatoes cooked in their skins burst
in their skins if in their skins steam is released fast
Peas, beans lentils 10 - 15 Cook large beans 10 min longer
Buckwheat, millet 7 - 10 Cooking time for soaked cereal
Maize, spelt grain 6 - 15 Cooking time for soaked cereal
Pudding rice 20 - 25 Cooking temperature at 1
st
ring
Long-grain rice 6 - 8
Brown rice 12 - 15
Wheat, rye 10 - 15 Cooking time for soaked cereal
Cherries, plums 2 - 5 It is advisable to use the
perforated insert
Apples, pears 2 - 5 It is advisable to use the
perforated insert
Cooking time begins as soon as the required cooking
indicator ring is visible
Times given are guides
Choose preferably shorter times as food can always be cooked longer
Times given result in firmly cooked vegetables
The cooking temperature at 1st ring is 110 °C and at 2
nd
ring is 119 °C
Recipes are to be found at www.wmf.com
24
Pork and Veale
Cooking temperature is at
2nd ring. Make sure there
is at least 1/4 l of liquid.
Special insert is not re-
quired with any dish.
Beef
Cooking temperature is at
2nd ring. Make sure there
is at least 1/4 l of liquid.
Perforated insert required
for beef tongue.ötigt.ötigt.
Chicken
Cooking temperature is at
2nd ring and amount of
at least 1/4 l. remain the
same. Perforated insert
needed for boiling fowl.
Game
Cooking temperature is at
2nd ring. Make sure there
is at least 1/4 l of liquid.
No special insert needed.
Lamb
Cooking temperature is at
2nd ring. Make sure there
is at least 1/4 l of liquid.
Fish
Cooking temperature is at
1st ring. Make sure there
is at least 1/4 l of liquid.
No insert needed for ra-
gout or stew. Otherwise
use solid insert.
Minutes
Pork cut in strips 5 - 4
Ragout of pork 10 - 15
Joint of pork 20 - 25 Time depends on size and shape
Veal cut in strips 5 - 7
Ragout of veal 10 - 15
Knuckle of veal 25 - 30
Veal tongue 15 - 20 Cover with water
Joint of veal 20 - 25 Time depends on size and shape
Meat loaf 10 - 15
Marinated joint 30 - 35
Tongue 45 - 60
Strips of beef 6 - 8
Goulash 15 - 20
Roulades 15 - 20
Joint of beef 35 - 45 Time depends on size and shape
Boiling fowl 20 - 25 Max. 1/2 capacity
Chicken pieces 6 - 8
Turkey leg 25 - 30 Depending on size
Turkey ragout 6 - 10
Turkey escalope 2 - 3
Rabbit 15 - 20
Loin of rabbit 10 - 12
Venison 25 - 30
Venison stew 15 - 20
Lamb stew 20 - 25 Mutton requires longer cooking time
Joint of lamb 25 - 30 Depends on size and shape
Fillet of fish 2 - 3 Steamed in own juice
Whole fish 3 - 4 Steamed in own juice
Ragout or stew 3 - 4
11. Cooking time chart

27
DEGBESBGDKFIFRGRITNLNOPLPTRUSESKSICZTRHUHR
Instrucciones de manejo
ES
Contenido
1. Indicaciones de seguridad
2. Utilización de la olla rápida
3. Indicaciones de uso
4. Cocinar con la olla rápida
5. Cuatro métodos para liberar la presión
6. Cuidados de la olla rápida
Limpieza, conservación, mantenimiento
7. Múltiples aplicaciones
8. Declaración de garantía
9. Exención de responsabilidad
10. Solución de averías
11. Tabla de tiempos de cocción
Consultar numeración en el interior
de las dos contraportadas.
1. Indicaciones
de seguridad
1. Lea detenidamente las instrucciones y todas
las indicaciones antes de empezar a utilizar
la olla rápida WMF. La incorrecta utilización
de la olla podría dañarla.
2. No deje la olla rápida a nadie que no haya
leído antes las instrucciones.
3. Mantenga a los niños alejados de la olla
cuando la esté utilizando.
4. Nunca utilice la olla rápida en el horno. Las
asas, las válvulas y los dispositivos de segu-
ridad se dañan con las altas temperaturas.
La olla rápida solo puede ser utilizada para
el fin para el cual está diseñada: la cocción
de alimentos.
5. Cuando esté bajo presión, tenga mucho
cuidado al mover la olla. No toque ninguna
superficie caliente. Utilice los mangos y los
botones. En caso necesario, utilice guantes.
6. Utilice la olla rápida sólo para los fines
previstos.
7. Esta olla cocina por presión. La utilización
de la olla para otros fines podría ocasionar
quemaduras. Asegúrese de haber cerrado
la olla correctamente antes de ponerla
en la fuente de calor. En el manual de
instrucciones encontrará información al
respecto.
8. Nunca abra la olla rápida con violencia.
Antes de abrirla asegúrese de que se ha
eliminado por completo la presión interior y,
para ello, el indicador de cocción debe estar
totalmente hundido en el mango. No toque
el indicador de cocción.
9. No utilice nunca la olla sin haber echado
antes agua, de hacerlo, le ocasionaría graves
daños. Mínimo: 1/4 l de líquido.

29
DEGBESBGDKFIFRGRITNLNOPLPTRUSESKSICZTRHUHR
2. Utilización de la olla rápida
Antes de usar la olla por primera vez
2.1. Abrir la olla
Deslice la corredera de cocción (7) sostenién-
dola por ambos lados hasta el final del mango.
La corredera de cocción (7) deberá estar en
ABIERTO/OPEN (A).
Gire el mango de la tapa (5) hacia la derecha,
hasta que las marcas de la tapa y del mango
del cuerpo (6) coincidan (B). Levante la tapa.
2.2. Limpiar la olla
Antes de usar la olla por primera vez, quite
las pegatinas y lave todas las piezas (véase el
capítulo »Limpieza«).
Gire la tapa y quite el mango (5). Para ello,
tire del pulsador naranja (4) situado en la parte
inferior del mango de la tapa (5) en la direc-
ción de la flecha hasta el final del mango (C),
abra el mango y desengánchelo (D). Quite el
anillo-junta (10) de la tapa (O).
2.3. Cerrar la olla
Enganche el mango en la tapa y deslice el puls-
ador naranja (4) por el borde de la tapa hasta
que encaje perceptiblemente (E). Coloque el
anillo-junta (10) en el borde de la tapa de
forma que quede situado debajo del borde que
dobla hacia dentro (G). Coloque la tapa (véase
las marcas en la tapa y en el mango de la olla)
y gire el mango de la tapa hacia la izquierda
hasta que haga tope (B). Deslice la corredera
de cocción (7) exactamente hasta la posición
CERRADO/CLOSED.
La olla no debe montarse erróneamente. El
montaje solo debe realizarse de la manera
prevista.
3. Indicaciones de uso
3.1. Comprobación de los dispositivos
de seguridad antes de cada uso
Asegúrese de que el anillo-junta (10) y el
borde de la tapa están limpios. Compruebe
que la bola está asentada correctamente en
la válvula de seguridad (9) situada en la parte
inferior de la tapa (G).
Si la bola se encuentra en la cámara superior
de la válvula de seguridad/del dispositivo au-
tomático de calentamiento (9), retire el mango
(5) y presione la bola con el dedo introducién-
dola en la cámara inferior (F).
Retire el mango y compruebe la movilidad de la
válvula principal (3) presionando con el dedo (H).
Compruebe si la junta indicador de cocción (2)
asienta correctamente o si está dañada.
Observe: No presione completamente la junta
indicador de cocción, porque al hacerlo, podría
dañar el sistema de presión residual y la olla
podría dejar de funcionar correctamente (P).
Enganche el mango en la tapa (E). Coloque la
tapa en la olla y ciérrela (B).
3.2. Cantidades de líquido
Para generar vapor se necesita, al menos,
1/4 l de líquido, independientemente de que se
utilice o no el cestillo (12).
Deberá llenarse la olla rápida hasta los 2/3
como máximo para que su funcionamiento no
se vea afectado (M). Cuando cocine alimen-
tos que generan espuma y se hinchan (por
ejemplo, caldo de carne, legumbres, vísceras,
compota), llene la olla solo hasta la mitad. Si
desea más información, consulte el capítulo
»Preparación de alimentos integrales«.
Si desea rehogar algún alimento (cebollas, tro-
zos de carne, etc.) antes de cocinarlo a presión,
puede utilizar la olla rápida WMF como si se
tratase de una olla convencional.
Cuando prepare algún plato, antes de cerrar
la olla rápida, deberá remover el contenido
y añadir la cantidad de líquido necesaria
(al menos, 1/4 l).
28
Observación importante:
Asegúrese de que no se evapore todo el líquido.
Las piezas de plástico podrían derretirse y
dañar la olla. También podrían quemarse los
alimentos o derretirse el aluminio del fondo
y dañar la placa. Si esto sucediera, apague
la fuente de calor y no mueva la olla hasta
que se enfríe completamente.
10. No llene la olla nunca más de 2/3 de su
capacidad. Cuando cocine alimentos que
se expandan durante la cocción, como
arroz o verduras secas, llene la olla, como
máximo, hasta la mitad de su capacidad y
observe las instrucciones complementarias
del fabricante de la olla.
11. Mantenga la olla controlada en todo
momento. Regule la potencia de calor
para que el indicador no suba del
correspondiente anillo naranja. Si no se
reduce la potencia del calor, saldrá vapor
por la válvula. Los tiempos de cocción
serán diferentes y la pérdida de líquido
puede ocasionar averías.
12. Utilice sólo las fuentes de calor indicadas
en el manual de instrucciones.
13. Cuando cocine carne que tenga piel (como
lengua), que pueda inflarse bajo el efecto
de la presión, no pinche la carne mientras
la piel esté hinchada, puesto que podría
quemarse.
14. Agite la olla antes de abrirla, para que
las burbujas de vapor no salpiquen y usted
no se queme. Esto resulta especialmente
importante cuando efectúe una descom-
presión rápida o sosteniendo la olla bajo
un chorro de agua corriente.
15. Cuando efectúe una descompresión rápida
o poniendo la olla bajo un chorro de agua
corriente, mantenga las manos, la cabeza
y el cuerpo fuera de la zona de peligro.
Podría dañarse con el vapor que sale.
16. Antes de utilizar la olla, compruebe que
los dispositivos de seguridad, las válvulas
y las juntas están en perfectas condiciones
de funcionamiento. Sólo así se podrá
garantizar el funcionamiento seguro de
la olla. En el manual de instrucciones en-
contrará información al respecto.
17. No utilice la olla rápida bajo presión para
freír alimentos con aceite. Una utilización
inadecuada de la olla rápida puede provo-
car lesiones.
18. No manipule los sistemas de seguridad.
Limítese a cumplir las instrucciones
de mantenimiento indicadas en las
instrucciones de uso.
19. Cambie periódicamente las piezas que
sufran desgaste (véase la garantía). Las
piezas que se decoloren, se agrieten o pre-
senten otros daños o bien que no asienten
correctamente, deberán cambiarse por pie-
zas de repuesto originales WMF.
20. Utilice siempre piezas de repuesto origi-
nales WMF. Utilice especialmente siempre
ollas y tapas del mismo modelo.
21. No utilice la olla rápida si alguno de sus
componentes o la propia olla rápida pre-
sentan daños o deformaciones, o si su
funcionamiento no corresponde con las
descripciones presentes en las instruc-
ciones de uso. En estos casos diríjase a la
tienda especializada WMF más cercana
o póngase en contacto con el departa-
mento de servicio al cliente de WMF Group
GmbH.
Guarde estas instrucciones de uso.

31
DEGBESBGDKFIFRGRITNLNOPLPTRUSESKSICZTRHUHR
El sistema de presión residual garantiza que la
olla sólo se pueda abrir una vez que la presión
haya caído completamente, es decir, cuando el
anillo amarillo esté totalmente oculto.
Si el anillo amarillo sigue a la vista (K), el dispo-
sitivo de seguridad de la presión residual se ha
activado. Para soltarlo, deslice la corredera de
cocción (7) hasta la posición CERRADO/LOCKED.
Si no sale más vapor, agite la olla.
De esta forma se deshacen las burbujas de vapor
de los alimentos que puedan haberse formado,
especialmente en el caso de alimentos líquidos
y pastosos, y que le pueden salpicar al sacar la
tapa. A continuación, gire el mango de la tapa
hacia la derecha y abra la olla.
4.6. Indicaciones para placas de inducción
La base TransTherm® (11) es apta para todo tipo
de placas, incluso para las de inducción.
En las placas de inducción puede oírse un zum-
bido si se aplica un nivel de cocción elevado.
Este ruido se produce por una cuestión técnica,
y no significa que la placa ni la olla estén defec-
tuosas.
El tamaño de la olla deberá coincidir con el del
campo de cocción, puesto que de no ser así,
existe la posibilidad (especialmente si los
diámetros son pequeños) de que el campo
de cocción (campo magnético) no reaccione
en la base de la olla.
5. Tres métodos para liberar la presión
Observación importante:
Si ha cocinado alimentos que forman espuma
o que se hinchan (como legumbres, caldo de
carne, cereales), no deje que la olla pierda la
presión utilizando el método 2 ó 3.
Las patatas cocidas con pela revientan cuando la
olla se descomprime utilizando el método 2 ó 3.
Cuando efectúe una descompresión rápida
utilizando la corredera de cocción o poniendo
la olla bajo un chorro de agua corriente,
mantenga las manos, la cabeza y el cuerpo
fuera de la zona de peligro. Podría dañarse
con el vapor que sale.
Método 1
Retire la olla de la fuente de calor. Tras un breve
espacio de tiempo, el indicador desciende (1).
Cuando esté totalmente oculto en el mango (I),
deslice lentamente la corredera de cocción
hasta la posición ABIERTO/OPEN (A). Al hacerlo,
se escapará el resto del vapor que quede por
debajo del mango de la tapa. Cuando no salga
más vapor, agite la olla un poco, para
deshacer las burbujas de vapor que se hayan
formado en los alimentos.
Método 2
En los alimentos con tiempos de cocción cortos
(por ejemplo, verduras), deslice la corredera de
cocción (7) despacio, paso a paso, hacia la posi-
ción ABIERTO/OPEN (A), hasta que salga vapor
por debajo del mango de la tapa.
Cuando haya colocado la corredera de cocción
en la posición ABIERTO/OPEN, no salga más
vapor y el indicador haya descendido por
completo (I), agite la olla y ábrala.
Método 3
Si le molesta el vapor, coloque simplemente la
olla en el fregadero y deje correr un chorro de
agua fría por encima de la tapa (L) hasta que
el indicador (1) quede oculto en el mango de
la tapa (I). Agite la olla y ábrala.
30
¡Atención! No utilice nunca la olla sin sufi-
ciente líquido y asegúrese siempre de que el
líquido no se consume completamente. Si no
observa estas indicaciones, la comida podría
quemarse y la olla y los mangos de plástico
podrían resultar dañados.
4. Cocinar con la olla rápida
4.1. Generalidades
En esta olla los alimentos se cocinan a presión,
es decir, con temperaturas superiores a 100 °C.
Los tiempos de cocción se reducen así hasta en
un 70 %, lo que supone un ahorro considerable
de energía. Además, este tipo de cocción rápida
mantiene el olor, el sabor y las vitaminas.
4.2. Cocinar con cestillos
Dependiendo del tamaño de la olla, podrá
utilizar cestillos (12) y soporte (13).
Podrá adquirirlos en una tienda especializada
(véase »Accesorios y piezas de repuesto«
en la portada).
4.3. Calentar
Coloque la olla llena y cerrada en la fuente de
calor a la máxima potencia. Mediante el dis-
positivo automático de calentamiento (9), que
sirve al mismo tiempo de válvula de seguridad,
se expulsa aire durante la fase inicial de la ebul-
lición hasta que la válvula se cierra haciendo un
sonido, y se puede formar presión.
El indicador (1) se eleva, el anillo amarillo y los
dos anillos naranjas quedan a la vista (J).
Reduzca el foco de calor a tiempo y hasta una
potencia suficiente de forma que sólo quede vi-
sible el anillo naranja recomendado en la receta.
4.4. Tiempos de cocción
El tiempo de cocción empieza cuando el anillo
recomendado en la receta queda totalmente
visible. Asegúrese de que la posición del anillo
permanece estable. Regule el fuego. Si el indi-
cador (1) desciende hasta quedar por debajo del
anillo naranja correspondiente, deberá aumen-
tar la potencia de la fuente de calor.
El tiempo de cocción se prolongará.
Si el indicador (1) sube y queda por encima del
segundo anillo naranja, se generará una presión
excesiva que saldrá emitiendo un sonido
a través de la válvula principal (3) del mango
de la tapa.
Retire la olla de la fuente de calor, espere a que
el indicador haya bajado del segundo anillo na-
ranja y reduzca la potencia del foco de calor.
La olla rápida permite lograr tiempos de cocción
cortos, porque gracias a la presión del vapor de
la olla se alcanzan temperaturas más elevadas:
Primer anillo, aproximadamente 110 °C
para alimentos sensibles como el pescado
o la compota.
(45 kPa presión de funcionamiento,
130 kPa presión de regulación)
Segundo anillo, aproximadamente 119 °C
para todos los demás alimentos.
(95 kPa presión de funcionamiento, 130 kPa
presión de regulación)
Las personas sensibilizadas con el ahorro en-
ergético desconectan la fuente de calor antes
de que finalice el tiempo de cocción, porque el
calor acumulado en la olla basta para finalizar el
proceso. Un mismo alimento puede tener tiem-
pos de cocción diferentes, ya que la cantidad, la
forma y el estado varían.
4.5. Abrir la olla
Tras finalizar el tiempo de cocción, retire la
olla rápida de la fuente de calor. La tapa sólo
se podrá abrir y retirar de la olla una vez que
la presión haya caído completamente, es decir,
cuando el indicador (1) haya desaparecido com-
pletamente del mango.

33
DEGBESBGDKFIFRGRITNLNOPLPTRUSESKSICZTRHUHR
Introduzca 1/4 l de agua en la olla, coloque
la fruta del cestillo perforado al cestillo no
perforado y eche azúcar al gusto. Cuézala en el
2˚anillo naranja. Dependiendo del tipo de fruta,
el tiempo de cocción oscila entre 10 y 20minutos.
Deje que salga la presión de la olla colocándola
bajo un chorro de agua corriente (método 3).
Agítela un poco antes de abrirla.
7.5. Esterilizar
Podrá esterilizar biberones, tarros de cristal,
etc. muy rápidamente.
Colóquelos con la abertura hacia abajo en el
cestillo perforado, eche 1/4 l de agua y esteri-
lícelos durante 20minutos como mínimo en el
2°anillo naranja. Deje que enfríe lentamente
(método 1).
7.6. Cocción con interiores
Dependiendo del tamaño de la olla, podrá utili-
zar interiores y soporte. Podrá adquirirlos en la
tienda especializada como accesorios.
La olla rápida también le permite preparar
varios platos al mismo tiempo. Los diferentes
ingredientes se separan utilizando cestillos. El
plato que necesite un mayor tiempo de cocción
deberá colocarse en primer lugar sin cestillo en
la olla.
Ejemplos
Asado (20 min) – base de la olla
Patatas (8 min) – cestillo perforado
Verdura (8 min) – cestillo no perforado
Deje que el asado se haga durante 12 minutos.
A continuación, abra la olla según las indicacio-
nes. Coloque las patatas en el cestillo perforado
sobre el soporte portacomidas, coloque las ver-
duras en el cestillo no perforado, cierre la olla
y deje que se hagan durante otros 8 minutos.
Si los tiempos de cocción de los diferentes
alimentos no son muy diferentes, puede
introducir todos los cestillos en la olla al
mismo tiempo.
Al abrir de vez en cuando la olla, sale vapor, por
lo que deberá echar más líquido del necesario.
8. Declaración de garantía
Durante el período de garantía le garantizamos
el correcto funcionamiento del producto y de
todos sus componentes. El período de garantía es
de 3 años y comienza el día de la adquisición del
producto WMF en la tienda especializada, y el
cupón de garantía deberá estar debida y comple-
tamente cumplimentado por el vendedor.
Si el producto presentara defectos durante el pe-
ríodo de garantía, estos defectos serán solucio-
nados de forma gratuita mediante el reemplazo
de los componentes defectuosos por otros en
buen estado.
Los componentes defectuosos solo puede ser
reemplazados por el distribuidor especializado
WMF o por el departamento de servicio al cliente
de WMF Group GmbH en Geislingen. El dere-
cho a garantía se limita exclusivamente a esto.
Queda excluida cualquier otra reclamación de
garantía.
Para poder alegar el derecho de garantía, es
necesario presentar el cupón de garantía debida-
mente cumplimentado.
Se deberá entregar al comprador simultánea-
mente junto con la olla rápida WMF. El derecho
de garantía solo es válido si se presenta el cupón
debidamente cumplimentado.
De más está decir que sus derechos legales de
garantía no se verán afectados por esta declara-
ción de garantía.
Usted tiene derechos legales de garantía dentro
del plazo de la misma, respecto a cumplimiento
posterior, reducción, desistimiento y daños y
perjuicios según el alcance legal correspondiente.
Los siguientes componentes quedan excluidos de
la garantía:
- Junta de indicador de cocción
- Válvula de seguridad
- Anillo de junta
Estos componentes están sometidos a un des-
gaste natural. 10 años de garantía de entrega
sobre los repuestos.
32
6. Cuidados de la olla rápida
6.1. Limpieza
Limpie la olla rápida después de cada uso.
Desencaje el mango de la tapa y lávelo por
ambos lados con un chorro de agua corriente
(D) (N).
Suelte el anillo-junta (10) de la tapa (O)
y enjuáguelo.
La olla, la tapa y los cestillos se pueden lavar
en el lavavajillas. No rasque los restos de
suciedad que queden, deje que se ablanden.
Si presenta cal, ponga la olla al fuego con
agua y vinagre.
Limpie periódicamente la base de la olla.
6.2. Conservación
Después de la limpieza coloque la tapa en
posición invertida sobre la olla. Después de la
limpieza guarde el anillo de junta (10) por se-
parado para protegerlo.
6.3. Mantenimiento
Las piezas de la olla rápida están sometidas
a un desgaste. Por ello, después de un largo
período de utilización, deberán revisarse com-
probando la »Lista de piezas de repuesto«.
Si se han producido cambios visibles, las piezas
afectadas deberán cambiarse.
Utilice siempre piezas de repuesto originales
del fabricante.
Observación: Si se daña el mango de la tapa (5),
deberá repararse en el servicio técnico.
7. Múltiples aplicaciones
Las ventajas de este modo de cocina rápida
no se aplican sólo a los modos de preparación
convencionales:
7.1. Preparación de alimentos congelados
Los alimentos congelados pueden cocinarse en
la olla rápida sin necesidad de descongelarlos
antes. Deje que se descongele un poco la carne
antes de sofreírla. La verdura puede echarse
directamente del envase en la olla.
El agua tardará más tiempo en romper a hervir,
pero los tiempos de cocción no varían.
7.2. Preparación de alimentos integrales
Para hacer comidas integrales, se suelen utili-
zar cereales y legumbres. En la olla rápida, no
es necesario poner a remojo antes los cereales
ni las legumbres. Los tiempos de cocción suelen
ser la mitad de los convencionales.
Introduzca 1/4 l de líquido como mínimo en
la olla y además por cada parte de cereales /
legumbres añada como mínimo 2 partes de
líquido. El calor residual del foco de calor
puede utilizarse para que la comida acabe de
hacerse. Observe que para los alimentos que
generan espuma o se hinchan (cereales, legum-
bres), deberá llenar la olla sólo hasta la mitad.
7.3. Preparación de conservas
Para recipientes de 1 l se utiliza la olla de 6,5
l y 8,5 l, para envases más pequeños, la olla
de 4,5 l. Prepare los alimentos como siempre.
Llene la olla con 1/4 l de agua. Introduzca los
recipientes en el cestillo perforado.
Cueza la verdura/la carne en el 2˚ anillo
naranja durante aproximadamente 20 minutos
Cueza la fruta en el 1˚ anillo naranja durante
aproximadamente 5minutos
Cueza la fruta con hueso en el 1˚ anillo
naranja durante aproximadamente 10 minutos
Para hacer salir el vapor, deje que la olla se
enfríe lentamente (método 1): no utilice la cor-
redera de cocción ni la coloque bajo un chorro
de agua, porque de hacerlo así, el zumo haría
presión en los tarros.
7.4. Exprimir
Puede utilizar la olla rápida para hacer zumo
de pequeñas cantidades de fruta.

35
DEGBESBGDKFIFRGRITNLNOPLPTRUSESKSICZTRHUHR
Causa
El diámetro del foco de calor no es apto.
La potencia del foco de calor no es la adecuada.
La tapa no está colocada correctamente.
La bola no asienta correctamente en la válvula
de seguridad/en la automática de cocción (9).
Falta líquido (mín. 1/4 l).
El anillo-junta (10) y/o el borde de la olla no
están limpios.
La corredera de cocción (7) no está en CERRADO/LOCKED.
El anillo-junta (10) está dañado o está duro
(por desgaste).
La bola no asienta correctamente en la válvula.
La bola se ha introducido en la cámara superior.
En caso de avería, retire siempre la olla
rápida de la fuente de calor.
No fuerce nunca la olla para abrirla.
Solución
Seleccione el foco de calor adecuado al
diámetro de la olla.
Aumente la potencia.
Libere completamente la presión de la olla, abra
la tapa. Compruebe que el anillo-junta (10)
asienta correctamente y vuelva a cerrar la olla.
Libere totalmente la presión de la olla,
ábrala, retire el mango, compruebe la válvula
de seguridad (9), compruebe que la bola de
metal asienta en la tapa (F) y (G) vuelva a
cerrar la olla.
Libere completamente la presión, abra la tapa.
Eche más líquido y cierre nuevamente la olla.
Libere completamente la presión, abra la tapa.
Limpie la junta de cierre (10) y el borde de la
tapa y vuelva a cerrar la olla.
Coloque la corredera de cocción (7) en CERRADO/LOCKED.
Cambie el anillo-junta (10) por otro original
WMF.
Libere completamente la presión, abra la
tapa y retire el mango. Introduzca la bola en
la cámara inferior (F), compruebe si la válvula
principal (3) se mueve (G) y vuelva a cerrar
la olla.
34
9. Exención de responsabilidad
No se ofrece ninguna garantía en caso de
daños debidos a los siguientes motivos:
– Utilización indebida e incorrecta
– Trato incorrecto o negligente
– Reparaciones incorrectas
– El montaje de piezas de repuesto que no
se corresponde con el modelo original
– Efectos químicos o físicos sobre las
super-ficies de la olla
– Incumplimiento de estas instrucciones de
manejo
Nombre y dirección del otorgante de la ga-
rantía
WMF ESPA—OLA, S. A.
Avda. Llano Castellano, 15
28034 Madrid (España)
WMF Group GmbH
Eberhardstraße 35
73312 Geislingen/Steige
Germany
wmf.com
El derecho de garantía deberá hacerse efectivo
directamente en una tienda especializada WMF
o en uno de los servicios técnicos indicados en
este manual.
10. Solución de averías
Averías de la olla rápida
El tiempo inicial de calentamiento o el
indicador (1) no sube.
El vapor sale por la tapa.
De la válvula de seguridad/automática de
cocción (9) sale continuamente vapor (no se
aplica a la fase inicial de calentamiento).

37
DEGBESBGDKFIFRGRITNLNOPLPTRUSESKSICZTRHUHR
Hortalizas
Cocinar con el anillo 1 y
tener en cuenta la cantidad
mínima de llenado de 1/4 l.
Para la col fermentada
y la remolacha roja no se
necesita ningún accesorio.
Para los demás platos se
precisa el portacomidas.
A partir de las judías se in-
crementa la temperatura del
tiempo de cocción (Anillo 2).
Pescado
Cocinar con el anillo 1 y
tener en cuenta la cantidad
mínima de llenado de 1/4 l.
Para el ragout y el goulasch
no se precisa ningún acce-
sorio, para lo demás emplear
los portacomidas no calados.
Legumbres secas
Cereales
Cocinar con el anillo 2 y
tener en cuenta la cantidad
mínima de llenado de 1/4 l
y la cantidad máxima de
llenado de 1/2 contenido de
la olla, con dos partes de
agua por cada parte de cere-
ales. Los cereales no reblan-
decidos precisan una cocción
de 20–30min más larga.
Fruta
Cocinar con el anillo 1 y
tener en cuenta la cantidad
mínima de llenado de 1/4 l.
Minutos
Berenjenas, pepinos, 2 - 3 Hortalizas cocidas al vapor
tomates
Coliflor, pimiento, puerro 3 - 5 no se disuelven tan rápidamente
Guisantes, apio, colinabo 4 - 6
hinojo, zanahoria, berza 5 - 8
Judías, col común, lombarda 7 - 10
Col fermentada 10 - 15
Remolacha roja 15 - 25
Patatas hervidas 6 - 8
Patatas con piel 6 - 10 Las patatas con piel se abren si
se escapa el vapor muy rápido
Filetes de pescado 2 - 3 Rociados en su propio jugo
Pescados enteros 3 - 4 Rociados en su propio jugo
Ragout o goulasch 3 - 4
Guisantes, judías, lentejas 10 - 15 Las judías grandes 10 min. más
de cocción
Trigo sarraceno, 7 - 10 Tiempo de cocción para cereales
gachas de mijo reblandecidos
Maíz, escanda verde 6 - 15 Tiempo de cocción para cereales
reblandecidos
Arroz con leche 20 - 25 Cocción con el anillo 1
Arroz de grano largo 6 - 8
Arroz integral 12 - 15
Trigo, centeno 10 - 15 Tiempo de cocción para cereales
reblandecidos
Cerezas, ciruelas 2 - 5 Cocción con portacomidas calado.
Manzanas, peras 2 - 5 Cocción con portacomidas calado.
El tiempo de cocción empieza cuando en el indicador esté visible
el anillo recomendado.
Los tiempos de cocción indicados son aproximativos
Es preferible seleccionar tiempos de cocción cortos, pues la cocción
siempre puede continuarse cuando sea preciso.
Los tiempos de cocción para las verduras están definidos de manera
que éstas sigan algo crujientes después de la cocción.
La temperatura de cocción en el primer anillo asciende a 110 °C
y en el segundo a 119 °C.
Encontrará recetas en www.wmf.com 36
11. Tabla de tiempos de cocción
Cerdo y ternerae
Cocinar con el anillo 2 y
tener en cuenta la cantidad
mínima de llenado de 1/4 l.
No se necesita ningún
accesorio especial.
Vaca
Cocinar con el anillo 2 y
tener en cuenta la cantidad
mínima de llenado de 1/4
l. Para la lengua de vaca se
necesita un portacomidas
calado.
Pollo
Cocinar con el anillo 2 y
tener en cuenta la cantidad
mínima de llenado de 1/4 l.
Para la sopa de pollo se
necesita un portacomidas
calado.
Caza
Cocinar con el anillo 2 y
tener en cuenta la cantidad
mínima de llenado de 1/4 l.
No se necesita ningún
accesorio especial.
Cordero
Cocinar con el anillo 2 y
tener en cuenta la cantidad
mínima de llenado de 1/4 l.
Sopas
Cocinar con el anillo 2 y
tener en cuenta la cantidad
mínima de llenado
de 1/4 l y la cantidad
máxima de llenado de 1/2
contenido de la olla.
No se necesita ningún
accesorio especial.
Minutos
Cerdo troceado 5 - 7
Goulasch de cerdo 10 - 15
Carne de cerdo adobada 20 - 25 Tiempo de cocción según tamaño y forma
Ternera troceada 5 - 7
Goulasch de ternera 10 - 15
Pierna de ternera en pieza 25 - 30
Lengua de ternera 15 -20 Cubrir de líquido
Asado de ternera Vasca 20 - 25 Tiempo de cocción según tamaño y forma
Asado de carne picada 10 - 15
Carne adobada 30 - 35
Lengua de vaca 45 -60
Troceada 6 - 8
Goulasch 15 - 20
Rulada 15 - 20
Asado de vaca 35 - 45 Tiempo de cocción según tamaño y forma
Sopa de pollo 20 - 25 Máx. 1/2 cantidad de llenado
Piezas de pollo 6 - 8
Muslo de pavo 25 - 30 Dependiendo del grosor del muslo
Ragout de pavo 6 - 10
Filete de pavo 2 - 3
Asado de liebre 15 - 20
Lomo de liebre 10 - 12
Asado de ciervo 25 - 30
Goulasch de ciervo 15 - 20
Ragout de cordero 20 -25 El carnero tiene tiempos
de cocción más largos
Asado de cordero 25 - 30 Tiempo de cocción según
tamaño y forma
Puré de guisantes,
de lentejas 12 - 15 Legumbres secas reblandecidas
Caldo de carne 25 - 30 Válido para todo tipo de carnes
Puré de verduras 5 - 8
Sopa de goulasch 10 - 15
Sopa de pollo 20 - 25 Tiempo dependiendo del tamaño
Sopa de rabo de buey 35
Puré de patata 5 - 6
Sayfa yükleniyor...
Sayfa yükleniyor...
Sayfa yükleniyor...
Sayfa yükleniyor...
Sayfa yükleniyor...
Sayfa yükleniyor...
Sayfa yükleniyor...
Sayfa yükleniyor...
Sayfa yükleniyor...
Sayfa yükleniyor...
Sayfa yükleniyor...
Sayfa yükleniyor...
Sayfa yükleniyor...
Sayfa yükleniyor...
Sayfa yükleniyor...
Sayfa yükleniyor...
Sayfa yükleniyor...
Sayfa yükleniyor...
Sayfa yükleniyor...
Sayfa yükleniyor...
Sayfa yükleniyor...
Sayfa yükleniyor...
Sayfa yükleniyor...
Sayfa yükleniyor...
Sayfa yükleniyor...
Sayfa yükleniyor...
Sayfa yükleniyor...
Sayfa yükleniyor...
Sayfa yükleniyor...
Sayfa yükleniyor...
Sayfa yükleniyor...
Sayfa yükleniyor...
Sayfa yükleniyor...
Sayfa yükleniyor...
Sayfa yükleniyor...
Sayfa yükleniyor...
Sayfa yükleniyor...
Sayfa yükleniyor...
Sayfa yükleniyor...
Sayfa yükleniyor...
Sayfa yükleniyor...
Sayfa yükleniyor...
Sayfa yükleniyor...
Sayfa yükleniyor...
Sayfa yükleniyor...
Sayfa yükleniyor...
Sayfa yükleniyor...
Sayfa yükleniyor...
Sayfa yükleniyor...
Sayfa yükleniyor...
Sayfa yükleniyor...
Sayfa yükleniyor...
Sayfa yükleniyor...
Sayfa yükleniyor...
Sayfa yükleniyor...
Sayfa yükleniyor...
Sayfa yükleniyor...
Sayfa yükleniyor...
Sayfa yükleniyor...
Sayfa yükleniyor...
Sayfa yükleniyor...
Sayfa yükleniyor...
Sayfa yükleniyor...
Sayfa yükleniyor...
Sayfa yükleniyor...
Sayfa yükleniyor...
Sayfa yükleniyor...
Sayfa yükleniyor...
Sayfa yükleniyor...
Sayfa yükleniyor...
Sayfa yükleniyor...
Sayfa yükleniyor...
Sayfa yükleniyor...
Sayfa yükleniyor...
Sayfa yükleniyor...
Sayfa yükleniyor...
Sayfa yükleniyor...
Sayfa yükleniyor...
Sayfa yükleniyor...
Sayfa yükleniyor...
Sayfa yükleniyor...
Sayfa yükleniyor...
Sayfa yükleniyor...
Sayfa yükleniyor...
Sayfa yükleniyor...
Sayfa yükleniyor...
Sayfa yükleniyor...
Sayfa yükleniyor...
Sayfa yükleniyor...
Sayfa yükleniyor...
Sayfa yükleniyor...
Sayfa yükleniyor...
Sayfa yükleniyor...
Sayfa yükleniyor...
Sayfa yükleniyor...
Sayfa yükleniyor...
Sayfa yükleniyor...
Sayfa yükleniyor...
Sayfa yükleniyor...
Sayfa yükleniyor...
Sayfa yükleniyor...
Sayfa yükleniyor...
Sayfa yükleniyor...
Sayfa yükleniyor...
Sayfa yükleniyor...
Sayfa yükleniyor...
Sayfa yükleniyor...
Sayfa yükleniyor...
Sayfa yükleniyor...
-
 1
1
-
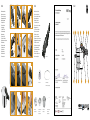 2
2
-
 3
3
-
 4
4
-
 5
5
-
 6
6
-
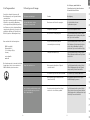 7
7
-
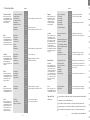 8
8
-
 9
9
-
 10
10
-
 11
11
-
 12
12
-
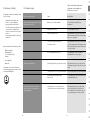 13
13
-
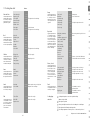 14
14
-
 15
15
-
 16
16
-
 17
17
-
 18
18
-
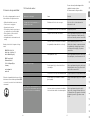 19
19
-
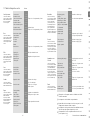 20
20
-
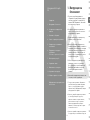 21
21
-
 22
22
-
 23
23
-
 24
24
-
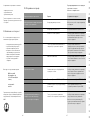 25
25
-
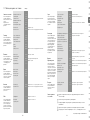 26
26
-
 27
27
-
 28
28
-
 29
29
-
 30
30
-
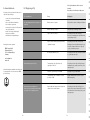 31
31
-
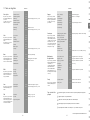 32
32
-
 33
33
-
 34
34
-
 35
35
-
 36
36
-
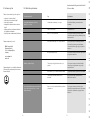 37
37
-
 38
38
-
 39
39
-
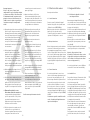 40
40
-
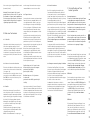 41
41
-
 42
42
-
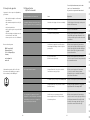 43
43
-
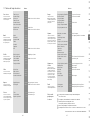 44
44
-
 45
45
-
 46
46
-
 47
47
-
 48
48
-
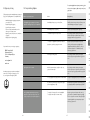 49
49
-
 50
50
-
 51
51
-
 52
52
-
 53
53
-
 54
54
-
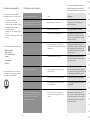 55
55
-
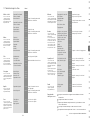 56
56
-
 57
57
-
 58
58
-
 59
59
-
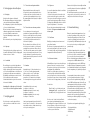 60
60
-
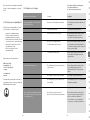 61
61
-
 62
62
-
 63
63
-
 64
64
-
 65
65
-
 66
66
-
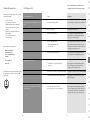 67
67
-
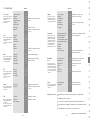 68
68
-
 69
69
-
 70
70
-
 71
71
-
 72
72
-
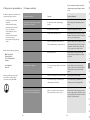 73
73
-
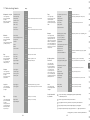 74
74
-
 75
75
-
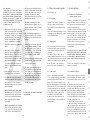 76
76
-
 77
77
-
 78
78
-
 79
79
-
 80
80
-
 81
81
-
 82
82
-
 83
83
-
 84
84
-
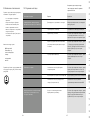 85
85
-
 86
86
-
 87
87
-
 88
88
-
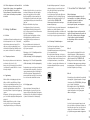 89
89
-
 90
90
-
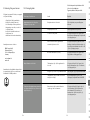 91
91
-
 92
92
-
 93
93
-
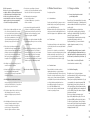 94
94
-
 95
95
-
 96
96
-
 97
97
-
 98
98
-
 99
99
-
 100
100
-
 101
101
-
 102
102
-
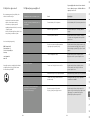 103
103
-
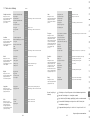 104
104
-
 105
105
-
 106
106
-
 107
107
-
 108
108
-
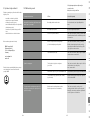 109
109
-
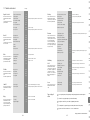 110
110
-
 111
111
-
 112
112
-
 113
113
-
 114
114
-
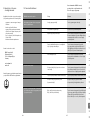 115
115
-
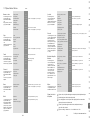 116
116
-
 117
117
-
 118
118
-
 119
119
-
 120
120
-
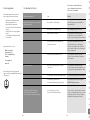 121
121
-
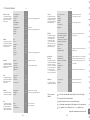 122
122
-
 123
123
-
 124
124
-
 125
125
-
 126
126
-
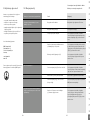 127
127
-
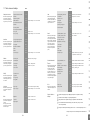 128
128
-
 129
129


WMF Schnellkochtopf Perfect Safety instructions & instructions for use
- Tip
- Safety instructions & instructions for use
diğer dillerde
- slovenčina: WMF Schnellkochtopf Perfect
- français: WMF Schnellkochtopf Perfect
- italiano: WMF Schnellkochtopf Perfect
- dansk: WMF Schnellkochtopf Perfect